No-Bake Coconut Cream Balls: Easy and Delicious Dessert Recipe
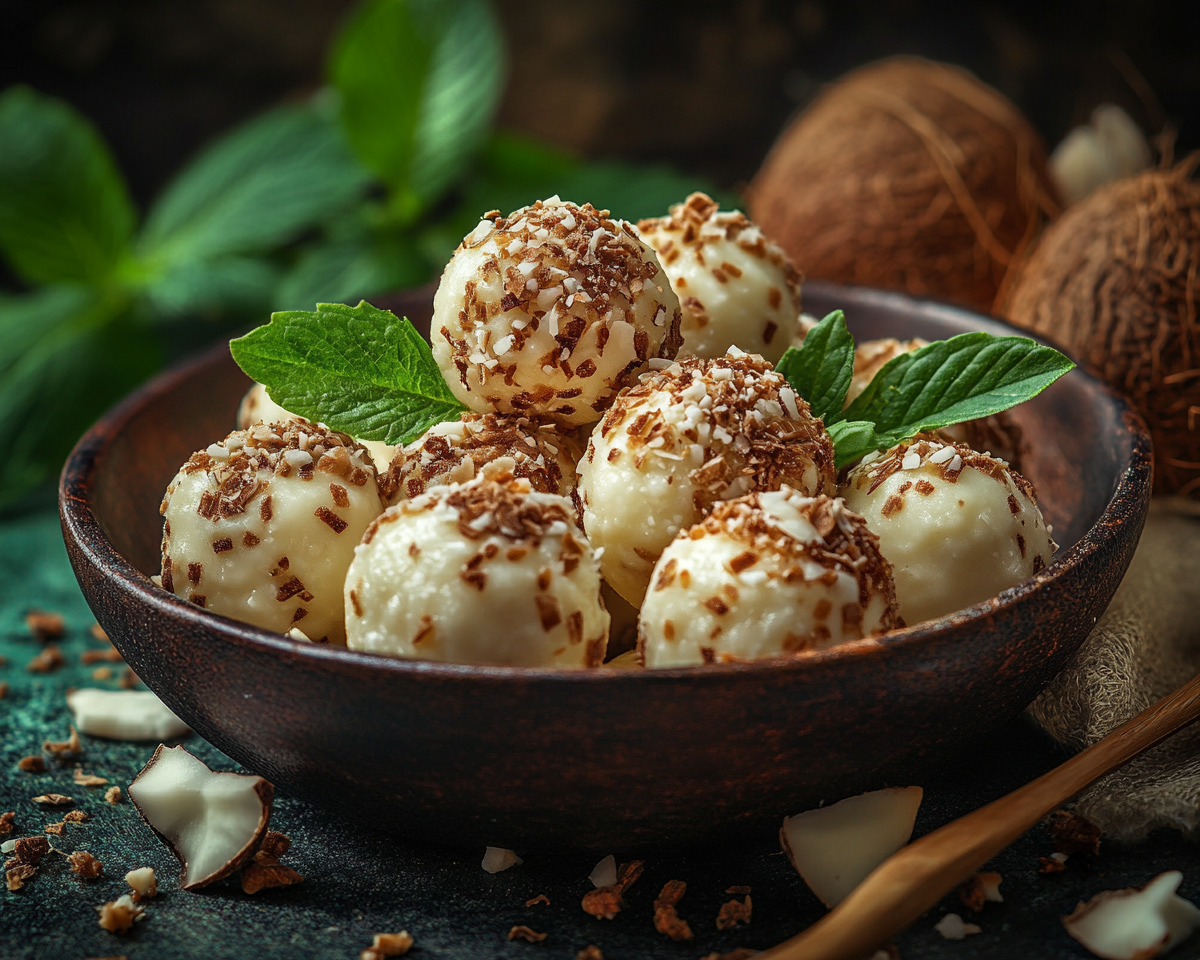
No-Bake Coconut Cream Balls: A Sweet Delight
If you’re on the hunt for a quick, easy-to-make dessert that doesn’t require baking, look no further than No-Bake Coconut Cream Balls. These delightful treats combine shredded coconut, sweetened condensed milk, and a luscious chocolate coating into bite-sized perfection. Not only are they delicious and visually appealing, but they’re also versatile enough to suit any occasion—be it a family gathering, holiday celebration, or simple self-indulgence.
For beginners, these coconut cream balls are an excellent way to master the art of no-bake desserts. You can find more inspiration for no-bake creations, like “Mini Pineapple Coconut Cheesecakes”, to expand your repertoire.
Ingredients That Make Magic
The key to perfect No-Bake Coconut Cream Balls lies in the careful selection of ingredients. Each component plays an essential role in achieving the desired texture and flavor.
Key Ingredients
Shredded Coconut: Provides the dessert’s chewy texture and tropical flavor.
Sweetened Condensed Milk: Acts as a binder and adds sweetness.
Vanilla Extract: Enhances the flavor profile.
Powdered Sugar: Contributes to the smoothness of the filling.
Chocolate Chips (Semi-Sweet or White): Creates a glossy, firm coating.
Coconut Oil: Optional but helps achieve a silky chocolate finish.
For those exploring healthier or alternative options, check out “Healthy No-Bake Recipes” for ideas on substitutions like dairy-free or low-sugar ingredients.
Step-by-Step Preparation Guide
1. Preparing the Dough
Combine shredded coconut, sweetened condensed milk, vanilla extract, and powdered sugar in a large mixing bowl.
Mix thoroughly until the ingredients form a sticky dough.
2. Shaping the Balls
Using a tablespoon, scoop portions of the dough and roll them into 1-inch balls.
Place the balls onto a parchment-lined tray to avoid sticking.
3. Chilling
Refrigerate the balls for 30–45 minutes to firm them up. This step is crucial for easier coating.
4. Melting the Chocolate
In a microwave-safe bowl, melt chocolate chips in 30-second intervals, stirring between each to ensure smoothness.
Add a teaspoon of coconut oil for an extra glossy coating.
5. Coating the Balls
Using a fork or skewer, dip each ball into the melted chocolate.
Return the coated balls to the tray and let them set at room temperature or refrigerate for 15 minutes.
Creative Variations
One of the most exciting aspects of No-Bake Coconut Cream Balls is the endless customization possibilities. Here are some crowd-pleasing variations:
1. Dark Chocolate Delight
For a richer flavor, swap semi-sweet chocolate with dark chocolate. This pairs beautifully with a sprinkle of sea salt.
2. Nutty Twist
Add finely chopped almonds, pecans, or walnuts to the mixture for added texture and flavor.
3. Fruity Fusion
Incorporate dried fruits like cranberries or mango for a tropical flair.
4. Holiday Themed
Add food coloring to the filling or top the chocolate coating with festive sprinkles.
Pro Tips for Success
Prevent Stickiness: Lightly dust your hands with powdered sugar when shaping the balls.
Smooth Chocolate Coating: Always melt chocolate slowly to prevent burning, and use high-quality chips for the best results.
Uniform Sizes: Use a cookie scoop for evenly sized balls.
No-Bake Coconut Cream Balls are the perfect treat for any occasion. Their simplicity, versatility, and delightful flavor make them a staple dessert. Whether you’re an experienced baker or a kitchen novice, this recipe will quickly become a favorite. Try it today and let the compliments roll in!
Spice Up Your Dinner with Cajun Grilled Chicken and Alabama White Sauce
Cajun Grilled Chicken with Alabama White Sauce: A Southern Delight
⚖️
Difficulty
Medium
⏲️
Prep Time
20 mins
🕒
Cook Time
30 mins
⏱️
Total Time
50 mins
🍽️
Servings
4
Welcome to the world of Southern cuisine where the zesty kick of Cajun spices meets the creamy tang of Alabama White Sauce. This Cajun Grilled Chicken is a mouthwatering dish that pairs perfectly cooked chicken with a sauce rich in heritage and flavor. The juxtaposition of spicy and creamy flavors promises a delightful journey for your taste buds. Whether it’s a weekend barbecue or a family dinner, this dish will become a staple in your kitchen repertoire, offering a perfect balance of spice and comfort.
Quick Recipe Highlights
Flavor Profile: The dish boasts a rich combination of spicy, smoky Cajun flavors balanced by the tangy, creamy Alabama White Sauce.
Texture: Enjoy a tender, juicy chicken texture with a delightful creamy sauce, adding a smooth finish to each bite.
Aroma: The aroma is inviting with notes of grilled spices, garlic, and the distinctive zest of vinegar-based white sauce.
Visual Appeal: This dish boasts vibrant, charred chicken pieces contrasted with a pale, velvety sauce, making it as appealing to the eyes as it is to the palate.
Skill Level Needed: Perfect for intermediate cooks, this recipe requires simple grilling techniques paired with sauce preparation.
Special Equipment: A grill or grill pan is essential to achieve the authentic taste and texture.
Recipe Overview
Difficulty Level: This medium-difficulty recipe involves understanding grilling techniques and perfecting a homemade sauce, ideal for those looking to enhance their cooking skills.
Category: Ideal for lunch or dinner, it can be a star entrée in American and Southern-style meals.
Cuisine: Rooted in Southern cuisine, the dish draws from Creole and Cajun traditions with a nod to Alabama’s unique barbecue culture.
Cost: Reasonably priced with affordable ingredients like chicken and pantry staples, enhancing the experience without breaking the bank.
Season: Best enjoyed in the summer grilling season but equally delightful year-round indoors.
Occasion: Perfect for casual family dinners, outdoor barbecues, and festive celebrations.
Why You’ll Love This Recipe
The Cajun Grilled Chicken with Alabama White Sauce is all about indulging your senses. The exciting spice blend creates a lively dance of flavors, ensuring each bite is packed with zest and culinary intrigue. Its crispy golden exterior, contrasted with tender, juicy insides, is a testament to the charms of perfect grilling. The creamy Alabama White Sauce further elevates the dish with its cool, tangy profile that marries beautifully with the Cajun heat.
In terms of convenience, this recipe is pleasingly straightforward. Simple steps and versatile ingredients align beautifully for a hassle-free cooking experience. It’s quick enough for a busy weeknight yet sophisticated enough for a weekend culinary exploration.
Nutritionally, this dish offers a balanced profile. Lean chicken is a great source of protein while the sauce, flavored with vinegar and mayonnaise, allows for indulgence within respectable calorific limits.
For social gatherings or family meals, this dish shines as a centerpiece of camaraderie and flavor. Whether grilled in the backyard or prepared indoors, it invites lively conversation and shared enjoyment.
Finally, it’s an economical recipe that makes great use of staple ingredients, ensuring a high flavor profile with low investment. This accessibility makes it an excellent choice for cooks on a budget without sacrificing satisfaction.
Historical Background and Cultural Significance
The Cajun Grilled Chicken merges two significant culinary influences – the bold, spicy flavors of Cajun cuisine and the unique touch of Alabama White Sauce. Cajun cooking originates from the Acadian people in Louisiana, integrating French, African, and Spanish flavors in a harmonious blend known for its robust heat and complex spices.
Alabama White Sauce, on the other hand, is a quintessential Southern barbecue sauce characterized by its mayonnaise base, invented by Robert Gibson in Decatur, Alabama. Known for its distinct tang and creaminess, it pairs beautifully with poultry, cutting through spices while complementing grilled notes.
Over time, this fusion has grown, encouraging regional adaptations and personal twists, making it a beloved addition to Southern barbecues and picnics. The mix of these two elements celebrates an evolution of culinary techniques and cross-cultural flavor narratives.
Embracing regional variations, each preparation of the dish offers subtle differences based on available ingredients and chef preferences. This intimate customization reflects the personal touch endemic to home cooking, showcasing the broad embrace of traditional recipes while encouraging creativity.
Ingredient Deep Dive
Chicken, the star of our dish, is integral in Southern and Cajun cuisines. Cherished for its versatility, chicken boasts a rich cultural significance tied to home cooking and family gatherings. As a lean protein source, it’s valued for its health benefits, offering nutrients like niacin and selenium.
For selection, choose high-quality, fresh chicken, ensuring a tender outcome. Organic or free-range varieties are recommended for superior texture and flavor. Store chicken in the refrigerator and use it within a few days of purchase to maintain freshness. Substitutions can include turkey breast or vegan alternatives like tofu based on dietary needs.
Cajun seasoning is a cornerstone of Cajun cooking, composed of paprika, cayenne, garlic powder, and herbs. Beyond flavor, it celebrates the vibrant history of Louisiana cuisine. Opt for fresh, vivid spices for maximum flavor impact. Store your seasoning in a cool, dark place to preserve its potency. You can create your own blend or use commercial options for convenience, adjusting spice levels to taste. These ingredients are the backbone of the Cajun Grilled Chicken, ensuring each bite is resplendent with deep-rooted tradition and flavorful depth.
Common Mistakes to Avoid
Over-marination: Allowing the chicken to sit in Cajun seasoning for too long can overpower the taste; 30 minutes is sufficient.
Uneven Cooking: Avoid inconsistent cooking by ensuring even-sized chicken pieces to ensure uniform grilling.
Skipping Preheating: Failing to preheat the grill can result in uneven cooking and poor texture.
Infrequent Turning: Turning only once or twice can lead to burnt or overly charred surfaces instead of a crispy finish.
Under-seasoning the Sauce: Be generous with seasoning in the Alabama White Sauce to balance the spicy chicken.
Using Low-Quality Ingredients: Opt for fresh and high-quality chicken and spices for optimal results.
Neglecting Rest Time: Letting chicken rest after grilling allows juices to redistribute, ensuring tenderness.
Improper Sauce Storage: Store leftover sauce in an airtight container in the refrigerator to maintain freshness.
Essential Techniques
Mastering grilling is crucial for perfect Cajun Grilled Chicken. It locks in the natural flavors while imparting a unique, smoky essence critical to this dish. To master it, preheat the grill and maintain a consistent medium heat. Brush oil on the grill to prevent sticking and ensure beautiful sear marks.
Equally important is the sauce preparation. Balance is key in Alabama White Sauce—mix mayonnaise, vinegar, salt, pepper, and optional horseradish. Whisk until smooth, and adjust seasoning to taste. Ensure an even consistency for dipping or drizzling.
Pro Tips for Perfect Cajun Grilled Chicken with Alabama White Sauce
– Let the chicken reach room temperature before grilling for even cooking.
– Use a meat thermometer: Ensures precise grilling; chicken should reach 165°F.
– Experiment with spice levels in Cajun seasoning to cater to your heat preference.
– Marinate longer for more intense flavors, but not over an hour to avoid overpowering.
– Use fresh herbs like thyme or oregano for a fresh twist in Alabama White Sauce.
– Rest the chicken post-grill for about 5 minutes to seal in juices.
– Apply Alabama White Sauce generously—its tangy creaminess is transformative.
Variations and Adaptations
Regional variations include incorporating local spices or modifying the sauce with regional mustard or honey for a distinct edge. Adapting the recipe for seasonal variances allows for lighter preparations during summer or heartier marinades for winter. For low-carb or keto variations, omit sugar from the sauce and opt for alternatives like Greek yogurt instead of mayo.
Serving and Presentation Guide
To present this dish like a pro, place grilled chicken on a rustic wooden board, drizzled with Alabama White Sauce and garnished with chopped parsley for a fresh pop of color. Complement with side dishes like coleslaw or grilled vegetables for a balanced plate.
Wine and Beverage Pairing
Opt for crisp, white wines like a Sauvignon Blanc to complement the spice and tanginess, while non-alcoholic pairings such as iced tea or lemonade maintain the dish’s Southern charm.
Storage and Shelf Life
Store leftovers in an airtight container in the fridge for up to 3 days. The sauce can last slightly longer, making it a great make-ahead component for convenient use.
Make Ahead Strategies
Prepare Alabama White Sauce in advance; its flavors meld beautifully over time. Marinade chicken ahead, storing it in the refrigerator to streamline meal preparation.
Scaling Instructions
Effortlessly double or halve the recipe according to the number of servings required. This versatility suits everything from intimate dinners to large gatherings.
Nutritional Deep Dive
Explore the macro aspects of the dish, featuring protein-rich chicken complemented by a sauce that, while rich, offers beneficial fats ensuring a nutritionally balanced meal.
Dietary Adaptations
For gluten-free adaptations, ensure all seasonings and sauce ingredients are certified gluten-free to accommodate dietary needs effortlessly.
Troubleshooting Guide
Adjust texture issues by monitoring grill temperature, flavor balance tweaking via seasoning, and managing timing for the perfect outcome.
Recipe Success Stories
Our vibrant cooking community shares variations and adaptation stories that build a shared tapestry of satisfied, adventurous home meals.
Frequently Asked Questions
How long can leftovers be kept? Leftovers stored properly can be kept for up to three days in the refrigerator.
How do I make the dish spicier? Increase the cayenne in the Cajun spice mix or add hot sauce to the marinade.
Can this be made in advance? Yes, make the sauce and marinade the chicken ahead of time to streamline meal prep.
How do I prevent burning? Monitor grill temperature closely and turn chicken frequently for even cooking without charring.
Additional Resources
Delve into related recipes, explore our extensive Cajun and barbecue techniques, and elevate your culinary prowess with our comprehensive guides.
Join the Conversation
Connect on social media, share your versions, interpretations, and flavor enhancements of this beloved recipe, or tag your creations with #CajunChickenDelight.
The Recipe
Cajun Grilled Chicken with Alabama White Sauce
Serves: 4
Prep Time: 20 mins
Cook Time: 30 mins
Total Time: 50 mins
Kitchen Equipment Needed
Grill or grill pan
Mixing bowls
Whisk
Meat thermometer
Ingredients
4 boneless chicken breasts
2 tablespoons Cajun seasoning
1 cup mayonnaise
1/4 cup apple cider vinegar
1 teaspoon horseradish
Salt and pepper to taste
1 tablespoon olive oil
Directions
Preheat your grill to medium-high heat.
Rub chicken breasts with olive oil and Cajun seasoning, ensuring even coverage.
Grill chicken for 6-8 minutes on each side until cooked through and internal temperature reaches 165°F.
While grilling, prepare Alabama White Sauce by mixing mayonnaise, vinegar, horseradish, salt, and pepper in a bowl; whisk until creamy.
Let chicken rest for 5 minutes post-grilling. Serve drizzled with Alabama White Sauce.
Recipe Notes
For a spicier kick, add extra cayenne pepper to the marinade.
Store leftover sauce in an airtight container in the refrigerator for up to a week.
Gooey Cinnamon Cream Cheese Muffins: The Ultimate Sweet Treat Recipe
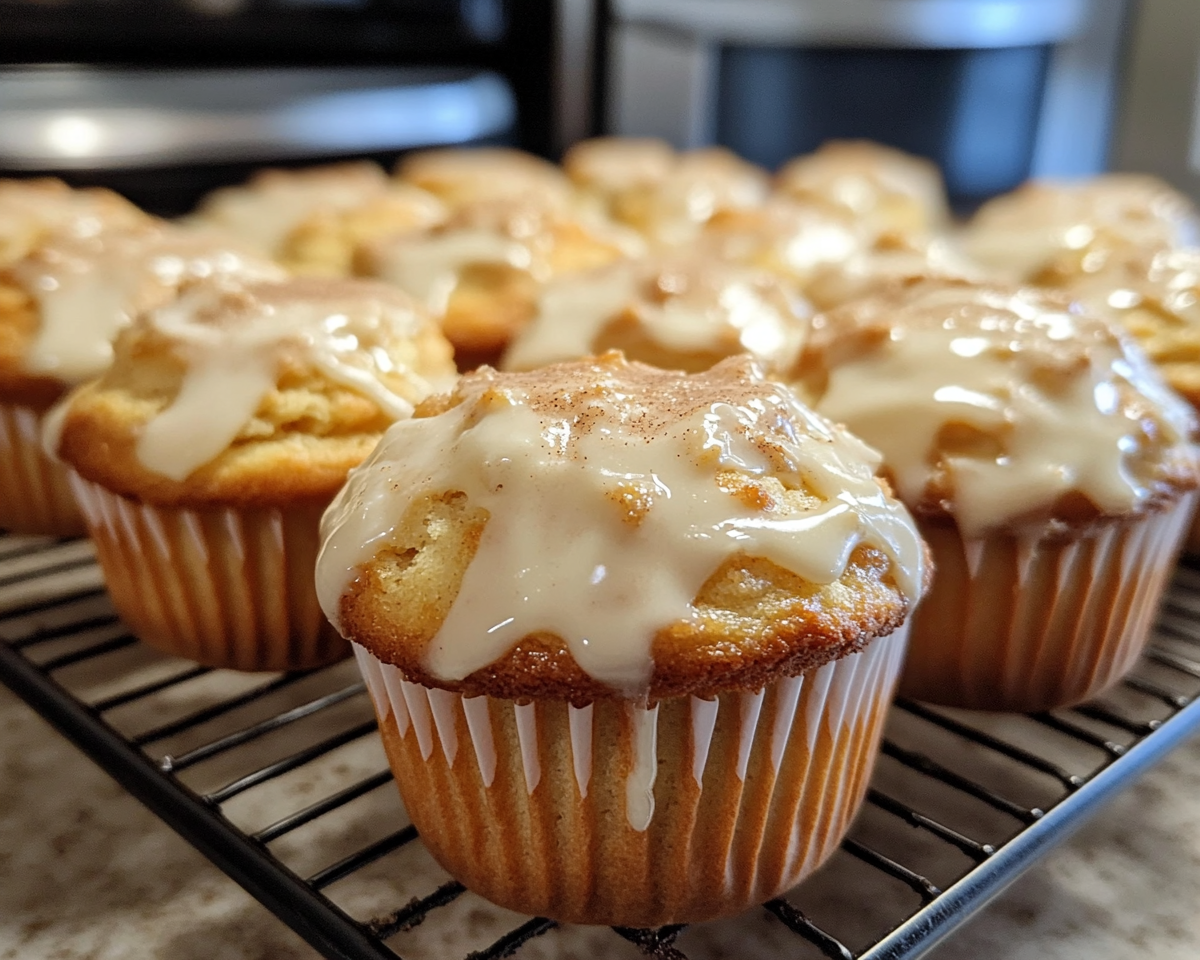
Gooey Cinnamon Cream Cheese Muffins: A Recipe to Savor
If you’re a lover of all things cinnamon, then gooey cinnamon cream cheese muffins should be your next baking adventure. Combining the warmth of cinnamon with the luscious tang of cream cheese, these muffins are perfect for breakfast, dessert, or a midday treat. Follow this comprehensive guide to create muffins that are not just delicious but also irresistibly gooey!
The Perfect Combination of Ingredients
To achieve the perfect balance of gooeyness and flavor, you need to pay attention to your ingredients. Here’s what you’ll need:
Dry Ingredients
2 cups all-purpose flour
1 cup granulated sugar
1 tablespoon baking powder
1/2 teaspoon salt
1 teaspoon ground cinnamon
Wet Ingredients
1/2 cup unsalted butter (melted)
1 cup milk
2 large eggs
1 teaspoon vanilla extract
Cream Cheese Filling
8 oz cream cheese (softened)
1/4 cup powdered sugar
Optional Topping
1 tablespoon cinnamon sugar mixture
Melted white chocolate drizzle
For additional baking tips, explore “Mastering Muffin Baking”, which offers valuable insights into perfecting your muffin game.
Step-by-Step Guide to Gooey Perfection
Preparation
Preheat your oven to 375°F (190°C).
Line a 12-cup muffin tin with paper liners or grease it lightly.
Mix the Batter
Combine the dry ingredients in one bowl.
Whisk the wet ingredients in another. Gradually fold the wet mixture into the dry ingredients until just combined. Avoid overmixing, which can make the muffins dense.
Create the Cream Cheese Filling
Beat softened cream cheese with powdered sugar until smooth. Set aside.
Assemble the Muffins
Fill each muffin cup halfway with batter. Add a dollop of the cream cheese mixture to the center, then cover with more batter.
Bake to Perfection
Sprinkle cinnamon sugar on top and bake for 18–22 minutes or until a toothpick inserted near the edge (not the center) comes out clean.
Gooey cinnamon cream cheese muffins are more than just a dessert; they’re an experience of warmth, sweetness, and satisfaction. Whether you’re serving them at brunch, gifting them to loved ones, or indulging solo, these muffins are sure to impress. Start baking today and unleash the magic of gooey goodness in your kitchen!
Decadent Mini Chocolate Peanut Butter Pies for Sweet Indulgence
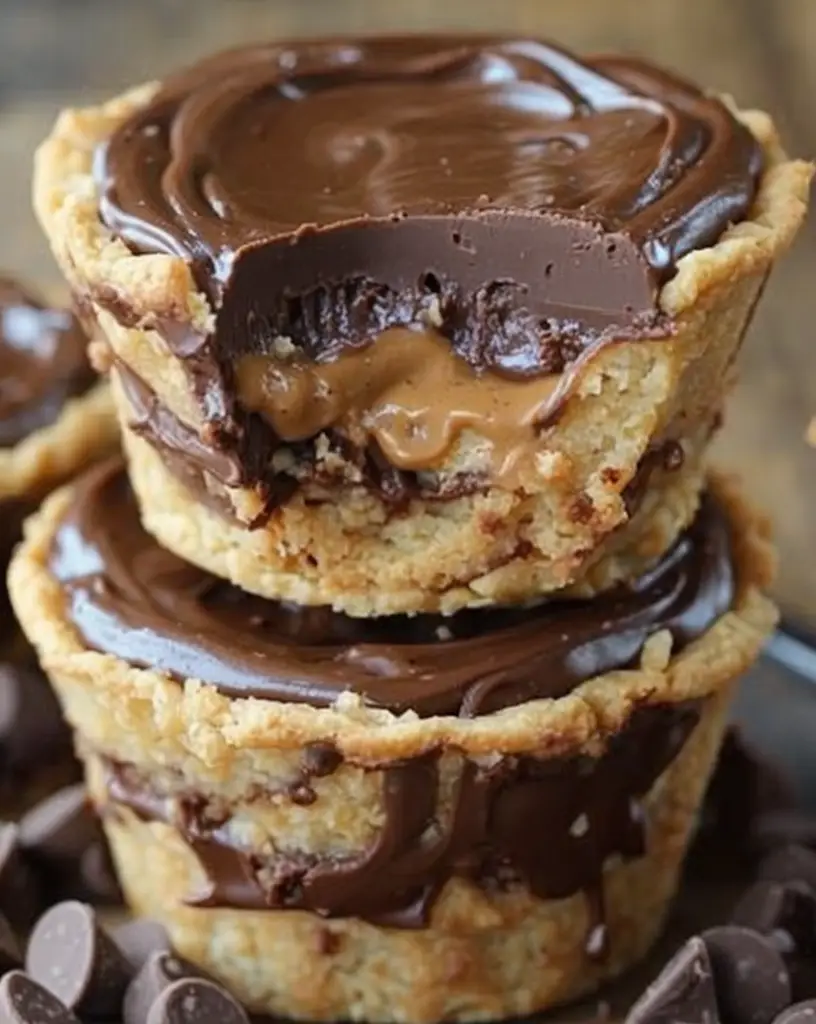
Irresistible Mini Chocolate Peanut Butter Pies: A Blissful Treat for All Occasions
⚖️
Difficulty
Easy
⏲️
Prep Time
20 mins
🕒
Cook Time
10 mins
⏱️
Total Time
30 mins
🍽️
Servings
6
Are you ready to indulge your chocolate cravings? Meet our Irresistible Mini Chocolate Peanut Butter Pies, a dessert that combines the richness of chocolate and the creamy delight of peanut butter into one sensational bite. Perfectly portioned for individual enjoyment, these pies are a showstopper at any gathering or a delightful treat for a lazy Sunday afternoon. The synergy of chocolate and peanut butter creates a flavor harmony that’s hard to resist, satisfying every dessert lover’s palate.
The deep, velvety softness of the chocolate complements the nutty, creamy texture of the peanut butter filling, providing an explosion of taste with every spoonful. These charming mini pies are so easy to make that even novice bakers will achieve dessert success. Whether you enjoy them alone or share with loved ones, these pies are a testament to the divine union of chocolate and peanut butter. Gather your ingredients, and let’s dive into the world of decadent bites and heavenly indulgence.
Quick Recipe Highlights
Flavor Profile: Decadent chocolate meets creamy peanut butter in a perfect symphony of flavors, ensuring a divine experience for your taste buds.
Texture: The pies have a creamy, rich filling enveloped by a slightly crisp crust, offering both suppleness and crunch in every bite.
Aroma: A captivating aroma of warm chocolate and nutty undertones fills your kitchen as you prepare these delightful treats.
Visual Appeal: Miniature pies with a glossy chocolate top and garnished with peanut butter drizzles add elegance and playfulness to your dessert table.
Skill Level Needed: Easy and approachable, making it ideal for beginners who want to impress with minimal effort.
Special Equipment: A muffin tin or mini pie pans are required to achieve the perfect individual pies.
Recipe Overview
Difficulty Level: This recipe is straightforward and suitable for cooks of all levels, thanks to its easy-to-follow steps and simple ingredient list.
Category: This recipe falls under sweet treats and desserts, perfect for an after-meal indulgence or a standalone snack.
Cuisine: With roots in American comfort food, this dessert draws inspiration from the beloved peanut butter cup, a nostalgic treat for many.
Cost: Affordable and made with pantry staples, making it budget-friendly without compromising on taste.
Season: Ideal all year round, but especially delightful in colder months when rich, warm flavors are most comforting.
Occasion: Perfect for birthdays, family gatherings, or as a special dessert for a romantic dinner at home.
Why You’ll Love This Recipe
The irresistible taste of these mini pies is sure to win you over. The combination of velvety chocolate and creamy peanut butter offers a luscious juxtaposition of flavors that is both familiar and decadent. Each bite is an explosion of taste that satisfies cravings for something sweet and indulgent.
Conveniently, the preparation of these pies requires minimal time and effort. With simple ingredients and easy-to-follow instructions, you can whip up these pies on a whim, even when the craving for something sweet strikes unexpectedly. Cleanup is also straightforward, allowing you more time to enjoy your creation.
Nutritionally, while these pies are indeed indulgent, they offer the benefits of peanut butter, such as protein and healthy fats. Moderation is key, but enjoying one of these pies can fit into a balanced diet and provide a satisfying conclusion to a meal.
The social aspect of sharing these individual mini pies with others enhances their appeal. They’re perfect for entertaining, ensuring everyone gets their own delightful portion. Moreover, the pies make for striking dessert displays at parties, drawing attention and admiration.
From a cost perspective, these pies are economically wise. Using common ingredients such as chocolate, peanut butter, and basic pastry elements, you can create a gourmet-style dessert on a modest budget. Impress your friends and family without expensive trips to specialty stores.
Historical Background and Cultural Significance
Chocolate and peanut butter have long been celebrated as the ultimate pairing in American cuisine. The origins of this combination can be traced back to the early 20th century with the invention of classic candies that feature both ingredients. These mini pies are a modern twist that respects this storied tradition.
Culturally, the combination of chocolate and peanut butter is deeply ingrained in the American dessert landscape. It represents comfort, nostalgia, and even the playful indulgence associated with enjoying a beloved treat from childhood.
Over the years, recipes featuring this iconic flavor combination have evolved, appearing in various forms from candies to baked goods. Our mini pies are an evolution that retains the core attributes that make the pairing so cherished, while offering something slightly novel and delightful.
Regionally, variations of chocolate and peanut butter desserts have emerged across the U.S., each influenced by local palates and dessert traditions. However, the appeal is universal, transcending geographic boundaries and uniting dessert lovers everywhere.
Ingredient Deep Dive
Chocolate is the star ingredient in this recipe, celebrated for its rich flavor and luxurious texture. The use of high-quality chocolate contributes to the depth of flavor in these mini pies. It’s essential to opt for real chocolate for the best results, prioritizing cocoa content according to personal taste preference.
Chocolate also offers various health benefits due to antioxidants and minerals, though it should be consumed in moderation. Store chocolate in a cool, dry place to prevent blooming, and handle it gently to maintain its shiny, smooth consistency when melted.
Peanut butter adds a creamy, nutty flavor that balances the rich chocolate beautifully. Its origins as a popular American ingredient have led to its incorporation in countless recipes, offering both flavor and nutritional benefits like protein and healthy fats.
When choosing peanut butter for baking, look for varieties without added sugar or additives to let the true nutty flavor shine through. Store in the pantry for easy access, but refrigerate for longer storage to maintain freshness.
Common Mistakes to Avoid
Using low-quality chocolate can significantly affect the final taste and texture of your pies. Opt for good-quality, dark or milk chocolate for the best results.
Overheating chocolate when melting it can cause it to seize, becoming grainy and unusable. Melt gently over a double boiler or in the microwave in short intervals.
Using oily peanut butter might cause the filling to be overly greasy. Use a stable, creamy peanut butter for a smooth texture.
Not allowing pies to set can lead to soft, runny results. Be sure to cool and set pies properly before serving or refrigerating them.
Skipping the crust baking step might result in a soggy base. A quick pre-bake ensures a crispy texture.
Overmixing the filling can introduce too much air, affecting the texture. Mix just until ingredients are combined.
Using the wrong type of butter in crust can alter the flavor and structure. Stick with unsalted, real butter for best results.
Improperly measuring ingredients can lead to imbalances in taste and texture. Use accurate measuring tools for precision.
Neglecting to grease the pans can lead to sticking issues. A light coating of butter or oil ensures easy removal once pies are set.
Storing pies uncovered in the refrigerator can dry out the crust or filling. Always cover with plastic wrap or a lid.
Essential Techniques
Melting chocolate is a crucial skill in creating these mini pies. The key to mastery is to melt the chocolate slowly to avoid seizing and burning, using either a double boiler or gentle microwaving. Visual cues include seeing the chocolate turn glossy and smooth.
Preparing the crust involves careful mixing and pressing to ensure the right balance of crumbly texture and cohesive form. Use the right amount of melted butter to bind the crust without making it too greasy or dry.
Blending the peanut butter filling is all about achieving the right consistency. It’s important to mix until smooth and creamy but avoid overmixing, which can trap air and affect texture. Scrape the bowl frequently to incorporate all ingredients evenly.
Baking and assembly require attention to time and temperature. Pre-baking the crust helps maintain structure and crispness, while cooling completely before adding the filling ensures the perfect layer without blending or softening.
Pro Tips for Perfect Irresistible Mini Chocolate Peanut Butter Pies
For a professional finish, gently tap the pan on a counter after pouring in the chocolate to remove air bubbles, ensuring a smooth, even top.
Use room temperature ingredients to ensure that fillings blend smoothly and achieve the desired creamy texture.
Enhance flavor by adding a pinch of sea salt to the peanut butter filling, complementing the sweetness and adding dimension to the overall taste.
Consider adding a thin layer of melted chocolate over the crust before adding the filling for added texture and taste complexity.
For variety, incorporate a layer of caramel under the peanut butter filling, adding a sweet, sticky contrast.
For even portioning, use a small ice cream scoop to fill each pie cup with the filling mixture, ensuring uniform sizes.
Add a visual and flavor pop by topping finished pies with chopped peanuts or grated chocolate.
Ensure proper cooling time after assembling the pies; patience allows the layers to set perfectly and enhances sliceability.
Variations and Adaptations
Regional variations can include adding a hint of spice, like chili powder, to the chocolate for a southwestern twist on these classic flavors.
Seasonal adaptations could involve incorporating fruit preserves between the chocolate and peanut butter layers for a summer treat.
Dietary modifications can be made by using gluten-free crust substitutes like almond flour or a homemade graham cracker crust for those with gluten sensitivities.
For a flavor twist, consider using almond butter or cashew butter in place of peanut butter, offering a mild, nutty alternative.
To alter texture, consider blending in some whipped cream to the peanut butter filling for a lighter, mousse-like consistency.
Presentation alternatives include using small, decorative tart pans for elegant plating or serving them in glass cups for a creative, transparent look.
Serving and Presentation Guide
Consider using unique plates or stands to elevate the presentation of your mini pies, offering a chic and sophisticated touch.
Garnishing with a drizzle of melted chocolate, a sprinkle of chopped peanuts, or a pinch of sea salt can enhance visual appeal and taste.
For traditional accompaniments, serve with a dollop of whipped cream or a scoop of vanilla ice cream, complementing the rich pies beautifully.
Modern serving suggestions include assembling a dessert board with these pies alongside fresh berries and other sweets for a varied but cohesive visual display.
Temperature considerations are vital; serving slightly chilled emphasizes the creamy texture without losing structure.
Portion control tips encourage individual servings, making this dessert ideal for buffet-style setups or individually plated presentations.
Wine and Beverage Pairing
Rich, red wines such as Malbec or Cabernet Sauvignon pair beautifully with the chocolate and peanut butter flavors, bringing out deeper notes.
For non-alcoholic options, consider serving with a chilled glass of milk or a warm mug of tea, offering a soothing counterbalance to the sweetness.
Coffee pairings, especially robust blends, complement the pies’ decadent taste, enhancing the chocolate’s bitterness in an enjoyable contrast.
Temperature considerations suggest serving both wines and non-alcoholic drinks at room temperature or slightly chilled to complement the pies.
Serving suggestions could incorporate a small dessert glass of your chosen beverage alongside each plated pie for visually appealing decisions.
Storage and Shelf Life
Store in an airtight container in the refrigerator to maintain freshness, preventing the pies from drying out or absorbing odors.
Temperature requirements dictate storing at a consistent cool temperature, ideally around 40°F, for best results.
Container recommendations include using stackable food-safe containers to save space while keeping pies protected and easily accessible.
Signs of spoilage include off odors or changes in texture. Always inspect closely before consuming if pies have been stored for an extended period.
Reheating instructions apply to those who enjoy their pies slightly warm, suggesting brief warming in the microwave to soften the filling.
Freezing guidelines recommend storing in a freezer-safe container, with wax paper between layers to prevent sticking, ensuring up to three months’ storage without significant quality loss.
Make-Ahead Strategies
The prep timeline suggests preparing the crust and chocolate layers a day ahead, allowing for a relaxing and more organized dessert assembly.
Storing between steps involves keeping pre-made components in the refrigerator until assembly, ensuring they remain fresh.
Quality impact assessment confirms that storing elements separately does not diminish overall quality but rather allows flavors to meld.
Assembly tips include organizing all components and decorations before beginning, streamlining the final preparation stage.
Reheating guidelines for chilled pies suggest allowing them to sit at room temperature briefly before serving to achieve optimal taste and texture.
Add fresh elements, such as garnishes, just before serving to maintain peak freshness and enhance visual appeal.
Scaling Instructions
To halve the recipe, simply divide all ingredients by two, and reduce baking and resting times slightly to accommodate smaller portions.
Doubling or tripling requires adjusting ingredient measurements accordingly, with special attention to potential shifts in taste balance when increasing quantity.
Equipment adjustments may include using multiple muffin tins or larger mixing bowls for easier handling and preparation.
Timing modifications entail observing visual cues for doneness rather than relying solely on time, particularly when baking larger batches.
Storage considerations suggest using larger storage containers or freezer bags to accommodate increased yield.
Nutritional Deep Dive
Macro breakdown reveals a balanced portion of carbohydrates, fats, and proteins, offering a satisfying treat without overly imbalanced nutrition.
Micronutrient analysis highlights important contributions from ingredients like peanuts and chocolate, providing beneficial elements like magnesium and iron.
Health benefits cover the inclusion of antioxidants from chocolate, known to improve mood and possibly support heart health.
Dietary considerations advise enjoying in moderation due to calorie density, encouraging mindful consumption alongside other balanced meals.
Portion analysis confirms each mini pie offers an ideal single-serving size designed for individual enjoyment and dietary alignment.
Weight management tips encourage enjoying these pies as part of a balanced meal plan, savoring each bite for maximum satisfaction.
Dietary Adaptations
For a gluten-free option, substitute regular flour in crust with almond or coconut flour, maintaining structure with appropriate binding agents.
Dairy-free modifications involve using plant-based butter alternatives and dairy-free chocolate chips to respect dietary restrictions while preserving flavor integrity.
A vegan adaptation can include coconut milk-based whip and vegan-friendly crust options, embracing plant-based eating while maintaining dessert delight.
Low-carb enthusiasts might opt for a sugar-free sweetener in the peanut butter filling, reducing carbs while enhancing protein content with slight modifications.
The keto diet is respected with high-fat focuses, using almond meal crusts and sugar-free chocolate, tailored to fit the diet’s macro requirements closely.
For paleo, opt for natural nut butters and cocoa-derived chocolate substitutes, aligning with whole-food principles and minimizing processed components.
A low-FODMAP approach considers peanut butter and chocolate selections carefully, ensuring ingredients are suitable for sensitive digestive systems.
Other specific diets may require substituting ingredients or adjusting portions to meet individual nutritional plans without sacrificing flavor fundamentals.
Troubleshooting Guide
Texture issues often stem from over or under mixing fillings; proper blending and cooling ensure optimal creaminess and structuring.
Flavor balance concerns are typically resolved by adjusting ingredient ratios, paying attention to the harmony between sweet and savory elements.
Temperature problems like excessive melting can be combated by chilling pies until firm, achieving set quality before serving.
Equipment challenges might arise with incorrect sizing; ensure you possess necessary tin sizes or adjust baking times to accommodate variance.
Ingredient substitutions require understanding flavor impacts; mindful experimentation with compatible alternatives maintains original intentions.
Timing concerns require intuitive adjustments, observing ingredient readiness and using visual cues for baking and cooling instead of focusing solely on timings.
Recipe Success Stories
Community feedback often tells of successful family gatherings where these pies stole the show, becoming topics of praise and recipe requests.
Variation successes emerge with home bakers incorporating personal touches like adding espresso, elevating pies to mocha-inspired excellence.
Adaptation stories share of gluten-free innovator bakers who tweaked the crust to suit dietary needs without compromising on dessert pleasures.
Reader suggestions typically involve creative serving ideas, such as pairing with unique beverages, inspiring others to personalize presentation.
Photography tips abound, showcasing pies’ visual allure by focusing on glossy tops and artful garnishes in well-lit settings for capturing irresistible dessert allure.
Frequently Asked Questions
Can these pies be made in advance?
Yes, they can be prepared a day in advance and stored in the refrigerator until serving. This allows the flavors to blend beautifully for optimal enjoyment.
What type of chocolate should I use?
High-quality dark or milk chocolate is recommended for the best results, providing a deep, rich flavor that complements the peanut butter filling well.
How long do these pies stay fresh?
They can be stored in an airtight container in the refrigerator for up to 4 days, ensuring they remain delicious and ready to enjoy.
What if I don’t have mini pie pans?
You can use a muffin tin instead, which works perfectly for individual-sized servings. Just be sure to grease it well for easy removal.
Can I freeze these pies?
Yes, freezing is an option. Simply wrap each pie individually and store in a freezer-safe container for up to 3 months. Thaw in the refrigerator before serving.
Can I use almond butter instead?
Absolutely! Almond butter makes a wonderful alternative to peanut butter, offering a similar creamy texture with a slightly different nutty flavor.
Is it possible to make a larger version of this recipe?
Yes, by adjusting the ingredient quantities, you can create a single large pie. Alter cooking times as necessary and enjoy a family-sized treat.
Can these be made without a crust?
While possible, the crust provides essential structure and a nice textural contrast. Consider using a gluten-free or alternative crust if needed.
What garnishes work well with these pies?
Chopped nuts, chocolate curls, and a sprinkle of flaky sea salt make excellent garnishes, enhancing both visual attraction and layered flavors.
Can this recipe be halved?
Yes, simply halve the ingredient amounts, adjusting baking and cooling times slightly. This approach is perfect for smaller households or intimate gatherings.
Additional Resources
Explore related recipes such as chocolate truffles or peanut butter treats to satisfy cravings with similar flavor profiles and sweet indulgences.
Technique guides offer deeper insights into essential baking skills, such as melting chocolate or creating perfect crusts, enriching various culinary adventures.
Ingredient information focuses on exploring the richness of chocolate and the versatility of nut butters, sharing how these ingredients can elevate diverse dishes.
Equipment recommendations highlight reliable brands and types, ensuring your baking endeavors start with proper and effective tools.
Seasonal variations provide inspiration for altering recipes in accordance with changing preferences, aligning with different weather and festive occasions.
Join the Conversation
Share your mini pie creations on social media, connecting with fellow bakers and dessert enthusiasts by tagging and joining in delightful recipe exchanges.
Photography tips offer guidance on framing and lighting these mini pies for stunning shots, encapsulating their deliciousness in enticing images.
Recipe reviews and community engagement facilitate sharing experiences, improvements, and adaptations with a global community of like-minded bakers.
Encouragement for recipe variations invites personal touches and experimentation, enriching each baking experience with individuality and unique flair.
Connect with other food lovers through comments, exchanging insights and discovering shared joy in culinary creativity inspired by these delightful mini pies.
The Recipe
Irresistible Mini Chocolate Peanut Butter Pies
Serves: 6
Prep Time: 20 mins
Cook Time: 10 mins
Total Time: 30 mins
Kitchen Equipment Needed
Muffin tin or mini pie pans
Mixing bowls
Electric mixer
Double boiler or microwave-safe bowl
Whisk
Spatula
Ingredients
1 cup crushed graham crackers
1/4 cup melted butter
1 cup creamy peanut butter
1/2 cup powdered sugar
1/2 cup heavy cream
1 cup high-quality chocolate, chopped
1/2 cup whipping cream
Pinch of sea salt (optional)
Chopped peanuts, for garnish (optional)
Directions
Preheat oven to 350°F (175°C). Grease a muffin tin or mini pie pans.
In a bowl, mix crushed graham crackers with melted butter. Press into the bottom of each muffin cup to form the crust. Bake for 5-7 minutes and let cool.
In a large mixing bowl, beat peanut butter, powdered sugar, and heavy cream until smooth. Spoon over cooled crusts.
Melt chocolate using a double boiler or microwave in 30-second increments, stirring until smooth.
Spread melted chocolate over the peanut butter layer, smoothing the tops with a spatula.
Chill pies in the refrigerator for at least an hour to set.
Before serving, garnish with a drizzle of melted chocolate or a sprinkle of chopped peanuts if desired.
Recipe Notes
For a nut-free version, substitute peanut butter with sunflower seed butter.
The crust can be made with gluten-free graham crackers for those with gluten sensitivities.
Cranberry Feta Pinwheels with Cream Cheese: Your Perfect Party Appetizer
⚖️
Difficulty
Easy
⏲️
Prep Time
15 mins
🕒
Cook Time
5 mins
⏱️
Total Time
20 mins
🍽️
Servings
10
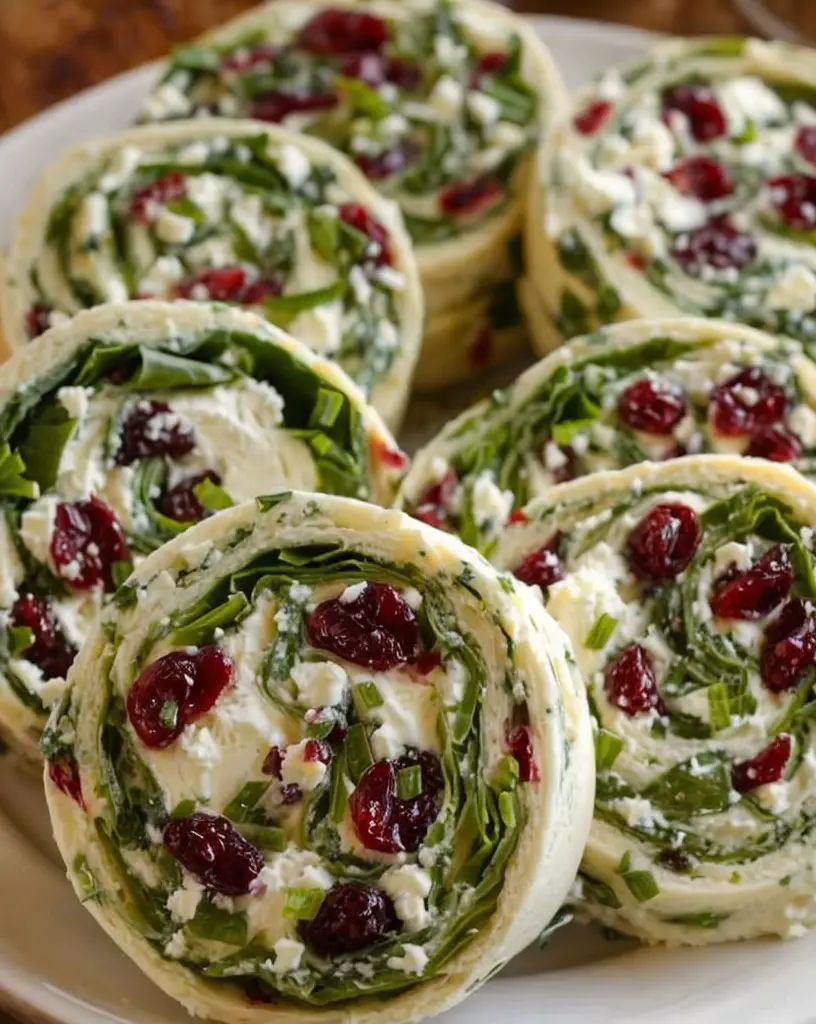
Looking for an appetizer that’s bound to impress without the stress? These Cranberry Feta Pinwheels with Cream Cheese might just be your next culinary masterpiece. With a bold blend of flavors that speak directly to the holiday season, these pinwheels are not only appetizing but also visually stunning. Imagine a soft tortilla wrapped around a creamy filling combining the tanginess of feta cheese and the sweetness of dried cranberries. It’s a bite-sized delight you can prepare in no time and with minimal effort.
The Cranberry Feta Pinwheels are a culinary adventure, combining sweet and savory elements in an irresistible spiral. Perfect as a quick snack or a sophisticated appetizer, these pinwheels can turn a casual gathering into an elegant affair. Their vibrant red and creamy white contrast against the tortilla creates a festive and inviting appearance that’s ideal for holiday gatherings. Easy to make and delicious to eat, these appetizers are perfect for any occasion and an excellent way to impress your guests.
Quick Recipe Highlights
Flavor Profile: The interplay of tangy feta and sweet cranberries creates a perfect balance of sweet and savory.
Texture: Creamy cheese contrasts with the soft tortilla and chewy cranberries, offering an enticing range of textures.
Aroma: The subtle savory aroma of feta mingled with the mild sweetness of cranberries is inviting and pleasant.
Visual Appeal: The spirals showcase a pop of festive red from the cranberries against the creamy filling and pale tortilla.
Skill Level Needed: This recipe requires minimal cooking expertise, making it perfect for beginners.
Special Equipment: Only basic kitchen tools are needed, allowing for easy preparation at home.
Recipe Overview
Difficulty Level: Easy. This recipe involves simple steps and ingredients readily available, making it suitable for home cooks at any skill level.
Category: Appetizers & Snacks. These pinwheels work wonderfully as appetizer bites or party snacks, perfect for any gathering.
Cuisine: This dish leans towards American cuisine with a twist, thanks to its fusion of Mediterranean influences like feta cheese.
Cost: Relatively inexpensive, as it requires only a few ingredients that won’t break the bank.
Season: Ideally enjoyed during the holiday season thanks to their colorful, festive look and flavors.
Occasion: These are suitable for parties, potlucks, or casual get-togethers where guests can appreciate a tasty, handheld treat.
Why You’ll Love This Recipe
The taste and texture appeal of Cranberry Feta Pinwheels is what truly sets them apart. The silky cream cheese provides a perfect base that accentuates the sharpness of feta and the natural tartness of cranberries. Together, these ingredients create a symphony of flavors that delight the palate, making these pinwheels a must-try.
This recipe is incredibly convenient. With a prep time of just 15 minutes and simple steps to follow, it’s perfect for last-minute gatherings. The pinwheels can be made ahead of time, making them an ideal choice for stress-free entertaining and allowing hosts to enjoy their own party.
Nutritionally, these pinwheels offer a balance of macronutrients. The feta cheese provides calcium and the cranberries bring a touch of fiber and antioxidants. This combination supports a balanced diet while indulging in a delicious snack that remaining health-conscious guests can enjoy.
Socially and for entertaining value, Cranberry Feta Pinwheels create that “wow” factor at any event. Their festive appearance makes them a showstopper that guests will be eager to photograph and share, granting you culinary praise and admiration.
Cost-effectiveness is another advantage. These pinwheels utilize ingredients that are not only affordable but also versatile, allowing you to use them in a variety of other recipes beyond this one, stretching your food budget further.
Historical Background and Cultural Significance
The concept of pinwheels as appetizers has an interesting origin tied to the idea of roulades or rolls, which have been a part of culinary traditions across the globe. Roulades are often associated with European dishes and have been tailored into more modern, creative interpretations like these pinwheels.
Culturally, appetizers play a significant role as a precursor to meals, allowing people to experiment with flavors and textures. These pinwheels fit seamlessly into this culinary scenario, bringing together Mediterranean-inspired ingredients in an accessible format.
The evolution of this recipe is marked by adaptable flavors—beginning with cream cheese-based spreads, which are incredibly popular in American cuisine, and advancing into more gourmet combinations with ingredients like feta and cranberries.
Regionally, the variations of pinwheels are broad, with each culture adding its unique spin. While this recipe focuses on a sweet and savory blend, there are versions around the world that incorporate cheeses, meats, and herbs that reflect their local tastes.
Ingredient Deep Dive
Feta cheese, a staple in Mediterranean diets, has a rich history rooted in Greek cuisine. Its tangy, salty flavor adds depth to dishes. Nutritionally, feta offers a good source of calcium and protein, contributing to bone health. Selective purchases should favor feta packaged in brine for maximum freshness. It remains best stored in the fridge, well-sealed. If needed, a mild goat cheese can substitute its place without compromising much on taste.
Dried cranberries provide a sweet contrast to this savory dish. Known for their vibrant color and tart bite, cranberries were initially harvested by Native Americans. They are high in antioxidants and vitamin C. When selecting, look for plump, unsweetened options. Store them in an airtight container for lasting freshness. Raisins or chopped dried apricots can work as substitutes if cranberries are unavailable.
Common Mistakes to Avoid
Overfilling the tortillas can lead to difficulty in rolling and potential tearing.
Not chilling the pinwheels before slicing may result in uneven, messy cuts.
Using feta crumbles instead of block feta can lead to uneven cheese distribution.
Choosing low-fat cream cheese might compromise the rich, creamy texture.
Skipping the resting time might affect the pinwheels’ flavors as they need time for the ingredients to meld.
Using dry tortillas instead of fresh ones may result in cracks during rolling.
Not slicing pinwheels evenly affects presentation and serving portions.
Failing to incorporate all ingredients evenly leads to flavor imbalance in each bite.
Rolling the tortillas too tightly can squeeze out and disperse the filling unevenly.
Essential Techniques
Spreading ingredients evenly is crucial to ensure that every bite of your pinwheels is balanced. Use a spatula to distribute the cream cheese mixture consistently over the tortilla, hitting all corners and edges for an even layer. This ensures a harmonious distribution of flavors.
Rolling the tortilla tightly without bursting is another vital technique. Start at one edge and roll steadily, applying gentle pressure to avoid tearing. Aim for a consistent, tight roll that hugs the filling without crushing it. Visual cues, such as a steady, circular roll without bulging, indicate success.
Chilling the rolled wraps is essential before slicing. This technique firms up the filling, ensuring the pinwheels hold their shape once cut. It also allows flavors to meld together. Aim to refrigerate for at least an hour. An adequately chilled roll will feel firm to the touch, leading to crisp, clean slices.
Pro Tips for Perfect Cranberry Feta Pinwheels
Room temperature cream cheese is easier to work with and helps achieve a smooth consistency when mixing and spreading.
Incorporate fresh herbs like dill or parsley into the cream cheese for an extra burst of flavor and a touch of freshness.
If time permits, make the cream cheese filling the day before to deepen the flavor fusion as the ingredients marry overnight.
For a festive touch, consider using both plain and spinach tortillas to add contrasting hues to your appetizer platter.
To boost the flavor, consider adding a pinch of ground cinnamon to complement the cranberries, enhancing the sweet and savory balance.
Use a sharp, serrated knife to slice the pinwheels, as this preserves the integrity of the presentation and keeps the edges neat and clean.
Variations and Adaptations
For regional variations, consider swapping feta with creamy ricotta for an Italian-inspired flair. This substitution upholds the creaminess while integrating a lighter cheese flavor.
Adaptations for summer could include substituting cranberries for sun-dried tomatoes, giving the pinwheels a fresh and tangy approach suited for warmer months.
For a vegan adaptation, replace the cream cheese with a plant-based alternative and choose a vegan feta to maintain quantity and consistency while observing dietary preferences.
Introduce a spicy flavor variation by adding finely chopped jalapeños to the filling, offering an exciting twist to the traditional pinwheels, adding a heat kick.
Alter the texture by incorporating a crunchy element like chopped nuts, such as walnuts or almonds, to mix up the mouthfeel while preserving the taste.
Presentation alternatives include serving the pinwheels stacked on appetizer plates, or threaded onto decorative skewers for easy grab-and-go bites during gatherings.
Serving and Presentation Guide
To achieve the best plating techniques, arrange the pinwheels in concentric circles on a large platter for a striking visual effect.
Consider garnishing with fresh herbs or a sprinkle of chopped nuts to include a fresh, crunchy element and vibrant color.
Traditional accompaniments like a side of cranberry sauce amplify the cranberry flavor profile, enhancing the dish’s cohesiveness.
Modern serving suggestions recommend pairing with a light salad of arugula and shaved fennel to balance the creaminess of the pinwheels.
Temperature considerations mean serving the pinwheels chilled for optimal flavor and texture. This also aids in maintaining the shape and preventing them from becoming soft.
Portion control tips involve slicing into small rounds, ensuring guests can easily enjoy more than one without overindulging.
Wine and Beverage Pairing
An ideal wine pairing might include a crisp and light Sauvignon Blanc, which complements the savory and sweet elements without overpowering them.
For non-alcoholic alternatives, a lightly infused water with cucumber and mint offers refreshing palate-cleansing between bites.
If offering coffee or tea, consider a mild green tea or a light white tea as a pairing, as it won’t overshadow the more delicate flavors of the pinwheels.
Temperature considerations recommend serving beverages chilled or room temperature to align with the refreshment profile of the dish.
Serving suggestions highlight using elegant glassware for beverages to maintain the sophistication of the setup, enhancing the overall dining experience.
Storage and Shelf Life
To store these pinwheels effectively, wrap them tightly in plastic wrap before slicing to maintain freshness and shape.
Consider a fridge temperature of around 40°F (4°C), which is optimal for preserving the pinwheels without risking spoilage.
Opt for airtight containers when storing sliced pinwheels. This prevents air exposure and extends freshness for up to three days.
Signs of spoilage include a sour smell, a change in color, or a slimy texture. These indicators suggest compromised quality and potential food safety issues.
Reheating instructions are unnecessary as pinwheels are best served cold. For freshness, allow pinwheels to acclimate to room temperature briefly before serving.
Freezing guidelines suggest avoiding freezing due to changes in the texture of the cheese and tortilla, which can result in a soggy dish.
Make Ahead Strategies
For effective prep timelines, plan to make the cream cheese mixture a day ahead, allowing more time on the event day for assembly.
Store rolled but unsliced pinwheels wrapped tightly in the refrigerator until ready to serve, ensuring optimal freshness and flavor fusion.
Assess quality impacts by testing a small batch a day ahead, observing any changes in flavor or texture to adjust ingredients or timing as required.
During assembly, slice pinwheels just before serving to maintain sharp edges and avoid any changes in appearance due to fridge conditions.
Reheating guidelines are not applicable, but consider adding fresh herbs or a sprinkle of zest before serving to refresh flavors.
Incorporate fresh element additions like adding a spritz of lemon or lime juice prior to presenting for added vibrancy and taste boost.
Scaling Instructions
When halving the recipe, maintain ingredient ratios to preserve the balance of flavors, ensuring no element overpowers another.
Doubling or tripling the recipe requires meticulous ingredient scaling, paying close attention to seasoning and mixing to avoid inconsistencies.
Equipment adjustments may involve using larger mixing bowls and ample workspace to accommodate increased ingredient quantities.
Timing modifications could include additional chilling time as larger rolls may require extra time to set and achieve the ideal slicing texture.
Consider additional storage space if scaling up, ensuring larger airtight containers are available for prepared pinwheels.
Nutritional Deep Dive
The macro breakdown offers a balanced profile with carbohydrates from tortillas and healthy fats from cheese to support energy needs.
Micronutrient analysis includes calcium from cheese and antioxidants from cranberries, promoting bone health and reducing inflammation.
Health benefits align with a moderate intake, supporting bone strength through calcium and promoting heart health via unsaturated fats.
Dietary considerations highlight moderation, especially in sodium-sensitive diets, as feta cheese can contain higher salt levels.
Portion analysis suggests serving 2-3 pinwheels per person to maintain balance without overconsumption of calories.
Weight management tips include focusing on portion control and potentially substituting low-fat cheese options without altering key flavors.
Dietary Adaptations
For gluten-free versions, opt for gluten-free tortillas and verify all filling ingredients, including cream cheese, are certified gluten-free.
To achieve a dairy-free version, substitute both the cream cheese and feta cheese with their lactose-free, plant-based counterparts.
Creating a vegan adaptation involves selecting plant-based cheese substitutes and ensuring all ingredients are free from animal products.
Implementing a low-carb option could involve utilizing low-carb tortillas and adjusting the filling proportion for a macro-friendly version.
Keto modifications align with low-carb adaptations but focus on maximizing fats and minimizing carbohydrates.
Paleo and Low-FODMAP diets necessitate a more significant adaptation, using compliant cheese substitutes and focusing on fresh, non-processed tortillas.
Troubleshooting Guide
For texture issues, ensure cream cheese is adequately softened to facilitate smooth spreading and the cheese’s distinct, creamy texture.
To address flavor balance, taste the mixture and adjust seasoning prior to assembly, ensuring the optimal balance of salty, sweet, and creamy elements.
Managing temperature problems means ensuring ingredients are properly chilled before serving to maintain freshness and structure.
Effective solutions for equipment challenges include utilizing a sharp knife for slicing and ensuring workspace readiness for assembly.
Ingredient substitutions that retain quality involve using similar texture and flavor profile substitutes, ensuring guest dietary preferences are met.
Attend to timing concerns by organizing assembly efficiently, reducing unnecessary delays between preparing and serving to maintain freshness.
Recipe Success Stories
Community feedback has frequently highlighted the ease and versatility of this recipe, with numerous praises for its taste and festive presentation.
Variation successes often involve adding additional herbs or spices, expanding the flavor profile while still adhering to the core recipe.
Adaptation stories reveal the unique twists readers have implemented, such as using different cheese varieties, which offer personalized touches.
Reader suggestions have inspired us to include fruits like finely chopped apples, adding crunch alongside the cranberries to amplify the texture.
Photography tips shared by the community suggest emphasizing the colorful pinwheel slices in natural lighting, showcasing their full visual potential.
Frequently Asked Questions
Can I make Cranberry Feta Pinwheels in advance?
Yes, you can make them ahead of time. Prepare the mixture and assemble the rolls the day before. Slice before serving for the freshest presentation.
What can I use instead of feta cheese?
Goat cheese or a firm ricotta can substitute. They maintain the texture and flavor, although they will slightly alter the final flavor profile.
Are Cranberry Feta Pinwheels suitable for kids?
They are generally kid-friendly, but it’s best to consider the tang of feta and adjust to the children’s taste preferences.
What’s the best way to transport these for a party?
Wrap uncut rolls in plastic wrap and store in an airtight container. Slice onsite if possible, maintaining their presentation and freshness.
How long do Cranberry Feta Pinwheels last?
When stored properly in the fridge, they maintain good quality for up to three days. Ensure they are in an airtight container to retain freshness.
Can I use fresh cranberries instead of dried?
Fresh cranberries can be too sour—it’s preferable to use dried, as they offer the sweetness and texture balance necessary for this dish.
What’s the best cutting technique?
Utilize a serrated knife for sawing motions to prevent smashing the pinwheels. This method ensures neat, round slices every time.
How can I achieve a perfectly round pinwheel?
Ensure even spreading of filling and maintain consistent pressure when rolling to avoid lumps or elongated areas.
What’s the serving size for each person?
Plan for 2-3 pinwheels per guest to serve as an appetizer, offering a moderate portion while leaving room for other dishes.
Are there alternative ways to serve this dish?
Besides traditional plating, consider skewering them for grab-and-go convenience or topping a salad for a creative twist.
Do Cranberry Feta Pinwheels freeze well?
Freezing isn’t advised as the texture and flavors may degrade. It’s best to enjoy them fresh for optimal taste and quality.
How can I make pinwheels spicier?
Introduce finely chopped jalapeños or red pepper flakes to the cream cheese mixture. Adjust to the desired spice level for a kick.
Additional Resources
Explore related recipes, such as other bite-sized appetizers suitable for parties, offering a variety of flavors for your next event.
Delve into technique guides to master rolling and cutting techniques, ensuring your presentation shines with professional appeal.
Ingredient information resources can provide valuable insights into selecting the freshest, most flavorful choices for your dish.
Equipment recommendations may enhance your preparation experience, ensuring you have the necessary tools for efficient slicing and assembly.
Seasonal variations in appetizers introduce adaptable recipes across the year, capitalizing on seasonal flavors and ingredients.
Join the Conversation
We invite you to share your thoughts and tweaks to the Cranberry Feta Pinwheel recipe on our social media platforms. Your insights enrich our community.
Capture your culinary masterpiece and submit photos or comments to inspire others. We value aesthetic and innovative interpretations and love to see yours.
Engage with recipe reviews on our site to learn how others have succeeded and what alterations have thrived in practice.
Explore community engagement by participating in online cooking challenges we host, expanding your culinary repertoire and testing creativity.
Experiment with recipe variations and bring fresh ideas to traditional concepts, using our platform to document and share your unique creations.
The Recipe
Cranberry Feta Pinwheels with Cream Cheese
Serves: 10
Prep Time: 15 mins
Cook Time: 5 mins
Total Time: 20 mins
Kitchen Equipment Needed
Mixing bowl
Spatula
Sharp, serrated knife
Plastic wrap
Cutting board
Ingredients
4 large flour tortillas
8 ounces cream cheese, softened
1 cup feta cheese, crumbled
1 cup dried cranberries
1 tablespoon honey (optional)
Fresh herbs, like parsley or dill, for garnish
Directions
In a mixing bowl, combine the softened cream cheese, feta cheese, dried cranberries, and honey. Mix thoroughly until well combined.
Spread the mixture evenly over each tortilla, ensuring full coverage to the edges.
Roll each tortilla tightly. Wrap in plastic wrap and refrigerate for at least 1 hour.
When ready to serve, unwrap and slice each roll into 1-inch pieces using a sharp, serrated knife.
Arrange on a serving platter, garnish with fresh herbs, and serve chilled.
Recipe Notes
For variation, try adding walnuts or chopped apples to the filling.
If using low-fat cream cheese, ensure even mixing for a smooth consistency.
To enhance flavor, consider a sprinkle of cinnamon over the filling before rolling.