Stuffed Peppers: The Ultimate Guide to a Customizable and Delicious Meal
Stuffed Peppers: A Deliciously Customizable Dish
Stuffed Peppers are a versatile and hearty meal that blends tender vegetables with flavorful fillings. From meat-based recipes to vegetarian options, stuffed peppers offer something for everyone. This guide covers everything you need to create the perfect stuffed peppers, including preparation tips, variations, and serving ideas.
The Stuffed Peppers recipe is a crowd-pleaser that allows for endless creativity. Whether you prefer traditional meat fillings or vegetarian options, this dish is easy to adapt and serves as a hearty, satisfying meal. Pair it with your favorite side dishes for a dinner that delights every time.
Slow Cooker Spaghetti Bolognese: Easy, Rich, and Flavorful
Slow Cooker Spaghetti Bolognese: A Classic Italian Dish Made Easy
Slow Cooker Spaghetti Bolognese offers a convenient way to enjoy a hearty, flavorful meal. By utilizing a slow cooker, you achieve tender meat and a rich sauce that’s perfect for pairing with pasta.
The Slow Cooker Spaghetti Bolognese is a versatile and foolproof recipe that brings out the best in Italian flavors. Slow cooking ensures a tender, flavorful sauce that pairs beautifully with pasta. Whether you’re hosting a dinner party or meal prepping for the week, this dish is a winner.
Apple Caramel Puff Pastry Braid with Cream Cheese Filling: A Flaky, Irresistible Delight
Apple Caramel Puff Pastry Braid with Cream Cheese Filling: A Decadent Treat
Apple Caramel Puff Pastry Braid with Cream Cheese Filling combines rich flavors and stunning presentation, making it perfect for any occasion. This recipe features tender apples caramelized to perfection, a creamy cheese filling, and flaky puff pastry, braided to create a visually appealing dessert or breakfast option.
The Apple Caramel Puff Pastry Braid with Cream Cheese Filling is a show-stopping recipe that impresses both visually and taste-wise. With its flaky crust, creamy filling, and caramel-drizzled apples, it’s the perfect dessert for your next gathering. Customize it with your favorite add-ins and share the joy with loved ones.
Deliciously Unique Savory Dill Pickle Cupcakes for Adventurous Tastebuds
Savory Dill Pickle Cupcakes: A Unique Gourmet Treat
⚖️
Difficulty
Intermediate
⏲️
Prep Time
20 mins
🕒
Cook Time
25 mins
⏱️
Total Time
45 mins
🍽️
Servings
12
Welcome to a world where classic dill pickles meet the delightful world of cupcakes. Introducing our Savory Dill Pickle Cupcakes, a surprising flavor-packed delight that’s sure to intrigue your taste buds. If you love combining unexpected taste elements, these cupcakes offer the ideal balance between sweet cake batter and the zesty, tangy hint of dill pickles. Perfect for adventurous palates, this recipe promises a culinary journey you won’t forget.
Dill pickle fans rejoice! These cupcakes reimagine the beloved savory snack into a soft, moist cake. Infused with aromatic dill and underlined by the distinctive zing of pickle juice, these cupcakes are not only a conversation starter but also a unique take on a traditional dessert. The playful melody of flavors dances on the palate, offering an unforgettable eating experience.
Crafted for those who crave culinary adventure, Savory Dill Pickle Cupcakes surprise and delight with every bite. Whip them up for an unconventional treat at your next gathering—your guests will be talking about them long after the last crumb is gone.
Quick Recipe Highlights
Flavor Profile: These cupcakes artfully meld sweet and savory notes, with the tanginess of dill pickles complementing the sugariness of a cupcake base.
Texture: Expect a soft and light crumb, enhanced by small bursts of pickles adding a delightful crunch.
Aroma: The scent of fresh dill and subtle vinegar hints tantalize your senses, inviting you to take a bite.
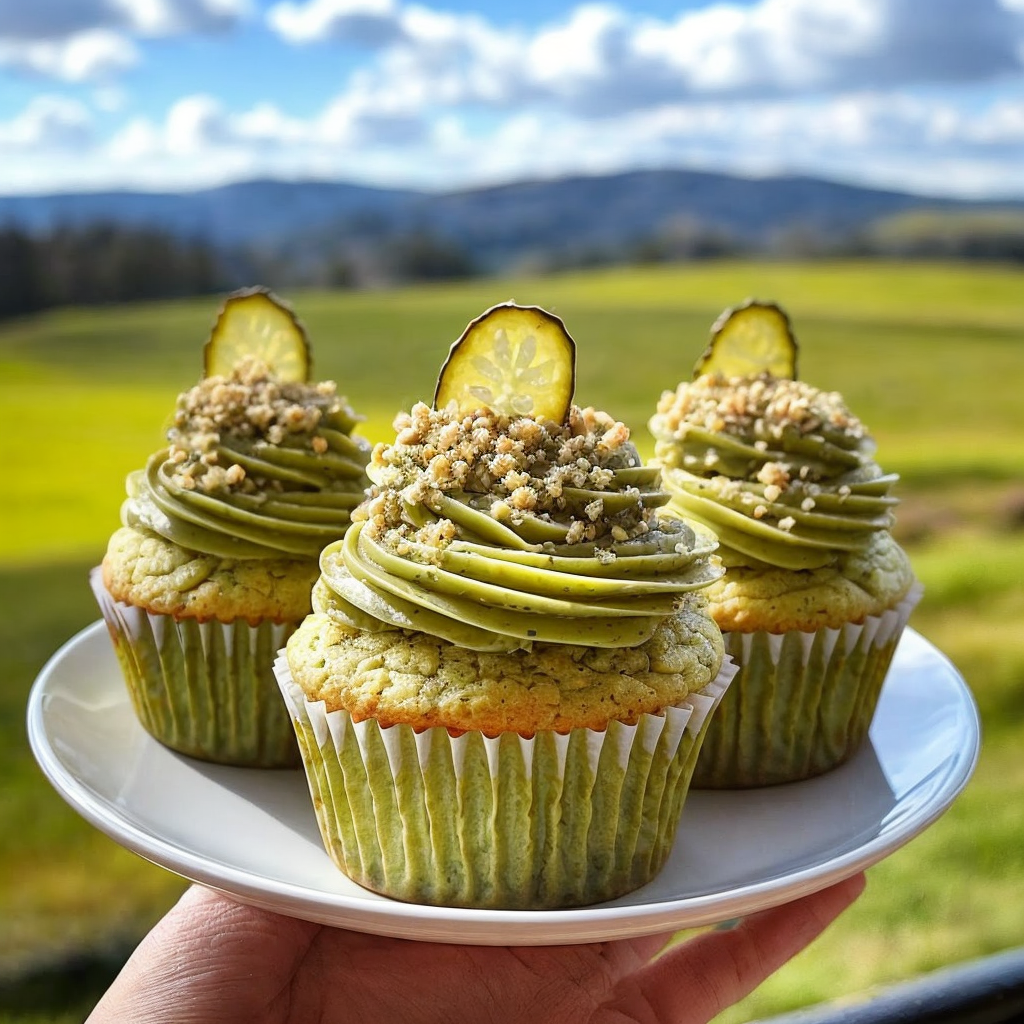
Visual Appeal: Beautifully golden cupcakes topped with a luscious cream cheese frosting, punctuated by a sprinkling of dill.
Skill Level Needed: Intermediate—Perfect for home bakers with some experience eager to push their creative boundaries.
Special Equipment: A muffin tin, hand mixer, and piping bag for frosting detailing.
Recipe Overview
Difficulty Level: Considered intermediate, this recipe requires basic baking skills and a dash of creativity for ingredient styling.
Category: Dessert, Savory Treat
Cuisine: This innovation draws from American comfort food, blending classic flavors with a modern twist.
Cost: With basic pantry staples and affordable pickles, this recipe is budget-friendly while still feeling gourmet.
Season: Ideal in the summer for a refreshing, cool cake option or year-round when you want a taste of sunshine.
Occasion: Serve at picnics, barbecues, or as an intriguing choice at any holiday table.
Why You’ll Love This Recipe
The Savory Dill Pickle Cupcakes masterfully intertwine flavor with texture, offering a moist cake layered with bursts of pickle brilliance. With their soft crumb and tangy finish, these cupcakes are a true conversation starter. They provide a touch of sophistication to any dessert lineup while catering to those who chase new taste adventures.
Convenience is on your side with this recipe. Despite their unconventional ingredient list, the cupcakes are straightforward to prepare. The dough comes together swiftly in a single bowl, minimizing mess and maximizing efficiency. Plus, the relatively brief bake time means you won’t have to wait long to enjoy your unique creation.
Not only are these cupcakes a delight for the palate, but they also pack a bit of nutritional punch—a touch of salt and vinegar from the pickles, and the freshness of real dill contribute flavor and a slight nutritional boost. For those who are adventurous eaters, introducing a vegetable into a cupcake has never been this deliciously fun.
Sharing these cupcakes at social gatherings is a surefire way to captivate and entertain guests. Their unique combination of flavors is guaranteed to spark conversations, making your hosting look effortless and imaginative. And if you have friends who think they’ve seen it all, these cupcakes are sure to surprise them.
Creating these cupcakes is both cost-effective and rewarding. Using readily available ingredients from your local grocery store ensures that the final output won’t break the bank. Perfectly aligned with the growing trend of experimental culinary experiences, they stand out as an accessible gourmet treat.
Historical Background and Cultural Significance
The inspiration for dill pickle cupcakes may draw unique roots, combining classic baking techniques with a love for pickled foods that dates back centuries. Pickling itself is an ancient method of food preservation, originating thousands of years ago, and savored across cultures as a flavorful enhancement to various dishes.
Culturally, pickles are cherished for their tart bite and their role as a complement to rich, fatty foods. In America, pickles have cemented their place in comfort food, adding a crispy satisfaction to burgers and sandwiches alike. Savory Dill Pickle Cupcakes embrace this love for pickles, crafting a novel dessert that combines this cultural heritage with innovation.
Initially perceived as a whimsical edition, such creative recipes have found a place in modern kitchens, offering versatility and unique twists to classic formats. Across regions, variations of these cupcakes may differ, highlighting the surrounding area’s preference in spice blend, sweet base, or pickle type, thereby showcasing how tradition and creativity can harmoniously exist.
Regional iterations might focus more on local herbs or distinct pickle varieties, signifying how the recipe evolves based on cultural influences. This adaptability isn’t just a flavor consideration but equally a testament to cultural identities, presenting the global shift towards cross-cultural culinary explorations.
Ingredient Deep Dive
Flour: The foundation of every delicious cupcake, flour offers structure when baking, interacting with water and heat to create the soft and tender texture we all crave. In cultural contexts, flour has been a humble yet essential ingredient in various baked goods worldwide, from ancient bread to modern pastries.
When selecting flour, opt for all-purpose varieties for consistency in texture. Store flour in a cool, dry place to ensure freshness, and if desired, substitute with whole grain or gluten-free alternatives for different texture and nutritional profiles.
Dill Pickles: Celebrated for their distinctive tanginess, dill pickles provide the unique edge required for this recipe. Joining cupcakes, they offer a surprising yet enjoyable contrast to the sweetness of the cake. Pickles historically serve as a simple preservation method across many cultures, providing an essential food source with a delightful flavor.
Choose crisp, quality pickles to ensure a robust flavor in your cupcakes. Store opened jars in the fridge, paying attention to expiration dates. For variety, consider sweet pickles or jalapeño pickles for a different take.
Common Mistakes to Avoid
Over-mixing the batter can produce a tough cupcake, as it would activate too much gluten.
Not draining the pickles well can introduce too much liquid, altering the cupcake consistency adversely.
Using cold ingredients straight from the fridge can affect mixing and the eventual batter consistency.
Incorrect oven temperature can lead to uneven baking, affecting texture significantly.
Skimping on dill seasoning may result in a flavorless cupcake lacking its intended zest.
Ignoring measurements due to personal taste may yield inconsistent results.
Over-baking can lead to dry cupcakes with unsatisfactory texture.
Skipping the cooling time before frosting: warm cupcakes will melt the frosting, making it less aesthetic.
Essential Techniques
Creaming Butter and Sugar: This step is pivotal in creating the cupcake’s desirable light and airy texture. It allows air to incorporate into the batter, ensuring a smooth and fluffy cake. Master this technique by ensuring your butter is just below room temperature, not too soft, and using a mixer to thoroughly combine until light and fluffy. Watch for a pale yellow color as your visual cue.
Incorporating Dry Ingredients: Proper blending of dry ingredients ensures even distribution of flavors and leavening agents. To avoid over-mixing, gently fold the dry ingredients into the wet using a spatula, underlining the need for gentleness to maintain the airiness of the batter.
Pro Tips for Perfect Savory Dill Pickle Cupcakes
Opt for quality dill pickles, as they are the flavor heroes. Fresno varieties or homemade versions often hold richer flavors. Drain them well to avoid extra moisture. Balance sweetness and savoriness to have an unmatched flavor medley. Use a gentle hand when incorporating ingredients to maintain fluffy consistency.
Consider adding a tad more dill seasoning if your pickles lack pungency. This can enhance the overall zing of your cupcakes. Use a toothpick test to confirm cupcake readiness, which involves inserting a toothpick in the center and ensuring it comes out clean. For an aesthetic appeal, top the cupcakes with a slice of dill pickle or sprinkle dill weed before serving.
Variations and Adaptations
Regional variations might emphasize different herbs beyond dill, adding thyme or rosemary for an aromatic twist. Embrace what’s seasonal, swapping standard pickles for any pickled vegetables available at local farmers’ markets during peak harvesting adventures.
Dietary needs, such as gluten-free, can be accommodated using almond or coconut flours, shifting the cupcakes from conventional to extraordinary for those with gluten sensitivities. Additionally, for those avoiding sugar, consider utilizing sugar substitutes to maintain the flavor profile without added sugar.
Serving and Presentation Guide
Transform these dill pickle cupcakes into a delightful treat by following key plating techniques—arrange them on a contrasting color platter for added drama. A delicate dill sprig elegantly garnishing each top captivates visual interest while aligning with the flavor narrative.
Traditional accompaniments, including small sandwiches or briny olives, seamlessly blend the savory with sweet, taking palates on a playful taste adventure. For a modern flair, serve with a light cucumber salad, balancing refreshing undertones.
Wine and Beverage Pairing
Pair these cupcakes with a light, crisp white wine like Sauvignon Blanc—the citrus notes harmonizing with the tanginess of the dill pickles. If alcohol isn’t ideal, opt for unsweetened iced tea or a basil-infused lemonade to enhance the herbal aspects.
Aligning with coffee pairings, a medium roast coffee highlights the sweetness while contrasting the savory essence. Consider serving lightly chilled, complementing the cupcakes’ cool nature.
Storage and Shelf Life
Once baked, these cupcakes stay fresh in an airtight container at room temperature for up to two days. To extend shelf life, refrigerate for up to five days, ensuring to bring them to room temperature before serving for optimal flavor expression. Each cupcake should be individually wrapped for freezing to prevent freeze-burn or dryness.
Make Ahead Strategies
Bake these cupcakes a day prior to serving for convenience, storing them in the fridge until time for frosting. Assemble all dry ingredients in advance to expedite mixing when ready to bake. Prepare frosting ahead of time and store it in the refrigerator, piping it fresh before serving to maintain the frosting’s creamy texture.
Scaling Instructions
Halving this recipe is simple, dress down each measurement appropriately and bake in small muffin trays to maintain individual serving sizes. For larger groups, double or triple by scaling each ingredient, ensuring to adjust bake time, checking frequently for necessary variations.
Nutritional Deep Dive
These cupcakes offer an unusual twist by incorporating vegetable elements with delightful pastry. Analyze macronutrients for a balance of carbohydrates and moderate protein. Dill lends itself to being a natural digestive aid, enhancing the nutritional profile subtly.
If aware of dietary constraints, consider halving sugar content or using alternative sweeteners without sacrificing taste, maintaining balance while appealing to health-oriented diners.
Dietary Adaptations
Alterations for specific dietary needs are possible. Gluten-free baking offers substitution with almond or coconut flours. Dairy-free seekers can employ plant-based alternatives like coconut or almond milk alongside vegan butter replacements for a thorough revamp.
Adopt a vegan strategy by opting for egg replacers, easily enhancing dimensions for plant-based diets. Low-carb enthusiasts can swap sugar for erythritol or similar substitutes to maintain low carb-intake levels.
Troubleshooting Guide
Address texture concerns by avoiding over-mixing, ensuring pickles are accurately drained, and activating baking soda with the appropriate acid in the batter. Combat flavor imbalance through seasoning adjustment according to pickle strength; more dill and spices like garlic or onion powders may be incorporated.
For temperature challenges, make certain your oven is calibrated and refrain from frequent opening to avoid heat escape, ensuring an evenly baked cupcake. Ingredient substitutions should be made considering physical properties and baking interactions to avoid unsatisfactory results.
Recipe Success Stories
Across our community, feedback highlights these cupcakes as experimental success, with users remarking upon their delight at unique flavor profiles and newfound enthusiasm for savory-sweet creations. Captured photographs show inviting creations with lush frosting and appealing pickle garnishes, ready to captivate at any gathering.
Reader suggestions have introduced alternative herbs and spices, expanding the recipe’s potential and equipping bakers with further creative capabilities, crafting personalized versions welcomed by eclectic tastes.
Frequently Asked Questions
1. Can I use bread and butter pickles for a sweeter variation?
Certainly! Bread and butter pickles introduce a contrasting sweetness that harmonizes with the savory dough, perfect for those preferring a sweeter touch without drastically shifting away from the theme.
2. What’s the best way to store these cupcakes?
Keep them in an airtight container at room temperature for up to two days or refrigerate if longer storage is needed. Before serving, allow refrigerated cupcakes to achieve room temperature for optimal flavor.
3. Can coconut flour be used as a substitution?
Yes, however, it alters consistency due to its absorptive nature. Reduce quantities and adjust liquids accordingly to sustain moisture levels within the batter.
4. Is frosting necessary?
Not strictly; however, it beautifully complements the savory cupcake, enhancing the overall dining experience with a creamy contrast. For minimalist approaches, consider dusting with a powdered sugar-dill blend.
5. How can I incorporate more flavor without making them too salty?
Use herbs like dill, thyme, or rosemary, and experiment with adding citrus zest such as lemon to impart freshness without increasing sodium levels.
6. Are there other pickled vegetables that work with this recipe?
Indeed! Try using pickled jalapeños for an adventurous spice kick or pickled beets for a vibrant color and distinct flavor backdrop.
7. What can replace eggs for a vegan version?
Utilize commercial egg replacers, flaxseeds, or chia seeds with water proportions for plant-based adaptations that won’t compromise structure or texture.
8. Do halved measurements affect baking time?
Slightly reduced sizing means watching closely as muffins will likely bake quicker. Monitor time to ensure proper doneness without overdrying the product.
9. Is there a preferred sugar substitute for low-carb versions?
Erythritol is effective, closely mimicking sugar’s properties in taste and baking interactions, allowing you to maintain sweetness while addressing sugar concerns.
10. How do I ensure frosting consistency?
Maintain butter at a slightly cool room temperature underscored by gradual incorporation of powdered sugar. Adjust with milk or cream to acquire desired smooth and pipeable consistency without unwanted runniness.
Additional Resources
Embark on a culinary journey beyond these pastries by exploring related recipes focusing on other savory-sweet delights, including pickle-infused breads, loaves, and savory cookies, supplying imaginative bakers with keystone recipes to expand repertoires.
Technique guides detail methods for successful pickling if homemade creations inspire you. Expand culinary courage with an array of exciting baked goods integrating dill’s vibrant harmony paired with thoughtful ingredient highlights.
Join the Conversation
These cupcakes open the gateway to exploring unconventional flavors, challenging baking norms, and embracing culinary creativity. We encourage you to share your experiences, photo experiments, varying tastes, and mindful adaptations within our open community, enhancing collective knowledge and enjoyment.
Engage on social media through specialized hashtags, allowing bakers to connect worldwide, showcasing distinct creations, exchanging sincere reviews, and supporting fellow adventurers in the unpredictable, beautiful journey of baking.
The Recipe
Savory Dill Pickle Cupcakes
Serves: 12
Prep Time: 20 mins
Cook Time: 25 mins
Total Time: 45 mins
Kitchen Equipment Needed
Muffin tin
Hand mixer
Piping bag for frosting
Ingredients
1 1/2 cups all-purpose flour
1 tsp baking soda
1/4 tsp salt
1/2 cup butter, softened
1 cup sugar
2 large eggs
1/4 cup dill pickle juice
1/2 cup chopped dill pickles
1/4 cup sour cream
1 tsp minced dill
Cream cheese frosting
Directions
Preheat oven to 350°F (175°C). Line a muffin tin with cupcake liners.
In a bowl, mix flour, baking soda, and salt. Set aside.
Cream butter and sugar with a mixer until light and fluffy.
Add eggs one at a time, beating well after each addition.
Stir in dill pickle juice and sour cream until combined.
Gradually add dry ingredients to the wet mixture. Stir until just combined.
Fold in chopped dill pickles and minced dill.
Spoon batter into prepared muffin tin, filling each cup 3/4 full.
Bake in the preheated oven for 20-25 minutes or until a toothpick inserted comes out clean.
Allow to cool completely before frosting with cream cheese frosting.
Recipe Notes
Substitute dill pickles with sweet pickles for a sweeter cupcake variation.
Piping frosting creates a beautiful, professional look—use a round or star nozzle for decorative flair.
Irresistible Pistachio and Raspberry Cheesecake Domes Recipe for Dessert Lovers
Pistachio and Raspberry Cheesecake Domes: A Delightful Dessert Masterpiece
⚖️
Difficulty
Moderate
⏲️
Prep Time
30 mins
🕒
Cook Time
15 mins
⏱️
Total Time
45 mins
🍽️
Servings
6
Indulge in the luscious delight of Pistachio and Raspberry Cheesecake Domes. This dessert offers a harmonious balance of flavors and textures, combining creamy cheesecake with a hint of pistachio and the tartness of raspberries. These domes are not only a treat for your taste buds but also a feast for your eyes with their stunning presentation. Whether you’re impressing guests at a dinner party or indulging your sweet tooth, these cheesecake domes are sure to elevate the occasion.
Cheesecake lovers will appreciate the rich, velvety texture complemented by crunchy pistachio bits. The vibrant raspberry coulis contrasts beautifully with the creamy filling, providing a refreshing pop of flavor and color. This recipe, though moderately complex, is a rewarding baking project that promises culinary satisfaction and aesthetic delight.
Strong
Quick Recipe Highlights
Flavor Profile: A perfect blend of nutty pistachios with zesty raspberries intertwined in a creamy cheesecake foundation.
Texture: Velvety smooth cheesecake against the crunch of pistachios and a soft raspberry layer.
Aroma: Sweet and nutty notes with a hint of fresh raspberry essence.
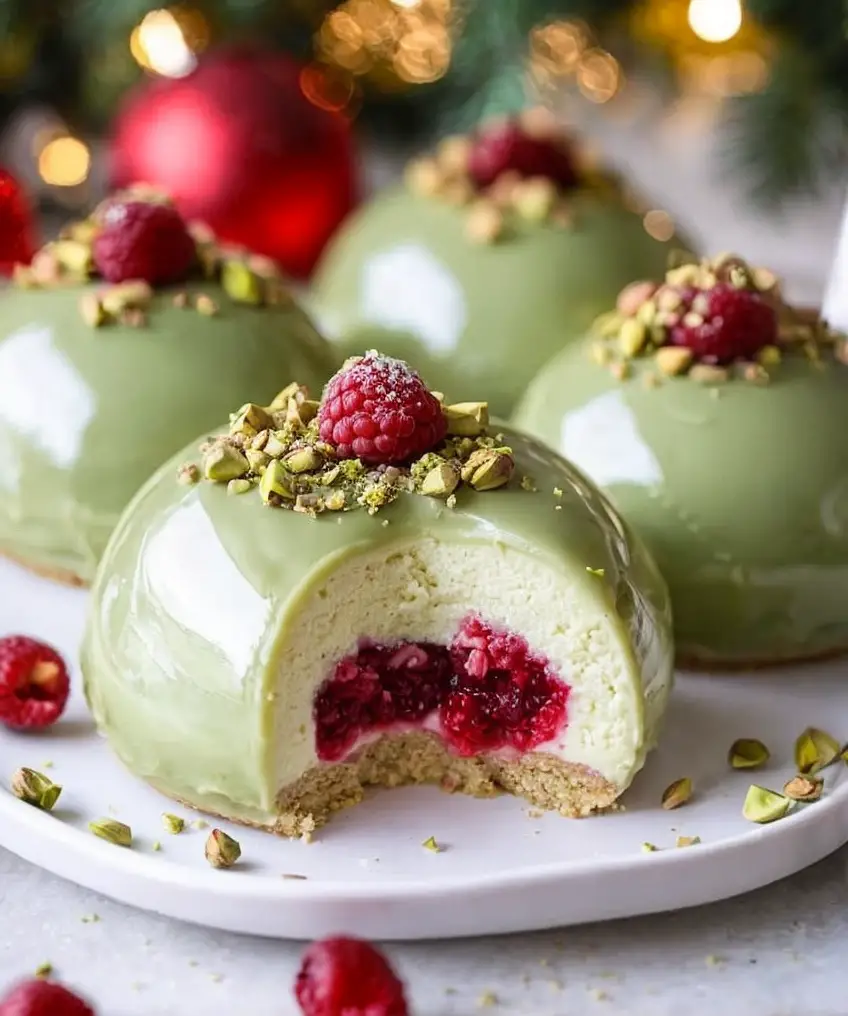
Visual Appeal: Chic dome shape with contrasting green and red hues from pistachios and raspberries, respectively.
Skill Level Needed: Suitable for home bakers with moderate experience; involves basic baking and layering techniques.
Special Equipment: Required tools include a silicone dome mold and a food processor for best results.
Recipe Overview
Difficulty Level: This recipe is moderately challenging due to layering techniques and precise presentation. However, each step is manageable for those familiar with basic baking concepts.
Category: Perfect for desserts, especially for gatherings and festive occasions.
Cuisine: Inspired by contemporary patisserie, infusing traditional cheesecake with modern flair.
Cost: Estimated cost is moderate, with pistachios being the priciest component, followed by raspberries.
Season: Best enjoyed during raspberry season in summer; however, frozen raspberries can make this treat suitable year-round.
Occasion: Ideal for birthdays, anniversaries, or any event that warrants a sophisticated dessert centerpiece.
Why You’ll Love This Recipe
The Pistachio and Raspberry Cheesecake Domes captivate with their luxurious combination of flavors and textures. The smooth, creamy cheesecake base perfectly complements the crunch of roasted pistachios, creating a symphony of sensations with each bite. The tangy raspberry coulis not only adds a vibrant splash of color but also balances the sweetness, making this dessert a delightful indulgence.
Convenience meets style with these domes, as they can be prepared ahead of time, allowing the flavors to meld beautifully. The recipe is detailed enough to guide you through each step with ease, making it suitable for bakers with a moderate level of expertise. By following the outlined techniques, you’ll find satisfaction in both the process and the remarkable outcome of your culinary efforts.
From a nutritional standpoint, this dessert offers nuts and fruits, which are beneficial components of a balanced diet. Pistachios provide healthy fats, protein, and fiber, while raspberries contribute vitamins and antioxidants. This, paired with indulgence, makes the dessert not only delicious but enriching in a unique way.
Socially, this dessert is a conversation starter. Its elegant appearance makes it a perfect addition to any gathering, sparking admiration and delight among diners. This adds to its value as a charming and impressive contribution to any dessert table.
Cost-wise, the ingredients are generally accessible, with the exception of pistachios, which might be considered a splurge. Nonetheless, the dessert’s elegance and the compliment it receives make it a worthy investment for special occasions or to impress your guests with culinary finesse.
Historical Background and Cultural Significance
The Pistachio and Raspberry Cheesecake Domes nod to the long-standing tradition of cheesecake, a dessert with roots that trace back to ancient Greece. Originally a simple mix of fresh cheese, honey, and flour, cheesecake has evolved over the centuries, with iterations found in countless cultures worldwide. This recipe is a testament to the dessert’s versatility and timeless appeal.
In many Middle Eastern cuisines, pistachios play a significant role in desserts. This prized nut, rich in flavor and historical significance, symbolizes wealth and happiness, often used in festive and celebratory dishes. Incorporating pistachios brings a touch of this cultural richness to the cheesecake domes.
The addition of raspberries offers a fresh twist to classic cheesecake, introducing a fruity element with a European touch. Raspberries have been cultivated in Europe for centuries and are known for their vibrant flavor that pairs exceptionally well with the creamy textures of cheesecake.
Over time, cheesecake has embraced regional variations and innovations, from the classic New York style to Japanese fluffy cheesecakes. Our Pistachio and Raspberry Cheesecake Domes are a modern twist, reflecting a blend of cultural influences and contemporary culinary creativity.
Ingredient Deep Dive
Pistachios have been treasured since ancient times and are considered a symbol of luxury. Their distinctive flavor and vibrant green hue make them a prized addition to sweet and savory dishes alike. Nutritionally, they are an excellent source of proteins, fiber, and healthy fats, making them not only tasty but also beneficial.
To ensure optimal quality, select pistachios that are bright green and free from signs of spoilage or staleness. Store them in an airtight container in a cool, dry place, or refrigerate them to extend their shelf life. Should you need a substitute, almonds or cashews can be considered for similar nutty undertones, though pistachios’ unique taste is unmatched.
Raspberries, with their juicy, tangy-sweet flavor profile, are a beloved fruit perfect for balancing richer desserts like cheesecake. Rich in vitamins, fiber, and antioxidants, raspberries are not only delicious but extremely health-promoting.
When purchasing raspberries, choose firm, brightly colored berries that show no sign of bruising. They are best kept in cool, dry environments and should be consumed shortly after purchase for optimum freshness. In a pinch, fresh strawberries or a berry blend could replace raspberries, though they’d alter the distinctive flavor.
Common Mistakes to Avoid
Overbeating the cream cheese causes cracks and affects texture. Beat until just smooth to avoid this.
Failing to temper the cream cheese results in a lumpy mixture, so ensure it’s at room temperature before use.
Using non-fat cream cheese alters the taste and texture; stick to full-fat for authenticity.
Adding sugar directly into hot raspberry coulis causes it to crystallize. Allow the mixture to cool slightly first.
Neglecting to line your molds can cause sticking. Use a non-stick spray or line with parchment paper.
Skipping the chill time for cheese filling results in poorly formed domes. Patience ensures better structure.
Using whole berries in coulis can lead to inconsistent flavors. Always strain for smoothness.
Under-toasting pistachios weakens the nutty flavor. Toast them lightly to enhance aroma and crunch.
Essential Techniques
Tempering cream cheese is an integral step to avoid lumps and ensure a smooth filling. Leave the cream cheese at room temperature until it softens. This allows it to incorporate effortlessly with other ingredients and retain a creamy texture.
To achieve beautifully smooth raspberry coulis, simmer raspberries with sugar until softened. Puree and then strain the mixture to remove seeds, ensuring only the smoothest sauce complements your cheesecake. Timing and temperature are crucial to avoid altering the sugar’s texture.
The art of dome construction relies on patience and technique. Carefully layer the ingredients in your mold, beginning with the coulis. Allow each layer to set before adding the next to achieve a neat, well-defined dome structure.
Pro Tips for Perfect Pistachio and Raspberry Cheesecake Domes
Ensure that your cream cheese is at room temperature to avoid lumps when mixing. If pressed for time, cut it into cubes to quicken the process. This little trick will drastically improve the texture of your cheesecake.
To intensify the pistachio flavor, consider adding a few drops of pistachio extract to the cheesecake mixture. This addition elevates the nutty profile without overpowering the overall taste.
Using a food processor to crush pistachios ensures uniform pieces that not only add texture but visually complement the raspberry coulis. Alternatively, you can use a mortar and pestle for a more rustic aesthetic.
Chill each layer thoroughly before assembling to ensure well-defined domes. Rushing this step could lead to mixing of layers, resulting in a less visually appealing dessert.
To easily release domes from molds, dip the bases quickly in hot water before unmolding. This slight warming helps separate the dessert from the mold without damaging its shape.
For a decorative finish, garnish with additional crushed pistachios or a light dusting of powdered sugar. Both enhance the presentation while adding flavor and texture contrast.
If time permits, make these cheesecakes a day in advance to allow flavors to meld and develop. This resting period enriches the overall taste, showcasing the pistachio and raspberry notes.
Variations and Adaptations
For a seasonal twist, consider swapping raspberries for other berries like strawberries or blueberries during their peak seasons. This adaptation ensures the cheesecake stays fresh and vibrant year-round, capitalizing on the natural sweetness of the season’s finest.
For those favoring a dairy-free version, substitute cream cheese with a plant-based alternative. This adaptation maintains the creamy texture while making the dessert suitable for dietary needs.
To embrace regional influences, incorporate spices like cardamom with pistachios for a more exotic flair. This combination adds depth and warmth, reflecting Middle Eastern dessert traditions.
If texture diversity is desired, add a thin layer of sponge cake at the base of each dome. It enhances structural integrity and provides an additional layer of flavor.
For an aesthetic presentation, serve these domes on a bed of raspberry coulis. The sauce not only complements the dessert visually but adds another dimension of flavor.
Lastly, explore serving options by cutting the domes into halves or quarters. This approach beautifully showcases the layered the structure inside and makes for a dramatic presentation.
Serving and Presentation Guide
Plating these cheesecake domes on elegant, individual dessert plates turns them into stunning centerpieces. Ensure each dome is positioned neatly in the center to draw visual attention.
Garnishing with a drizzle of raspberry coulis or a sprinkle of crushed pistachios not only enriches the taste but also enhances visual appeal. Fresh mint leaves or edible flowers can offer a lovely contrast and add a pleasing aroma.
Traditional accompaniments might include a dollop of whipped cream or crème fraîche, subtly enhancing the rich, creamy flavor of the cheesecake without overpowering it. Modern twists like a scoop of sorbet provide refreshing acidity.
Maintain serving temperatures by refrigerating until just before serving, ensuring the desserts are cold but not overly chilled to enjoy their creamy texture fully.
Pay attention to portion sizes, ensuring each dome provides a perfect individual-sized delight, reducing waste and maximizing enjoyment for every guest.
Wine and Beverage Pairing
A sweet dessert wine, such as a Moscato or a late-harvest Riesling, pairs wonderfully with these cheesecake domes, enhancing the fruity notes while balancing creaminess with acidity.
For a non-alcoholic option, consider a raspberry-infused herbal tea or a refreshingly chilled berry peppermint iced tea. Both choices highlight the fruit flavors of the cheesecake while adding a refreshing palate cleanser.
For coffee lovers, a rich, dark espresso complements the nutty and chocolatey elements, creating a sophisticated pairing. Alternatively, a mild green tea offers a lighter, contrasting brew that refreshes the palate.
Serving both warm and chilled beverages caters to diverse tastes, allowing guests to enjoy their preferred pairing style, whether it’s an invigorating brew or a soothing blend to match the dessert.
Storage and Shelf Life
Properly storing these cheesecake domes is key to extending their edible lifespan. Once prepared, keep them refrigerated in an airtight container to maintain freshness and flavor. They are best consumed within three days to enjoy their optimal taste.
To prevent any odor transfer from the fridge, use containers with tight seals or wrap each dome with plastic wrap, ensuring direct contact with their surfaces.
If freezing is necessary, wrap domes individually with parchment paper followed by aluminum foil to prevent freezer burn. Use within a month to retain the dessert’s quality and integrity.
Signs of spoilage include an off-putting smell or discoloration on the cheesecake. Always inspect them before serving if they have been stored for an extended period.
Make Ahead Strategies
Preparing these domes in stages can simplify the process. Complete the cheesecake filling and raspberry coulis a day in advance, allowing you to focus on assembly later.
Store pre-chilled components separately to enhance flavor melding without compromising structure. This strategy ensures mix-in integration and supports well-defined layers.
Reheat the raspberry coulis gently before garnishing to restore its texture and flow, adding a finishing touch that’s freshly made yet stress-free.
Delaying the addition of fresh elements like mint or pistachio garnish until the last moment guarantees a fresh and vibrant presentation.
Scaling Instructions
Wish to halve this recipe? Simply reduce ingredient quantities by 50%, ensuring to check consistency as you go to maintain the desired texture. This scale-down is perfect for smaller gatherings or intimate settings.
To double, prepare in batches rather than all at once, avoiding overcrowding of your kitchen equipment and maintaining ease of assembly.
Adjust mold quantities accordingly, preparing more or using larger alternatives if needed, and allow extra chill time if working with larger molds to ensure integrity.
Scaling up requires careful planning of storage and equipment usage, ensuring that each dome achieves the desired precision and aesthetic appeal.
Nutritional Deep Dive
This dessert, rich in macro-nutrients such as fats (from cream cheese and pistachios), carbohydrates, and proteins, provides a balanced, indulgent treat. Enjoying it in moderation allows for guilt-free culinary pleasure.
Micronutrients like vitamins C and E from the raspberries contribute to the overall health benefits of this dessert. These vitamins play critical roles in immune function and skin health.
While treated as a dessert pleasure, the recipe’s nutrition offers fiber from its fruit component and additional nut-based protein, broadening the health appeal.
For those monitoring weight, portion control remains crucial. Balance dessert enjoyment with a focus on moderation, pairing smaller servings with a balanced daily diet to maintain dietary goals.
Dietary Adaptations
For a gluten-free adaptation, ensure that all baking components and possible crust inclusions use gluten-free certified ingredients. This change keeps the dessert accessible to those with gluten sensitivities.
In a dairy-free approach, replace the cream cheese with coconut or almond-based alternatives. This adaptation creates a plant-based variation that caters to diverse dietary preferences.
Creating a vegan version calls for substituting gelatin with agar agar or pectin, providing similar textural qualities while maintaining the cheesecake’s firmness.
Classify this dessert as low-carb by reducing sugar levels and using alternative sweeteners like erythritol, making it suitable for keto enthusiasts wanting a low-sugar indulgence.
For those following a paleo diet, utilize coconut cream and cashed-based cheeses, keeping the recipe faithful to paleo guidelines whilst maintaining the traditional cheesecake charm.
Troubleshooting Guide
If you encounter issues with texture, make sure all ingredients are at the correct temperatures before mixing. This ensures uniform consistency and prevents curdling or lumping.
Balance flavors effectively by adjusting sugar or citrus elements to complement the pistachio and raspberry. Taste progressively to avoid over-sweetness or tartness.
Unexpected temperature fluctuations during cooling can harm the setting process. Always set your fridge to a consistent setting for optimal results.
Inadequately mixing the cream cheese can lead to graininess. Consistent blending keeps the texture smooth and appealing.
Ingredient substitutions require careful consideration to maintain flavor balance. Opt for lightly flavored alternatives to keep the dominant essence of pistachio and raspberry intact.
Timing concerns may arise in assembly. Allow adequate chilling time between layers to achieve neat, distinct separations for an attractive presentation.
Recipe Success Stories
Our community has shared many wonderful experiences with the Pistachio and Raspberry Cheesecake Domes, noting their success following specific tips and tricks. Readers have creatively incorporated local fruits or flavors to adapt the dessert to their regional cuisine.
Feedback highlights the impressive visual appeal when shared via social media, inspiring fellow bakers to embrace this visually stunning creation. Helping inspire creativity through photography and presentation, these domes never fail to impress.
In adaptation stories, readers have successfully altered the basic recipe to suit diverse dietary needs, widening the scope of this dessert’s accessibility and enjoyment. This feedback encourages nutritional inclusivity while appreciating timeless classic flavors.
Friendly suggestions often include trying alternative garnishes or plating methods, enhancing the dessert’s charm and adapting it to fit unique meal themes or dining experiences.
Frequently Asked Questions
Can I use frozen raspberries instead of fresh?
Absolutely, frozen raspberries work as a suitable substitute but may require additional draining to eliminate excess moisture. Adjust cooking time slightly when making coulis to achieve the desired consistency.
What is the best way to store these cheesecake domes?
To preserve freshness, store the domes in an airtight container in the fridge. Consume within three days for best flavor and texture. For longer storage, freeze wrapped in parchment paper followed by aluminum foil.
Can this recipe be made vegan?
Yes, substitute cream cheese with plant-based alternatives and use agar agar instead of gelatin. This ensures a vegan-friendly dessert without compromising on taste or structure.
How can I add more pistachio flavor?
Consider adding a few drops of pistachio extract for a more pronounced nutty taste. Toasting the pistachios before incorporating also enhances their natural aroma and flavor.
Can I make this dessert ahead of time?
Indeed, these domes are perfect make-ahead treats. The flavors develop beautifully over time, making prep a day in advance a smart choice for busy hosts or those scheduling dessert production.
What’s a good alternative to raspberry for coulis?
Blueberries or strawberries are excellent choices. Adjust the sugar to taste to manage different fruit sweetness levels, ensuring the coulis complements the cheesecake’s essence.
How do I avoid the domes sticking to the mold?
Utilizing a light coating of non-stick spray or lining with plastic wrap can facilitate easy removal. Additionally, a quick dip of the mold in warm water eases the separation process.
Are there any low-carb adaptions?
Substitute sugar with a low-carb sweetener like erythritol and use almond or coconut flour-based crusts. This integration ensures a suitable low-carb dessert option.
What’s the best way to toast pistachios?
Lightly toast pistachios in a dry pan over medium heat. Stir constantly until fragrant and lightly browned, which enhances flavor without burning the nuts.
Can these be served frozen?
While serving frozen isn’t recommended, these domes should be firm and chilled, allowing a slight warming period post-refrigeration for optimal enjoyment and texture.
Additional Resources
Explore further with related recipes that embrace similar fruity and nutty themes, such as berry almond tarts or chocolate hazelnut mousse. These recipes offer imaginative extensions of flavor pairings.
Access technique guides providing in-depth demonstrations of dome construction and coulis preparation, strengthening your foundational baking skills and enabling exciting variations.
Ingredient information delves into pistachios’ historical significance and nutritional advantages, highlighting their contribution beyond mere taste. Discover how this nut enriches culinary creations globally.
Equipment recommendations, such as silicone molds or pastry brushes, assist in achieving professional-grade results, inspiring future baking endeavors.
Seasonal variations invite creative experimentation with different fruits and complementary spices, ensuring your dessert recipes remain fresh, dynamic, and tailored to current produce availability.
Join the Conversation
Bakers and dessert enthusiasts alike can join the conversation on social media, sharing their own adaptations and photography of Pistachio and Raspberry Cheesecake Domes. Utilize platforms like Instagram or Pinterest to engage with fellow culinary creatives.
Capture the beauty of your handmade desserts through photography tips shared within our community, enhancing visuals that showcase the elegant structure and vibrant colors of these domes.
Contribute by reviewing recipes and sharing personal experiences, helping others eager to test this modern take on cheesecake while gathering ideas and constructive feedback.
Dive into recipe variations proposed by other readers, dissecting and recreating them to fit your preferences and taste perceptions. This collaborative effort fosters community growth and shared delight in successful culinary achievement.
The Recipe
Pistachio and Raspberry Cheesecake Domes
Serves: 6
Prep Time: 30 mins
Cook Time: 15 mins
Total Time: 45 mins
Kitchen Equipment Needed
Silicon dome mold
Food processor
Microwave
Refrigerator
Ingredients
200g cream cheese, softened
100g pistachios, shelled and toasted
150g raspberries
100g granulated sugar, divided
100ml heavy cream
1 tsp vanilla extract
2 tbsp gelatin
Optional: Pistachio extract, for extra flavor
Directions
Prepare your silicone dome mold with a light spray of nonstick cooking spray.
In a food processor, blend half of the pistachios until finely ground.
In a saucepan, combine raspberries and half of the sugar. Cook over medium heat until raspberries break down, about 5 minutes. Strain to remove seeds, returning smooth sauce to the pan.
Whisk 1 tbsp gelatin into the coulis. Pour the mixture into the dome mold, filling each one to about 1 cm depth. Refrigerate until set.
Beat cream cheese with remaining sugar until smooth and fluffy. Stir in vanilla and pistachio extract if using. Gradually beat in heavy cream until thickened.
In a small bowl, dissolve the remaining gelatin in water. Microwave until melted, then slowly mix it into the cream cheese mixture.
Spoon the cheesecake filling over the set raspberry layer in the dome mold, spreading evenly. Sprinkle chopped pistachios on top for texture.
Chill in the refrigerator for at least 4 hours or overnight until fully set.
To serve, remove the domes from the mold and place on individual plates. Garnish with remaining pistachios and fresh raspberries.
Recipe Notes
Ensure all ingredients are at room temperature before starting to prevent curdling.
Add additional raspberry coulis or fresh fruit when serving for enhanced presentation.