Indulge in a Creamy No-Bake German Chocolate Cheesecake Delight

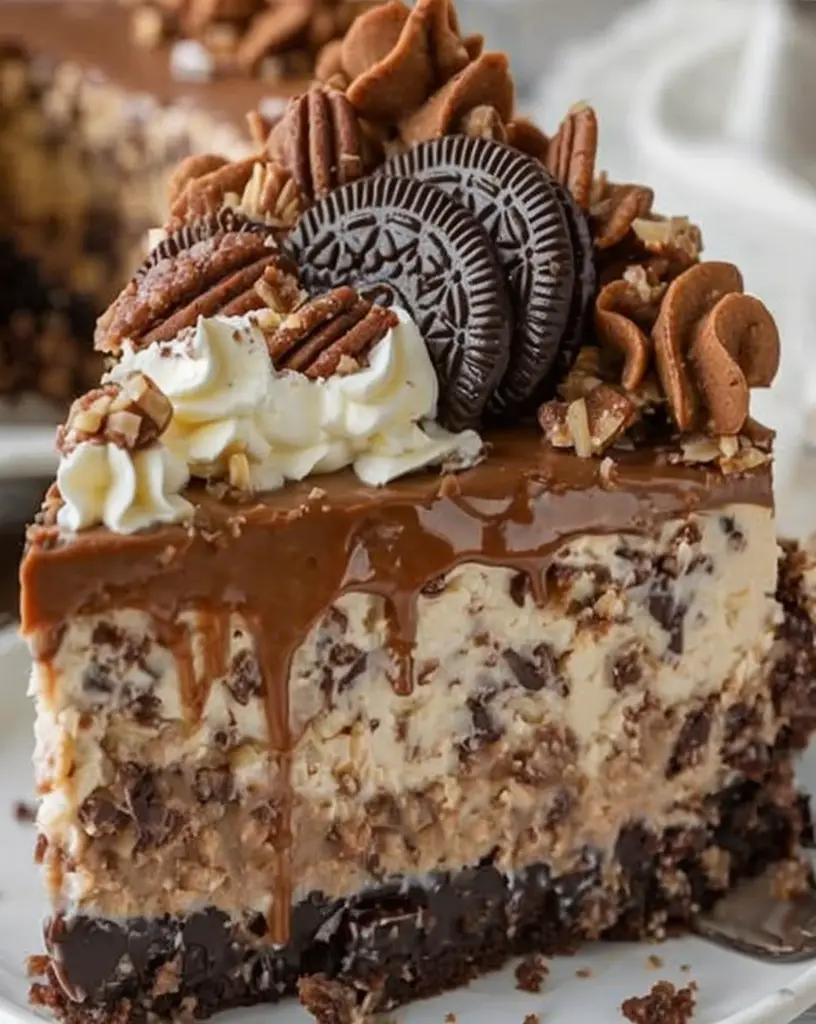
No-Bake German Chocolate Cheesecake: A Decadent Delight

⚖️
Difficulty
Medium

⏲️
Prep Time
25 mins

🕒
Cook Time
10 mins

⏱️
Total Time
35 mins

🍽️
Servings
8

Indulge in the ultimate fusion of flavors with this No-Bake German Chocolate Cheesecake, combining the rich, decadent essence of traditional German chocolate cake with the creamy, smooth texture of cheesecake. This dessert promises a delightful culinary experience that will satisfy your sweet cravings. Perfect for those who desire a taste of luxury without the need for an oven, this cheesecake is an enchanting creation that stands out at any occasion. With layers of velvety chocolate and a luscious cream cheese mixture, each bite unveils a harmonious blend of sweetness and texture.

Quick Recipe Highlights

  • Flavor Profile: Combining sweet chocolate with a subtle tang from the cream cheese, this dessert offers a perfect harmony of flavors, accentuated by notes of coconut and toasted pecans.
  • Texture: A delightful smoothness from the cream cheese layer contrasts with the slightly chewy coconut topping and the crunchy, nutty base.
  • Aroma: The alluring aroma of chocolate mingles with the inviting scent of toasted nuts and coconut, creating an irresistible sensory experience.
  • Visual Appeal: Each slice presents a beautiful layer of rich chocolate atop a creamy cheesecake, crowned with a decorative topping of pecans and coconut flakes.
  • Skill Level Needed: Intermediate—this recipe involves simple techniques but requires attention to detail and patience to achieve the perfect consistency.
  • Special Equipment: You’ll need a springform pan to achieve the characteristic cheesecake shape, along with a mixer to ensure a smooth, creamy texture.

Recipe Overview

  • Difficulty Level: This recipe is considered medium due to the required precision in mixing the cheesecake and the patience needed for the chilling process, ensuring a firm yet creamy outcome.
  • Category: A perfect dessert option for chocolate and cheesecake enthusiasts, this falls under the category of luxurious, indulgent sweets.
  • Cuisine: Inspired by German culinary traditions, this cheesecake brings the renowned flavors of German chocolate cake into a classic American dessert style.
  • Cost: Estimated at a moderate price range, accounting for quality ingredients like German chocolate, cream cheese, and pecans, contributing to its premium taste.
  • Season: Ideal for any season, though especially fitting for holiday gatherings when decadent desserts are most appreciated.
  • Occasion: Serve this at festive gatherings, birthdays, or any event where a show-stopping dessert is required to impress.

Why You’ll Love This Recipe

The No-Bake German Chocolate Cheesecake offers a sensational taste experience with its carefully layered flavors; the chocolate and cream cheese meld together for a mouthwatering delight. The convenience of a no-bake dessert simplifies preparation, making it accessible even for novice bakers while saving time. Nutritionally, it provides the joy of indulgence while offering a touch of protein from the nuts and dairy ingredients. Its presentation enhances social gatherings, adding a touch of sophistication and delight to any table setting. Furthermore, with easily accessible ingredients, it remains a cost-effective way to indulge in a lavish treat without breaking the bank.

Historical Background and Cultural Significance

The German chocolate cake, credited to Sam German in the 19th century, paved the way for this innovative cheesecake interpretation. Originally developed to celebrate luxury, this dessert has since evolved to become a staple in modern indulgence, showcasing the versatile appeal of chocolate in various forms. In the culinary landscape, this cheesecake version reflects a fusion of German innovation and American dessert traditions, showcasing the adaptability and timelessness of these flavors. Across regions, this no-bake adaptation highlights variations in technique and presentation, maintaining its cultural significance in culinary expression.

Ingredient Deep Dive

German chocolate remains the star of this dessert, renowned for its sweet, mild cocoa flavor which is historically celebrated in confections. Nutritionally, it offers an energy boost and a sense of satiety. When selecting your chocolate, opt for brands known for their rich cocoa content, and store it in a cool, dry place to maintain quality. Cream cheese, another key component, provides the cheesecake’s signature silky texture. Choose full-fat options for the creamiest outcome and store refrigerated until use to preserve freshness. Should you need alternatives, mascarpone can serve as a creamy substitute without losing richness.

Common Mistakes to Avoid

  • Overmixing the cream cheese can lead to a runny texture. Mix just until combined for the best results.
  • Not allowing the cheesecake ample time to chill can result in a less firm structure, impacting the final presentation.
  • Skipping the toasting step for the pecans and coconut can diminish the dessert’s flavor complexity.
  • Using low-fat cream cheese may alter both the consistency and flavor, leading to a less decadent experience.
  • Neglecting to line the springform pan base can make it difficult to remove the cheesecake intact.
  • Incorrect layering sequence can disrupt the balance of textures; follow the specified order for optimal results.
  • Choosing chocolate with insufficient cocoa content risks a lackluster taste. Opt for high-quality German chocolate for authenticity.
  • Improperly measuring ingredients can lead to an imbalanced flavor profile; use precise tools for accuracy.

Essential Techniques

Achieving the perfect whipped cream consistency is crucial; it adds lightness to your cheesecake layer. Ensure your cream is cold, and whisk until soft peaks form to avoid over-beating. To toast pecans, evenly spread them on a baking sheet and bake in a preheated oven until they’re aromatic and lightly browned, enhancing their nutty flavor. For a successful chill, ensure your refrigerator is set to the correct temperature—this step ensures the cheesecake sets correctly and maintains its structure.

Pro Tips for Perfect No-Bake German Chocolate Cheesecake

Ensure all dairy ingredients are at room temperature before mixing to achieve a smoother blend. Patience pays off—allow plenty of chilling time to let the flavors meld and the layers set beautifully. Use a hot knife to slice through the set cheesecake for clean, restaurant-quality slices. Enhance your topping by adding a hint of sea salt to the coconut and pecan mixture for a delightful contrast. Adjust sweetness to taste by modifying sugar quantities based on chocolate type. Consider adding a splash of vanilla extract to the cream cheese layer for depth.

Variations and Adaptations

Explore regional variations by swapping traditional pecans for macadamia nuts, adding a tropical twist. For a seasonal adaptation, incorporate fresh berries or other seasonal fruits in the topping for a refreshing contrast. Those with dietary restrictions can opt for vegan cream cheese and dark chocolate for a vegan adaptation. Consider experimenting with flavor variations by introducing almond or hazelnut extracts in the base for a nutty undertone. Modify the texture by incorporating crushed graham crackers in the base for additional crunch, or use gluten-free cookies for a coeliac-friendly alternative.

Serving and Presentation Guide

For an elegant presentation, carefully remove the cheesecake from the springform pan and place it on a decorative cake stand or plate. Garnish with a delicate sprinkle of chocolate shavings or edible gold dust for a touch of glamour. Traditional accompaniments such as freshly brewed coffee or a light Moscato wine enhance the cheesecake experience. Alternatively, consider serving with a side of mixed berries for a modern touch. Serve cold or at room temperature, slicing with a hot knife to avoid mess. Exercise portion control by pre-slicing cheesecake pieces for guests.

Wine and Beverage Pairing

Pair this decadent cheesecake with a robust red wine such as Zinfandel, which complements the rich chocolate notes beautifully. For non-alcoholic alternatives, a glass of almond milk or cold-pressed coffee would enhance the dessert’s nuances. Should you prefer a coffee pairing, opt for an espresso or Americano to balance the richness of the cake. Consider serving beverages slightly chilled or at room temperature to match the cheesecake’s creamy texture. Enjoy the dessert alongside a fragrant herbal tea like chamomile for a soothing end to your meal.

Storage and Shelf Life

Store your No-Bake German Chocolate Cheesecake in an airtight container in the refrigerator to maintain freshness for up to five days. Ensure it is kept at a constant cold temperature to prevent spoilage. To avoid flavor absorption from fridge odors, keep the dessert covered firmly. If freezing is necessary, wrap portions individually in plastic wrap and then a layer of foil, storing in a freezer-safe container for up to two months. When ready to enjoy, allow frozen portions to thaw gradually in the refrigerator before serving to retain texture quality.

Make Ahead Strategies

Prepare components separately in advance for smoother assembly when needed. Keep the chocolate base and cream cheese filling refrigerated up to two days before combining. Maintain texture and flavor quality by storing finished cheesecake in an airtight container. Remember to prepare the topping fresh to add a crisp, fresh element when ready to serve. Reheat components like the chocolate base with gentle warmth if firm due to refrigeration, ensuring even spreading. Incorporate freshly toasted nuts and coconut prior to serving to enhance flavor and texture.

Scaling Instructions

For smaller gatherings, halve the recipe while maintaining ingredient proportions as close as possible to retain balance. Larger celebrations may require doubling or tripling the recipe—consider using a larger springform pan to accommodate, adjusting chilling time if necessary. Be mindful when scaling up that baking and chilling times may vary slightly according to volume. Store excess in workable portions to maintain dessert quality over several days, serving freshly cut portions for optimal enjoyment. Always ensure appliances like mixers are compatible with scaled quantities to prevent equipment strain.

Nutritional Deep Dive

With macronutrients balancing fats from cream cheese and chocolate, the No-Bake German Chocolate Cheesecake provides a satisfying indulgence experience. Micronutrients present in nuts offer essential vitamins and minerals, enhancing overall nutritional value. Although primarily a sugary treat, this dessert provides an energy source when portioned properly within a balanced diet. Pay attention to caloric intake during dessert consumption, integrating active lifestyle habits to accommodate occasional indulgence. Recognize potential allergens and dietary restrictions, modifying ingredients where necessary to meet personal health goals without compromising taste.

Dietary Adaptations

Creating a gluten-free version requires substituting the base with crushed gluten-free cookies or biscuits. To satisfy dairy-free requirements, employ vegan cream cheese and chocolate variants, mindful of blending consistency. A vegan twist involves incorporating plant-based substitutes for all dairy components without loss of flavor integrity. For those on a low-carb regimen, consider reducing or eliminating additional sugars, favoring natural sweetness from chocolate. Adapting for a keto lifestyle involves prioritizing high-fat ingredients and moderating sweeteners to ensure dietary compliance. Paleo enthusiasts will appreciate a focus on natural components, limiting processed inclusions.

Troubleshooting Guide

Address texture issues by ensuring proper whipping of cream cheese and thorough chilling before cutting. Achieve balanced flavors through careful measurement and potential sweetener adjustments to align with chocolate bitterness. If temperature challenges arise, verify refrigeratory settings to maintain dessert integrity. When tackling equipment issues, assess compatibility and function, utilizing appropriately sized appliances for ingredient incorporation. Strategize ingredient substitutions mindfully, selecting alternatives that respect original flavor profiles. Timing inaccuracies may require a reassessment of preparation schedules, facilitating smoother workflow and ensuring optimal consistency.

Recipe Success Stories

Community feedback highlights the No-Bake German Chocolate Cheesecake’s capability to impress at social events, often praised for taste and presentation. Success stories of flavor adaptations include integrating fruit toppings and nut varieties to personalize experiences. Variations accommodate dietary restrictions, demonstrating the recipe’s versatility while preserving indulgence. Reader suggestions often involve creative uses of garnishes and decorative touches, reflecting personal culinary flair. Photography tips from the community emphasize lighting techniques to showcase the dessert’s layered structure and rich hues, enhancing visual appeal in shared images.

Frequently Asked Questions

Q: Can I substitute the cream cheese for a lighter option?
A: While a lighter cream cheese variant is an option, be aware it may affect the structure and creaminess. Different cheeses possess varying moisture levels, impacting set firmness.

Q: How far in advance can I make this cheesecake?
A: You can prepare this dessert up to two days in advance, storing it covered in the fridge to maintain freshness and taste integrity.

Q: Is a springform pan necessary?
A: While ideal for ease of removal and presentation, a springform pan is not strictly required—alternatively, use a well-lined regular baking tin for manageable removal.

Q: Can I use milk chocolate instead of German chocolate?
A: Milk chocolate can be used but be mindful of increased sweetness; consider adjusting sugar quantities in the rest of the recipe accordingly for balance.

Q: How should I store leftovers?
A: Leftover portions should be stored in airtight containers in the refrigerator to ensure freshness or wrapped carefully in the freezer for longer periods.

Q: What serves as the best nut substitute?
A: With variations in flavor and texture, walnuts or hazelnuts can replace pecans effectively, each offering unique flavor characteristics.

Q: What changes if I use low-fat ingredients?
A: Utilizing low-fat components may lead to a less rich texture and taste; experiment incrementally to maintain the ideal consistency without sacrificing satisfaction.

Q: Are there gluten-free adaptations?
A: Yes, by using gluten-free cookies or biscuits in the base, the cheesecake becomes suitable for gluten-sensitive individuals without losing its appeal.

Q: What’s essential for the perfect texture?
A: Ensure all mixing is done precisely as guided in the recipe, combined with adequate chilling times to achieve the signature smooth, firm texture expected.

Q: How can flavors be personalized?
A: Subtle flavor tweaks like adding zests or extracts allow personalization—consider orange zest with chocolate or almond extract in the base for unique dimensions.

Additional Resources

Enhance your dessert repertoire with related recipes such as classic New York Cheesecake or indulgent Chocolate Torte for cake lovers. Dive into technique guides detailing perfect chocolate melting procedures for a silky finish. Navigate ingredient options, exploring various cream cheese brands for desired fat content impacts. Consider equipment recommendations focusing on reliable springform pans for effortless dessert unmoulding. Seasonal variations advice offers fruit-based topping inspiration according to ingredient availability throughout the year.

Join the Conversation

Engage with fellow baking enthusiasts on social media, sharing your No-Bake German Chocolate Cheesecake creations. Capture and post pictures utilizing natural lighting for highlighting intricate details, inviting community feedback. Submit your reviews to contribute firsthand experiences or innovative adaptations to the shared knowledge pool. Exchange variations or suggestions through community forums, inspiring both novice and experienced bakers alike as they explore possibilities with this cherished recipe.

Delicious Blueberry Lime Cheesecake Cupcakes: The Ultimate Dessert Recipe

Irresistible Blueberry Lime Cheesecake Cupcakes: A Zesty Delight

⚖️
Difficulty
Moderate

⏲️
Prep Time
20 mins

🕒
Cook Time
30 mins

⏱️
Total Time
50 mins

🍽️
Servings
12 cupcakes

Indulge in the rich and creamy world of Irresistible Blueberry Lime Cheesecake Cupcakes, a tantalizing fusion of zesty lime and luscious blueberries nestled within smooth cheesecake. With every bite, experience the harmonious balance of tart lime, juicy blueberries, and velvety cream cheese. These cupcakes promise a delightful exploration of flavors that will captivate your taste buds and add a touch of sophistication to your dessert repertoire. Their inviting color palette and heavenly aroma will undoubtedly make them the star of any gathering.

The preparation of these blueberry lime cheesecake cupcakes is an artful blend of simplicity and decadence. Perfect for celebrations or satisfying an elegant sweet craving, these cupcakes are a testament to culinary creativity. The bold flavors and smooth textures ensure that every mouthful is a symphony of delight. Whether you’re a seasoned baker or a curious novice, the step-by-step process offers both excitement and satisfaction in creating a dessert that strikes the perfect balance between classic and contemporary.

Quick Recipe Highlights

  • Flavor Profile: The juxtaposition of tangy lime and sweet blueberries weaves a delightful flavor tapestry, underscored by the richness of cream cheese.
  • Texture: Experience a melt-in-your-mouth texture with every bite, complemented by the subtle crunch of a biscuit base.
  • Aroma: Revel in the fresh scent of lime zest mingling with the sweet, fruity fragrance of blueberries.
  • Visual Appeal: Vivid pops of blueberry against a creamy white backdrop, garnished with zesty lime curls, create an eye-catching presentation.
  • Skill Level Needed: This recipe requires moderate baking skills, focusing on precise ingredient integration and controlled baking.
  • Special Equipment: A muffin tin, liners, and an electric mixer are essential tools for best results.

Recipe Overview

  • Difficulty Level: This moderate recipe requires attention to detail and patience, ensuring ingredients are blended perfectly for a smooth consistency without overworking the mixture.
  • Category: Ideal for dessert enthusiasts, these cupcakes can be savored as both a delightful treat and a sophisticated dinner-party dessert.
  • Cuisine: This recipe embraces classic American cheesecake with a vibrant twist, celebrating the fusion of fruity and creamy elements.
  • Cost: Ingredients are reasonably priced, with fresh blueberries and quality cream cheese being the most significant investments for premium taste.
  • Season: Best enjoyed during spring and summer when blueberries are ripe, although they can be made year-round using frozen berries.
  • Occasion: These cupcakes shine at brunches, tea parties, or as a sweet finish to an intimate dinner gathering.

Why You’ll Love This Recipe

The taste of blueberry lime cheesecake cupcakes is where gourmet meets everyday delight. The delicate balance between lime’s zesty tartness and the sweetness of blueberries creates a captivating taste experience. The creaminess of the cheesecake is contrasted by the slight crunch of the biscuit base, making every bite a remarkable journey.

Preparation is straightforward and efficient, enabling the creation of an exquisite dessert without demanding lengthy hours in the kitchen. These cupcakes can be made ahead, allowing flavors to meld beautifully, making them a convenient choice for events or impromptu get-togethers.

Despite offering an indulgent treat, these cupcakes can fit into a balanced diet when enjoyed in moderation. Blueberries, known for their antioxidant properties, and the option to modify the recipe for lower sugar content, add a nutritious edge to this otherwise luxurious dessert.

In social settings, these cupcakes often become conversation starters, appreciated not only for their taste but also for their appealing presentation. They allow home bakers to showcase their skills and offer something unique, yet familiar, to guests.

Cost-wise, the recipe remains accessible, with ingredients readily available in most grocery stores. The ability to use either fresh or frozen blueberries adds to their practicality and ensures this dessert can be an affordable indulgence.

Historical Background and Cultural Significance

The concept of combining cheesecake with fruit dates back centuries, with origins in European baking traditions where creamy textures were paired with local fruits. In America, cheesecake has evolved to include various flavors, with blueberries becoming a popular choice due to their native roots and abundant seasonal growth.

The cultural significance of cheesecake in American cuisine is notable, as it represents adaptation and innovation in dessert-making. The use of lime in these cupcakes adds an international flair, showcasing how global influences can enhance traditional recipes.

Over the years, cheesecake has seen many variations, from the rich and dense New York styles to lighter, mousse-like versions. Each adaptation reflects regional tastes and ingredient availability, with blueberry lime cheesecake cupcakes embodying a lighter, seasonal approach.

Regional variations of this cheesecake cupcake can often be found substituting other local berries or citrus fruits, offering a sense of place to this beloved dessert. The adaptability and enduring appeal of cheesecake ensure its continued presence and reinvention in dessert repertoires worldwide.

Ingredient Deep Dive

Blueberries have long been esteemed in America for their vibrant color and sweet flavor. Rich in antioxidants, they offer profound health benefits and add nutritional value to desserts. When selecting blueberries, choose plump and firm fruit with a deep hue; store them in a refrigerator to maintain freshness. If needed, frozen berries can be substituted without compromising the dessert’s quality or taste.

Lime, with its bright and tangy profile, originates from exotic culinary traditions, lending an exciting twist to traditional cheesecake. Known for its vitamin C content, lime enhances flavor while offering health benefits. Select limes that are firm and heavy for their size, storing them at room temperature to maintain their juiciness. Lime zest can be substituted with lemon for a milder citrus note if desired.

Cream cheese serves as the silky foundation for the cheesecake mixture, offering a rich and savory depth. When selecting cream cheese, opt for a full-fat variety to deliver the creamiest texture and flavor. It should be refrigerated at all times and only brought to room temperature shortly before use for easier mixing. If necessary, a light cream cheese can be used, though it may slightly alter the texture.

Common Mistakes to Avoid

  • Overmixing the cheesecake batter can lead to a dense texture. Mix just until combined to ensure a smooth but airy consistency.
  • Using cold cream cheese can create lumps. It’s crucial to bring cream cheese to room temperature before mixing.
  • Baking at a high temperature can cause cracks in the cheesecake. Ensure even baking by setting the correct oven temperature.
  • Opening the oven door frequently can disrupt the baking process. Keep the door shut until required checking time.
  • Skipping the bain-marie or water bath can result in uneven cheesecake tops. The water bath promotes even baking and moisture.
  • Incorrect measurements can affect the final taste and texture. Use precise measurements for consistency and results.
  • Using overly ripe or underripe fruit can affect flavor balance. Choose blueberries that are perfectly ripe.
  • Rushing the cooling process affects texture setting. Allow the cupcakes to cool gradually to maintain their form.

Essential Techniques

Folding the Batter: Gently folding the batter ensures that air is incorporated, providing a light and fluffy texture. Mastering this technique means avoiding stirring vigorously, as that deflates air pockets.

Water Bath (Bain-Marie): Essential for preventing cracks, the water bath technique involves insulating the cheesecake in a water-filled tray while baking, ensuring even heat distribution. It’s crucial to check water levels throughout the baking process.

Creaming Method: This step involves first beating cream cheese to a creamy consistency before adding sugars and eggs. Ensuring it’s lump-free sets the foundation for a smooth batter.

Baking and Cooling: Pay attention to baking time and temperature, and allow cupcakes to cool inside the oven with the door slightly ajar. This gradual temperature reduction is key to preventing cracks.

Pro Tips for Perfect Irresistible Blueberry Lime Cheesecake Cupcakes

Ensure all refrigerated ingredients, like cream cheese and eggs, are at room temperature to achieve a flawlessly smooth batter. It aids in consistent mixing and prevents lumps.

To intensify the blueberry flavor, toss the berries with a little sugar before incorporating them into the cupcake batter. This enhances their natural sweetness and prevents them from sinking.

Add a dash of vanilla extract to the cheesecake mixture for a subtle backdrop that complements the citrus and berry notes.

Use muffin liners or baking cups to avoid sticking and ensure easy removal from the tin. This is especially helpful if transporting the cupcakes.

Experiment with garnishes like lime zest curls or fresh mint leaves for an added visual flourish.

Allow the cupcakes to chill overnight in the fridge before serving. The rest period improves flavor blend and offers a firmer texture.

Variations and Adaptations

Consider using strawberries or raspberries as an alternative to blueberries for a different berry twist. These fruits provide a similar sweetness with a unique flavor profile.

For a seasonal adaptation, try adding a hint of spices like cinnamon or nutmeg during autumn months, adding warmth to the cooling citrus.

Modify the recipe for a gluten-free diet by using gluten-free biscuit alternatives for the base while maintaining the rich cheesecake top.

Infusing the cheesecake batter with a splash of liquor such as raspberry liqueur or limoncello can offer a grown-up variation, perfect for cocktail parties.

For a softer-textured cupcake, replace half of the cream cheese with ricotta cheese, providing a lighter and less dense result.

Alternative presentation options include serving these cupcakes in glass jars for a “cake-in-a-jar” visual, ideal for picnicking or unique party favors.

Serving and Presentation Guide

For elegant plating, place the cupcakes on a dainty dessert plate with a dollop of whipped cream on the side and a few extra fresh blueberries for garnish.

Garnish possibilities are abundant. consider zesting a fresh lime over the final cupcakes just before serving for an aromatic touch.

In keeping with traditional cheesecake accompaniments, serve with crème fraîche or a simple blueberry compote for a richer Michelin-star look.

Modern serving suggestions can include creating a deconstructed version, layering crumbled cupcake along with whipped topping in parfait glasses.

Serve these cupcakes slightly chilled at room temperature to best appreciate their dense yet creamy consistency without any firmness.

Understanding portion control, consider smaller servings for more guests or decadent mini-cupcakes for an informal dessert buffet allowing guests to sample.

Wine and Beverage Pairing

Pair these cupcakes with a light and fruity white wine, such as a Riesling or a Gewürztraminer, which complements the lime’s zest and the blueberries’ richness.

For a non-alcoholic option, consider a chilled herbal tea infused with lemon and mint, enhancing the citrusy notes while staying refreshing.

If serving with coffee, opt for a softer roast with muted acidity, like a Colombian or Guatemalan blend, that rounds out the creaminess without overpowering it.

Pay attention to beverage temperatures. All should be served well-chilled, to align with the dessert’s cool nature, for a refreshing summertime finish.

For serving, present wine in delicate crystal glasses, emphasizing elegance, while herbal teas in slender tea cups evoke a quaint tea-party charm.

Storage and Shelf Life

Store leftover cupcakes in an airtight container in the refrigerator up to five days. They maintain freshness and flavor when kept cool.

Ensure consistent refrigeration by maintaining a temperature of around 40°F to prevent bacterial growth and spoilage.

Use plastic wrap to cover each cupcake individually before placing them in containers for best moisture retention.

Look out for signs of spoilage, including discoloration or an off-odor, as these are indicators to dispose of the cupcakes.

For reheating, allow them to come to room temperature naturally or use the defrost setting on a microwave to avoid over-softening.

Cupcakes can be frozen for longer storage. Wrap each tightly in plastic wrap, place in a freezer-safe bag, and store for up to three months.

Make Ahead Strategies

Begin by preparing the biscuit base and cheesecake mixture a day in advance, storing each separately in the refrigerator to save time on baking day.

Store prepared components like base and batter in the fridge, covered securely, to prevent flavor contamination from other ingredients.

While the cupcakes may lose some fresh texture, assembling them close to serving ensures that they’re still creamy and rich.

Reheat frozen cupcakes by defrosting them in the fridge overnight, allowing them to come to room temperature before serving.

Fresh elements like whipped cream or fruit garnishes should be added right before serving for a burst of vibrant color and texture.

Scaling Instructions

To halve the recipe, divide all ingredients by two, paying particular attention to egg quantities where usage of egg whites or yolks may differ.

If doubling or tripling, increase baking time slightly while maintaining careful observation to avoid over-baking or drying out the cupcakes.

Adjust equipment accordingly, using multiple muffin tins or a larger oven-safe tray for bulk baking. This ensures efficient time management in a large kitchen setting.

As proportions of liquid and solid ingredients change, reassess storage solutions, especially to accommodate larger quantities in refrigeration.

Nutritional Deep Dive

From a nutritional standpoint, these cupcakes present a modest indulgence, combining carbohydrates from sugar and crackers with the protein-rich profile of cream cheese.

Micronutrient-wise, fresh lime and blueberries bring vitamin C and antioxidants into the mix, contributing toward daily nutrient goals.

A moderate source of fats from the cream cheese, considered tackling dietary needs for a lower-fat alternative if desired, such as using light cream cheese.

For those managing dietary controls, each cupcake offers an approximate calorie count suitable within balanced meals, yet setup portion sizes accordingly.

Bearing in mind sodium content from cream cheese and biscuits is crucial, so monitoring intake is beneficial for those on specific dietary regimes.

Dietary Adaptations

Substitute the biscuit base with crushed gluten-free cookies to offer a celiac-friendly alternative while preserving the cheesecake’s flavor.

For dairy-free alternatives, use lactose-free cream cheese and ensure all ingredients like butter or milk are suitable substitutes.

Change the egg-derived structure for a vegan version using aquafaba or silken tofu mixtures to keep the cheesecake’s creamy essence.

Adaptation for a low-carb diet includes sugar substitutes like erythritol or monk fruit sweeteners, maintaining sweetness without carbohydrate load.

To meet keto preferences, a nut-based crust like almond flour with butter serves as a satisfying base, while cream cheese remains fitting in keto plans.

For a paleo-friendly dessert, utilize cashew cream as a cheese substitute and almond flour or coconut flour for the base, focusing on unprocessed ingredients.

In low-FODMAP diets, opt for lactose-free ingredients where necessary and limit citrus to the green part of the lime peel for flavoring.

Troubleshooting Guide

Texture issues often arise from overmixing the batter. Readjust folding techniques and aim for gentler mixing for a creamier consistency.

To manage flavor balance, alter sugar and lime proportions gradually, taste-testing to reach personal flavorful heights.

Temperature assessments are vital; utilize an oven thermometer to confirm correct settings and certainty for consistent baking.

For equipment challenges, substitute makeshift water bath setups if lacking proper trays or bake the cupcakes directly on sturdy racks.

Ingredient substitutions may create unexpected results; test smaller batch recipes first to evaluate taste and texture alterations.

Adjust timing and technique if the cupcakes sink. Calibrate baking times accurately and ensure even equipment heating distribution.

Recipe Success Stories

Feedback from community members highlights these cupcakes as a “refreshing twist” on classic cheesecake, appealing for their balance of sweet and tart.

Variations have flourished, with some substituting berries with made seasonal twists showcasing rhubarb or peaches for strong summery themes.

Adaptation stories include using these cakes as bases for larger, layered desserts topped with whipped cream and layered fresh fruit supreme.

Reader suggestions include adding melted white chocolate directly into the batter for a nuanced richness, finding eager success in testing this method.

Photography tips emphasize focusing on cupcake garnishes like lime curls or berries for dynamic shots that capture the dessert’s colorful appeal.

Frequently Asked Questions

Can I use frozen blueberries instead of fresh ones?
Yes, frozen blueberries can be used, ensuring they are defrosted and patted dry before folding into the batter. The texture may vary slightly, but the flavor remains intact.

How can I prevent my cupcakes from cracking on top?
Avoid overmixing the batter and ensure gradual baking and cooling. A water bath can also help maintain even moisture levels during baking.

What is the best way to store these cupcakes?
Store the cupcakes in an airtight container in the fridge for up to five days to maintain both flavor and texture. Ensure they are covered well to avoid refrigerator odor absorption.

Can I substitute lemon for lime in this recipe?
Yes, lemon can replace lime for a less tangy and slightly sweeter profile. Ensure that lemon zest and juice measurements are equivalent to maintain balance.

Is it possible to double the recipe easily?
The recipe can be doubled, though you should monitor the baking time and temperature settings closely to ensure even cooking.

What type of biscuit works best for the base?
Graham crackers or digestives can be used for their suitable crumbly texture and mild sweetness, which perfectly complements the cheesecake mixture.

Why did my cheesecake filling turn out lumpy?
Lumpy filling often results from cold cream cheese. Always let it reach room temperature before mixing to achieve a smooth consistency.

Can these cupcakes be made gluten-free?
Yes, by using gluten-free cookies for the base and verifying all other ingredients are gluten-safe, you can enjoy a gluten-free version of this dessert.

What can I do if my cupcakes are too sweet?
Reduce sugar in both the cheesecake mix and base crust slightly to align with your sweetness preference, or use fresh citrus for a sharper contrast.

How can I tell if the cupcakes are done baking?
Cheesecake cupcakes are done when the center is slightly jiggly while the edges set. A gentle touch should spring back slightly after cooling.

How can the same recipe be used to make a full cheesecake?
Multiply ingredients and adjust baking time and temperature, using a springform pan, ensuring the same classic flavor but on a larger scale.

Additional Resources

Dive into associated recipes like lime-infused pound cakes or blueberry compotes, which offer complementary flavors drawing inspiration from this recipe.

Master technique guides show step-by-step folding techniques for proper batter mixing and provide insight into setting up effective water baths.

Ingredient information focuses on blue and citrus varietals, giving background and tips for sourcing the best seasonal produce consistently.

Equipment recommendations may include silicon muffin trays or quality non-stick pans to enhance baking ease and product release.

Seasonal variations illustrate how pear or apple integrations can yield fresh autumn or winter takes on the timeless cheesecake idea.

Join the Conversation

Engage with our thriving social media community by sharing this recipe using our #BlueberryLimeCheesecake hashtag. Your photo might be featured in our monthly roundup!

Photography tips include natural lighting emphasis to highlight cupcake vibrancy, encouraging ingredient-focused or step-by-step baking story displays.

Share your thoughts in our comment sections or leave reviews with personalized twists on our classic recipe, aiding fellow bakers with newfound inspiration.

Community engagement often brings new recipe variations from around the world. Contribute your twist to this epicurean fusion of taste and texture.

Explore and taste a beautifully crafted dessert origin with universal appeal while exchanging ideas and stories through our shared baking passion.

The Recipe

Irresistible Blueberry Lime Cheesecake Cupcakes

Serves: 12 cupcakes

Prep Time: 20 mins

Cook Time: 30 mins

Total Time: 50 mins

Kitchen Equipment Needed

  • Muffin tin
  • Muffin liners
  • Electric mixer
  • Mixing bowls
  • Spatula
  • Measuring cups and spoons
  • Zester
  • Food processor

Ingredients

  • 1 cup graham cracker crumbs
  • 2 tablespoons sugar
  • 4 tablespoons unsalted butter, melted
  • 8 oz cream cheese, room temperature
  • 1/3 cup sugar
  • 1 large egg, beaten
  • 1 teaspoon vanilla extract
  • Zest of 1 lime
  • 1 tablespoon fresh lime juice
  • 1 cup fresh blueberries

Directions

  1. Preheat oven to 325°F (160°C) and prepare a muffin tin with liners.
  2. In a food processor, blend graham cracker crumbs, sugar, and melted butter until combined. Press a tablespoon of the mixture into each liner for a firm base.
  3. In a large bowl, beat cream cheese until smooth, gradually adding sugar until well blended.
  4. Mix in beaten egg, vanilla extract, lime zest, and lime juice until fully incorporated.
  5. Gently fold in blueberries with a spatula, ensuring even distribution.
  6. Pour the cheesecake mixture over each crust evenly. Tap the tray lightly to remove air bubbles.
  7. Bake for 25-30 minutes, until the cupcakes are set but slightly jiggly in the center. Avoid opening the oven door during baking.
  8. Cool in the tray for 10 minutes, then transfer to a wire rack to cool completely. Refrigerate for at least 2 hours before serving.
  9. Garnish with extra lime zest or blueberries just before serving, if desired.

Recipe Notes

  • Substitute lime with lemon for a milder flavor.
  • Store in an airtight container for up to 5 days in the fridge.
  • Frozen blueberries can be used; ensure they are thawed and excess moisture is patted dry.

Easy and Delicious Zesty Baked Lemon Garlic Cod Recipe

Zesty Baked Lemon Garlic Cod: Bursting With Flavor and Freshness

⚖️
Difficulty
Easy

⏲️
Prep Time
15 mins

🕒
Cook Time
20 mins

⏱️
Total Time
35 mins

🍽️
Servings
4

The Zesty Baked Lemon Garlic Cod is a show-stopper of a dish that perfectly encapsulates the fresh, simple flavors of Mediterranean cuisine. It’s light, flaky, and infused with the bold flavors of garlic and lemon. Each bite is a burst of vibrant zestiness, ideal for spring and summer meals. This dish is a surefire way to bring people together over its inviting aroma and irresistible taste. Perfect for both weeknight dinners and special occasions, this recipe makes cod a star ingredient in every way.

There’s something profoundly comforting about the simple, yet flavorful combination of tangy lemon and aromatic garlic coupled with succulent cod. The Zesty Baked Lemon Garlic Cod is not only delicious, but it also speaks to those who appreciate the art of home-cooking. Crafted with minimal ingredients yet packed with flavor, this dish is designed for cooks at all levels who wish to deliver gourmet results.

Quick Recipe Highlights

  • Flavor Profile: The citrusy tang of lemon paired with the sweet, pungent notes of freshly minced garlic makes for a delightful combination.
  • Texture: The cod is tender and flaky, providing a juicy, light experience that melts in your mouth.
  • Aroma: The baked dish releases a fragrant melody of lemon and garlic, perfect for igniting the senses.
  • Visual Appeal: Golden-brown edges surround the pristine white flesh of the cod, accented with bright lemon slices and herbs.
  • Skill Level Needed: This recipe is beginner-friendly, requiring basic skills to master the oven-baked method successfully.
  • Special Equipment: An oven and a baking dish are all you need, making this a fuss-free endeavor.

Recipe Overview

  • Difficulty Level: Perfect for beginners, this recipe involves straightforward techniques such as chopping, zesting, and baking.
  • Category: This dish can be served as a main course, fitting seamlessly into any meal rotation.
  • Cuisine: Inspired by Mediterranean flavors, it blends fresh ingredients known for their health benefits and delightful taste.
  • Cost: Moderate, as it involves simple ingredients like cod, lemon, and garlic, which are easily sourced and affordable.
  • Season: Ideal for warmer months when light, refreshing flavors are in demand, though enjoyable year-round.
  • Occasion: Suitable for casual family dinners, entertaining, or even as part of a festive spread.

Why You’ll Love This Recipe

The Zesty Baked Lemon Garlic Cod captures the essence of simple yet sophisticated dining. Its taste and texture are unparalleled, offering a delightful contrast between the flaky cod and the acidity of lemon. The entrancing aroma of garlic and herbs envelops your kitchen, enticing everyone around. This recipe provides convenience as its preparation is minimal, letting your oven do the heavy lifting.

Nutritionally, this dish ticks many boxes. Cod is a lean protein rich in essential nutrients and low in calories, making it an excellent choice for health-conscious eaters. Combined with lemons, garlic, and herbs, you gain a robust dish packed with antioxidants and vitamins without added sugars and fats.

Socially, this dish is a conversation starter, whether you’re hosting an intimate dinner or a larger gathering. Its vibrant presentation and bold flavors elicit compliments and spark discussion. Economically, it’s a smart choice—lean and nutritious without breaking the bank, accessible to home cooks wanting to explore new tastes without the need for exotic ingredients.

Historical Background and Cultural Significance

Cod has been a staple in various cuisines, revered for its versatility and nutrition. This dish pulls from centuries of Mediterranean cookery, where seafood thrives within local staples. Lemon and garlic, foundational in these traditions, add layers of timeless notes remembered through generations. Historically, these ingredients represent health and prosperity, commonly used in recipes passed down from family kitchens to modern culinary stages.

Over time, the recipe evolved from being cooked over an open flame to refined oven-baked techniques, which preserve nutrients and enhance aroma. Variants have emerged, reflecting regional twists on a classic pairing, but all capture the base pleasures of simplicity.

Ingredient Deep Dive

Cod, renowned for its mild flavor and firm flesh, provides the canvas upon which the other ingredients shine. Historically, cod has been globally revered, with rich cultural ties to both Northern European diets and broader maritime cuisines. Nutritionally, it’s high in protein, selenium, and vitamins B6 and B12, promoting heart health and metabolic boosts.

Lemons are nearly synonymous with Mediterranean culinary practices. Their tartness is essential to cutting through rich flavors, balancing dishes. Nutritionally, lemons are vital sources of vitamin C and flavonoids, which improve digestive health and clear skin. Storage involves keeping them cool and dry, and when selecting, choose vibrant, firm lemons.

Common Mistakes to Avoid

  • Using poor-quality fish can compromise flavor—ensure your cod fillets are fresh.
  • Overcooking can lead to dry results; keep an eye on suggested baking times.
  • Under-seasoning renders the dish bland; be generous with salt and pepper to taste.
  • Avoid skipping lemon zest; it significantly lifts the aromatic profile.
  • Neglecting pre-heating leads to uneven cooking; proper oven temperature is key.
  • Using too much oil can leave the dish greasy, overshadowing delicate cod nuances.
  • Improper baking dish size may result in uneven cooking by crowding fillets.
  • Failing to rest after baking: allow dish moments to settle for enhanced flavor development.

Essential Techniques

Ensuring each fillet is coated with a lemon-garlic mix is pivotal, allowing flavors to seep into the crevices of the fish. Master this by using a spoon or brush to cover every inch of your cod before baking. Baking at the right temperature gives the cod its signature flaky texture and golden finish. Watch for visual cues—opaque white coloring indicates completion, and resist over-baking to maintain moisture.

Pro Tips for Perfect Zesty Baked Lemon Garlic Cod

Enhance flavors by marinating your fish briefly before baking, drawing out deep citrus and herb essence. For crispy edges, consider broiling the fish in the final minutes. To balance the boldness of garlic and lemon, pair with a subtly seasoned side like steamed vegetables or a simple salad. Experiment with fresh herbs, such as dill or basil, as an optional topping for added aromatic depth. Always pat your fillets dry to ensure optimal seasoning adherence. Embrace variations by incorporating capers for an added briny kick.

Variations and Adaptations

Regional variations might see additions like olives or tomatoes to evoke the sun-soaked fields of Southern Europe. As seasons change, swap lemon for oranges for a milder twist. Dietary shifts, such as gluten-free, require no adaptations, but keto diners may decrease lemon juice, focusing on fats such as olive oil and nuts as toppings. Modulate flavor by increasing spice levels using paprika or cayenne to depart from traditional tones. Adjust textures through cooking time, offering a less flaky, moist result with a reduced bake. When presenting, elevate its appearance with microgreens or a drizzle of herb-infused oil for a modern twist.

Serving and Presentation Guide

For the perfect plating, use a bright, contrasting plate to make the white cod and lemon slices pop. Drizzle with olive oil and garnish with parsley or dill. Serve with traditional sides like roasted vegetables or couscous. For a modern take, consider pairing with a vibrant quinoa salad or an herbaceous sauce like chimichurri. Temperature should be warm but not hot for optimal flavor retention. Ensure portions are generous, highlighting the cod’s tender flake and citrus aroma in every bite.

Wine and Beverage Pairing

Pair this lemony cod with a crisp, dry white wine such as Sauvignon Blanc, which complements the dish without overwhelming it. Alternatively, a non-alcoholic citrus-infused sparkling water or a homemade lemon-herb iced tea can refresh the palate. If coffee or tea is preferred, opt for a light-bodied flavor, such as green tea, which will cleanse and invigorate. Maintain served temperature aligned with dish warmth for harmony, and offer chilled serving glasses to elevate the occasion.

Storage and Shelf Life

After cooking, store leftovers in an airtight container, refrigerating for up to two days. Keep it on the top shelf where temperatures are most consistent. Adjust any containers to allow moisture escape during reheat to protect integrity. Signs of spoilage include off aromas or slimy textures, indicators that the dish has surpassed its prime. When reheating, do so gently in the oven to avoid rubbery texture. Although suitable for freezing, defrost fully before reheating to prevent mushiness.

Make Ahead Strategies

To prepare ahead, zest lemons and mince garlic up to a day in advance, storing separately in airtight containers. Cod fillets can be marinated for up to four hours. Store in a single layer to avoid compression. Upon assembly, bring all ingredients to room temperature prior to baking for a uniform result. Reheat at moderate temperatures to preserve moisture, and garnish fresh to maintain vivid color and minty citrus notes.

Scaling Instructions

When halving the recipe, adjust the lemon and garlic proportionally to maintain flavor balance. For doubling or tripling, ensure a larger oven space or multiple baking dishes to handle the increased cod volume. Timing may vary slightly; maintain even spacing. Storage between batches is crucial; maintain cooked sections in a warm oven until all are complete. Reserve extra garnish for a final touch before serving.

Nutritional Deep Dive

Each serving contributes a balanced array of macronutrients; protein from cod, healthy fats from extra virgin olive oil, and flavor without excess calories. Key micronutrients include immunity-boosting vitamin C from lemons. The dish complements dietary pursuits focused on omega-3 intake, lean muscle maintenance, and low-sodium diets. Proper portions of cod allow for weight management, aligning with weekly dietary frameworks. Enjoy with moderation and as part of a balanced eating plan.

Dietary Adaptations

The dish naturally suits gluten-free diners, with lemon and garlic offering bold alternative flavors without breading. For dairy-free, vegan recipes, adjust toppings rather than the main components, maintaining integrity via plant-based proteins like tofu. Implement low-carb ideas by reducing lemon juice and integrating oil-rich substitutes like avocado. Keto variants favor herbs like rosemary for additional aromatic appeal. Low-FODMAP adjustments could omit garlic, introducing scapes or greens as flavor retainers.

Troubleshooting Guide

For an under-flavored cod, ensure garlic is generously applied over fillets. If consistency isn’t flaky, it may be undercooked; delicate timing around visual cues aids crisp results. Baking temperatures should be verified for uneven cooking, while alternate ingredient substitutions such as lemon-for-lime demand consideration of zesty nuances. Should preparation timing overwhelm, pre-organizing steps into manageable, sequential tasks maintains flow. For ingredient unavailability, simplicity in substitution—herbs for herbs—offers flexibility.

Recipe Success Stories

Readers around the globe have shared their successes with our Zesty Baked Lemon Garlic Cod. Anecdotes range from family praises at festive dinners to casual weekend cookouts where the dish stole the spotlight. Photography tips from our community reveal that natural lighting beyond flash captures the dish’s alluring colors best. Community feedback reiterates the adaptability of the recipe; from additional herbs to spice-infused adventures, culinary creativity is celebrated.

Frequently Asked Questions

Can I use frozen cod for this recipe?

Yes, frozen cod works well. Ensure it’s fully thawed and patted dry before seasoning to achieve the desired texture and flavor.

What if I don’t like garlic?

Garlic can be reduced or omitted, though it contributes significantly to the dish’s flavor. Consider substituting with shallots or scallions for milder notes.

How do I prevent the cod from sticking to the baking dish?

Using parchment paper or a light coating of olive oil prevents sticking while maintaining the fish’s integrity.

Can I cook this dish on the grill?

Absolutely! Use a grill-friendly dish and monitor cooking closely, as it may require less time than baking depending on grill settings.

What should I serve alongside?

Pair with a fresh salad, quinoa, or steamed vegetables to complement the flavors. A starch like rice or potatoes works well too.

How do I store leftovers?

Leftovers should be refrigerated in an airtight container, consumed within two days for best results. Reheat gently to retain texture.

Can I use a different type of fish?

Fish types like halibut or haddock are excellent alternatives. Cooking times may vary slightly based on thickness and density.

What wine pairs well?

Select a citrus-forward white, such as Sauvignon Blanc or Pinot Grigio, to sync with the lemony notes of the dish.

How do I know when the cod is fully cooked?

A fully cooked cod will be opaque and easily flake under gentle pressure with a fork.

Is it necessary to use fresh lemon juice?

While fresh lemon juice is preferred for its vibrant taste, bottled lemon juice can be a substitute if necessary.

Can this dish fit into a low-sodium diet?

Certainly; control salt quantities and use herbs like dill or parsley to elevate flavors without additional sodium.

Additional Resources

Explore our collection for complementary dishes like classic Mediterranean sides, fresh salad recipes, and seafood cuisines that elevate the culinary experience. Technique guides on perfecting lemon zest and achieving optimal cooking temperatures may enhance your kitchen prowess. For seasonal ingredient recommendations, turn to our database connecting fresh market picks with creative kitchen solutions. Equipment like specialized fish spatulas ensures the cooking and serving of delicate fillets with ease and precision.

Join the Conversation

Join us in celebrating culinary excellence by sharing your Zesty Baked Lemon Garlic Cod adventures on social media, with hashtag #LemonGarlicCodMagic. Exchange great photography insights and recipe reviews among a community of fellow enthusiasts. Inspire others by introducing your unique variations and record findings for collective learning. Let’s savor the joys of kitchen creativity together through shared insights and delicious discoveries.

The Recipe

Zesty Baked Lemon Garlic Cod

Serves: 4

Prep Time: 15 mins

Cook Time: 20 mins

Total Time: 35 mins

Kitchen Equipment Needed

  • Baking dish
  • Oven
  • Cutting board
  • Knife
  • Zester or grater

Ingredients

  • 4 cod fillets (about 6 ounces each)
  • 1 lemon, zested and juiced
  • 4 cloves garlic, minced
  • 2 tablespoons olive oil
  • Salt and pepper to taste
  • Fresh parsley, for garnish
  • Lemon slices, for garnish

Directions

  1. Preheat your oven to 400°F (200°C).
  2. In a small bowl, mix lemon juice, lemon zest, minced garlic, olive oil, salt, and pepper.
  3. Place cod fillets in a baking dish and pour the lemon garlic mixture over them.
  4. Bake in the preheated oven for 15-20 minutes or until the fish flakes easily with a fork.
  5. Garnish with fresh parsley and lemon slices before serving.

Recipe Notes

  • If desired, substitute cod with haddock or halibut.
  • Add a pinch of red pepper flakes for a hint of heat.
  • Pair with a light salad or steamed vegetables for a complete meal.

Irresistible Crunchy Ritz Butter Chicken Delight: A Must-Try Recipe

Crunchy Ritz Butter Chicken Delight: A Crispy, Flavorful Twist on Classic Favorites

⚖️
Difficulty
Easy

⏲️
Prep Time
15 mins

🕒
Cook Time
30 mins

⏱️
Total Time
45 mins

🍽️
Servings
4

Crunchy Ritz Butter Chicken Delight brings together the succulent tenderness of chicken with a crispy Ritz cracker coating that’s baked to perfection. This easy recipe promises a mouthwatering experience with its buttery notes and golden crunch, making it a great choice for family dinners or casual get-togethers. The rich buttery aroma fills the kitchen, promising a delightful dining experience full of texture and flavor.

Using Ritz crackers for the breading provides an innovative twist to traditional fried chicken recipes, catering to those who love a good crunch without the usual frying mess. It’s not just the crunch that wins here, but the harmonious blend of buttery richness and subtle seasoning that makes every bite irresistible, which is why Crunchy Ritz Butter Chicken Delight is increasingly popular in home kitchens.

Quick Recipe Highlights

  • Flavor Profile: A delightful mix of buttery, savory, and slightly tangy flavors that blend perfectly in each bite.
  • Texture: Expect a crispy outer layer with a juicy and tender chicken inside, offering a perfect contrast.
  • Aroma: The buttery fragrance combined with the seasoning’s subtle spice creates an inviting aroma.
  • Visual Appeal: Golden-brown crust gives a visually appealing presentation that ignites the appetite.
  • Skill Level Needed: Simple enough for beginners, with straightforward steps ensuring success for all cooks.
  • Special Equipment: A baking sheet and a food processor (or a plastic bag and rolling pin) for crushing crackers.

Recipe Overview

  • Difficulty Level: This is rated as an easy recipe, making it accessible to new cooks while being efficient for seasoned chefs due to its straightforward steps and minimal preparation.
  • Category: Ideal for a dinner main course but adaptable enough for casual lunch settings or as part of a larger buffet spread.
  • Cuisine: While echoing the essence of Southern comfort food, it introduces a modern twist with its unique coating choice.
  • Cost: Relatively cost-effective, utilizing common pantry ingredients and affordable chicken breast, making it suitable for budget-conscious families.
  • Season: Perfect for all seasons due to its basic ingredients, but particularly comforting during colder months when warm, hearty meals are cherished.
  • Occasion: Great for everyday meals yet special enough for gatherings, offering comfort and enjoyment to all tables.

Why You’ll Love This Recipe


Crunchy Ritz Butter Chicken Delight offers an exquisite balance of taste and texture that will captivate your taste buds. The Ritz cracker coating provides an unparalleled crunch that compliments the juicy chicken perfectly. Its subtle buttery notes blend seamlessly with hints of garlic, onion, and a mix of herbs that ensure a delightful dining experience.

Convenience is another key highlight. This recipe’s simplicity requires minimal preparation time and uses ingredients typically found in a standard pantry. With just 15 minutes of prep and a short oven cook time, it’s an ideal choice for nights when you’re craving a delectable meal in a flash without excessive effort.

Healthier than traditional fried chicken, Crunchy Ritz Butter Chicken Delight is baked instead of fried, reducing the oil content significantly. Additionally, using lower-fat alternatives for butter can make it an even lighter option, ensuring a tasty indulgence without any guilt.

Serving this dish at gatherings can elevate any dinner party, making it a conversation starter due to its unique twist on the classic chicken entrée. It not only leaves guests satisfied but pleasantly surprised by its distinctive taste and presentation, forging a memorable meal shared with loved ones.

Considering the cost-effectiveness of this dish, it brilliantly combines affordability with gourmet appeal. With accessible ingredients, you don’t have to compromise on quality or taste, providing a luxurious homemade meal that won’t break the bank.

Historical Background and Cultural Significance


Originating from the need to create a quick yet succulent chicken meal, the Crunchy Ritz Butter Chicken Delight has a storied place in culinary experimentation. Its creation is a testament to the innovation within home cooking, as chefs sought ways to infuse classic comfort with new textures.

Culturally, this dish subtly bows to Southern roots where Ritz crackers have often been used in casseroles or as pie crusts, adding a novelty that brought the familiar Ritz crunch to a center stage role in a hearty chicken dish. This coupling of crunchy exterior with the comfort of baked chicken speaks volumes to the adaptability observed in American home kitchens.

The recipe has evolved over time with regional adaptations including optional seasonings and modifications that reflect local flavors and ingredients available, making this dish a versatile staple across homes. From spicy Southern versions to more mellow Midwest takes, each variation pays homage to its original format while highlighting local preferences.

Its popularity has led to several regional variations, including spicy versions with cayenne or paprika and healthier adaptations using whole wheat crackers or gluten-free alternatives, each iteration blending tradition with contemporary tastes. This flexible dish maintains its backbone while inviting personalized creativity.

Ingredient Deep Dive


Chicken is the star ingredient, chosen for its versatile taste and health benefits. Rich in protein and low in fat, chicken is essential for muscle growth and repair. When selecting, fresh, organic chicken breasts are recommended for the best flavor and nutritional profile, storing them in the refrigerator and using within a couple of days for peak freshness.

Ritz crackers are renowned for their iconic buttery flavor, which imparts a rich taste that’s both comforting and welcoming. Originally used as a snack, their role in this recipe transforms them into an affordable gourmet breading option. Always store Ritz crackers in a cool, dry place to maintain their crispness until ready for use.

Use real butter for its authentic flavor, providing essential fat and a smell that enhances the sensory experience of cooking. For a healthier take, consider using a blend of real butter and its low-fat counterpart to maintain flavor while reducing calorie intake. Store butter in the refrigerator, ensuring it’s wrapped well to prevent absorption of other odors.

To round off the flavors, a dash of garlic powder, onion powder, and an assortment of dried herbs such as thyme or parsley is recommended. These seasonings offer depth without overwhelming the natural flavors. Ensure all spices are stored in a cool, dark place to retain their potency and use within a year of purchase for optimal freshness.

Common Mistakes to Avoid

  • Skipping the cracker crushing process might lead to an uneven coating. Ensure they’re finely crushed for a uniform crust.
  • Using skin-on chicken can disrupt texture; always choose skinless for a better coating adherence.
  • Over-cooking will dry out the chicken. Keep an eye on the oven timer to maintain juiciness.
  • Not preheating the oven can result in uneven cooking, so make sure it reaches the right temperature before baking.
  • Skipping the butter drizzle could lead to a lack of flavor depth; don’t skimp on the buttery glaze.
  • Using flavored crackers might overpower the dish. Stick to original Ritz for the intended flavor profile.
  • Overcrowding the baking sheet can lead to inconsistent baking; maintain space between pieces.
  • Not using a non-stick spray or parchment paper can lead to sticking; always prep your baking dish properly.

Essential Techniques


Crushing the crackers is a crucial step that requires a fine consistency for an even coating. Use a food processor or crush them manually using a rolling pin while the crackers are inside a sealed bag. This ensures that the coating adheres well and cooks evenly, avoiding large chunks that could create imbalances in texture.

Drizzling butter over the coated chicken before baking is essential for achieving that golden-brown finish and adding moisture. Melt butter until just liquid and use a spoon to evenly drizzle over each piece, ensuring the cracker coating absorbs this buttery richness. This technique distributes the buttery flavor perfectly, enhancing the overall taste profile.

While baking, ensure the chicken is arranged in a single layer on the baking sheet. Crowding the pieces can lead to steaming rather than baking, which affects the final crunch. Keep a small space between each piece for optimal airflow and even cooking. Watch for visual cues such as a golden-brown color to indicate doneness alongside internal temperature checks.

Pro Tips for Perfect Crunchy Ritz Butter Chicken Delight


For a gluten-free version, substitute Ritz crackers with gluten-free crackers or almond meal for a similar crunchy effect that accommodates dietary restrictions. This adaptation ensures flavor integrity while being inclusive for those with gluten sensitivities.

Enhance the seasoning with herb-infused butter, adding fresh or dried herbs like rosemary or sage to the melted butter before drizzling. This infuses the chicken with aromatic notes that pair beautifully with its buttery core. Experimenting with herbs can personalize the dish to suit your palate.

For an extra crispy finish, double-coat the chicken by dipping it in a milk or egg wash between two layers of cracker crumb coating. This additional step amplifies the crunch factor, particularly beneficial for those seeking an ultra-textured experience.

Let the chicken rest for a few minutes after baking before slicing. This resting period allows the juices to redistribute, retaining moisture and flavor when cutting into the chicken. It also ensures the crust remains intact during serving.

If you prefer a lighter version, replace some of the butter with olive oil. This provides a different health profile while maintaining moisture and aiding the crisping process. Olive oil subtly shifts the flavor profile, offering a Mediterranean touch.

Pair this dish with a simple green salad dressed with lemon vinaigrette. The acidity from the vinaigrette complements the richness of the chicken, creating a balanced meal that’s both satisfying and fresh.

Variations and Adaptations


Regional variations can include spices native to your area, such as Cajun spice mix for those who love some heat, or Italian herbs for a Mediterranean spin. These adaptations respect local palates while maintaining the dish’s core essence.

During summer, lighten the dish by adding lemon zest to the cracker crumbs before baking; its citrus brightness lifts the flavors and adds a warm-weather suitability more suitable for al fresco dining experiences.

Opt for dietary modifications by utilizing low-fat Ritz crackers or a low-calorie butter substitute. These tweaks lower the overall fat content, making the dish more aligned with low-fat diets without compromising taste.

Enhance flavor with a marinade of yogurt and spices like cumin and coriander before applying the cracker coating. This Indian-inspired twist adds depth and complexity, suitable for adventurous eaters seeking new taste horizons.

To modify texture, finely crush half the crackers and coarsely crush the rest, offering a varied crumb structure that enhances tastebuds’ attention with every bite. Textural play elevates the dining experience, adding intrigue and enjoyment.

For the presentation, use a circular mold to stack the chicken sliced into rounds, creating a tiered effect that impresses visually. Garnish with fresh parsley or fried shallots to add layers of visual and taste appeal.

Serving and Presentation Guide


Plating this dish with a side of roasted vegetables not only supplements the nutritional value but offers a vibrant color palette that enhances visual appeal. Choose brightly colored veggies like bell peppers or carrots for contrast.

Garnishing ideas include sprinkling chopped fresh herbs such as parsley or chives over the plated chicken just before serving, adding a pop of color and a hint of freshness that complements the buttery richness of the chicken.

Traditional accompaniments like mashed potatoes or rice pilaf offer a comforting base that absorbs the chicken’s juices and complements its flavors, enhancing the dining experience by intertwining textures and tastes.

For a modern twist, serve the chicken atop a bed of leafy greens drizzled with a light citrus vinaigrette, balancing the richness of the chicken with refreshing, crisp greens. This pairing capitalizes on contrasts in flavor and mouthfeel.

Temperature considerations favor serving the chicken warm but not hot, allowing the flavors to shine without overwhelming the palate. Resting the chicken for a few minutes post-baking aids in reaching the ideal serving temperature.

Control portion sizes by serving smaller, evenly-sized pieces of chicken, especially in a buffet setting, ensuring guests can comfortably enjoy the dish alongside other offerings without overcommitting on one entree alone.

Wine and Beverage Pairing


A crisp Chardonnay pairs beautifully with Crunchy Ritz Butter Chicken Delight, its light oak notes melding sweetly with the buttery chicken flavor, while the wine’s acidity cuts through the richness for a palate-cleansing effect.

Non-alcoholic alternatives include a sparkling apple cider or a bright, fruity lemonade which echoes the dish’s citrus undertones, providing a refreshing counterpoint to the savory richness that adults and children alike can enjoy.

For coffee or tea pairings, a light herbal tea with floral notes such as chamomile or a mild green tea complements the chicken without competing, offering a soothing conclusion to a hearty meal.

Serve beverages at a slightly chilled temperature to reset the palate after each bite, enhancing the meal’s flavor dynamics by bridging the balance between savory richness and refreshing beverage clarity.

Ensure serving glasses are clean and free from any lingering aftertastes that could detract from the delicate interplay between flavors, providing an optimal sensory experience across taste, smell, and visual engagement.

Storage and Shelf Life


Store any leftover Crunchy Ritz Butter Chicken Delight in an airtight container in the refrigerator to maintain freshness, ideally consuming it within 3 to 4 days for the best quality. This short storage window ensures optimal taste and safety.

Consider temperature requirements, ensuring storage consistent at a temperature below 40°F (4°C) to preserve food safety and prevent spoilage that could affect flavor and texture negatively.

Use containers with a tight seal to avoid contamination and retain moisture, enabling the chicken to stay tender without drying out. Plastic or glass containers are both suitable for maintaining the recipe’s quality over short storage times.

Signs of spoilage to watch for include an off-odor, change in color, or unusual texture, indicating the chicken should not be consumed. These markers ensure food safety, protecting consumers from potential health risks.

Reheat leftovers in a 350°F (175°C) oven for optimal results, covering loosely with foil to maintain moisture while re-crisping the crust, avoiding the microwave which can compromise the texture and make the coating soggy.

While freezing is not recommended due to potential texture changes, if necessary, flash-freeze pieces individually before sealing in bags to protect the crust structure, reheating directly from frozen to minimize texture compromise.

Make Ahead Strategies


Develop a prep timeline by preparing the cracker coating a day in advance, storing it in an airtight container to save time on the day of cooking. This advance preparation ensures efficiency without sacrificing quality.

Store the coated, unbaked chicken on a baking sheet covered in the refrigerator if preparing a few hours early, taking care to bring it briefly to room temperature before baking for even cooking results.

Assess the quality impact of preparing in advance, noting that refrigerating for too long can compromise the crispness, hence keep the time between preparation and baking as short as practically possible to maintain texture.

Assembly tips include coating the chicken immediately before baking if possible to preserve the maximum crispness, ensuring the cracker crumbs adhere well and maintain their texture upon baking.

Reheat previously cooked chicken gently in an oven to regain crispness while protecting the interior’s moisture, taking care not to overheat which can dry out the chicken.

Add fresh elements like a squeeze of lemon or sprinkle of fresh herbs just before serving to revitalize and enhance flavors that might have mellowed during the storage phase.

Scaling Instructions


When halving the recipe, ensure to divide ingredients evenly, paying particular attention to seasonings that might require slight adjustments for balance despite reduced quantities.

Doubling or tripling requires careful consideration of cooking equipment capacity, ensuring the oven can fit larger quantities for batch baking if needed to prevent overcrowding that could impede cooking performance.

Adjust equipment settings by considering using multiple baking sheets and rotating them during cooking to ensure even results when scaling up, maintaining the same high-quality end product.

Timing modifications might include monitoring the baking process closely when increasing quantities, as larger batches may require longer cooking times or multiple sessions based on your oven’s capacity.

Consider storage needs when scaling, preparing additional containers if necessary to store leftovers properly while maintaining the chicken’s original taste and texture without degradation.

Nutritional Deep Dive


Crunchy Ritz Butter Chicken Delight offers a balanced macro breakdown, primarily composed of proteins and fats with a moderate carbohydrate content from the Ritz crackers. Understanding this balance helps in dietary planning around this dish.

Micronutrient analysis reveals modest contributions of vitamins and minerals like niacin and phosphorus from the chicken, with additional calcium and iron provided by whole grain variations of crackers if used.

Health benefits include high-quality protein essential for growth and maintenance, with possible adaptations to reduce saturated fat content for heart health when opting for lower-fat butter or oil alternatives.

Dietary considerations might account for sodium content, particularly if seasoning further, encouraging mindful consumption for those needing to moderate salt levels, reflecting recommended daily intakes.

Manage portions effectively by pairing the chicken with sides rich in fiber and low-calorie vegetables, creating a nutritionally complete meal that’s satisfying without being overly calorie-dense.

Weight management tips suggest balancing the indulgence of this rich dish with lighter side offerings and ensuring portion control remains at the forefront to prevent exceeding daily intake needs.

Dietary Adaptations


For a gluten-free adaptation, switch to gluten-free crackers and ensure any other ingredients like spices aren’t at risk of cross-contamination, catering to those with gluten intolerance or celiac disease.

Adopt a dairy-free route by omitting butter and using a plant-based oil such as avocado oil for its buttery flavor, maintaining the recipe’s integrity while accommodating lactose intolerance or other dairy restrictions.

Vegan versions will require substituting chicken with firm tofu or a chicken substitute like seitan, alongside a vegan cracker alternative. Flavorings can remain similar, ensuring a delicious meal for plant-based eaters.

Low-carb options include replacing crackers with crushed nuts or Parmesan cheese for a similar adaptively crunchy exterior, reducing overall carbohydrate quantities without sacrificing the core crunch element.

Keto-friendly variations maintain low carbohydrate content, closely aligning with low-carb adaptations through nut-based coatings and mindful seasoning adjustments, ensuring compatibility with ketogenic dietary plans.

Paleo transformations involve grain-free crumb coatings using almond flour or coconut flakes, with ingredient adjustments such as ghee instead of butter to uphold ancestral diet principles.

Low-FODMAP adaptations can include substituting onion and garlic powders with alternatives like garlic-infused oils for flavor without triggering symptoms, meeting specific dietary requirements without losing zest.

Troubleshooting Guide


If facing texture issues like soggy crusts, ensure the oven is preheated properly and consider using a wire rack for baking to allow air circulation under the chicken, helping the crust crisp evenly.

For flavor balance challenges, adjust seasonings incrementally, focusing on adding subtle spice layers rather than overwhelming flavors which can overpower the delicate Ritz-induced butteriness.

Temperature problems, particularly undercooking, can be resolved by conducting multiple internal temperature checks with a meat thermometer, aiming for an internal temperature of 165°F (74°C).

Circumvent equipment challenges such as overcrowding on baking sheets by utilizing additional trays to maintain proper space between chicken pieces, ensuring hot air can circulate effectively during baking.

For ingredient substitutions like using different crackers, test the flavor impact first, as different brands and types may contribute varying levels of salt and buttery tones that alter your final dish subtly.

Timing concerns can be preemptively managed by using timers and adhering to preparation steps, preventing overbaking which may dry out chicken or underbaking that can leave coatings less crisp.

Recipe Success Stories


Community feedback highlights the recipe’s success as a staple in family meal planning, praised for its easy preparation and satisfying flavors. Many readers choose it for weeknight dinners that feel special without the stress.

Variation successes have emerged, with some incorporating spices like paprika and cajun seasoning to suit hotter palates. These successful adaptations maintain the recipe’s core nature while offering personal twists.

Adaptation stories often feature dietary changes for macros or personal preferences, showcasing how versatile this recipe can be while maintaining delightful taste and its signature crispy texture despite various modifications.

Reader suggestions often include pairing ideas, with roasted seasonal vegetables or light salads enhancing the meal’s appeal. These pairings round out meals by adding variety and interest to traditional serving styles.

Photography tips shared by the community emphasize natural lighting and rustic plating to highlight the golden crust and tender chicken beautifully. These visual complements make recipe sharing on socials a vibrant extension of success.

Frequently Asked Questions

Can I use chicken thighs instead of chicken breast?
Absolutely! Chicken thighs can be substituted for a juicier and more flavorful option, keeping an eye on cooking time as thighs may take slightly longer to bake to perfection.

What can I use instead of Ritz crackers?
If Ritz crackers aren’t available, try using any buttery cracker, plain breadcrumbs, or even crushed cornflakes for varied textures and taste, each altering the flavor profile subtly.

How do I ensure the chicken remains juicy?
Ensuring not to overcook the chicken is key, as well as allowing it to rest post-baking. Using a meat thermometer ensures that the chicken reaches but does not exceed the required internal temperature.

Is there a vegan version of this recipe?
A vegan version can involve substituting chicken with tofu or seitan, and using plant-based crackers and oils, ensuring equivalent flavor enjoyment for non-meat eaters.

What side dishes complement this recipe?
Consider serving with mashed potatoes, roasted vegetables, or a fresh leafy salad to complement and offset the richness of the chicken, creating a balanced meal experience.

Can this recipe be made ahead?
Yes, prepare the chicken up to the baking step, storing in the fridge, and ensure it’s fully cooked prior to serving for the best crunch and texture.

Can I freeze leftovers?
Freezing is possible, though not recommended, as the texture may change. Flash-freezing before sealing helps retain better texture when reheated.

What spices can I add for more flavor?
Additional spices like smoked paprika or cayenne can enhance flavor profiles, adjusting to personal taste preferences and maintaining the dish’s essence.

Can I substitute margarine for butter?
Margarine can replace butter for a lower fat alternative, though the flavor may differ slightly. Consider margarine with a buttery flavor if available for best results.

What is the best wine pairing?
A crisp, unoaked Chardonnay pairs excellently, complementing the buttery notes of the chicken while the acidity provides a refreshing counterbalance.

Are there other crackers that work as well?
Yes, buttery crackers or panko breadcrumbs are alternatives, each providing a distinct flavor or texture variation while adhering to the core principles of the recipe.

What’s the best way to store leftovers?
Use airtight containers to store leftovers in the refrigerator for up to 4 days, ensuring the best flavor preservation. Always reheat thoroughly before serving again.

Additional Resources


Dive deeper into the art of coating and frying with guides on achieving the perfect crumb consistency for various recipes, enhancing the knowledge base for budding cooks looking to expand their technique arsenal.

Explore related recipes such as classic Southern fried chicken or Parmesan-crusted chicken breast for further culinary adventures, drawing parallels and contrasts in preparation, taste, and technique.

Ingredient information on modern uses for Ritz crackers reveals their adaptability across recipes, bringing insight into how pantry staples can innovate everyday meals beyond snacking.

Consider equipment recommendations, focusing on must-have baking sheets or food processors that streamline preparation and ensure success across multiple recipes with shared methodology.

Given the seasonal flexibility of Crunchy Ritz Butter Chicken Delight, articles on how to incorporate seasonal produce and flavors can support adaptation, ensuring this is a year-round valued recipe.

Join the Conversation


Connect with us on social media as you share your culinary creations, tagging your renditions of Crunchy Ritz Butter Chicken Delight and comparing notes with a worldwide network of enthusiasts.

Utilize photography tips shared by the community to capture your dish, focusing on natural lighting and emphasis on the golden crust to create impactful, shareworthy cuisine visuals.

Write recipe reviews on the blog to share your experiences and adjustments, providing insightful feedback to help others create their perfect version of this satisfying meal.

Engage with our community by offering suggestions, asking questions, or offering new ideas that might inspire another delicious variation or adaptation of this classic dish.

Explore personalized recipe variations shared by community members, inspiring your future culinary adventures and embracing the creative potential of altering established recipes to delight taste buds.

The Recipe

Crunchy Ritz Butter Chicken Delight

Serves: 4

Prep Time: 15 mins

Cook Time: 30 mins

Total Time: 45 mins

Kitchen Equipment Needed

  • Baking sheet
  • Food processor (or zip-lock bag and rolling pin)
  • Mixing bowl
  • Meat thermometer

Ingredients

  • 4 boneless, skinless chicken breasts
  • 2 cups crushed Ritz crackers
  • 1/2 cup melted butter
  • 1 teaspoon garlic powder
  • 1 teaspoon onion powder
  • 1/2 teaspoon salt
  • 1/4 teaspoon black pepper
  • 1/2 teaspoon dried thyme or parsley

Directions

  1. Preheat your oven to 350°F (175°C). Line a baking sheet with parchment paper or spray with non-stick spray.
  2. Place Ritz crackers in a food processor and pulse until finely crushed, or crush them in a zip-lock bag using a rolling pin.
  3. In a shallow bowl, mix the crushed Ritz crackers with garlic powder, onion powder, salt, pepper, and thyme.
  4. Dip each chicken breast in the melted butter, then coat thoroughly in the cracker mixture, pressing down to ensure the crumbs stick well.
  5. Arrange the coated chicken breasts on the prepared baking sheet, leaving space between each piece.
  6. Drizzle remaining butter over the coated chicken breasts for extra flavor and brownness.
  7. Bake for 30 minutes, or until the chicken reaches an internal temperature of 165°F (74°C) and is golden brown and crispy.
  8. Remove from the oven and let rest for 5 minutes before serving.

Recipe Notes

  • For more flavor, add a pinch of cayenne pepper to the cracker mixture.
  • To make ahead, prepare until coating and store in the fridge, baking when ready.
  • Leftovers can be reheated in a 350°F oven to preserve crispness.

The Best Meatloaf Recipe: Moist, Flavorful, and Easy to Make

easy meatloaf recipe, moist meatloaf recipe, homemade meatloaf, classic meatloaf recipe, flavorful meatloaf, best baked meatloaf, comfort food recipes

The Best Meatloaf Recipe: A Comprehensive Guide to a Classic Dish

Meatloaf has been a staple comfort food for decades, celebrated for its hearty, customizable nature. This guide to The Best Meatloaf Recipe ensures a perfect, moist, and flavorful loaf every time. Whether you’re a beginner or a seasoned cook, this recipe will elevate your meatloaf game.

Explore related recipes like Savory French Onion Soup Burgers or Crockpot Potato Soup for more comfort food inspiration.


Why This Meatloaf Recipe Stands Out

  • Perfect Texture: Moist but not mushy, with just the right balance of meat and binders.
  • Rich Flavor: Seasoned to perfection with a blend of spices and sauces.
  • Versatile: Adaptable for dietary needs like gluten-free or keto.

Pair this recipe with garlic mashed potatoes and steamed green beans for a complete meal.


Ingredients for the Best Meatloaf Recipe

Key Ingredients:

  • Ground Meat: A mix of beef and pork for a rich flavor.
  • Binders: Eggs, breadcrumbs, and milk to keep the loaf cohesive.
  • Seasonings: Onion, garlic, Worcestershire sauce, and Italian seasoning.
  • Glaze: Ketchup, brown sugar, and Dijon mustard for a sweet and tangy topping.

Optional Additions:

  • Diced bell peppers or shredded carrots for texture.
  • Grated Parmesan cheese for extra richness.

Tools You’ll Need

  • Mixing bowls for combining ingredients.
  • Loaf pan or baking sheet for shaping.
  • Meat thermometer for perfect doneness.

Step-by-Step Recipe

1. Prepare the Ingredients

  • Chop onions and garlic finely for even distribution.
  • Mix breadcrumbs with milk to create a moist binder.

2. Combine and Shape

  • In a large bowl, combine ground meat, binders, and seasonings. Mix gently to avoid overworking.
  • Shape into a loaf and place on a baking sheet or in a loaf pan.

3. Glaze and Bake

  • Spread the glaze evenly over the top of the meatloaf.
  • Bake at 350°F (175°C) for 1 hour or until the internal temperature reaches 160°F (70°C).

4. Rest and Serve

  • Let the meatloaf rest for 10 minutes before slicing to retain its juices.

Variations and Serving Suggestions

  • Low-Carb Option: Use almond flour or crushed pork rinds instead of breadcrumbs.
  • Vegetarian Version: Swap the meat with lentils, mushrooms, and beans.
  • Spicy Twist: Add diced jalapeños or hot sauce to the mix.

Check out French Bread Pizza for another versatile dish that pairs well with meatloaf.


FAQs

1. How do I prevent my meatloaf from drying out?

  • Use a mix of fats like beef and pork and include a moisture-rich binder like milk-soaked breadcrumbs.

2. Can I freeze meatloaf?

  • Yes, freeze the loaf before or after cooking. Reheat in the oven for the best texture.

3. How can I make meatloaf gluten-free?

  • Substitute breadcrumbs with gluten-free alternatives like oats or almond flour.

4. What sides go best with meatloaf?

  • Mashed potatoes, roasted vegetables, or a fresh green salad complement meatloaf beautifully.

Internal Linking Opportunities


Conclusion

The Best Meatloaf Recipe combines timeless flavors with modern techniques, ensuring a moist, flavorful dish every time. With this recipe, you’ll transform a classic comfort food into a culinary masterpiece perfect for any occasion.