Lemon Lush Lasagna Cake: Layers of Creamy, Tangy Delight

lemon dessert lasagna, lemon layered cake, creamy lemon cake, tangy lemon lush, no-bake lemon cake, layered lemon delight

Lemon Lush Lasagna Cake: A Sweet and Tangy Delight


Introduction

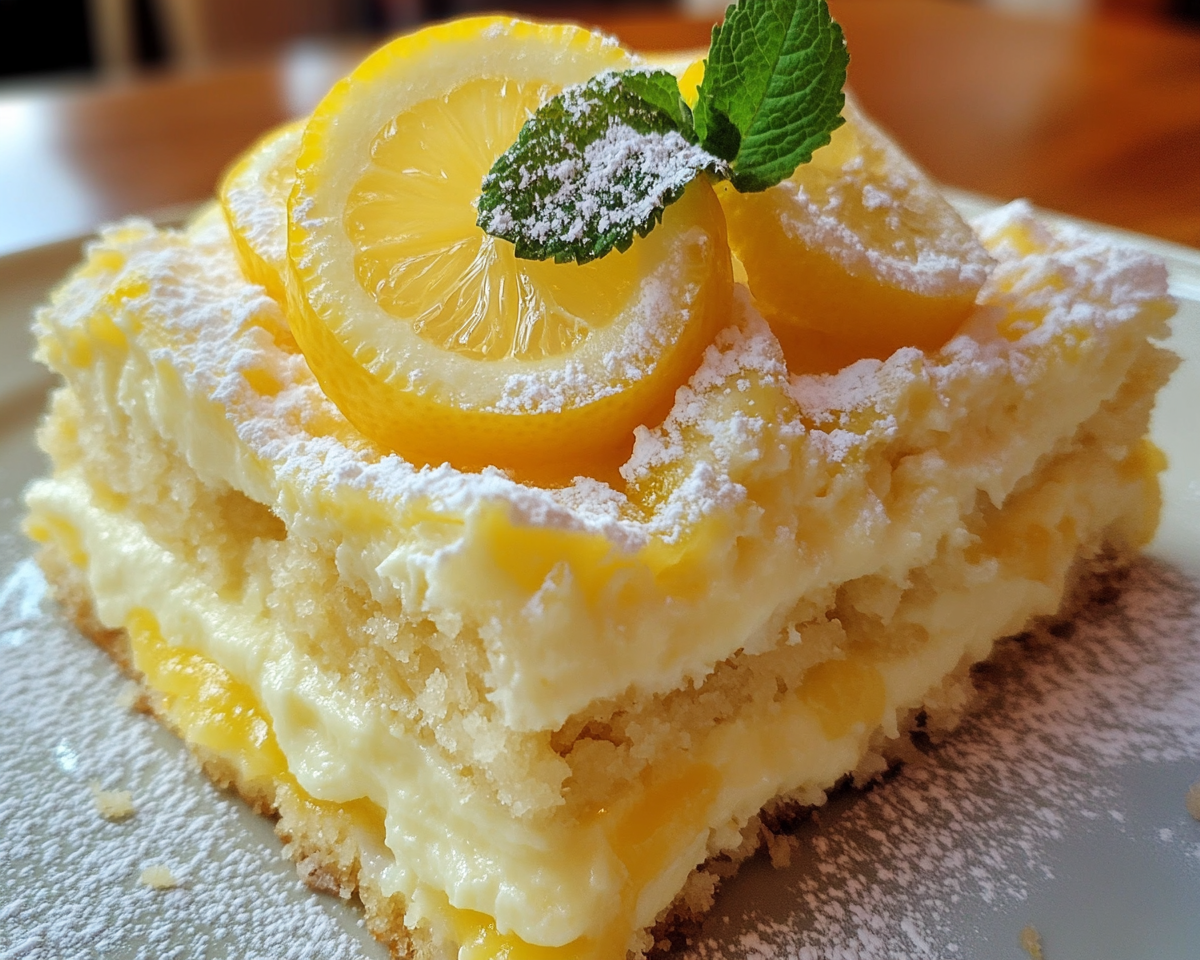
The Lemon Lush Lasagna Cake is a multi-layered dessert that brings together the tangy zest of lemon and the creamy richness of cheesecake. With its no-bake options and simple preparation, this dessert is a showstopper at any gathering.

For more dessert ideas, explore “Delightful Mini Pineapple Upside-Down Cakes” and “Kentucky Butter Cake”.


What Makes Lemon Lush Lasagna Cake Special?

This cake is not only a visual delight but also a versatile treat that can be customized for any occasion. Its creamy layers and zesty flavor profile make it a refreshing alternative to heavier desserts.

Check out “Mastering Spaghetti Carbonara” for a main course that pairs beautifully with this dessert.


Ingredients and Preparation

Core Ingredients

  • Base Layer: Shortbread or graham cracker crust.
  • Filling Layers: Cream cheese, lemon pudding, and whipped cream.
  • Toppings: Lemon zest, crushed cookies, or fresh fruit.

Tools Needed

  • Springform pan for easy assembly.
  • Spatula for spreading layers evenly.
  • Mixing bowls for preparing fillings.

Step-by-Step Recipe

  1. Prepare the Crust
    • Blend cookies or crackers with melted butter, then press into the pan.
  2. Make the Cream Cheese Layer
    • Beat cream cheese with powdered sugar and vanilla until smooth.
  3. Layer the Lemon Pudding
    • Prepare instant lemon pudding and spread over the cream cheese.
  4. Add the Whipped Topping
    • Top with whipped cream or Cool Whip for a light finish.
  5. Chill and Serve
    • Refrigerate for at least 4 hours before slicing.

Creative Variations

  • Vegan Lemon Lush: Use plant-based cream cheese and pudding.
  • Berry Infusion: Add a layer of mixed berry compote.
  • Tropical Twist: Incorporate coconut flakes into the crust.

Serving Suggestions

  • Garnish with fresh mint leaves or a dollop of whipped cream.
  • Pair with iced tea or sparkling water for a summer vibe.

Storage and Reheating

  • Store in the refrigerator for up to 3 days.
  • Do not freeze, as the texture of the pudding may change.

FAQs

  • Can I make this dessert gluten-free?
    Yes, use gluten-free cookies or crackers for the crust.
  • What’s the best way to slice this cake?
    Use a sharp knife dipped in hot water for clean slices.
  • Can I use homemade lemon curd?
    Absolutely! It enhances the tangy flavor.

Internal Linking Opportunities

  1. Link to “Delightful Mini Pineapple Upside-Down Cakes” with anchor text: mini layered desserts.
  2. Link to “Kentucky Butter Cake” with buttery Southern classics.
  3. Link to “Mastering Spaghetti Carbonara” using elegant dinner ideas.

Conclusion

The Lemon Lush Lasagna Cake is a perfect blend of creamy, tangy, and sweet. Whether served as a centerpiece or a light dessert, it’s sure to impress your guests and leave them wanting more!

Bacon Grilled Cheese: Crispy, Cheesy, and Irresistible Comfort Food

grilled cheese with bacon, cheesy bacon sandwich, crispy bacon grilled cheese, gourmet grilled cheese, classic bacon sandwich, bacon cheddar grilled cheese

Bacon Grilled Cheese: A Delicious Twist on a Classic


Introduction

Bacon Grilled Cheese is a savory masterpiece that elevates the classic grilled cheese sandwich to new heights. By adding crispy bacon and exploring creative variations, this dish becomes a versatile favorite for any time of the day.

For more comforting recipes, explore “The Ultimate Comfort Food: Crockpot Potato Soup” or “Slow Cooker Baked Ziti”.


What Makes Bacon Grilled Cheese Special?

  • Rich Flavor: Combines the creamy melt of cheese with the crispy, savory bite of bacon.
  • Customizable: Suitable for gourmet twists or simple weekday meals.

Pair it with tomato soup or try innovative options like “Cheesy Bacon Jalapeño Corn Dip”.


Ingredients and Preparation

Core Ingredients

  • Cheese: Cheddar, gouda, or mozzarella for a gooey texture.
  • Bacon: Crispy and smoky, the heart of the recipe.
  • Bread: Sourdough or brioche for a perfect crust.

Optional Add-Ins

  • Sliced tomatoes or avocado.
  • Jalapeños for a spicy kick.

Tools Needed

  • Non-stick skillet or panini press for grilling.
  • Butter or mayonnaise for spreading.

Step-by-Step Instructions

  1. Cook the Bacon
    • Fry bacon to desired crispness, then drain on paper towels.
  2. Assemble the Sandwich
    • Spread butter on bread slices. Layer cheese, bacon, and optional add-ins.
  3. Grill to Perfection
    • Heat on medium, flipping until bread is golden and cheese is melted.

Creative Variations

  • Bacon and Brie with Fig Jam: A sweet and savory twist.
  • Apple and Cheddar Bacon Grilled Cheese: Adds a tart crunch.
  • Spicy Jalapeño Grilled Cheese: For heat lovers.

Serving Suggestions


Storage and Reheating

  • Storage: Keep in airtight containers for up to 3 days.
  • Reheating: Use a skillet or toaster oven to maintain crispness.

FAQs

  • Can I use turkey bacon or plant-based options?
    Yes, both work beautifully as alternatives.
  • What’s the best cheese for grilling?
    Sharp cheddar or a blend for optimal melt and flavor.
  • Can I freeze bacon grilled cheese?
    It’s not ideal, as bread may become soggy upon reheating.

Internal Linking Opportunities

  1. Link to “Cheesy Bacon Jalapeño Corn Dip” with anchor text: delicious cheesy appetizers.
  2. Link to “Crockpot Potato Soup” using pair with hearty soups.
  3. Link to “Slow Cooker Baked Ziti” with comforting dinner recipes.

Conclusion

Bacon Grilled Cheese offers a satisfying balance of crispy and creamy textures. It’s a dish that’s easy to prepare, endlessly versatile, and sure to become a family favorite. Dive in and enjoy this elevated classic!

Pecan Praline Cake: A Southern Classic with Rich Caramelized Flavors

praline bundt cake, caramel pecan cake, Southern pecan dessert, moist pecan cake, pecan praline glaze, traditional Southern desserts

Pecan Praline Cake: A Southern Delight


Introduction

Pecan Praline Cake is a Southern dessert that combines the nutty richness of pecans with a buttery, caramelized praline topping. It’s a dessert that feels like a warm hug, perfect for holidays or any celebration.

For other comforting dessert ideas, explore “Kentucky Butter Cake: A Slice of Southern Comfort” and “Delightful Mini Pineapple Upside-Down Cakes”.


What Makes Pecan Praline Cake Special?

This dessert stands out for its combination of moist cake and crunchy, caramelized topping. It’s versatile enough to serve as a show-stopping centerpiece or a casual treat.

For more bundt cake inspiration, check out “Mastering Bundt Cakes with a Southern Twist”.


Ingredients and Preparation

Core Ingredients

  • Cake Base: Yellow cake mix, sour cream, eggs, and vanilla extract.
  • Praline Topping: Brown sugar, butter, heavy cream, and chopped pecans.

Optional Add-Ins

  • Bourbon for a boozy twist.
  • Maple syrup in the glaze for added depth.

Tools Needed

  • Bundt pan for the traditional shape.
  • Saucepan for preparing the praline topping.

Step-by-Step Instructions

  1. Prepare the Cake Batter
    • Combine dry and wet ingredients, mixing until smooth.
  2. Bake the Cake
    • Pour batter into a greased bundt pan and bake until golden brown.
  3. Create the Praline Glaze
    • Melt butter, add brown sugar and cream, and simmer until thickened.
  4. Assemble and Serve
    • Pour the praline glaze over the cooled cake, allowing it to drip down the sides.

Flavor Variations

  • Chocolate Pecan Praline Cake: Add cocoa powder to the batter.
  • Gluten-Free Option: Use gluten-free flour alternatives.
  • Holiday Twist: Incorporate nutmeg and cinnamon for a festive flavor.

Serving Suggestions

  • Serve with a dollop of whipped cream or a scoop of vanilla ice cream.
  • Pair with a strong cup of coffee or sweet tea for a Southern touch.

Storage and Reheating

  • Store in an airtight container at room temperature for up to 3 days.
  • Reheat slices in the microwave to refresh the praline glaze.

FAQs

  • Can I use homemade cake batter?
    Yes, any yellow cake recipe will work beautifully.
  • What’s the best way to toast pecans?
    Spread pecans on a baking sheet and toast at 350°F for 5–7 minutes.
  • Can this cake be frozen?
    Absolutely! Wrap tightly and freeze for up to 3 months.

Internal Linking Opportunities

  1. Link to “Kentucky Butter Cake” using anchor text: buttery Southern desserts.
  2. Link to “Cheesy Bacon Jalapeño Corn Dip” with anchor text: delicious party recipes.
  3. Link to “Mini Pineapple Upside-Down Cakes” using anchor text: mini dessert ideas.

Conclusion

Pecan Praline Cake is a dessert that combines rich flavors with a melt-in-your-mouth texture. Whether for holidays or just a special family treat, it’s sure to become a favorite in your recipe collection. Give it a try, and let its Southern charm transform your dessert table!

Country French Garlic Soup: A Rustic and Aromatic Comfort Dish

French garlic soup, rustic garlic soup, garlic and herb soup, creamy garlic broth, traditional French soup, roasted garlic soup, aromatic garlic dishes

Country French Garlic Soup: A Rustic and Flavorful Comfort Dish


Introduction

Country French Garlic Soup is a simple yet flavorful dish, deeply rooted in French culinary traditions. Packed with roasted garlic and enriched with creamy broth, this soup is a must-try for anyone looking to explore the rustic side of French cuisine.

For other comforting soup ideas, explore “The Ultimate Comfort Food: Crockpot Potato Soup” or “Hearty Ham and Potato Soup”.


What Makes This Soup Special?

This garlic soup is celebrated for its ability to transform humble ingredients into an aromatic masterpiece. Its velvety texture and rich flavors make it a perfect appetizer or main course for chilly evenings.

For other French-inspired recipes, try “Mastering Spaghetti Carbonara”.


Ingredients and Preparation

Core Ingredients

  • Garlic: Roasted whole cloves for sweetness and depth.
  • Broth: Chicken or vegetable stock as the base.
  • Enhancers: Thyme, bay leaves, and butter for added richness.

Optional Add-Ins

  • Cream for a silky finish.
  • Rustic bread or croutons for texture.

Tools Needed

  • Dutch oven or soup pot for simmering.
  • Blender for a smooth consistency.

Step-by-Step Instructions

  1. Roast the Garlic
    • Peel whole garlic heads, drizzle with olive oil, and roast until golden.
  2. Prepare the Base
    • Sauté onions and herbs in butter, then add roasted garlic and broth.
  3. Blend for Texture
    • Puree the soup for a creamy texture, or leave chunky for a rustic feel.
  4. Garnish and Serve
    • Add a drizzle of cream, sprinkle with fresh herbs, and serve hot.

Flavor Variations

  • Creamy Option: Add heavy cream or coconut milk for a richer texture.
  • Vegan Adaptation: Use vegetable stock and olive oil instead of butter.
  • Herb Infusion: Include rosemary or sage for an aromatic twist.

Serving Suggestions

  • Pair with crusty French bread or garlic croutons.
  • Garnish with grated Parmesan or a swirl of olive oil.

Storage and Reheating

  • Store in an airtight container for up to 3 days.
  • Reheat gently on the stovetop, adding a splash of broth if needed.

FAQs

  • What type of garlic works best?
    Fresh, whole garlic cloves are ideal for roasting.
  • Can this soup be made ahead of time?
    Yes, it reheats beautifully and develops even more flavor overnight.
  • What’s the best way to thicken the soup?
    Add mashed potatoes or a cornstarch slurry.

Internal Linking Opportunities

  1. Link to “Slow Cooker Magic: Crockpot Baked Ziti” using anchor text: easy comfort food recipes.
  2. Link to “Creamy Garlic Parmesan Chicken” with anchor text: garlic-rich dishes.
  3. Link to “Rediscovering the Magic of Leftovers: French Toast Casserole Muffins” using anchor text: creative bread-based dishes.

Conclusion

Country French Garlic Soup is a delightful exploration of rustic French flavors. Whether served as a starter or the star of the meal, it’s a dish that will warm your soul and elevate your culinary repertoire.

Mexican Restaurant-Style Cheese Dip: Creamy, Spicy, and Irresistible

Mexican Restaurant-Style Cheese Dip: Creamy and Irresistible Introduction Mexican Restaurant-Style Cheese Dip is the ultimate party pleaser, combining creamy textures and bold flavors reminiscent of authentic Mexican restaurants. Perfect for any gathering, this dip pairs wonderfully with tortilla chips, veggies, and more. For similar creamy appetizer recipes, explore “Cheesy Bacon Jalapeño Corn Dip” and “Dorito Chicken Casserole”. What Makes This Cheese Dip Unique? This cheese dip is celebrated for its rich, smooth texture and the perfect balance of spice. The combination of premium cheeses, fresh chilies, and authentic spices creates a dip that's both satisfying and versatile. For a crunchy twist, try pairing it with ideas from “Homemade Pizza Sticks”. Ingredients and Preparation Core Ingredients Cheese Base: White American cheese or Monterey Jack for creaminess. Liquid Elements: Evaporated milk, heavy cream, or half-and-half. Flavor Boosters: Diced green chilies, jalapeños, garlic powder, cumin, and paprika. Optional Add-Ins Cooked ground chorizo for a meaty touch. Fresh cilantro for a bright, herbal flavor. Tools Needed Slow cooker for effortless melting. Saucepan and whisk for smooth blending. Step-by-Step Instructions Melt the Cheese Base In a saucepan, combine cheese and milk over medium heat. Stir until melted. Add Flavor Components Mix in diced green chilies, jalapeños, and spices. Stir continuously to avoid lumps. Achieve Desired Consistency Adjust thickness with additional milk or cream as needed. Serve Hot Pour the cheese dip into a serving bowl or a small slow cooker to keep warm. Flavor Variations Spicy Queso: Add habanero peppers for extra heat. Vegetarian Option: Mix in black beans, corn, or roasted red peppers. Healthier Alternative: Use low-fat milk and a lighter cheese blend. Serving Suggestions Pair with tortilla chips, soft pretzels, or veggie sticks. Use as a topping for nachos, tacos, or baked potatoes. Storage and Reheating Store leftovers in an airtight container in the fridge for up to 3 days. Reheat gently on the stovetop, adding a splash of milk to regain creaminess. FAQs Can I use pre-shredded cheese? Yes, but freshly shredded cheese ensures better melting and texture. What’s the best way to keep the dip warm at a party? A small slow cooker or fondue pot works best. Can I make the dip ahead of time? Yes, prepare the base and reheat before serving. Internal Linking Opportunities Link to “The Ultimate Comfort Food: Crockpot Potato Soup” using anchor text: warm, creamy appetizers. Link to “Slow Cooker Baked Ziti” with anchor text: easy slow cooker recipes. Link to “Perfect Ribeye Steak Recipe” with anchor text: perfectly cooked meals. Conclusion Mexican Restaurant-Style Cheese Dip is a guaranteed hit for any occasion. With its creamy texture and bold flavors, it’s the ideal companion for snacks, appetizers, or meal toppings. Give it a try and elevate your next gathering!

Mexican Restaurant-Style Cheese Dip: Creamy and Irresistible


Introduction

Mexican Restaurant-Style Cheese Dip is the ultimate party pleaser, combining creamy textures and bold flavors reminiscent of authentic Mexican restaurants. Perfect for any gathering, this dip pairs wonderfully with tortilla chips, veggies, and more.

For similar creamy appetizer recipes, explore “Cheesy Bacon Jalapeño Corn Dip” and “Dorito Chicken Casserole”.


What Makes This Cheese Dip Unique?

This cheese dip is celebrated for its rich, smooth texture and the perfect balance of spice. The combination of premium cheeses, fresh chilies, and authentic spices creates a dip that’s both satisfying and versatile.

For a crunchy twist, try pairing it with ideas from “Homemade Pizza Sticks”.


Ingredients and Preparation

Core Ingredients

  • Cheese Base: White American cheese or Monterey Jack for creaminess.
  • Liquid Elements: Evaporated milk, heavy cream, or half-and-half.
  • Flavor Boosters: Diced green chilies, jalapeños, garlic powder, cumin, and paprika.

Optional Add-Ins

  • Cooked ground chorizo for a meaty touch.
  • Fresh cilantro for a bright, herbal flavor.

Tools Needed

  • Slow cooker for effortless melting.
  • Saucepan and whisk for smooth blending.

Step-by-Step Instructions

  1. Melt the Cheese Base
    • In a saucepan, combine cheese and milk over medium heat. Stir until melted.
  2. Add Flavor Components
    • Mix in diced green chilies, jalapeños, and spices. Stir continuously to avoid lumps.
  3. Achieve Desired Consistency
    • Adjust thickness with additional milk or cream as needed.
  4. Serve Hot
    • Pour the cheese dip into a serving bowl or a small slow cooker to keep warm.

Flavor Variations

  • Spicy Queso: Add habanero peppers for extra heat.
  • Vegetarian Option: Mix in black beans, corn, or roasted red peppers.
  • Healthier Alternative: Use low-fat milk and a lighter cheese blend.

Serving Suggestions

  • Pair with tortilla chips, soft pretzels, or veggie sticks.
  • Use as a topping for nachos, tacos, or baked potatoes.

Storage and Reheating

  • Store leftovers in an airtight container in the fridge for up to 3 days.
  • Reheat gently on the stovetop, adding a splash of milk to regain creaminess.

FAQs

  • Can I use pre-shredded cheese?
    Yes, but freshly shredded cheese ensures better melting and texture.
  • What’s the best way to keep the dip warm at a party?
    A small slow cooker or fondue pot works best.
  • Can I make the dip ahead of time?
    Yes, prepare the base and reheat before serving.

Internal Linking Opportunities

  1. Link to “The Ultimate Comfort Food: Crockpot Potato Soup” using anchor text: warm, creamy appetizers.
  2. Link to “Slow Cooker Baked Ziti” with anchor text: easy slow cooker recipes.
  3. Link to “Perfect Ribeye Steak Recipe” with anchor text: perfectly cooked meals.

Conclusion

Mexican Restaurant-Style Cheese Dip is a guaranteed hit for any occasion. With its creamy texture and bold flavors, it’s the ideal companion for snacks, appetizers, or meal toppings. Give it a try and elevate your next gathering!