Crock Pot Green Enchilada Chicken Soup: A Creamy and Flavorful Comfort Dish
Crock Pot Green Enchilada Chicken Soup: A Comforting and Flavorful Recipe
Green enchiladas and creamy chicken soup come together in this hearty and comforting dish, perfect for busy weeknights or meal prepping. This Crock Pot Green Enchilada Chicken Soup is loaded with rich flavors and is incredibly simple to prepare. Whether you’re feeding a crowd or planning for leftovers, this recipe is sure to satisfy.
Why This Soup is a Must-Try
The beauty of this recipe lies in its simplicity and versatility. Using a crockpot, the ingredients meld together over time, resulting in a deeply flavorful and creamy soup. Plus, with customizable toppings and dietary adaptations, it’s a dish that can cater to everyone’s preferences.
Crock Pot Green Enchilada Chicken Soup combines the bold flavors of green enchiladas with the comfort of creamy soup. It’s a versatile recipe that’s easy to customize and even easier to love. Whether you’re seeking a family dinner solution or prepping meals for the week, this soup is bound to be a favorite.
Deliciously Crispy Chicken with Creamy Pasta Recipe to Try
Crispy Chicken with Creamy Pasta: A Delightful Comfort Dish
⚖️
Difficulty
Medium
⏲️
Prep Time
20 mins
🕒
Cook Time
30 mins
⏱️
Total Time
50 mins
🍽️
Servings
4
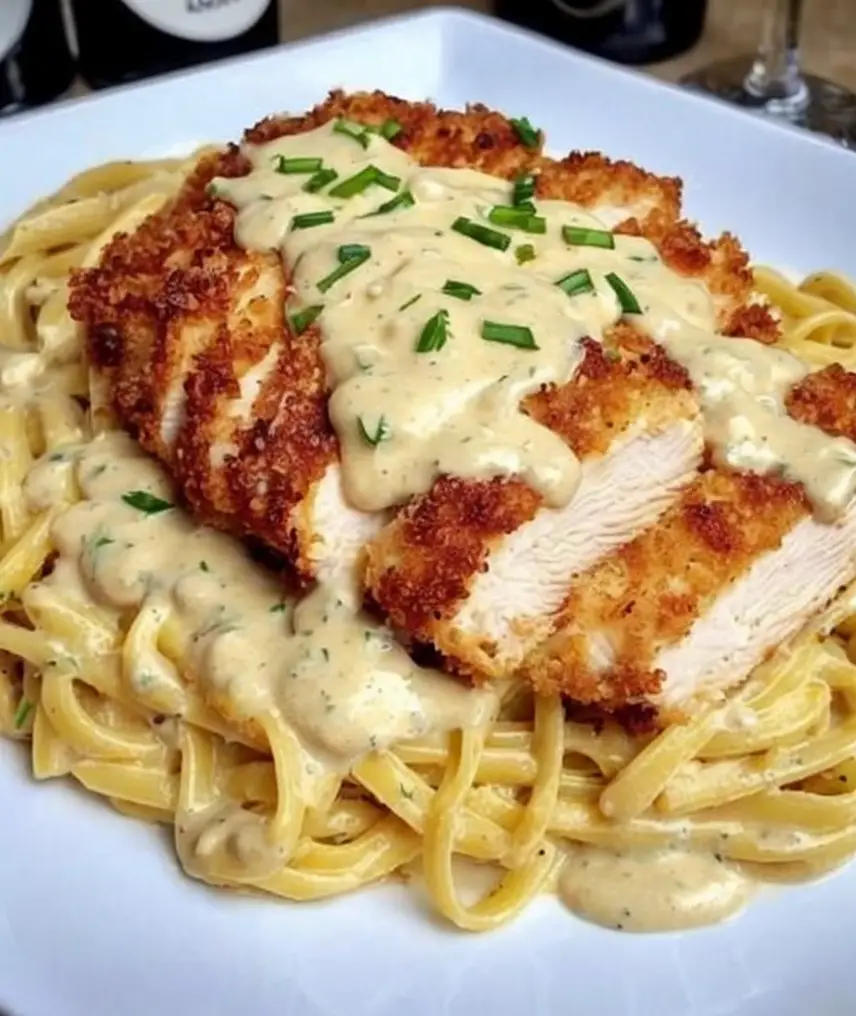
Welcome to a culinary adventure with our Crispy Chicken with Creamy Pasta. This dish is a perfect blend of flavors and textures that will delight your senses and warm your heart. The crispy chicken is golden brown and juicy, nestled atop a bed of creamy pasta that is absolutely irresistible. With every bite, you’ll experience a satisfying crunch followed by a rich and velvety mouthfeel, making it an ideal meal for family gatherings or a cozy dinner at home.
This dish combines tender chicken that’s coated in a crispy crust with a luscious cream sauce that envelops the pasta. Imagine savory herbs, Parmesan cheese, and a hint of garlic, dancing together to create a harmonious balance of flavors. Each forkful of pasta complements the chicken effortlessly, making it hard to resist going for seconds–or thirds! Whether you’re a seasoned cook or a beginner, this hearty recipe promises an enjoyable cooking experience.
Quick Recipe Highlights
Flavor Profile: Rich and savory with a hint of garlic and herbs, perfectly balanced with the creamy sauce.
Texture: Crispy chicken paired with smooth, creamy pasta creates a delightful contrast.
Aroma: The aromatic blend of sautéed garlic and herbs fills your kitchen with warmth.
Visual Appeal: Golden chicken served on a plate of creamy, glistening pasta, garnished with fresh herbs.
Skill Level Needed: Ideal for home cooks of all levels; simple preparations and techniques.
Special Equipment: A frying pan, pot for pasta, and a mixing bowl are all you need.
Recipe Overview
Difficulty Level: This medium-difficulty recipe requires basic cooking skills such as frying and boiling but offers room for creative flair in presentation.
Category: A perfect main dish for lunch or dinner, great for weeknight meals or special occasions.
Cuisine: Inspired by traditional Italian cooking, this dish brings a comforting, home-cooked feel to your table.
Cost: Affordable ingredients create a scrumptious dish without breaking the bank; perfect for feeding families.
Season: Enjoy this dish year-round; the comforting flavors are perfect for all seasons.
Occasion: Perfect for family dinner nights, gatherings, or impressing friends at your next get-together.
Why You’ll Love This Recipe
The crispy chicken with creamy pasta offers a deliciously harmonious blend of flavors that please even the pickiest eaters. The tender, succulent chicken complements the rich, creamy sauce that envelops the pasta, crafting a delightful mouthfeel that is hard to forget. Pairing the delicious crunch of the crispy chicken with the silkiness of the pasta makes this dish an instant family favorite.
This recipe shines not just in taste but also in convenience. It allows for quick prep and straightforward cooking, reducing time in the kitchen while still delivering an impressive meal. The ease of preparation is a huge plus for busy weeknights or last-minute dinner plans.
Nutritionally, you can feel good about serving this dish. Packed with protein from the chicken and carbohydrates from the pasta, it provides a balanced meal that keeps you satisfied and energized throughout the day.
Crispy Chicken with Creamy Pasta is also a wonderful social dish. It’s the type of meal that brings family and friends together, sparking conversations and laughter over a shared love of food. The visually stunning presentation enhances the communal aspect of dining, making it even more special.
Lastly, the cost-effectiveness of this recipe cannot be overlooked. You can prepare a hearty, satisfying meal without overspending, making it accessible to anyone looking to enjoy a home-cooked feast.
Historical Background and Cultural Significance
The origin of this recipe can be traced back to the rich culinary traditions of Italy, where pasta is a fundamental ingredient in many beloved dishes. The concept of combining pasta with various sauces reflects the Italian ethos of comfort food, where each region has its own variations based on local ingredients and preferences.
Culturally, pasta has always been central to family gatherings and celebrations. The act of preparing and sharing a pasta meal aligns with Italy’s communal dining practices, where food acts as a vessel for connection and communication.
As this recipe evolved, it integrated various influences from different culinary traditions, including American adaptations that introduced crispy fried chicken as a delightful twist. This blend of cultures contributes to its widespread popularity across the globe.
Regional variations abound, with some versions featuring different types of pasta, vegetable inclusions, or alternative spices and herbs, showcasing the beauty of culinary adaptability and individual taste preferences.
Ingredient Deep Dive
Chicken: Chicken is not only a flavorful protein source but also boasts significant cultural importance in various cuisines worldwide. Nutritionally, it’s high in protein and low in fat, especially when skinless. When selecting chicken, look for a firm texture and minimal discoloration. Store it in the coldest part of your fridge and use it within 1-2 days. Substitution options include turkey or tofu for a meatless approach.
Pasta: As a staple across many cultures, pasta’s history dates back to ancient times. It’s primarily made from durum wheat, offering complex carbohydrates for energy. When shopping for pasta, consider the shape that will best hold your sauce. Store dry pasta in a cool, dry place and cooked pasta in the fridge for up to 3 days. For gluten-free diets, alternatives like quinoa or rice pasta can be used.
Common Mistakes to Avoid
Not properly seasoning the chicken, which can lead to bland flavors. Always season thoroughly before cooking.
Overcooking the pasta, which results in a mushy texture; cook until al dente for the best bite.
Skipping the resting period on the chicken after frying, which can result in loss of juiciness.
Using too much sauce; balance is key, as too much can overshadow the crispy chicken.
Frying chicken at the wrong temperature, leading to greasy or undercooked pieces; aim for a high enough heat.
Using cold ingredients in your sauce, which can prevent it from emulsifying smoothly; let your ingredients come to room temperature first.
Neglecting to taste your sauce; adjusting seasoning throughout cooking elevates flavors.
Overcrowding the pan while frying; it can lead to uneven cooking and less crispiness.
Failing to follow the timing of each component, which can result in either overcooked pasta or cold chicken.
Being rushed with plating; take the time to present beautifully for better appeal.
Essential Techniques
To achieve perfectly crispy chicken, the technique of buttermilk marination is crucial. This process not only tenderizes the meat but also introduces flavor and moisture, ensuring that your chicken stays succulent and juicy. Master this by allowing adequate marination time, at least an hour but up to overnight. Watch for golden color as a cue that your chicken is ready to be removed from the heat.
Managing pasta involves the technique of cooking it until al dente, which means ‘to the tooth’ in Italian. This texture ensures that the pasta maintains structure and doesn’t become mushy when mixed with sauce. Rinse your pasta with cold water after draining to halt the cooking process, especially if not serving immediately.
Pro Tips for Perfect Crispy Chicken with Creamy Pasta
1. Always use freshly grated Parmesan cheese for a richer flavor; it melts beautifully into the sauce.
2. Opt for high-quality chicken; organic or free-range tends to offer superior flavor and texture.
3. Experiment with herbs; adding thyme or rosemary to the breading can enhance the crispy crust.
4. Adjust the creaminess of your sauce by adding more pasta water for a thinner consistency.
5. Ensure your oil is hot enough before frying; use a thermometer if needed to check for accuracy around 350°F (175°C).
6. Take your time to make the sauce; simmering allows flavors to deepen and meld beautifully.
7. For added crunch, finish with a sprinkle of panko breadcrumbs on the chicken just before serving.
8. Don’t forget to add some sautéed vegetables into your pasta for added nutrition and freshness.
Variations and Adaptations
For a regional twist, consider adding sun-dried tomatoes and fresh basil to your creamy pasta, embodying classic Italian flavors. Seasonal adaptations might include roasted butternut squash in the sauce during the fall, offering a sweetness and warmth to balance the dish. Dietary modifications can include using gluten-free pasta or swapping chicken for chickpeas in a vegan adaptation.
For flavor variations, try incorporating different cheeses such as feta or goat cheese within the creamy sauce for a tangy element. Texture modifications may involve adding crispy bacon or pancetta for extra crunch. Lastly, consider presentation alternatives by serving in individual ramekins for an elegant touch at dinner parties.
Serving and Presentation Guide
For plating techniques, consider twirling the pasta with a fork and spoon to create elegant nests on each plate. Garnish with fresh parsley or basil to add color and vibrancy, and a sprinkle of freshly cracked pepper for an aromatic touch. Traditional accompaniments like garlic bread complement the dish perfectly, while modern servings could involve a small side salad for balance.
Temperature considerations are important; serve immediately for the best texture, and for optimal flavor, allow a brief rest after frying the chicken. Portion control can be achieved by uniformly scooping pasta and ensuring each plate receives a piece of chicken, creating a well-rounded meal presentation.
Wine and Beverage Pairing
Pair this dish beautifully with a rich Chardonnay, whose buttery undertones complement the creamy sauce perfectly. If you prefer a red, a light Pinot Noir can also work well, bringing out nuances of the chicken’s flavors. For a non-alcoholic option, consider a sparkling water with a squeeze of lemon to cleanse the palate between bites.
When enjoying coffee or tea along with your meal, opt for a herbal tea like chamomile, which can provide a calming finish after a satisfying dinner. Ensure all beverages are served chilled to enhance the overall dining experience.
Storage and Shelf Life
For optimal storage, allow the dish to cool completely before transferring it to an airtight container, which helps maintain freshness. This dish can be stored in the refrigerator for up to three days; however, the pasta may absorb some creaminess over time. Reheating should be done gently on the stovetop with a splash of cream or milk to restore texture.
Freezing is possible, but keep in mind that cream sauces may separate when thawed. To freeze, portion the chicken and pasta separately into freezer-safe bags. Label with the date for easy referencing, and use within three months for the best flavor.
Make Ahead Strategies
To prep this dish ahead of time, you can marinate the chicken the night before, allowing flavors to develop fully. Cook the pasta al dente and store it in an airtight container; it’ll be ready to toss into the sauce when you’re ready to serve.
When preparing the creamy sauce, you can make it ahead of time and simply reheat with a little extra cream to smooth it out. Consider storing each component separately until just before serving for the best quality.
Add fresh herbs just before serving to maintain their vibrant flavor and appearance, keeping the dish bright and appealing.
Scaling Instructions
For halving the recipe, simply divide all ingredient quantities by two for a perfect smaller-scale meal. Conversely, if you’re looking to serve a larger crowd, doubling the ingredients typically works well; ensure your cooking vessel is large enough.
Equipment adjustments may be necessary; use larger pans or multiple pots when cooking in bulk. You may need extra cooking time when scaling, especially for frying chicken; ensure all pieces cook evenly.
Storage considerations should also be made, as larger batches may require more considerable fridge space, especially when storing leftovers.
Nutritional Deep Dive
From a nutritional standpoint, this dish serves as a balanced meal delivering essential macros. The chicken provides a high protein content, which is vital for muscle repair and growth, while the pasta supplies carbohydrates–giving energy for an active lifestyle.
Micronutrient analysis reveals a good source of B vitamins from the chicken and complex carbohydrates, essential for metabolism. Health benefits of serving vegetables alongside this dish can enhance fiber intake, promoting digestive health.
Understanding portion analysis is critical for weight management; a balanced plate includes both protein and carbohydrates without exceeding caloric intakes. Keeping track of serving sizes is essential for maintaining a healthy diet.
Dietary Adaptations
For gluten-free options, consider using gluten-free pasta or spiralized zucchini for a lighter alternative. If dairy-free is preferred, substitute cream with coconut cream or cashew cream, both of which provide richness without dairy.
Vegan adaptations are straightforward; swap chicken for chickpeas or tofu, and ensure plant-based broth and non-dairy cheese are used. Low-carb diets can be accommodated through zucchini noodles and a high-protein, low-carb sauce.
Keto-friendly adaptations use heavy cream and minimize pasta; instead, focus on low-carb vegetables and hearty chicken for a satisfying meal. For a low-FODMAP option, limit garlic and onion use, ensuring the dish remains easy to digest.
Troubleshooting Guide
For texture issues, if your chicken turns out too dry, consider adjusting frying times or temperatures; lower heat often helps to retain moisture. A common flavor imbalance can be fixed by adding salt gradually as needed; taste-testing is crucial throughout cooking.
When encountering temperature problems, ensure oil is consistently monitored for frying. If your pasta becomes mushy, reduce cooking time next attempt or prioritize consistent stirring.
When equipment challenges arise, check cookware durability; avoiding overcrowding ensures optimal cooking for each piece. If substitutions were made, consider adjusting quantities for proper flavor balance.
Recipe Success Stories
Community feedback reveals a warm reception for this recipe; many families have made it a staple for Sunday dinners due to its crowd-pleasing nature. Variations have included recipes with added vegetables, garnering praise for accommodating picky eaters smoothly.
Readers share adaptation stories where the recipe was tailored using different cheeses, providing delightful surprises in flavors. Suggestions on photography tips have transformed ordinary plating into visual masterpieces, perfect for sharing on social platforms.
Frequently Asked Questions
Can I prep this dish in advance? Absolutely! The chicken can be marinated overnight, and the pasta can be cooked ahead of time. Just combine them close to serving time.
What are some good sides to serve with this recipe? Garlic bread, a fresh green salad, or steamed vegetables are excellent options to complement this dish.
Can I freeze leftovers? Yes, but keep in mind that the creamy sauce may separate when thawing. Store in airtight containers for best results.
What can I substitute for cream in this recipe? Coconut cream, cashew cream, or nut milk can be used as dairy-free alternatives, providing similar consistency.
How can I make this dish healthier? Consider using whole-grain pasta, reducing the cream or butter in the sauce, and adding vegetables for added nutrients.
Is this dish kid-friendly? Yes! The crispy chicken and creamy texture of the pasta are appealing to children and can be adjusted to suit their taste.
What type of chicken is best for this recipe? Boneless, skinless chicken breasts or thighs work well, providing different textures and flavors.
Can I use a different type of pasta? Certainly! Feel free to swap out for any pasta shape you love, such as penne or fusilli, while keeping cooking times in check.
How can I enhance the flavor? Adding fresh herbs like basil or thyme to the sauce can elevate the dish further. Consider also using garlic-infused oil.
Is this recipe suitable for meal prep? Yes, it’s perfect for meal prep! The components can be made in advance and stored separately in the refrigerator.
Additional Resources
If you enjoyed this recipe and seek more inspired dishes, consider trying our garlic herb chicken or creamy mushroom pasta. For technique guides, we have useful tips on frying chicken, creating creamy sauces, and pasta cooking essentials.
Ingredient information about the value of herbs and spices will enhance flavor diversity, making your culinary adventures even more gratifying. If you’re looking to expand your kitchenware, check out our recommendations for essential tools every home cook should have.
Join the Conversation
We’d love to hear your thoughts on this recipe! Feel free to share your experience with us on social media or in the comments below. Use #CrispyChickenPasta to show us your attempts at this delightful dish or offer any variations you’ve created. Join our vibrant cooking community by sharing photos, asking questions, and giving feedback; we’re excited to engage with fellow food lovers!
The Recipe
Crispy Chicken with Creamy Pasta
Serves: 4
Prep Time: 20 mins
Cook Time: 30 mins
Total Time: 50 mins
Kitchen Equipment Needed
Frying pan
Pot for boiling pasta
Mixing bowl
Whisk
Measuring cups and spoons
Chef’s knife
Ingredients
2 boneless, skinless chicken breasts
1 cup buttermilk
1 cup all-purpose flour
1 teaspoon paprika
1 teaspoon garlic powder
Salt and pepper, to taste
8 ounces pasta of your choice
1 cup heavy cream
½ cup grated Parmesan cheese
Fresh parsley, for garnish
Directions
In a mixing bowl, marinate chicken in buttermilk for at least 1 hour.
Combine flour, paprika, garlic powder, salt, and pepper in a separate bowl.
Heat oil in a frying pan over medium-high heat.
Remove chicken from the buttermilk and dredge it in the flour mixture.
Fry chicken for 6-7 minutes on each side until golden brown and cooked through.
Meanwhile, boil pasta according to package instructions; drain and set aside.
In a saucepan, combine cream and cheese over medium heat; stir until melted and smooth.
Add pasta to the sauce, tossing to coat.
Serve crispy chicken atop creamy pasta, garnishing with fresh parsley.
Recipe Notes
For added flavor, add herbs to the buttermilk marinade.
Adjust cream level to desired richness for the sauce.
Consider using whole wheat pasta for a healthier option.
Irresistible Jalapeño Cornbread Muffins with Cream Cheese Filling Recipe
Jalapeño Cornbread Muffins with Cream Cheese Filling: The Perfect Spicy-Sweet Treat
⚖️
Difficulty
Medium
⏲️
Prep Time
15 mins
🕒
Cook Time
20 mins
⏱️
Total Time
35 mins
🍽️
Servings
12 muffins
Indulge in the delightful blend of flavors with these Jalapeño Cornbread Muffins with Cream Cheese Filling. Bursting with a perfect combination of spicy jalapeños and creamy, tangy filling, these muffins will elevate your snack or meal time. They’re not just breakfast items; serve them as a side with soups, stews, or even as a standalone treat! The aroma of fresh cornbread baking in the oven is irresistible, inviting everyone to gather and savor a warm muffin from the batch.
These muffins are the epitome of comfort food with a twist. The texture is both fluffy and moist, thanks to the addition of cream cheese that provides a rich, decadent center. As you take your first bite, the subtle heat from the jalapeños gradually unfolds, balancing perfectly with the sweetness of cornbread. Not to mention, they are incredibly easy to make, making them an instant favorite for gatherings or just a cozy night in. Let’s dive into this delicious recipe!
Quick Recipe Highlights
Flavor Profile: Enjoy the unique contrast of sweet cornbread with spicy jalapeños and creamy cheese for a burst of flavor.
Texture: These muffins are fluffy on the outside and smooth on the inside, creating a delightful mouthfeel with each bite.
Aroma: The tantalizing scent of baking cornmeal combined with fresh jalapeños fills your kitchen with warmth and anticipation.
Visual Appeal: The golden muffins, speckled with green jalapeño bits, are not only tasty but also visually pleasing on any serving platter.
Skill Level Needed: This is a medium-difficulty recipe, suited for all home cooks looking to enhance their baking skills.
Special Equipment: You’ll need a muffin tin, mixing bowls, and a spatula to craft these delightful treats.
Recipe Overview
Difficulty Level: These jalapeño cornbread muffins are easy to prepare but require attention to mixing and baking time for the best results.
Category: They make an excellent savory snack, perfect for breakfast or brunch, and pair beautifully with soups.
Cuisine: This recipe draws on Southern culinary traditions where cornbread is a staple, enriched further by a nod to spicy Mexican ingredients.
Cost: Overall, the ingredients are quite economical, making this an affordable addition to your weekly meal prep.
Season: Ideal for year-round enjoyment, these muffins shine particularly well in the fall and winter months, warming hearts and homes.
Occasion: Perfect for potlucks, holiday gatherings, or even casual family dinners, these muffins will surely impress your guests.
Why You’ll Love This Recipe
These Jalapeño Cornbread Muffins are more than just a snack; they are a taste sensation that satisfies a variety of cravings. The combination of the savory jalapeños and the sweet cornbread creates a perfect balance that appeals to both sweet and savory lovers. Their light and fluffy texture contrasted with the creamy filling offers a delightful bite that keeps you coming back for more. Whether served warm or at room temperature, the flavor holds up beautifully, making them great for meal prep.
The convenience of throwing this recipe together in under an hour is a major plus, whether you’re preparing for a casual family meal or looking to impress at a gathering. The straightforward ingredients mean less time shopping and on prep, allowing you to enjoy the fruits of your labor much faster. Plus, the muffins store well, allowing for enjoyment over several days—great for busy lifestyles!
Nutritionally, these muffins provide a lovely balance of carbs and fats from the cornmeal and cream cheese, along with the beneficial vitamins found in jalapeños. With their unique mix of ingredients, you’ll get a taste adventure that feels indulgent without the guilt. Your guests will rave about the flavor while you feel good about serving them quality ingredients.
Socially, these muffins can serve as great conversation starters. Every bite is bound to evoke comments about the flavorful kick from the jalapeños or the creamy surprise in the center. They are ideal for sharing, whether during a cozy brunch with friends or a lively potluck, bringing everyone together over delicious food.
Lastly, the cost-effectiveness of this recipe makes it both accessible and enjoyable. With simple ingredients that are typically pantry staples, creating a batch of these muffins won’t break the bank. Tailor them to your taste, and you have a quick, easy dish that is flavorful, economical, and satisfying.
Historical Background and Cultural Significance
Cornbread has a rich history in American cuisine, particularly in the Southern United States, where corn is a staple grain. Often associated with Native American cuisine, cornbread recipes have evolved over centuries, with regional variations reflecting the diverse cultures across America. The addition of jalapeños into cornbread recipes marks a fusion of culinary influences—bringing a bit of rustic charm and Tex-Mex flair that’s prevalent in modern American tables.
As jalapeños became popular in the Southwest, they made their way into cornbread recipes, offering a delightful kick. The juxtaposition of creamy filling within cornbread is reminiscent of other popular Southern dishes, such as stuffed biscuits and creamy casseroles. This evolution showcases the creativity of home cooks who meld traditional recipes with personal flair, helping innovate beloved classics to keep up with modern palates.
Considering regional variations, some Southern recipes may use different peppers or spices based on local availability. These muffins represent a broader trend of experimentation in the kitchen where cooks honor traditional culinary principles while putting their unique spin on classic recipes.
This particular dish serves as a cultural bridge, bringing together the comfort of cornbread with the boldness of Mexican cuisine, showcasing that good food often goes beyond mere sustenance—it’s about creativity, heritage, and bringing people together around the table.
Ingredient Deep Dive
Cornmeal
Cornmeal, the primary ingredient in this recipe, has origins dating back thousands of years, deeply rooted in Native American culture. It’s not just a versatile ingredient; cornmeal delivers a unique flavor and texture that plays beautifully in both sweet and savory dishes. Nutritionally, cornmeal is a source of essential carbohydrates and contains fiber, promoting digestion. When selecting cornmeal, look for a finely ground variety for the smoothest batter, and store it in an airtight container to prolong its freshness.
Jalapeños
Jalapeños are known for their bold flavor and varying levels of heat, often used in various cuisines across the world. They contain vitamins A and C, offering numerous health benefits. When selecting jalapeños, look for firm, bright green peppers with a smooth surface for the best quality. Store them in the fridge for up to a week, and feel free to substitute them with milder peppers if desired, tailoring the heat to your preference.
Cream Cheese
Believed to have originated in the United States in the 19th century, cream cheese adds richness and a smooth texture to many dishes. Its versatility makes it a popular choice for both savory and sweet recipes, offering a balance of flavor. Rich in fats, cream cheese can enhance the palatability of dishes, making them more luscious. When buying cream cheese, look for a full-fat option for the creamiest results. Store it in the fridge, and it’s best to consume it within a few weeks of opening.
Other Ingredients
Other key ingredients like flour, baking powder, and sugar serve to unify the flavors and provide necessary structure and sweetness to the muffins. Each component plays a role in achieving the perfect balance for successful baking. When substituting, consider adjustments to keep the texture of the muffins consistent.
Common Mistakes to Avoid
Overmixing the Batter: Overmixing leads to dense muffins. Stir just until combined for the best texture.
Using Stale Ingredients: Freshness matters! Always check the dates on baking powder and flour.
Ignoring Oven Temperature: Ensure your oven is preheated. Baking at the wrong temperature can affect the rise and texture.
Packing the Cornmeal: Measure your cornmeal correctly to avoid heavy muffins. Lightly spoon it into the measuring cup.
Inadequate Filling: Don’t skimp on the cream cheese filling. Use enough to create a delicious surprise in each muffin.
Testing for Doneness: Use a toothpick to test. If it comes out clean, your muffins are ready to come out of the oven.
Not Letting the Muffins Cool: Allow the muffins to cool in the pan for a few minutes before transferring to a wire rack to avoid sogginess.
Using Too Many Jalapeños: Adjust the quantity of jalapeños based on personal heat preference to avoid overpowering the cornbread flavor.
Essential Techniques
Measuring Ingredients Accurately
Accurate measurement is crucial in baking. Use a kitchen scale for precision, especially for flour and cornmeal, as differences can significantly affect the texture and rise. Always spoon dry ingredients into measuring cups and level with a knife for best results.
Incorporating Cream Cheese Filling
Creating the perfect filling requires a technique to prevent a soggy muffin. Using a piping bag or a spoon, make a small well in the center of each muffin before filling. This method allows muffins to rise properly while keeping the filling intact.
Monitoring Baking Time
Baking times can vary, so it’s essential to keep an eye on your muffins. Start checking for doneness at the lower end of the time range. Look for golden tops and a toothpick that comes out clean when inserted into the center.
Cooling Properly
Allowing your muffins to cool properly is a vital step. Cooling in the pan briefly helps set the structure, while transferring them to a wire rack prevents steam buildup that can lead to sogginess.
Pro Tips for Perfect Jalapeño Cornbread Muffins
Mix the batter only until combined to ensure your muffins are light and fluffy. Overmixing develops gluten, leading to tougher muffins. For an extra pop of flavor, consider using roasted jalapeños for a smoky twist.
Experiment with different fillings by adding shredded cheese or herbs to the cream cheese for added depth. Waiting a few minutes before serving allows the flavors to meld, enhancing the overall taste experience.
Pair these muffins with honey or jalapeño jelly for an added touch of sweetness. This contrast complements the flavors beautifully. Don’t hesitate to double the recipe since they freeze well—stocking your freezer means you’ll always have a savory snack at hand!
Use paper liners in your muffin tin to make cleanup a breeze and to keep your muffins intact while serving. Additionally, a light dusting of cornmeal on the muffin cups can promote easier removal.
Variations and Adaptations
Consider adding a bit of cheddar cheese to the batter for a cheesy cornbread experience. This addition will enhance the flavor and create a delightful texture.
To cater to seasonal ingredients, replace jalapeños with green chiles in summer for a milder flavor or fresh herbs like cilantro or parsley to elevate freshness when available.
For a gluten-free option, substitute regular flour with a gluten-free flour blend, ensuring a suitable baking powder is also gluten-free.
If you’re looking for a twist, try incorporating diced sweet corn or black beans for added sweetness and texture.
For delightful texture variations, you could mix in a handful of corn kernels or cooked bacon bits into the batter for a heartier muffin.
Presentation alternatives include serving them in muffin wrappers made from colorful baking cups or garnishing with a sprinkle of fresh herbs to brighten the appearance.
Serving and Presentation Guide
For plating, arrange your muffins on a rustic wooden board for a charming homey presentation. Garnish with sprigs of cilantro or parsley for a vibrant touch.
Accompany with a small dish of honey or butter to enhance the flavor experience. Presentation is key; stack the muffins in varying heights for an appealing look, perfect for brunch settings.
Consider serving them warm, as warm muffins tend to retain moisture and are more inviting. If serving later, allow them to come to room temperature to best experience the flavors.
Portion control is important; quarter or half a muffin can make for an easy snack or appetizer. This way, guests can sample flavors without feeling overwhelmed.
Wine and Beverage Pairing
Pair these muffins with a chilled Riesling or Sauvignon Blanc to contrast the sweetness and complement the heat from the jalapeños. The crisp acidity in these wines cuts through the richness of the cream cheese filling beautifully.
For non-alcoholic options, consider serving them alongside a fresh cucumber mint lemonade that refreshes the palate and provides a nice counterbalance to the spicy muffins.
If your gathering extends into evening, serving coffee can offer a cozy touch—consider a mild roast to avoid overwhelming the palatable flavors of the muffins.
Make sure beverages are served chilled, especially if pairing with spicy food, to provide a refreshing contrast while enjoying your jalapeño cornbread muffins.
Storage and Shelf Life
To store your jalapeño cornbread muffins, let them cool completely before placing them in an airtight container. Store at room temperature for up to three days, or refrigerate for up to a week.
For best results, consider freezing them if you have leftovers. Use freezer-safe bags, ensuring you remove as much air as possible to prevent freezer burn. They can last up to three months in the freezer.
Signs of spoilage include a sour aroma, noticeable mold, or any slimy texture. If you see any signs, it’s best to discard them.
When reheating, ensure the muffins are heated thoroughly—microwave or oven-reheat until warm in the center. Avoid overheating to maintain moisture and texture.
Make Ahead Strategies
To save time, prepare the batter in advance and store it in the refrigerator for a few hours. Avoid adding jalapeños until just before baking for fresher flavor.
Alternatively, bake a batch the day before your event and allow cooling completely before storing in an airtight container. This allows flavors to develop and meld overnight.
You can also freeze unbaked muffins. Portion the batter into muffin cups and freeze. Once frozen, transfer to a freezer-safe container and bake directly from frozen, adding a few extra minutes to cook time.
If making ahead, consider leaving off toppings (like cheese) until just before serving to ensure they stay fresh and visually appealing.
Scaling Instructions
If you want to halve or double your recipe, simply adjust the quantities of each ingredient accordingly, keeping the ratios the same.
For larger gatherings, tripling the batch is straightforward, but be mindful of your mixing bowl size and muffin tin capacity to allow enough space to mix properly and avoid spillage.
Adjust the bake time as well: when making larger muffins, you may need to increase the cooking time slightly, whereas smaller portions may cook more quickly.
Always test for doneness by inserting a toothpick in the center of one muffin to avoid dry or undercooked results.
Nutritional Deep Dive
These jalapeño cornbread muffins provide a balanced macronutrient profile, with carbohydrates from the cornmeal, fats from the cream cheese, and a moderate amount of protein.
On the micronutrient front, jalapeños are rich in vitamin C and antioxidants, which can support a healthy immune system. Cream cheese contributes calcium, promoting bone health, while cornmeal adds dietary fiber to promote digestive health.
Consider portion control for those managing calorie intake—these muffins are hearty and can be fulfilling, making a smaller portion sufficient for satisfaction.
Assessment of flavors and textures can be affected by serving size; therefore, moderating portion sizes based on dietary goals is essential.
Dietary Adaptations
For a gluten-free version, swap regular all-purpose flour with a certified gluten-free blend, ensuring all other ingredients are also gluten-free.
A dairy-free take can easily be accomplished by using a dairy-free cream cheese option and replacing regular milk with almond or coconut milk.
Vegan adaptations can include substituting eggs with flaxseed meal mixed with water, maintaining the texture needed for a moist batter.
For a low-carb version, use almond flour instead of all-purpose flour and a low-carb cream cheese for a keto-friendly muffin.
These muffins can also cater to paleo enthusiasts by using coconut flour, and avoiding any refined sugars in favor of honey or maple syrup.
Troubleshooting Guide
If your muffins are dense, it’s likely that you overmixed the batter or did not incorporate enough air during the mixing process. Aim for just combining the wet and dry ingredients.
Lack of flavor might stem from under-seasoning. Always taste the batter before baking, adjusting salt and spice levels to enhance the overall flavor profile.
If muffins are too crumbly, ensure you used enough cream cheese for moisture and check that you haven’t packed your dry ingredients, especially the flour and cornmeal.
For timing challenges, consider using an oven thermometer to verify that your oven temperature is accurate, as some ovens can run hotter or cooler, resulting in improper cooking times.
If your muffins are sticking to the tin, consider using liners or ensuring you thoroughly grease and flour the muffin cups before pouring in your batter.
Recipe Success Stories
Readers have shared their love for this recipe and how they’ve tailored it to incorporate personal preferences, leading to success at dinner parties and family gatherings alike.
A reader mentioned experimenting with different cheese fillings, discovering that adding cheddar enhances the flavor while maintaining the signature moistness of the cornbread.
Many appreciate the simplicity of the recipe paired with bold flavors, making them a go-to for casual brunch. The ability to freeze leftovers has also been a hit, with various readers reporting success in enjoying them weeks later.
Photos shared on social media showcase beautiful variations of presentation, inspiring others to take their culinary creations to new heights.
Frequently Asked Questions
Q1: Can I replace jalapeños with another pepper?
Absolutely! Feel free to experiment with different types of peppers, such as poblano or banana peppers, depending on your heat preference. Just adjust the quantity to match your desired spice level!
Q2: Can I make these muffins ahead of time?
Yes! You can prepare the batter in advance and store it in the fridge for a few hours or even bake them the day before. Just make sure to store them in an airtight container to maintain freshness.
Q3: How long can leftovers be stored?
The muffins can stay fresh at room temperature for up to three days. If you choose to refrigerate them, they’ll last for about a week!
Q4: Are there any gluten-free options for this recipe?
Definitely! Substitute regular all-purpose flour with a gluten-free flour blend to make this recipe gluten-free. Just double-check that all other ingredients are also gluten-free.
Q5: Can I use frozen jalapeños in this recipe?
Yes, frozen jalapeños can be used. Just make sure to thaw and drain any excess moisture to avoid affecting the batter’s consistency.
Q6: Is this recipe suitable for vegetarians?
Yes, these muffins are entirely vegetarian! They contain no meat or fish, making them perfect for vegetarian diets.
Q7: How can I make these muffins spicier?
If you enjoy extra heat, consider adding diced habaneros or a dash of cayenne pepper to the batter. You can also top the muffins with a spicy jalapeño jam!
Q8: What can I do if my muffins come out too dry?
Dry muffins can result from overbaking or not including enough moisture. Make sure to test for doneness a few minutes before the suggested bake time and ensure accurate measurements of wet ingredients.
Q9: Can I add other fillings aside from cream cheese?
Certainly! You can include shredded cheese, herbs, or even cooked and crumbled sausage for an extra layer of flavor and texture. Be creative!
Q10: How do I store baked muffins?
Let the muffins cool completely, then store in an airtight container at room temperature for 3 days, in the refrigerator for a week, or freeze to enjoy later!
Additional Resources
For more delicious recipes, explore our selection of savory muffins or delve into more creative uses for jalapeños in baking. Check out our technique guides for mastering cornbread or other beloved Southern dishes.
We’ve also compiled lists of essential baking tools to help you on your culinary journey—discover which items can transform your kitchen into a baking wonderland.
Lastly, keep an eye on seasonal variations of cornbread and other festive treats that align with upcoming holidays, ensuring that you’re always prepared to impress your guests with delightful dishes.
Join the Conversation
We’d love to hear your thoughts on these Jalapeño Cornbread Muffins! Share your experiences on social media or comment down below. Post your pictures and variations of the recipe, as we welcome community engagement and feedback.
Feel free to provide reviews or suggestions based on your cooking journey, and connect with fellow food lovers who appreciate the art of baking. Every success story or feedback can inspire future creations!
The Recipe
Jalapeño Cornbread Muffins with Cream Cheese Filling
Serves: 12 muffins
Prep Time: 15 mins
Cook Time: 20 mins
Total Time: 35 mins
Kitchen Equipment Needed
Muffin tin
Mixing bowls
Spatula
Piping bag (optional)
Measuring cups and spoons
Ingredients
1 cup cornmeal
1 cup all-purpose flour
1 tablespoon baking powder
1/2 teaspoon salt
1/4 cup sugar
1 cup milk
2 large eggs
1/4 cup melted butter
2-3 jalapeños, diced
8 oz cream cheese, softened
Directions
Preheat your oven to 375°F (190°C) and grease your muffin tin or line it with paper liners.
In a large bowl, combine cornmeal, flour, baking powder, salt, and sugar.
In another bowl, whisk together milk, eggs, and melted butter.
Stir the wet ingredients into the dry ingredients until just combined. Fold in the diced jalapeños.
In a separate bowl, mix the softened cream cheese until smooth.
Fill each muffin cup halfway with the batter, then add a small dollop of cream cheese, and top with more batter until each is about 3/4 full.
Bake in preheated oven for 20 minutes, or until a toothpick inserted in the center comes out clean.
Allow muffins to cool slightly before removing from the tin and serving warm.
Recipe Notes
Feel free to adjust the number of jalapeños based on your heat preference.
For an extra flavor boost, consider adding shredded cheese to the batter.
These muffins can be frozen for up to three months—just reheat in the oven to enjoy them later!
Crispy Air Fryer Garlic Parmesan Chicken Bites Recipe Delight
Crispy Air Fryer Garlic Parmesan Chicken Bites: A Deliciously Healthy Snack
⚖️
Difficulty
Easy
⏲️
Prep Time
15 mins
🕒
Cook Time
10 mins
⏱️
Total Time
25 mins
🍽️
Servings
4 servings
Crispy Air Fryer Garlic Parmesan Chicken Bites are the ultimate healthy snack that you can whip up in no time. Perfectly seasoned, these delightful bites combine the delicious flavors of garlic and Parmesan with a satisfying crunch, making them an irresistible treat for any occasion. Whether you’re entertaining guests or simply craving a quick bite, these chicken bites are sure to impress with their robust flavor and crispy texture.
Using an air fryer elevates these chicken bites, allowing them to maintain their juiciness while achieving that crispy exterior without the excess oil. Each bite bursts with flavor, thanks to the garlic and Parmesan coating that not only adds taste but also creates a beautiful golden crust. These bites are not just appealing to the palate but also to the eyes, making them perfect as an appetizer or a game day snack. Prepare to indulge in a healthier version of a classic favorite!
Quick Recipe Highlights
Flavor Profile: The zesty kick from garlic combined with the nutty richness of Parmesan cheese creates a harmonious balance that delights the taste buds.
Texture: The chicken is tender and juicy on the inside, encased in a perfectly crispy, golden-brown exterior that provides a satisfying crunch.
Aroma: The enticing aroma of roasted garlic and cheesy goodness fills your kitchen, heightening the anticipation of enjoying these bites.
Visual Appeal: The appealing golden color and crispy texture make these chicken bites visually stunning, perfect for sharing at gatherings.
Skill Level Needed: This recipe is straightforward and can be mastered by beginners looking to enhance their cooking skills.
Special Equipment: You will need an air fryer to achieve maximum crispiness without deep frying.
Recipe Overview
Difficulty Level: Easy, making it accessible for cooks of all skills.
Category: This recipe falls under appetizers or snacks, perfect for entertaining or casual dining.
Cuisine: American cuisine with Italian influences from the garlic and Parmesan combination.
Cost: This budget-friendly recipe utilizes affordable ingredients, ensuring you won’t break the bank.
Season: Ideal for any season, but especially enjoyable in the warmer months when lighter snacks are preferred.
Occasion: Great for casual gatherings, parties, or as a delicious snack for movie nights.
Why You’ll Love This Recipe
The taste and texture appeal of Crispy Air Fryer Garlic Parmesan Chicken Bites make them a hit among family and friends. With every bite, you experience the full flavor of garlic mingling beautifully with the savory notes of Parmesan cheese, creating a mouth-watering combination. The air-fried technique keeps the chicken tender while giving it a crunchy exterior, providing the perfect textural contrast.
One of the main advantages of this recipe is its convenience and ease of preparation. With just a few simple steps, you can have a delicious snack ready in under 30 minutes. Unlike traditional frying methods that can be messy and time-consuming, the air fryer simplifies the process, allowing you more time to enjoy your creation or entertain guests.
From a nutritional standpoint, these chicken bites are a healthier alternative to regular fried chicken, making them a guilt-free indulgence. You can savor the flavors without worrying about excess oils or fats, fitting perfectly into a balanced diet. They are high in protein, making them a filling option that can help curb cravings.
These chicken bites are also a fantastic social food, perfect for sharing during gatherings. Whether you serve them at a party or as a snack during game days, they’re sure to be a crowd-pleaser. Their finger-friendly size makes them ideal for casual dining and mingling.
Cost-effectiveness is yet another reason to love this recipe. The ingredients are simple and inexpensive, making it easy to prepare a large batch for gatherings without straining your budget. With just a handful of pantry staples and some fresh chicken, you can treat your friends and family to a delicious snack.
Historical Background and Cultural Significance
The origins of crispy chicken bites can be traced back to many culinary traditions, often associated with comfort food in American kitchens. While fried chicken has been a staple for centuries, the introduction of the air fryer has revamped how we enjoy this classic dish. Today, it allows for a healthier take while retaining the beloved flavors.
Culturally, dishes that incorporate garlic and cheese, such as these chicken bites, hold significant importance in various cultures. Garlic, known for its bold flavor and health benefits, is a staple in Mediterranean cooking, celebrated for its ability to enhance nearly any dish. Parmesan cheese, on the other hand, comes from Italy, where it is revered for its rich, umami flavor profile that complements various dishes.
Over the years, the evolution of recipes has led to countless adaptations, showing how versatile chicken can be. The air fryer has revolutionized snack preparation, bringing crispy and healthy options to the forefront of modern cooking. What was once commonly deep-fried is now enjoyed guilt-free, emphasizing the shift toward healthier eating without sacrificing flavor.
Regional variations of chicken bites exist, with spices and coatings reflecting local tastes. From spicy buffalo versions to more herb-infused mixtures, the variations showcase culinary creativity while keeping the essence of the crispy chicken bite intact.
Ingredient Deep Dive
Chicken Breast: Historically a preferred choice in various cuisines, chicken breast provides a lean source of protein that is incredibly versatile. Nutritionally rich in vitamins and minerals, it supports muscle growth and overall health. Look for fresh, high-quality breast cuts. Store them in the refrigerator for up to 2 days, or freeze for later use. Substitutions like turkey breast can also work well.
Garlic: Known for its culinary and medicinal benefits, garlic has a storied past in multiple cultures, often symbolizing protection and health. Packed with antioxidants, garlic supports immune function. Choose fresh, firm garlic bulbs and store in a cool, dark place. For a more subtle flavor, consider using garlic powder as a substitute.
Parmesan Cheese: Originating from Italy, Parmesan cheese is celebrated for its sharp and nutty flavor, rich in calcium and protein. Always use freshly grated cheese for optimal flavor. Store it in an airtight container in the fridge and use within a week. Alternatives like Pecorino Romano can provide a similar, yet distinct flavor, should you wish to experiment.
Common Mistakes to Avoid
Not Preheating the Air Fryer: Skipping this step can lead to uneven cooking or less crispiness, so always preheat for the best results.
Overcrowding the Basket: Placing too many chicken bites at once can trap steam, inhibiting crisping. Always arrange in a single layer for optimal airflow.
Using Too Much Oil: While a light mist is recommended, excess oil can cause greasiness instead of crunch. A spray bottle can help control the amount.
Ignoring Cooking Time: Each air fryer may differ in performance; setting a timer and checking progress will prevent overcooking or burning.
Using Cold Chicken: Ensuring your chicken is brought to room temperature will allow for more even cooking throughout.
Skipping the Marinade: For enhanced flavor, marinating the chicken beforehand is advised. Even a quick 10-minute soak will make a difference.
Forgetting to Flip: Flipping the chicken bites halfway through cooking promotes even browning and crispiness on both sides.
Not Experimenting with Spices: Feel free to customize your seasoning blend beyond garlic and Parmesan, experimenting with herbs or spices to suit your taste.
Serving Immediately: Letting the chicken bites rest for a few minutes after cooking will ensure they retain their juiciness and improve texture.
Essential Techniques
Air Frying: This technique effectively cooks food by circulating hot air, providing crispiness without excessive fat. Mastering this method requires understanding your air fryer’s specific settings and ensuring optimal placement of food for airflow.
Coating and Breading: The goal is to achieve that perfect crispy crust. To master this, ensure the chicken is well-coated in the seasoning mixture, allowing for adherence. A common pitfall is not shaking off excess flour or breadcrumbs, which can lead to clumping.
Marinating: Marinating not only enhances flavor but also tenderizes the meat. Use acidic ingredients like lemon juice or vinegar as they break down protein, improving texture. Avoid over-marinating, which can lead to mushy chicken.
Pro Tips for Perfect Crispy Air Fryer Garlic Parmesan Chicken Bites
Select high-quality chicken breast for the best flavor and texture.
Thoroughly pat the chicken dry before seasoning to promote better adherence of the coating.
Experiment with different cheeses for varying flavor profiles like cheddar or mozzarella.
Try adding dried herbs into the breading for an extra layer of flavor.
For added crunch, use panko breadcrumbs instead of regular breadcrumbs.
Ensure the air fryer basket is clean before use to avoid unwanted flavors from previous meals.
Garnish with fresh parsley or basil after cooking to elevate presentation.
Keep leftovers tightly sealed in the refrigerator to maintain freshness.
Variations and Adaptations
Regional variations might include spicy versions with the addition of cayenne pepper or chili powder for those who enjoy a kick.
For seasonal adaptations, consider adding fresh herbs during spring or grilling them during summer barbeques for a smoky flavor.
If dietary modifications are necessary, you can use gluten-free breadcrumbs or oven roasting if avoiding fried foods.
Flavor variations can be easily achieved by changing the type of cheese, like using feta or goat cheese for a distinct taste.
Texture modifications are possible through the use of different coatings, such as crushed nuts or seeds for added crunch.
Presentation alternatives can include serving with dipping sauces like ranch or marinara to enhance enjoyment.
Serving and Presentation Guide
Plating techniques can include stacking the chicken bites in a small bowl to encourage sharing, creating an interactive dining experience.
Garnish with fresh herbs or a drizzle of balsamic glaze to elevate visual appeal.
Consider traditional accompaniments like celery or carrot sticks to add freshness to your presentation.
Modern serving suggestions include serving the bites in individual ramekins or on skewers for easy handling at parties.
Be aware of temperature considerations to ensure chicken is served warm for maximum enjoyment.
Portion control tips can help manage serving sizes and ensure everyone has a chance to indulge without overdoing it.
Wine and Beverage Pairing
For wine pairings, a crisp Sauvignon Blanc complements the savory notes without overwhelming the flavor of the chicken.
Non-alcoholic alternatives, such as sparkling water with lemon, will cleanse the palate between bites.
If you prefer warm beverages, consider a mild herbal tea that balances the richness of the cheese.
Temperature of beverages is important to maintain freshness and enjoyment; serve chilled drinks alongside these warm bites.
When entertaining, consider offering a diverse range of beverages to suit varying preferences among guests.
Storage and Shelf Life
Storing your chicken bites in an airtight container extends their shelf life for up to 3 days in the refrigerator.
Temperature requirements are essential; ensure the bites are cooled before sealing to avoid condensation and sogginess.
Containers recommended include glass jars or plastic containers specifically designed for leftovers.
Signs of spoilage include off-smells or discoloration; always check before consuming leftovers.
Reheating instructions should be done in the air fryer at a low temperature, preserving crispiness while ensuring thorough reheating.
Freezing can be done if wrapped properly; chicken bites can last up to 2 months in the freezer. Always thaw fully before reheating.
Make Ahead Strategies
Prep timeline can begin by marinating the chicken a day before serving to enhance flavor.
Storing ingredients separately until close to serving time helps maintain freshness and avoid sogginess.
Quality impact assessment reveals that some flavors deepen over time, making some variations even better after being prepped a day ahead.
Assembly tips include having all ingredients prepped and ready for quicker cook time when it’s time to serve.
Reheating guidelines suggest a quick cycle in the air fryer ensures they regain their original texture.
Fresh elements like a side salad or dipping sauce can be prepared last minute to serve alongside the chicken bites.
Scaling Instructions
Halving the recipe is straightforward, simply adjust the ingredient quantities while keeping the cooking time consistent.
Doubling or tripling the recipe requires ensuring your air fryer is large enough or working in batches for even cooking.
Equipment adjustments might be necessary if significantly increasing the recipe size; consider using multiple air fryer baskets or cooking methods.
Timing modifications can include checking on the chicken bites sooner when cooking larger amounts.
Storage considerations should be noted, as leftovers will require careful storage to prevent drying out or becoming soggy.
Nutritional Deep Dive
Macro breakdown shows these chicken bites offer a high protein content with reduced carbs, supporting a balanced diet.
Micronutrient analysis reveals they are rich in vitamins B6 and B12, essential for energy production.
Health benefits include the potential for improved muscle growth and satiety, making them an excellent snack choice.
Dietary considerations should be made for those seeking lower fat or calorie intake; adjusting the oil and chicken type can impact nutritional outcomes.
Portion analysis suggests serving 4-6 bites per person for a reasonable snack that won’t derail dietary goals.
Weight management tips encourage mindful eating and balancing with physical activity to enjoy these snacks guilt-free.
Dietary Adaptations
Gluten-free options can utilize almond flour or gluten-free breadcrumbs to accommodate dietary restrictions.
Dairy-free substitutions might include nutritional yeast for a cheesy flavor without the milk products.
Vegan variations could consider using tofu or tempeh, marinated in similar flavors for a plant-based alternative.
Low-carb adaptations can focus on the chicken, minimizing carbs in breading by using egg wash and no flour.
Keto dieters can remain within their diet by using high-fat cheeses and ensuring minimal carbs in accompanying sauces.
Paleo dieters may prefer to skip breadcrumbs altogether, opting for crushed nuts or seeds for added texture.
Low-FODMAP options can minimize garlic or explore alternatives like chives for seasoning without digestive complaints.
Troubleshooting Guide
Texture issues often arise from overcrowding the air fryer, leading to steamed bites instead of crispy. Always serve in a single layer.
Flavor balance can be achieved by adjusting the seasoning amount; taste the breading mixture before coating the chicken.
Temperature problems may result from an uncalibrated air fryer; always review the cooking chart to ensure accurate settings.
Equipment challenges like basket sticking can be fixed by thoroughly preheating and lightly greasing before adding food.
Ingredient substitutions may lead to unexpected results; keep in mind how replacements might alter flavor and texture.
Timing concerns can arise with larger batches; keep an eye on the first batch to gauge the time needed for perfect crispiness.
Recipe Success Stories
Community feedback has shown universally positive reactions to this recipe, with many praising its simplicity and flavor.
Variation successes include incorporating different spices and blends, leading to a unique twist on the classic taste.
Adaptation stories often highlight how this recipe has been a favorite in families, with many sharing their own tips for improvement.
Reader suggestions have encouraged experimenting with dips, enhancing social gatherings with a variety of flavors.
Photography tips suggest using natural light and colorful garnishes for presentation, creating mouth-watering imagery.
Frequently Asked Questions
Can I use frozen chicken for this recipe?
It’s better to use thawed, fresh chicken for best results. Frozen chicken can cook unevenly, leading to a rubbery texture. If using frozen, ensure it’s thawed and patted dry before seasoning.
What dipping sauces pair well with these chicken bites?
Many enjoy classic ranch or buffalo sauce, but a honey mustard or tangy barbecue can provide a delightful contrast to the savory garlic Parmesan flavor. Feel free to experiment with your favorites!
How do I know when the chicken is done cooking?
The chicken should reach an internal temperature of 165°F (74°C). Using a meat thermometer is the best way to ensure it’s fully cooked without being overdone.
Can I make these chicken bites ahead of time?
Yes! You can marinate and coat the chicken bites a few hours in advance. Just store them in the fridge until you’re ready to cook. This allows the flavors to meld beautifully!
Are these chicken bites gluten-free?
They can be made gluten-free by using gluten-free breadcrumbs or almond flour instead of traditional breadcrumbs. Always check your labels to ensure all ingredients meet your dietary needs.
What’s the best way to store leftovers?
Store leftovers in an airtight container in the refrigerator for up to 3 days. To maintain their crispiness, reheat in the air fryer rather than the microwave.
Can I cook these chicken bites in an oven instead of an air fryer?
Absolutely! You’ll want to bake them on a lined baking sheet at 425°F (218°C) for 20–25 minutes, flipping halfway through until golden brown.
Can I use a different type of cheese?
Yes! While Parmesan is traditional, feel free to experiment with other cheeses such as mozzarella, cheddar, or even feta for distinct flavor profiles.
Are there any side dishes that would complement these chicken bites?
Fresh salads, roasted vegetables, or a simple coleslaw can make great accompaniments, providing balance to the richness of the chicken bites.
How can I make these chicken bites spicier?
Add red pepper flakes or cayenne pepper to the breading mixture for an added kick, or serve them with a spicy dipping sauce for extra heat.
Additional Resources
Related recipes for crispy snack ideas include air fryer vegetable chips and sweet potato fries.
Technique guides focusing on air frying and breadcrumbing can enhance your culinary skills.
Ingredient information about selecting the best garlic and cheese can be beneficial for those seeking quality.
Equipment recommendations suggest the best air fryers on the market for optimal results.
Seasonal variations might include summer barbecue ideas or fall flavors using pumpkin spices for other recipes.
Join the Conversation
Social media sharing encourages readers to post their creations with hashtags for community engagement.
Photography tips can be shared so others can improve their food photography skills, promoting creativity.
Recipe reviews are a wonderful way to gather feedback and connect with others who have tried the recipe.
Encourage community engagement through user-submitted variations, fostering a space for culinary creativity.
The Recipe
Crispy Air Fryer Garlic Parmesan Chicken Bites
Serves: 4
Prep Time: 15 mins
Cook Time: 10 mins
Total Time: 25 mins
Kitchen Equipment Needed
Air fryer
Mixing bowls
Measuring cups and spoons
Whisk or fork
Meat thermometer
Ingredients
1 lb chicken breast, cut into bite-sized pieces
1 cup breadcrumbs (or panko for extra crunch)
½ cup grated Parmesan cheese
3 cloves garlic, minced
1 tsp Italian seasoning
Salt and pepper to taste
1 egg, beaten
Olive oil spray
Directions
In a bowl, combine breadcrumbs, Parmesan cheese, minced garlic, Italian seasoning, salt, and pepper.
In another bowl, beat the egg and dip each chicken piece into it, allowing excess to drip off.
Coat the chicken pieces in the breadcrumb mixture until fully covered.
Preheat the air fryer to 400°F (200°C) for about 5 minutes.
Spray the air fryer basket lightly with olive oil to prevent sticking.
Add the chicken bites in a single layer, leaving space between each piece.
Cook for about 10 minutes, flipping halfway through for even browning.
Check doneness with a meat thermometer to ensure they reach 165°F (74°C).
Once cooked, remove from the air fryer and serve immediately with desired dipping sauce.
Recipe Notes
Feel free to adjust the seasoning according to your taste preferences.
These chicken bites can also be frozen before cooking; just add a few extra minutes to the cooking time.
Experiment with different types of cheese or add spices to create unique flavors!
Tender Slow Cooker Beef Brisket with Homemade BBQ Sauce Recipe
Slow Cooker Beef Brisket with BBQ Sauce: A Tender and Flavorful Delight
⚖️
Difficulty
Moderate
⏲️
Prep Time
20 mins
🕒
Cook Time
8 hours
⏱️
Total Time
8 hours 20 mins
🍽️
Servings
6 servings
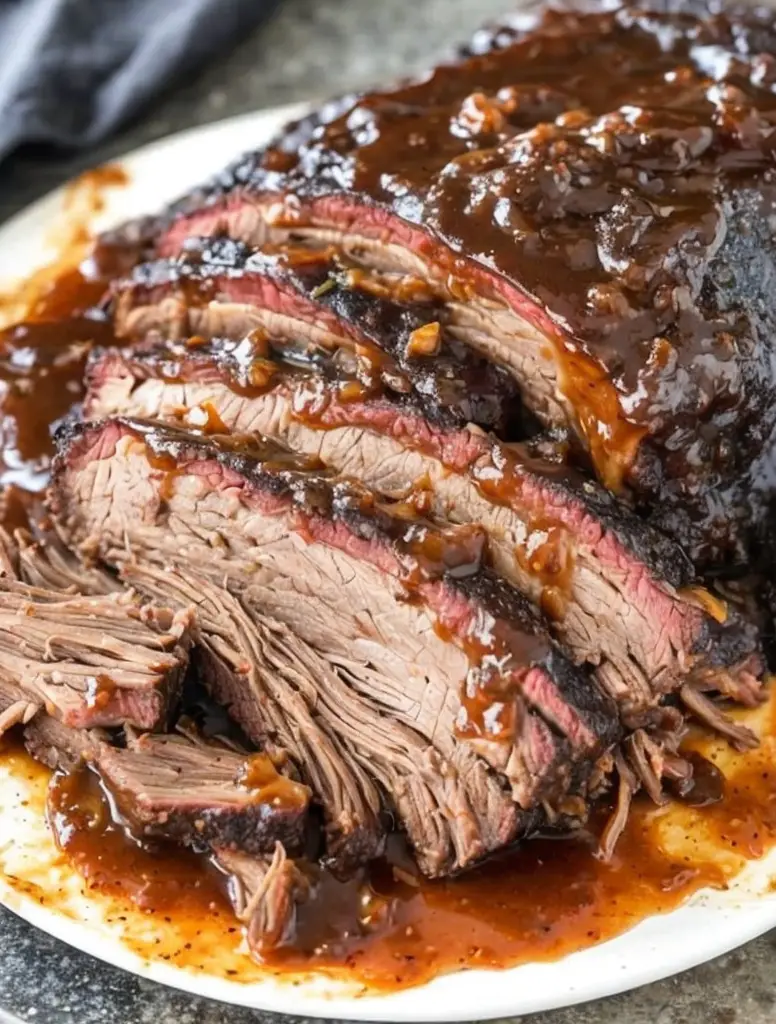
Slow Cooker Beef Brisket with BBQ Sauce is a mouthwatering dish that combines succulent tender beef with a rich, tangy barbecue sauce. Perfect for gatherings, family dinners, or meal prep, this recipe allows you to embrace the full flavor potential of brisket. The slow cooking process renders the beef unbelievably tender while infusing it with the aromatic and sweet notes of the barbecue sauce, creating a delightful meal that everyone will love.
Imagine biting into perfectly cooked beef that melts in your mouth, paired with a hint of smokiness and sweetness from the BBQ sauce. This dish doesn’t just fill the stomach; it warms the heart with every bite. Whether served on its own or integrated into a hearty sandwich, this brisket is sure to become the centerpiece of your culinary repertoire.
Quick Recipe Highlights
Flavor Profile: Rich with a balance of sweet and savory from the BBQ sauce that enhances the natural beefiness of the brisket.
Texture: Juicy and tender, the slow cooking process breaks down the connective tissues, resulting in a melt-in-your-mouth experience.
Aroma: A tantalizing mix of smoked spices paired with sweet sauces creates an inviting aroma in any kitchen.
Visual Appeal: Beautifully caramelized edges and a glossy BBQ coating make this dish visually stunning on any dining table.
Skill Level Needed: Great for both novice cooks and seasoned chefs looking for a no-fuss meal.
Special Equipment: A reliable slow cooker is essential for this recipe to achieve that perfect tenderness.
Recipe Overview
Difficulty Level: This recipe is classified as moderate due to the long cooking time, but the active preparation steps are minimal and straightforward, making it accessible for all skill levels.
Category: This dish fits perfectly into a main course and is ideal for family dinners, potlucks, and BBQ gatherings.
Cuisine: Having roots in American Southern BBQ traditions, this recipe showcases a delightful blend of flavors that are synonymous with backyard cookouts.
Cost: With a modest budget, this recipe uses affordable cuts of beef, making it a practical choice for feeding larger groups.
Season: Ideal throughout the year, but especially popular during BBQ season in warmer months, when outdoor gatherings are frequent.
Occasion: Perfect for casual gatherings, holiday celebrations, or a comforting family meal during colder months.
Why You’ll Love This Recipe
The rich and satisfying taste of Slow Cooker Beef Brisket with BBQ Sauce is a comforting experience that excites your taste buds. The interplay between the beef’s natural flavors and the barbecue sauce’s sweetness creates a harmony that many find irresistible. With every bite, you’ll be delighted by the tender texture that only slow cooking can achieve, turning a simple roast into a flavorful feast.
Convenience is a key benefit of this recipe. With minimal preparation time, you can set your slow cooker in the morning and let it work its magic while you go about your day. The anticipation builds as the savory aroma fills your home, making dinner a much-anticipated event. Plus, leftovers (if there are any) can be easily repurposed into sandwiches, salads, or tacos, providing diverse meal options.
Nutritiously, this recipe offers the benefits of protein-packed beef while allowing you to control ingredients, especially when selecting your BBQ sauce. Opt for a low-sugar sauce or make your own to tailor the flavor and healthiness to your preference. Additionally, brisket is rich in minerals and vitamins, contributing to a well-rounded meal.
The dish is a fantastic option for social gatherings, drawing people together around the table. Sharing a hearty meal creates a warm atmosphere, fostering connection and conversation. Whether hosting a game day or a casual dinner party, serving brisket is sure to impress your guests.
From a cost perspective, beef brisket is often more affordable than other cuts, making it a smart choice for feeding a crowd without breaking the bank. The combination of low prep time and high yield makes this recipe not only delicious but also an economical solution for any busy home cook.
Historical Background and Cultural Significance
Slow Cooker Beef Brisket has roots in both American culinary traditions and Jewish cuisine, where brisket has long been a staple for holidays and celebrations. Over the years, it’s become synonymous with American BBQ culture, especially in regions like Texas, where beef brisket takes center stage at cookouts and competitions. This cut of meat has not only endured but flourished, showcasing a robust lineage of flavor and tradition.
The cultural importance of brisket extends beyond just its taste; it symbolizes togetherness and celebration. Many families gather over brisket during significant holidays, solidifying its status as a beloved dish that brings people together, fostering memories around the dinner table.
As cooking techniques evolved, so did the preparation of brisket. From traditional methods of smoking and braising to modern slow cooking, this evolution represents a blend of innovation and respect for culinary heritage. The slow cooker has become a transformative tool in modern kitchens, allowing home cooks to replicate the flavors and tenderness that once required hours of active cooking.
Regional variations of brisket recipes abound, reflecting local tastes and preferences. Whether it’s using specific spices from the South or sauces unique to certain areas, the adaptability of brisket demonstrates its versatility and wide appeal. This adaptability has allowed brisket to maintain its popularity while continually being reinvented across various culinary cultures.
Ingredient Deep Dive
When it comes to the main ingredient, beef brisket, its significance cannot be understated. This cut comes from the breast or lower chest of the cow and is known for its rich, beefy flavor. Historically, brisket was considered a tougher cut, often braised or slow-cooked to achieve tenderness. Today, it’s appreciated for both its flavor and versatility in various cuisines.
Nutritionally, brisket provides a good source of protein and essential vitamins, such as B vitamins, which are crucial for energy metabolism. When selecting brisket, look for a piece with a good fat cap, as this will provide moisture and flavor during cooking. Proper storage is also essential; if not cooked immediately, briskets can be refrigerated for a few days or frozen for up to six months.
Choosing the right barbecue sauce can elevate the flavors of brisket significantly. Many sauces combine tangy, sweet, and spicy elements to complement the rich meat. Common ingredients include tomatoes, vinegar, molasses, and various spices. Homemade options are always a favorite, as they allow control over sweetness and spice levels.
The selection of barbecue sauce is also a matter of personal taste. Fans of vinegar-based sauces might prefer a tangy, zesty flavor profile, while those who enjoy sweet sauces may gravitate towards those laced with honey or brown sugar. Storage suggestions for opened sauce typically include refrigeration to maintain freshness, and homemade sauces can last up to two weeks, making them a brilliant way to ensure flavor in every bite.
Common Mistakes to Avoid
Not trimming the brisket properly: Leaving too much fat can result in greasy meat, while trimming too much can dry it out.
Using high cooking temperatures: To achieve desired tenderness, brisket should be cooked low and slow; high temps lead to tough results.
Not allowing the brisket to rest: Skipping resting time after cooking can result in dry meat, so aim for at least 20-30 minutes.
Over-saucing: Adding too much sauce before cooking can make the brisket overly sweet, so balance is key.
Not seasoning adequately: Skipping the seasoning will result in bland brisket; rub with spices overnight for maximum flavor.
Not using enough liquid: A little broth or water will help maintain moisture and improve flavor during slow cooking.
Skipping the sear: For added depth of flavor, sear the brisket before slow cooking; this enhances color and taste.
Ignoring cooking times: Each brisket varies in size, ensure proper internal temperature for doneness by using a meat thermometer.
Disregarding the grain: When slicing, always cut against the grain for the most tender bites.
Not experimenting: Don’t hesitate to try new sauces or spices to find your perfect flavor combination.
Essential Techniques
One of the essential techniques for achieving perfect brisket is the searing process. Searing the meat before placing it in the slow cooker creates a flavorful crust that adds depth to the dish. To master this technique, make sure your pan is hot enough before adding the brisket, and avoid overcrowding the pan, which can cause steaming instead of browning.
Another vital technique is the low and slow cooking method, which is critical for breaking down tough connective tissues in brisket. Maintaining a consistent low temperature allows collagen to convert into gelatin, resulting in a tender and juicy dish. Common pitfalls include rushing the cooking process or adjusting the temperature too high, which can lead to a dried-out result. Look for visual cues like a tender texture and easily shreddable meat to know when it’s ready.
Pro Tips for Perfect Slow Cooker Beef Brisket with BBQ Sauce
1. Choose a brisket with a good amount of marbling, as fat enhances flavor and tenderness during cooking.
2. Rub your chosen spices on the brisket the night before cooking for a deeper flavor profile; let it marinate overnight.
3. Always allow the brisket to come to room temperature before cooking to ensure even cooking throughout.
4. Avoid lifting the lid on your slow cooker during cooking to maintain the internal temperature and moisture.
5. Consider using a mix of BBQ sauces for a unique flavor; experiment with sweet and smoky combinations.
6. Keep some extra sauce on the side for serving to enhance flavors at the table.
7. For additional depth, add onions or garlic to the slow cooker along with your brisket.
8. If you find your brisket is too dry after cooking, shred it and mix in additional sauce for moisture.
Variations and Adaptations
There are countless ways to adapt this Slow Cooker Beef Brisket with BBQ Sauce recipe to suit different tastes or occasions. For regional variations, consider integrating local spices or sauces, such as adding a spicy chipotle sauce for a kick or a sweet bourbon-infused sauce for a unique twist. Seasonal adaptations can also enhance the dish; during fall, adding pumpkin or apple cider can provide deep, warming flavors.
For dietary modifications, consider using a leaner cut of beef if you’re watching calories or provide a vegetarian twist by substituting brisket with jackfruit, marinated and cooked similarly. Flavor variations can be achieved by incorporating different herbs and spices; try using smoked paprika or liquid smoke to elevate the barbecue profile.
Regarding texture modifications, experimenting with the cooking time can yield different results; a shorter cooking time can leave the brisket firmer for slicing, while a longer time will offer more tenderness. Lastly, presentation alternatives include serving the brisket with colorful sides like coleslaw or roasted veggies, which not only provide a textural crunch but also an appealing contrast to the rich brisket.
Serving and Presentation Guide
Plating techniques for presenting Slow Cooker Beef Brisket can include slicing the brisket into thick, hearty pieces and arranging them artfully on a serving platter. Garnishing with fresh herbs such as cilantro or parsley adds a touch of color and can elevate the visual appeal of your dish. For a more rustic presentation, consider serving the brisket directly on a wooden cutting board alongside small bowls of extra BBQ sauce.
Traditional accompaniments range from classic coleslaw to cornbread, both of which balance the richness of the brisket while adding a refreshing crunch. Modern serving suggestions might involve a brisket sandwich topped with pickles and onions, delivered on a toasted bun for a comforting meal.
Temperature considerations are crucial; brisket should be served warm but not scalding hot, enhancing its flavors while ensuring an enjoyable eating experience. Portion control tips suggest serving generous slices that allow diners to savor every bite while preventing wastage.
Wine and Beverage Pairing
When it comes to wine pairings, bold red wines like Cabernet Sauvignon or Zinfandel beautifully complement the robust flavors of BBQ brisket. The tannins in these wines enhance the grilled tastes while balancing the dish’s richness. If you’re a fan of white wines, consider a fuller-bodied Chardonnay that can stand up to the beef’s flavors.
For non-alcoholic alternatives, iced tea infused with lemon or sparkling water with a hint of lime can provide a refreshing contrast to the savory meal. If you enjoy coffee or tea, consider offerings like dark roast coffee, which strokes the richness of the brisket. Serve beverages chilled, allowing for a refreshing palate cleanse between bites.
Storage and Shelf Life
To store your Slow Cooker Beef Brisket with BBQ Sauce, ensure it has cooled completely before transferring it to airtight containers. Proper storage methods can extend its shelf life to about three to four days in the refrigerator. Store at a temperature below 40°F (4°C) to maintain safety.
When it comes to freezing, brisket can be stored for up to three months. Use freezer-safe containers or heavy-duty bags to prevent freezer burn. Signs of spoilage include off-smells and discoloration; if unsure, it’s best to err on the side of caution and discard it.
For reheating, use low heat on the stovetop or microwave in short intervals, ensuring the brisket does not dry out. Adding a splash of additional BBQ sauce or broth during reheating can help maintain moisture and flavor.
Make Ahead Strategies
Planning is vital when preparing Slow Cooker Beef Brisket. A strategic prep timeline allows you to maximize your cooking efficiency; consider seasoning and marinating the brisket the night before to enhance flavor depth. Store the seasoned meat in the refrigerator for optimal light infusion of the spices.
For storage between steps, the cooking time can be adjusted to your needs; brisket can be cooked overnight and stored. Its flavor improves as it rests, making it an excellent option for weekend meal prep. Assessing the impact on quality is essential; brisket served on the same day will have a more robust flavor compared to those stored overnight.
When it comes to assembly, keep garnishes and sauces separate until serving to maintain freshness and presentation quality. Lastly, consider adding fresh herbs, sliced veggies, or crisp lettuce just before serving to enhance that fresh element and visually appealing aspects of the meal.
Scaling Instructions
When halving this recipe for a smaller gathering, adjust the seasoning and sauce to maintain balance, but keep the same cooking time for the brisket to achieve desired tenderness. If doubling or tripling, ensure your slow cooker is large enough to accommodate the increased amount of brisket and sauce, as well as maintain even cooking.
Equipment adjustments may include using multiple slow cookers for larger portions, allowing for even distribution and cooking. Timing modifications should be noted; while the slow cooker time remains consistent, be attentive to the doneness and texture for different quantities.
Lastly, make sure to account for storage considerations; larger batches may require additional space in the refrigerator or freezer, necessitating more extensive planning for storing leftovers.
Nutritional Deep Dive
In considering the macro breakdown of Slow Cooker Beef Brisket, it provides a hearty source of protein. A typical serving contains around 25 grams of protein and varying amounts of fat, depending on the cut. The key macro nutrition should be reviewed to ensure balance in meal planning.
Micronutrient analysis reveals brisket is rich in iron, essential for blood health, and provides several B vitamins critical for energy metabolism. This makes it a nourishing option within a balanced diet. Health benefits include providing essential amino acids along with iron; however, it’s advised to be mindful of portion sizes due to the richness of the meat.
Dietary considerations should focus on balancing the brisket with lighter side dishes, such as salads or steamed vegetables, to enhance overall nutrition. This ensures a well-rounded meal experience, balancing protein intake with additional vitamins and minerals.
For those mindful of weight management, consider controlling portion sizes and pairing brisket with fiber-rich side dishes to create a balanced plate without excessive calorie consumption.
Dietary Adaptations
To accommodate gluten-free diets, ensure that any sauces or marinades used are certified gluten-free, as many conventional BBQ sauces may contain gluten. Additionally, providing gluten-free sides complements the meal while ensuring everyone can partake.
For dairy-free adaptations, this recipe naturally aligns with dairy-free preparations, making it suitable for those with lactose intolerances. If you’re looking to transform it into a vegan option, replace the brisket with jackfruit or seitan, using the same marinade for flavor.
Low-carb and keto variations can be achieved by omitting sugar from sauces or using sugar substitutes, allowing individuals to enjoy delicious BBQ flavors without the carbohydrate load. Additionally, paleo diets are easily accommodated through the use of natural ingredients, focusing on fresh herbs and spices for seasoning.
Furthermore, modifying for low-FODMAP diets can be achieved by using garlic-infused oils instead of whole garlic and ensuring that the BBQ sauce does not contain high-FODMAP ingredients. Tailoring the recipe ensures that dietary needs are met while maintaining the delightful tastes associated with brisket.
Troubleshooting Guide
When dealing with texture issues, if your brisket comes out tough, it’s likely due to not cooking it long enough. Always ensure low and slow cooking to break down the collagen adequately. Conversely, if it’s too mushy, it may have been cooked for too long—keeping a close watch on cook time helps avoid this.
Flavor balance is another common concern. If the brisket tastes overly salty or bland, consider adjusting the seasoning next time, and experiment with marinating for more flavor infusion. If the BBQ sauce is too sweet, balancing it with vinegar or mustard may help sour it out.
If temperature problems arise, ensure your slow cooker’s temperature settings are calibrated correctly. Modern slow cookers can differ significantly, so keeping track of internal meat temperatures is vital for doneness.
For equipment challenges, if you find your slow cooker isn’t holding temperature, try using a different appliance—sometimes, an oven set on low can yield similar results. Ingredient substitutions can also affect cooking times, so keep notes for future reference.
Timing concerns can be remedied with accurate planning; always allow extra time beyond the stated cooking time to ensure maximum tenderness. Good preparation will prevent rushing and allow flavors to meld beautifully.
Recipe Success Stories
Sharing community feedback on Slow Cooker Beef Brisket illustrates how family and friends appreciate this dish’s flavors and tenderness. Many first-time cooks have successfully mastered this recipe, often raving about its ease and delicious outcome. Several users have shared their adaptations, such as using different sauces, which have led to equally delightful results.
Reader suggestions like incorporating apple cider for a tangy finish or adding spices like smoked paprika can enhance the flavor and variety of the dish. Photography tips from the community emphasize showcasing the glossy BBQ coating and tender slices, making it irresistibly appealing when shared on social media.
Adaptation stories often highlight how this recipe becomes a staple for various gatherings, proving its versatility. People frequently share their experiences, emphasizing how these recipes turned simple meals into remarkable occasions filled with warmth and family bonding.
Frequently Asked Questions
1. How do I know when my brisket is done? The best way to check for doneness is by using a meat thermometer. For brisket, it should reach an internal temperature of around 195°F to 205°F for optimal tenderness. You should be able to shred it easily with forks when done.
2. Can I use frozen brisket? Yes, but it is essential to thaw it completely in the refrigerator before cooking. Cooking from frozen may lead to uneven cooking and texture.
3. What if my brisket is too dry? If you find your brisket has become dry, consider shredding it and mixing it with additional BBQ sauce or broth to reintroduce moisture.
4. Can I cook brisket overnight? Absolutely! Many home cooks prefer to cook brisket overnight in a slow cooker. Just ensure it’s set on the low setting and allow for adequate resting time afterwards.
5. How do I store leftovers? Leftover brisket should be stored in an airtight container in the refrigerator for up to four days. You can also freeze it for longer storage.
6. Can I cook this in an Instant Pot? Yes, you can adapt this recipe for the Instant Pot. Cook on high pressure for about 60-90 minutes, and follow the same seasoning instructions.
7. What’s the best way to serve brisket? Brisket can be served sliced or shredded, often with extra BBQ sauce. It’s great in sandwiches, tacos, or alongside sides like coleslaw and baked beans.
8. Is beef brisket healthy? Brisket is a good source of protein and essential vitamins. However, moderation is key due to its richness; pairing with vegetables can create a balanced meal.
9. What can I do with leftover brisket? Leftover brisket can be used in a variety of ways—think sandwiches, salads, or even in a hearty chili for a warm comfort dish.
10. Can I use another cut of meat? Yes, while brisket is preferred, other cuts like chuck roast may be used with similar results, though cooking times and flavors may vary.
Additional Resources
To further enhance your culinary journey, explore other related recipes that pair wonderfully with Slow Cooker Beef Brisket, such as homemade coleslaw, cornbread, or roasted veggies. Technique guides on slow cooking and flavor profiling can be invaluable for achieving the best results.
Ingredient information is also important; familiarize yourself with different types of BBQ sauces, spices, and cuts of meat for a versatile cooking experience. Equipment recommendations can enhance your cooking efficiency—invest in quality slow cookers or Instant Pots for maximum flavor.
Lastly, seasonal variations not only enhance the dish but can also inspire creativity in the kitchen. Consider using seasonal vegetables or fruits that pair well with the smokiness of brisket, bringing fresh taste to your table.
Join the Conversation
Sharing cooking experiences on social media platforms encourages community engagement. Post your photos and variations of Slow Cooker Beef Brisket to inspire others and exchange tips. Encourage readers to share reviews and feedback, fostering an environment of learning and improvement.
Highlighting unique adaptations results in a broader spectrum of flavors and experiences, enriching the overall conversation around this dish. Remember, the beauty of cooking lies not only in the dish itself but in the connections made and memories created through food.
The Recipe
Slow Cooker Beef Brisket with BBQ Sauce
Serves: 6 servings
Prep Time: 20 mins
Cook Time: 8 hours
Total Time: 8 hours 20 mins
Kitchen Equipment Needed
Slow cooker
Large skillet (for searing)
Meat thermometer
Sharp knife (for slicing)
Cutting board
Measuring cups and spoons
Ingredients
3-4 lbs beef brisket
2 cups BBQ sauce (store-bought or homemade)
1 tablespoon smoked paprika
1 tablespoon garlic powder
1 tablespoon onion powder
1 teaspoon salt
1 teaspoon black pepper
1 cup beef broth (or water)
Directions
Trim excess fat from the brisket, ensuring a small fat cap remains for moisture.
In a large skillet, heat oil over medium-high heat and sear the brisket on all sides until browned (approx. 5-6 minutes per side).
Transfer the brisket to the slow cooker, and mix together the spices (paprika, garlic powder, onion powder, salt, and pepper) in a bowl. Rub the mixture all over the brisket.
Add the beef broth and 1 cup of BBQ sauce to the slow cooker. Pour remaining sauce over the brisket.
Cover and cook on low for 8 hours, or until the brisket is tender and easily shreds with a fork.
Once cooked, remove the brisket and let it rest for at least 20 minutes before slicing against the grain.
Serve with additional BBQ sauce and your choice of sides.
Recipe Notes
To enhance flavor, let the brisket marinate with the spice rub in the fridge overnight.
For spicy brisket, mix in some cayenne pepper or use hot BBQ sauce.
Leftover brisket can be stored in an airtight container for up to 4 days.