Delicious Strawberry Crunch Cheesecake Recipe You Must Try Today

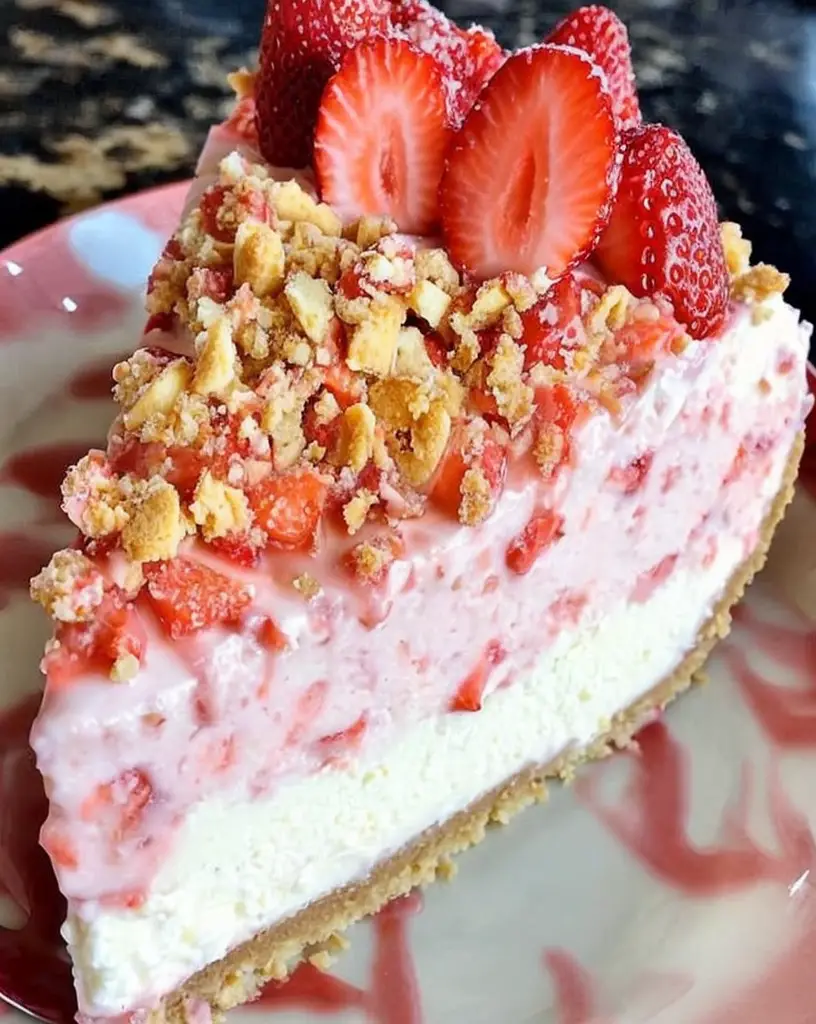
Delicious Strawberry Crunch Cheesecake: A Delightful Dessert Delight

⚖️
Difficulty
Moderate

⏲️
Prep Time
30 mins

🕒
Cook Time
60 mins

⏱️
Total Time
90 mins

🍽️
Servings
8 slices

Indulge in the creamy, fruity bliss of our Strawberry Crunch Cheesecake, a dessert that brings together the rich, velvety texture of cheesecake with a delightful crunch. This recipe features layers of luscious strawberries and a crumbly topping that transforms the classic cheesecake into an extraordinary treat. With every bite, you’ll experience the perfect balance of sweetness and tartness, making it a delightful choice for any occasion.

Picture yourself serving this stunning cheesecake at your next gathering, where its vibrant colors and captivating aroma are sure to impress. The combination of smooth cream cheese and fresh strawberries creates a mouthwatering sensation, while the crunchy topping adds an irresistible contrast that elevates each slice. The simplicity of this recipe belies its visual and culinary appeal, ensuring that it stands out on any dessert table.

Quick Recipe Highlights

  • Flavor Profile: This cheesecake features a delightful blend of rich creaminess with the bright, sweet flavor of fresh strawberries, making it a refreshing treat.
  • Texture: With a creamy filling, a hint of fluffiness, and a satisfying crunchy topping, the contrasting textures create a mouthwatering experience.
  • Aroma: The sweet aroma of baked strawberries mingles with the rich scent of cream cheese, creating an inviting atmosphere for dessert lovers.
  • Visual Appeal: The vibrant red of the strawberries against the pale cheesecake is visually stunning, making it a beautiful centerpiece at any gathering.
  • Skill Level Needed: This cheesecake requires basic baking skills, making it perfect for both novice bakers and experienced chefs alike.
  • Special Equipment: A springform pan is essential for achieving the perfect cheesecake shape and ease of serving.

Recipe Overview

  • Difficulty Level: The moderate difficulty of this Strawberry Crunch Cheesecake involves a combination of baking techniques, but the steps are straightforward and manageable.
  • Category: This dessert falls under the category of cheesecake, specifically a fruity variation that captures the essence of spring and summer desserts.
  • Cuisine: Inspired by classic American desserts, this cheesecake incorporates the freshness of strawberries, a popular choice in many culinary traditions.
  • Cost: The basic ingredients for this cheesecake are affordable, with strawberries being the most significant expense, especially if fresh.
  • Season: Best enjoyed during spring and summer when strawberries are in season and at their sweetest, this cheesecake is perfect for warm weather gatherings.
  • Occasion: Ideal for celebrations, birthdays, and potlucks, the Strawberry Crunch Cheesecake serves as a delightful ending to any festive meal.

Why You’ll Love This Recipe

The Strawberry Crunch Cheesecake stands out due to its irresistible taste and texture appeal. The creamy filling perfectly complements the sweetness of fresh strawberries, while the crunchy topping adds flair. This dessert promises satisfaction that will leave your guests asking for seconds.

Convenience is another delightful feature. The preparation involves simple steps that yield stunning results, making this cheesecake manageable for bakers of all skill levels. Plus, it’s a great make-ahead dessert, allowing you to impress without last-minute stress.

Nutritionally, strawberries provide essential vitamins, antioxidants, and fiber, making this dessert a bit healthier than many others. So, you can indulge guilt-free! Additionally, the cheesecake offers ways to adapt for various dietary preferences, such as gluten-free or vegan variations.

Socially, the Strawberry Crunch Cheesecake is a dessert that brings people together. Its visual appeal is a conversation starter, and sharing delicious food creates bonds, making it a perfect choice for gatherings.

Finally, the affordability of the ingredients ensures accessibility for everyone. You can whip up this delightful dessert without breaking the bank, allowing you to share joy with family and friends through homemade goodness.

Historical Background and Cultural Significance

The origins of cheesecake date back to ancient Greece, where it was served at the first Olympic Games as a source of energy. Over centuries, the recipe evolved, transitioning from simple cheese mixtures to the beloved cheesecake variations we know today.

In America, cheesecake gained immense popularity in the 19th century, influenced by European immigrants who brought their recipes. Today, the versatility of cheesecake allows countless adaptations, including the addition of seasonal fruits like strawberries, integrating local flavors into the dessert.

The evolution of the recipe reflects the changing culinary landscape, with cheesecakes embracing contemporary ingredients and techniques. Seasonal influences and local produce play a vital role in cheesecakes across different regions, showcasing variations that celebrate unique cultural twists.

Regionally, the love for strawberries in America makes the Strawberry Crunch Cheesecake a beloved favorite, especially during summer months. This cheesecake serves as a symbol of nostalgia, reminding us of picnics, barbecues, and family gatherings, connecting generations through shared culinary experiences.

Ingredient Deep Dive

Strawberries: Strawberries have a rich history, beloved since ancient times for their unique sweetness and vibrant color. They’re packed with vitamins C and K, and high in antioxidants, contributing to heart health and improved skin. When selecting strawberries, look for bright red, plump fruit with a fragrant aroma. Store them in the refrigerator for up to a week, and you can freeze excess strawberries for later use.

Cream Cheese: Cream cheese is a crucial ingredient in cheesecakes, contributing to the creamy texture and rich flavor. This ingredient has roots in American dairy production, originating in the 19th century. Cream cheese is also a source of calcium and protein, enhancing the nutritional profile of desserts. When purchasing, opt for full-fat for the best results and store it in the refrigerator, using it within a couple of weeks after opening.

Common Mistakes to Avoid

  • Overmixing the batter can lead to cracks in the cheesecake. To achieve the perfect texture, mix until just combined.
  • Not using room temperature ingredients can cause lumpy batter and uneven cooking, so allow cream cheese and eggs to reach room temp beforehand.
  • Baking the cheesecake too long will result in a dry texture; be sure to check doneness with a slight jiggle in the center.
  • Underestimating the chilling time can ruin the structure, so allow the cheesecake at least four hours to set properly.
  • Skipping the water bath can lead to cracked tops. Wrapping the pan with foil while baking helps maintain moisture and temperature.
  • Using low-quality chocolate for the topping can diminish flavor; always choose high-quality chocolate or berry toppings.
  • Not preparing for serving can lead to a mess. Use a hot knife for cleaner slices and an attractive presentation.
  • Forgetting to line the bottom of the springform pan can make removal difficult. Always use parchment paper for smoother lifting.
  • Forgetting to taste before baking can lead to an unbalanced flavor; always check sweetness levels with your strawberries.
  • Not allowing for the cooling period can spoil the texture; let the cheesecake cool to room temperature before refrigerating.

Essential Techniques

Baking in a Water Bath: Baking your cheesecake in a water bath helps to regulate temperature and moisture. It’s crucial for preventing cracks and achieving a smooth, creamy texture. To master this technique, wrap the springform pan in foil to prevent leaks and place it in a larger pan filled with hot water.

Proper Cooling: Allowing the cheesecake to cool slowly in the oven with the door ajar will help prevent cracks by avoiding sudden temperature changes. After baking, let it cool gradually for at least an hour before transferring to the refrigerator. This cooling method ensures an even texture and beautiful appearance.

Pro Tips for Perfect Strawberry Crunch Cheesecake

1. Always preheat your oven to ensure consistent baking temperatures, which is key for even cooking.
2. Choose ripe strawberries for the best flavor; avoid overripe fruit which can affect overall sweetness.
3. Incorporating a bit of lemon zest with the filling enhances the fresh strawberry flavor beautifully.
4. Refrigerate the cheesecake overnight for the best taste and restrained firmness.
5. Consider experimenting with graham cracker alternatives for the crust to add variety and flavor.
6. For added texture and flair, sprinkle crushed nuts or coconut on top before serving.
7. Use quality vanilla extract for an enhanced depth of flavor in the cheesecake.
8. Feel free to drizzle a homemade berry sauce over slices for an elegant presentation.

Variations and Adaptations

Substituting different fruits can create exciting new flavors for your cheesecake. For example, using blueberries or raspberries instead of strawberries provides a slightly tart twist.

Depending on the season, you can modify the cheesecake toppings to match available fruits or even use chocolate ganache for a decadent touch in colder months.

For dietary considerations, you can create a gluten-free version by using almond flour instead of graham cracker crumbs for the crust or opting for dairy-free cream cheese alternatives.

Experimenting with spices such as cinnamon or nutmeg can also elevate the flavor profile of your cheesecake, adding warmth and complexity.

Creative presentation alternatives can include layering sliced strawberries on top or forming a berry compote for a burst of color and taste.

Serving and Presentation Guide

Plating your Strawberry Crunch Cheesecake beautifully elevates the dessert. Use a slice remover to gently lift portions and present them on individual plates.

For garnishing, consider adding a sprig of mint or a dusting of powdered sugar for a refined touch. You might also decorate with additional sliced strawberries on the side or drizzle a berry sauce for added flavor.

Traditional accompaniments like whipped cream or vanilla ice cream pair exceptionally well, adding richness to the fruity cheesecake.

Serving temperature is crucial; allow the cheesecake to sit out for 10-15 minutes before serving, as it’s most flavorful when slightly softened.

Portion control can enhance the dining experience, especially with rich desserts. Cut smaller slices to allow guests to enjoy without feeling overwhelmed.

Wine and Beverage Pairing

Pairing your Strawberry Crunch Cheesecake with the right beverage can enhance the dessert experience. A sweet dessert wine, like a late harvest Riesling, complements the fruity flavors without overpowering them.

Alternatively, a sparkling rosé offers a refreshing contrast to the richness of the cheesecake, providing a balanced sip between bites.

For non-alcoholic options, a chilled hibiscus tea with a hint of lemon can add a lovely tartness that mirrors the strawberry notes.

Temperature is key; serve wines chilled and consider slight warming of hot beverages for a cozy pairing.

Incorporating a refreshing iced tea, lightly sweetened or with fresh mint, serves as an excellent alternative for warmer days.

Storage and Shelf Life

To maintain the decadent taste and texture, store your Strawberry Crunch Cheesecake in the refrigerator, ideally in an airtight container. This dessert keeps well for up to five days, ensuring you can enjoy leftovers.

If freezing, wrap the cheesecake in plastic wrap and then foil to prevent freezer burn. It can be frozen for up to three months without losing its delightful quality.

Signs of spoilage include changes in texture, an off smell, or mold formation; always inspect before enjoying stored cheesecake.

When reheating, allow gradual thawing in the refrigerator before serving to preserve consistency and flavor.

Frozen portions can be enjoyed cold or at room temperature, offering flexibility for serving.

Make Ahead Strategies

If you’re planning for a gathering, this Strawberry Crunch Cheesecake can be made a day in advance, allowing for perfect chilling time.

Store the cheesecake in the fridge overnight covered to avoid drying out or gathering unwanted odors. If preparing several days ahead, consider freezing and thawing in the fridge 24 hours before serving.

During preparation, you can prepare the crust and filling separately, storing the crust at room temperature, and the filling in the refrigerator until you’re ready to assemble.

For optimal freshness, add fresh strawberries or toppings just before serving to ensure fruits maintain their texture and flavor.

Reheating or serving fresh cheesecakes is easier and enhances the eating experience; avoid clutter before your gathering by organizing serving plates in advance.

Scaling Instructions

When scaling the Strawberry Crunch Cheesecake recipe, halving or doubling ingredients is straightforward. Keep ratios consistent for the best outcomes, particularly for the crust and filling.

For larger gatherings, consider using a larger springform pan or multiple smaller ones to ensure even baking. Ensure adjustments to cooking times based on the thickness of your cheesecake.

Monitor baking time closely, as changes can impact texture and doneness; the cheesecake should remain slightly jiggly in the center when done.

If you’re like to save portions, remember to adjust packaging sizes for freezing or serving; pack into appropriate sizes for convenience.

When planning to make multiple variations or flavors, prepare the base mixture and divide it into separate bowls to add fruit or flavorings individually.

Nutritional Deep Dive

The Strawberry Crunch Cheesecake contains a balanced macro breakdown: about 20g of fat, 30g of carbs, and 5g of protein per slice. The creamy richness from the cream cheese contributes to its fat content.

Micronutrient analysis shows it’s a source of vitamin C from strawberries, calcium from cream cheese, and beneficial antioxidants, making it an indulgence with health perks.

In moderate portions, this cheesecake aligns well with various dietary needs, but keep an eye on added sugars, especially for health-conscious consumers.

For weight management tips, consider savoring smaller portions, allowing the flavors to linger without excess calories.

Incorporating more whole ingredients and minimizing added sugars could enhance the overall nutritional profile while maintaining sweetness.

Dietary Adaptations

For those needing gluten-free desserts, replace graham crackers with almond flour or gluten-free cookie crumbs to maintain the crust’s integrity.

A dairy-free version can be achieved using vegan cream cheese and nut-based toppings to blend flavors without sacrificing texture.

For a vegan option, consider aquafaba in place of eggs in the filling, yielding a light and airy cheesecake without animal products.

Lower-carb or keto diets can utilize almond flour to create a suitable crust while minimizing sugar in the filling by using natural sweeteners like stevia.

Adaptations for paleo diets often encourage using natural sweeteners and whole food ingredients, focusing on unprocessed components.

Understanding these dietary modifications allows more people to enjoy the delightful experience of cheesecake while adhering to their personal preferences or restrictions.

Troubleshooting Guide

If your cheesecake has cracks, it could be due to rapid temperature changes; ensure your oven temperature is consistent, and cool the cheesecake slowly.

For texture issues, like a grainy or overly dense cheesecake, ensure cream cheese is at room temperature before mixing and don’t overmix ingredients.

Flavor balance problems can arise from too many or too few strawberries. Always taste the filling before baking to adjust sweetness or acidity as necessary.

If you’re encountering problems with ingredient substitutions, test out small batches to find suitable replacements that maintain the desired flavor and texture.

Timing concerns often arise; prepare for extended chilling and baking time due to variation in oven performance and ingredient temperatures.

Keeping a close eye on doneness is crucial; cakes should jiggle slightly in the center when finished rather than appearing solid.

Recipe Success Stories

Community feedback on this Strawberry Crunch Cheesecake has been overwhelmingly positive, with many raving about its lightness and burst of flavor. User stories often highlight successful adaptations and substitutions, inspiring others to try their variations.

Readers have noted how well the dessert holds up for gatherings, sharing photos that showcase their creative presentations and proud achievements.

Feedback regarding the ease of the recipe has encouraged novice bakers to venture into cheesecake-making, boosting confidence and kitchen skills.

Social media sharing has become a trend, with stunning photography capturing the vibrant beauty of this cheesecake, encouraging further engagement within cooking communities.

This dessert has transformed into a favorite for potlucks and family celebrations, consistently eliciting requests for the recipe and variations from attendees.

Frequently Asked Questions

Can I use frozen strawberries in this recipe? Yes, frozen strawberries can be used, but make sure to thaw and drain excess liquid to prevent a watery filling.

How do I know when my cheesecake is done baking? A cheesecake is done when the edges are set, but there’s a slight jiggle in the center. It will continue to firm as it cools.

Can I make this cheesecake ahead of time? Absolutely! This cheesecake can be made a day in advance or frozen for longer storage, ensuring it’s ready for your gathering.

What can I use if I don’t have a springform pan? You can use a regular pie pan, but be sure to line it well for easier removal after baking.

How can I fix a cracked cheesecake? To fix a crack, consider topping it with fresh strawberries or a fruit glaze to hide imperfections while adding flavor.

Is this recipe suitable for diabetics? The strawberry cheesecake can be adapted by using sugar substitutes and whole grain crusts, making it more diabetic-friendly.

How long can I store the cheesecake in the fridge? The cheesecake can last up to five days in the refrigerator. Keep it well covered to maintain freshness.

Can I swap cream cheese for Greek yogurt? Using Greek yogurt will change the texture and taste but can produce a lighter version of the cheesecake.

What are the best toppings for this cheesecake? Fresh whipped cream, fruit compote, or drizzled chocolate all complement the cheesecake superbly while enhancing its beauty.

Can I make mini cheesecakes with this recipe? Yes, you can use muffin tins to create mini cheesecakes. Adjust baking time accordingly to ensure they set properly.

Additional Resources

If you enjoyed this Strawberry Crunch Cheesecake, check out related recipes such as Chocolate Raspberry Cheesecake or Classic New York Cheesecake for new twists on popular desserts.

For mastering cheesecakes further, explore technique guides that delve into baking, cooling, and slicing with finesse.

Ingredient information, including seasonal produce lists, can help inspire you to make the most of what’s fresh and available for your desserts.

Consider investing in equipment recommendations for successful baking, as high-quality pans and mixers can significantly impact results.

Seasonal variations can offer exciting ideas, such as incorporating pumpkin for autumn or citrus fruits for festive winter desserts.

Join the Conversation

We’d love to see your Strawberry Crunch Cheesecake creations! Share your photos on social media, and don’t forget to tag us.

Photography tips can enhance your dessert snaps, ensuring you capture the beautiful colors and textures of your cheesecake perfectly.

Leave a review to help other bakers discover the joys of this recipe, sharing any variations or tips you found helpful.

Engage with our community by sharing your feedback, adaptations, or even failure stories, as every experience contributes to our collective growth in the kitchen.

Explore different recipe variations and let us know your favorites, as we’re excited to see how you make this cheesecake your own!

The Recipe

Strawberry Crunch Cheesecake

Serves: 8 slices

Prep Time: 30 mins

Cook Time: 60 mins

Total Time: 90 mins

Kitchen Equipment Needed

  • Springform pan
  • Mixing bowl
  • Electric mixer
  • Spatula
  • Measuring cups and spoons
  • Paring knife for slicing
  • Small saucepan (for berry sauce optional)

Ingredients

  • 1.5 cups graham cracker crumbs
  • 1/2 cup unsalted butter, melted
  • 1/4 cup sugar
  • 3 (8 oz) packages cream cheese, softened
  • 1 cup sugar (for cheesecake filling)
  • 3 large eggs
  • 2 teaspoons vanilla extract
  • 2 cups fresh strawberries, pureed and hulled
  • 1 cup strawberries, sliced for topping
  • 1 cup crushed nuts or crunchy topping (optional)

Directions

  1. Preheat your oven to 325°F (160°C). Prepare a springform pan by lining the bottom with parchment paper.
  2. In a mixing bowl, combine the graham cracker crumbs, melted butter, and sugar until evenly moistened. Press the mixture firmly into the bottom of the prepared pan.
  3. In a separate bowl, beat the cream cheese until smooth. Gradually add 1 cup sugar, continuing to mix until well combined.
  4. Add the eggs one at a time, mixing well after each addition. Stir in the vanilla extract and pureed strawberries.
  5. Pour the cream cheese mixture over the crust in the springform pan. Smooth the top with a spatula.
  6. Bake in the preheated oven for about 60 minutes or until the edges are set, and the center still slightly jiggles.
  7. Remove the cheesecake from the oven and allow it to cool to room temperature in the pan. Then refrigerate for at least 4 hours or overnight for best results.
  8. Before serving, top with sliced strawberries and optional crushed nuts for garnish. Slice and enjoy!

Recipe Notes

  • Feel free to adjust the sweetness to your liking, particularly when using fresh or frozen strawberries.
  • If desired, you can add a layer of strawberry glaze or chocolate ganache on top for added flavor.
  • Make sure to release the springform pan gently to preserve the shape of the cheesecake when removing it.
  • Consider doubling the recipe for larger gatherings and using a larger pan accordingly.

Soothe Your Throat with this Easy Cinnamon Sore Throat Tea Recipe

cinnamon tea for sore throat, honey lemon tea recipe, natural sore throat remedy, cinnamon herbal tea, soothing throat tea

Suggested Internal Linking Opportunities for “Cinnamon Sore Throat Tea Recipe”

Relevant Internal Links from ExoRecipes:

  1. Comfort Food for Sickness Relief
  2. Slow Cooker Winter Favorites
  3. Everyday Comfort Essentials

Full Article: Cinnamon Sore Throat Tea Recipe


Introduction

When battling a sore throat, finding natural remedies that are both effective and delicious is crucial. Enter Cinnamon Sore Throat Tea—a soothing, aromatic beverage that combines the healing powers of cinnamon, honey, and lemon. Whether it’s to calm an irritated throat or boost your immunity during colder months, this tea is the ultimate comfort drink. Plus, it’s simple enough to prepare in just minutes.


Why Cinnamon Tea is a Must-Try Remedy

Cinnamon has been a trusted spice in traditional medicine for centuries. Its anti-inflammatory and antimicrobial properties are scientifically backed and ideal for addressing throat discomfort. Combining it with honey, known for its soothing qualities, creates a powerful duo for natural healing. According to Healthline, cinnamon may also support overall immune function.

  • Key benefits:
    • Relieves throat irritation.
    • Boosts immunity.
    • Natural antioxidants for overall health.

Internal Resource: Check out our guide to warm and soothing recipes for comfort to pair with your tea.


Ingredients and Why They Work

To make this tea, you’ll need:

  • Cinnamon sticks or powder: Anti-inflammatory and antibacterial properties.
  • Honey: Soothes irritation and has antibacterial effects.
  • Lemon juice: Rich in Vitamin C and supports hydration.
  • Optional:
    • Ginger slices for added warmth.
    • Cayenne pepper for sinus relief.

Preparation Tips: Explore other hearty slow cooker meals that complement this tea for a full day of soothing comfort.


Recipe: Step-by-Step Instructions

  1. Gather Ingredients:
    • 2 cinnamon sticks or 1 teaspoon of cinnamon powder.
    • 1 tablespoon of honey.
    • Juice of 1/2 a lemon.
    • 2 cups of water.
  2. Simmer:
    • Boil water, add cinnamon, and simmer for 10 minutes.
    • For extra flavor, include ginger or cayenne pepper.
  3. Finish and Serve:
    • Strain the tea into a cup.
    • Stir in honey and lemon juice.
    • Enjoy warm for maximum relief.

Pro Tip: Learn how to create other classic comfort food recipes like Slow Cooker Magic to support your recovery.


Variations to Try

  • Chai-Infused Version: Add cardamom, cloves, and star anise for a chai twist.
  • Iced Cinnamon Tea: Chill and serve with ice cubes for a refreshing alternative.
  • Spiced Apple Version: Include apple slices and a dash of nutmeg.

Health Benefits and Science-Backed Evidence

  • Soothes Sore Throats: Honey coats and protects the throat lining.
  • Boosts Immunity: Lemon provides a Vitamin C kick.
  • Anti-inflammatory Effects: Cinnamon reduces swelling and redness.

For more on the health benefits of cinnamon, check out this comprehensive guide.


FAQs

1. Can I drink cinnamon tea every day?
Yes, but moderate consumption (1-2 cups) is recommended to avoid side effects.

2. What type of honey is best?
Opt for raw, unfiltered honey for maximum health benefits.

3. Can I use powdered cinnamon instead of sticks?
Yes, but strain the tea thoroughly to remove clumps.


Conclusion

Making Cinnamon Sore Throat Tea at home is a straightforward way to feel better and boost your immunity. With simple, natural ingredients, this tea provides both comfort and healing. Pair it with other classic comfort food recipes for a well-rounded approach to wellness.

Chicken and Potato Bake: A Hearty and Easy One-Dish Meal

baked chicken and potatoes, chicken potato casserole, one-pan chicken dinner, creamy chicken bake, roasted chicken with potatoes, chicken and vegetable bake

Chicken and Potato Bake: A Comforting Classic

If you’re searching for a wholesome, hearty dish that combines the tenderness of chicken with the rich, buttery texture of potatoes, this Chicken and Potato Bake recipe is your answer. With minimal effort and a few simple ingredients, this dish provides the perfect balance of nutrition and flavor.

Before diving into the recipe, let’s explore the versatility and adaptability of this family favorite. Whether you’re looking for a quick weekday meal or something to impress guests, the Chicken and Potato Bake is a dish that never disappoints.

Why Choose Chicken and Potato Bake?

This recipe has stood the test of time for several reasons:

  • Ease of Preparation: With straightforward steps, even novice cooks can achieve perfection.
  • Flexible Ingredients: Add your favorite vegetables or swap seasonings to suit your taste.
  • Meal Prep-Friendly: Make ahead and enjoy throughout the week.

For more inspiration on enhancing your recipe, explore our Creamy Garlic Parmesan Chicken article for flavor variations.


Ingredients for Chicken and Potato Bake

Here’s what you’ll need to recreate this delightful dish:

  • Chicken: Opt for boneless thighs or breasts for a juicy texture.
  • Potatoes: Yukon gold or russets work best due to their ability to hold their shape.
  • Herbs & Spices: Garlic, rosemary, paprika, and thyme enhance the flavor profile.
  • Optional Add-Ins:
    • Vegetables like carrots or broccoli.
    • Cheese for a creamy finish.

Looking for a ranch-inspired twist? Check out Chicken Bacon Ranch Potatoes for ideas on seasoning combinations.


Step-by-Step Guide

Step 1: Prepping the Ingredients

  • Wash and peel potatoes (if desired).
  • Cut chicken into even pieces for consistent cooking.
  • Season chicken and potatoes separately using olive oil, garlic, and spices.

Step 2: Assembling the Dish

  • Grease a baking dish to prevent sticking.
  • Layer seasoned potatoes at the bottom, creating an even base.
  • Place chicken pieces on top, ensuring even heat distribution.

Step 3: Baking

  • Preheat oven to 375°F (190°C).
  • Cover with foil and bake for 35 minutes.
  • Remove foil, sprinkle cheese (if using), and bake for an additional 10 minutes until golden.

Looking for alternative cooking methods? See Crockpot Ranch Chicken and Potatoes for a slow-cooker variation.


Tips for Success

  1. Perfecting the Texture:
    • Toss potatoes with cornstarch for extra crispiness.
    • Use skin-on chicken to retain moisture.
  2. Adding Depth:
    • Incorporate a splash of chicken broth or cream before baking.
    • Sprinkle grated Parmesan for a cheesy finish.
  3. Vegetable Variations:
    • Swap potatoes for sweet potatoes or squash for a unique flavor.
    • Add green beans or bell peppers for added color and nutrition.

For a casserole alternative, visit our Ham and Potato Casserole recipe.


Pairing Suggestions

Enhance your meal by serving with:

  • Fresh Salad: A crisp garden salad balances the richness of the bake.
  • Bread: Garlic bread or dinner rolls are great for dipping.
  • Sauces: A dollop of sour cream or ranch dressing adds a creamy contrast.

FAQs About Chicken and Potato Bake

Can I use frozen chicken?
Yes, but ensure it’s fully thawed to prevent uneven cooking.

How do I reheat leftovers?
Use an oven or air fryer to restore the crispy texture of the potatoes.

What’s the best potato variety for baking?
Yukon gold potatoes are preferred for their creamy texture.


Nutrition Information

NutrientAmount (Per Serving)
Calories420
Protein25g
Carbohydrates35g
Fats15g

Final Thoughts

The Chicken and Potato Bake is a timeless recipe that fits any occasion. Its simplicity, paired with the ability to customize, makes it a staple in kitchens everywhere. Whether you’re adding cheese, swapping vegetables, or experimenting with spices, this dish ensures satisfaction in every bite.

For more culinary ideas, explore Ultimate Cheesy Ranch Chicken and elevate your cooking repertoire today!

Irresistible Bang Bang Shrimp Recipe for Spicy Seafood Lovers

Bang Bang Shrimp: Irresistibly Crispy and Creamy Delight

⚖️
Difficulty
Medium

⏲️
Prep Time
20 mins

🕒
Cook Time
10 mins

⏱️
Total Time
30 mins

🍽️
Servings
4 servings

If you’re looking for a dish that perfectly balances crunch and creaminess, then Bang Bang Shrimp is just what you need. This delightful recipe features tender shrimp that are lightly coated and fried to a golden crisp before being tossed in a creamy, spicy sauce that sets your taste buds on fire. It’s a dish that combines ease and flavor, making it an ideal choice for casual dinners or impressive gatherings. Serve it as an appetizer or alongside rice for a main meal, and watch it disappear quickly!

The allure of Bang Bang Shrimp lies not only in its bold flavors but also in its quick preparation time. Whether you’re entertaining guests or enjoying a cozy night in, this recipe is perfect for any occasion. The marriage of crispy textures, a hint of spice, and delectable sweetness creates an unforgettable dining experience that you’ll find yourself craving time and time again.

Quick Recipe Highlights

  • Flavor Profile: A perfect combination of sweet, spicy, and savory, with notes of garlic and heat from the chili sauce.
  • Texture: Crispy exterior from frying contrasted with tender, juicy shrimp.
  • Aroma: Rich, inviting scents that combine creamy mayonnaise and zesty sauces, making it irresistible.
  • Visual Appeal: Eye-catching presentation with vibrant colors that showcase the dish’s appetizing glaze on the shrimp.
  • Skill Level Needed: Simple enough for beginners but indulgent enough for experienced cooks; just follow the easy steps.
  • Special Equipment: A frying pan or deep fryer for the best results, plus a mixing bowl for the sauce.

Recipe Overview

  • Difficulty Level: This Bang Bang Shrimp recipe is rated medium in difficulty, involving straightforward frying and mixing techniques.
  • Category: It serves as a versatile dish, perfect for appetizers, snacks, or main courses, depending on your serving style.
  • Cuisine: This dish is rooted in Asian flavors, specifically inspired by Thai and Asian fusion cuisine.
  • Cost: The dish is budget-friendly, with affordable ingredients like shrimp, frying oil, and pantry staples.
  • Season: This recipe shines in the warmer months when fresh shrimp are abundant and can be paired with a crisp salad.
  • Occasion: Ideal for parties, casual gatherings, or family dinners, it’s sure to impress with its flavor and presentation.

Why You’ll Love This Recipe

Bang Bang Shrimp will quickly become a favorite due to its fantastic taste and texture. The crispy coating gives a satisfying crunch that complements the tender shrimp inside, creating a delightful mouthfeel. As you’re indulging in this dish, the creamy, spicy sauce brings a flavor explosion that keeps every bite exciting.

One of the great conveniences of this recipe is its simplicity. With prep taking just 20 minutes and cooking only 10, you’ll have a delectable dish ready in under half an hour. Perfect for those weeknights when you need something quick yet delicious that doesn’t skimp on quality or flavor.

Nutrition-wise, shrimp is an excellent source of protein and low in calories, making this dish both satisfying and healthy. The sauce can be adjusted to suit dietary preferences, allowing you to enjoy a guilt-free version without compromising on taste.

Socially, Bang Bang Shrimp is a paragon of sharing. It’s an excellent dish for entertaining guests; its vibrant presentation and crowd-pleasing taste make it a guaranteed success, sparking conversation and joy at any table.

Moreover, its cost-effectiveness makes it accessible for everyone. With affordable ingredients that you might already have at home, you can whip up this exciting meal without breaking the bank.

Historical Background and Cultural Significance

Bang Bang Shrimp has become prevalent in many American restaurants, yet its origins are often debated. It is believed to have been inspired by Asian culinary techniques that incorporate crispy textures and bold flavors. The name “Bang Bang” reportedly comes from the sound of frying, symbolizing the lively cooking process.

In the wider context, this dish reflects the growing trend of Asian fusion cuisine that has taken root in the United States. By merging different culinary traditions, Bang Bang Shrimp showcases how food can bring people together, fostering appreciation for diverse flavors.

The recipe has evolved over time, with various adaptations appearing in restaurants and home kitchens. Many versions now include unique twists like different sauces or coatings, demonstrating the dish’s versatility and adaptability.

Regional variations abound, showcasing local tastes and preferences. From sweet chili peppers in the South to spicy sriracha in the Northeast, each adaptation adds depth to its cultural significance and connects communities through shared culinary experiences.

Ingredient Deep Dive

– Shrimp: Renowned for its versatility, shrimp is a staple in many cuisines, noted for its high protein content and low fat. When selecting shrimp, look for firm, translucent, and shiny specimens. Store fresh shrimp in the coldest part of your refrigerator, ideally to be used within 1-2 days for optimal flavor and safety. Frozen shrimp offers a convenient alternative and can be stored for months. Consider using sustainably sourced shrimp for environmental responsibility.

– Mayonnaise: A creamy condiment that serves as a base for the signature sauce in Bang Bang Shrimp. Its emulsified nature contributes to a rich mouthfeel and can also enhance the overall taste of various dishes. When selecting mayonnaise, look for high-quality options made with wholesome ingredients. Homemade mayonnaise can be a fresh alternative, adding a personalized touch. Store it in the refrigerator to maintain freshness and safety.

Common Mistakes to Avoid

  • Overcooking the shrimp can lead to a rubbery texture. Cook just until they turn pink.
  • Not patting the shrimp dry before frying can cause excess moisture, leading to soggy coating.
  • Failing to maintain oil temperature can result in greasy shrimp. Ensure your oil is hot enough before frying.
  • Using stale or expired ingredients may compromise flavor; check your pantry before starting.
  • Improperly measuring ingredients can lead to off flavors; use precise amounts for the sauce.
  • Not heating the pan consistently can yield uneven cooking; let your pan preheat adequately.
  • Skipping the cooling process can result in a soggy crust; let fries rest briefly after cooking.
  • Ignoring the sauce ratio can make it too spicy or sweet; adjust to your taste preference.
  • Underestimating prep time can lead to rushed cooking; take time to prep ingredients thoroughly.
  • Using low-quality frying oil can affect taste; opt for oils suitable for high-heat cooking.

Essential Techniques

Frying shrimp correctly is vital to achieving the desired crispy texture. To master frying, ensure your oil is at 350°F (175°C) before adding shrimp. Use a thermometer for precision; hot oil will create a crispy outer layer while keeping the shrimp tender. Monitor cooking time closely, which should not exceed 3-4 minutes per batch, to avoid overcooking.

When preparing the sauce, incorporating the right balance of ingredients is crucial. Start with mayonnaise as a base, slowly mixing in sauces like sriracha and sweet chili sauce. Tasting as you adjust will help you achieve the perfect flavor profile without overpowering the dish.

Pro Tips for Perfect Bang Bang Shrimp

When creating your Bang Bang Shrimp, here are some pro tips:

1. Keep all shrimp similar in size for even cooking.
2. Marinate shrimp for 15-30 minutes to enhance flavor absorption.
3. Use cornstarch or flour for added crunch in the coating.
4. Consider shallow frying for less oil absorption, achieving crispiness with lighter texture.
5. Try popping the shrimp in the refrigerator for 15 minutes after coating for crunch before frying.
6. Experiment with different sauces—mix mayo with lemon juice for a fresh twist.
7. For a gluten-free option, substitute with gluten-free flour.
8. Serve the shrimp on a bed of lettuce for a fresh, colorful presentation.

Variations and Adaptations

Bang Bang Shrimp is highly adaptable, allowing for a variety of regional twists. For a Southern flair, consider adding spices like Cajun seasoning to the coating mixture. If you’re in the mood for something heartier, serve it over a bed of fried rice, combining flavors for an all-in-one meal.

Seasonal adaptations include incorporating summer produce, such as corn or zucchini, to the dish for a veggie boost. For dietary modifications, you can use cauliflower florets for a low-carb and gluten-free version that retains that satisfying crunch. Additionally, consider infusing the sauce with different flavor profiles, such as garlic or lime, for a refreshing lift or a kick.

Serving and Presentation Guide

For an inviting presentation, arrange the fried shrimp on a large platter, garnishing with freshly chopped green onions or cilantro for a pop of color. Serve alongside a small bowl of the creamy sauce for dipping—a design that encourages sharing and interaction.

Drizzle additional sauce over the crispy shrimp for visual appeal and flavor enhancement. Consider pairing it with sliced cucumbers or carrots for a refreshing crunch that adds to the dish’s texture. Remember to serve at a warm temperature, as this enhances the overall flavor experience.

Wine and Beverage Pairing

For wine pairings, consider a crisp, chilled Sauvignon Blanc or a light-bodied Chardonnay that complements the shrimp’s delicate flavor while balancing the sauce’s creaminess. A sparkling wine can also enhance the experience, making it a festive choice for gatherings.

Non-alcoholic options like an iced ginger tea or a citrus-infused sparkling water can add a refreshing contrast to the meal. For coffee enthusiasts, a light roast with citrus notes or an herbal tea can serve as a perfect counterpoint post-meal.

Storage and Shelf Life

To store Bang Bang Shrimp, let the dish cool to room temperature and place it in an airtight container. This can be stored in the refrigerator for up to 3 days; however, for best results, enjoy it fresh as reheating may compromise the crispy texture.

When reheating, use an oven or air fryer to restore some of that crunch. Avoid using a microwave, which can lead to sogginess. If you’re planning to make ahead, consider storing the sauce and shrimp separately to maintain texture. Additionally, the fried shrimp can be frozen for up to one month, but it’s best to cook them fresh for the best flavor and texture experience.

Make Ahead Strategies

If you’re looking to prepare Bang Bang Shrimp in advance, consider chopping and marinating the shrimp. This can be done up to 24 hours before cooking, allowing flavors to meld. Keep the sauce in a separate container, ready to toss just before serving for optimal freshness.

For fried shrimp, you can also coat them ahead of time and freeze them prior to frying. Simply let the frozen shrimp sit at room temperature for about 15-20 minutes before frying to ensure they cook evenly.

Lastly, assemble all ingredients and tools before starting. Having everything laid out can streamline the process, allowing you to focus on perfecting your dish as you approach serving.

Scaling Instructions

Scaling your Bang Bang Shrimp recipe is simple! To halve the recipe, just reduce the shrimp and sauce amounts accordingly. Ensure your cooking time stays roughly the same; however, batch cooking might be necessary to maintain oil temperature.

For doubling or tripling, keep a close eye on your frying batch sizes to prevent overcrowding, which can lower oil temperature. Adjust the equipment used; for larger quantities, consider utilizing a large pot or deep fryer for even cooking.

Remember to stretch storage in mind; if you make sizable portions, ensure that your containers can appropriately store the finished shrimp.

Nutritional Deep Dive

When evaluating the nutrition of Bang Bang Shrimp, it’s essential to consider its macronutrient breakdown. Each serving typically provides a solid amount of protein from shrimp while keeping carbohydrates relatively low, especially when served without heavy sides.

Micronutrient-wise, shrimp is also rich in selenium and vitamin B12, contributing to overall well-being. It’s important to monitor added sugars in the sauce; however, the primary ingredients offer substantial health benefits without excessive calories when enjoyed in moderation.

Be conscious of portion size, especially if you’re minded about weight management. Sticking to recommended serving sizes can ensure you enjoy this dish without straying into excessive indulgence.

Dietary Adaptations

Bang Bang Shrimp can be easily adapted for various dietary needs. For a gluten-free version, opt for gluten-free flour in the coating, and ensure all sauces are also gluten-free certified.

If dairy-free options are desired, substitute regular mayonnaise with avocado mayonnaise or a dairy-free version made from plant-based ingredients. Vegan adaptations are possible by replacing shrimp with a suitable plant-based alternative or tofu, retaining the crunch with a similar batter.

Low-carb diets may call for swapping traditional frying for an air fryer or oven method, using less batter. Adapting this dish to cater to Keto or Paleo diets can include vegetable-based substitutes or sauces made from natural sweeteners.

Troubleshooting Guide

If you encounter texture issues, ensure the oil is hot enough before adding shrimp to avoid a soggy texture. If you find the coating doesn’t stick well, try longer marinating times and ensure they’re well-patted dry.

Flavors can sometimes fall flat; if this occurs, consider enhancing the sauce with fresh herbs or an extra kick of spice. If the shrimp cool too quickly and lose their crispness, a quick re-fry will rejuvenate their texture.

In case of ingredient substitutions causing problems, keep in mind that the ratios and cooking times may differ; maintain flexibility in approach for adjustments.

Recipe Success Stories

Readers have shared their successes with Bang Bang Shrimp, noting how easy it is to adapt the recipe for various dietary restrictions. One home cook embellished their shrimp with additional spices, creating a unique twist on the original.

Photography enthusiasts also remarked on how stunning this dish looks on camera, perfect for sharing on social media platforms. Various adaptations have indeed delighted family and friends, with guests often asking for the recipe with amazement.

Cookers shared tips about adding local favorites like grilled tropical fruits for a unique garnish, showcasing the thrill of personalizing this versatile dish while maintaining its core identity.

Frequently Asked Questions

Can I use frozen shrimp for this recipe?

Yes! Frozen shrimp can be used, but ensure to thaw them completely before cooking. A quick soak in cold water can help speed up the thawing process.

Is the sauce a key part of the recipe?

Absolutely! The sauce is what gives Bang Bang Shrimp its signature flavor. Feel free to adjust the spice levels based on your preference!

How can I make Bang Bang Shrimp less spicy?

To reduce the spice in the sauce, decrease the amount of sriracha and consider using a sweeter chili sauce as a base for added flavor without the heat.

Can I bake instead of frying the shrimp?

Yes! Baking is a healthier option; just ensure to preheat your oven to 425°F and lay the shrimp out on a baking sheet to achieve a crispy texture.

How long will Bang Bang Shrimp keep in the fridge?

Bang Bang Shrimp can be stored in the refrigerator for up to 3 days in an airtight container. For best results, enjoy fresh!

Can I make this recipe ahead of time?

Yes, you can prep the shrimp and the sauce ahead of time. Just assemble and fry them right before serving for the best texture and flavor.

What is the best way to reheat Bang Bang Shrimp?

The best way to reheat Bang Bang Shrimp is to use an oven at 350°F for about 10 minutes to restore their crispiness, rather than using a microwave.

Can I use a different protein besides shrimp?

Definitely! You can substitute shrimp with chicken, tofu, or even vegetables, maintaining the same preparation method for delicious results.

How do I prevent the shrimp from becoming greasy?

Prevent greasy shrimp by frying in hot oil and in small batches. Additionally, draining cooked shrimp on paper towels will remove excess oil.

What can I serve with Bang Bang Shrimp?

Bang Bang Shrimp can be served with a side salad, over rice, or in tacos for a complete meal. Adding crispy veggies or rice noodles complement the dish beautifully.

Additional Resources

For more exciting meal ideas, check out our collection of shrimp recipes ranging from garlic butter shrimp to spicy shrimp tacos. Explore our technique guides for frying and perfecting your sauce-making skills. Dive deeper into ingredient information to learn about the health benefits of shrimp.

If you’re planning a seasonal menu, look into fresh produce pairings to elevate the taste of your Bang Bang Shrimp and incorporate local flavors for a farm-to-table experience.

Join the Conversation

We invite you to share your experiences with Bang Bang Shrimp! Is this recipe a favorite in your household? Snap a photo and tag us on social media. We love hearing about your variations and improvement tips that make this dish uniquely yours.

Your feedback and reviews are valuable; let others know how you enjoyed or adapted this recipe. Join our community and discover exciting new ways to cook and share your culinary adventures!

The Recipe

Bang Bang Shrimp

Serves: 4 servings

Prep Time: 20 mins

Cook Time: 10 mins

Total Time: 30 mins

Kitchen Equipment Needed

  • Heavy-bottom frying pan or deep fryer
  • Mixing bowl
  • Measuring cups and spoons
  • Thermometer
  • Strainer or slotted spoon
  • Tongs

Ingredients

  • 1 lb shrimp, peeled and deveined
  • 1 cup all-purpose flour
  • 1 cup panko breadcrumbs
  • 1/2 cup mayonnaise
  • 1/4 cup sweet chili sauce
  • 2 tablespoons sriracha (to taste)
  • Salt and pepper, to taste
  • Oil for frying

Directions

  1. In a bowl, combine the mayonnaise, sweet chili sauce, and sriracha. Mix well and set aside.
  2. Season the shrimp with salt and pepper.
  3. Prepare your breading station: Place flour in one bowl, and panko in another.
  4. Dredge each shrimp in flour, then dip it in the mayo mixture, and finally coat it with panko breadcrumbs.
  5. Heat oil in a frying pan over medium heat until shimmering. Carefully add shrimp to the hot oil in batches.
  6. Fry for about 2-3 minutes on each side, or until golden brown and cooked through. Remove with a slotted spoon and drain on paper towels.
  7. Toss the hot shrimp in the prepared sauce until well coated.
  8. Serve immediately and enjoy!

Recipe Notes

  • For extra crunch, let the coated shrimp chill in the fridge for 15 minutes before frying.
  • Feel free to adjust the spice level in the sauce by adding more or less sriracha.
  • Pair with fresh lime wedges and cilantro for a zesty finish.

Egg Roll Stir Fry: A Quick, Healthy, and Flavorful Meal

Egg roll in a bowl, low-carb stir fry, Asian-inspired stir fry, keto egg roll recipe, cabbage stir fry, healthy egg roll dish, ground pork stir fry.

Article: Egg Roll Stir Fry – A Flavorful, Low-Carb Delight

Introduction: The Charm of Egg Roll Stir Fry

Egg Roll Stir Fry has gained popularity as a quick, healthy, and versatile meal that satisfies cravings for Asian-inspired flavors without the carb-heavy wrappers. This dish combines tender ground meat, crunchy vegetables, and savory sauces to recreate the essence of an egg roll in a skillet.

Explore why this dish is loved by keto enthusiasts and busy home cooks alike. For those interested in improving their stir-fry skills, check out this guide on perfect stir-fry techniques.


Ingredients: Building the Foundation

Core Ingredients for Egg Roll Stir Fry
  • Protein: Ground pork, chicken, or turkey
  • Vegetables: Shredded cabbage, carrots, and green onions
  • Sauces and Seasonings: Soy sauce, sesame oil, ginger, garlic, and rice vinegar
Optional Add-Ins for Customization
  • Sliced mushrooms
  • Water chestnuts for crunch
  • Chili flakes for heat

Visit how to prep vegetables for stir-fry to streamline your cooking process.


Preparation and Cooking: Step-by-Step Guide

  1. Preparation:
    • Dice the onions and shred the cabbage and carrots. Mince garlic and ginger.
  2. Cooking the Protein:
    • Heat sesame oil in a skillet, sauté the ground meat until browned, and set aside.
  3. Stir-Frying the Vegetables:
    • In the same skillet, cook the onions, garlic, and ginger until aromatic. Add the cabbage and carrots, stirring frequently.
  4. Combining Everything:
    • Return the protein to the skillet. Add soy sauce and rice vinegar, mixing thoroughly.

Why People Love Egg Roll Stir Fry

Egg Roll Stir Fry is perfect for those following low-carb or keto diets. By replacing traditional wrappers with vegetables, this dish is not only nutritious but also quick and convenient.


Serving and Storage Tips

  • Serve as is or over cauliflower rice for a keto option.
  • Store leftovers in airtight containers for up to 3 days.

For more sauce ideas, check out keto-friendly stir-fry sauces.


Internal Linking Opportunities

Based on the sitemap from ExoRecipes, consider linking to the following:


FAQs

1. Is Egg Roll Stir Fry Keto-Friendly?
Yes! Replace soy sauce with coconut aminos for a keto alternative.

2. Can I Make This Dish Vegan?
Use tofu as the protein and swap fish sauce for a vegan alternative.

3. What’s the Best Way to Add Spice?
Incorporate chili flakes or sriracha.

4. Can I Freeze Egg Roll Stir Fry?
Yes, store portions in airtight containers for up to a month.


Conclusion

Egg Roll Stir Fry is the ultimate fusion of flavor, nutrition, and convenience. Whether you’re looking for a quick dinner or a low-carb delight, this dish is sure to please. Try it today and share your variations!