Strawberry bombs

Indulging in Sweetness: The Art of Making Strawberry Bombs

In the world of confectionery delights, few pleasures can match the joy of biting into a perfectly made Strawberry Bomb. This dessert, a harmonious blend of fluffy fried dough, sweet strawberries, and luscious whipped cream, represents more than just a treat; it’s an experience, a culinary journey that speaks to the heart of comfort food. As we delve into the process of creating Strawberry Bombs, we uncover the layers of flavor, technique, and tradition that make this dish an unforgettable indulgence.

The Origins of Fried Dough

The history of fried dough is as old as civilization itself, spanning across cultures and continents. From the ancient Egyptians to the medieval fairs of Europe, frying dough in hot oil has been a staple method for creating quick, hearty meals and delectable sweets. Strawberry Bombs belong to this extensive family of fried delights, drawing inspiration from the rich tradition of doughnuts, beignets, and other fried pastries that have captivated taste buds around the globe.

Crafting the Perfect Dough

The journey to the perfect Strawberry Bomb begins with the dough, a simple yet versatile canvas for the flavors to come. The combination of flour, yeast, milk, and butter yields a dough that is tender yet sturdy enough to hold the filling. Kneading the dough becomes a meditative process, a dance of hands and flour that transforms basic ingredients into the base of our culinary masterpiece.

The Magic of Yeast and Warmth

Yeast, the microscopic fungus that gives our dough its lift and airiness, plays a crucial role in the creation of Strawberry Bombs. Activating the yeast in warm milk, with just a touch of sugar to feed it, sets the stage for the dough to rise, becoming soft and elastic. This step is a testament to the patience and care required in baking, reminding us that the best things often take time.

Frying to Golden Perfection

Frying the dough in hot oil is where the transformation truly occurs, turning the pale balls of dough into golden, crispy treasures. The key is to maintain a steady temperature, allowing the dough to cook evenly without absorbing too much oil. The result is a light, airy shell, ready to be filled with the sweet, creamy concoction that gives Strawberry Bombs their name.

A Symphony of Strawberries and Cream

The heart of the Strawberry Bomb lies in its filling – fresh strawberries and whipped cream, a combination that has delighted palates for centuries. The choice of strawberries brings a burst of freshness and tartness, cutting through the richness of the dough, while the whipped cream adds a silky, decadent layer. Together, they create a balance of flavors that is both satisfying and refreshing.

The Final Touch: Assembly and Presentation

Assembling the Strawberry Bombs is an act of artistry, each step carefully layering the components to ensure every bite is a blend of textures and tastes. The dough, sliced open like a delicate pastry bun, cradles the strawberries and cream, a sight to behold. A dusting of granulated sugar adds the final sparkle, making the Strawberry Bombs not just a dessert, but a centerpiece, a conversation starter, a memory in the making.

Beyond the Recipe: A Culinary Adventure

Creating Strawberry Bombs is more than just following a recipe; it’s an adventure in the kitchen, an opportunity to experiment with flavors, textures, and techniques. It invites us to explore the endless possibilities of fried dough, to customize and create variations that reflect our tastes and culinary aspirations.

Conclusion: The Joy of Sharing

In the end, the true essence of Strawberry Bombs lies in the joy of sharing them with others. Whether served at a family gathering, a festive celebration, or a quiet moment of indulgence, these delightful treats have the power to bring people together, to create moments of happiness and connection over the simple pleasure of good food.

As we savor the sweet, creamy, and crispy layers of the Strawberry Bomb, we are reminded of the beauty of baking, the art of cooking, and the timeless tradition of coming together to enjoy the fruits of our labor. In every bite, we find a story, a journey, and a taste of home.

FAQs for Strawberry Bombs Recipe

Can I use instant yeast instead of dry yeast?

Yes, you can use instant yeast in place of dry yeast. The substitution ratio is 1:1, so you can use the same amount. Instant yeast doesn’t need to be dissolved in warm milk first and can be mixed directly with the dry ingredients.

How can I ensure my dough is the right consistency?

The dough should be soft, slightly sticky, but manageable. If it’s too sticky, add flour one tablespoon at a time until it reaches the right consistency. If it’s too dry, add a bit more milk. The key is to add gradually and knead well after each addition.

What’s the best oil for frying?

Neutral oils with a high smoke point, such as canola, vegetable, or peanut oil, are best for frying. They won’t impart any unwanted flavors into your Strawberry Bombs and can withstand the frying temperature without burning.

Can I make the dough ahead of time?

Yes, you can prepare the dough ahead of time. After kneading, place it in a greased bowl, cover it with plastic wrap, and refrigerate for up to 24 hours. Let it come to room temperature and proceed with the rising steps before frying.

How do I know when the oil is ready for frying?

The oil should be around 350°F to 375°F (175°C to 190°C) for frying. If you don’t have a thermometer, you can test the oil by placing a small piece of dough in it. If it sizzles and rises to the surface, the oil is ready.

Can I fill Strawberry Bombs with something other than whipped cream and strawberries?

Absolutely! Feel free to get creative with your fillings. Custard, chocolate ganache, or a mix of different berries and fruits can also make delicious fillings for Strawberry Bombs.

How do I store leftover Strawberry Bombs?

Store them in an airtight container at room temperature for up to 2 days. For best results, reheat them in the oven at 350°F (175°C) for a few minutes to crisp up the exterior before serving.

Can Strawberry Bombs be made gluten-free?

Yes, you can make them gluten-free by substituting the wheat flour with a gluten-free all-purpose flour blend. Be mindful that the texture might slightly differ, and you may need to adjust the liquid content to achieve the right dough consistency.

Is there a vegan alternative for this recipe?

For a vegan version, use plant-based milk, a vegan butter substitute for the dough, and fill with vegan whipped cream or a coconut cream-based filling. Ensure the sugar and any other additions are vegan-friendly.

How do I prevent Strawberry Bombs from absorbing too much oil while frying?

Frying at the correct temperature is key to preventing excess oil absorption. Also, don’t overcrowd the pan, as this can lower the oil’s temperature. Fry in batches if necessary, and place the fried Strawberry Bombs on a wire rack or paper towels to drain any excess oil.

Print

clock clock iconcutlery cutlery iconflag flag iconfolder folder iconinstagram instagram iconpinterest pinterest iconfacebook facebook iconprint print iconsquares squares iconheart heart iconheart solid heart solid icon

Strawberry bombs

  • Author: Chef Emy

Description

The Strawberry Bombs recipe you’ve shared is indeed irresistible, blending the soft, airy texture of freshly fried dough with the sweet, luscious combination of strawberries and cream. This delightful treat is perfect for those special moments when you crave something sweet and satisfying. Here’s a closer look at the recipe and some tips for making these delicious strawberry bombs:


Ingredients

Scale

For the Dough:

  • 300g (2 cups) flour
  • 1 egg
  • 45g (1/4 cup) sugar
  • Pinch of salt
  • 7g dry yeast
  • 140 ml (3/5 cup) hot milk
  • 40 g (1/4 cup) softened butter

For the Decoration:

  • Whipped cream
  • Strawberries, chopped
  • Granulated sugar (for sprinkling)

Instructions

Step 1: Prepare the Yeast Mixture

  • In a medium bowl, combine the sugar, yeast, and hot milk. Stir until the sugar and yeast dissolve completely. This mixture will help activate the yeast, ensuring your dough rises properly.

Step 2: Make the Dough

  • Whisk the egg in a separate bowl. Add the flour and a pinch of salt to the yeast mixture, then start to incorporate the egg. Use a spatula initially to combine the ingredients, then switch to kneading with your hands to develop an elastic dough.

Step 3: Incorporate the Butter

  • Add the softened butter to the dough, continuing to knead until the butter is fully incorporated. This will give your dough a rich flavor and tender crumb.

Step 4: First Rise

  • Form the dough into a ball, then cover it with a tea towel or plastic wrap. Let it rise in a warm place for about an hour, or until it has doubled in size. This resting period allows the gluten in the dough to relax and the yeast to ferment, creating the air bubbles that will make your dough light and fluffy.

Step 5: Shape the Dough

  • Divide the risen dough into 8 equal parts. Roll each part into a ball, then cover and let them rest for 30 minutes. This second rest helps the dough relax further, making it easier to shape.

Step 6: Final Shaping

  • Slightly flatten each ball, then roll them into balls again for a smooth surface. Cover and let rest for an additional 30 minutes.

Step 7: Fry the Dough

  • Heat oil in a deep fryer or large pot over low heat. Fry the dough balls for 2-3 minutes on each side or until they are golden brown and cooked through. Frying at a lower temperature ensures that the dough cooks evenly without burning the outside.

Step 8: Assemble the Strawberry Bombs

  • After frying, let the dough balls cool slightly, then slice them in half lengthwise, similar to a burger bun. Fill the bottom half with a generous dollop of whipped cream and a spoonful of chopped strawberries. Place the other half on top, like a sandwich.

Step 9: Serve and Enjoy

  • Sprinkle the assembled strawberry bombs with granulated sugar for a sweet finish. Serve immediately to enjoy the contrast of warm dough with the cool, creamy filling.

Notes

Tips for Perfect Strawberry Bombs:

  • Yeast Activation: Ensure your milk is warm, not hot, to activate the yeast without killing it.
  • Dough Consistency: The dough should be soft and slightly sticky. If it’s too dry, add a little more milk.
  • Frying Temperature: Keep the oil temperature consistent to avoid absorbing too much oil or burning the outside before the inside is cooked.
  • Serving: These are best enjoyed fresh but can be reheated in the oven for a few minutes if needed.

Indulge in the delightful combination of fried dough, sweet strawberries, and cream with these homemade strawberry bombs. Whether for a special occasion or a treat-yourself moment, they’re sure to impress and satisfy any sweet tooth.
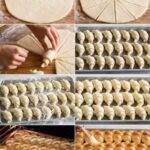
Croissant homemade bread

The Art of Homemade Croissant Bread: A Culinary Journey

The croissant, with its flaky layers and buttery richness, is more than just a pastry; it’s a symbol of French culinary artistry and a staple of breakfast tables worldwide. However, the journey to making croissant bread at home is one filled with patience, precision, and the joy of baking. This article will guide you through the process of creating homemade croissant bread, offering insights into its history, technique, and the endless possibilities it presents for customization.

The Origins of Croissants: A Blend of Myth and History

The croissant’s history is as layered as the pastry itself, with tales of its origin dating back to the Siege of Vienna in the 17th century. However, the croissant as we know it today, with its meticulous lamination process and buttery dough, was refined in France. Understanding the croissant’s past enhances the appreciation for the pastry, connecting bakers to the centuries-old tradition of pastry making.

Ingredients: The Foundation of Flavor

The simplicity of the croissant bread’s ingredients belies the complexity of its flavor. Each component, from the warm milk that activates the yeast to the butter that creates its tender layers, plays a pivotal role in the croissant’s final taste and texture. This section of the article will delve into the quality and handling of these ingredients, emphasizing the importance of precision in baking.

The Technique: Mastering Lamination

Lamination, the process of folding butter into the dough multiple times to create thin layers, is the heart of croissant making. This technique, while intimidating to many home bakers, can be demystified with step-by-step guidance. The article will break down the lamination process, offering tips to achieve the perfect flaky texture that croissants are known for.

The Recipe: Crafting Your Croissant Bread

Here, the article will present a detailed recipe for homemade croissant bread, tailored to those looking to recreate the magic of French bakeries in their kitchens. From mixing the dough to the final bake, each step will be explained with care, ensuring readers can follow along with confidence, regardless of their baking experience.

Variations: Personalizing Your Pastry

One of the joys of homemade croissant bread is the ability to customize it to personal taste. Whether filled with chocolate, almond paste, or savory ingredients like cheese and ham, the possibilities are endless. This section will explore various ways to adapt the basic recipe, encouraging bakers to experiment and make the pastry their own.

The Experience: Beyond the Bake

Making croissant bread at home is more than a culinary task; it’s an experience that engages the senses and evokes a sense of achievement. This part of the article will reflect on the tactile pleasure of kneading dough, the anticipation of the bake, and the satisfaction of sharing the finished pastries with loved ones.

Pairings: Complementing Your Croissant

A discussion on how best to enjoy croissant bread, from coffee pairings to accompaniments that enhance its flavors, will guide readers on how to make their homemade pastry part of a memorable meal or moment.

Conclusion: Embracing the Art of Baking

The article will conclude with a reflection on the beauty of baking and the particular delight that comes from creating croissant bread. It will emphasize the connection between baker, history, and ingredient, celebrating the act of baking as a form of expression and creativity.

FAQs for Homemade Croissant Bread

Can I use active dry yeast instead of instant yeast?

Yes, you can substitute instant yeast with active dry yeast in the same quantity. Remember to activate it first by dissolving it in a portion of the warm milk from the recipe, along with a pinch of sugar, and let it sit until frothy (about 5-10 minutes) before adding it to the other ingredients.

How important is the type of flour?

The type of flour can significantly affect the texture of your croissants. All-purpose flour works well, but for a more authentic texture, consider using bread flour because of its higher protein content, which helps develop a stronger gluten network for flakier layers.

What if my dough is too sticky or too dry?

If your dough is too sticky, add flour one tablespoon at a time, kneading after each addition until it reaches a manageable consistency. If it’s too dry, add milk one tablespoon at a time. Remember, the dough should be soft and slightly tacky but not overly sticky.

Can I make the dough ahead of time?

Yes, the croissant dough benefits from resting. You can prepare the dough and let it go through its first rise, then refrigerate it overnight. This not only makes the dough easier to handle but can also enhance the flavor.

How thin should I roll out the dough?

For the lamination process, roll out the dough to about 1/4 inch thick. This thickness allows you to fold and roll the dough several times without it becoming too bulky or the butter seeping out.

Can I freeze croissant bread?

Absolutely. Bake the croissants as instructed, allow them to cool completely, then wrap them individually in plastic wrap and place them in a freezer bag. They can be frozen for up to 2 months. Reheat in an oven at 350°F (175°C) until they’re warm and crisp.

How do I achieve a shiny, golden top on my croissants?

Brushing your croissants with an egg wash (a beaten egg with a tablespoon of water or milk) before baking will give them a shiny, golden finish. Apply the egg wash gently to avoid deflating the dough.

My croissants didn’t rise much during baking. What went wrong?

Insufficient rising can result from several factors: the yeast wasn’t active, the room temperature was too low during the rising period, or the butter was too soft and got absorbed into the dough. Ensure your yeast is fresh, let the dough rise in a warm, draft-free area, and keep the butter cold during lamination.

Can I add fillings to my croissant bread?

Yes, you can add fillings like chocolate, almond paste, or ham and cheese. Place your filling on the dough before rolling it up. Be mindful of the amount – too much filling can prevent the dough from rising properly and can leak out during baking.

Why do I need to make small cuts in the center before baking?

Making small cuts in the center of your shaped dough helps the steam escape during baking, preventing the croissants from splitting or becoming misshapen. It also contributes to a more uniform rise and a better texture.

Print
clock clock iconcutlery cutlery iconflag flag iconfolder folder iconinstagram instagram iconpinterest pinterest iconfacebook facebook iconprint print iconsquares squares iconheart heart iconheart solid heart solid icon

Croissant homemade bread

  • Author: Chef Emy

Description

This recipe simplifies the traditional croissant process, making it more accessible for home bakers while still delivering that delicious, flaky texture and rich flavor we all love in croissants. Perfect for breakfast, lunch, or dinner, these homemade croissants will be a hit.


Ingredients

Scale
  • 400 ml of milk, warm
  • 12 g of yeast (1 heaping tablespoon)
  • 1 tablespoon of sugar
  • 30 g of melted butter
  • 600 g of wheat flour
  • 8 g of salt (1 teaspoon)
  • 15 g of common wheat flour (for dusting)
  • Egg yolk (for brushing)
  • Optional: additional butter for layers

Instructions

  1. Dough Preparation:

    • In a mixing bowl, combine the warm milk, dry yeast, and sugar. Stir well until the sugar and yeast dissolve.
    • Add the melted butter to the mixture and stir.
    • Incorporate the wheat flour and salt into the wet ingredients gradually, mixing well to combine.
    • Once the mixture becomes doughy, transfer it to a floured surface.
    • Knead the dough until it becomes soft and smooth, about 10 minutes. If the dough is too sticky, you can add a little more flour as you knead.
  2. Shaping the Croissants:

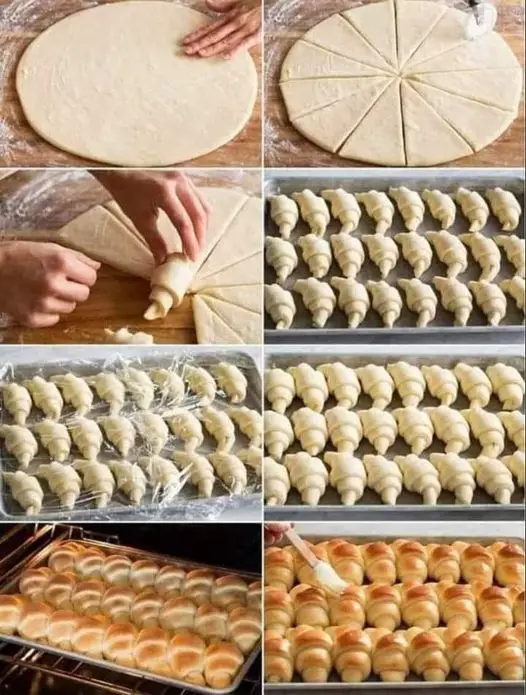
    • Divide the dough into two equal parts. Then, divide each part into 6 equal pieces. This will give you 12 pieces in total.
    • Shape each piece into a ball and let them rest for about 15 minutes under a clean kitchen towel. This allows the gluten to relax, making the dough easier to shape.
    • On a lightly floured surface, roll out each ball into an oval shape. If you like more layers, you can spread a thin layer of butter on the dough before rolling it out.
    • Make small cuts in the center of each oval to help the croissants expand as they bake.
    • Roll each piece from one end to the other, and place them on a baking sheet with the seam side down.
  3. Baking:

    • Preheat your oven to 200°C (392°F).
    • Brush each croissant with egg yolk for a golden finish. This will give them a beautiful, shiny crust.
    • If desired, place a small piece of butter on top of each croissant for extra richness.
    • Bake in the preheated oven for about 25 minutes, or until the croissants are puffed up and golden brown.
  4. Serving:

    • Let the croissants cool slightly on a wire rack before serving. They are best enjoyed warm, with butter, jam, or any filling of your choice.

Notes

This homemade croissant bread recipe brings the essence of a French bakery into your kitchen, offering a rewarding baking experience and delicious results. Enjoy the process and the delightful croissants you’ll create!

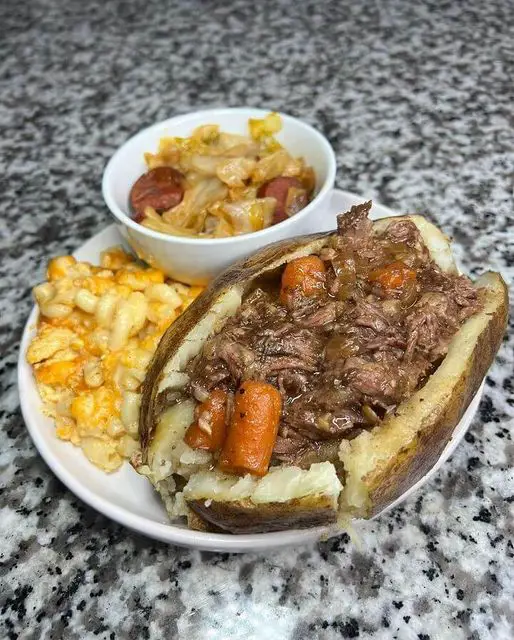
Pot Roast Twice Baked Potato

Introduction to Comfort Food: A Cultural Staple

The concept of comfort food transcends cultures, each having its own version that speaks to the heart through the stomach. In the American culinary landscape, few dishes are as emblematic of this idea as pot roast and baked potatoes. The former, with its roots in the Sunday dinners and family gatherings of yesteryears, and the latter, a versatile side that has graced countless meals, together form a dish that is both nostalgic and innovative.

The Pot Roast: A Slow-Cooked Delight

At the heart of this recipe is the pot roast, a dish that has stood the test of time. Originating from the need to tenderize tougher cuts of meat, the pot roast embodies the principle of turning simple ingredients into something extraordinary through the magic of slow cooking. The process of browning the meat, sautéing the vegetables, and simmering everything in a rich broth not only maximizes flavor but also celebrates the art of patience in cooking.

The Twice Baked Potato: A Canvas for Creativity

The twice-baked potato, on the other hand, elevates a humble ingredient to new heights. By baking, scooping, mixing, and baking again, the potato transforms into a vessel of creamy, fluffy perfection, ready to be customized with an array of fillings. It’s a testament to the potato’s role as a staple food and its ability to complement and enhance the flavors it’s paired with.

Crafting the Dish: A Step-by-Step Guide

The article would then guide readers through the meticulous process of creating Pot Roast Twice Baked Potatoes, from selecting the right cut of beef for the pot roast to achieving the perfect consistency for the potato filling. This section would not only provide practical tips and tricks but also encourage readers to engage with the recipe as a form of culinary expression, inviting them to add personal touches or experiment with different ingredients.

Flavor Fusion: Marrying Two Classics

The fusion of pot roast and twice-baked potatoes into a single dish is a culinary adventure that marries robust, meaty flavors with the comforting, creamy texture of mashed potatoes. This section of the article would explore how the combination elevates the dining experience, offering a symphony of flavors and textures that comfort and satisfy in equal measure.

The Art of Leftovers: A Sustainable Approach

Incorporating leftovers into new creations is both an art and a nod to sustainability. This recipe stands as a prime example of how creativity in the kitchen can reduce waste while producing meals that are both innovative and delicious. The article would delve into the philosophy of using leftovers as a cornerstone of conscious cooking, providing readers with inspiration to view yesterday’s meals as the foundation for today’s culinary delights.

Serving and Sharing: Beyond the Plate

Beyond its ingredients and preparation, Pot Roast Twice Baked Potatoes is a dish meant for sharing. It embodies the communal aspect of comfort food, bringing people together to share in the joy of a meal well made. This section would reflect on the importance of food in fostering connections, celebrating the role of meals in creating memories and strengthening bonds.

Conclusion: A Culinary Journey

In concluding, the article would encapsulate the journey of creating Pot Roast Twice Baked Potatoes as more than just following a recipe; it’s an exploration of flavors, a celebration of cooking as an art form, and an embrace of food’s power to comfort and connect. It would encourage readers to embark on their culinary adventures, armed with the knowledge and inspiration to transform simple ingredients into extraordinary meals.

FAQs for Pot Roast Twice Baked Potatoes

Can I use a different type of meat for the pot roast?

Yes, while beef chuck roast is traditional for its flavor and tenderness, you can use alternative cuts such as brisket or round roast. For a different taste, you could even use lamb or pork shoulder, adjusting cooking times accordingly.

What if I don’t have a Dutch oven for the pot roast?

If you don’t have a Dutch oven, you can use any heavy-bottomed pot with a tight-fitting lid. Alternatively, you can brown the meat and vegetables in a skillet and transfer them to a slow cooker, cooking on low for 8-10 hours or on high for 4-5 hours.

How can I make this recipe vegetarian?

For a vegetarian version, substitute the pot roast with a hearty mix of mushrooms, lentils, or a plant-based meat alternative. Cook these with the same seasonings and broth to mimic the depth of flavor found in the meat-based version.

Can I prepare the Twice Baked Potatoes in advance?

Absolutely! You can bake and scoop the potatoes, then store the scooped flesh and potato skins separately in the refrigerator for up to two days. When ready to proceed, reheat the potato flesh before mixing with other ingredients and stuffing the skins for the final bake.

Is it possible to freeze the Twice Baked Potatoes?

Yes, the Twice Baked Potatoes freeze well. Complete the recipe, including the final bake, then cool them down. Wrap each potato individually in plastic wrap and freeze. Reheat in the oven from frozen at 350°F (175°C) until warmed through, about 20-25 minutes.

How can I make the potato filling creamier?

For a creamier filling, you can increase the amount of butter or sour cream. Adding a splash of heavy cream or substituting half of the milk with cream can also enhance the richness.

What other vegetables can I add to the filling?

Feel free to incorporate other vegetables such as diced bell peppers, spinach, or kale for added nutrition and color. Sauté them before adding to ensure they are fully cooked and integrate well with the mixture.

Can I make this dish dairy-free?

Yes, to make this dish dairy-free, use olive oil instead of butter and a dairy-free milk alternative. There are also dairy-free cheese substitutes that melt well and can be used both inside the potato mixture and as a topping.

How do I prevent the bottom of the potatoes from burning during the second bake?

To prevent burning, ensure your oven is correctly calibrated, and place the potatoes in the middle rack. You can also bake them on a lined baking sheet or place a piece of aluminum foil beneath them to catch any drips and provide insulation.

Can the Twice Baked Potatoes be served as a main dish?

Yes, the Pot Roast Twice Baked Potatoes are hearty enough to serve as a main dish, especially when loaded with pot roast and vegetables. Pair with a simple side salad or steamed green beans for a complete meal.

Print
clock clock iconcutlery cutlery iconflag flag iconfolder folder iconinstagram instagram iconpinterest pinterest iconfacebook facebook iconprint print iconsquares squares iconheart heart iconheart solid heart solid icon

Pot Roast Twice Baked Potato

  • Author: Chef Emy

Description

The Pot Roast Twice Baked Potato combines the hearty, comforting flavors of a slow-cooked pot roast with the creamy, indulgent texture of a twice-baked potato. This dish is perfect for those seeking to elevate their potato game or for anyone looking to repurpose leftover pot roast into an entirely new and delicious meal. Here’s how you can create this culinary delight:


Ingredients

Scale

For the Pot Roast:

  • 23 lbs beef chuck roast
  • Salt and pepper to taste
  • 2 tablespoons olive oil
  • 1 onion, chopped
  • 2 carrots, chopped
  • 2 stalks celery, chopped
  • 3 cloves garlic, minced
  • 2 cups beef broth
  • 1 tablespoon Worcestershire sauce
  • 1 teaspoon rosemary
  • 1 teaspoon thyme

For the Twice Baked Potatoes:

  • 4 large russet potatoes
  • 1/4 cup butter
  • 1/2 cup sour cream
  • 1/4 cup milk
  • Salt and pepper to taste
  • 1 cup shredded cheddar cheese
  • Chopped chives or green onions for garnish

Instructions

1. Prepare the Pot Roast:

  • Season the beef chuck roast generously with salt and pepper.
  • Brown the roast in a large pot or Dutch oven with olive oil over medium-high heat. Remove and set aside.
  • Sauté onions, carrots, and celery in the same pot until softened. Add garlic and cook for another minute.
  • Deglaze the pot with beef broth, scraping up any browned bits. Add Worcestershire sauce, rosemary, and thyme.
  • Return the roast to the pot. Cover and simmer on low for 3-4 hours or until the meat is tender and falls apart easily.
  • Shred the cooked pot roast and set aside. Reserve some of the cooking liquid for moistening the meat.

2. Prepare the Twice Baked Potatoes:

  • Bake the russet potatoes in a preheated oven at 400°F (200°C) for about an hour, or until they are soft and fully cooked.
  • Cut each potato in half lengthwise. Carefully scoop out the insides, leaving a thin layer of potato in the skin for support.
  • Mash the scooped potato in a bowl with butter, sour cream, milk, salt, and pepper until smooth and creamy.
  • Mix in a generous amount of shredded pot roast and a bit of the reserved cooking liquid to keep the mixture moist.
  • Spoon the mixture back into the potato skins. Top with shredded cheddar cheese.
  • Bake again for about 20 minutes, or until the tops are golden and the cheese has melted.

3. Serve:

  • Garnish with chopped chives or green onions.
  • Serve hot as a fulfilling main course or a hearty side dish.

Notes

Tips:

  • Feel free to customize the filling by adding other ingredients such as cooked vegetables or different types of cheese according to your preference.
  • For an even richer flavor, mix some of the pot roast vegetables into the potato filling.
  • This dish is perfect for making ahead. Prepare the potatoes and store them in the refrigerator until ready to bake for the second time.

The Pot Roast Twice Baked Potato is a perfect example of comfort food at its best, blending rich flavors and textures into a dish that’s sure to impress family and guests alike. Whether you’re using up leftovers or planning a special meal, this recipe offers a delicious twist on classic favorites.

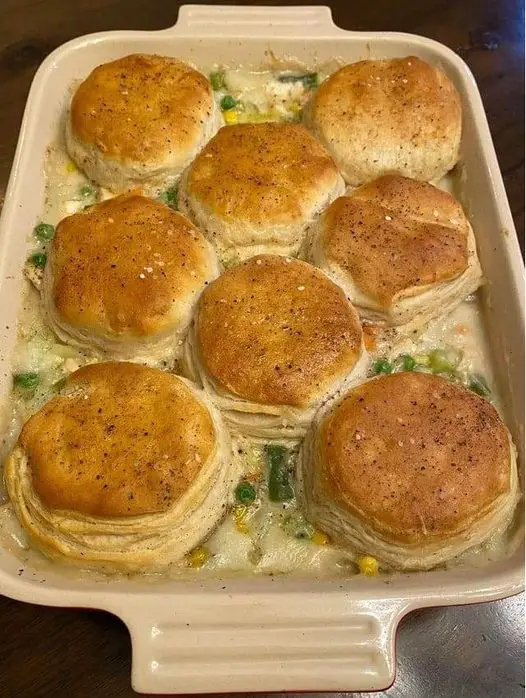
Chicken Pot Pie Casserole

The Comforting Embrace of Chicken Pot Pie Casserole

In the realm of comfort food, few dishes hold a candle to the heartwarming embrace of a Chicken Pot Pie Casserole. This dish, with its flaky pastry crust and rich, savory filling, speaks directly to the soul, offering warmth and comfort with every bite. It’s a culinary hug, a blend of tender chicken, vibrant vegetables, and creamy sauce, all encased in a golden crust that’s both crisp and tender.

Origins and Evolution: A Pie That Tells a Story

To appreciate the Chicken Pot Pie Casserole fully, one must delve into its origins. The pot pie’s journey began in Ancient Greece, evolving through the Roman Empire, and becoming a staple in medieval Europe. Initially, these pies were more crust than filling, serving as mere containers for preserving meats. The transformation over centuries has been remarkable, with each era adding its own twist to the recipe, culminating in the beloved casserole version that graces our tables today.

The Anatomy of a Classic: Deconstructing the Casserole

The essence of a Chicken Pot Pie Casserole lies in its components. Each element, from the creamy filling to the flaky topping, plays a pivotal role in creating the final dish. The filling, a hearty mixture of chicken and vegetables simmered in a rich broth, becomes a canvas for flavors – thyme and sage adding depth, while the flour and milk lend it a creamy consistency. The choice of vegetables – carrots, peas, corn, and green beans – introduces a spectrum of colors and textures, making the dish as visually appealing as it is delicious.

Crafting the Perfect Casserole: A Step-by-Step Culinary Adventure

The process of making Chicken Pot Pie Casserole is both an art and a science. It begins with the preparation of the filling, a medley of ingredients that must be balanced perfectly to achieve the right flavor profile. The sautéing of onions and garlic lays the foundation, upon which the rest of the dish is built. The gradual addition of broth and milk, followed by the thickening of the sauce, requires patience and attention, ensuring the filling is rich but not runny.

The topping, often a pre-made crescent roll dough or puff pastry, adds an element of convenience to the dish, making it accessible even to novice cooks. Yet, the act of laying the dough over the filling, brushing it with an egg wash for that golden sheen, and cutting slits for steam to escape, transforms the act of cooking into a ritual, imbuing the dish with love and care.

Beyond the Recipe: Variations and Personal Touches

The beauty of Chicken Pot Pie Casserole lies in its versatility. The recipe invites customization, allowing cooks to infuse the dish with their personal touch. From the choice of vegetables to the addition of herbs and spices, each variation adds a new dimension to the classic recipe. The inclusion of sautéed mushrooms or diced bell peppers, the substitution of turkey for chicken, or the addition of a cheese blend for an extra layer of flavor – these are but a few ways to make the dish your own.

Serving and Sharing: The Communal Joy of Chicken Pot Pie Casserole

There’s a reason Chicken Pot Pie Casserole is considered a comfort food. Beyond its rich flavors and hearty textures, it’s a dish meant for sharing. Serving this casserole at family gatherings, potlucks, or simply a weeknight dinner transforms the meal into an occasion, a moment to come together and share not just food, but stories, laughter, and life.

Conclusion: A Tribute to Home Cooking

In writing about Chicken Pot Pie Casserole, we do more than share a recipe; we celebrate the tradition of home cooking, the joy of creating something delicious and nourishing for our loved ones. This dish, with its deep roots and simple ingredients, reminds us of the power of food to comfort, to heal, and to bring people together. It’s a testament to the enduring appeal of home-cooked meals and the timeless tradition of sharing a table with family and friends.

As we conclude this exploration of Chicken Pot Pie Casserole, we invite our readers to embrace the recipe not just as a set of instructions, but as an invitation to engage with the rich tapestry of culinary tradition, to experiment with flavors and textures, and to create memories that will last a lifetime. In the kitchen, as in life, it’s the love and care we infuse into our actions that make the difference, turning a simple meal into a celebration of the joys of cooking and communal dining.

FAQs for Chicken Pot Pie Casserole

Can I make Chicken Pot Pie Casserole in advance?

Yes, you can prepare the filling in advance and refrigerate it overnight. When you’re ready to bake, top it with the pastry and bake according to the recipe. For fully assembled casseroles, bake, cool completely, cover, and refrigerate. Reheat in the oven until warm throughout.

How can I make a gluten-free version?

To make this casserole gluten-free, use a gluten-free all-purpose flour blend for thickening the filling. Ensure your chicken broth is gluten-free and use a gluten-free dough or topping alternative for the crust.

Can I use a different type of crust?

Absolutely! While crescent roll dough or puff pastry is convenient, you can also make a homemade pie crust or use biscuit dough for a different texture. Each option provides a unique flavor and texture to the dish.

Is it possible to add different vegetables?

Yes, the recipe is versatile. Feel free to add or substitute vegetables according to your preference or what you have on hand. Popular additions include mushrooms, celery, and bell peppers.

Can I freeze Chicken Pot Pie Casserole?

Yes, Chicken Pot Pie Casserole freezes well. Cool the baked casserole completely, then cover it tightly with foil or transfer it to an airtight container. Freeze for up to 3 months. Thaw overnight in the refrigerator and reheat in the oven until heated through.

What can I serve with Chicken Pot Pie Casserole?

This dish is hearty and can be served on its own, but it pairs well with a simple green salad, steamed vegetables, or cranberry sauce for added freshness and contrast.

How can I make the filling creamier?

For a creamier filling, you can increase the amount of milk or add a splash of heavy cream to the sauce. Adjust the thickness by simmering the filling longer if it becomes too thin.

Can I use leftover chicken or turkey?

Absolutely! Leftover cooked chicken or turkey is perfect for this recipe. It’s a great way to repurpose leftovers into a delicious new meal. Just skip the initial cooking step for the meat and add it with the vegetables.

How do I know when the casserole is done?

The casserole is done when the filling is bubbly, and the crust is golden brown and cooked through. Inserting a knife into the crust should come out clean, indicating the bottom has cooked properly.

Can I make this dish vegetarian?

Yes, you can create a vegetarian version by substituting the chicken with a mix of hearty vegetables like parsnips, turnips, and extra mushrooms, or use a plant-based meat substitute. Use vegetable broth instead of chicken broth.

Print
clock clock iconcutlery cutlery iconflag flag iconfolder folder iconinstagram instagram iconpinterest pinterest iconfacebook facebook iconprint print iconsquares squares iconheart heart iconheart solid heart solid icon

Chicken Pot Pie Casserole

  • Author: Chef Emy

Description

Chicken Pot Pie Casserole is a comforting, hearty dish that combines all the beloved flavors of a traditional chicken pot pie with the convenience and ease of a casserole. It’s perfect for a cozy family dinner, offering a satisfying blend of tender chicken, vegetables, and a creamy sauce, all topped with a golden, flaky crust. Here’s how you can make it at home:


Ingredients

Scale

For the Filling:

  • 2 tablespoons olive oil
  • 1 lb chicken breast, cooked and shredded
  • 1 medium onion, diced
  • 2 garlic cloves, minced
  • 2 cups mixed vegetables (carrots, peas, corn, green beans), fresh or frozen
  • 1/3 cup all-purpose flour
  • 2 cups chicken broth
  • 1 cup milk
  • 1 teaspoon thyme
  • 1 teaspoon sage
  • Salt and pepper to taste

For the Topping:

  • 1 package (about 8 ounces) refrigerated crescent roll dough or puff pastry
  • 1 egg (for egg wash, optional)

Instructions

1. Preheat the Oven:

  • Preheat your oven to 375°F (190°C).

2. Prepare the Filling:

  • In a large skillet, heat the olive oil over medium heat. Add the diced onion and cook until soft, about 5 minutes.
  • Stir in the minced garlic and cook for another minute until fragrant.
  • Add the mixed vegetables and cook for 5-7 minutes until they begin to soften.
  • Sprinkle the flour over the vegetables and stir to combine. Cook for 2 minutes to remove the raw flour taste.
  • Slowly pour in the chicken broth and milk, stirring continuously to combine everything into a smooth mixture.
  • Bring to a simmer and let the mixture thicken, about 5 minutes.
  • Stir in the cooked, shredded chicken and season with thyme, sage, salt, and pepper. Remove from heat.

3. Assemble the Casserole:

  • Transfer the chicken and vegetable mixture to a greased 9×13 inch baking dish.
  • Unroll the crescent roll dough or puff pastry and lay it flat over the top of the filling, covering it completely. If using an egg wash, lightly beat the egg with a tablespoon of water and brush it over the dough.
  • Cut small slits in the dough to allow steam to escape during baking.

4. Bake:

  • Bake in the preheated oven for 25-30 minutes, or until the topping is golden brown and the filling is bubbly.

5. Serve:

  • Let the casserole cool for a few minutes before serving. This helps the filling set and makes it easier to serve.

Notes

This Chicken Pot Pie Casserole captures all the warm, comforting flavors of a classic pot pie with less fuss, making it an ideal recipe for busy weeknights or a relaxing weekend dinner. Serve it with a side salad or simply enjoy it on its own for a fulfilling meal that’s sure to please the whole family.

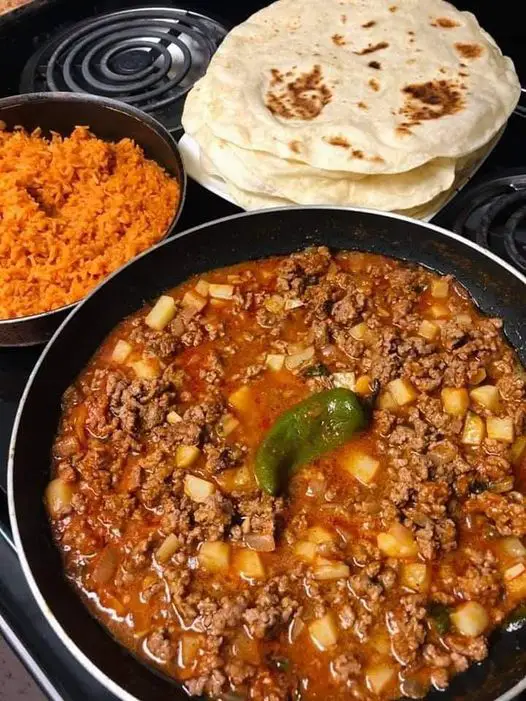
Homemade Picadillo with Flour tortillas

The Soul of Mexican Cuisine: A Story of Picadillo

Picadillo, at its core, is a reflection of Mexican cuisine’s vibrant spirit, a dish that balances simplicity with profound flavor. Originating from the Spanish word “picar,” which means “to mince” or “to chop,” Picadillo is a versatile, minced meat dish that has been embraced and adapted across Latin America and the Philippines, each region infusing it with local flavors and ingredients. In Mexico, it’s not just food; it’s a narrative of history, colonization, and the fusion of indigenous and Spanish culinary traditions.

The Anatomy of Picadillo: Ingredients and Cultural Significance

Breaking down the ingredients of Picadillo is like reading the chapters of a culinary story. Each component, from the ground beef symbolizing the cattle ranching introduced by the Spaniards, to the indigenous potatoes and tomatoes, speaks to a confluence of cultures. The inclusion of Serrano chiles and spices like cumin, oregano, and chili powder, meanwhile, showcases the rich biodiversity of Mexico and its deep-rooted spice trade history.

Potatoes: Earth’s Bounty

Potatoes, a humble yet essential ingredient, ground the dish with their earthy flavor and comforting texture. Their journey from the Andean mountains to becoming a staple in kitchens worldwide mirrors the spread of ingredients that followed the Columbian exchange.

Beef: A Legacy of Livestock

The choice of ground beef as the protein reflects the ranching culture brought to the New World by Spanish conquistadors. It’s a nod to the pastoral landscapes that shaped much of Mexico’s agricultural and culinary development.

Tomatoes and Serrano Chiles: A Splash of Color and Heat

Tomatoes, with their juicy sweetness, and Serrano chiles, with their fiery kick, are the heart of Picadillo, painting the dish with the vibrant colors and bold flavors that Mexican cuisine is celebrated for.

Flour Tortillas: A Blanket of Comfort

Flour tortillas, while not as ancient as their corn counterparts, have become synonymous with northern Mexican cuisine. Their soft, pliable texture makes them the perfect vessel for the rich

and hearty Picadillo, allowing for a harmonious blend of flavors with each bite. The process of making tortillas from scratch—mixing, kneading, rolling, and cooking on a hot griddle—is a ritual that connects us to generations past, a testament to the handmade over the mass-produced, and a celebration of the tactile joy of cooking.

The Craft of Tortilla Making

The art of tortilla making is steeped in tradition, a skill passed down through families, a daily ritual that speaks to the importance of bread in all its forms across cultures. The transition from corn to flour tortillas in certain regions of Mexico reflects both the adaptation to available resources and the influence of Spanish culinary practices.

The Picadillo and Tortilla Symphony: A Culinary Ballet

The marriage of Picadillo with flour tortillas represents a culinary ballet, where each ingredient plays a crucial role, and the final dish is much greater than the sum of its parts. This combination is a staple of Mexican home cooking, offering a comforting, satisfying meal that can be enjoyed at any time of day.

The Versatility of Picadillo

Picadillo’s true beauty lies in its versatility. It can be enjoyed on its own, used as a filling for tacos and empanadas, or even as a base for other dishes. This adaptability makes it a beloved recipe in households across Mexico and beyond, a canvas for cooks to express their creativity and culinary heritage.

Beyond the Recipe: Nutrition, Adaptation, and Personalization

While deeply rooted in tradition, Picadillo with Flour Tortillas also reflects contemporary culinary trends, including the movement towards healthier eating, the fusion of global flavors, and the personalization of classic dishes. Substitutions like lean ground turkey, the addition of more vegetables, or the use of gluten-free flour alternatives for tortillas allow this dish to be adapted to meet dietary needs and personal tastes.

The Nutritional Aspect

The recipe offers a balanced meal, with protein from the beef, carbohydrates from the potatoes and tortillas, and vitamins and minerals from the tomatoes and green beans. Each component contributes to a well-rounded diet, showcasing how traditional dishes can be both nourishing and delicious.

The Cultural Exchange of Food

Picadillo with Flour Tortillas is more than just a meal; it’s a testament to the power of food as a medium for cultural exchange. It invites conversations about history, family, and the ways in which food connects us to our heritage and to each other. It’s a dish that transcends borders, adapting and evolving while remaining anchored in the flavors and traditions of Mexico.

Conclusion: A Celebration of Home Cooking

In exploring the depths of Homemade Picadillo with Flour Tortillas, we uncover not only the steps to creating a flavorful meal but also the stories, traditions, and innovations that make Mexican cuisine so rich and vibrant. This dish is a celebration of home cooking, of the joy found in the simple act of preparing food for loved ones, and of the endless possibilities that cooking offers for creativity, connection, and cultural expression.

FAQs for Homemade Picadillo with Flour Tortillas

Can I use ground turkey or chicken instead of beef for the Picadillo?

Yes, you can substitute ground beef with ground turkey or chicken for a leaner option. Keep in mind that the cooking times may vary slightly, and you might want to adjust the seasonings to complement the milder taste of poultry.

What can I use if I don’t have Serrano chiles?

If Serrano chiles are not available, you can use jalapeño peppers for a similar level of heat. If you prefer a milder taste, you can remove the seeds and membranes from the peppers before adding them to the Picadillo.

How can I make the flour tortillas if I don’t have vegetable shortening?

Vegetable shortening can be substituted with lard for a more traditional flavor, or with butter for a richer taste. If using butter, ensure it’s cold and cut into small pieces before incorporating it into the flour mixture.

Can I add other vegetables to the Picadillo?

Absolutely! Picadillo is a versatile dish, and you can add other vegetables such as carrots, peas, or bell peppers to add more color, texture, and nutritional value to the meal.

How do I store leftover Picadillo and flour tortillas?

Leftover Picadillo can be stored in an airtight container in the refrigerator for up to 3 days or frozen for up to 3 months. Flour tortillas can be kept at room temperature in a sealed bag for a few days or frozen with parchment paper between each tortilla and reheated on a skillet or microwave.

Is it possible to make the flour tortillas gluten-free?

Yes, you can make gluten-free flour tortillas by substituting all-purpose flour with a gluten-free flour blend. Keep in mind that the texture and taste may vary, and you may need to adjust the amount of water to achieve the right dough consistency.

Can the Picadillo be made in advance?

Yes, Picadillo tastes even better the next day as the flavors have more time to meld. You can prepare it in advance and gently reheat it on the stove or in the microwave before serving.

How can I ensure my flour tortillas are soft and pliable?

The key to soft and pliable tortillas is not overworking the dough and allowing it to rest before rolling and cooking. This rest period helps the gluten relax, making the tortillas easier to roll out and resulting in a softer texture.

What are some serving suggestions for Picadillo with Flour Tortillas?

Picadillo with Flour Tortillas can be enjoyed in many ways: as a filling for tacos, burritos, or quesadillas, or simply served with rice and beans on the side for a complete meal. Feel free to garnish with fresh cilantro, diced avocado, or a squeeze of lime for added flavor.

Print
clock clock iconcutlery cutlery iconflag flag iconfolder folder iconinstagram instagram iconpinterest pinterest iconfacebook facebook iconprint print iconsquares squares iconheart heart iconheart solid heart solid icon

Homemade Picadillo with Flour tortillas

  • Author: Chef Emy

Description

Homemade Picadillo with Flour Tortillas is a heartwarming dish that brings the rich flavors of traditional Mexican cuisine right to your table. This recipe is perfect for a comforting family dinner or a festive gathering with friends. Here’s how to create this delicious meal from scratch:


Ingredients

Scale

For Picadillo:

  • 2 tbsp extra virgin olive oil (EVOO)
  • 1 to 2 lbs ground beef
  • 3 potatoes, cubed
  • 1 can green beans or fresh (optional)
  • 1 small onion, chopped
  • 2 garlic cloves, minced
  • 3 tomatoes, diced
  • 2 Serrano chiles, chopped
  • 1 tsp kosher salt (add more if needed)
  • 1 tsp garlic salt
  • 1/4 tsp cumin
  • 1 tsp oregano, rubbed between palms
  • 1 tsp chili powder
  • 3 tsps paprika
  • Pepper to taste

For Flour Tortillas:

  • 4 cups all-purpose flour
  • 1 tsp salt
  • 1 tsp baking powder
  • 1 cup vegetable shortening
  • 1 cup warm water

Instructions

For Picadillo:

  1. Cook Potatoes: In a skillet, heat the extra virgin olive oil over medium heat. Add the cubed potatoes and cook until they are browned and cooked through. Once done, remove them from the pan and set aside.
  2. Brown the Beef: In the same skillet, add the ground beef, minced garlic, and chopped onions. Cook until the beef is browned. As it cooks, season with kosher salt, garlic salt, cumin, oregano, chili powder, paprika, and pepper to taste, ensuring the spices are well distributed throughout the beef.
  3. Add Vegetables and Simmer: Add the diced tomatoes and chopped Serrano chiles to the skillet. Let the mixture cook until it thickens a bit. Then, reintroduce the potatoes (and green beans if using) to the skillet. Stir well to combine and let everything simmer together for about 5 minutes.

For Flour Tortillas:

  1. Mix Dry Ingredients: In a large bowl, combine the all-purpose flour, salt, and baking powder. Mix these dry ingredients well.
  2. Incorporate Shortening: Add the vegetable shortening to the bowl. Use your hands or a pastry cutter to work the shortening into the flour mixture until it resembles coarse crumbs.
  3. Form the Dough: Gradually add warm water to the mixture, stirring until a dough forms. The dough should be soft but not sticky. Adjust with a little more flour or water as needed to achieve the right consistency.
  4. Rest the Dough: Transfer the dough to a Ziploc bag or cover it with a damp cloth. Let it rest for at least 1 hour. This resting period helps the gluten relax, making the dough easier to roll out.
  5. Shape and Cook Tortillas: After the dough has rested, divide it into small balls. On a lightly floured surface, roll out each ball into a thin circle. Heat a griddle or skillet over medium-high heat. Cook each tortilla until bubbles form on the surface, then flip and cook the other side until lightly browned. Keep the cooked tortillas wrapped in a cloth to stay warm.

Notes

Serve the savory picadillo with the freshly made warm flour tortillas for a truly comforting meal. The combination of the flavorful, spicy beef and potato mixture wrapped in a soft, homemade tortilla is sure to satisfy any appetite. This dish not only offers a taste of traditional Mexican cuisine but also showcases the joy of cooking from scratch. Enjoy this delicious meal with your loved ones, and feel free to customize the recipe with your favorite vegetables or adjust the spices to suit your taste