Classic Spaghetti Carbonara – Creamy and Authentic Recipe

Classic Spaghetti Carbonara: A Timeless Italian Delight

⚖️
Difficulty
Medium

⏲️
Prep Time
10 mins

🕒
Cook Time
20 mins

⏱️
Total Time
30 mins

🍽️
Servings
4

Classic Spaghetti Carbonara is an Italian masterpiece that captures the essence of comfort food. This dish combines simple ingredients to create an unforgettable flavor experience that is rich, creamy, and utterly satisfying. Imagine twirling your fork around al dente spaghetti coated in a velvety sauce made of eggs, pecorino cheese, and crispy pancetta. Each bite brings together the saltiness of the cheese and meat with the smoothness of the egg, creating a harmony of taste that lingers on your palate. It’s not just a meal; it’s an experience that transports you to the streets of Rome.

The beauty of Spaghetti Carbonara lies in its simplicity and the quality of its ingredients. As you gather around the table with family or friends, the aroma of sizzling pancetta and fragrant garlic fills the air, setting the stage for a delightful evening. Whether it’s a romantic dinner or a casual get-together, this classic Italian dish promises to impress and satisfy even the most discerning food lovers. With its rich flavors and creamy texture, it’s no wonder that Carbonara is a favorite among many around the globe.

Quick Recipe Highlights

  • Flavor Profile: This dish offers a beautifully balanced blend of savory, creamy, and slightly tangy flavors, making every bite a delight.
  • Texture: The spaghetti’s chewiness contrasts beautifully with the crispiness of the pancetta and the luscious creaminess of the sauce.
  • Aroma: The dish is aromatic, featuring notes from the garlic and the sizzling pancetta that tantalize your senses.
  • Visual Appeal: The plating is stunning, with golden pasta glistening under a sprinkle of freshly cracked pepper and a sprinkle of cheese.
  • Skill Level Needed: Although it seems complex, creating a perfect Carbonara is achievable for home cooks with basic skills, making it accessible and rewarding.
  • Special Equipment: All you need is a pot, a pan, and a mixing bowl to whip up this incredible dish, no fancy gadgets required!

Recipe Overview

  • Difficulty Level: This recipe is classified as medium difficulty due to the timing of cooking processes, but with careful attention, you can achieve perfect results.
  • Category: Classic Spaghetti Carbonara fits perfectly in the pasta category and is a popular choice for main meal sections in Italian cuisine.
  • Cuisine: Italian cuisine is celebrated for its rich flavors and fresh ingredients, and Carbonara exemplifies the heart of this culinary tradition.
  • Cost: The ingredients for Carbonara are generally affordable, making it a cost-effective option for a hearty meal.
  • Season: This dish is enjoyed year-round but is particularly comforting during the cooler months when warmer meals are desired.
  • Occasion: Spaghetti Carbonara is ideal for family dinners, social gatherings, or even a special date night; it’s a versatile dish for varied occasions!

Why You’ll Love This Recipe

The classic Spaghetti Carbonara is a dish that excites the taste buds with its dynamic flavor profile. The creamy sauce envelops the pasta perfectly, while the savory pancetta adds a satisfying crunch with each bite. The simplicity of the ingredients only enhances the overall experience, allowing each flavor to shine brightly. You might find it hard to resist a second helping!

In addition to its delicious taste, this recipe offers convenience and quick preparation. With a total time of about 30 minutes, it’s perfect for busy weeknights or impromptu gatherings. You can have a gourmet meal on the table without extensive prep work. The straightforward steps make it easy for anyone to replicate this dish in their own kitchen, ensuring that you can enjoy a restaurant-quality meal at home.

Nutritionally, Carbonara can be a balanced meal when paired with a side of vegetables or a fresh salad. The use of eggs provides a great source of protein, while the pasta offers carbohydrates for energy. When made thoughtfully, this dish can cater to various dietary needs while satisfying hunger with its richness.

Practically, Spaghetti Carbonara holds a social aspect as well. It’s a dish that brings people together around the table, encouraging laughter and conversation over shared plates. The communal experience of enjoying a classic Italian dish fosters connection and warmth, making it a great choice for entertaining friends and family.

Lastly, the affordability of the ingredients makes this recipe accessible to many. Even while enjoying a fine culinary experience, you won’t stretch your budget. Classic Spaghetti Carbonara is a fine example of how simple ingredients can create something truly delightful, proving that cooking can be both an art and a joy.

Historical Background and Cultural Significance

Spaghetti Carbonara has its origins deeply rooted in Italian cuisine, particularly in the Lazio region, where Rome is located. Its invention is often attributed to the mid-20th century, with tales suggesting that it was created by Italian charcoal workers (‘carbonari’). The simplicity of the dish reflects the practicality of these workers who needed a satisfying, energy-rich meal.

Culturally, Carbonara is not just a meal; it represents a piece of Italy’s culinary heritage. It embodies the Italian philosophy of “fare la scarpetta,” which means to savor every last bite of food, often using bread to wipe the plate clean. Carbonara encourages sharing and savoring, emphasizing community and connection.

Over the years, the recipe has evolved, with various regions of Italy adding their personal twists. While traditionalists hold firm to the original components of eggs, cheese, pepper, and pork, modern variations have emerged, introducing ingredients like cream or vegetables. These adaptations showcase cooking’s adaptability and the creativity of home cooks exploring outside traditional limits.

Regional variations further highlight the dish’s significance across Italy and beyond. Different provinces may use unique local ingredients or methods, reflecting their culture and contributing to the global appreciation for this delicious carbonara. The dish celebrates the diverse history of Italian cuisine while maintaining a beloved status among food lovers worldwide.

Ingredient Deep Dive

Spaghetti is the heart of Carbonara, providing the base for the dish. Roman tradition calls for spaghetti, but you can also use fettuccine or bucatini. As a staple in Italian cuisine, it has historical significance dating back to the 12th century. Spaghetti contains carbohydrates which are a primary energy source for the body, making it an excellent inclusion in any meal. When selecting spaghetti, look for high-quality, durum wheat pasta for better texture and flavor, and ensure to store it in a cool, dry place.

Pancetta plays a crucial role in imparting rich flavor to the dish. This Italian bacon adds a delightful saltiness and texture, key to the overall experience of Carbonara. Pancetta is often sold in thin slices and is made by curing pork belly with spices, enhancing its flavor. Nutritionally, it contributes protein and fat, so it’s important to use it judiciously. When choosing pancetta, always select a good quality product, preferably from an Italian supplier. Store it in the fridge and use it within a week for freshness.

Eggs are vital for creating the creamy sauce that binds the dish. Traditionally, fresh eggs from free-range chickens are preferred for the best color and flavor. Eggs are a great source of protein and contain numerous vitamins and minerals, making them an essential part of a well-balanced diet. To achieve the perfect sauce, use high-quality eggs, ideally from a local farmer’s market. Store eggs in the refrigerator and aim to use them within their expiration date to ensure their quality.

Pecorino Romano cheese adds the characteristic tangy flavor to Carbonara. This hard cheese, made from sheep’s milk, not only enhances the taste but also adds richness and depth. It’s a source of protein and essential fatty acids. When selecting cheese, look for an authentic Pecorino Romano rather than generic hard cheese for the best results. Store any leftover cheese in the refrigerator, wrapped tightly to maintain freshness.

Common Mistakes to Avoid

  • Using low-quality ingredients: Opting for subpar ingredients can lead to an unsatisfactory end product. Always choose the freshest eggs, high-quality cheese, and quality pasta.
  • Overcooking the pasta: Cooking pasta until mushy will ruin the texture of your dish. Always aim for al dente, as it will continue to cook slightly when mixed with the sauce.
  • Adding cream: Traditional Carbonara relies solely on eggs and cheese for creaminess. Adding cream can alter the authentic taste and texture of this classic dish.
  • Not mixing the sauce properly: Failing to blend the egg mixture with hot pasta can lead to scrambled eggs. Mix them off the heat for smooth results.
  • Using precooked pancetta: Pre-cut or precooked pancetta may lack flavor. Freshly sauté it to develop deeper flavors essential for Carbonara.
  • Forget to reserve pasta water: Not saving some pasta water can leave your sauce too thick. Use it to adjust the sauce’s consistency when needed.
  • Inadequate seasoning: Pasta needs seasoning! Ensure you’re adding enough salt to the water and seasoning your sauce to enhance flavors.
  • Rushing the process: Cooking Carbonara requires some care in timing, especially when combining the sauce with the pasta. Take your time for the best results.

Essential Techniques

Cooking the Pasta: Cooking pasta is fundamental to this dish. Learn to master the timing and don’t forget to salt the water well to enhance the pasta’s flavor. Always test for doneness a minute before the package suggests. Look for a firm bite, known as al dente.

Making the Sauce: The key to a creamy sauce without scrambling the eggs is to mix them off the direct heat. Once you add the hot pasta, the residual heat will cook the eggs just enough without overcooking them. Visual cues include a smooth, glossy sauce that clings to the spaghetti.

Pro Tips for Perfect Classic Spaghetti Carbonara

One essential tip is to use room temperature eggs for a smoother emulsion when making the sauce. Cold eggs can shock and curdle when they come in contact with hot pasta.

Always mix the eggs and cheese together before adding them to the pasta. This method ensures an even distribution of cheese throughout the dish, enhancing each bite.

Try using a combination of Pecorino Romano and Parmigiano-Reggiano for a sought-after flavor balance. This mix brings out a nutty richness that complements the salty pancetta beautifully.

When sautéing the pancetta, ensure it’s crisp, as this adds a delightful crunch that contrasts with the creamy pasta. A dash of black pepper brings just the right amount of heat.

Reserve more pasta water than you think you’ll need, as it helps adjust the consistency of the sauce without compromising flavor. The starch from the pasta water helps bind the sauce to the noodles for a better overall texture.

Serve Carbonara immediately after plating to enjoy it at its peak temperature. The sauce thickens quickly, and the ingredients taste best when fresh.

Finally, consider adjusting the recipe for personal taste by experimenting with the type of pasta or cheese you use. Exploring different pasta shapes can add a fun twist to this classic dish!

Variations and Adaptations

Classical variations of Spaghetti Carbonara can include different types of meats such as guanciale or bacon, each imparting unique flavors while preserving the dish’s essence. Incorporating seasonal vegetables like peas or asparagus can add a refreshing twist, enhancing its nutritional profile without sacrificing flavor.

For those looking for dietary modifications, a gluten-free pasta option can be a great substitute. The use of zoodles or spaghetti squash can easily create a low-carb version while maintaining the spirit of the dish.

If you’re aiming for a vegetarian adaptation, consider omitting the meat entirely and using smoked paprika to mimic the smoky flavor traditionally provided by pancetta.

For an explosion of flavor, adding truffle oil or fresh herbs like basil or parsley can elevate your Carbonara experience in unexpected yet delightful ways.

Finally, consider plating your Carbonara in unique ways such as serving it in a Parmesan cheese bowl for a dramatic presentation, making it as pleasing to the eyes as to the palate.

Serving and Presentation Guide

Presentation is critical when serving Classic Spaghetti Carbonara. Start by twisting the spaghetti into a nest on the plate for a refined look. Finish it off with a generous grating of Pecorino Romano and a sprinkle of fresh cracked pepper on top.

Garnishing with fresh herbs, such as parsley, will add a pop of color and freshness to the dish, enhancing its visual appeal. Remember, presentation matters—presenting the pasta artfully will invite people to dig in!

For a more rustic approach, serve Carbonara in individual bowls, allowing guests to customize their plates with extra cheese or pepper to taste.

Temperature plays a crucial role, too; ensure the pasta is piping hot as it greatly enhances the overall flavor experience. A side of garlic bread or a light salad complements the main dish beautifully.

Portion control is essential to keep guests satisfied without overwhelming them. A typical serving is about 2 ounces of dry pasta per person, allowing for a hearty meal with room for sides without going overboard.

Wine and Beverage Pairing

When selecting the perfect wine to pair with Classic Spaghetti Carbonara, a white wine like Pinot Grigio or a light red like Chianti will complement the dish beautifully. The acidity of the wine cuts through the richness of the sauce, enhancing both the meal and the drink.

For a non-alcoholic alternative, consider sparkling water with a slice of lemon. This refreshingly light option will cleanse your palate and keep the meal feeling light.

If you enjoy coffee, a smooth cappuccino can serve as an excellent pairing after the meal, mirroring the creaminess found in the Carbonara while offering a delightful contrast in flavor.

Serve these beverages chilled to enhance your dining experience, and don’t hesitate to offer a variety, allowing your guests to choose their preference.

Storage and Shelf Life

Storing leftover Classic Spaghetti Carbonara properly is essential to maintain its flavor and texture. Make sure to transfer it to an airtight container soon after the meal. It can be refrigerated for up to 2 days.

When reheating, avoid microwaving directly, as it may overcook the eggs and ruin the creamy texture. Instead, gently warm it on the stovetop over low heat, adding a splash of reserved pasta water to revive the sauce.

Frozen Carbonara is not recommended due to the quality of the eggs; freezing may cause them to separate when thawed. However, if you must freeze it, store it for no more than a month.

Always check for signs of spoilage before consuming leftovers. If you notice an off smell or discoloration, it’s best to err on the side of caution and discard it.

Make Ahead Strategies

To save time in preparing Classic Spaghetti Carbonara, consider prepping the ingredients ahead of time. Chop the pancetta, measure out your cheese, and have your garlic peeled and ready to go. This will streamline the cooking process and allow for a swift assembly once you’re ready to cook.

You can also cook the pasta al dente earlier in the day. Shock the pasta in ice water to stop the cooking process and toss it with a small amount of oil to prevent sticking. When it’s time to heat, just warm it in your sauce.

Assemble everything just before serving for the best flavor; this preserves the dish’s creamy texture without any compromise.

When reheating, you can enhance freshness by adding a touch of grated cheese or freshly cracked pepper during the warming process.

Fresh herbs can also be added just before serving to add a burst of flavor and aroma that elevates your Carbonara for your guests!

Scaling Instructions

If you wish to scale Classic Spaghetti Carbonara, it can be done easily! For halving the recipe, reduce all ingredients by 50%, and this will help with maintaining the balance of flavors and textures.

For doubling or tripling the recipe, ensure you have larger pots and pans to accommodate the extra pasta. Adjust the cooking time slightly, but keep an eye on the pasta for doneness since the cooking time may vary with larger quantities.

When preparing large batches, consider cooking in shifts to manage the timing more effectively and to avoid overcrowding the pot.

Ensure that you have enough sauce; double-check the egg and cheese ratio to match the increased pasta quantity. It’s crucial to preserve its creamy texture, so always adjust the ingredients accordingly.

Finally, pay extra attention to storage; larger quantities may require different containers, so plan for adequate packaging to maintain freshness!

Nutritional Deep Dive

Classic Spaghetti Carbonara offers a balanced nutritional profile. With a macro breakdown, one serving typically provides around 400 calories, comprising healthy carbohydrates from the pasta, protein from the eggs and pancetta, and fats from the cheese.

In terms of micronutrient analysis, eggs provide essential vitamins like B12 and D, while pecorino adds calcium and Vitamin A. These nutrients are vital in supporting overall health and metabolic functions.

Eating Carbonara in moderation can offer health benefits, allowing for a rich serving of protein that gives energy and keeps you feeling full. Pairing with a salad or veggies can enhance the meal’s nutritional value and balance.

When considering portion size, a typical serving is about 2 ounces of dry pasta, which can keep the meal within reasonable calorie limits while still enjoying the rich flavors.

For those mindful of weight management, consider adjusting ratios or adding vegetables to increase the fiber content, which is beneficial for maintaining a balanced diet.

Dietary Adaptations

If you’re following a gluten-free diet, using gluten-free pasta is an excellent adaptation for Classic Spaghetti Carbonara while maintaining the integrity of the dish. Ensure that the pasta is certified gluten-free to avoid cross-contamination.

For a dairy-free option, though challenging for a traditional carbonara, you can utilize plant-based cheese alternatives, and coconut cream can add a creamy texture as a substitute for traditional cheese.

Vegans can take a creative approach by replacing this recipe’s components with tofu or chickpea flour to mimic the texture of eggs, while nutritional yeast can provide a cheesy flavor profile.

Low-carb dieters can replace spaghetti with zucchini noodles or spaghetti squash, offering a similar texture and flavor without the extra carbohydrates.

Adapting to the keto lifestyle can be achieved by sticking with alternatives such as cauliflower rice or shirataki noodles, maintaining the core flavors while adjusting the carbohydrate content significantly.

For others on specific diets like low-FODMAP, you can focus on using garlic-infused oil instead of whole garlic and reducing cheese to ensure that the meal aligns with dietary restrictions while still being enjoyable!

Troubleshooting Guide

Should you encounter texture issues, ensure that you’re mixing the eggs properly with the pasta away from direct heat. This step is essential to avoid scrambling the eggs while achieving a creamy consistency.

If the flavor balance is off—too salty or bland—add a touch of fresh black pepper or a hint of lemon juice to enhance and round out the flavors, providing brightness without overpowering.

Temperature problems may arise if the pasta is clumped together or the sauce is too cold. A quick dip in boiling water or a gentle reheating with added pasta water can alleviate this issue.

For equipment challenges, ensure your stovetop pans are the right size; if they’re too small, prevent even cooking and proper mixing. Upgrading to a larger pan can help avoid these problems.

If using ingredient substitutions, pay attention todo potential flavor clashes. Test different ratios slowly until you find the ideal balance without compromising the dish’s essence.

Lastly, timing concerns can be effectively managed by prepping ingredients in advance and setting a timer to maintain focus during critical cooking steps, ensuring an easier experience and successful results.

Recipe Success Stories

Readers have flooded in with community feedback praising Classic Spaghetti Carbonara for its comfort and simplicity. Many have shared that they’ve successfully recreated the dish using fresh ingredients from local markets, leading to personal triumphs in their culinary endeavors.

Variations on the recipe have sparked creativity; some have shared adaptations like adding spices or seasonal vegetables, enriching their Carbonara recipes while staying true to the original essence. These reader suggestions broaden the spectrum of this classic dish.

Photography tips from the community have encouraged the use of natural light and simple backgrounds to showcase the beautiful textures and colors of the pasta, inspiring others to document their experiences with Carbonara.

Adaptation stories reveal that many home cooks initially feared the complexity but found joy in the easy instructions, paving the way for confidence in creating traditional Italian dishes in their kitchens.

The enjoyment of creating this dish that brings family together has led to a greater appreciation for cooking at home. Many appreciate the shared moments around the table and the laughter that occurs when enjoying a beautiful meal like Spaghetti Carbonara.

Frequently Asked Questions

Can Carbonara be made in advance?
Yes, you can prepare the ingredients beforehand. However, it’s best to cook and combine them right before serving to maintain the creamy texture.

What can I substitute for pancetta?
You can substitute pancetta with guanciale for authenticity or bacon; however, be cautious of adjusting seasoning as bacon may be saltier.

Is it necessary to use eggs?
Yes, eggs are a key component in creating the sauce’s creamy texture, but vegan alternatives like silken tofu might work as a substitute.

How do I know when the pasta is done?
Pasta should be al dente, which means it should be cooked but still have a slight bite. Regularly taste it to avoid overcooking!

Can leftovers be reheated?
Yes, reheating is possible, but use gentle heat on the stovetop and add a splash of pasta water to maintain creaminess.

Can I use other types of cheese?
While Pecorino Romano is traditional, mixing it with Parmesan or using a lactose-free cheese can provide tasty alternatives.

Is it okay to add cream to Carbonara?
Traditional Carbonara does not include cream. It’s cherished for its simple, creamy texture achieved through eggs and cheese alone.

How can I make a vegetarian version?
Omit pancetta and incorporate sautéed mushrooms or smoked paprika to obtain smoky flavors without meat.

Can I freeze Carbonara?
Freezing is not recommended due to the egg content. The sauce may break when thawed, leading to a less-than-ideal texture.

How do I prevent clumping when reheating?
Add a small amount of reserved pasta water while gently reheating on low heat to loosen the sauce and incorporate moisture back in.

Additional Resources

For those eager to delve deeper into culinary adventures, check out related recipes such as Fettuccine Alfredo or Classic Lasagna, which embody the


Homemade Starbucks Coffee – Easy Recipe for Café Flavor

Homemade Starbucks Coffee: Brew Your Favorite Cup at Home!

⚖️
Difficulty
Easy

⏲️
Prep Time
10 mins

🕒
Cook Time
5 mins

⏱️
Total Time
15 mins

🍽️
Servings
2

Are you craving that rich flavor, creamy texture, and invigorating aroma of Starbucks coffee? Look no further! This homemade Starbucks coffee recipe allows you to recreate the magic of your favorite café right in your own kitchen. With only a few simple ingredients and steps, you can enjoy the indulgent experience of sipping a freshly brewed cup of coffee, tailored to your tastes.

Imagine waking up to the enticing scent of freshly ground coffee beans filling your home, the warmth of the brewed coffee in your hands, and the soothing flavors awakening your senses. This recipe combines quality coffee grounds with just the right amount of cream and sweetener, ensuring each sip is a moment of pure bliss. Whether it’s a morning pick-me-up or an afternoon treat, this coffee is bound to enhance your day!

Quick Recipe Highlights

  • Flavor Profile: Bold coffee blended with rich creaminess and sweet notes creates a perfect balance that delights the palate.
  • Texture: A smooth, creamy finish that coats the mouth, combined with the boldness of freshly brewed coffee.
  • Aroma: Inviting coffee aromas complemented by sweet, creamy undertones create a sensory experience.
  • Visual Appeal: Dark, rich coffee artfully topped with a swirl of cream, creating an enticing presentation.
  • Skill Level Needed: An easy recipe suitable for beginners and coffee enthusiasts alike!
  • Special Equipment: A coffee maker or French press will work wonders in brewing this coffee.

Recipe Overview

  • Difficulty Level: This recipe is easy to follow, requiring minimal skills in the kitchen, ideal for all coffee lovers.
  • Category: Perfect for breakfast, brunch, or any time of day when a delicious coffee is needed.
  • Cuisine: This recipe reflects the global coffee culture while embodying the Starbucks signature style.
  • Cost: Budget-friendly as it requires minimal ingredients available at most grocery stores.
  • Season: Enjoy this recipe all year round, but perfect for cozy winters and refreshing summers alike.
  • Occasion: Great for casual get-togethers, cozy mornings, or as a special treat on weekends.

Why You’ll Love This Recipe

This Starbucks coffee recipe appeals to your taste and texture, delivering the perfect balance of bold flavors and creamy texture. You’ll taste the richness of the coffee paired with smooth cream, creating an indulgent experience that leaves you wanting more. Convenience is another perk; you can whip up this coffee in just 15 minutes without needing expert skills.

The nutritional advantages are something to consider as well. With the ability to control the ingredients, you can opt for healthier milk alternatives or sweeteners to align with your dietary needs. Additionally, this coffee is fantastic for social occasions, allowing you to impress friends and family by serving them a café-quality beverage right at home.

Cost-effectiveness is another reason to love this recipe. You can make multiple servings for the price of one overpriced coffee from the café, ensuring a luxurious drink experience without breaking the bank. Accessibility plays a big role, too, as many of the ingredients are pantry staples.

Finally, this homemade Starbucks coffee provides an opportunity to customize. You can adjust the sweetness, creaminess, or even add flavored syrups to tailor the experience to your liking. Every cup can be a unique creation reflecting your taste.

Historical Background and Cultural Significance

The origin of coffee is steeped in legend, with tales tracing back to Ethiopia where coffee beans were first discovered. The beverage gained popularity across the globe, becoming a staple in various cultures. Over time, coffee shops emerged as social hubs, and Starbucks played a pivotal role in transforming coffee drinking from a simple beverage to an experience enjoyed by millions.

Each coffee style has its own cultural significance and has been embraced differently in various regions. For instance, Italy is renowned for its espresso culture, while Scandinavian nations are famous for their coffee “fika” practices. Starbucks has merged these traditions into its offerings, providing a glimpse into the global appreciation for coffee.

As the coffee industry evolved, so did the methods of preparation, leading us to the present-day techniques enjoyed worldwide. From simple brewed coffee to artisanal blends, the evolution reflects the passion and artistry behind each cup.

Regional variations in coffee preparation also emerged, highlighting how local ingredients and methods are embraced. Familiarizing yourself with these intricacies enhances the flavor profile, making your homemade Starbucks coffee a more enriched experience.

Ingredient Deep Dive

Coffee beans are the star ingredient in this recipe, coming in various types such as Arabica and Robusta. Each type holds cultural significance; for example, Arabica is often regarded as superior due to its rich flavor profile. When selecting coffee beans, look for whole beans that are freshly roasted for optimal flavor.

Additionally, the choice of cream or milk directly impacts the texture and taste of your coffee. Options like whole milk, almond milk, or oat milk cater to different dietary preferences, providing versatility to the recipe. Store these ingredients appropriately to maintain their freshness and flavor, ensuring the best coffee experience.

Common Mistakes to Avoid

  • Using stale coffee beans: Freshness is key to great coffee. Always use beans that have been roasted recently.
  • Neglecting measurements: Precise measurements of coffee and water are crucial for a balanced flavor.
  • Not preheating equipment: Always preheat your coffee maker or French press for optimal brewing temperature.
  • Using boiling water: Water should be just below boiling to avoid burning the coffee and releasing bitter flavors.
  • Over-brewing: Allowing coffee to brew too long can lead to over-extraction and a bitter taste.
  • Skipping the grind: Grinding your beans just before brewing significantly enhances the flavor.
  • Rushing the cooling process: Allow the coffee to cool slightly before adding cream or milk to avoid curdling.
  • Ignoring clean equipment: Regularly clean your coffee maker to prevent old flavors from affecting your brew.
  • Choosing low-quality cream: The type of milk or cream can make a huge difference—opt for high-quality options for the best results.
  • Forgetting to stir: Stirring helps combine flavors effectively, enhancing the overall taste experience.

Essential Techniques

Brewing coffee correctly is vital. Use filtered water, maintain the correct temperature, and let it steep adequately to achieve the best aroma and flavor. Avoid common pitfalls like boiling water or letting it brew for too long, as both can compromise flavor.

Another key technique is proper grinding. Coffee beans should be ground just before brewing to preserve freshness. Master this by using a grinder that matches the brewing method—coarser grounds for a French press and finer for espresso.

Pro Tips for Perfect Homemade Starbucks Coffee

Use high-quality, freshly roasted beans to elevate your coffee experience. Store your coffee beans properly in an airtight container to maintain freshness and avoid exposure to light and moisture.

Experiment with grind size; adjusting this can drastically alter the flavor. A burr grinder is ideal to achieve consistency.

Incorporate flavored syrups or spices to personalize your coffee to your tastes. Vanilla extract, cinnamon, or cocoa powder can transform your drink.

Invest in a good coffee maker or French press for consistent results—quality equipment leads to a better brew.

Don’t hesitate to adjust milk levels to find your perfect creaminess without overpowering the coffee flavor.

Finally, enjoy the ritual of making coffee; it allows you to appreciate the process and results with every cup.

Variations and Adaptations

If you prefer a lighter coffee, try using a milk frother to create a light froth on top without overwhelming the coffee’s flavor. Seasonal adaptations could include pumpkin spice for the fall or peppermint for the winter. Experiment with different flavored syrups to reflect your taste.

For dietary modifications, opt for non-dairy creamers or sugar substitutes that align with your nutritional goals. Adjusting sweetness and creaminess can also cater to different preferences.

Texture variations can be achieved by blending the coffee with ice for a refreshing iced coffee or adding whipped cream for a richer experience. Each variation provides a unique twist on classic Starbucks coffee.

Serving and Presentation Guide

For an inviting presentation, use a clear glass mug to showcase the rich color of the coffee. A sprig of mint or a dash of cinnamon on top can create a lovely touch.

Garnishing with whipped cream can add a luxurious appearance and a flavor boost, especially if topped with chocolate drizzle or caramel sauce.

Temperature matters; serve your coffee hot for a cozy feeling, or ice it for a refreshing drink. Carefully consider portion sizes to ensure everyone can enjoy this delightful beverage.

Wine and Beverage Pairing

If you prefer an adult twist, consider pairing your coffee with a smooth dessert wine like a tawny port, enhancing the coffee’s richness.

For non-alcoholic alternatives, herbal teas or spicy chai can complement the coffee’s boldness without overpowering it.

If you enjoy coffee on its own, consider pairing with complementary flavors like dark chocolate or freshly baked pastries to enrich your experience.

Storage and Shelf Life

Store any leftover coffee in an airtight container in the refrigerator, ensuring it retains flavors for a couple of days. Reheat gently on the stove or microwave when you’re ready to enjoy it again.

For brewed coffee, avoid leaving it out at room temperature for extended periods to maintain freshness and taste. Signs of spoilage include an off smell or sour taste.

If you have leftover cream or milk, store it in the refrigerator and use it within its expiration date, ensuring optimal freshness for your coffee.

Make Ahead Strategies

To streamline your morning routine, prepare coffee grounds before bed and set your coffee maker to brew at a specific time. This makes getting your coffee fix quick and seamless.

To enhance quality, consider chilling your brewed coffee and using it for iced coffee recipes later in the week.

If time permits, whip up a batch of whipped cream ahead of time and store it in the refrigerator, ready to top your coffee whenever you need it.

Scaling Instructions

Halving the recipe is simple, just cut the coffee and cream measurements in half, maintaining the same brewing methods.

When doubling or tripling the recipe, adjust the brew time if using a larger coffee maker to ensure even extraction and flavor.

Consider adjusting water ratios carefully to achieve the desired strength and flavor when increasing quantities.

Nutritional Deep Dive

One serving of this homemade Starbucks coffee offers a delightful caffeine boost and a mix of essential nutrients, depending on the cream and sweeteners used. If using whole milk, you’ll gain calcium and vitamin D.

Make sure to analyze portions; this coffee can become calorie-dense with added sugars or cream. It’s best to measure accordingly for healthy enjoyment.

Dietary Adaptations

For gluten-free options, ensure any flavored syrups used are certified gluten-free. The base recipe itself is naturally gluten-free, making it suitable for those with dietary restrictions.

Dairy-free versions can easily be achieved by substituting regular milk and cream with almond, soy, or oat milk, providing numerous flavor profiles.

Vegans can enjoy this recipe by skipping on any dairy bases and using plant-based milk alternatives alongside vegan-friendly syrups.

Troubleshooting Guide

If you’re experiencing bitterness, check your brew time; over-extraction leads to harsh flavors. Adjusting the steeping time correctly mitigates this issue.

For texture problems, ensure you’re using the correct grind for your brewing method; a fine grind for espresso and coarser for French presses can significantly affect the final result.

If coffee tastes too weak, increase the coffee quantity or reduce water as needed to develop a richer flavor.

Recipe Success Stories

Readers have shared how they enjoyed rediscovering coffee at home, with rave reviews highlighting great flavor similar to their beloved Starbucks coffee. Many love the ability to customize their drinks to suit their taste preferences.

Adaptation stories include using unique flavored syrups, such as lavender or hazelnut, creating unique and memorable experiences.

Share your success stories and photography tips with your community! Engaging with fellow coffee lovers contributes to an enriching culinary dialogue and inspires more people to recreate their favorite coffee at home.

Frequently Asked Questions

Q1: Can I use decaf coffee beans for this recipe?

A1: Absolutely! You can use decaf coffee beans in the same quantity for a delicious, caffeine-free version of your homemade Starbucks coffee.

Q2: What’s the best way to store coffee beans?

A2: Store coffee beans in an airtight container, away from light and heat to preserve their freshness for longer periods.

Q3: How can I reduce calories in this coffee recipe?

A3: Opt for low-fat or plant-based milk and consider using natural sweeteners or reducing the amount of syrup to cut calories.

Q4: Is this recipe easy to make for a large crowd?

A4: Yes, simply scale the recipe up by adjusting ingredients, and use larger brewing equipment for larger batches, ensuring equal flavor.

Q5: Can flavored coffee be made with this recipe?

A5: Yes! Simply add flavored syrups before serving to customize your coffee to your preferred taste.

Q6: What type of cream works best in this coffee?

A6: Whole milk or heavy cream provides a rich texture, but feel free to experiment with half-and-half, oat milk, or almond milk for unique flavors.

Q7: How do I prevent my coffee from getting cold?

A7: Serve coffee in preheated mugs or use insulated mugs to keep your beverage warm for longer.

Q8: What’s a good side dish to serve with homemade coffee?

A8: Pastries like croissants or muffins pair perfectly with coffee, enhancing the enjoyment of your homemade drink.

Q9: Can I use a coffee pod machine instead of a traditional coffee maker?

A9: Yes! You can use a coffee pod machine; just select your favorite coffee pods to create a quick and delicious brew.

Q10: How long can I keep brewed coffee in the refrigerator?

A10: Brewed coffee can last up to 3 days in the refrigerator. Ensure it’s in an airtight container to maintain flavor.

Q11: How can I improve the frothiness of my milk?

A11: Use a milk frother or steam the milk to create light, airy froth for your homemade coffee.

Q12: What are some popular syrups to add to my coffee?

A12: Popular choices include vanilla, caramel, hazelnut, and seasonal flavors like pumpkin spice or peppermint during the holidays.

Additional Resources

Check out our related recipes for delicious treats to serve alongside your coffee, from pastries to desserts! You’ll also find technique guides for perfecting your brewing methods and informative ingredient guides to enhance your culinary journey.

Join the Conversation

Share your recreated Starbucks coffee on social media, and engage with fellow coffee lovers! Share photography of your perfected coffee, and exchange tips, reviews, and variations to inspire each other in the wonderful world of coffee making.

The Recipe

Homemade Starbucks Coffee

Serves: 2

Prep Time: 10 mins

Cook Time: 5 mins

Total Time: 15 mins

Kitchen Equipment Needed

  • Coffee maker or French press
  • Measuring cups and spoons
  • Container for milk/cream

Ingredients

  • 2 cups of water
  • 1 cup of freshly ground coffee
  • ½ cup of milk or cream
  • 1-2 tablespoons of flavored syrup (optional)
  • Sweetener of choice (to taste)

Directions

  1. Boil the water in a kettle.
  2. Measure and add the coffee grounds to the coffee maker or French press.
  3. Pour the boiling water over the coffee grounds, making sure to cover them entirely.
  4. Let it steep for about 4-5 minutes.
  5. In a separate container, heat your milk or cream and whisk or froth if desired.
  6. Once brewed, gently press or filter the coffee, pouring it into mugs.
  7. Add the heated milk or cream to coffee, stirring to combine.
  8. Sweeten with syrup and additional sweeteners to your liking.
  9. Enjoy your homemade Starbucks coffee!

Recipe Notes

  • Feel free to adjust the coffee-to-water ratio according to your taste preferences.
  • For an iced version, allow the coffee to cool, then serve over ice with cream.
  • Experiment with various syrups for unique flavors!

Best 15 Nespresso Vertuo Pods for Bold and Smooth Coffee

15 Best Nespresso Vertuo Pods: Discover Your Perfect Brew

⚖️
Difficulty
Easy

⏲️
Prep Time
5 mins

🕒
Cook Time
0 mins

⏱️
Total Time
5 mins

🍽️
Servings
1

If you’re a coffee enthusiast, then discovering the 15 best Nespresso Vertuo pods can elevate your coffee experience to new heights. These pods are designed to unleash an explosion of flavor with every cup, be it a rich espresso or a smooth, full-bodied coffee. Nespresso has carefully curated a selection of blends and flavors that cater to every palete, making it easier than ever to enjoy café-quality coffee at home.

The beauty of Nespresso Vertuo pods lies in their versatility. From fruity and floral notes to robust chocolatey flavors, there’s a Nespresso pod to enhance your morning routine or to share with friends during a cozy afternoon gathering. Each pod promises to deliver not only comfort but a touch of indulgence, wrapped in an easy-to-brew experience as you relax and enjoy a moment just for you.

Quick Recipe Highlights

  • Flavor Profile: Experience a diverse range of flavors including chocolatey, nutty, and fruity notes that tantalize your taste buds.
  • Texture: Enjoy a velvety texture that perfectly complements the aroma and flavor of each brew.
  • Aroma: Revel in the rich, enticing aromas that fill your kitchen as you brew your favorite pod.
  • Visual Appeal: Each cup showcases a beautiful crema that signifies a well-prepared coffee.
  • Skill Level Needed: Brewing with Nespresso is beginner-friendly, making it perfect for coffee lovers of any skill level.
  • Special Equipment: A Nespresso Vertuo machine is all you need to create your perfect cup!

Recipe Overview

  • Difficulty Level: Brewing coffee with Nespresso pods is incredibly simple, making it perfect for busy mornings or leisurely afternoons.
  • Category: Coffee and beverages.
  • Cuisine: Global coffee influences that allow you to taste a little of everything from around the world.
  • Cost: Nespresso pods are a cost-effective way to enjoy gourmet coffee without the café price tag.
  • Season: Ideal any time of the year, whether it’s a hot summer afternoon or a cozy winter morning.
  • Occasion: Perfect for any occasion, from a simple morning ritual to impressing guests at a brunch gathering.

Why You’ll Love This Recipe

The array of flavors offered by the 15 best Nespresso Vertuo pods creates an irresistible appeal for every coffee lover. Each pod is intricately designed to highlight various flavor profiles, ensuring that there’s always an option that suits your mood. Whether you crave the comforting embrace of a dark roast or the refreshing zing of a light blend, you will find a choice that satisfies.

Moreover, the convenience of using Nespresso pods cannot be overstated. Simply insert the pod into the machine, press a button, and in moments, you have a steaming cup of coffee or espresso. This ease of preparation means you can whip up your favorite brew without the usual fuss of traditional coffee-making methods.

As for nutritional advantages, coffee has been shown to provide several health benefits, including improved cognitive function and increased metabolism. Enjoying a cup of coffee can provide that energy boost you need to follow through with your daily tasks.

When it comes to social events, brewing a variety of these pods can spark engaging conversations with friends and family as you explore different flavors together. From sharing laughter to enjoying the buzz from a caffeine boost, this experience can often turn a mere coffee break into a cherished moment.

Lastly, Nespresso Vertuo pods are not just convenient but also highly accessible, available in numerous outlets both online and offline. This ensures that enjoying your favorite blend of coffee is just a quick shop away, making gourmet coffee an everyday luxury.

Historical Background and Cultural Significance

Nespresso has its roots in the historical evolution of coffee culture, which traces back centuries to the Middle East. The introduction of espresso made coffee accessible and enjoyable in novel ways, and Nespresso expanded this transformation. The introduction of the Nespresso Vertuo system marked a significant evolution in coffee-making, capturing the essence of global coffee traditions within a pod.

The cultural importance of coffee, especially in casual meet-ups, remains significant worldwide. From Italy’s espresso bars to Portugal’s bica, coffee has always been more than just a drink; it’s a social phenomenon that brings people together.

The evolution of Nespresso has witnessed the company continually innovating to meet the tastes of the modern consumer. As coffee loves turn to Nespresso, they’ve come to appreciate the convenience without compromising on flavor. This has nurtured a rich history of premium coffee experiences.

Across regions, different countries have their own variations and coffee traditions. Nespresso pods showcase these blends through limited editions, celebrating the origins of coffee flavors by highlighting specific bean varieties and roasting techniques.

Ingredient Deep Dive

Each Nespresso Vertuo pod is crafted from high-quality arabica or robusta beans, sourced from regions like Latin America and Africa. These beans undergo a rigorous selection process to ensure only the finest make it into each pod, reflecting a commitment to excellence. Coffee beans are rich in antioxidants and essential nutrients, making them beneficial for health when enjoyed in moderation.

When selecting Nespresso pods, consider your preferred flavors: whether you enjoy brighter, fruit-forward blends or more intense, dark roast flavors. Store your pods in a cool, dry place, away from sunlight to maintain flavor integrity. Also, if you’re looking to experiment, you can easily substitute different pods to find your signature blend.

Common Mistakes to Avoid

  • Using old pods: Always check the expiry date; fresh pods yield better-tasting coffee.
  • Not rinsing the machine: Regularly clean your Nespresso machine to avoid bitter flavors in your brew.
  • Overfilling the cup: Avoid pouring too much water over the pod; it’s designed for specific volumes.
  • Restarting brewing too quickly: Allow your machine to cool between brews for optimal performance.
  • Using metallic cups: Metal can alter the flavor; choose glass or ceramic instead.
  • Ignoring water quality: Poor water can affect the overall taste of your coffee.
  • Choosing the wrong pod for the beverage: Each pod is crafted for specific drink styles; be mindful.
  • Neglecting to clean parts: Regular maintenance keeps your machine in top shape and improves taste.

Essential Techniques

Understanding the importance of machine maintenance is crucial for achieving the best flavor from your Nespresso pods. Regular cleaning and descaling prevent mineral build-up and ensure optimum brewing performance. This technique is essential for achieving that smooth, rich taste.

Another key technique involves properly inserting the pod to ensure a seal. A common pitfall is not completing the closing process correctly, which may lead to improper brewing. When inserted correctly, you’ll see quick visual cues as the machine engages effectively.

Pro Tips for Perfect Nespresso Vertuo Pods

  • Experiment with different pod flavors to find your ideal blend.
  • Use filtered water to enhance the purity of coffee taste.
  • Consider pre-warming your cups to maintain the temperature of your beverage for longer.
  • Don’t forget about milk frothers for lattes or cappuccinos.
  • Keep your machine clean to preserve the freshest flavors.
  • Mix different pods for unique flavor combinations.
  • Adjust the water volume settings according to your taste preferences.
  • Try iced variations using cold milk or homemade coffee ice cubes for summer refreshment.

Variations and Adaptations

You can create seasonal adaptations with your Nespresso Vertuo pods by adding limited-time flavors, like pumpkin spice in the fall or peppermint in winter. This allows you to keep up with current trends while indulging in your favorite beverages.

Experiment with different presentations, such as serving your coffee in unique glassware or garnishing with themed toppings for various occasions. Presentation can elevate the experience, making it feel more special.

Serving and Presentation Guide

For an inviting coffee experience, consider investing in aesthetically pleasing coffee mugs or glass cups to enhance the visual appeal of your brew. Adding garnishes, such as a sprinkle of cocoa powder or a dash of cinnamon, can add a delightful finishing touch.

When serving, make sure to include a selection of milk or cream for guests who enjoy a creamier texture. Remember to serve your coffee at the right temperature to maximize enjoyment and flavor.

Wine and Beverage Pairing

Pairing coffee with desserts such as chocolate cake or cookies can complement the rich flavors beautifully. Opt for a light-bodied white wine if transitioning from coffee to a celebratory drink, while dark chocolate can heighten the experience of a rich cup of espresso.

For a refreshing take, consider serving iced coffees with fruity non-alcoholic drinks during summer gatherings. This allows guests to enjoy multiple flavors and textures as they sip various beverages.

Storage and Shelf Life

Store Nespresso pods in their original packaging to maintain freshness and flavor. Keep them in a cool, dry place, away from direct sunlight, to extend their shelf life. Ideally, consume pods within a few months for the best taste experience.

Be on the lookout for any signs of spoilage, such as an off smell or off-taste, which can indicate that the pods have lost their freshness. When reheating coffee, avoid the microwave; instead, use a stovetop or a coffee pot for best results.

Make Ahead Strategies

Since Nespresso pods are individually wrapped, there’s little preparation involved; all you need to do is decide on your flavor in advance and keep your machine ready. Planning for the week and selecting favorite pods can streamline your morning routine.

If you’re hosting, brew a pot of coffee using a few pods to allow quick refills for guests. Keep milk and cream on standby, so they’re ready for use when you need them.

Scaling Instructions

For gatherings, you can easily scale by preparing multiple servings at once, adjusting the number of pods based on how many cups you need. Each pod yields a specific amount, so take that into account to ensure everyone has their fill.

When doubling or tripling, simply keep the brewing time in mind and ensure your guests are served fresh cups without delay.

Nutritional Deep Dive

Coffee is revered not just for its taste and aroma but also for its nutritional properties. A standard cup of brewed coffee contains minimal calories and can provide essential nutrients like riboflavin and potassium. The health benefits of coffee include enhanced alertness and potential metabolic boosts due to caffeine content.

When enjoyed with moderation and mindfulness of additives, coffee can be a healthy addition to most diets. The antioxidants found in coffee can also help combat oxidative stress, contributing to overall health benefits.

Dietary Adaptations

For those following gluten-free diets, Nespresso pods can be an excellent option as they do not contain gluten. Additionally, many flavors cater to vegan lifestyles—typically consisting of plant-based ingredients—making it easy for everyone to join in on the coffee experience.

You can also adapt your coffee recipes; for example, using nut or soy milk instead of dairy can be fulfilling and fitting for a wide variety of dietary preferences without compromising the enjoyment of your brew.

Troubleshooting Guide

Should you experience consistency issues, confirming your machine is properly calibrated can help clear up any brewing problems. Each pod is designed to work optimally, so any variations in temperature or water volumes can affect the final product.

If your coffee lacks flavor, consider experimenting with different pod types or ensure you’re using fresh pods. The type of milk used can also enhance or dim the flavor profiles based on personal preferences.

Recipe Success Stories

Community feedback on Nespresso pods highlights how users discover new flavor preferences through variations and blending. Stories of attendees at coffee-tasting events often showcase what makes a particular pod stand out, creating excitement and memorable moments around every cup.

Readers regularly suggest ways to enhance their brewing techniques, emphasizing customization as a vital part of the experience, showcasing how these pods foster a sense of creativity within the coffee culture.

Frequently Asked Questions

1. Are Nespresso Vertuo pods recyclable?

Yes, but recycling procedures vary by location. Nespresso offers dedicated recycling programs that spare inefficient waste management;

2. Can I use Nespresso pods for cold beverages?

Absolutely! You can brew strong coffee using the pods and pour it over ice for a refreshing drink.

3. How many different types of pods are available?

Nespresso frequently updates their offerings, with a variety of flavors and intensities available depending on your preference.

4. What is the difference between Original and Vertuo pods?

Vertuo pods are designed for larger servings and use unique brewing technology to extract flavors effectively, while Original pods focus on traditional espresso.

5. How should I store my Nespresso pods?

Keep them in a cool, dry place stored inside their original packaging for optimal preservation of flavor.

6. How long do Nespresso pods last?

While the shelf life can vary, they are typically best consumed within 6-12 months of the production date.

7. Can I reuse Nespresso pods?

For the best flavor, it is recommended to use each pod only once. However, there are reusable alternatives available for purchase.

8. Is there caffeine in Nespresso pods?

Yes, the caffeine content varies by pod; darker roasts typically have a higher caffeine content.

9. What’s the best way to clean my Nespresso machine?

Regularly run the cleaning cycle and follow Nespresso’s instructions, including descaling every few months.

10. Are Nespresso pods gluten-free?

Yes, Nespresso pods are gluten-free, making them a suitable option for those with gluten intolerances.

Additional Resources

For further exploration, consider incorporating related recipes that pair well with a cup of coffee, such as pastries or breakfast items. Engaging technique guides can enhance your overall skills in coffee brewing, making your experience even more enjoyable.

Additionally, look into ingredient information that highlights the provenance of various coffee beans and how to recognize quality. Lastly, recommendations on coffee-making equipment can help refine your home barista experience.

Join the Conversation

We invite you to share your favorite Nespresso experiences on social media. If you’ve tried a new pod or discovered a unique recipe variation, reach out and let us know how it went. Engaging with the community can inspire fresh ideas and broaden your palate—together, we can create a vibrant coffee culture!

The Recipe

Nespresso Vertuo Brewing Guide

Serves: 1

Prep Time: 5 mins

Cook Time: 0 mins

Total Time: 5 mins

Kitchen Equipment Needed

  • Nespresso Vertuo machine
  • Coffee mug
  • Water (filtered recommended)

Ingredients

  • 1 Nespresso Vertuo pod of choice

Directions

  1. Fill the water tank of your Nespresso machine with filtered water.
  2. Insert the Nespresso Vertuo pod into the machine.
  3. Select your desired cup size and press the brew button.
  4. Wait for the machine to complete the brewing cycle.
  5. Serve and enjoy hot or iced based on your preference.

Recipe Notes

  • Feel free to experiment by adding milk, cream, or enjoying it black.
  • Explore different pod flavors for unique taste experiences.
  • Check out seasonal offerings for exciting new blends.

Best Starbucks Strawberry Matcha Recipe to Make at Home

Starbucks’s Strawberry Matcha: The New Secret Menu Item TikTok Is Obsessed With

⚖️
Difficulty
Easy

⏲️
Prep Time
5 mins

🕒
Cook Time
0 mins

⏱️
Total Time
5 mins

🍽️
Servings
1

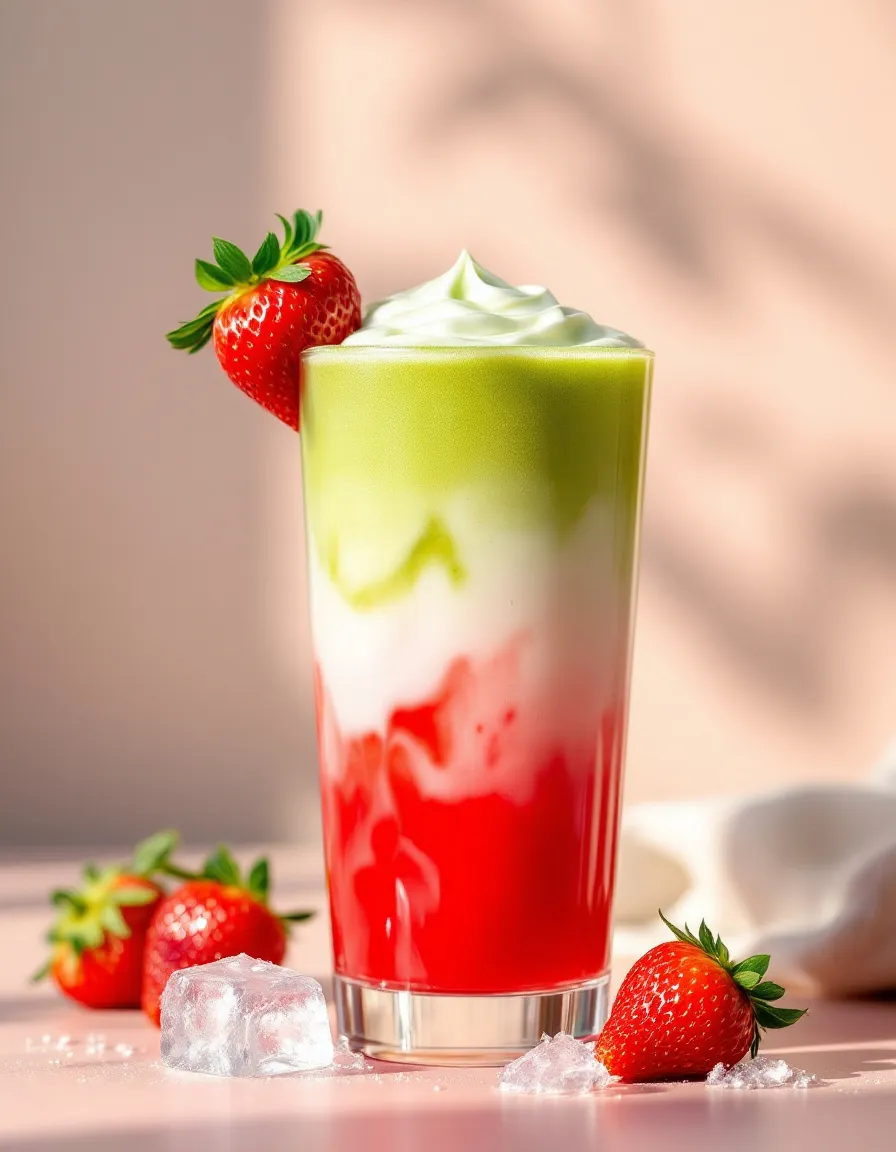
The buzz around Starbucks’s Strawberry Matcha has captured the hearts and taste buds of TikTok users everywhere. This vibrant drink fuses the earthiness of matcha with the sweetness of fresh strawberries, resulting in a refreshing, Instagram-worthy concoction that’s just as delightful to drink as it is to look at. Imagine a creamy and indulgent beverage that’s both energizing and soothing, perfect for warm afternoons or as a morning pick-me-up. The layers of green matcha contrasting with bright red strawberries make for a visual feast as you enjoy these delightful flavors.

One of the best aspects of this Strawberry Matcha drink is its adaptability. You can whip it up in just a few minutes, using fresh ingredients that not only taste fabulous but are also packed with nutrients. This drink balances the antioxidants from matcha with the vitamins in strawberries, making it a tasty treat that can also contribute to your daily wellness goals. Whether you’re sipping it on a sunny patio or sharing it with friends, this Strawberry Matcha will undoubtedly leave a lasting impression.

Quick Recipe Highlights

  • Flavor Profile: This Strawberry Matcha boasts a delightful combination of earthy, slightly bitter matcha and sweet, succulent strawberries that harmoniously elevate each sip.
  • Texture: Each mouthful offers a creamy and smooth texture, contrasting with the refreshing juiciness of the strawberries, providing a satisfying drinking experience.
  • Aroma: You’ll enjoy the fresh scent of strawberries blended with the earthy notes of matcha, creating an aromatic profile that is both inviting and invigorating.
  • Visual Appeal: The stunning contrast of vibrant green and red makes this drink not just delicious but also a feast for the eyes, sure to impress anyone you serve it to.
  • Skill Level Needed: With a straightforward recipe that requires no special cooking techniques, this drink is accessible for anyone from novice to expert.
  • Special Equipment: You’ll need a blender or mixer to combine the ingredients effectively, plus a nice glass for serving your Instagram-ready drink.

Recipe Overview

  • Difficulty Level: Easy, suitable for those who may not have extensive cooking skills. The simplicity of execution makes it an approachable recipe.
  • Category: This drink fits perfectly into the beverage category, ideal for breakfast, brunch, or a refreshing afternoon treat.
  • Cuisine: Drawing from Japanese culinary traditions with matcha, this recipe also celebrates fresh fruits, making it a delightful fusion of flavors.
  • Cost: Inexpensive to prepare, as matcha powder and strawberries are affordable and readily available at most grocery stores.
  • Season: Best made during the warmer months when strawberries are in season, but delicious year-round with frozen options!
  • Occasion: Perfect for brunches, casual gatherings, or a fun treat any day when you want to impress guests with little effort.

Why You’ll Love This Recipe

Using fresh, high-quality ingredients creates a taste sensation that captivates the palate, combining creamy matcha flavor with the sweet essence of strawberries. This Strawberry Matcha drink is not only visually appealing but also incredibly refreshing, providing an energizing boost without overwhelming sweetness. The bright green of the matcha ground powder is balanced perfectly by the luscious, ruby red strawberries, making it both a treat for the taste buds and a visual delight.

In addition to its exceptional taste, this recipe is effortlessly convenient. It requires minimal ingredients and can be whipped up in just five minutes. With only a blender or mixer needed, you can prepare this fabulous drink anytime, whether you’re at home or on the go. Simply blend or shake all the ingredients together, and your drink is ready to go, perfect for busy mornings or surprise visits from friends.

Another winning aspect of this Strawberry Matcha is its nutritional value. Matcha is known for its high levels of antioxidants, promoting overall health and wellness, while strawberries provide a good source of vitamin C and folate. This combination ensures that your refreshing drink is not only a treat but also contributes to a balanced diet, making you feel good while enjoying delicious flavors.

Socially, this Starbucks-inspired drink makes for a fantastic sharing experience. Its aesthetic appeal is perfect for social media snapshots, encouraging people to share their experiences along with variations they tried. Whether served at a brunch with friends or featured at a backyard barbecue, this drink fosters conversation and fun while elevating the gathering experience with its vibrant look and refreshing taste.

Finally, the cost-effectiveness of this recipe makes it even more enticing. With staple ingredients like strawberries and matcha powder being relatively inexpensive, you can recreate this popular Starbucks drink at home without breaking the bank. Plus, it lets you control the quality and source of your ingredients. Saving money while enjoying a trendy drink? It’s a win-win!

Historical Background and Cultural Significance

The origin of matcha dates back centuries to China, where powdered green tea was first introduced before making its way to Japan. It became an integral part of Japanese tea ceremonies, representing harmony and respect. The practice of drinking matcha evolved over time, gaining popularity due to its unique flavor and health benefits. Combining matcha with strawberries is a modern twist that symbolizes the fusion of traditional and contemporary tastes, appealing to the taste preferences of today’s consumers.

Culturally, tea plays a vital role in various societies, often associated with rituals and gatherings. In Japan, the tea ceremony is a profound cultural expression reflecting tranquility and mindfulness. Strawberry Matcha blends this rich cultural tradition with the contemporary love for creative, Instagram-ready beverages, effectively bridging the past and present while making it accessible to a wider audience.

The evolution of the Strawberry Matcha drink can be attributed to the rise of social media platforms like TikTok, where innovative and aesthetically pleasing food trends capture the public’s imagination. Users began experimenting with matcha and fruit combinations, leading to the creation of this visually stunning drink that appeals to younger generations who value both flavor and visual presentation.

Regional variations of this drink include using different fruits like mango or blueberries or even adjusting the sweetness levels according to personal preferences. As the trend continues to grow, we can expect to see even more exciting adaptations of the Strawberry Matcha, solidifying its place within modern beverage trends.

Ingredient Deep Dive

Matcha

Matcha, made from finely ground powdered green tea leaves, has its roots in ancient Chinese and Japanese history. Once a beverage reserved for emperors, it’s now widely celebrated for its numerous health benefits, including high antioxidant content that supports overall health. When selecting matcha, look for vibrant green colors, indicating freshness and quality; avoid dull or yellowish hues. Store matcha in a cool, dark place to maintain its flavor, and when not directly slotted for a recipe, it should be used within 2-4 weeks of opening to guarantee quality. Substituting matcha can be tricky, but a high-quality powdered green tea can offer a similar taste experience when needed.

Strawberries

Strawberries are not just delicious; they also have a rich cultural significance, often symbolizing love and passion. They are a fantastic source of essential vitamins, particularly vitamin C, which contributes to skin health and immune support. When selecting strawberries, look for those that are vibrant red with a fresh green stem. Store them in the fridge to prolong freshness, and they are best enjoyed within a few days after purchase. If fresh strawberries aren’t available, frozen strawberries can serve as a suitable substitution, maintaining flavor and texture in the final drink.

Common Mistakes to Avoid

  • Not Using Fresh Ingredients: Ensure that your matcha and strawberries are fresh to achieve the best flavor. Old ingredients can diminish the drink’s taste.
  • Overblending: Blend just until well combined; overdoing it can cause the matcha to become overly bitter.
  • Incorrect Matcha Measurement: Use the right amount of matcha for balance—too much can overpower the strawberries, while too little may go unnoticed.
  • Neglecting Temperature: Make sure to serve the drink chilled; using warm ingredients can affect the refreshing quality.
  • Skimming on Sweetness: Adjust sweetness to your liking to ensure the flavor balance is right, especially if using unsweetened matcha.
  • Skipping the Layering: For a beautiful presentation, avoid mixing the ingredients completely; leave some separation for the best visual effect.
  • Improper Blending Technique: Use a high-speed blender to achieve a smooth consistency without chunky bits.
  • Storing Incorrectly: Drink immediately for the best flavor; if left too long, the drink may separate and lose its appeal.

Essential Techniques

Blending

Blending is crucial for achieving a smooth consistency in the Strawberry Matcha drink. Start by adding the softer ingredients, like strawberries, into the blender first, followed by matcha and any liquids. This method ensures that the harder ingredients get smoothly blended without overdoing it. A common pitfall is blending too long, which can lead to inconsistencies, so blend until all components are well combined but still visually appealing.

Layering

Mastering layering is vital for achieving that stunning visual effect typical in drinks like the Strawberry Matcha. To accomplish this, pour your blended ingredients slowly, allowing them to settle in layers rather than fully incorporating them. Start with your matcha layer, followed by the strawberry puree to create a beautiful gradient effect. Pay attention to pouring speed; pouring too quickly can cause the layers to mix, negating the aesthetic appeal.

Pro Tips for Perfect Starbucks’s Strawberry Matcha

1. Choose high-quality ceremonial grade matcha for the best flavor profile; it will significantly elevate the drink’s taste.
2. For an indulgent touch, consider adding a splash of coconut milk or almond milk for a creamier consistency that complements the strawberries.
3. If you’re looking for a sweeter drink, opt for honey or agave syrup instead of granulated sugar, as it blends more smoothly with the liquids.
4. Prioritize ripe strawberries for the best sweetness; if they are too firm, consider letting them sit out for a day to ripen slightly.
5. If you want additional flavor, try adding a dash of vanilla extract for an unexpected twist that enhances the drink’s complexity.
6. Experiment with toppings like whipped cream or crushed nuts for added texture, flavor, and visual appeal.
7. For an ice-cold version, use frozen strawberries or ice cubes in place of some of the fruits to chill the drink without watering it down.
8. Serve in a clear glass to showcase the beautiful layers and colors, making it Instagram-ready for all your social media followers.

Variations and Adaptations

To keep your Strawberry Matcha drink exciting, consider incorporating seasonal variations. In autumn, you can swap strawberries for pumpkin puree for a fall-themed drink, or add a dash of pumpkin spice for a twist. Summer allows for the use of ripe peaches or melons, creating a refreshing summer vibe that’s perfect for hot days. Additionally, feel free to experiment with dairy alternatives, such as oat milk or almond milk, for a vegan-friendly version while still maintaining the creamy texture.

Flavor adaptations can also introduce other complementary fruits. Adding bananas creates a rich and mellow taste, while citrus zests, like lemon or lime, can provide an invigorating kick. For a more decadent treat, you can add a scoop of vanilla or strawberry ice cream for a dessert-like indulgence. Regarding presentation, try utilizing edible flowers or fresh mint leaves as garnishes to elevate your drink to a premium experience, further enhancing visual appeal.

Serving and Presentation Guide

When serving your Strawberry Matcha, consider the glassware. Clear, tall glasses showcase the stunning layers you’ve created. For plating, you might want to add a swirl of cream on top, or drizzle some extra strawberry puree over the drink for an artistic touch. Garnishing with a fresh strawberry on the rim or a sprig of mint can enhance not only the flavor but also the drink’s appeal.

For modern serving suggestions, consider utilizing colorful straws or a decorative glass full of ice, especially when serving to guests. Temperature control is vital; this drink is best served immediately after making to preserve freshness. If enjoying outside, chill the glass beforehand or keep it in an ice bucket for a delightful experience on hot days.

Portion control is also essential—consider serving in smaller glasses for tasting flights featuring different variations or flavors of Strawberry Matcha to share excitement during gatherings. This approach allows people to experience various flavors without committing to a full drink, making it a fun and engaging way to present your creations.

Wine and Beverage Pairing

When it comes to pairing beverages with your Strawberry Matcha, a light sparkling wine complements the fruity notes well, adding an element of sophistication to the drink. For those preferring non-alcoholic options, a refreshing herbal tea, like mint or chamomile, provides an excellent contrast, enhancing the matcha’s earthy tones.

If you want to explore more traditional options, matcha pairs nicely with high-quality green tea, which can amplify its flavors. Serve these drinks chilled or at room temperature to maintain balance without overpowering the drink’s refreshing character. Additionally, for coffee lovers, consider a light cold brew version on the side for those who enjoy a little caffeine kick mixed with fruity goodness.

Storage and Shelf Life

Proper storage methods for your Strawberry Matcha drink are essential for maintaining flavor and freshness. If you’ve prepared more than you can consume, store the drink in an airtight container in the refrigerator, where it can last for up to two days. However, for optimal freshness and texture, it’s recommended to consume it immediately after preparation, as separation can occur over time.

When reheating or consuming leftovers, be cautious. If you’ve added ice, it’s best to discard the ice and enjoy the drink cold to avoid dilution. If the drink has settled, gently stir it, but be mindful not to disrupt any beautiful layers you may have created. For long-term storage, consider freezing strawberry puree separately and blend it with matcha when you’re ready to enjoy this refreshing treat again.

Make Ahead Strategies

To make your Strawberry Matcha easier to prepare on busy days, consider prepping your ingredients ahead of time. You can wash and slice strawberries, then store them in an airtight container in the fridge. You might also prepare matcha in advance by measuring it out for easier mixing when you’re ready to make the drink.

Another strategy is creating pre-made strawberry puree. Blend strawberries and store the puree in the fridge; this can last for up to three days, making assembly a breeze. Quality can impact the final taste, so be sure to check everything before use. Assemble your drink shortly before serving to retain its texture and freshness so you can enjoy all the delightful flavors.

Scaling Instructions

If you want to adjust the recipe serving size, scaling it is straightforward. To halve the recipe, use a single serving of strawberries and adjust matcha and liquid accordingly. Doubling or tripling the recipe for a gathering simply requires adding more strawberries and increasing matcha proportions, though it’s wise to taste along the way to maintain desired flavor balance.

When scaling, ensure you have larger blending equipment if preparing for a crowd. A blender pitcher with more capacity can help combine larger quantities of ingredients effectively. Consider the timing adjustments; while prep time remains largely the same, making larger quantities may require a bit more time for assembly and blending, so plan accordingly. Store any extras properly to maintain freshness if not consumed immediately.

Nutritional Deep Dive

When analyzing the nutritional aspects of your Strawberry Matcha, consider its macro breakdown. Each serving typically contains moderate carbohydrates from strawberries and minimal protein; however, the role of matcha as a source of antioxidants adds significant health benefits. This drink also provides dietary fiber essential for digestion and supports the feeling of fullness.

Micronutrient analysis reveals that strawberries are a rich source of vitamin C and potassium, while matcha delivers vitamins A and K, along with some essential minerals. The health benefits of this drink are manifold, including improved metabolism from matcha and immune health support thanks to strawberries’ vitamin content. When enjoying this drink, consider portion analysis to balance your intake for broader healthy dietary practices.

For those managing weight, Strawberry Matcha can satisfy sweet cravings with natural flavors, providing a healthier alternative to traditional sugary drinks. Opting for unsweetened or lightly sweetened versions can help maintain your dietary goals while still indulging in a delightful treat. This recipe serves as a flavorful option that can seamlessly fit various dietary lifestyles when whipped up with mindful ingredients.

Dietary Adaptations

For those following a gluten-free diet, this Strawberry Matcha recipe is naturally gluten-free as it utilizes whole ingredients without any additives. Vegan versions can be achieved by using plant-based milk alternatives and ensuring you select sugar options, like agave, that meet vegan standards.

If someone is on a low-carb or keto diet, sugar can be substituted with low-carb sweeteners, and the calorie count can be adjusted by moderating the amount of strawberries used. Additionally, paleo followers can enjoy this recipe with whole foods, ensuring they use only fresh ingredients and proper sweeteners that align with paleo guidelines.

By recognizing dietary preferences, you can create adaptations that maintain flavor while often enriching the nutritional profiles across various eating habits, ensuring everyone can enjoy this Strawberry Matcha delight.

Troubleshooting Guide

Should you encounter texture issues, such as a gritty drink, ensure you’re using fine-quality matcha and blend well enough to incorporate all ingredients smoothly. If the flavor feels off, particularly if overly sweet, balancing flavors with a bit of additional matcha or acidity from citrus zest can lift the taste profile without overpowering sweetness.

In case of temperature problems, consider adjusting the method to chill your drink properly or adding ice cubes at the end to ensure it’s refreshingly cold. If any equipment challenges arise during preparation, double-check your appliance settings; some blenders might require different speeds for effective blending.

Ingredient substitutions may affect texture or taste, so it’s always best to modify with caution. Consider timing concerns as you prepare larger batches, as agitation and blending times will expand when increasing quantities, and ensure sufficient tasting along the process to perfect the final result.

Recipe Success Stories

Community feedback about the Strawberry Matcha has been overwhelmingly positive, with friends sharing their unique variations and adaptations. Many enjoy playing with ingredient ratios, sparking engaging conversations and delightful exchanges of ideas among food enthusiasts. Success stories highlight personal twists such as the use of different fruits for sourcing flavors that fit individual preferences.

Readers have suggested enhancing the drink visually using edible flowers or unique garnishing techniques, further inspired by its aesthetic appeal. The vibrant contrast of colors has encouraged photography tips, leading more enthusiasts to capture and share their experiences around creating this aesthetically stunning drink.

These shared efforts within the community create a welcoming space for experimentation, using personal preferences and feedback as drivers for finding new heights with this delicious Strawberry Matcha recipe. Each successful attempt serves as motivation for others to join in and explore their versions, showcasing the drink’s versatility in flavor and presentation.

Frequently Asked Questions

1. Can I make this recipe dairy-free?

Yes! You can easily make it dairy-free by using almond milk, coconut milk, or any other plant-based milk instead of regular milk. This keeps the flavor delightful while accommodating dietary preferences.

2. How do I store the Strawberry Matcha if I can’t finish it in one go?

Store any leftover Strawberry Matcha in an airtight container in the fridge for up to two days. Be sure to stir well before consuming, as separation may occur over time.

3. Is matcha good for health?

Absolutely! Matcha is packed with antioxidants, including EGCG, which can boost metabolism and offer various health benefits, including improved heart health and inflammation reduction.

4. Can I use frozen strawberries for this recipe?

Yes! Frozen strawberries can work just as well, especially if fresh strawberries are out of season. Just make sure to allow some time for thawing before blending for easier incorporation.

5. What is the best way to sweeten my drink?

You can sweeten your Strawberry Matcha with honey, agave syrup, or even stevia for a low-calorie option. Adjust the sweetness according to your taste preference.

6. Can I prepare the ingredients ahead of time?

Definitely! Pre-slicing strawberries and measuring out matcha in advance can save time when you’re ready to make your drink.

7. How long does matcha last after opening?

Matcha can last about 2-4 weeks after opening if stored in a cool, dark place. Make sure to seal it tightly to preserve freshness.

8. What if I want a richer flavor?

Adding a splash of coconut milk or a scoop of vanilla ice cream can introduce a richer, creamier mouthfeel, enhancing both the taste and texture of your drink.

9. Can I make this drink with other fruits?

Absolutely! You can substitute other fruits like bananas, peaches, or even citrus fruits to create new flavor combinations. Experimenting is encouraged!

10. What kind of equipment do I need to make the drink?

All you need is a blender or mixer to combine the ingredients effectively and a glass for serving. It’s quite simple and user-friendly!

Additional Resources

If you’re interested in more recipes inspired by popular coffee shop trends, check out similar beverages like Vietnamese Iced Coffee or Chai Tea Latte. For those new to matcha, look for guides on selecting high-quality matcha or other delicious matcha recipes available on our website. Utilizing the right kitchen tools, such as a matcha whisk, can enhance your overall experience, making the preparation process smoother and more enjoyable.

If seasonal variations appeal to you, consider checking different fruits and flavor profiles for refreshing summertime versions to ensure you can enjoy a versatile selection of options year-round.

Join the Conversation

We want to hear from you! Share your experiences making the Strawberry Matcha and any creative twists you’ve added to the original recipe. Don’t forget to tag us on social media with your beautiful creations or share your photography tips that might help others find inspiration. Providing your reviews or suggestions helps us improve our offerings and create a community where everyone feels welcome to share their recipe experiments.

We also encourage you to join in the discussion about dietary adaptations; your tips could inspire those looking for gluten-free, vegan, or low-carb alternatives. Join us in the conversation and help each other on culinary adventures!

The Recipe

Starbucks’s Strawberry Matcha

Serves: 1

Prep Time: 5 mins

Cook Time: 0 mins

Total Time: 5 mins

Kitchen Equipment Needed

  • Blender or Mixer
  • Measuring Cups
  • Glass for Serving

Ingredients

  • 1 tablespoon matcha powder
  • 1 cup fresh strawberries, hulled
  • 1 cup milk (dairy or non-dairy)
  • 2 teaspoons sweetener of your choice (like honey or agave)

Directions

  1. In a blender, combine the matcha powder and milk. Blend until it’s smooth and fully incorporated.
  2. In a separate bowl, mash the strawberries with a fork or blend lightly until you achieve the desired consistency.
  3. Layer the matcha mixture into a glass, followed by the mashed strawberries, leaving some separation between the two layers for the perfect presentation.
  4. Optionally, garnish with fresh strawberries or mint leaves.
  5. Serve immediately and enjoy your refreshing drink!

Recipe Notes

  • Ensure the matcha is finely sifted to avoid clumping.
  • Adapt sweetness to your liking; taste after each addition.
  • Fresh strawberries can be replaced with frozen ones for a similar flavor.

Easy Pink Drink Recipe – Perfect for Refreshing Summer Sips

How to Make a Pink Drink: Refreshing and Elegant Beverage Recipe

⚖️
Difficulty
Easy

⏲️
Prep Time
10 mins

🕒
Cook Time
0 mins

⏱️
Total Time
10 mins

🍽️
Servings
2

The Pink Drink has taken social media by storm, transforming into a beloved summer refreshment. This captivating beverage is not only visually stunning, boasting its signature pink hue, but also tantalizingly delicious, blending fruity flavors with creamy undertones. Think of a sip on a warm, sunny day, the refreshing coconut milk balancing with the tang of strawberries and an invigorating splash of juice, making it the perfect item for picnics, brunches, or just a leisurely afternoon at home.

As you dive into the world of crafting this delightful Pink Drink, you’ll discover how easy it is to recreate this refreshing sensation at home. The ingredients meld together beautifully and present a delightful interplay of taste, texture, and aesthetic appeal. Whether you’re serving it at a party or enjoying a quiet afternoon treat, this drink is sure to impress.

Quick Recipe Highlights

  • Flavor Profile: The Pink Drink offers a luscious combination of sweet strawberries and creamy coconut, creating a refreshing yet indulgent taste experience that keeps you coming back for more.
  • Texture: The drink presents a smooth and creamy texture, thanks to the coconut milk, which beautifully complements the slight crunch from the fresh strawberries.
  • Aroma: Expect a delightful aromatic blend of tropical coconut mingled with the sweet and fragrant notes of fresh strawberries, awakening your senses with every sip.
  • Visual Appeal: The Pink Drink’s striking color comes from blended strawberries, creating a vibrant and eye-catching presentation that instantly captures attention.
  • Skill Level Needed: This recipe is ideal for beginners and those with limited cooking experience, as it requires no cooking and minimal preparation.
  • Special Equipment: All you’ll need is a blender and a glass to serve your beautiful concoction.

Recipe Overview

  • Difficulty Level: Making a Pink Drink is incredibly straightforward, requiring only simple steps to blend ingredients and serve. This level of simplicity makes it a great choice for beginner cooks.
  • Category: This beverage falls under the category of desserts and beverages, perfect for satisfying your craving for something sweet, light, and refreshing.
  • Cuisine: Although popularized in cafes, the Pink Drink draws from tropical influences, utilizing coconut and strawberries—ingredients commonly found in many culinary traditions around the world.
  • Cost: The Pink Drink is cost-effective, with most ingredients typically available at local grocery stores without breaking the bank.
  • Season: Best enjoyed in warmer months, this drink’s refreshing qualities make it ideal for summer gatherings or any hot day.
  • Occasion: Whether it’s served at a garden party, ladies’ brunch, or a simple family get-together, the Pink Drink fits numerous casual occasions perfectly.

Why You’ll Love This Recipe

The Pink Drink is a flavor-packed treat that pleases every palate, making it an instant favorite among friends and family. Its sweet strawberry notes harmonize perfectly with the creamy undertones of coconut, creating a delightful balance that is both refreshing and satisfying. Additionally, the presentation of vibrant colors can elevate any gathering, making it a visual centerpiece.

In terms of convenience, this recipe shines with its straightforward preparation. With no cooking required, you can whip up this delightful beverage in just minutes, leaving you more time to relax and enjoy your day. The easy-to-find ingredients mean you can create this delightful drink anytime the craving strikes.

Nutritionally, this Pink Drink can be made healthier by using fresh strawberries and coconut milk, providing vitamins and nutrients without the guilt. It’s an excellent way to indulge while still enjoying the benefits of fruit, making it a smart choice for those who want to treat themselves.

Socially, this drink serves as a fantastic conversation starter at gatherings, where guests will be drawn to its delightful appearance and refreshing taste. Sharing this drink with loved ones creates a memorable experience as they gather around to enjoy something visually appealing and delicious.

Lastly, the affordability of this recipe makes it accessible for everyone. With just a few simple ingredients, you can treat yourself and others to a refreshing beverage without spending much. The low cost and impressive presentation make it a go-to recipe for any occasion.

Historical Background and Cultural Significance

The Pink Drink has become a cultural phenomenon, especially popularized by social media outlets. Its origins can be traced back to various cafes where unique combinations of fruit and cream captured the interest of refreshment-seekers. As more people experimented with these delicious blends, the Pink Drink soared in popularity, quickly becoming a favorite.

In terms of cultural significance, this beverage represents the broader trend of vibrant, Instagram-worthy food and drink. The appeal of colorful and aesthetically pleasing beverages has led to a renewed interest in crafted drinks, pushing many people to explore their culinary creativity at home.

The evolution of the Pink Drink has also seen it morph and adapt, with various recipes emerging as home cooks add their twist to it. From different fruit combinations to dairy-free versions, its versatility invites passion in experimentation, which enhances its popularity further.

Regionally, this beverage has seen variations and adaptations based on local ingredients and preferences. Whether it’s a tropical twist in areas known for their coconut production or a berry blend in fruit-abundant regions, the Pink Drink reflects a delightful local flavor while remaining true to its refreshing essence.

Ingredient Deep Dive

The key ingredient of fresh strawberries carries significant cultural importance, especially during the summer months as they symbolize warmth and abundance. Nutritionally, strawberries offer a wealth of vitamins, particularly vitamin C, and antioxidants, known for their health benefits. When selecting strawberries, look for bright red, plump berries, past their prime. For storage, keep them in the fridge and rinse them just before consumption.

Coconut milk is an essential part of this drink, historically used in various cultures, particularly in tropical regions. It not only adds a rich creaminess but also provides healthy fats. When choosing coconut milk, opt for unsweetened varieties for a milder flavor and easier blending. Store any leftovers in an airtight container in the fridge for up to a week.

Common Mistakes to Avoid

  • Using overly ripe or mushy strawberries, which can affect the drink’s taste and texture. Always select firm, fresh berries for the best flavor.
  • Forgetting to chill the coconut milk beforehand; this can lead to a less refreshing drink.
  • Not blending long enough, leaving chunks of ingredients instead of a smooth mixture. Aim for a creamy consistency.
  • Adding too much liquid sweetener, which can overpower the natural taste of the strawberries.
  • Neglecting to taste the drink before serving; adjust the sweetness and creaminess according to your preference.
  • Skipping the garnish, which detracts from the overall presentation. A sprig of mint or slice of strawberry can make a difference.
  • Making the drink too far in advance, as it can settle. Always mix well before serving.
  • Using low-quality coconut milk that can separate and affect the luxurious creaminess.

Essential Techniques

Mastering the blending technique is crucial in making a Pink Drink. A high-speed blender ensures that all ingredients meld together smoothly, resulting in a creamy and luscious beverage. To avoid common pitfalls, ensure the ingredients are cut small enough to blend evenly, and blend long enough to avoid chunks.

Garnishing is another important technique to learn. Utilize fresh fruits or mint leaves to enhance the visual appeal of your drink. Pay attention to how you arrange the garnish, as a well-placed sprig can elevate the drink presentation to a whole new level, impressing your guests.

Pro Tips for Perfect Pink Drink

1. Always taste as you go; add a bit of honey or agave for extra sweetness based on your preference.
2. Use frozen strawberries for a thicker texture while keeping the drink cold without watering it down.
3. Blend in some ice for an ultra-refreshing option, especially on hot days.
4. Prepare a larger batch if serving at a gathering, allowing you to enjoy with friends.
5. Experiment with different types of milk substitutes for varied flavors and textures.
6. Don’t skip the presentation; serve in clear glasses to showcase the vibrant pink color.
7. Consider adding a splash of sparkling water for a fizzy twist.
8. For an adult version, spike it with a splash of rum or vodka for a fruity cocktail.

Variations and Adaptations

The Pink Drink can easily be adapted to capture other seasonal ingredients, such as ripe peaches or mangoes, for a unique tropical twist. For a healthier alternative, you can use a dairy-free yogurt instead of coconut milk to reduce calories and add creaminess.

Dietary modifications can also be made; consider it vegan-friendly by ensuring all ingredients meet plant-based standards. For those looking to reduce sugar, consider using stevia as a natural sweetener without compromising on taste.

Flavor variations can remain infinite, with possibilities including additional elements like vanilla extract or lime for a zesty kick. Modify the texture by blending in oats or chia seeds for added nutrition and thickness.

Additionally, presentation can be transformed by serving the drink in themed cups or incorporating edible flowers for a stunning visual treat.

Serving and Presentation Guide

When presenting the Pink Drink, use clear glasses to showcase its vibrant colors and refreshing texture. Aim for a rim of fresh fruit or a sugared edge for added flair. Garnishing with a slice of strawberry or a sprig of mint can not only enhance the look but also compliment the drink’s flavors.

Consider pairing the drink with light snacks, such as fruit platters or mini pastries, providing a well-rounded experience for your guests. Temperature matters; serve the drink chilled on warm days or with ice cubes to enhance its refreshing qualities.

Portion control is essential; serve appropriate portions to allow guests to enjoy this treat throughout the evening. Crafting the right atmosphere with lighting and snacks will create an enjoyable experience around this beautiful drink.

Wine and Beverage Pairing

For a delightful pairing, consider light, fruity wines such as Riesling or Rosé. These wines complement the flavors in the Pink Drink beautifully, highlighting the strawberries while maintaining the refreshing vibe.

If you prefer non-alcoholic options, sparkling water infused with fruit is a great companion, enhancing the overall experience without overwhelming the palate. Additionally, herbal teas served chilled can provide a unique flavor twist that pairs nicely with the drink’s sweetness.

When serving, ensure the beverage is well-chilled for maximum enjoyment. Offering options allows guests to choose their preference, helping to tailor the experience to everyone’s taste.

Storage and Shelf Life

When it comes to storing your Pink Drink, it is best kept in the fridge in a sealed container for up to 24 hours. This helps maintain the drink’s freshness and prevents settling. Avoid freezing, as the texture may become unpalatable once thawed.

Signs of spoilage may include off-smells or changes in color. Always check for freshness before serving leftovers. Reheat or refresh it by adding fresh fruit or more ice just before serving to reinvigorate its delicious flavor.

For longer-term storage, consider separating the components and prepping them in advance. This approach ensures the freshest taste while allowing for quick assembly when ready to serve.

Make Ahead Strategies

To save time, prepare the ingredients in advance, such as washing and slicing the strawberries, which can be stored in an airtight container in the fridge. Having your coconut milk chilled and ready will also streamline the process when it’s time to make your drink.

If you plan to enjoy this on a busy day, blend the drink the night before to allow flavors to meld, but avoid adding ice until you’re ready to serve to maintain the ideal texture. This way, you can have a refreshing beverage ready any time.

Consider having everything ready to mix and serve on demand: just blend and enjoy without excessive preparation each time. This method can keep your Pink Drink freshly made and delicious whenever you desire.

Scaling Instructions

Scaling the Pink Drink recipe is straightforward; simply double or triple the ingredients as needed for larger gatherings. Use a larger blender, ensuring all ingredients fit comfortably to maintain the smooth consistency.

When adjusting quantities, also consider the balance of flavors; be sure to maintain the ratio of fruit to coconut milk for consistent taste. Timing may need modification if using a larger blender—do not rush the blending process.

For storage, if you double the recipe but do not finish it all, store any leftovers separately in the fridge for 24 hours, consuming while still fresh.

Nutritional Deep Dive

The Pink Drink’s nutritional composition leans heavily on its prime ingredients—strawberries and coconut milk. Strawberries are low in calories yet high in vitamins, making them an excellent choice for a health-conscious treat.

Coconut milk provides healthy fats, offering benefits for energy and heart health. By utilizing unsweetened coconut options, unnecessary sugars are avoided, ensuring a balanced beverage.

In portion analysis, maintaining moderation is key. While the drink can be indulgent, considering serving sizes helps in managing caloric intake effectively while still enjoying its rich and fruity delight.

Dietary considerations also apply; the Pink Drink can easily fit within most healthy eating plans if tailored to your specific diet preferences and restrictions.

Dietary Adaptations

For those needing gluten-free options, the Pink Drink naturally meets this criteria with its simple fruit and milk mixture. Those requiring dairy-free solutions can seamlessly substitute regular milk with almond, hemp, or oat milk.

It’s also simple to make this drink vegan by ensuring all components reflect plant-based standards. Low-carb or keto adaptations could include using fewer strawberries or opting for low-carb sweeteners, keeping it both delicious and diet-friendly.

Experimenting with these adaptations can lead to unexpected delights, allowing everyone—regardless of dietary restrictions—to enjoy this refreshing treat.

Troubleshooting Guide

If you encounter a grainy texture in your Pink Drink, it may be due to the coconut milk separating. Blend again for a smoother consistency. If the flavor is too sweet, consider adding more strawberries or diluting it slightly with water or ice.

For an overly thin consistency, blending in extra frozen strawberries can help to thicken it, creating a creamier mouthfeel. Conversely, if it’s too thick, a splash of coconut water can balance it out.

Storing any leftovers effectively can help avoid a change in quality; if extensive leftover time occurs, consider reducing the component ratios in the original recipe to prevent waste.

Recipe Success Stories

Community feedback on this Pink Drink shows immense popularity, particularly among those looking to recreate delightful café experiences at home. Various readers have reported their success in crafting unique variations, like incorporating different fruits or adding floral notes for a sophisticated twist.

With the ability to adapt and modify thoroughly, families have shared how it became a bonding activity, with everyone contributing their ideas. This collaboration has led to some incredibly creative interpretations, adding both personal touches and flavor.

Photography tips often arise, with many readers eager to capture their beautifully crafted drinks for social media. The visual appeal of the Pink Drink makes it particularly photogenic, leading to a surge of creative presentations that inspire others.

Frequently Asked Questions

What can I substitute for coconut milk?

For those who prefer not to use coconut milk or are allergic to it, almond milk, oat milk, or cashew milk are excellent alternatives. Ensure they are unsweetened to maintain the flavor balance of the Pink Drink.

Can I use frozen strawberries?

Yes, frozen strawberries work perfectly for this recipe! They can make the drink colder and thicker, allowing for a refreshing treat without compromising flavor.

Is this drink suitable for children?

Absolutely! This Pink Drink is a fantastic choice for kids, providing natural sweetness and fun colors, making it appealing without any artificial ingredients.

How can I make this drink less sweet?

If you prefer a less sweet drink, reduce the amount of honey or syrup used, or add more coconut milk to dilute the sweetness while maintaining texture.

How long can the Pink Drink be stored?

It’s best to enjoy the Pink Drink fresh. However, if stored in a sealed container in the fridge, it should last up to 24 hours before losing flavor and freshness.

Can I enhance the flavor with herbs?

Yes! Fresh herbs like mint or basil can add delightful notes to the drink. A sprig of mint as a garnish elevates both the flavor and presentation.

Are there any alcoholic versions of the Pink Drink?

Definitely! Consider adding flavored rum, vodka, or even prosecco for an adult twist, making it a fun cocktail option for summer parties.

How can I make this drink more decadent?

For a richer experience, incorporate whipped cream on top or a swirl of yogurt, providing extra creaminess and visual appeal.

What occasions are best for serving the Pink Drink?

This drink is versatile but is particularly well-suited for brunches, garden parties, or summer gatherings when guests crave something light and refreshing.

Can I add other fruits?

Absolutely! Feel free to blend in other fruits like raspberries or blueberries to customize your drink. This can add complexity and delicious nuances to the flavor.

Additional Resources

For those looking to expand their culinary repertoire, consider exploring related recipes that incorporate seasonal fruits or refreshing beverages. Technique guides on basic blending and garnishing can help hone your skills. Ingredient-wise, understanding the benefits of tropical fruits can inspire you to craft even more delightful drinks.

Explore equipment recommendations to ensure you have the best blender for smoothies, helping you make not only Pink Drinks but also other frozen delights throughout the year. Seasonal variations can keep your recipes exciting and fresh!

Join the Conversation

Engagement around the Pink Drink can thrive on social media, as participants share their unique takes on this recipe. Encourage feedback and photography from readers to build a community around their success stories, fostering recognition of individual styles and creativity.

Invite recipe reviews and suggestions for modifications to maintain an active discussion. Encouraging readers to swap ideas encourages experimentation, allowing the community to flourish with diverse interpretations of the classic Pink Drink.

The Recipe

How to Make a Pink Drink

Serves: 2

Prep Time: 10 mins

Cook Time: 0 mins

Total Time: 10 mins

Kitchen Equipment Needed

  • High-speed blender
  • Measuring cups
  • Serving glasses

Ingredients

  • 1 cup fresh strawberries, hulled
  • 1 cup coconut milk
  • 2 tablespoons honey or agave syrup (adjust to taste)
  • Iced or chilled sparkling water (optional)
  • Fresh mint leaves for garnish (optional)

Directions

  1. In a blender, combine the strawberries, coconut milk, and honey/agave syrup.
  2. Blend until smooth and creamy, scraping down the sides if necessary.
  3. Taste the mixture and adjust sweetness if desired.
  4. If using, add a splash of sparkling water for fizzy texture, and blend briefly.
  5. Pour into glasses and garnish with mint leaves or a slice of strawberry if desired.
  6. Serve immediately and enjoy the refreshing flavors!

Recipe Notes

  • Feel free to experiment with different berries for unique flavors.
  • For a thicker drink, consider adding frozen strawberries instead of fresh.
  • This recipe can easily be doubled for larger gatherings.
  • Keep in the fridge for up to 24 hours, but best enjoyed fresh.