Nutella Cream-Filled Crepes: Decadent Delights for Every Occasion
Indulging in Nutella cream-filled crepes is a delightful experience that perfectly balances sweetness with rich, nutty flavors. These thin, delicate French pancakes are irresistibly filled with creamy Nutella and topped with whipped cream, fresh fruits, or a dusting of powdered sugar. Imagine the first bite, where the soft crepe gives way to a luscious interior, melting into your mouth – it’s pure bliss! Whether for breakfast, dessert, or a special brunch, these crepes are sure to impress.
This easy-to-follow recipe allows anyone to create restaurant-quality Nutella cream-filled crepes in their own kitchen. Perfect for cozy family gatherings or lavish brunch spreads, these crepes will leave your guests clamoring for more. With the right combination of techniques and ingredient balance, anyone can master this heavenly dish and enjoy its delightful flavors.
Quick Recipe Highlights
- Flavor Profile: The rich, chocolate-hazelnut flavor of Nutella meets the mild buttery taste of crepes, creating an irresistible combination that feels luxurious yet comforting.
- Texture: The crepes are light and tender, encasing a velvety filling that complements the lightness of the pancake while providing a creamy mouthfeel.
- Aroma: The warm aroma of cooked crepes mingles with the nutty scent of hazelnuts and chocolate, creating a welcoming and indulgent experience.
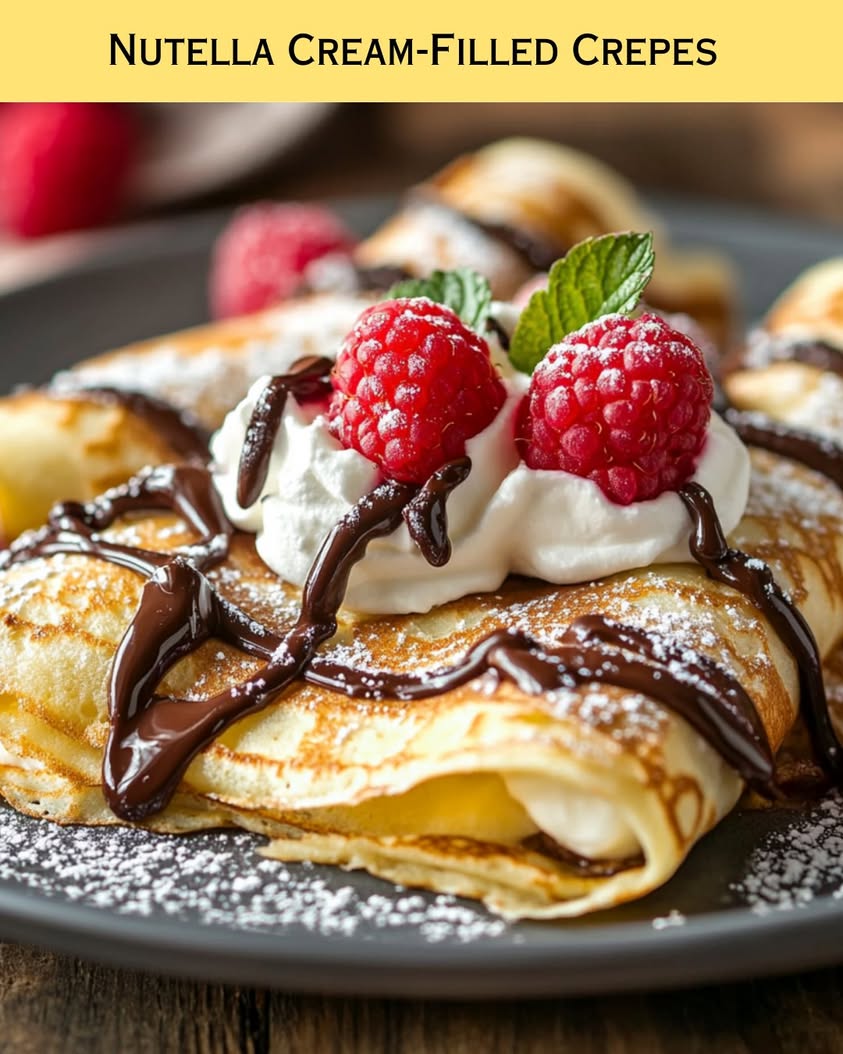
- Visual Appeal: Golden-brown crepes with a glossy Nutella filling make for a visually stunning dish, finished beautifully with fresh fruit or whipped cream.
- Skill Level Needed: This recipe requires basic cooking skills, making it approachable for both beginner and experienced cooks.
- Special Equipment: A nonstick skillet or crepe pan is essential for creating perfectly cooked crepes without sticking.
Recipe Overview
- Difficulty Level: With a medium difficulty level, these crepes are simple enough for beginners yet offer a rewarding challenge for more experienced cooks, encouraging mastery of culinary techniques.
- Category: These nutella cream-filled crepes fall into the dessert and breakfast categories, making them versatile for any meal occasion.
- Cuisine: Originating from France, crepes have become a beloved dish around the world, showcasing their adaptability in many modern culinary cultures.
- Cost: This recipe is budget-friendly, primarily requiring basic pantry staples and Nutella, making it accessible for anyone wanting to try their hand at homemade crepes.
- Season: Perfect for any season, these crepes can be enjoyed year-round, but they shine during festive occasions when served with seasonal fruits.
- Occasion: Ideal for celebrations, brunch gatherings, or a comforting night in, these crepes suit any event requiring a touch of sweetness.
Why You’ll Love This Recipe
Nutella cream-filled crepes are irresistible due to their decadent taste and creamy texture. Each bite offers a heavenly combination of rich hazelnut chocolate that contrasts beautifully with the delicate pancake. Whether enjoyed solo or as part of a spread, these crepes are a visual and gastronomic delight.
The convenience of this recipe is another reason to love it. With a quick preparation and cooking time, you can whip up a batch for an impromptu breakfast or dessert. Gather your ingredients, and in less than 40 minutes, you can serve a delightful treat that will impress your family and friends.
Nutritionally, crepes can be tailored to fit many dietary needs. While traditionally simple, you can switch out ingredients to include whole grains or gluten-free options without compromising flavor. This way, you can create a delicious dessert that everyone can enjoy.
Socially, these crepes are fantastic for sharing and entertaining. Imagine hosting a brunch where guests can fill their crepes with a luscious Nutella cream filling. It encourages interaction and personalization, making it a fun and engaging experience.
The cost-effectiveness of this recipe elevates its appeal. With minimal and affordable ingredients, you can serve a substantial and extravagant treat without breaking the bank. Creating memories over delightful food is what makes cooking and sharing so rewarding.
Historical Background and Cultural Significance
Crepes have a rich history dating back to the 13th century in Brittany, France, as a humble peasant food. Made with simple ingredients like flour, water, and salt, they served as versatile and affordable nourishment. Over time, crepes evolved into a cherished culinary tradition, celebrated in both casual and fine dining settings.
Culturally, crepes are significant in France, prominently featured during Candlemas, a holiday honoring the presentation of Jesus in the temple. In France, it’s common to make crepes at this time, symbolizing prosperity and good fortune for the year ahead.
The evolution of crepes also gave rise to a diverse range of fillings and toppings, showcasing the dish’s versatility. From savory to sweet, the adaptability of crepes has helped them transition from humble beginnings to a centerpiece of modern gastronomy around the world.
Regional variations further highlight the importance of crepes. Different cultures have embraced the concept, leading to various interpretations across Europe and beyond—from the Italian crespelle to the Russian blin—not only reinforcing crepe’s universal appeal but also its deep-rooted culinary significance.
Ingredient Deep Dive
Flour is a staple found in most kitchens, serving as a primary ingredient in crepes. Traditionally, all-purpose flour is used, offering a light texture. To enhance nutritional value, opt for whole wheat or buckwheat flour, both providing higher fiber content and a unique flavor profile. When selecting flour, choose finely ground options for a smoother batter, and store in a cool, dry place to maintain freshness.
Nutella, the star ingredient, is a beloved spread made from hazelnuts and chocolate. Rich in flavor and creamy in texture, it adds indulgence to the crepes while being a source of energy. However, it’s essential to enjoy Nutella in moderation due to its sugar and fat content. Keep Nutella stored in a cool environment, and if you’re looking for alternatives, consider making a homemade version using cocoa powder and sweeteners for a healthier option.
Eggs serve as a binding agent in the crepe batter, providing moisture and richness. They are essential for achieving the desired texture and color. When choosing eggs, look for high-quality, organic options, and store them in refrigeration. If you’re vegan, you can substitute with flaxseed meal and water or aquafaba to replicate the binding properties of eggs.
Milk contributes to the fluffiness of the crepes, enhancing the overall texture. Whole milk yields a richer flavor, while alternatives like almond or oat milk cater to those with dietary restrictions. Store milk in the refrigerator, and remember to consume plant-based options within a few days once opened.
Butter adds richness and flavor to the crepes, ensuring a golden-brown finish when cooking. While unsalted butter is customary, coconut oil or dairy-free alternatives can be suitable replacements for different dietary needs. Store butter in the fridge or freezer, depending on usage frequency, and ensure it remains well-wrapped.
Common Mistakes to Avoid
- Not letting the batter rest: Resting crepe batter is crucial for texture; it’s recommended to let it sit for at least 30 minutes to relax the gluten.
- Using a hot pan: Ensure your pan is at the right temperature before pouring the batter; too hot can lead to burnt crepes, while too cool can produce soggy ones.
- Pouring too much batter: Use a small amount of batter to achieve thin crepes; the perfect thickness allows for even cooking and maximum flexibility.
- Overcooking crepes: Keep an eye on the color; crepes should be lightly golden. Overcooked crepes become tough and lose their appealing texture.
- Skipping the seasoning: Adding a pinch of salt or sugar to the batter enhances the overall flavor. Omitting seasonings can result in bland crepes.
- Not using a nonstick surface: A nonstick pan or a well-seasoned cast-iron skillet is essential to avoid sticking and ensure easy flipping.
- Neglecting to cool crepes: Layers of hot crepes can stick together. Allow them to cool slightly before stacking.
- Forgetting to shake the batter: Ensuring the batter is well-mixed prevents lumps and allows for a smooth, cohesive texture.
- Using cold fillings: Warm your fillings slightly for a better flavor blend; cold fillings can take away from the overall indulgent experience.
- Improper storage: If you make crepes ahead, store them in an airtight container with parchment paper in between to prevent sticking.
Essential Techniques
Achieving the perfect crepe starts with mastering the batter. It’s crucial for a smooth blend of ingredients. Whisk until no lumps remain, then allow to rest. This resting period is vital for preventing gluten from forming too much, resulting in tender, flaky crepes.
When cooking, preheat your pan adequately. A nonstick skillet is ideal; just ensure it’s hot enough before adding the batter. Pour a small amount of batter and quickly swirl to coat the base evenly. Watch for small bubbles, which indicate it’s time to flip. A gentle, swift motion will ensure a smooth transition to the other side.
Filling techniques enhance not just the flavor but also the presentation. When adding your fillings, remember to place them in the middle of the crepe and fold gently for a neat package. Experiment with layering fillings for added taste and richness—apply Nutella first, then add whipped cream or fruits for a delightful combination.
Pro Tips for Perfect Nutella Cream-Filled Crepes
To achieve perfectly thin crepes, use a ladle to measure your batter, ensuring consistent sizing. A quick swirl will help distribute the batter evenly across the pan.
Let your crepes cool on a wire rack before stacking; this prevents them from becoming soggy and sticking together. If preparing in advance, consider lining your container with paper towels for additional moisture absorption.
Experiment with flavoring your batter; adding vanilla extract or a hint of almond essence can elevate your crepes. For a caramel twist, consider drizzling caramel sauce over the Nutella for an even sweeter experience.
Adjust the thickness of your batter depending on your preference; if you desire thinner crepes, add a touch more milk to reach your desired consistency.
Used ingredients like strawberries or bananas for filling; they complement the chocolate-hazelnut flavor beautifully.
Finally, make sure to keep the heat on low to avoid browning the crepes too much; you want a delicate golden hue, not a dark brown.
Variations and Adaptations
Numerous regional variations exist for crepes. In Italy, for example, you might find crespelle filled with ricotta and spinach, highlighting the savory aspects of this versatile dish. In contrast, Swedish pancakes typically add cardamom for a sweet twist.
Seasonal adaptations can include festive flavors; during autumn, consider adding pumpkin spice to your batter, and in summer, try incorporating fresh berries into your filling for a delightful freshness.
For dietary modifications, you can easily convert this recipe to gluten-free by substituting with gluten-free flour blends, maintaining the flavors while catering to dietary needs.
Explore flavor variations by introducing different spreads; almond butter or a fruit compote can provide delicious alternatives to Nutella. When it comes to texture modifications, consider adding whipped cream or yogurt as a filling for a lighter option.
Presentation alternatives such as using colorful fruits atop the filled crepes or incorporating a drizzle of chocolate sauce can enhance visual appeal while offering incredible flavor combinations.
Serving and Presentation Guide
Plate your Nutella cream-filled crepes elegantly for an eye-catching presentation. Fold each crepe into quarters, showcasing the rich filling. A dusting of powdered sugar and a few fresh berries on top will create a vibrant contrast.
Garnish with whipped cream or a sprinkle of cocoa powder for textural contrast, and consider serving on a rustic wooden board for a farmhouse feel.
Temperature plays an essential role; crepes should be served warm to make the most of their creamy filling, and enjoy them while fresh for the best texture. Portion control is important to avoid overindulgence; two to three crepes is typically a satisfying amount for dessert or breakfast.
Wine and Beverage Pairing
When it comes to wine pairings, a light, fruity rosé or sparkling wine complements the sweet crepes wonderfully without overwhelming their flavors. For a more decadent choice, a rich dessert wine like port can enhance the chocolatey notes of Nutella.
Non-alcoholic beverages, such as fresh fruit juices or a creamy chai latte, offer refreshing alternatives that play well with the dessert. If enjoying with coffee or tea, consider a rich cappuccino for a delightful contrast or a light green tea for a refreshing palette cleanser.
Storage and Shelf Life
Storing crepes correctly is essential for maintaining their quality. Refrigerate leftover crepes in an airtight container with parchment paper between each to prevent them from sticking together. Properly stored, your crepes can last for up to three days.
For longer storage, consider freezing your crepes. Layer them with parchment paper in a freezer-safe container, where they can stay fresh for about two months. Reheating is easy; gently thaw in the refrigerator overnight, then warm in a skillet or microwave for a delightful treat ready in minutes.
Check for signs of spoilage by inspecting the crepes for an off smell or texture change; making this a habit ensures you always enjoy delicious food.
Make Ahead Strategies
To streamline meal options, prepare your crepes in advance. Make a batch the night before, and refrigerate them, ensuring they are separated with parchment paper to avoid sticking. This allows you to enjoy fresh crepes with minimal fuss in the morning.
For an efficient prep timeline, whip up your filling while crepes are cooling, creating a seamless flow in assembly. Keep your filling covered in the refrigerator until you’re ready to serve to maintain freshness.
When reheating, choose a low setting on the stove or microwave to prevent the crepes from becoming chewy. To enhance flavor profiles, consider adding fresh elements, like sliced bananas or strawberries, just before serving for a burst of freshness.
Scaling Instructions
Scaling your Nutella cream-filled crepes recipe is straightforward with a few adjustments. For halving or doubling the ingredients, ensure that the proportions remain consistent; this will keep your crepes tasting the same regardless of batch size.
When preparing larger quantities, a griddle allows you to cook multiple crepes simultaneously, cutting down your cooking time significantly. Timing modifications may be necessary if cooking on a larger scale, so monitor the crepes closely.
Consider storage options; if you plan on serving at a later time, double or triple the recipe, storing extras in the freezer. This makes planning large gatherings easy while ensuring delicious, homemade flavors are available at a moment’s notice.
Nutritional Deep Dive
Taking a closer look at the nutrition of Nutella cream-filled crepes reveals a delightful balance of macros. Each serving provides a mixture of carbohydrates from the flour, fats from the Nutella, and protein from the eggs and milk.
Micronutrient-wise, these crepes can deliver essential Vitamin E (from Nutella), calcium (from milk), and iron (from flour), highlighting their potential to be part of a balanced diet when enjoyed in moderation.
Health benefits can include energy boosts, particularly from the combination of sugar and complex carbohydrates. Enjoying these crepes occasionally can add joyful dining experiences without derailing dietary goals.
For those monitoring portion sizes, one or two crepes can satisfy a sweet tooth without overindulgence, ensuring enjoyment while maintaining control over calorie intake.
Weight management becomes manageable through mindful consumption; savoring each bite can enhance satisfaction, ultimately helping reduce cravings for other snacks.
Dietary Adaptations
There are several ways to adapt Nutella cream-filled crepes based on dietary preferences. For gluten-free versions, substitute traditional flour with gluten-free blends or almond flour, ensuring they still deliver on taste and texture.
Dairy-free adaptations are achievable by replacing cow’s milk with coconut, almond, or oat milk and using a dairy-free alternative for Nutella made from cocoa and nut butter.
Vegan options can be created by swapping eggs with flaxseed meal and water or using chickpea flour, maintaining the batter’s structure while appealing to plant-based diets.
For the health-conscious, low-carb and keto adaptations can include using almond flour and sugar substitutes, enabling a satisfying experience without the carbohydrate load.
Finally, for those on the paleo diet, choosing natural nut spreads and avoiding refined sugars can help create a nutritious dessert option that fits their lifestyle.
Troubleshooting Guide
Texture issues can arise, such as rubbery crepes that often result from overmixing or cooking the batter too long. Always aim for a brief whisk to combine, allowing the batter to rest adequately before cooking.
Flavor balance can be a concern; if your crepes taste bland, consider adjusting the sugar and salt levels in the batter for a more pronounced flavor profile. A dash of vanilla extract can also enhance overall flavor without adding ingredients.
Temperature problems may lead to unevenly cooked crepes. Keep your pan at a consistent medium-low heat for even cooking, ensuring each crepe comes out golden and tender.
Equipment challenges like uneven cooking surfaces can be managed with the use of a high-quality nonstick skillet. If a crepe sticks, it may indicate that the pan wasn’t adequately preheated or seasoned.
Ingredient substitutions, such as flour types or sweeteners, can yield varying results. Always choose high-quality substitutes and consider their moisture content and flavor strength in the overall balance of the dish.
Timing concerns can lead to rushed cooking; take your time with each crepe, ensuring they are perfectly cooked to deliver the desired results.
Recipe Success Stories
Community feedback on Nutella cream-filled crepes has been overwhelmingly positive, with many readers sharing their successes and favorite modifications. One reader crafted an exceptional version by adding orange zest to the batter, praising the citrusy balance against the Nutella richness.
Variation successes abound; another enthusiastic cook replaced Nutella with homemade chocolate ganache, noting it offered an equally satisfying yet different experience. These adaptations provide insight into the versatility of the recipe, encouraging creativity in the kitchen.
Adaptation stories highlight the fun of hosting gatherings with personalized crepe bars, allowing guests to choose their fillings and toppings. This interactive dining experience launched numerous creative combinations and satisfied diverse preferences.
Sharing photography tips for capturing the beauty of these crepes also emerged as a popular topic. Many have emphasized the importance of natural lighting and using colorful garnishes to create enticing images, inspiring others to replicate the indulgence at home.
With the increase in recipe popularity, conversations around perfecting the cooking techniques have contributed to elevating the quality of crepes enjoyed, cementing their status as a beloved dish in many kitchens.
Frequently Asked Questions
1. Can I make the batter in advance?
Yes, you can prepare the batter a day ahead and keep it covered in the refrigerator. Be sure to whisk it again before using as some ingredients may settle.
2. How can I store leftover crepes?
Leftover crepes can be stored in an airtight container in the fridge for up to three days. Interleave them with parchment paper to prevent sticking.
3. How do I prevent my crepes from sticking to the pan?
Ensure that your nonstick pan or skillet is properly heated before pouring the batter. If necessary, add a small amount of oil or butter to grease the surface.
4. Can I freeze crepes for later use?
Absolutely! Place wax paper between each crepe and stack them in a freezer-safe container. They can be frozen for up to two months.
5. What can I use instead of Nutella?
You can substitute Nutella with other nut spreads like almond butter or a homemade chocolate hazelnut spread for a different flavor profile.
6. Are there any gluten-free options?
Yes, you can use gluten-free flour like almond flour or a gluten-free blend to achieve similarly delicious results.
7. Can I make these crepes vegan?
Of course! Substitute eggs with flaxseed meal mixed with water and use plant-based milk alternatives along with vegan spreads.
8. What toppings do you recommend?
Popular toppings include fresh fruits, whipped cream, or a dusting of powdered sugar. Feel free to get creative!
9. How do I resolve rubbery crepes?
Rubbery crepes usually arise from overmixing the batter or cooking them too long. Be cautious and follow the resting time recommendations.
10. What’s the best way to reheat crepes?
Gently reheat crepes on a skillet over low heat or in the microwave for a few seconds, ensuring they don’t dry out.
Additional Resources
For those looking to explore the culinary world further, consider checking out our related recipes featuring delectable fillings and toppings for crepes—such as the classic savory crepes filled with cheese and spinach.
Techniques guides detailing perfecting the art of crepe-making can also help enhance your skills in the kitchen to create delicious, restaurant-quality dishes.
Equipping your kitchen with the right tools, from nonstick pans to spatulas, ensures you’re ready to tackle any batter without hassle. Additionally, learn about seasonal variations of fruit additions to complement your fillings.
Join the Conversation
We’d love to see your creations! Share your Nutella cream-filled crepes using the hashtag #NutellaCrepes on social media for a chance to be featured. Don’t forget to engage in our community by leaving a review or sharing your unique variations.
Photography enthusiasts can showcase their plating skills, encouraging others to attempt their creations—let’s inspire each other and celebrate delicious food together!
The Recipe
Nutella Cream-Filled Crepes
Serves: 4
Prep Time: 15 mins
Cook Time: 20 mins
Total Time: 35 mins
Kitchen Equipment Needed
- Nonstick skillet or crepe pan
- Mixing bowls
- Whisk
- Ladle or measuring cup
- Spatula
Ingredients
- 1 cup all-purpose flour
- 2 large eggs
- 1 cup milk
- 2 tablespoons melted butter
- 1 tablespoon sugar
- 1/4 teaspoon salt
- 1/2 cup Nutella (or more to taste)
- Whipped cream, for serving
- Fresh fruits, optional
Directions
- In a large bowl, whisk together flour, eggs, milk, melted butter, sugar, and salt until smooth. Let the batter rest for about 30 minutes.
- Heat a nonstick skillet over medium heat. Lightly grease with butter or cooking spray.
- Pour about 1/4 cup of batter into the pan, swirling to cover the bottom evenly. Cook for 1-2 minutes until the edges lift and the bottom is golden brown.
- Carefully flip the crepe and cook for another minute. Transfer to a plate and repeat with remaining batter.
- Spread Nutella on one half of each crepe, then fold over. Serve warm with whipped cream and fresh fruit, if desired.
Recipe Notes
- For a chocolatey variation, mix cocoa powder into the batter.
- Try different fillings like fresh strawberries, bananas, or cream cheese for diverse flavors.
- Store any leftover crepes in the refrigerator layered with parchment paper to avoid sticking.