Table of Contents
Homemade Popeyes Cajun Fries ( Copycat French Fries Recipe )
Introduction
Did you know that a recent survey found that over 65% of people crave restaurant-style seasoned fries but feel intimidated to make them at home? If you’re one of them, you’re in the right place. Today, we’re unlocking the secrets to making those iconic, crave-worthy Homemade Popeyes Cajun Fries right in your own kitchen. This copycat French fries recipe delivers that perfect combination of crispy, golden exterior, fluffy interior, and a zesty, smoky, and slightly spicy Cajun seasoning that makes Popeyes fries so addictive. Forget the drive-thru; with a few simple ingredients and techniques, you can create a side dish that’s not only more satisfying because you made it yourself but also allows you to control the quality and spice level. Let’s dive in and transform ordinary potatoes into an extraordinary snack or side.
Ingredients List
Gathering the right ingredients is the first step to fry perfection. Here’s what you’ll need for about 4 servings of these legendary fries.
- For the Fries:
- 4 large Russet potatoes (about 2 lbs): Their high starch content is key for a fluffy interior and crisp exterior. Look for firm, smooth-skinned potatoes.
- 4-6 cups vegetable oil, peanut oil, or canola oil for frying: These oils have high smoke points and neutral flavors, perfect for achieving a clean, golden fry. Peanut oil adds a subtle nutty depth.
- 1 tablespoon white vinegar (added to soaking water): This secret weapon helps keep the fries firm and prevents them from becoming mushy.
- Ice water for soaking.
- For the Cajun Spice Blend:
- 2 teaspoons paprika (smoked paprika is highly recommended for that authentic, deep flavor).
- 1 teaspoon garlic powder (not garlic salt).
- 1 teaspoon onion powder.
- 1 teaspoon dried oregano.
- 1/2 teaspoon cayenne pepper (adjust to your heat preference—this gives it the signature kick).
- 1/2 teaspoon freshly ground black pepper.
- 1/2 teaspoon white pepper (adds a different, sharper heat dimension).
- 1/2 teaspoon dried thyme.
- 1 1/2 teaspoons fine sea salt (or to taste).
Substitutions & Notes: No Russets? Yukon Golds can work but will yield a creamier, less fluffy fry. For a gluten-free and low-sodium version, ensure all your spices are pure and adjust salt accordingly. Out of white vinegar? Lemon juice works in a pinch for the soak.
Timing
While great fries require a bit of patience, the active work time is minimal. Compared to many “quick” fry recipes that skip crucial steps, our method ensures maximum crispiness.
30 minutes (includes soaking)
15-20 minutes
50-60 minutes
The 30-minute soak is non-negotiable for perfect texture—it removes excess starch, which is the difference between soggy and supremely crispy fries. Most recipes average 40 minutes total but often compromise on this step.
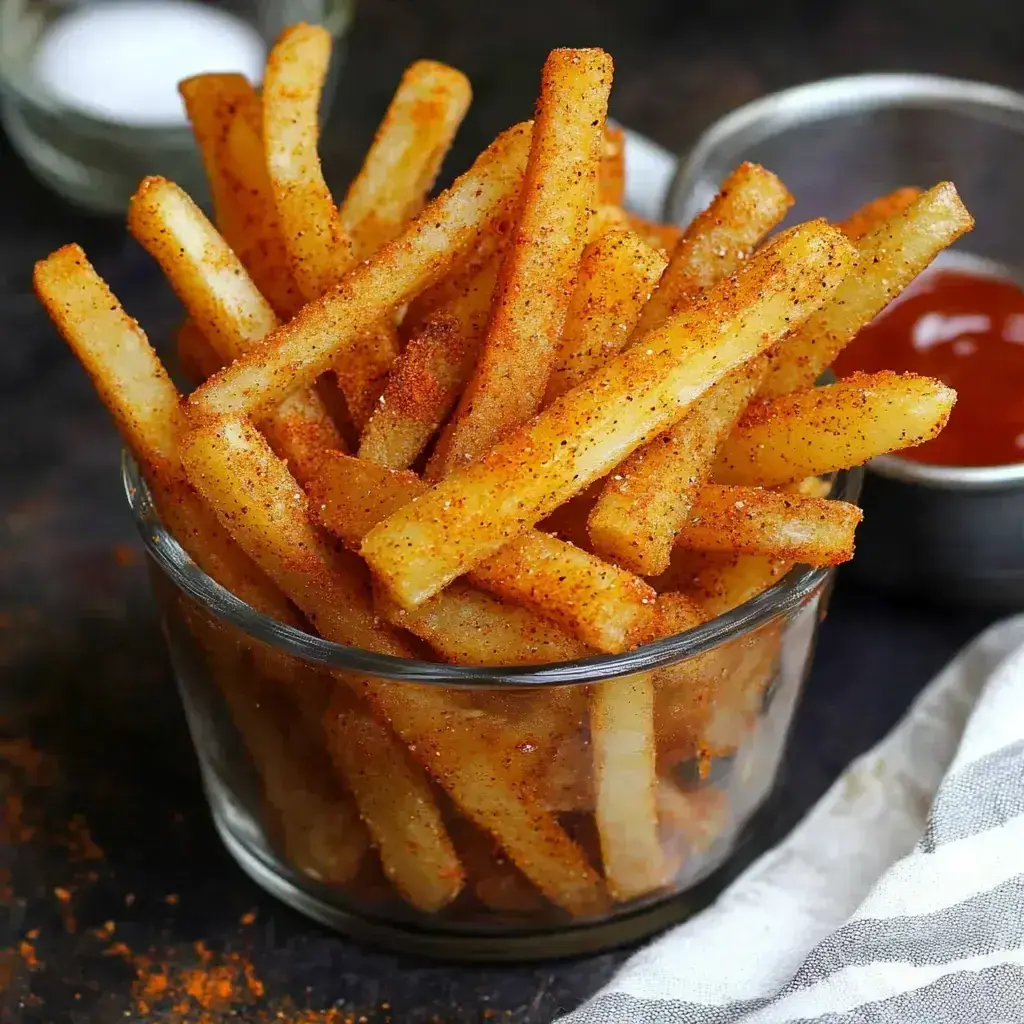
Crispy, golden, and perfectly seasoned Homemade Popeyes Cajun Fries ready to enjoy.
Step-by-Step Instructions
Follow these steps carefully for foolproof, restaurant-quality fries every single time.
Step 1: Prepare the Potatoes
Start by scrubbing your Russet potatoes clean under cold running water. I don’t peel them—the skin adds texture and nutrients, and it’s how many fast-food fries are made. Pat them completely dry with a clean kitchen towel. Now, cut them into uniform 1/4-inch thick batons. Consistency is your best friend here; it ensures every fry cooks at the same rate. Use a sharp chef’s knife or a mandoline for precision (watch your fingers!).
Step 2: Soak and Dry
This is the secret step! Place your cut fries in a large bowl and cover them with cold water mixed with the 1 tablespoon of white vinegar. Swirl them around with your hand. You’ll see the water turn cloudy—that’s the excess starch leaving the potatoes. Soak for at least 30 minutes, or up to 2 hours in the fridge. After soaking, drain and rinse the fries under cold water. Now, they must be bone-dry. Spread them in a single layer on multiple clean kitchen towels or paper towels and pat them aggressively until no moisture remains. Any water will cause the oil to splatter and steam the fries instead of frying them.
Step 3: Make the Cajun Spice Blend
While the fries soak, make your magic dust. In a small bowl, whisk together all the spices for the Cajun blend: paprika, garlic powder, onion powder, oregano, cayenne, black pepper, white pepper, thyme, and salt. Give it a good mix with a fork or a small whisk to break up any clumps and ensure the flavors are fully integrated. Taste a tiny pinch and adjust the salt or heat to your liking. Set this flavorful blend aside.
Step 4: Fry to Perfection
Choose a heavy-bottomed pot or Dutch oven and add your oil until it’s about 3 inches deep. Attach a deep-fry or candy thermometer to the side. Heat the oil over medium-high heat to 325°F (163°C). This is your first fry, or “blanching” stage. Working in small batches to avoid crowding and temperature drops, carefully add a portion of the dried fries. Fry for 4-5 minutes. They will not be golden yet, just soft and slightly translucent. Remove with a slotted spoon or spider strainer and drain on a wire rack set over a baking sheet. Let the oil return to 325°F before frying the next batch. Once all fries are blanched, increase the heat and bring the oil temperature to 375°F (190°C). Fry the blanched fries again, in batches, for 2-3 minutes until they are deeply golden brown and incredibly crispy. This double-fry method is what gives professional fries their perfect texture.
Step 5: Season and Serve
As soon as the fries come out of the hot oil from their second fry, transfer them to a large, dry bowl. While they are piping hot and glistening, sprinkle a generous amount of your homemade Cajun spice blend over them. Don’t be shy! Toss the fries vigorously to coat every surface evenly. The residual heat will toast the spices slightly, awakening their flavors. Serve immediately for the ultimate experience.
Nutritional Information
The following is an approximate nutritional breakdown for one serving (about 1/4 of the recipe), factoring in oil absorption. Values may vary based on specific ingredients and portion size.
- Calories: ~320 kcal
- Total Fat: 14g
- Saturated Fat: 1.5g
- Carbohydrates: 45g
- Dietary Fiber: 4g
- Sugars: 2g
- Protein: 5g
- Sodium: ~450mg (adjustable based on spice blend)
Healthier Alternatives
Love the flavor but want a lighter version? Here are some easy swaps that don’t sacrifice taste:
- Air Fryer Method: After soaking and drying, toss the fries with 1-2 tablespoons of oil (not 4-6 cups!). Cook in a preheated air fryer at 400°F (200°C) for 15-20 minutes, shaking the basket every 5 minutes, until crispy. Toss with seasoning after.
- Oven-Baked Fries: Toss dried fries with a minimal amount of oil (1-2 tbsp) and spread on a parchment-lined baking sheet. Bake at 425°F (220°C) for 25-35 minutes, flipping halfway. Finish with seasoning.
- Spice Blend Tweaks: Reduce the salt by half and boost flavor with extra herbs like rosemary or a squeeze of fresh lime juice after baking.
- Oil Choice: For frying, use high-oleic sunflower or avocado oil, which contain healthier monounsaturated fats.
Serving Suggestions
These Cajun fries are a star on their own, but they also play incredibly well with others:
- The Classic: Serve alongside a copycat Popeyes spicy chicken sandwich or tenders for the full experience.
- Loaded Fries: Pile them high with melted cheese, jalapeños, green onions, and a drizzle of ranch or comeback sauce.
- With Dips: Offer a trio of dips: classic ketchup, creamy remoulade, and a cool, herby garlic aioli.
- As a Side: Perfect with burgers, grilled fish, or a hearty bean chili.
Common Mistakes
Avoid these pitfalls to guarantee fry success:
- Skipping the Soak: This leads to gummy, dark fries that stick together.
- Not Drying Thoroughly: Wet fries = dangerous splatters and steamed, soggy results.
- Crowding the Pot: Adding too many fries at once drops the oil temperature drastically, resulting in greasy, limp fries.
- Seasoning Too Late: The seasoning won’t stick to cold fries. Always toss them the moment they come out of the fryer.
- Using the Wrong Potato: Waxy potatoes like Red Bliss will never achieve the desired fluffy interior.
Storing Tips
Fries are best enjoyed immediately, but if you have leftovers:
- Short-Term: Let cool completely, then store in an airtight container in the refrigerator for up to 2 days.
- Reheating: To restore