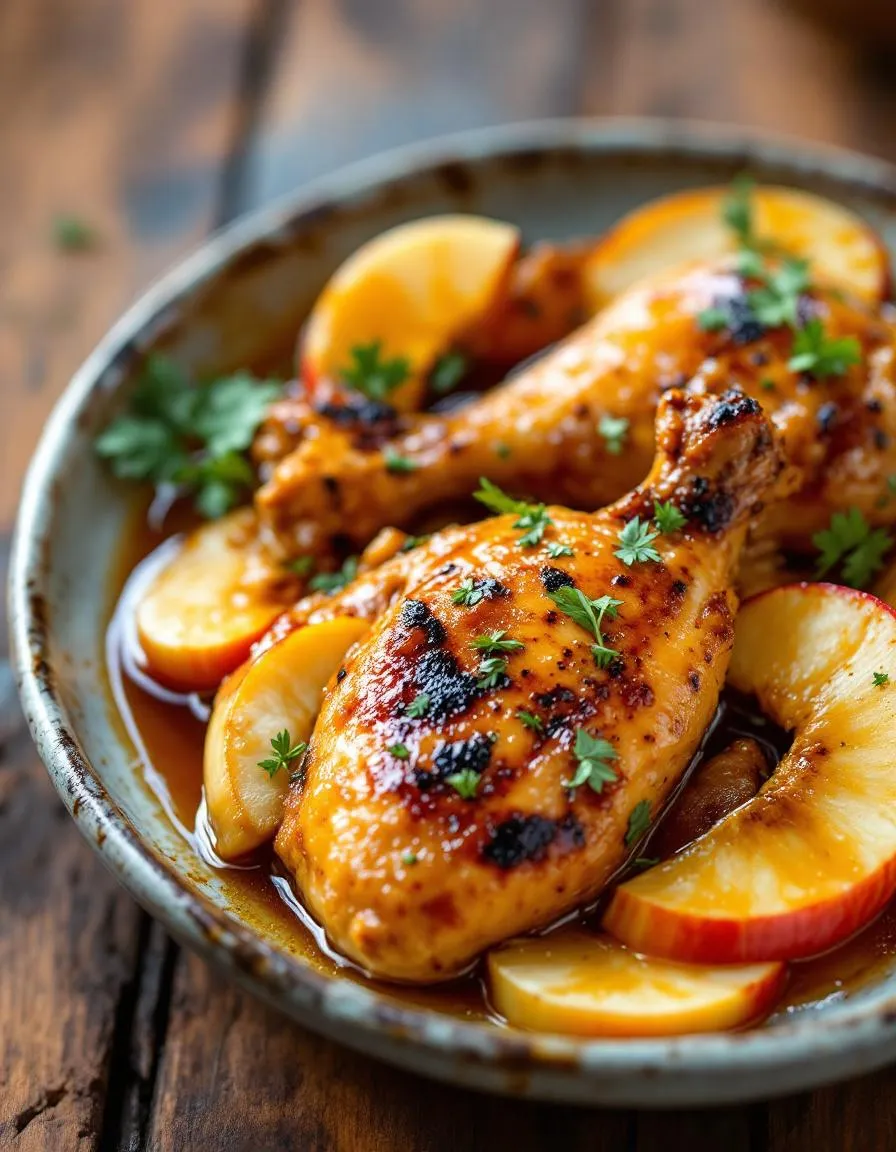
There’s something deeply comforting about a dish that balances tangy, savory, and tender all in one bite. If you’re craving a meal that feels both wholesome and exciting, this Apple Cider Vinegar Braised Chicken Recipe will hit the spot. Whether you’re cooking for a weeknight dinner or impressing guests, this recipe delivers bold flavors with minimal fuss. Plus, it’s a fantastic way to use pantry staples in a way that feels anything but ordinary. Let’s dive into why this dish deserves a permanent spot in your rotation.
Apple Cider Vinegar Braised Chicken Recipe is a hearty, flavor-packed dish where chicken simmers low and slow in a tangy, aromatic broth. The apple cider vinegar not only tenderizes the meat but also adds a bright, slightly sweet acidity that elevates every bite. Paired with herbs, garlic, and a touch of sweetness, this dish transforms simple ingredients into something extraordinary. Moreover, braising ensures the chicken stays juicy while absorbing all those delicious flavors. If you love cozy, one-pot meals, you’ll appreciate how this recipe fits seamlessly into busy schedules while tasting like it took hours to prepare.
This recipe aligns perfectly with our blog’s mission to share approachable yet impressive dishes. Whether you’re a seasoned cook or just starting out, the steps are straightforward, and the results are consistently delicious. For more braising inspiration, check out our ultimate guide to braising beef. And if you’re looking for other ways to use apple cider vinegar, our breakdown of its health benefits might surprise you. Now, let’s talk about why this recipe holds a special place in my kitchen.
Why I Love This Recipe
This Apple Cider Vinegar Braised Chicken Recipe reminds me of Sunday dinners at my grandma’s house. She always knew how to turn humble ingredients into something unforgettable, and this dish captures that same magic. The first time I made it, the aroma alone transported me back to her kitchen. Beyond nostalgia, I love how adaptable it is. Swap in thighs for breasts, add root vegetables, or adjust the vinegar to suit your taste. Every time I make it, I discover something new to love. If you’re looking for a recipe that feels like a warm hug, this is it.
Health and Nutrition
Why it’s good for your body
Apple Cider Vinegar Braised Chicken Recipe packs a nutritious punch while delivering bold flavors. First, apple cider vinegar adds a tangy kick and brings digestive benefits. It may help balance blood sugar levels and support gut health. Additionally, the chicken provides lean protein to keep you full and fuel muscle repair.
Moreover, this dish includes wholesome ingredients like garlic and herbs. These not only enhance taste but also offer anti-inflammatory properties. For example, garlic supports immune function, while herbs like thyme add antioxidants. Together, they make Apple Cider Vinegar Braised Chicken Recipe a flavorful way to nourish your body.
Furthermore, the braising method locks in moisture and nutrients. Unlike frying, it keeps the dish lower in unhealthy fats. As a result, you enjoy a satisfying meal without excess calories. Whether you seek better digestion or a protein-rich dinner, Apple Cider Vinegar Braised Chicken Recipe delivers.
How it fits in a healthy lifestyle
Apple Cider Vinegar Braised Chicken Recipe fits seamlessly into a balanced diet. If you focus on high-protein meals, this dish provides a lean option to support fitness goals. It also works well for gluten-free eaters, as it naturally avoids grains and processed ingredients.
For heart-healthy eating, the recipe relies on olive oil and fresh herbs instead of heavy creams or butter. Pair it with a side of roasted vegetables or a light salad for a complete, nutrient-dense meal. If you love meal prepping, you can easily make a batch ahead and enjoy it throughout the week. Check out our meal prep guide for more time-saving tips.
Even busy families will appreciate how simple and wholesome this recipe is. It’s a great alternative to takeout, offering more control over ingredients and portions. For more inspiration on healthy weeknight dinners, explore our quick and healthy recipes. Apple Cider Vinegar Braised Chicken Recipe proves that eating well doesn’t mean sacrificing flavor or convenience.
A tangy and savory braised chicken dish with the perfect balance of sweetness from apples and acidity from apple cider vinegar.
Ingredients
Scale
For the Crust:
4 bone-in, skin-on chicken thighs
1 tablespoon olive oil
1 large onion, sliced
2 garlic cloves, minced
2 apples, cored and sliced
1 cup apple cider vinegar
1 cup chicken broth
1 tablespoon honey
1 teaspoon dried thyme
Salt and pepper to taste
Instructions
1. Prepare the Crust:
Season chicken thighs with salt and pepper.
Heat olive oil in a large skillet over medium-high heat. Add chicken thighs, skin-side down, and cook until golden brown, about 5 minutes per side. Remove and set aside.
In the same skillet, add onions and garlic. Cook until softened, about 3 minutes.
Add apples, apple cider vinegar, chicken broth, honey, and thyme. Stir to combine.
Return chicken to the skillet, skin-side up. Bring to a simmer, then cover and cook on low heat for 25-30 minutes, or until chicken is cooked through.
Serve hot, spooning the sauce over the chicken.
Notes
You can customize the seasonings to taste.
“`html
="how-to-prepare-this-dish">How to Prepare This Dish
Steps and time-saving tips
Start by seasoning the chicken generously with salt and pepper on both sides. Heat a large skillet over medium-high heat and add a drizzle of olive oil. Once the oil shimmers, sear the chicken until golden brown, about 4-5 minutes per side. Transfer the chicken to a plate and set it aside. In the same skillet, sauté diced onions and minced garlic until fragrant, then deglaze the pan with apple cider vinegar, scraping up any browned bits for extra flavor. Stir in chicken broth, honey, and a pinch of thyme, then return the chicken to the skillet. Reduce the heat to low, cover, and let it simmer for 20-25 minutes until the chicken cooks through. For a time-saving tip, prep your ingredients ahead of time so everything flows smoothly. If the sauce seems too thin, remove the chicken and let the liquid reduce for a few extra minutes. Serve the Apple Cider Vinegar Braised Chicken Recipe over mashed potatoes or rice, and drizzle the reduced sauce on top for maximum flavor.
Mistakes I’ve made and learned from
One mistake I made early on was rushing the searing process, which resulted in pale, less flavorful chicken. Now, I patiently wait for the skillet to get properly hot before adding the chicken. Another hiccup? Over-reducing the sauce, leaving it too thick and overpowering. To fix this, I keep a splash of broth nearby to adjust consistency as needed. If you’re new to braising, check out my guide on perfect braising techniques for foolproof results. Also, balancing the acidity in the Apple Cider Vinegar Braised Chicken Recipe took trial and error—too much vinegar made it harsh. A touch of honey smoothed it out beautifully. For more tips on balancing flavors, my flavor balancing secrets post breaks it down simply.
Apple Cider Vinegar Braised Chicken Recipe carries a rich history, blending rustic comfort with tangy sophistication. Originally, braising techniques emerged as a way to tenderize tougher cuts of meat, and adding apple cider vinegar became a clever trick to balance richness with brightness. In the American South, cooks often simmer chicken with vinegar for a punchy, soul-warming dish, while in Europe, similar recipes might swap in white wine or herbs. Either way, the method transforms simple ingredients into something unforgettable.
Families often put thei
r own spin on Apple Cider Vinegar Braised Chicken Recipe too. Some add honey for sweetness, while others toss in garlic or smoked paprika for depth. In my kitchen, I love pairing it with seasonal apples or thyme from the garden. Meanwhile, Caribbean versions might include allspice or Scotch bonnet peppers for heat. No matter where you taste it, this dish adapts beautifully to local flavors while keeping its cozy, hearty core.
How it fits in today’s cooking
Today, Apple Cider Vinegar Braised Chicken Recipe fits perfectly into modern cooking trends. Busy home cooks appreciate its one-pot simplicity, while health-conscious eaters love the gut-friendly benefits of apple cider vinegar. It’s a star at fall gatherings, but also works as a quick weeknight meal when paired with roasted veggies or a crisp salad.
Many adapt the recipe to fit dietary needs, like using coconut sugar instead of honey or opting for bone-in thighs for extra flavor. For inspiration, check out our guide to healthy dinner swaps or explore cozy sides in our comfort food pairings roundup. Whether you’re cooking for a crowd or just craving nostalgia, this dish proves some classics never go out of style.
>Taste and Texture
What makes it delicious
The Apple Cider Vinegar Braised Chicken Recipe delivers a bold, tangy-sweet flavor that lingers on your palate. Tender chicken thighs soak up the rich, caramelized sauce, while the apple cider vinegar adds a bright, fruity acidity that balances the dish perfectly. Aromatic garlic and thyme deepen the savoriness, and a hint of honey rounds out the sharp edges. Meanwhile, the texture is irresistibly succulent—each bite falls apart effortlessly, yet the skin stays slightly crisp from searing. Every forkful of this Apple Cider Vinegar Braised Chicken Recipe feels like a cozy hug, with layers of warmth and complexity that make it unforgettable.
Boosting the flavor
For an extra flavor boost, try stirring in a spoonful of Dijon mustard to the braising liquid—it adds a peppery depth that pairs beautifully with the vinegar. Alternatively, top the finished dish with toasted walnuts for a nutty crunch. If you love herbs, fresh rosemary or sage can elevate the aroma even further. For a side that complements the tangy richness, try our Garlic Herb Roasted Potatoes or a light Crisp Apple Avocado Salad. Small tweaks like these keep the Apple Cider Vinegar Braised Chicken Recipe exciting and adaptable to your cravings.
Tips for Success
Best practices for results
Always pat the chicken dry before searing to ensure a golden-brown crust. Meanwhile, use a heavy-bottomed pot for even heat distribution during braising. Additionally, measure the apple cider vinegar precisely—too much can overpower the dish, while too little dulls the flavor. For the best Apple Cider Vinegar Braised Chicken Recipe results, simmer the chicken uncovered during the final 10 minutes to thicken the sauce slightly. Finally, let the dish rest for 5 minutes before serving to lock in juices.
Mistakes to avoid
Avoid overcrowding the pot when searing the chicken, as this steams the meat instead of browning it. Instead, work in batches if needed. Furthermore, don’t skip deglazing the pan with broth after searing—those browned bits add depth to your Apple Cider Vinegar Braised Chicken Recipe. For more on balancing acidity, check out our guide on cooking with vinegar. Also, resist the urge to boil the sauce vigorously; a gentle simmer keeps the chicken tender. Learn more about perfect braising temperatures in our braising basics post.
Serving and Pairing Suggestions
How to serve this dish
For a stunning presentation, plate your Apple Cider Vinegar Braised Chicken Recipe over a bed of creamy mashed potatoes or fluffy quinoa. Meanwhile, drizzle the rich braising liquid over the top for extra flavor and shine. Additionally, garnish with fresh thyme or parsley to add a pop of color and freshness. This dish shines at family dinners, but it also makes an impressive centerpiece for holiday gatherings. If you want to elevate the experience further, serve it in a rustic cast-iron skillet for a cozy, farmhouse feel.
h-it">What goes well with it
Pair your Apple Cider Vinegar Braised Chicken Recipe with a crisp green salad to balance the dish’s tangy richness. Alternatively, try roasted root vegetables for a hearty, autumnal twist. For drinks, a chilled glass of white wine or sparkling apple cider enhances the flavors beautifully. If you’re craving more comfort food pairings, our garlic herb dinner rolls soak up the braising liquid perfectly. Finally, finish the meal with a light dessert like our honey lavender shortbread for a sweet contrast.
What does apple cider vinegar do to chicken when braising?
Apple cider vinegar tenderizes the chicken by breaking down proteins, while adding a tangy depth of flavor to the braising liquid. In this Apple Cider Vinegar Braised Chicken Recipe, it also helps create a balanced sauce that complements the richness of the dish.
ank-math-faq-item">
Can I substitute white vinegar for apple cider vinegar in braised chicken?
While white vinegar works in a pinch, apple cider vinegar adds a fruity sweetness that enhances the overall flavor profile of this braised chicken recipe. For best results, stick with apple cider vinegar to achieve the intended taste of Apple Cider Vinegar Braised Chicken.
How long should you braise chicken with apple cider vinegar?
For this Apple Cider Vinegar Braised Chicken Recipe, simmer chicken pieces for 30-45 minutes until fully cooked and fork-tender. The braising time allows the vinegar to mellow while infusing the meat with flavor.
What sides go well with apple cider vinegar braised chicken?
Creamy mashed potatoes or polenta perfectly soak up the tangy sauce from the Apple Cider Vinegar Braised Chicken Recipe. Roasted root vegetables or a crisp green salad also balance the dish’s rich flavors.
div>
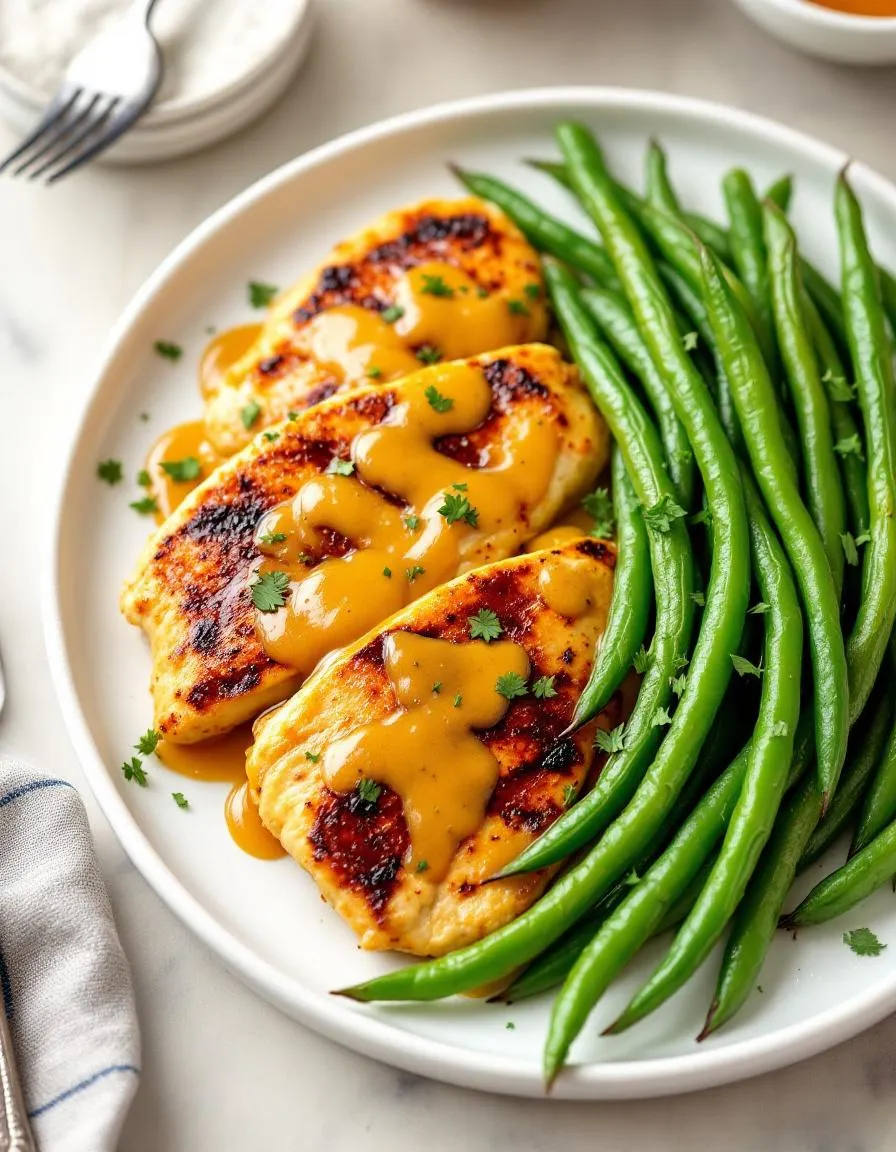
Best Grilled Honey Mustard Chicken with Green Beans
Introduction
There’s something undeniably comforting about a meal that balances sweet, tangy, and savory flavors in every bite. If you’re craving a dish that feels both wholesome and indulgent, Grilled Honey Mustard Chicken with Green Beans delivers exactly that. Whether you’re cooking for a weeknight dinner or a weekend barbecue, this recipe brings together juicy chicken, crisp-tender green beans, and a glaze so irresistible you’ll want to drizzle it on everything. Plus, it’s easy enough for beginners but flavorful enough to impress even the pickiest eaters. Let’s dive into why this dish deserves a spot in your regular meal rotation.
Grilled Honey Mustard Chicken with Green Beans is a vibrant, balanced meal that combines succulent chicken breasts with a sticky-sweet honey mustard marinade and perfectly charred green beans. The honey mustard glaze caramelizes beautifully on the grill, creating a slightly smoky depth that pairs wonderfully with the freshness of the beans. What makes this recipe stand out is its versatility. You can serve it as a quick family dinner or elevate it for gatherings by pairing it with sides like garlic herb roasted potatoes or a light summer berry spinach salad. Beyond its deliciousness, it’s also a healthier alternative to heavy comfort foods, packing protein and veggies into one satisfying plate. Fitting seamlessly into our blog’s focus on approachable yet flavorful recipes, this dish proves that eating well doesn’t mean sacrificing taste or convenience.
Why I Love This Recipe
Grilled Honey Mustard Chicken with Green Beans holds a special place in my heart because it’s the meal that turned my skeptical kids into veggie lovers. The first time I made it, they devoured the green beans without a single complaint, thanks to the caramelized edges and hint of honey mustard. Now, it’s our go-to summer dish, often enjoyed on the patio with laughter and extra napkins. The simplicity of the ingredients reminds me of my grandmother’s cooking—no fuss, just big flavor. Every time I make it, I’m reminded that the best meals are the ones that bring people together.
Health and Nutrition
Why it’s good for your body
Grilled Honey Mustard Chicken with Green Beans packs a nutritious punch while delighting your taste buds. First, the lean chicken breast delivers high-quality protein to support muscle repair and keep you full longer. Additionally, honey mustard adds a touch of natural sweetness without overwhelming your meal with refined sugars. Meanwhile, the green beans provide a crisp dose of fiber, vitamins A and C, and antioxidants to boost immunity and digestion.
Moreover, grilling the chicken keeps the dish lower in fat compared to frying, making it a heart-friendly choice. The honey mustard glaze also contains anti-inflammatory properties from ingredients like mustard seeds, which may help reduce oxidative stress. Furthermore, Grilled Honey Mustard Chicken with Green Beans balances macronutrients perfectly, offering protein, healthy carbs, and essential vitamins in one satisfying plate.
Finally, this dish is versatile enough to fit various dietary needs. Whether you’re aiming for a high-protein meal or simply want a wholesome dinner, Grilled Honey Mustard Chicken with Green Beans delivers flavor and nutrition without compromise. The combination of tender chicken and vibrant greens ensures you’re nourishing your body with every bite.
How it fits in a healthy lifestyle
Grilled Honey Mustard Chicken with Green Beans effortlessly aligns with a balanced diet. If you’re focusing on high-protein meals to support fitness goals, the chicken provides the fuel your muscles need. For those watching their carb intake, the green beans add volume and nutrients without excess calories. Plus, this dish is naturally gluten-free, making it a safe choice for anyone with sensitivities.
Planning meals ahead? Grilled Honey Mustard Chicken with Green Beans stores well for meal prep, so you can enjoy a healthy lunch or dinner all week. Pair it with a side of quinoa or a fresh salad for extra variety. If you’re exploring more heart-healthy recipes, check out our guide to balanced dinner ideas or discover how to simplify meal prep for busy weeknights. With its wholesome ingredients and easy preparation, this dish helps you stay on track without sacrificing flavor.
Juicy grilled chicken breasts glazed with a sweet and tangy honey mustard sauce, served with tender green beans.
Ingredients
Scale
For the Crust:
4 boneless, skinless chicken breasts
1/4 cup honey
2 tablespoons Dijon mustard
1 tablespoon whole-grain mustard
1 tablespoon olive oil
1 pound fresh green beans, trimmed
1/2 teaspoon garlic powder
1/2 teaspoon salt
1/4 teaspoon black pepper
Instructions
1. Prepare the Crust:
Preheat grill to medium-high heat (about 375°F).
In a small bowl, whisk together honey, Dijon mustard, whole-grain mustard, and olive oil. Set aside half of the sauce for serving.
Season chicken breasts with salt, pepper, and garlic powder. Grill for 6-7 minutes per side, basting with the honey mustard sauce during the last few minutes of cooking.
Meanwhile, steam or boil green beans until tender-crisp (about 5 minutes). Drain and toss with a drizzle of olive oil and a pinch of salt.
Serve grilled chicken with green beans and reserved honey mustard sauce on the side.
Notes
You can customize the seasonings to taste.
How to Prepare This Dish
Steps and time-saving tips
Start by preheating your grill to medium-high heat so it’s ready when you are. While it heats, whisk together the honey, Dijon mustard, olive oil, minced garlic, and a pinch of salt and pepper in a small bowl. This tangy-sweet marinade will give your Grilled Honey Mustard Chicken with Green Beans its signature flavor. Next, place the chicken breasts in a shallow dish and pour half the marinade over them, reserving the rest for later. Let the chicken sit for at least 10 minutes—or up to 30 if you have time—to soak up the flavors.
Toss the green beans wi
th a drizzle of olive oil, salt, and pepper on a baking sheet. If you’re short on time, skip blanching and roast them directly for a crisp-tender texture. Grill the chicken for 6-7 minutes per side, brushing with the reserved marinade halfway through. Meanwhile, pop the green beans into a 400°F oven for 12-15 minutes or until they’re slightly charred. For a one-pan twist, use a grill basket for the beans while the chicken cooks. Let the chicken rest for 5 minutes before slicing to keep it juicy. Serve everything hot with a final drizzle of marinade.
Mistakes I’ve made and learned from
I once rushed the marinating step for my Grilled Honey Mustard Chicken with Green Beans, and the flavors fell flat. Now I always give it at least 15 minutes—trust me, it’s worth the wait. Another blunder? Overcooking the green beans until they turned mushy. I’ve since learned to pull them from the oven when they’re still bright green with a slight crunch. If you’re new to grilling, check out my guide on perfect grilling temperatures to avoid dry chicken. And if your marinade separates, don’t panic—just whisk it back together like I do in my sauce emulsifying tutorial. Small tweaks make all the difference!
n-and-variations">Cultural Connection and Variations
Where this recipe comes from
Grilled Honey Mustard Chicken with Green Beans feels like a dish that bridges continents. While honey mustard sauces trace back to medieval Europe, where cooks mixed honey with sharp mustards for meats, grilling chicken over open flames ties it to American backyard barbecues. The green beans, though, add a crisp, fresh twist that makes it feel modern and light.
In the South, you might find this recipe with a smoky paprika rub or a splash of bourbon in the glaze. Meanwhile, in France, they could swap the green beans for haricots verts and pair the chicken with a Dijon-heavy sauce. My family? We toss the beans with toasted almonds for crunch. No matter where you go, Grilled Honey Mustard Chicken with Green Beans adapts to local flavors while keeping its sweet-savory heart.
Seasonally, it’s a summer staple for us—easy to cook outdoors and bright enough for warm nights. But in colder months, roasting the chicken and beans together with rosemary turns it into cozy comfort food. The dish’s flexibility is its magic.
ays-cooking">How it fits in today’s cooking
Today, Grilled Honey Mustard Chicken with Green Beans fits perfectly into fast, flavorful weeknight dinners. Busy cooks love it because the marinade does double duty as a glaze, and the green beans cook in minutes. Plus, it’s a hit with kids and adults alike—no picky-eater negotiations needed.
Modern twists include swapping honey for maple syrup or adding chili flakes for heat. Some even serve it over quinoa for a protein-packed bowl, like these meal prep bowls. Others pair it with a bright, citrusy salad, similar to this summer salads roundup, to balance the richness.
Whether you’re firing up the grill or baking it all on a sheet pan, this dish stays relevant because it’s simple, satisfying, and endlessly adaptable. That’s why it’s earned its spot in today’s kitchens—no fancy techniques required.
>Taste and Texture
What makes it delicious
Grilled Honey Mustard Chicken with Green Beans delivers a mouthwatering balance of sweet, tangy, and smoky flavors. The chicken boasts a caramelized, slightly charred crust from the grill, while the honey mustard glaze adds a sticky, golden richness that melts into every bite. Meanwhile, the green beans stay crisp-tender, offering a refreshing contrast to the juicy, succulent chicken. Fragrant garlic and a hint of Dijon mustard deepen the savory notes, while a touch of lemon brightens the dish. Together, the textures create harmony—creamy sauce, tender meat, and crunchy beans make each forkful irresistible.
Boosting the flavor
For an extra flavor kick, try marinating the chicken in the honey mustard mixture overnight. The longer soak lets the spices penetrate deeper, resulting in even more succulent Grilled Honey Mustard Chicken with Green Beans. Alternatively, sprinkle smoked paprika or a dash of cayenne for a subtle heat that complements the sweetness. If you love fresh herbs, toss chopped rosemary or thyme into the green beans while they cook. For sauce lovers, drizzle a creamy garlic aioli or a zesty lemon herb dressing over the finished dish. Craving more crunch? Toasted almonds or crispy shallots add a delightful finish. Small tweaks can elevate this meal from great to unforgettable.
Tips for Success
Best practices for results
Preheat your grill to medium-high heat before adding the chicken to ensure even cooking and those perfect grill marks. Meanwhile, marinate the chicken in the honey mustard mixture for at least 30 minutes to lock in flavor and moisture. For the green beans, toss them in a light coating of olive oil and season them just before grilling to prevent sogginess. Finally, let the Grilled Honey Mustard Chicken with Green Beans rest for 5 minutes after cooking so the juices redistribute for maximum tenderness.
Mistakes to avoid
Avoid overcrowding the grill, as this lowers the temperature and steams the food instead of searing it. Instead, cook the chicken and green beans in batches if needed. Another common mistake is brushing on extra honey mustard sauce too early, which can cause burning. Wait until the last few minutes of grilling to add a final glaze. For more grilling tips, check out our guide on grilling basics. Also, don’t skip resting the chicken—this step ensures juiciness, just like with our perfect roast chicken.
Serving and Pairing Suggestions
How to serve this dish
Grilled Honey Mustard Chicken with Green Beans shines when you plate it with intention. For a rustic look, arrange the chicken diagonally over a bed of crisp green beans on a wooden board or slate platter. Alternatively, drizzle extra honey mustard sauce in artistic swirls around the edges of a white plate for elegant contrast. Brighten the dish with lemon wedges or fresh parsley for a pop of color. This meal works beautifully for summer cookouts, weeknight dinners, or even as a standout dish at holiday gatherings. To make it extra inviting, serve family-style on a large platter so everyone can dig in.
h-it">What goes well with it
Pair Grilled Honey Mustard Chicken with Green Beans with a chilled glass of citrus-forward Sauvignon Blanc to balance the dish’s sweetness. For a non-alcoholic option, try sparkling water with a squeeze of lime for refreshing contrast. If you’re craving heartier sides, roasted garlic mashed potatoes or a light quinoa salad complete the meal perfectly. For dessert, our Lemon Blueberry Cake adds a tangy finish, while our Classic Vanilla Bean Ice Cream offers creamy simplicity. Each pairing highlights the chicken’s bold flavors without overpowering them.
How long should I marinate Grilled Honey Mustard Chicken?
For the best flavor, marinate Grilled Honey Mustard Chicken for at least 30 minutes, but ideally 2–4 hours. This allows the honey mustard mixture to penetrate the chicken, making it juicier and more flavorful when grilled. Avoid marinating overnight, as the acidity can break down the meat too much.
ank-math-faq-item">
Can I use frozen green beans for Grilled Honey Mustard Chicken with Green Beans?
Yes, but fresh green beans work best for this dish. If using frozen, thaw and pat them dry before tossing with oil and seasoning. Grilled Honey Mustard Chicken pairs well with crisp-tender green beans, so avoid overcooking them.
What temperature should Grilled Honey Mustard Chicken reach?
Cook Grilled Honey Mustard Chicken until it reaches an internal temperature of 165°F (74°C) for food safety. Use a meat thermometer to check the thickest part of the chicken. This ensures juicy, perfectly cooked chicken alongside your green beans.
Can I make Grilled Honey Mustard Chicken with Green Beans ahead of time?
You can prep components ahead, but grill the chicken fresh for the best texture. Store the honey mustard marinade and trimmed green beans separately in the fridge for up to 24 hours. Assemble and grill just before serving for optimal flavor.
div>
Best Creamy Chicken Taquitos – Easy Homemade Recipe
Introduction
Craving a crispy, creamy bite that delivers comfort in every roll? Look no further than this Creamy Chicken Taquitos Recipe, a crowd-pleasing dish that balances rich flavors with a satisfying crunch. Whether you need a quick weeknight dinner or a game-day snack, these taquitos bring joy to the table without demanding hours in the kitchen. Plus, they’re versatile enough to customize with your favorite toppings, making them a hit for both kids and adults alike.
Creamy Chicken Taquitos Recipe combines tender shredded chicken, melted cheese, and a velvety cream cheese filling, all wrapped in a golden tortilla and baked to perfection. Unlike dry or overly greasy versions, this recipe ensures a moist interior with just the right amount of crispiness. Taquitos have deep roots in Mexican cuisine, but this version leans into a Tex-Mex twist, perfect for anyone who loves bold flavors without the fuss. If you’ve ever tried our Easy Beef Enchiladas, you’ll appreciate how these taquitos offer a handheld alternative with the same crave-worthy appeal. They’re also freezer-friendly, so you can prep ahead for busy days—something our meal prep guide champions. Fitting seamlessly into our blog’s focus on approachable, flavor-packed recipes, this dish proves that delicious meals don’t require complicated techniques or hard-to-find ingredients.
Why I Love This Recipe
These Creamy Chicken Taquitos remind me of family gatherings where everyone hovered around the appetizer tray, sneaking seconds before dinner even started. I love how the cream cheese binds everything together, creating a luscious texture that contrasts with the crunchy shell. It’s also a recipe that adapts to whatever I have on hand—swap in leftover rotisserie chicken or add a dash of hot sauce for extra heat. Most importantly, it’s a dish that never fails to bring smiles, whether I’m serving it at a party or enjoying it as a cozy night-in treat.
Health and Nutrition
Why it’s good for your body
Craving something crispy and satisfying? The Creamy Chicken Taquitos Recipe delivers flavor without skimping on nutrition. First, lean chicken packs high-quality protein to keep you full and support muscle health. Meanwhile, the creamy filling often includes Greek yogurt or avocado, adding gut-friendly probiotics or heart-healthy fats. Plus, when you bake instead of fry the taquitos, you cut unnecessary calories while keeping that irresistible crunch.
Another benefit of the Creamy Chicken Taquitos Recipe is its versatility. You can load it with fiber-rich veggies like spinach or bell peppers for an extra nutrient boost. Additionally, whole-wheat or corn tortillas provide complex carbs for steady energy. Since this dish balances protein, healthy fats, and fiber, it helps stabilize blood sugar levels, making it a smarter choice than processed snacks.
Finally, spices like cumin and chili powder in the Creamy Chicken Taquitos Recipe do more than add flavor. They contain antioxidants that support immunity and reduce inflammation. Whether you serve them as a main dish or party appetizer, these taquitos prove that tasty food can also fuel your body well.
How it fits in a healthy lifestyle
The Creamy Chicken Taquitos Recipe fits seamlessly into balanced eating habits. For protein-focused diets, the chicken and Greek yogurt filling help meet daily goals without excess fat. If you prefer gluten-free options, simply swap in corn tortillas—they’re naturally gluten-free and add a wholesome texture.
Meal preppers love this recipe because it freezes well for quick lunches or dinners. Pair it with a fresh salad or roasted veggies for a complete, nutrient-dense meal. Looking for more high-protein ideas? Try our High-Protein Meal Prep Guide to keep your week on track. And if you’re exploring heart-healthy swaps, our Healthy Fats Guide makes it easy to choose ingredients that benefit your whole body.
Whether you’re cooking for a family or just yourself, the Creamy Chicken Taquitos Recipe adapts to your needs without sacrificing taste or nutrition. It’s proof that mindful eating can still be delicious.
Crispy baked taquitos filled with creamy shredded chicken and cheese, perfect for a quick and delicious meal.
Ingredients
Scale
For the Crust:
2 cups cooked shredded chicken
4 oz cream cheese, softened
1/2 cup shredded cheddar cheese
1/4 cup sour cream
1 tsp garlic powder
1 tsp cumin
1/2 tsp chili powder
12 small flour tortillas
2 tbsp olive oil
Salt and pepper to taste
Instructions
1. Prepare the Crust:
Preheat oven to 425°F (220°C) and line a baking sheet with parchment paper.
In a bowl, mix shredded chicken, cream cheese, cheddar cheese, sour cream, garlic powder, cumin, chili powder, salt, and pepper until well combined.
Warm tortillas slightly to make them pliable. Spoon about 2 tablespoons of the chicken mixture onto each tortilla and roll tightly.
Place taquitos seam-side down on the baking sheet. Brush lightly with olive oil.
Bake for 15-20 minutes until golden and crispy. Serve warm with your favorite dipping sauce.
Notes
You can customize the seasonings to taste.
“`html
How to Prepare This Dish
Steps and time-saving tips
Start by preheating your oven to 400°F and lining a baking sheet with parchment paper for easy cleanup. While the oven heats, mix shredded chicken, cream cheese, shredded cheddar, diced green chiles, and taco seasoning in a large bowl until well combined. Warm the tortillas in the microwave for 20 seconds to make them pliable and prevent cracking. Spoon about two tablespoons of the creamy chicken mixture onto each tortilla, then roll them tightly into taquitos. Place them seam-side down on the baking sheet, spacing them evenly. Lightly brush the taquitos with olive oil to help them crisp up in the oven. Bake for 15-18 minutes until golden and crispy. Meanwhile, whisk together sour cream, lime juice, and cilantro for a quick dipping sauce. Serve the creamy chicken taquitos hot with the sauce and extra toppings like avocado or pico de gallo. For a time-saving shortcut, use rotisserie chicken and pre-shredded cheese. If you’re prepping ahead, assemble the taquitos and refrigerate them covered for up to 24 hours before baking.
and-learned-from">Mistakes I’ve made and learned from
I used to overfill the tortillas, which caused them to burst open during baking. Now I stick to two tablespoons of filling per taquito—just enough to keep them hearty but neat. Another lesson? Skipping the tortilla-warming step led to cracks and messy rolls. A quick microwave steam makes all the difference, as I learned from my guide to perfect tortilla rolls. Once, I baked the taquitos on an unlined tray, and they stuck stubbornly. Parchment paper is non-negotiable now. If you’re new to working with cream cheese fillings, check out my cream cheese hacks for smoother mixing. Trust me, these small tweaks save time and frustration!
“`
n-and-variations">Cultural Connection and Variations
Where this recipe comes from
The Creamy Chicken Taquitos Recipe has deep roots in Mexican cuisine, where rolled tortillas—often called “flautas” or “taquitos”—hold a special place in family gatherings and street food culture. Traditionally, cooks fry corn tortillas until crisp, then stuff them with shredded meat, cheese, or beans. However, the creamy chicken version adds a rich, comforting twist by blending tender chicken with smooth cream cheese or sour cream. Some families even pass down their own variations, like adding roasted green chilies for extra heat or swapping chicken for slow-cooked pork.
Across regions, the dish adapts beautifully. In Northern Mexico, taquitos often feature flour tortillas, while Central Mexico sticks to corn. Meanwhile, in the U.S., home cooks bake them for a lighter take or load them with cheddar for extra indulgence. Whether served at birthday parties or weeknight dinners, the Creamy Chicken Taquitos Recipe bridges tradition and creativity. My abuela always said the secret lies in rolling them tight—so they stay crunchy no matter how you fill them!
How it fits in today’s cooking
Today, the Creamy Chicken Taquitos Recipe shines as a versatile crowd-pleaser. Busy parents love it for meal prep, while foodies dress it up with avocado crema or pickled onions. It’s also a star at game-day spreads and potlucks, proving that comfort food never goes out of style. Plus, modern twists like air-frying or gluten-free tortillas make it easier than ever to enjoy.
For those craving more
easy, flavorful ideas, our quick weeknight dinners collection features similar fuss-free recipes. And if you’re hosting a gathering, pair these taquitos with our crowd-pleasing appetizers for a menu everyone will rave about. Whether you stick to tradition or experiment, one thing’s clear: this dish keeps bringing people together, one crispy bite at a time.
Taste and Texture
What makes it delicious
The Creamy Chicken Taquitos Recipe delivers a mouthwatering contrast of textures and bold flavors. First, you’ll notice the golden, crisp tortilla shell that shatters with each bite, giving way to a tender, juicy filling. The shredded chicken mingles with a velvety cream cheese sauce, creating a rich, savory base. Meanwhile, spices like cumin and chili powder add warmth, while a hint of lime brightens every bite. As you chew, the melty Monterey Jack cheese stretches slightly, adding a satisfying chewiness. Best of all, the aroma of toasted corn tortillas and garlic wafts through the air, making the Creamy Chicken Taquitos Recipe irresistible before you even take a bite.
Boosting the flavor
For an extra flavor kick, try swapping the Monterey Jack for pepper jack cheese to introduce a subtle heat. A drizzle of avocado crema adds cool creaminess, while pickled jalapeños bring tangy crunch. If you love smoky notes, sprinkle smoked paprika into the chicken mixture or serve with a side of chipotle sauce for dipping. Fresh cilantro or a squeeze of lime right before serving also brightens the dish. With these tweaks, the Creamy Chicken Taquitos Recipe becomes even more dynamic—perfect for customizing to your taste.
First, warm your tortillas slightly before rolling to prevent cracking. Additionally, spread the creamy chicken filling evenly to ensure every bite has the perfect balance. For crispier taquitos, lightly brush them with oil before baking. Moreover, let the Creamy Chicken Taquitos Recipe rest for a minute after baking so the filling sets. Finally, serve them fresh for the best texture and flavor.
Mistakes to avoid
Avoid overfilling the tortillas, as this makes rolling difficult and can cause them to burst open. Instead, use about two tablespoons of filling per taquito. Also, don’t skip sealing the edges tightly—this keeps the creamy filling from leaking during baking. For more tips on handling tortillas, check out our guide on how to soften tortillas. Another common mistake is overcrowding the baking sheet, which leads to uneven cooking. Space them properly, and for extra crispiness, try the techniques in our crispy baked taquitos post.
g-suggestions">Serving and Pairing Suggestions
How to serve this dish
For a stunning presentation, arrange your Creamy Chicken Taquitos Recipe on a large platter with a drizzle of sour cream and a sprinkle of fresh cilantro. Alternatively, serve them in a rustic basket lined with parchment paper for a casual gathering. These taquitos shine at game-day parties, but they also make a fun weeknight dinner when paired with a simple salad. To elevate the experience, add lime wedges and colorful salsa on the side for dipping.
What goes well with it
Pair your Creamy Chicken Taquitos Recipe with a refreshing mango avocado salad for a bright contrast to the rich filling. If you prefer something heartier, try our cilantro lime rice for a zesty side that balances the creamy texture. For drinks, a cold horchata or a crisp Mexican lager complements the flavors perfectly. Don’t forget to check out our creamy chipotle sauce for an extra kick that ties everything together.
math-faq-block">
What’s the best way to keep creamy chicken taquitos from getting soggy?
To prevent soggy creamy chicken taquitos, make sure to fully drain any excess liquid from the filling before rolling. Also, bake them at a high temperature (around 400°F) until golden and crispy. Lightly brushing the taquitos with oil before baking helps achieve that perfect crunch.
Can I make creamy chicken taquitos ahead of time?
Yes! Assemble the creamy chicken taquitos and store them uncooked in the fridge for up to 24 hours before baking. For longer storage, freeze them on a baking sheet, then transfer to a freezer bag. Bake straight from frozen, adding a few extra minutes to the cooking time.
What dipping sauces go well with creamy chicken taquitos?
Creamy chicken taquitos pair perfectly with cool, tangy dips like ranch, avocado crema, or sour cream mixed with lime juice. For a spicy kick, try salsa verde, chipotle mayo, or a smoky chipotle ranch dressing to complement the flavors.
ank-math-faq-item">
Can I use flour tortillas instead of corn for creamy chicken taquitos?
Absolutely! Flour tortillas work well for creamy chicken taquitos and are easier to roll without cracking. Just warm them slightly first to make them pliable. Corn tortillas add authentic flavor, but flour tortillas give a softer, chewier texture.
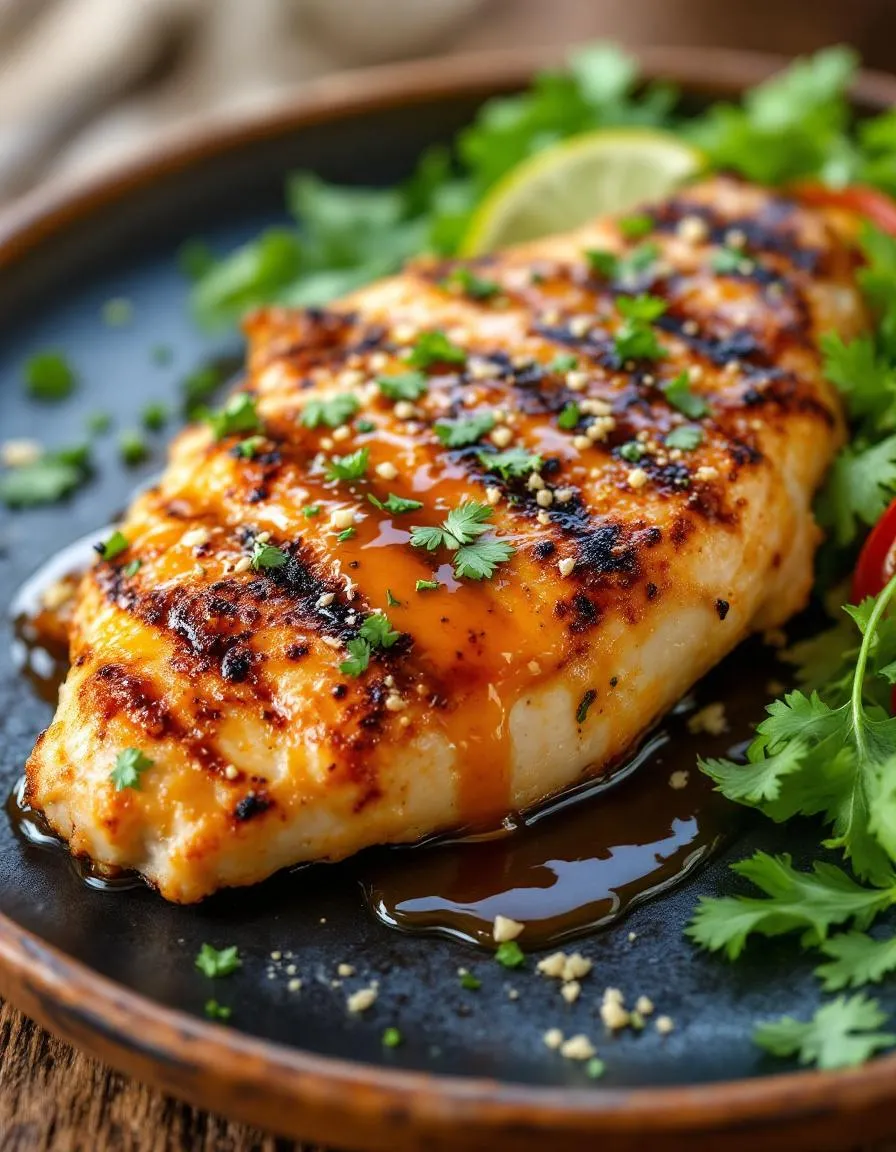
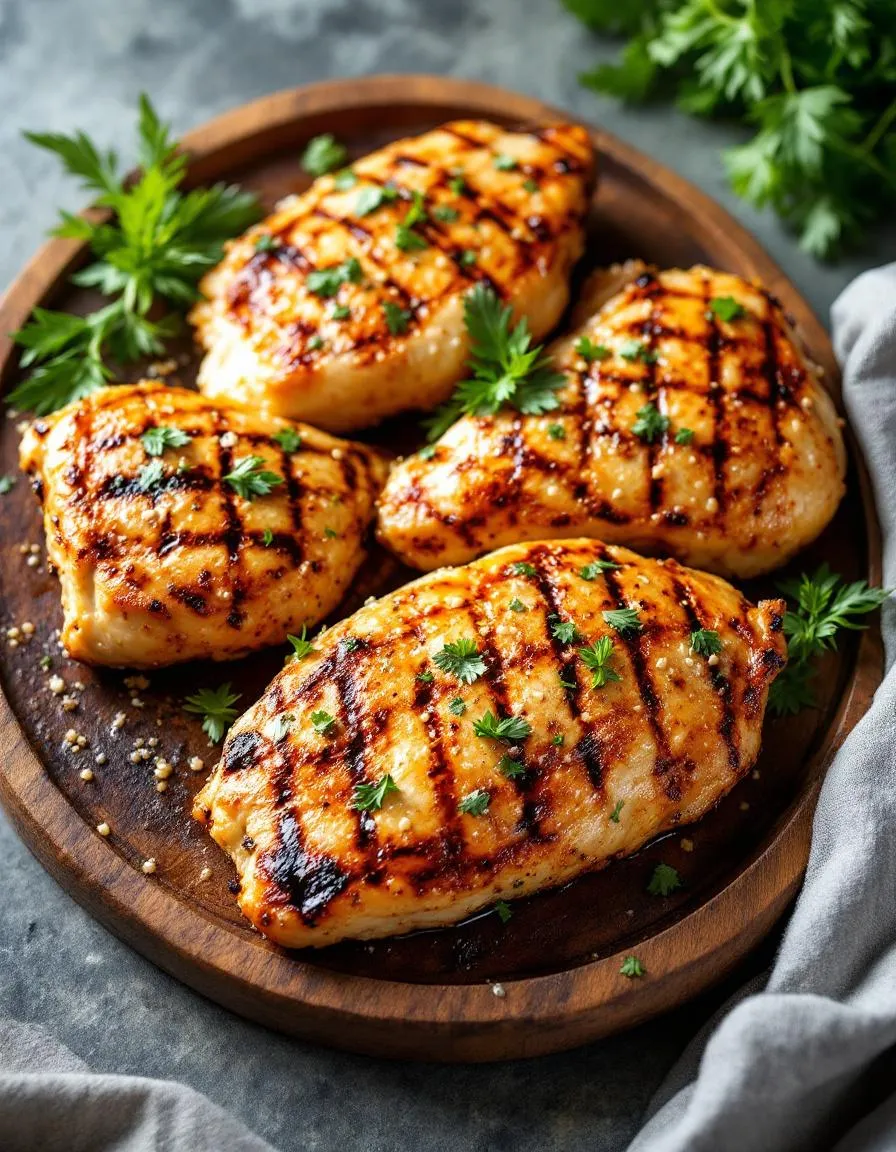
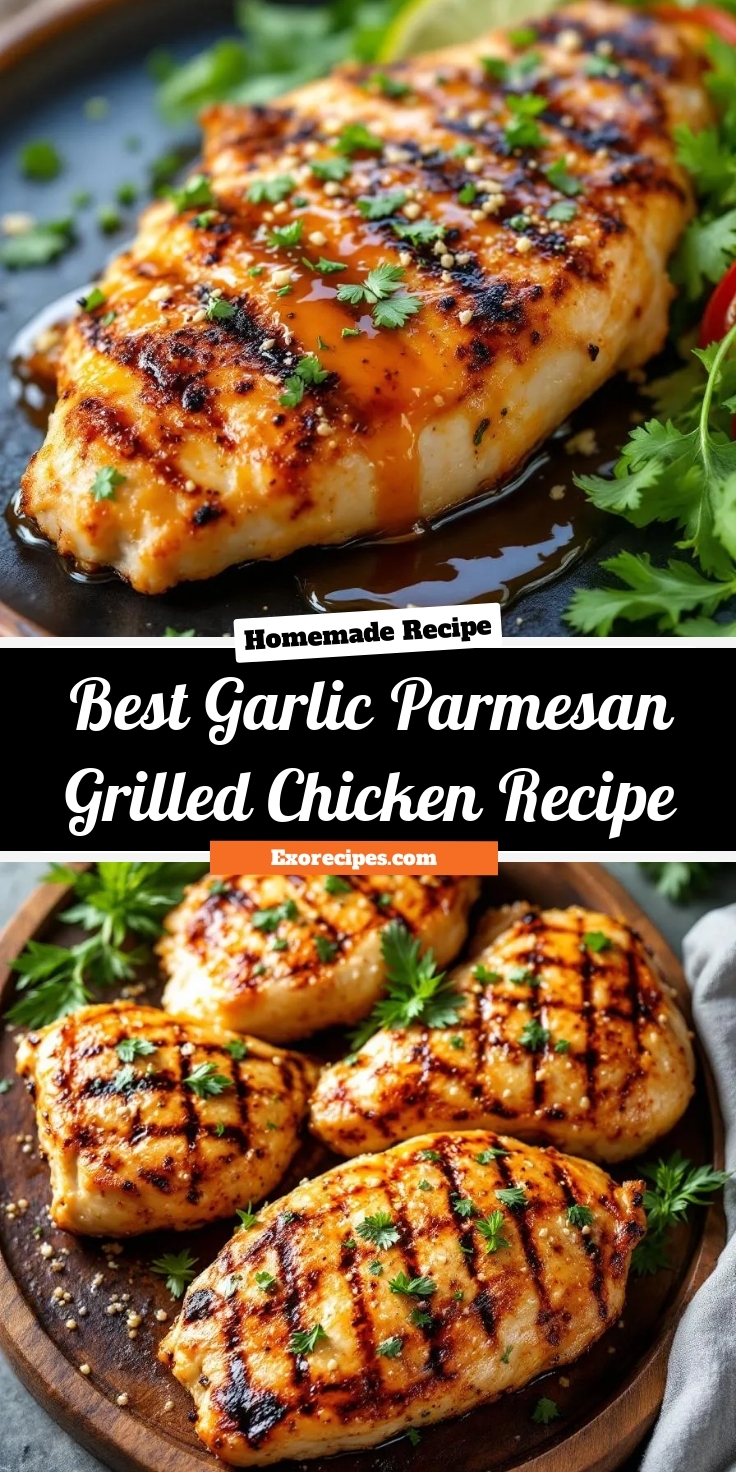
Best Garlic Parmesan Grilled Chicken Recipe
Introduction
There’s something undeniably comforting about the aroma of garlic and Parmesan mingling over a hot grill. Whether you’re hosting a summer barbecue or simply craving a flavorful weeknight dinner, this Garlic Parmesan Grilled Chicken Recipe delivers juicy, tender chicken with a crispy, cheesy crust. It’s the kind of dish that turns ordinary meals into memorable moments, and once you try it, you’ll understand why it’s a crowd favorite.
Garlic Parmesan Grilled Chicken Recipe combines bold flavors with simple techniques, making it perfect for both beginners and seasoned cooks. The garlic infuses the chicken with rich, savory depth, while the Parmesan creates a golden, slightly crispy coating that clings to every bite. Unlike dry or bland grilled chicken, this recipe ensures moist, flavorful results every time. Plus, it pairs beautifully with sides like roasted vegetables or a fresh garden salad, making it a versatile centerpiece for any meal. If you love easy yet impressive dishes, you’ll appreciate how this recipe fits seamlessly into your rotation, whether you’re meal prepping or entertaining guests. For more grilling inspiration, check out our grilling tips for beginners or explore our quick weeknight dinners collection.
Why I Love This Recipe
This Garlic Parmesan Grilled Chicken Recipe holds a special place in my heart because it reminds me of family gatherings in my backyard. My dad used to grill it for us every Fourth of July, and the smell alone would bring everyone running to the table. Even now, whenever I make it, I’m transported back to those warm, laughter-filled evenings. Beyond nostalgia, I love how reliably delicious it turns out—no fancy skills required, just honest, mouthwatering flavor that never fails to impress.
Health and Nutrition
Why it’s good for your body
Garlic Parmesan Grilled Chicken Recipe packs a powerful nutritional punch while delivering incredible flavor. First, chicken serves as a lean protein source, helping build and repair muscles without excess fat. Additionally, garlic boosts immunity with its natural antibacterial properties, making this dish a smart choice during cold season. Meanwhile, Parmesan cheese adds calcium for strong bones, though it keeps calories in check with just a light sprinkle.
Moreover, grilling the chicken instead of frying cuts down on unnecessary oils, keeping the meal heart-healthy. The Garlic Parmesan Grilled Chicken Recipe also includes olive oil, which provides healthy fats that support brain function and reduce inflammation. Since the dish uses simple, whole ingredients, you avoid processed additives that often sneak into pre-made meals.
Finally, the recipe balances macros perfectly, offering protein for satiety, fats for energy, and minimal carbs for those watching intake. Whether you’re fueling up post-workout or need a light yet satisfying dinner, Garlic Parmesan Grilled Chicken Recipe fits the bill. Plus, the garlic and herbs add antioxidants, giving your body an extra layer of defense against oxidative stress.
How it fits in a healthy lifestyle
Garlic Parmesan Grilled Chicken Recipe adapts effortlessly to various dietary goals. If you’re following a high-protein plan, this dish delivers without heavy carbs. It’s also naturally gluten-free, making it safe for those with sensitivities. For heart-conscious eaters, the lean chicken and olive oil align with Mediterranean diet principles, which prioritize wholesome fats and clean proteins.
Busy weeknights call for easy, nutritious meals, and this recipe fits the bill. Pair it with a crisp salad or roasted veggies for a complete, balanced plate. If you love meal prepping, the chicken stores well for quick lunches. For more gluten-free inspiration, check out our gluten-free dinner ideas. Or, if you’re exploring high-protein options, our high-protein meals guide offers plenty of tasty variations. With minimal prep and maximum nutrition, Garlic Parmesan Grilled Chicken Recipe makes healthy eating simple and delicious.
Juicy grilled chicken coated in a flavorful garlic parmesan marinade.
Ingredients
Scale
For the Crust:
4 boneless, skinless chicken breasts
1/4 cup olive oil
3 cloves garlic, minced
1/2 cup grated parmesan cheese
1 tsp dried basil
1 tsp dried oregano
1/2 tsp salt
1/4 tsp black pepper
1 tbsp lemon juice
Instructions
1. Prepare the Crust:
In a bowl, whisk together olive oil, garlic, parmesan cheese, basil, oregano, salt, pepper, and lemon juice.
Place chicken breasts in a resealable bag or shallow dish and pour the marinade over them. Coat evenly.
Marinate in the refrigerator for at least 30 minutes or up to 4 hours.
Preheat grill to medium-high heat. Grill chicken for 6-7 minutes per side or until internal temperature reaches 165°F.
Let rest for 5 minutes before serving.
Notes
You can customize the seasonings to taste.
How to Prepare This Dish
Steps and time-saving tips
Start by whisking together olive oil, minced garlic, lemon juice, and grated parmesan in a bowl to create the marinade for your Garlic Parmesan Grilled Chicken Recipe. Next, place the chicken breasts in a resealable bag or shallow dish, then pour the marinade over them, ensuring every piece gets coated evenly. Let the chicken marinate for at least 30 minutes, though an hour will deepen the flavors. While waiting, preheat your grill to medium-high heat—this ensures even cooking without charring. Once the grill is hot, lightly oil the grates to prevent sticking, then place the chicken on the grill. Cook for about 6-7 minutes per side, or until the internal temperature reaches 165°F. For extra flavor, brush the chicken with reserved marinade halfway through grilling. If you’re short on time, use a meat mallet to flatten thicker chicken breasts so they cook faster. Serve immediately with a sprinkle of fresh parsley and extra parmesan for a finishing touch.
and-learned-from">Mistakes I’ve made and learned from
One mistake I made early on with this Garlic Parmesan Grilled Chicken Recipe was overcrowding the grill, which caused uneven cooking and steamed instead of seared chicken. Now, I leave space between each piece for better airflow and crispier edges. Another lesson? Skipping the resting time—I used to slice the chicken right off the grill, losing precious juices. Letting it rest for 5 minutes makes all the difference. If you’re new to grilling, check out my guide on grilling tips for beginners to avoid common pitfalls. Also, I once used pre-shredded parmesan, which clumped instead of melting smoothly. Freshly grated cheese blends better, as I learned from my cheese selection guide. Trust me, these small tweaks elevate the dish from good to unforgettable.
Cultural Connection and Variations
Where this recipe comes from
The Garlic Parmesan Grilled Chicken Recipe has roots in Italian-American cuisine, where bold flavors meet simple grilling techniques. While Parmesan cheese and garlic dominate Italian cooking, this dish likely evolved as a fusion of old-world traditions and American backyard barbecues. In Italy, cooks might use chicken thighs or even rabbit, slow-roasting them with herbs. But here, we embrace the quick, smoky char of the grill for a weeknight-friendly twist.
Across the U.S., region
al takes pop up. In the South, you’ll find a buttermilk marinade before the garlic-parmesan crust. Meanwhile, Midwest families might swap grilled for baked, topping casseroles with crispy breadcrumbs. My grandmother added lemon zest to her Garlic Parmesan Grilled Chicken Recipe, a trick from her Sicilian neighbor. Whether served with pasta, salad, or crusty bread, this dish adapts while keeping its soul.
How it fits in today’s cooking
Today, the Garlic Parmesan Grilled Chicken Recipe shines as a versatile crowd-pleaser. Busy cooks love it for meal prep, while food bloggers riff with keto-friendly almond flour or dairy-free cheese. It’s a star at summer cookouts, yet cozy enough for winter sheet pan dinners alongside roasted veggies. Fitness fans appreciate its high-protein simplicity, and parents sneak extra garlic into the marinade for picky eaters.
Modern twists keep it fresh. Some add spicy honey glaze, while others layer it into meal prep bowls with quinoa. Whether you’re firing up the grill or using a stovetop pan, this recipe bridges tradition and today’s fast-paced kitchens. After all, good food—like good stories—only gets richer with retelling.
>Taste and Texture
What makes it delicious
The Garlic Parmesan Grilled Chicken Recipe delivers a mouthwatering balance of savory, garlicky richness and a hint of nutty Parmesan. Each bite bursts with fragrant, buttery notes from the minced garlic, while the grated cheese melts into a creamy, golden crust. The chicken stays juicy inside, thanks to the marinade, while the grill marks add a subtle smoky char. Meanwhile, the fresh parsley sprinkled on top brightens every forkful with a pop of herbal freshness. Whether you serve it hot off the grill or as leftovers, the Garlic Parmesan Grilled Chicken Recipe never loses its irresistible appeal.
Boosting the flavor
For an extra flavor kick, try swapping regular Parmesan for aged Pecorino Romano—its sharper taste deepens the umami profile. Alternatively, drizzle the grilled chicken with a squeeze of lemon or a spoonful of herb-infused olive oil to elevate the brightness. If you love heat, a pinch of red pepper flakes or a side of creamy cilantro lime sauce adds a tangy contrast. Finally, let the chicken rest for five minutes after grilling to lock in those delicious juices.
Tips for Success
Best practices for results
Always marinate the chicken for at least 30 minutes to lock in flavor and keep it juicy. Meanwhile, preheat your grill to medium-high heat so the Garlic Parmesan Grilled Chicken Recipe cooks evenly. For extra crispiness, pat the chicken dry before adding the marinade. Additionally, brush the grill grates with oil to prevent sticking and ensure those perfect grill marks. Finally, let the chicken rest for 5 minutes after grilling to seal in the juices.
Mistakes to avoid
Avoid overcrowding the grill, as this lowers the temperature and steams the chicken instead of searing it. Similarly, don’t skip the resting step—cutting into the Garlic Parmesan Grilled Chicken Recipe too soon releases all the flavorful juices. For more grilling tips, check out our guide on grilling temperatures. Also, resist the urge to flip the chicken too often; one flip halfway through ensures even cooking. If you’re unsure about doneness, use a meat thermometer—our meat thermometer guide makes it simple.
Serving and Pairing Suggestions
How to serve this dish
For a stunning presentation, arrange your Garlic Parmesan Grilled Chicken Recipe on a rustic wooden platter with fresh lemon wedges and a sprinkle of chopped parsley. Alternatively, layer it over a bed of vibrant greens for a light yet satisfying meal. This dish shines at summer barbecues, but it also makes an elegant centerpiece for dinner parties. To elevate the experience, drizzle extra garlic parmesan sauce right before serving for a glossy finish.
h-it">What goes well with it
Pair your Garlic Parmesan Grilled Chicken Recipe with crisp, chilled white wine like Sauvignon Blanc to balance the rich flavors. For sides, try roasted garlic mashed potatoes or a refreshing summer vegetable salad to add brightness. If you love dipping sauces, a creamy avocado ranch dressing enhances the dish with its cool, tangy contrast. Each pairing brings out the best in this savory grilled chicken.
How long should I marinate Garlic Parmesan Grilled Chicken?
For the best flavor, marinate your Garlic Parmesan Grilled Chicken Recipe for at least 30 minutes, but ideally 2–4 hours. This allows the garlic, Parmesan, and herbs to fully infuse the chicken. Avoid marinating overnight, as the acidity can break down the meat too much.
ank-math-faq-item">
What sides go well with Garlic Parmesan Grilled Chicken?
Garlic Parmesan Grilled Chicken Recipe pairs perfectly with light sides like roasted vegetables, a crisp Caesar salad, or garlic butter pasta. For a summer meal, try grilled corn or a fresh caprese salad to complement the rich flavors.
Can I use grated Parmesan instead of shredded for Garlic Parmesan Grilled Chicken?
Yes, but shredded Parmesan works better for the Garlic Parmesan Grilled Chicken Recipe because it melts more evenly and creates a better texture. Grated Parmesan can clump or burn more easily on the grill. If using grated, mix it into the marinade rather than sprinkling on top.
How do I prevent Garlic Parmesan Grilled Chicken from sticking to the grill?
To prevent sticking, oil your grill grates well and pat the Garlic Parmesan Grilled Chicken Recipe dry before cooking. Let the chicken sear for 3–4 minutes undisturbed before flipping—this helps it release naturally. Using a medium-high heat (not scorching) also reduces sticking.
div>
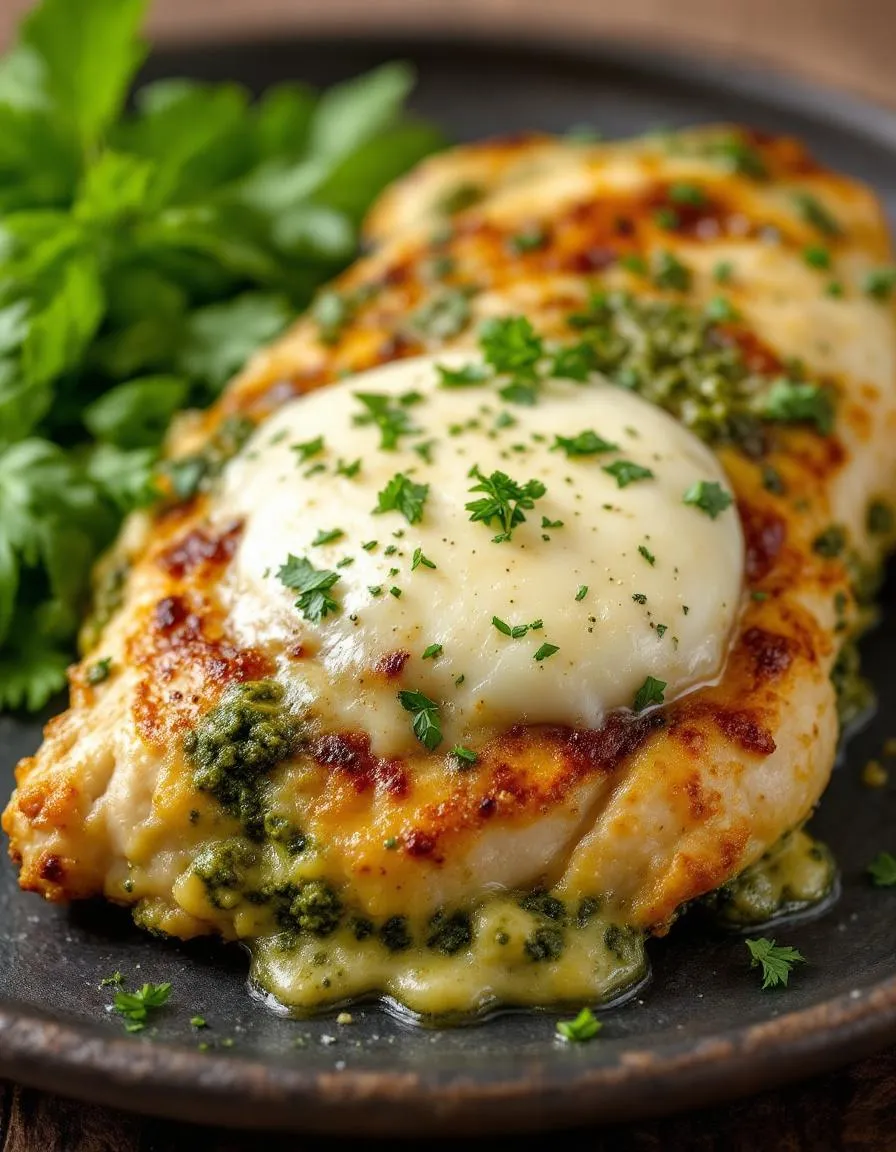
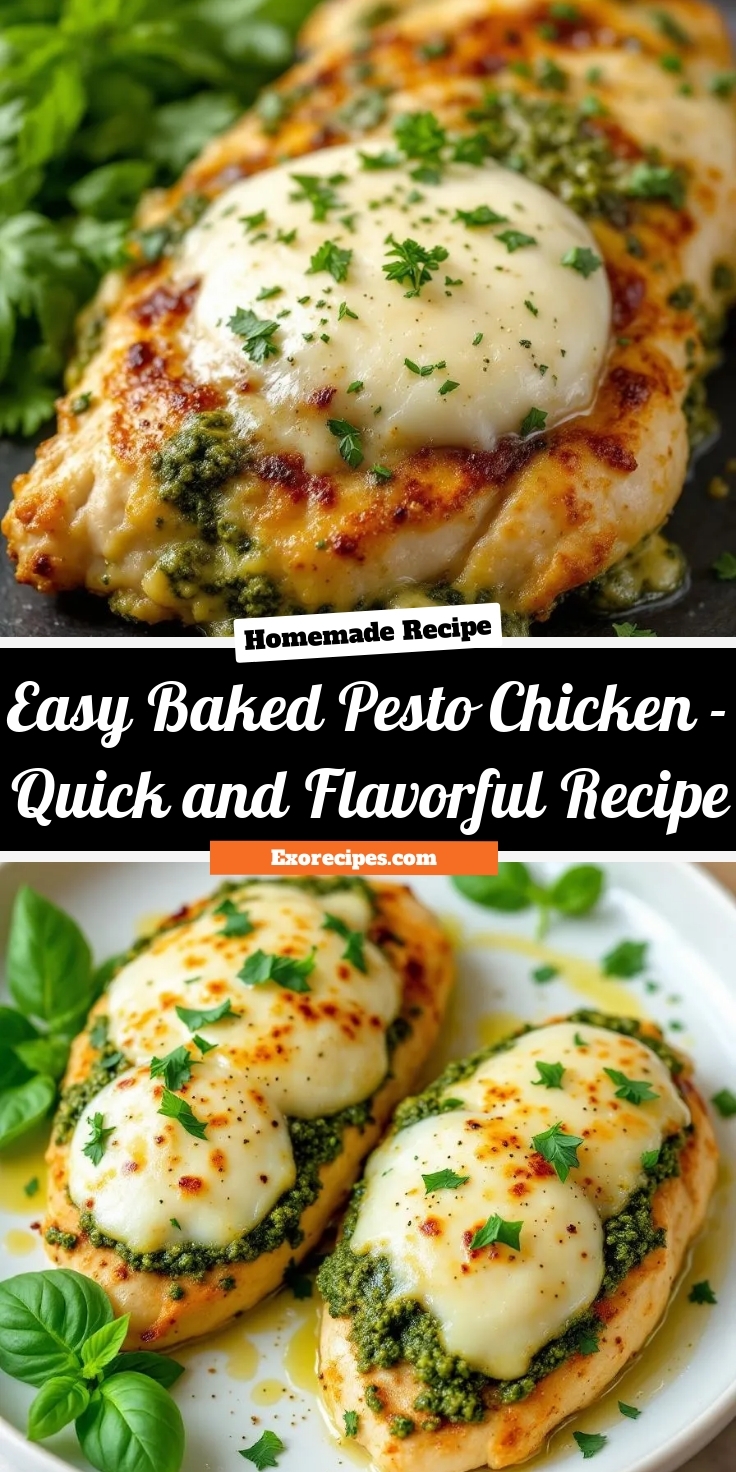
Easy Baked Pesto Chicken – Quick and Flavorful Recipe
Introduction
There’s something incredibly comforting about a dish that feels both gourmet and effortless. If you’re craving a meal that delivers bold flavors without hours in the kitchen, this Baked Pesto Chicken Recipe is your answer. Imagine tender chicken breasts smothered in vibrant pesto, baked to golden perfection, and paired with your favorite sides. Whether you’re cooking for a busy weeknight or impressing guests, this recipe strikes the perfect balance between simplicity and wow-factor. Plus, it’s a fantastic way to use up that jar of pesto sitting in your fridge. Let’s dive into why this dish deserves a spot in your regular rotation.
The Baked Pesto Chicken Recipe is a game-changer for anyone who loves quick, flavorful meals. At its core, it combines juicy chicken breasts with rich, herby pesto, creating a dish that’s both satisfying and versatile. Unlike fussy recipes that demand constant attention, this one lets the oven do most of the work. Simply coat the chicken, bake it, and enjoy the aromatic results. What makes it special? Pesto’s bright basil, garlic, and nutty Parmesan elevate the chicken, turning an ordinary protein into something extraordinary. For busy home cooks, it’s a lifesaver, and for food lovers, it’s a delicious twist on classic baked chicken.
This recipe fits perfectly with Exorecipes’ mission to deliver approachable yet impressive dishes. If you’re looking for more ways to use pesto, check out our creamy pesto pasta or explore our easy chicken dinners for more weeknight inspiration. The Baked Pesto Chicken Recipe also adapts easily to dietary preferences—swap in gluten-free breadcrumbs or dairy-free pesto without sacrificing flavor. Whether you’re a seasoned cook or just starting out, this dish proves that great meals don’t have to be complicated.
Why I Love This Recipe
This Baked Pesto Chicken Recipe holds a special place in my heart because it’s the dish that taught me how versatile pesto can be. Years ago, a friend made it for a casual dinner, and I was hooked by how something so simple could taste so decadent. Now, it’s my go-to when I need a meal that feels indulgent but requires minimal effort. I love how the pesto forms a crispy, flavorful crust while keeping the chicken moist inside. It’s also a hit with my family, and I adore how easily it pairs with roasted veggies or a fresh salad. Every bite reminds me that great cooking doesn’t have to be hard—it just has to be delicious.
Health and Nutrition
Why it’s good for your body
Baked Pesto Chicken Recipe packs a nutritious punch while delivering bold flavors. First, chicken provides lean protein, which helps build muscle and keeps you full longer. Additionally, the pesto adds healthy fats from olive oil and nuts, supporting heart health and brain function. Moreover, this dish includes fresh basil, which offers antioxidants to combat inflammation.
Since Baked Pesto Chicken Recipe uses minimal processed ingredients, it avoids unnecessary additives. The olive oil in pesto also promotes better cholesterol levels, while garlic boosts immunity. Furthermore, baking instead of frying keeps the meal lower in unhealthy fats. You get a satisfying, nutrient-dense dinner without sacrificing taste.
Finally, Baked Pesto Chicken Recipe balances macros beautifully. The protein aids recovery, the fats provide sustained energy, and the herbs add micronutrients. Whether you need a post-workout meal or a family-friendly dinner, this dish delivers both flavor and nourishment.
How it fits in a healthy lifestyle
Baked Pesto Chicken Recipe fits seamlessly into balanced eating habits. If you follow a high-protein diet, the chicken offers a solid foundation for muscle maintenance. For gluten-free eaters, this recipe naturally avoids grains, making it a safe choice. Even those focused on heart health benefit from the olive oil’s monounsaturated fats.
Pair this dish with a nutritious side like roasted veggies for a complete meal. It also works well for meal prep, saving time without compromising quality. If you’re exploring more wholesome dinner ideas, check out these simple weeknight recipes to keep your routine fresh and healthy. With minimal effort, Baked Pesto Chicken Recipe helps you stay on track without feeling restricted.
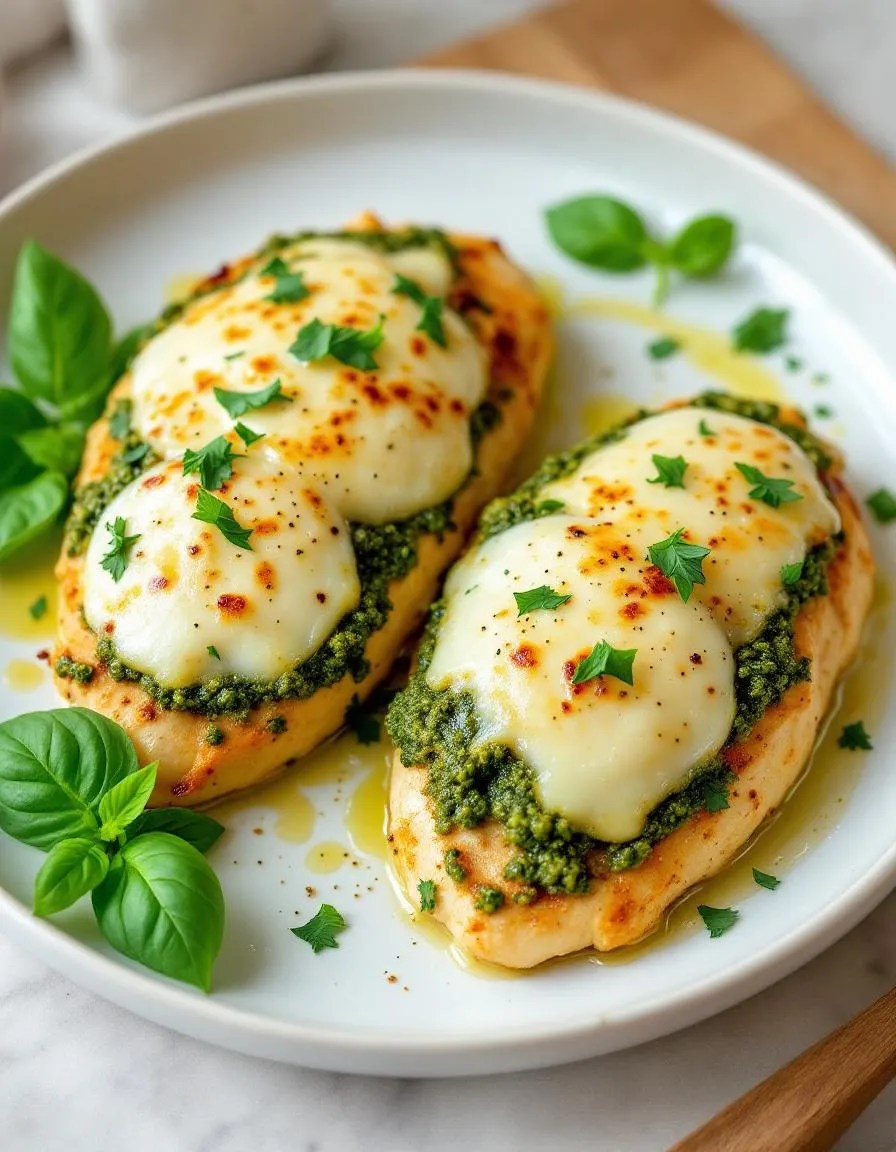
Juicy chicken breasts topped with pesto and melted cheese, baked to perfection.
Ingredients
Scale
For the Crust:
4 boneless, skinless chicken breasts
1/2 cup basil pesto
1 cup shredded mozzarella cheese
1/4 cup grated parmesan cheese
1 tbsp olive oil
1/2 tsp salt
1/4 tsp black pepper
Instructions
1. Prepare the Crust:
Preheat oven to 375°F (190°C). Lightly grease a baking dish with olive oil.
Season chicken breasts with salt and pepper, then arrange in the baking dish.
Spread 2 tablespoons of pesto over each chicken breast.
Top with mozzarella and parmesan cheeses.
Bake for 25-30 minutes or until chicken reaches 165°F internally.
Let rest for 5 minutes before serving.
Notes
You can customize the seasonings to taste.
How to Prepare This Dish
Steps and time-saving tips
Preheat your oven to 375°F and grab a baking dish large enough to hold your chicken breasts in a single layer. Pat the chicken dry with paper towels to help the pesto stick better, then season both sides generously with salt and pepper. Spread a thin layer of pesto over each piece, making sure to cover the entire surface for maximum flavor. If you’re short on time, use store-bought pesto—it works just as well. Layer sliced tomatoes over the pesto, then sprinkle shredded mozzarella cheese on top. Drizzle a little olive oil over the cheese to help it brown evenly. Bake for 25-30 minutes until the chicken reaches 165°F internally and the cheese turns golden. Let it rest for 5 minutes before serving to lock in the juices. For a quicker cleanup, line your baking dish with foil or parchment paper. If you want extra crispiness, broil for the last 2 minutes, but watch closely to avoid burning. Serve with a simple side salad or roasted vegetables for a complete meal.
and-learned-from">Mistakes I’ve made and learned from
I used to overcrowd the baking dish, thinking I could fit all the chicken in at once. This led to uneven cooking and soggy pesto. Now I always leave space between each piece for better airflow. Another mistake? Skipping the rest time. Cutting into the chicken right away caused all the juices to escape, leaving it dry. Letting it rest made a huge difference. If you’re new to cooking chicken, check out my guide on perfect chicken temperatures to avoid under or overcooking. Also, I once used too much pesto, which overpowered the dish. A thin, even layer is key—just like with my pesto pasta tips, balance is everything. Learn from my blunders, and your Baked Pesto Chicken Recipe will turn out flawless every time.
Cultural Connection and Variations
Where this recipe comes from
The Baked Pesto Chicken Recipe whispers of sun-drenched Italian summers, where basil grows wild and garlic perfumes the air. Originating in Genoa, the heart of pesto country, this dish takes the classic basil-and-pine-nut sauce and layers it over tender chicken for a simple yet vibrant meal. Families in Liguria might swap pine nuts for walnuts or skip the cheese for a lighter version, while nonnas often pan-fry the chicken first for extra crispness. Meanwhile, in my own kitchen, I love adding a sprinkle of chili flakes to the pesto—because why not?
Across the globe, cooks
put their own spin on the Baked Pesto Chicken Recipe. In California, avocado oil might replace olive oil for a buttery twist. Some Greek kitchens mix in a handful of feta, and in Thailand, chefs might toss in lemongrass for a bright, herbal kick. No matter where it lands, this dish carries the warmth of shared tables and adaptable flavors. Whether you serve it with crusty bread or a heap of roasted veggies, it always feels like a hug on a plate.
How it fits in today’s cooking
Today, the Baked Pesto Chicken Recipe shines as a weeknight hero—quick enough for busy schedules but fancy enough for date nights. Modern cooks streamline it with store-bought pesto (no shame!) or amp up the nutrition by blending kale into the sauce. It’s also a star at potlucks, especially when paired with crowd-pleasers like garlic butter rolls or a crisp strawberry spinach salad.
Seasonally, it’s a chameleon. In spring, fresh basil steals the show. Come fall, roasted squash or sweet potatoes turn it into cozy comfort food. And let’s not forget meal prep—this recipe reheats like a dream, making it a lunchbox favorite. Whether you’re feeding a family or just craving something wholesome, the Baked Pesto Chicken Recipe fits right into today’s rhythm of cooking: flexible, flavorful, and full of heart.
>Taste and Texture
What makes it delicious
The Baked Pesto Chicken Recipe delivers a burst of vibrant, herbaceous flavor with every bite. Juicy chicken breasts soak up the rich, garlicky pesto, while melted mozzarella adds a creamy, gooey finish. The golden, slightly crisp topping contrasts beautifully with the tender meat underneath. Fresh basil infuses the dish with a fragrant aroma, and toasted pine nuts lend a subtle crunch. Whether you serve it straight from the oven or let it rest, the Baked Pesto Chicken Recipe remains irresistibly moist and packed with layers of savory goodness.
Boosting the flavor
For an extra flavor kick, try swapping traditional pesto for a sun-dried tomato version or sprinkling grated Parmesan over the chicken before baking. A drizzle of balsamic glaze adds a tangy sweetness, while a pinch of red pepper flakes brings subtle heat. Pair this dish with a side of garlic butter roasted potatoes to round out the meal. Experiment with fresh herbs like thyme or rosemary to deepen the aroma, or layer prosciutto under the cheese for a salty, crispy twist.
Tips for Success
Best practices for results
Always pat the chicken dry before adding pesto to ensure the sauce sticks properly. For even cooking, pound thicker pieces to a consistent thickness or arrange them in a single layer. Spread pesto generously but not excessively to keep the Baked Pesto Chicken Recipe flavorful without becoming soggy. Meanwhile, check the internal temperature with a meat thermometer to reach 165°F for perfect doneness. Finally, let the chicken rest for 5 minutes before slicing to lock in juices.
Mistakes to avoid
Avoid overcrowding the baking dish, as this steams the chicken instead of letting it crisp. If you notice excess moisture, try blotting the pesto lightly with a paper towel before baking. Additionally, skip store-bought pesto with preservatives if possible—homemade blends like our Easy Fresh Basil Pesto deliver brighter flavor. Finally, don’t substitute boneless skinless thighs without adjusting cook time, as detailed in our Chicken Thighs vs Breast Guide.
Serving and Pairing Suggestions
How to serve this dish
For a stunning presentation, arrange your Baked Pesto Chicken Recipe on a white platter with fresh basil leaves and lemon wedges. Alternatively, layer the chicken over a bed of fluffy quinoa or couscous for a colorful contrast. If you’re hosting a dinner party, slice the chicken into strips and serve it family-style with a side of roasted vegetables. This dish also shines at casual gatherings, so pair it with a simple salad for a light yet satisfying meal. Whether it’s a weeknight dinner or a special occasion, the vibrant colors and rich flavors of Baked Pesto Chicken Recipe will impress every time.
h-it">What goes well with it
Brighten up your meal with a crisp arugula salad tossed in lemon vinaigrette—its peppery bite balances the creamy pesto perfectly. For heartier options, try serving Baked Pesto Chicken Recipe with garlic mashed potatoes or a warm slice of crusty bread to soak up the delicious juices. If you love wine, a chilled glass of Sauvignon Blanc enhances the herbaceous notes in the dish. Craving something sweet afterward? Our lemon blueberry cake makes a refreshing finale, while our classic tiramisu adds a rich, indulgent touch.
How long should I bake pesto chicken at 375°F?
For perfectly cooked Baked Pesto Chicken Recipe, bake boneless, skinless chicken breasts at 375°F for 25–30 minutes. The internal temperature should reach 165°F. The pesto coating keeps the chicken moist while adding rich flavor.
ank-math-faq-item">
Can I use store-bought pesto for baked pesto chicken?
Yes, store-bought pesto works well for Baked Pesto Chicken Recipe. Choose a high-quality brand for the best flavor, or opt for homemade if you prefer fresh ingredients. Either way, the pesto will infuse the chicken with delicious herbal notes.
What sides go well with baked pesto chicken?
Baked Pesto Chicken Recipe pairs beautifully with roasted vegetables, garlic mashed potatoes, or a simple arugula salad. For a complete meal, add crusty bread to soak up the flavorful pesto juices from the chicken.
Can I make baked pesto chicken ahead of time?
Yes! Assemble the Baked Pesto Chicken Recipe up to 24 hours in advance and refrigerate until ready to bake. Let it sit at room temperature for 15 minutes before cooking to ensure even baking. This makes it perfect for meal prep or entertaining.