Best Roasted Butternut Squash with Cranberries & Pecans
Introduction
There’s something magical about a dish that brings warmth, color, and joy to the table—especially during the holidays. If you’re craving a side that feels both comforting and celebratory, this Festive Roasted Butternut Squash with Cranberries and Pecans delivers. Imagine tender, caramelized squash paired with tart cranberries and crunchy pecans, all kissed with savory-sweet spices. Whether you’re hosting a dinner party or simply treating yourself, this recipe turns humble ingredients into a showstopper. Best of all, it’s as easy to make as it is delicious.
Festive Roasted Butternut Squash with Cranberries and Pecans is more than just a side dish—it’s a celebration of seasonal flavors. The natural sweetness of roasted butternut squash balances perfectly with the tangy pop of cranberries, while toasted pecans add a satisfying crunch. This dish shines at holiday gatherings, but it’s versatile enough for weeknight meals or meal prep. Plus, it’s packed with nutrients, making it a guilt-free indulgence. If you love vibrant, wholesome recipes, you’ll appreciate how this one aligns with our philosophy of simple, crowd-pleasing food. For more seasonal inspiration, check out our favorite autumn salads or explore healthy holiday sides to round out your menu.
Why I Love This Recipe
This recipe holds a special place in my heart because it reminds me of cozy family gatherings. My grandmother used to roast butternut squash with a sprinkle of cinnamon, and the aroma would fill the entire house. Over the years, I’ve added cranberries and pecans for extra texture and festivity, making it a modern twist on a nostalgic favorite. Every time I make Festive Roasted Butternut Squash with Cranberries and Pecans, it feels like honoring tradition while creating new memories. It’s the kind of dish that brings people together—and isn’t that what cooking’s all about?
Health and Nutrition
Why it’s good for your body
Festive Roasted Butternut Squash with Cranberries and Pecans packs a powerful nutritional punch. First, butternut squash delivers a hefty dose of vitamin A, which supports vision and immune health. Meanwhile, cranberries add antioxidants that fight inflammation, and pecans provide heart-healthy fats. Together, these ingredients create a dish that’s as nourishing as it is delicious.
Additionally, this recipe offers a fantastic fiber boost. Fiber keeps digestion smooth and helps maintain steady energy levels. Because Festive Roasted Butternut Squash with Cranberries and Pecans combines complex carbs, healthy fats, and plant-based nutrients, it’s a smart choice for sustained vitality. Plus, the natural sweetness of roasted squash means you won’t need excessive added sugars.
Finally, the dish shines with versatility. Whether you serve it as a side or a main, Festive Roasted Butternut Squash with Cranberries and Pecans fits seamlessly into balanced meals. The pecans add crunch and protein, while the cranberries contribute a tangy contrast. Ultimately, this recipe proves that wholesome eating can still feel indulgent.
How it fits in a healthy lifestyle
Festive Roasted Butternut Squash with Cranberries and Pecans aligns perfectly with a heart-healthy diet. The pecans contain monounsaturated fats, which support cholesterol balance, and the squash offers potassium to help regulate blood pressure. For gluten-free eaters, this dish is a naturally safe option that doesn’t sacrifice flavor.
If you’re meal prepping, this recipe stores well and pairs beautifully with proteins like roasted chicken or tofu. It’s also a great way to add more plant-based variety to your week. For more gluten-free inspiration, check out our gluten-free meal prep ideas.
Even on busy nights, Festive Roasted Butternut Squash with Cranberries and Pecans comes together quickly. Roasting maximizes flavor with minimal effort, making it ideal for weeknight dinners. Want more simple, nutrient-packed recipes? Explore our quick healthy dinners for additional ideas.
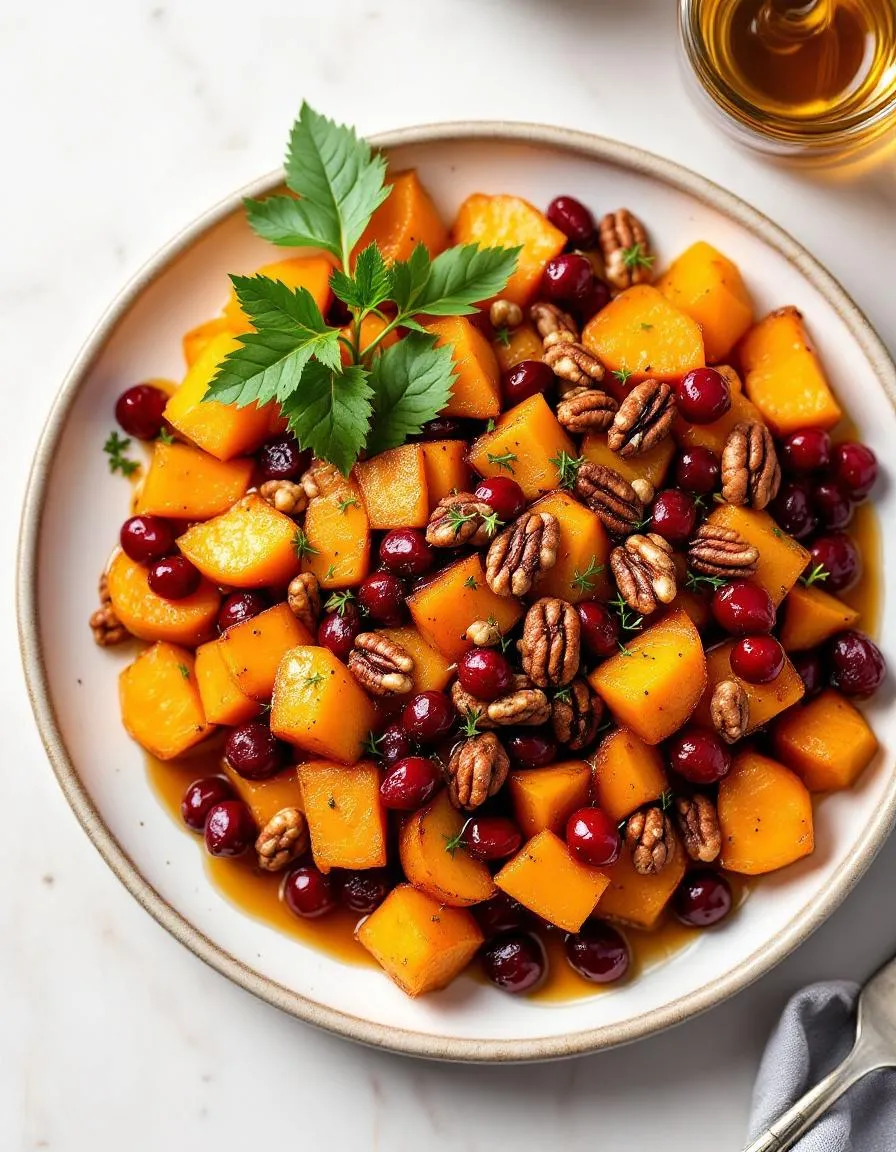
A sweet and savory roasted butternut squash dish with tart cranberries and crunchy pecans, perfect for holiday gatherings.
Ingredients
Scale
For the Crust:
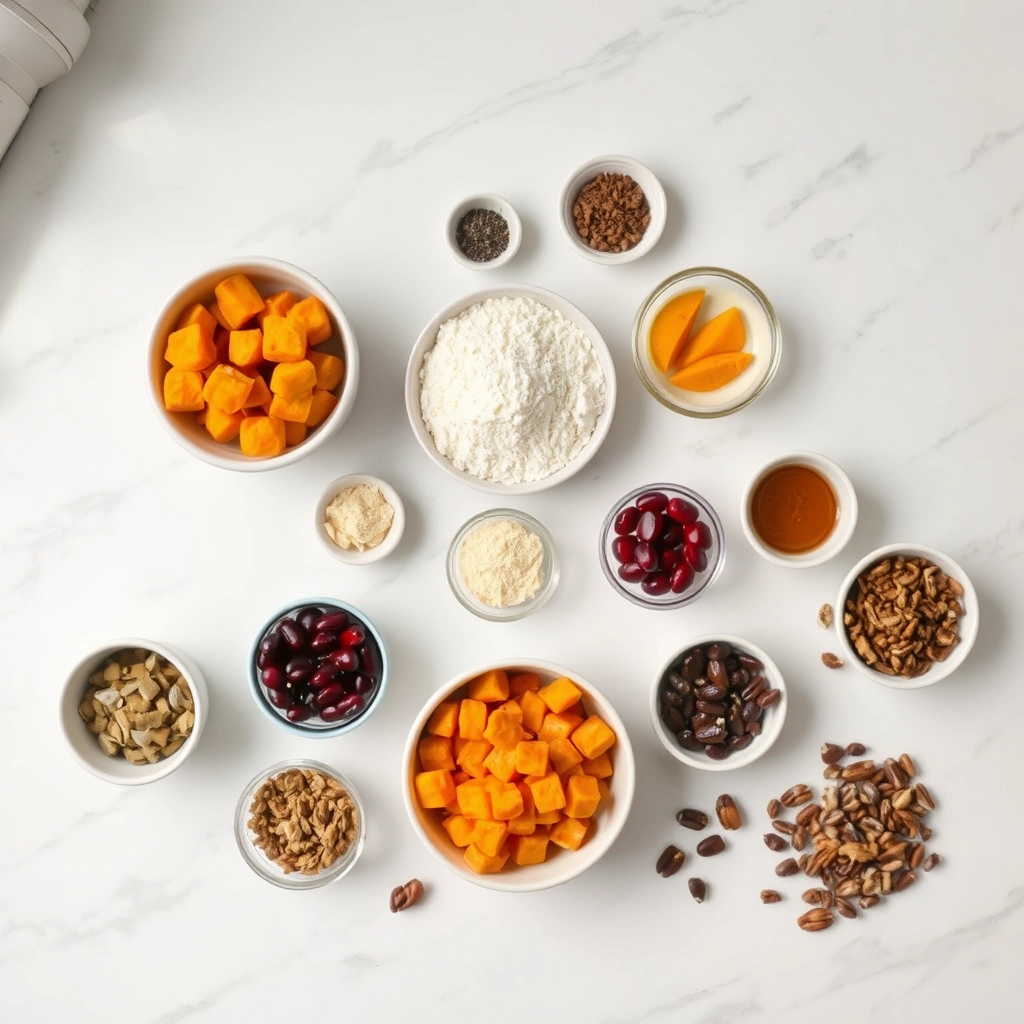
1 medium butternut squash, peeled and cubed
1/2 cup dried cranberries
1/2 cup pecans, roughly chopped
2 tablespoons olive oil
1 tablespoon maple syrup
1 teaspoon ground cinnamon
1/2 teaspoon salt
1/4 teaspoon black pepper
Instructions
1. Prepare the Crust:
Preheat oven to 400°F (200°C).
In a large bowl, toss butternut squash cubes with olive oil, maple syrup, cinnamon, salt, and pepper until evenly coated.
Spread the squash in a single layer on a baking sheet. Roast for 25 minutes, stirring halfway through.
Add cranberries and pecans to the baking sheet and roast for an additional 5 minutes until squash is tender and pecans are toasted.
Remove from oven and serve warm.
Notes
You can customize the seasonings to taste.
How to Prepare This Dish
Steps and time-saving tips
Start by preheating your oven to 400°F to ensure it’s ready when you are. While it heats, peel and cube the butternut squash into even 1-inch pieces—this helps them roast uniformly. Toss the squash in a large bowl with olive oil, maple syrup, salt, and a pinch of cinnamon for warmth. Spread the pieces in a single layer on a parchment-lined baking sheet to prevent sticking and promote crisp edges. Roast for 25 minutes, then flip the squash halfway through for even browning. Meanwhile, toast the pecans in a dry skillet over medium heat for 3-4 minutes until fragrant, stirring often to avoid burning. Once the squash is tender and caramelized, transfer it to a serving dish and sprinkle with dried cranberries and toasted pecans. For a finishing touch, drizzle with a little extra maple syrup and a sprinkle of flaky sea salt. If you’re short on time, prep the squash the night before and store it covered in the fridge—just add 2-3 extra minutes to the roasting time. This Festive Roasted Butternut Squash with Cranberries and Pecans shines as a side dish or a hearty salad base.
and-learned-from">Mistakes I’ve made and learned from
I once rushed the roasting step and overcrowded the baking sheet, which steamed the squash instead of crisping it. Now I always leave space between pieces—trust me, it’s worth using two trays if needed. Another time, I skipped toasting the pecans, and their flavor fell flat. Toasting unlocks their richness, so don’t skip it! If you’re new to working with squash, my guide on knife skills makes peeling and cubing safer. Also, if your cranberries seem too dry, try plumping them in warm water for 10 minutes, a trick I picked up from my holiday ingredient hacks post. Small adjustments make all the difference!
“`html
n-and-variations">Cultural Connection and Variations
Where this recipe comes from
Festive Roasted Butternut Squash with Cranberries and Pecans feels like a love letter to autumn and winter gatherings. Its roots weave through North American traditions, where squash has long been a staple for Indigenous communities. Early settlers embraced it too, pairing it with cranberries, a native fruit, and pecans, which thrive in the South. Over time, families adapted the dish—some adding maple syrup for sweetness, others tossing in rosemary for earthy depth.
In the Mediterranean, you might find a similar roast with olives and feta, while Caribbean versions often include warming spices like allspice or nutmeg. My grandmother, however, always insisted on a splash of orange juice to brighten the flavors. No matter the variation, Festive Roasted Butternut Squash with Cranberries and Pecans carries that cozy, communal spirit—perfect for potlucks or holiday tables where stories and seconds are shared freely.
How it fits in today’s cooking
Today, this dish bridges nostalgia and modern ease. Busy cooks love it for meal prep, roasting a big batch to pair with weeknight grains or sheet-pan chicken dinners. Health-conscious eaters appreciate its vibrant nutrients, while food bloggers riff on it—swapping pecans for walnuts or cranberries for pomegranate seeds. During the holidays, it’s a star side dish that effortlessly complements plant-based mains or classic roast turkey.
What keeps Festive Roas
ted Butternut Squash with Cranberries and Pecans timeless? Its flexibility. Whether you’re hosting a festive feast or craving a simple seasonal bite, this recipe adapts without losing its soul. And honestly, that’s the kind of dish we all need more of—one that feels both familiar and fresh, year after year.
“`
Taste and Texture
What makes it delicious
Festive Roasted Butternut Squash with Cranberries and Pecans delivers a symphony of flavors and textures in every bite. The squash caramelizes into a velvety, sweet base with earthy undertones, while the cranberries burst with tangy brightness. Toasted pecans add a satisfying crunch, and a drizzle of maple syrup ties everything together with warm, buttery richness. As it roasts, the dish fills your kitchen with an irresistible aroma—hints of cinnamon, nutmeg, and brown sugar mingling with the natural sweetness of the squash. Each forkful balances creamy, crisp, and chewy elements, making Festive Roasted Butternut Squash with Cranberries and Pecans a holiday standout.
r">Boosting the flavor
Elevate your Festive Roasted Butternut Squash with Cranberries and Pecans by swapping pecans for candied walnuts or spiced pepitas for extra texture. A sprinkle of crumbled feta or goat cheese adds a salty contrast, while a dash of smoked paprika deepens the flavor profile. For a finishing touch, try a drizzle of honey balsamic glaze or a spoonful of whipped herb yogurt to complement the dish’s sweetness. Experiment with fresh herbs like rosemary or thyme for an aromatic twist that enhances every bite.
Tips for Success
Best practices for results
Cut the butternut squash into even cubes so they roast uniformly. Meanwhile, toss the cranberries and pecans in halfway through baking to prevent burning. For extra flavor, drizzle the Festive Roasted Butternut Squash with Cranberries and Pecans with maple syrup before serving. Additionally, always preheat your oven to ensure consistent cooking. Finally, let the dish rest for five minutes after roasting to let the flavors meld.
>Mistakes to avoid
Avoid overcrowding the baking sheet, as this steams the squash instead of roasting it. Instead, use two pans or roast in batches if needed. Also, don’t skip toasting the pecans—raw nuts lack depth. For more roasting tips, check out our guide on perfect roasted vegetables. Another common mistake is adding salt too early, which draws out moisture. Instead, season the Festive Roasted Butternut Squash with Cranberries and Pecans right before serving. For seasoning tricks, explore our balancing flavors post.
Serving and Pairing Suggestions
How to serve this dish
Festive Roasted Butternut Squash with Cranberries and Pecans shines as a vibrant centerpiece for holiday gatherings or cozy weeknight dinners. For a festive touch, arrange the roasted squash on a rustic wooden platter and sprinkle extra cranberries and pecans on top. Alternatively, serve it in individual ramekins for an elegant appetizer at your next brunch. Since the dish already boasts rich colors, pair it with simple white or neutral-toned plates to let the golden squash and ruby cranberries pop. A final drizzle of maple syrup or a sprinkle of fresh thyme adds both flavor and visual appeal.
What goes well with it
This dish pairs beautifully with a crisp white wine like Sauvignon Blanc, which cuts through the squash’s sweetness while highlighting the cranberries’ tartness. For a non-alcoholic option, try a sparkling apple cider—its effervescence balances the dish’s earthy notes. If you’re serving Festive Roasted Butternut Squash with Cranberries and Pecans as a side, consider pairing it with our Herb-Crusted Pork Tenderloin for a hearty meal. Alternatively, round out your spread with a light salad like our Arugula and Pear Salad, which complements the squash’s warmth with fresh, peppery flavors.
How long does it take to roast butternut squash for this recipe?
Festive Roasted Butternut Squash with Cranberries and Pecans typically takes about 25–30 minutes at 400°F (200°C). The squash should be tender and lightly caramelized. Stir halfway through for even roasting.
Can I use frozen butternut squash instead of fresh?
Yes, but thaw and pat dry frozen butternut squash thoroughly to prevent sogginess. Fresh squash yields better texture for Festive Roasted Butternut Squash with Cranberries and Pecans, but frozen works in a pinch.
ank-math-faq-item">
What can I substitute for pecans in this dish?
Walnuts or almonds make great substitutes in Festive Roasted Butternut Squash with Cranberries and Pecans. For nut-free options, try toasted pumpkin seeds or omit nuts entirely—the cranberries still add plenty of flavor.
Is this butternut squash recipe good for meal prep?
Absolutely! Festive Roasted Butternut Squash with Cranberries and Pecans keeps well refrigerated for 3–4 days. Reheat gently to maintain texture. Add fresh pecans and cranberries before serving for best results.
Best Hearty Cabbage Roll Soup – Easy Recipe
Introduction
There’s something deeply comforting about a bowl of soup that tastes like home. If you love the cozy flavors of traditional cabbage rolls but crave a simpler, quicker version, this Hearty Cabbage Roll Soup Recipe is your answer. Packed with tender cabbage, savory ground beef, and a rich tomato broth, it delivers all the warmth and nostalgia of the classic dish—without the fuss. Whether you’re meal prepping for the week or need a satisfying dinner on a chilly night, this soup wraps you in comfort from the first spoonful.
Hearty Cabbage Roll Soup Recipe takes the beloved elements of stuffed cabbage rolls—like seasoned meat, rice, and tangy tomato sauce—and transforms them into a one-pot wonder. Unlike the labor-intensive original, this version skips the rolling and steaming, saving you time while keeping every bit of flavor. It’s perfect for busy cooks who still want wholesome, homemade meals. Plus, it’s incredibly versatile. You can swap ground turkey for beef, use cauliflower rice for a low-carb twist, or add extra veggies like carrots or bell peppers. The result? A nourishing, budget-friendly dish that feels like a hug in a bowl.
This recipe fits perfectly with our blog’s mission to deliver approachable, family-friendly meals that don’t sacrifice taste or quality. If you’re a fan of hearty soups like our Classic Beef Stew, you’ll appreciate how this dish balances simplicity with robust flavors. And if you’re looking for more ways to enjoy cabbage, our Roasted Cabbage Steaks offer another easy, delicious option. Whether you’re cooking for a crowd or just yourself, this soup is a guaranteed crowd-pleaser.
Why I Love This Recipe
This Hearty Cabbage Roll Soup Recipe holds a special place in my heart because it reminds me of my grandmother’s kitchen. She used to spend hours rolling cabbage leaves, but now I can enjoy those same flavors in half the time. Every time I make it, the aroma of simmering tomatoes and spices takes me right back to her cozy dining table. It’s more than just a meal—it’s a connection to memories, shared stories, and the kind of comfort that only homemade food can bring.
Health and Nutrition
Why it’s good for your body
Hearty Cabbage Roll Soup Recipe packs a nutritious punch while keeping flavors rich and satisfying. First, cabbage, the star ingredient, delivers fiber and vitamin C, which support digestion and immunity. Additionally, lean ground beef or turkey provides high-quality protein to keep you full and energized. Meanwhile, tomatoes add lycopene, an antioxidant linked to heart health.
Because this soup simmers slowly, it retains most of its nutrients while developing deep, comforting flavors. Moreover, the broth base keeps calories in check, making Hearty Cabbage Roll Soup Recipe a smart choice for weight management. The blend of vegetables like carrots and onions also boosts vitamin A and anti-inflammatory benefits.
Finally, this dish naturally balances macros without heavy creams or excessive fats. Whether you need a post-workout meal or a cozy dinner, Hearty Cabbage Roll Soup Recipe nourishes without compromise. Plus, the warmth of the broth soothes the stomach, making it ideal for chilly days or recovery meals.
How it fits in a healthy lifestyle
Hearty Cabbage Roll Soup Recipe fits seamlessly into balanced eating plans. For gluten-free diets, it’s a safe and flavorful option since it relies on fresh ingredients rather than thickeners. If you’re focusing on heart health, the lean proteins and vegetable-rich base align perfectly with low-sodium guidelines.
Meal preppers will love how well this soup stores, ensuring quick, wholesome lunches all week. It also pairs beautifully with a crisp salad or whole-grain bread for extra fiber. For those tracking macros, the protein-to-veggie ratio makes it easy to stay on target. Explore more meal prep ideas to keep your routine simple and nutritious. With versatile ingredients and crowd-pleasing taste, this soup helps you eat well without sacrificing flavor.
A comforting and flavorful soup that captures all the deliciousness of traditional cabbage rolls in an easy-to-make soup.
Ingredients
Scale
For the Crust:
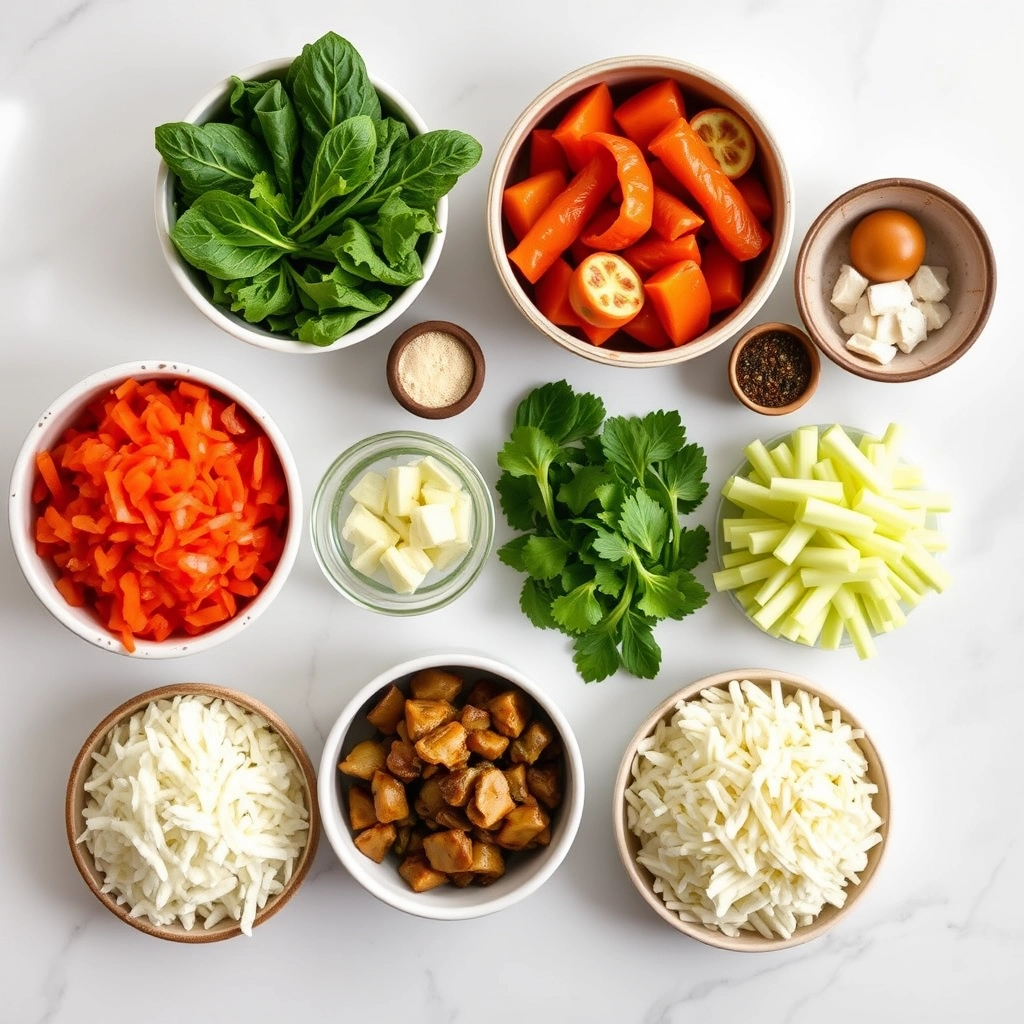
1 lb ground beef
1 small onion, diced
2 cloves garlic, minced
4 cups chopped cabbage
1 (15 oz) can diced tomatoes
1 (15 oz) can tomato sauce
4 cups beef broth
1 cup cooked rice
1 tsp paprika
1 tsp dried thyme
Salt and pepper to taste
Instructions
1. Prepare the Crust:
In a large pot, brown the ground beef with onion and garlic over medium heat until fully cooked.
Add the chopped cabbage and cook for 5 minutes until slightly softened.
Stir in diced tomatoes, tomato sauce, beef broth, paprika, and thyme. Bring to a boil.
Reduce heat to low and simmer for 20 minutes, stirring occasionally.
Add the cooked rice and simmer for an additional 5 minutes.
Season with salt and pepper to taste before serving.
Notes
You can customize the seasonings to taste.
s-dish">How to Prepare This Dish
Steps and time-saving tips
Start by heating a large pot over medium heat and drizzling in olive oil. Once hot, add diced onions and minced garlic, stirring until fragrant and translucent. Next, toss in ground beef or turkey, breaking it apart with a wooden spoon as it browns. Meanwhile, chop fresh cabbage into bite-sized pieces and set aside. Once the meat cooks through, drain any excess fat, then stir in tomato paste, diced tomatoes, and beef broth for a rich base. Add the chopped cabbage, along with cooked rice or cauliflower rice for a lighter option. Season generously with salt, pepper, and a pinch of paprika for warmth. Let the Hearty Cabbage Roll Soup Recipe simmer for 20-25 minutes, stirring occasionally, until the cabbage softens but still has a slight crunch. For a time-saving hack, use pre-shredded coleslaw mix instead of chopping cabbage. Right before serving, sprinkle fresh parsley on top for a bright finish. If you love leftovers, this soup tastes even better the next day as the flavors meld.
Mistakes I’ve made and learned from
Early on, I rushed the sautéing step and ended up with undercooked onions that made the Hearty Cabbage Roll Soup Recipe taste harsh. Now I take an extra minute to let them soften fully—it’s worth it. Another blunder? Overcrowding the pot with cabbage, which turned mushy. I learned to add it in batches for even cooking. If you’re new to soups, check out my guide on common soup mistakes to avoid similar pitfalls. Also, don’t skip tasting as you go—seasoning adjustments are key. For more tips on balancing flavors, my seasoning tips post breaks it down simply. Trust me, a little patience upfront saves a lot of disappointment later!
n-and-variations">Cultural Connection and Variations
Where this recipe comes from
Hearty Cabbage Roll Soup Recipe carries the soul of Eastern European comfort food, where stuffed cabbage rolls (or “golabki” in Polish) have warmed families for generations. Imagine cozy kitchens filled with the aroma of simmering cabbage, tomatoes, and savory meat—this soup captures that essence in a simpler, spoon-friendly form. In Hungary, they might add paprika for a smoky kick, while Ukrainians often mix in buckwheat or barley for extra heartiness. My grandmother, however, always tossed in a handful of dill for a fresh, herbal note that made her version unforgettable.
Across the Atlantic, the Hearty Cabbage Roll Soup Recipe evolved into a weeknight staple for busy cooks. Some regions in the U.S. swap ground beef for turkey or lentils, making it lighter or vegetarian-friendly. Others throw in a splash of apple cider vinegar for tang, a trick I picked up from a friend’s German mother. No matter the twist, this soup stays true to its roots: a humble, nourishing dish that brings people together, one bowl at a time.
How it fits in today’s cooking
Today, the Hearty Cabbage Roll Soup Recipe shines as a versatile star in modern kitchens. Meal preppers love it because it freezes beautifully, and busy families adore its one-pot simplicity. During fall and winter, it becomes a regular on dinner tables, especially alongside crusty bread or a crisp arugula salad for contrast. Plus, with the rise of gluten-free and keto diets, many cooks skip the rice or use cauliflower rice instead—proof that tradition can adapt without losing its charm.
Holidays or hectic week
nights, this soup fits right in. Some serve it as a starter for festive gatherings, while others rely on it for cozy comfort food dinners after long days. Whether you stick to the classic recipe or tweak it with modern twists, the Hearty Cabbage Roll Soup Recipe remains a timeless dish that bridges generations—and cravings.
Taste and Texture
What makes it delicious
Hearty Cabbage Roll Soup Recipe wraps you in warmth with its rich, savory broth and tender cabbage leaves that melt in your mouth. The ground beef adds a satisfying meatiness, while the tomatoes bring a bright, tangy sweetness. Each spoonful bursts with earthy notes from garlic and onions, balanced by the subtle peppery kick of paprika. Meanwhile, the rice soaks up the flavors, creating a comforting, slightly chewy texture. The aroma alone—a fragrant blend of simmering herbs and spices—will make your kitchen smell irresistible. Hearty Cabbage Roll Soup Recipe delivers all the cozy satisfaction of traditional cabbage rolls but in a bowl that’s easier to enjoy.
Boosting the flavor
For an extra layer of depth, try browning the ground beef until it’s deeply caramelized before adding it to the soup. A splash of Worcestershire sauce or a pinch of smoked paprika can amplify the umami richness. If you love a creamy twist, stir in a dollop of sour cream or Greek yogurt just before serving. Crusty bread or a sprinkle of fresh parsley brightens each bite. Craving more hearty soup ideas? Explore our Comforting Chicken Noodle Soup or Roasted Tomato Basil Soup for equally satisfying flavors. With a few tweaks, Hearty Cabbage Roll Soup Recipe becomes even more unforgettable.
Always brown the ground beef thoroughly before adding other ingredients to deepen the flavor of your Hearty Cabbage Roll Soup Recipe. Additionally, chop the cabbage into even, bite-sized pieces so they cook uniformly. For a richer taste, simmer the soup on low heat for at least 20 minutes after combining all ingredients. Finally, taste and adjust the seasoning just before serving to ensure a perfectly balanced dish every time.
Mistakes to avoid
One common mistake is overcooking the cabbage, which turns it mushy. Instead, add it halfway through simmering to keep a slight crunch. Another error is skipping the step of deglazing the pot after browning the meat. This step lifts flavorful bits from the bottom, so use a splash of broth or water to scrape them up. For more tips on perfecting soups, check out our guide on soup-making basics. Also, if your soup tastes too bland, you might need more salt or acidity—learn how to fix under-seasoned dishes with our seasoning tips.
g-suggestions">Serving and Pairing Suggestions
How to serve this dish
For a cozy family dinner, ladle the Hearty Cabbage Roll Soup Recipe into deep bowls and top with a dollop of sour cream or fresh dill. Meanwhile, if you want to impress guests, serve it in rustic bread bowls for a fun twist. Additionally, garnish with a sprinkle of crispy bacon or grated Parmesan to add texture and flavor. This soup shines at holiday gatherings, but it also makes a comforting weeknight meal. Finally, pair it with crusty bread for dipping, and watch everyone come back for seconds.
What goes well with it
A crisp green salad balances the richness of the Hearty Cabbage Roll Soup Recipe perfectly. Try our Simple Avocado Salad for a refreshing contrast. Alternatively, a slice of warm Honey Cornbread adds a touch of sweetness that complements the savory broth. For drinks, a light Pinot Noir or sparkling water with lemon elevates the meal without overpowering the flavors.
math-faq-block">
What makes Hearty Cabbage Roll Soup taste like traditional cabbage rolls?
Hearty Cabbage Roll Soup captures the classic flavors of stuffed cabbage rolls by simmering ground beef, rice, and shredded cabbage in a rich tomato-based broth. The combination of savory meat, tender cabbage, and aromatic spices like garlic and paprika creates a comforting taste just like the baked version.
Can I make Hearty Cabbage Roll Soup in a slow cooker?
Yes! Hearty Cabbage Roll Soup adapts perfectly to a slow cooker—just brown the ground beef first, then add all ingredients and cook on low for 6-8 hours. The slow simmering deepens the flavors, making the soup even more delicious.
How do I store and reheat leftover Hearty Cabbage Roll Soup?
Store cooled Hearty Cabbage Roll Soup in an airtight container in the fridge for up to 4 days. Reheat gently on the stovetop or in the microwave, adding a splash of broth if needed. The flavors often improve overnight!
ank-math-faq-item">
What can I serve with Hearty Cabbage Roll Soup for a complete meal?
Pair Hearty Cabbage Roll Soup with crusty bread, a dollop of sour cream, or a simple green salad. For a heartier meal, add warm dinner rolls or garlic toast to soak up the flavorful broth.
Best Indulgent Strawberry Cheesecake Delight Recipe
Introduction
There’s something magical about the first bite of a creamy, dreamy dessert that melts all your worries away. If you’ve ever craved a treat that feels like a hug in dessert form, this Indulgent Strawberry Cheesecake Delight is your answer. Picture velvety cheesecake paired with sweet, juicy strawberries—each bite delivers pure bliss. Whether you’re celebrating a special occasion or simply treating yourself, this recipe promises to elevate any moment into something extraordinary.
Indulgent Strawberry Cheesecake Delight combines the rich, tangy flavor of classic cheesecake with the bright freshness of strawberries. Unlike overly complicated desserts, this recipe strikes the perfect balance between simplicity and decadence. The creamy filling sits atop a buttery graham cracker crust, while a glossy strawberry topping adds a burst of color and flavor. What makes it special? It’s versatile enough for casual gatherings yet elegant enough for dinner parties. Plus, it’s a crowd-pleaser that even beginner bakers can master with confidence.
Here at Exo Recipes, we believe desserts should be as enjoyable to make as they are to eat. That’s why this Indulgent Strawberry Cheesecake Delight fits our philosophy perfectly. It’s approachable, delicious, and designed to bring people together. If you love no-bake desserts, you’ll adore our Easy No-Bake Desserts collection. And for more strawberry-inspired treats, check out our Strawberry Recipes roundup. Now, let’s dive into why this recipe holds a special place in my heart.
Why I Love This Recipe
This Indulgent Strawberry Cheesecake Delight isn’t just a dessert—it’s a memory maker. I first made it for my best friend’s birthday, and the way her face lit up after the first bite stuck with me. Since then, it’s become my go-to for celebrations, potlucks, and even those days when life calls for a little extra sweetness. The combination of creamy cheesecake and vibrant strawberries never fails to delight, and I love how it brings people together. Every time I make it, I’m reminded that the best moments in life often come with a side of something delicious.
Health and Nutrition
Why it’s good for your body
Indulgent Strawberry Cheesecake Delight packs more than just incredible flavor. First, fresh strawberries deliver a boost of vitamin C, which supports your immune system and skin health. Additionally, the creamy filling provides a good source of calcium, helping to strengthen bones and teeth. Meanwhile, the graham cracker crust offers whole grains for sustained energy.
Moreover, Indulgent Strawberry Cheesecake Delight contains antioxidants from ripe strawberries. These compounds fight free radicals and may reduce inflammation. Furthermore, the dessert balances sweetness with natural fruit flavors, so you satisfy cravings without excessive sugar. Finally, the protein-rich cream cheese filling helps keep you fuller longer compared to other sugary treats.
Of course, moderation is key. However, when you enjoy Indulgent Strawberry Cheesecake Delight, you treat yourself to nutrients alongside decadence. The combination of wholesome ingredients and mindful portions makes it a smarter choice for dessert lovers.
How it fits in a healthy lifestyle
Indulgent Strawberry Cheesecake Delight fits perfectly into a balanced diet when enjoyed mindfully. For those watching sugar intake, pairing a small slice with protein-rich foods like Greek yogurt can stabilize blood sugar. If you follow a gluten-free diet, simply swap the crust for a nut-based alternative—our gluten-free dessert guide offers easy substitutions.
Heart-healthy eaters will appreciate that strawberries support cardiovascular wellness, and opting for reduced-fat cream cheese lightens the dish without sacrificing taste. For active lifestyles, this dessert provides quick energy from natural sugars while the creamy texture feels like a true reward. Explore our balanced indulgence tips to learn how to incorporate treats like this into your routine without guilt. Whether as a weekend treat or a celebratory bite, Indulgent Strawberry Cheesecake Delight proves that delicious and nutritious can go hand in hand.
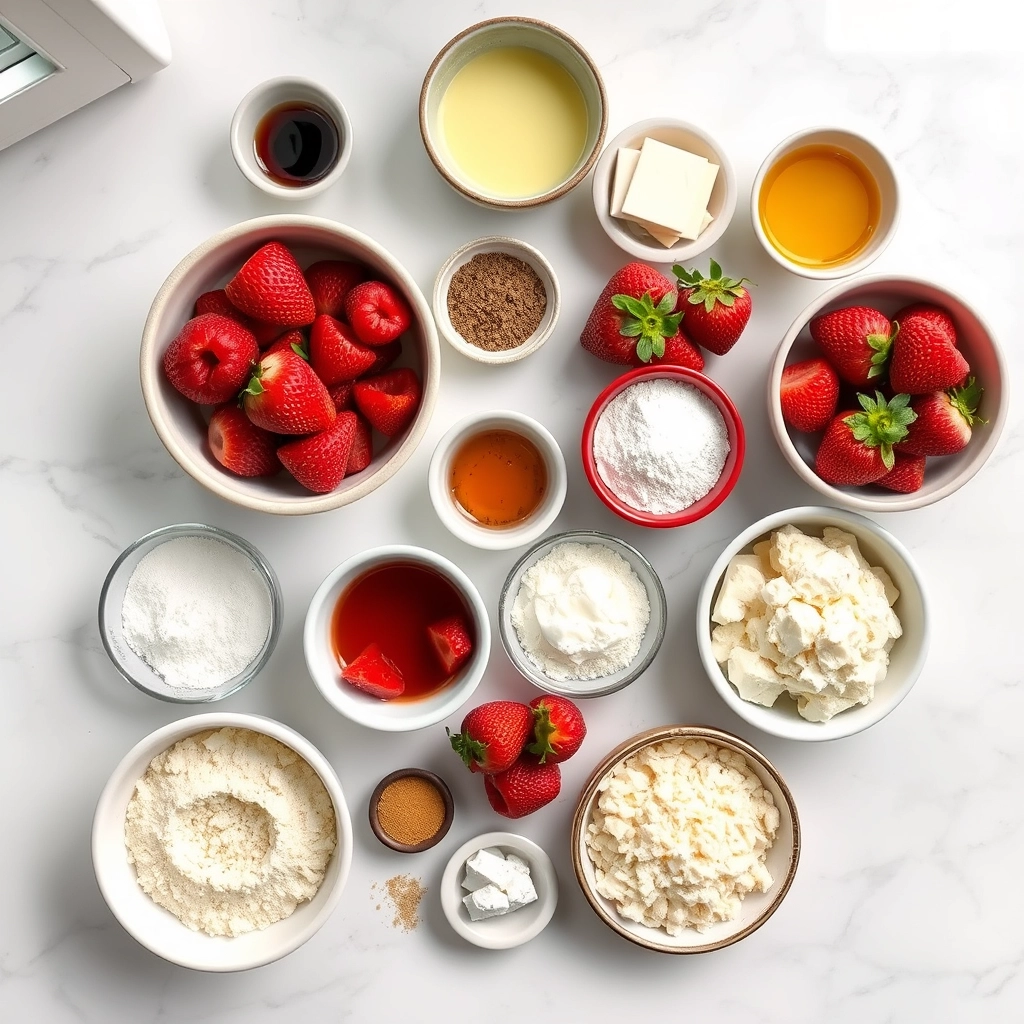
A creamy and rich strawberry cheesecake with a buttery graham cracker crust, topped with fresh strawberry sauce.
Ingredients
Scale
For the Crust:
1 1/2 cups graham cracker crumbs
1/4 cup granulated sugar
6 tbsp unsalted butter, melted
24 oz cream cheese, softened
3/4 cup granulated sugar
3 large eggs
1 tsp vanilla extract
1 cup sour cream
2 cups fresh strawberries, hulled and sliced
1/4 cup water
1/4 cup granulated sugar
1 tbsp cornstarch
Instructions
1. Prepare the Crust:
Preheat oven to 325°F (165°C). Mix graham cracker crumbs, 1/4 cup sugar, and melted butter. Press into the bottom of a 9-inch springform pan.
In a large bowl, beat cream cheese and 3/4 cup sugar until smooth. Add eggs one at a time, then mix in vanilla and sour cream.
Pour filling over crust. Bake for 50-55 minutes until center is almost set. Cool completely.
For the strawberry sauce: In a saucepan, combine strawberries, water, 1/4 cup sugar, and cornstarch. Cook over medium heat until thickened, about 10 minutes. Cool slightly, then spread over cheesecake.
Refrigerate for at least 4 hours before serving.
Notes
You can customize the seasonings to taste.
s-dish">How to Prepare This Dish
Steps and time-saving tips
Start by preheating your oven to 325°F to ensure it’s ready when you need it. Meanwhile, crush graham crackers into fine crumbs and mix them with melted butter until the texture resembles wet sand. Press this mixture firmly into the bottom of a springform pan, then bake for 10 minutes to set the crust. While it cools, beat cream cheese until smooth, then gradually add sugar and vanilla, whisking until fluffy. Next, gently fold in whipped cream to keep the filling light and airy. Pour this over the cooled crust and smooth the top with a spatula. Chill the Indulgent Strawberry Cheesecake Delight for at least 4 hours, though overnight is ideal for the best texture. For the strawberry topping, simmer fresh strawberries with a touch of sugar until they break down into a glossy sauce. Let it cool slightly before drizzling it over the cheesecake just before serving. To save time, use store-bought graham cracker crumbs or a pre-made strawberry compote, but homemade always tastes richer.
Mistakes I’ve made and learned from
One of my biggest blunders was overmixing the cream cheese, which made the filling dense instead of creamy. Now, I beat it just until smooth and stop immediately. Another lesson? Always use room-temperature ingredients—cold cream cheese clumps no matter how long you mix it. I also learned the hard way that skipping the water bath can cause cracks, so now I swear by my foolproof water bath method. Lastly, rushing the chilling time led to a soggy crust, but patience pays off with a perfect slice. If you’re new to cheesecakes, my guide to common cheesecake mistakes breaks down these pitfalls in detail. Trust me, even flops taste good, but these tweaks make all the difference.
n-and-variations">Cultural Connection and Variations
Where this recipe comes from
The Indulgent Strawberry Cheesecake Delight has roots that stretch across continents, blending classic European techniques with American flair. Originally, cheesecake traces back to ancient Greece, where people served it at weddings and celebrations. However, the creamy, rich version we know today evolved in New York, where bakers added cream cheese for extra decadence. Meanwhile, the strawberry topping brings a fresh twist, often tied to summer harvests or Valentine’s Day indulgences.
Around the world, variations of this dessert pop up with local twists. In Japan, they lighten the texture with whipped cream and matcha layers. Italian cooks might swap strawberries for figs or citrus, while in Mexico, they drizzle it with cajeta for a caramel kick. Even in my family, we tweak the recipe—sometimes adding a splash of bourbon to the crust or layering in fresh blueberries. No matter the version, the Indulgent Strawberry Cheesecake Delight remains a universal crowd-pleaser, bridging traditions and tastes.
How it fits in today’s cooking
Today, the Indulgent Strawberry Cheesecake Delight thrives as both a nostalgic treat and a modern staple. Home cooks love it for special occasions, like birthdays or anniversaries, but also whip it up for weekend brunches. Many adapt it to fit dietary needs, using gluten-free graham crackers or dairy-free cream cheese. Some even turn it into bite-sized mini desserts for parties, proving its versatility.
Seasonal twists keep it
fresh year-round. In winter, pomegranate seeds replace strawberries, while spring calls for a lemon zest garnish. Busy bakers also lean on shortcuts, like no-bake versions or store-bought crusts, without sacrificing flavor. For those craving more inspiration, our guide to easy cake mixes shows how to blend convenience with creativity. Whether classic or reinvented, this dessert never loses its charm.
Taste and Texture
What makes it delicious
The Indulgent Strawberry Cheesecake Delight is a symphony of flavors and textures that dance on your palate. First, the creamy, velvety cheesecake layer melts in your mouth, while the sweet-tart strawberry swirl adds a burst of fruity freshness. Meanwhile, the buttery graham cracker crust provides a satisfying crunch, creating a perfect contrast. Every bite releases a fragrant aroma of vanilla and ripe strawberries, making it impossible to resist. Whether served chilled or slightly warmed, the Indulgent Strawberry Cheesecake Delight delivers pure indulgence with its rich, balanced sweetness and luxurious mouthfeel.
Boosting the flavor
Elevate your Indulgent Strawberry Cheesecake Delight with a few clever tweaks. For an extra layer of depth, drizzle warm homemade caramel sauce over each slice, adding a buttery richness that complements the strawberries. Alternatively, sprinkle a pinch of cinnamon or cardamom into the crust for a subtle warmth. If you love texture, top it with toasted almond slivers or a dollop of vanilla bean whipped cream for an airy finish. These small changes make a big impact, transforming an already irresistible dessert into something truly extraordinary.
Always use room-temperature cream cheese for your Indulgent Strawberry Cheesecake Delight to ensure a smooth, lump-free filling. Meanwhile, pre-bake the crust for just 10 minutes to prevent sogginess. For the best texture, chill the cheesecake for at least 4 hours before adding the strawberry topping. Additionally, pat the strawberries dry before arranging them to keep the glaze from sliding off.
Mistakes to avoid
Avoid overmixing the batter once you add the eggs, as this can introduce air bubbles and cause cracks. Instead, gently fold the ingredients until just combined. Furthermore, never skip the water bath—it helps the Indulgent Strawberry Cheesecake Delight bake evenly without drying out. For more troubleshooting, check out our guide on perfect cheesecake baking. Also, if your glaze turns out too runny, thicken it with a cornstarch slurry as detailed in our fruit glaze tips post.
g-suggestions">Serving and Pairing Suggestions
How to serve this dish
Elevate your Indulgent Strawberry Cheesecake Delight by serving it on a chilled dessert plate for a refreshing touch. For a stunning presentation, drizzle extra strawberry sauce in a zigzag pattern and top with fresh mint leaves or edible flowers. Meanwhile, if you’re hosting a summer brunch, slice it into petite squares for easy sharing. Alternatively, during holidays, layer it in individual trifle glasses with whipped cream for a festive twist. No matter the occasion, this dessert always shines when you let its vibrant colors and creamy texture take center stage.
What goes well with it
Pair your Indulgent Strawberry Cheesecake Delight with a crisp glass of Prosecco to balance its richness with bubbly acidity. For a non-alcoholic option, try our Homemade Strawberry Lemonade, which echoes the fruity notes of the dessert. If you crave contrast, serve it alongside a scoop of vanilla bean ice cream or a warm Dark Chocolate Sauce for dipping. Each pairing enhances the creamy, tangy flavors while adding its own delightful twist.
math-faq-block">
What makes Indulgent Strawberry Cheesecake Delight so creamy?
The creaminess of Indulgent Strawberry Cheesecake Delight comes from a perfect blend of full-fat cream cheese, heavy whipping cream, and a touch of sour cream. These ingredients create a rich, velvety texture that melts in your mouth while keeping the strawberry flavor vibrant.
Can I make Indulgent Strawberry Cheesecake Delight ahead of time?
Yes! Indulgent Strawberry Cheesecake Delight actually tastes better when chilled overnight, allowing the flavors to meld. Just cover it tightly with plastic wrap and refrigerate for up to 3 days before serving.
What’s the best way to layer the strawberries in Indulgent Strawberry Cheesecake Delight?
For even distribution, slice fresh strawberries thinly and arrange them in a single layer between the cheesecake filling and the crust. You can also fold diced strawberries into the filling for extra bursts of flavor in every bite of your Indulgent Strawberry Cheesecake Delight.
ank-math-faq-item">
How do I prevent my Indulgent Strawberry Cheesecake Delight from cracking?
To avoid cracks, bake your Indulgent Strawberry Cheesecake Delight in a water bath and let it cool gradually in the oven with the door slightly ajar. Overmixing or sudden temperature changes can cause cracks, so handle the batter gently and cool it slowly.
Best Homemade Twix Bites – Easy & Irresistible
Introduction
Do you ever crave that perfect balance of buttery shortbread, gooey caramel, and rich chocolate? If so, you’ll adore this Irresistible Homemade Twix Bites Recipe. These bite-sized treats capture everything you love about the classic candy bar but with a homemade touch that makes them even more special. Whether you’re baking for a party, a sweet snack, or just because, these little delights will disappear fast. Plus, they’re surprisingly easy to make, so you can enjoy the magic of Twix anytime—right from your kitchen.
The Irresistible Homemade Twix Bites Recipe brings together three layers of perfection: a crisp shortbread base, a creamy caramel center, and a smooth chocolate coating. Unlike store-bought versions, you control the quality of ingredients, ensuring every bite tastes fresh and decadent. This recipe fits perfectly with our blog’s mission to deliver approachable yet impressive desserts that anyone can master. For example, if you love no-bake treats, you might also enjoy our Easy No-Bake Cookies, which share the same simplicity and crowd-pleasing appeal. Meanwhile, if you’re a caramel fan, our Salted Caramel Brownies offer another way to indulge your sweet tooth.
What makes this recipe stand out is its versatility. You can customize the chocolate coating with dark, milk, or even white chocolate, and a sprinkle of sea salt elevates the flavors beautifully. Moreover, these bites make fantastic gifts or party favors, proving that homemade treats often outshine store-bought ones. With clear instructions and minimal fuss, the Irresistible Homemade Twix Bites Recipe delivers nostalgia and satisfaction in every bite.
Why I Love This Recipe
I fell in love with this recipe because it reminds me of baking with my mom during the holidays. She always had a way of turning simple ingredients into something magical, and these Twix bites capture that same joy. Making them feels like a little celebration, whether I’m sharing them with friends or sneaking one (or three) for myself. The process is therapeutic, too—rolling out the shortbread, drizzling the caramel, and dipping each piece in chocolate feels like crafting edible treasures. Every time I make them, I’m reminded that the best desserts come from the heart.
Health and Nutrition
Why it’s good for your body
Irresistible Homemade Twix Bites Recipe offers more than just a sweet treat. First, the dark chocolate coating provides antioxidants, which help fight free radicals in your body. Additionally, the natural caramel layer contains healthy fats from butter, giving you a quick energy boost. Moreover, the shortbread base includes wholesome ingredients like almond flour, adding a dose of protein and fiber.
Unlike store-bought candy bars, Irresistible Homemade Twix Bites Recipe lets you control the sugar content. For example, you can reduce refined sugar or swap it for healthier alternatives like coconut sugar. Furthermore, homemade versions skip artificial preservatives, making them a cleaner choice for your digestive system. Over time, these small adjustments add up to better overall health.
Finally, Irresistible Homemade Twix Bites Recipe satisfies cravings without derailing your nutrition goals. Because you make them in bite-sized portions, you naturally practice mindful eating. In contrast to oversized desserts, these mini treats help you enjoy sweetness in moderation while still getting a nutrient-rich snack.
How it fits in a healthy lifestyle
Irresistible Homemade Twix Bites Recipe fits perfectly into a balanced diet when enjoyed mindfully. Since you can customize the ingredients, they work well for gluten-free diets by using almond flour instead of traditional wheat flour. They also pair wonderfully with a cup of herbal tea or fresh fruit for a satisfying yet light dessert.
If you follow a heart-healthy eating plan, you can tweak the recipe by opting for dark chocolate with higher cocoa content. This swap boosts flavonoids, which support cardiovascular health. For more tips on balancing treats with nutrition, check out our guide on healthy dessert swaps.
Even busy lifestyles benefit from Irresistible Homemade Twix Bites Recipe. Prep a batch ahead of time for portion-controlled snacking, so you avoid reaching for processed alternatives. For more ideas on smart meal prep, explore our meal prep tips. With a little planning, these bites become a delicious part of your everyday wellness routine.
Delicious bite-sized Twix bars with a buttery shortbread base, creamy caramel center, and rich chocolate coating.
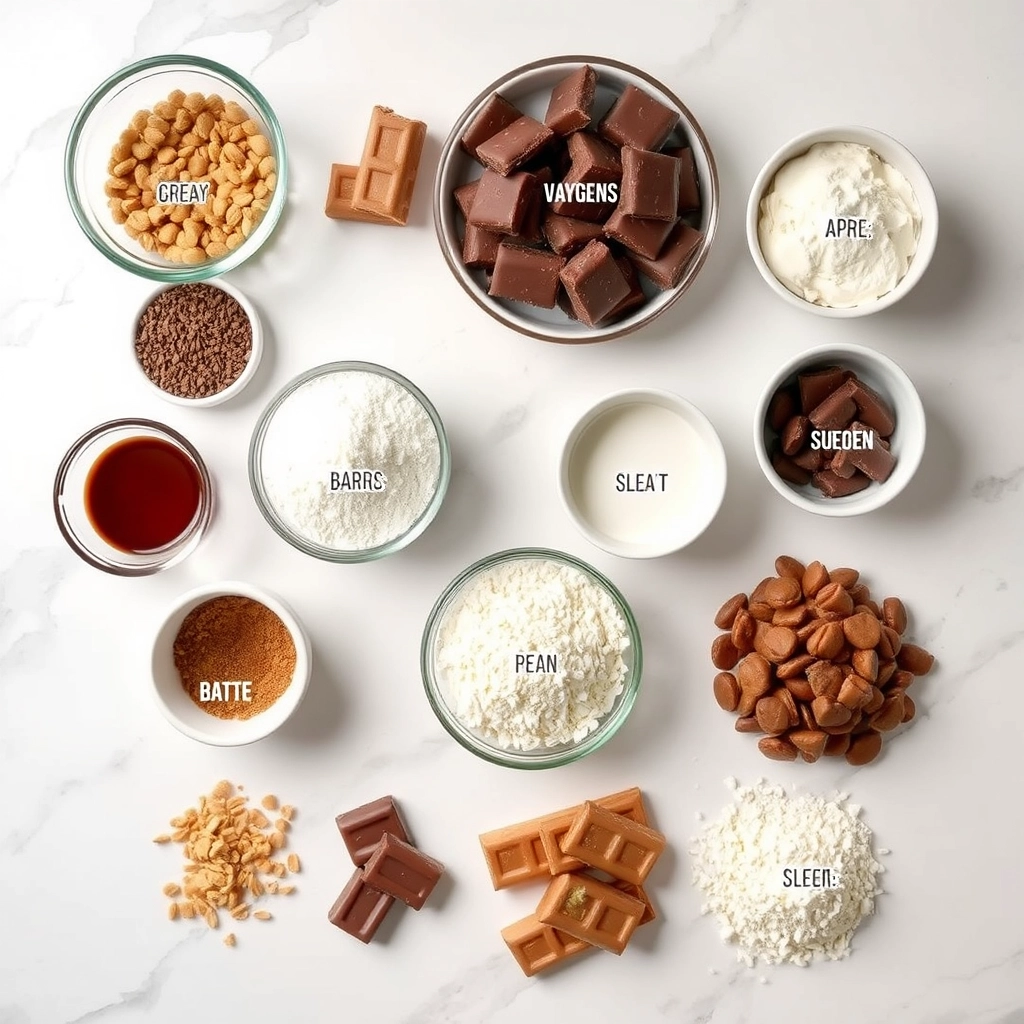
Ingredients
Scale
For the Crust:
1 cup all-purpose flour
1/4 cup granulated sugar
1/2 cup unsalted butter, softened
1 cup soft caramels
1 tablespoon heavy cream
1 cup semi-sweet chocolate chips
1 teaspoon coconut oil
Instructions
1. Prepare the Crust:
Preheat oven to 350°F (175°C). Line an 8×8 inch baking pan with parchment paper.
Mix flour, sugar, and butter until crumbly. Press into the prepared pan and bake for 15-20 minutes until golden. Let cool.
Melt caramels with heavy cream in a saucepan over low heat, stirring until smooth. Pour over cooled crust and refrigerate for 30 minutes.
Cut into small rectangles. Melt chocolate chips with coconut oil and dip each piece, coating completely. Place on parchment paper to set.
Notes
You can customize the seasonings to taste.
How to Prepare This Dish
Steps and time-saving tips
Start by preheating your oven to 350°F and lining a baking sheet with parchment paper. In a bowl, mix softened butter, sugar, and vanilla until creamy, then gradually fold in flour and salt to form a crumbly dough. Press the dough evenly into a square baking pan and bake for 15 minutes until golden. Meanwhile, whisk together caramel ingredients in a saucepan over medium heat, stirring constantly until smooth. Once the shortbread cools, spread the caramel layer evenly and chill for 20 minutes to set. Melt chocolate in a double boiler, then drizzle it over the caramel layer. For quicker results, use pre-made caramel or chocolate chips, but homemade delivers the best flavor. Slice the bars into bite-sized pieces while the chocolate is slightly soft for clean edges. Store them in an airtight container to keep them fresh.
Mistakes I’ve made and learned from
When I first tried making Irresistible Homemade Twix Bites Recipe, I rushed the caramel and ended up with a grainy texture. Now, I patiently stir it on low heat until fully dissolved. Another time, I sliced the bars too soon, causing messy edges—waiting until the chocolate firms up makes all the difference. If you’re new to candy-making, check out my guide to perfect caramel for foolproof techniques. Also, if your shortbread crumbles, try my baking basics for tips on achieving the right consistency. Learning these tricks saved me time and frustration, so don’t skip the chilling steps!
The Irresistible Homemade Twix Bites Recipe takes inspiration from the classic British candy bar, Twix, which first hit shelves in 1967. However, this version brings a homemade twist that feels both nostalgic and fresh. Many families, including mine, love making these bites during holidays or gatherings because they capture the same caramel-chocolate magic but with a personal touch. In some regions, bakers swap the shortbread base for graham crackers or even gluten-free alternatives, proving how versatile this treat can be.
Across Europe, you might find similar confections with local flair. For instance, German bakers often add hazelnuts to the caramel layer, while French patisseries might drizzle dark chocolate instead of milk chocolate. The Irresistible Homemade Twix Bites Recipe adapts beautifully to these variations, making it a global favorite. Whether you stick to the classic or experiment with new flavors, these bites always deliver comfort and joy.
ays-cooking">How it fits in today’s cooking
Today, the Irresistible Homemade Twix Bites Recipe remains a star in modern kitchens because it’s quick, customizable, and crowd-pleasing. Busy home cooks appreciate how easily it fits into meal prep routines, especially when paired with other treats like easy dessert recipes. Meanwhile, food bloggers and health-conscious bakers tweak the recipe with vegan caramel or sugar-free chocolate, proving it’s adaptable to any lifestyle.
Seasonal trends also keep this recipe relevant. During the holidays, families often include it in cookie swaps or gift boxes alongside classics like holiday baking ideas. Even on ordinary days, these bites offer a sweet escape—whether as an afternoon pick-me-up or a late-night indulgence. No matter how you serve them, the Irresistible Homemade Twix Bites Recipe always feels like a little celebration.
Taste and Texture
What makes it delicious
Irresistible Homemade Twix Bites Recipe delivers a symphony of textures and flavors that make every bite unforgettable. First, you’ll notice the crisp, buttery shortbread base, which crumbles just enough to contrast the velvety caramel layer. The caramel itself is rich and gooey, with deep notes of brown sugar and vanilla that melt on your tongue. Finally, a smooth chocolate coating wraps everything together, adding a satisfying snap and a hint of cocoa bitterness. The aroma alone—warm caramel mingling with toasted shortbread—will have you reaching for seconds. Whether you savor them slowly or devour them in one go, Irresistible Homemade Twix Bites Recipe strikes the perfect balance between sweet, salty, and indulgent.
r">Boosting the flavor
Want to take your Irresistible Homemade Twix Bites Recipe to the next level? Try swapping the milk chocolate for dark chocolate to add a sophisticated depth of flavor. For a nutty twist, sprinkle crushed toasted almonds or pecans over the caramel layer before dipping in chocolate. If you love a touch of warmth, a pinch of sea salt or a drizzle of salted caramel sauce elevates the sweetness beautifully. For an extra aromatic kick, infuse the shortbread with a teaspoon of cinnamon or cardamom. Craving more creative dessert ideas? Explore our decadent chocolate truffles for another crowd-pleasing treat. With these simple tweaks, your Twix bites will shine even brighter.
Tips for Success
Best practices for results
Always chill the dough for at least 30 minutes before shaping your Irresistible Homemade Twix Bites Recipe. This prevents spreading and ensures a crisp shortbread base. Additionally, use parchment paper to line your baking sheet for even browning and easy removal. For the caramel layer, stir constantly over medium heat to avoid burning, and let it cool slightly before pouring. Finally, temper your chocolate properly for a smooth, glossy finish that sets perfectly.
>Mistakes to avoid
One common error is rushing the caramel, which can lead to a grainy texture. Instead, cook it slowly until it reaches a deep amber color. Another mistake is skipping the chilling step, which causes the shortbread to lose its shape. For more tips on perfecting caramel, check out our caramel troubleshooting guide. Also, if your chocolate seizes, avoid adding water—opt for a splash of coconut oil instead. Learn more about working with chocolate in our tempering basics guide.
Serving and Pairing Suggestions
How to serve this dish
For a stunning presentation, arrange your Irresistible Homemade Twix Bites Recipe on a decorative platter or in mini cupcake liners. Meanwhile, drizzle melted chocolate over the top for an elegant touch. These bites shine at parties, so consider serving them alongside other desserts for a sweet buffet. Alternatively, package them in clear treat bags tied with ribbon for a thoughtful homemade gift. During holidays, sprinkle edible gold dust or festive sprinkles to match the occasion.
What goes well with it
Pair your Irresistible Homemade Twix Bites Recipe with a steaming cup of salted caramel latte for a cozy treat. The rich coffee balances the sweetness perfectly. If you prefer something cold, try blending them into a creamy milkshake using our Homemade Vanilla Ice Cream recipe. For a dessert spread, serve them with tangy lemon bars or our Classic Shortbread Cookies to contrast the caramel richness. Either way, these combos will delight every sweet tooth.
What are the key ingredients for Irresistible Homemade Twix Bites Recipe?
You’ll need shortbread cookies for the base, caramel for the middle layer, and melted chocolate for coating. The Irresistible Homemade Twix Bites Recipe also works well with vegan or gluten-free alternatives if needed.
How do you prevent the caramel from sticking when making Homemade Twix Bites?
Chill the caramel layer thoroughly before cutting and dipping in chocolate. For the Irresistible Homemade Twix Bites Recipe, freezing the caramel-topped shortbread for 15 minutes makes handling much easier.
ank-math-faq-item">
Can I make Irresistible Homemade Twix Bites ahead of time?
Absolutely! These treats store well in an airtight container for up to 2 weeks. The Irresistible Homemade Twix Bites Recipe actually improves in flavor after 24 hours as the layers meld together.
What’s the best chocolate for coating Homemade Twix Bites?
High-quality semi-sweet or milk chocolate chips work best for the Irresistible Homemade Twix Bites Recipe. For professional results, temper your chocolate to achieve that perfect snap and shine.
Best Cozy Chicken Soup – Easy Homemade Recipe
Introduction
There’s something undeniably comforting about a warm bowl of Cozy Chicken Soup Recipe, especially when the weather turns chilly or you need a little extra TLC. Whether you’re fighting off a cold or simply craving a hearty, homemade meal, this recipe wraps you in warmth from the first spoonful. Plus, it’s packed with wholesome ingredients that nourish both body and soul. Let’s dive into why this dish deserves a spot in your weekly rotation.
The Cozy Chicken Soup Recipe is a timeless classic, blending tender chicken, savory broth, and fresh vegetables into a dish that feels like a hug in a bowl. Unlike store-bought versions, this homemade recipe lets you control the flavors and quality of ingredients, ensuring every bite is both delicious and nutritious. Moreover, it’s incredibly versatile—you can easily customize it with your favorite herbs, noodles, or even a splash of lemon for brightness. If you love comforting meals, you’ll also enjoy our Hearty Beef Stew or Creamy Tomato Soup, which share the same soul-warming appeal.
What makes this recipe stand out is its simplicity. You don’t need fancy techniques or hard-to-find ingredients to create a pot of Cozy Chicken Soup Recipe that tastes like it simmered all day. In fact, it’s perfect for busy weeknights or lazy Sundays when you want minimal effort with maximum reward. The aroma alone will draw your family to the kitchen, and the flavors will keep them coming back for seconds. It’s the kind of meal that turns an ordinary day into something special.
Why I Love This Recipe
This Cozy Chicken Soup Recipe holds a special place in my heart because it reminds me of my grandmother’s kitchen. She used to make it whenever I visited, and the scent of simmering broth and herbs instantly made me feel at home. Now, whenever I whip up a batch, it’s like carrying on her tradition of love and care. Plus, seeing my own family gather around the table, bowls in hand, makes all the chopping and stirring worth it. It’s more than just a meal—it’s a reminder of connection, comfort, and the simple joys of cooking for those you love.
Health and Nutrition
Why it’s good for your body
Cozy Chicken Soup Recipe packs a powerful nutritional punch while warming you from the inside out. First, the lean chicken breast delivers high-quality protein to support muscle repair and keep you full longer. Additionally, the slow-simmered broth absorbs collagen from the bones, which may promote joint health and glowing skin. Moreover, the carrots, celery, and onions add fiber, vitamins A and C, and antioxidants to boost immunity.
Since the ingredients simmer together, Cozy Chicken Soup Recipe becomes an easy way to hydrate while nourishing your body. The broth also contains electrolytes like potassium, which helps maintain fluid balance. Furthermore, garlic and herbs like thyme offer anti-inflammatory benefits, making this soup a soothing choice when you feel under the weather. With minimal added fats and no refined sugars, it’s a light yet satisfying meal.
Finally, Cozy Chicken Soup Recipe adapts well to dietary needs. You can easily swap noodles for quinoa or zucchini if you prefer lower-carb options. Whether you need a post-workout recovery meal or a comforting dish on a chilly day, this soup delivers both flavor and nutrition in every spoonful.
How it fits in a healthy lifestyle
Cozy Chicken Soup Recipe fits seamlessly into balanced eating habits. If you’re watching your carb intake, skip the noodles and load up on extra veggies instead. The high-protein base makes it ideal for fueling active days or supporting weight management goals. For heart-healthy eating, the broth’s low sodium content and lean protein help maintain blood pressure and cholesterol levels.
Busy weeknights call for simple, nourishing meals, and this soup delivers. Pair it with a crisp kale salad for extra greens or serve it alongside whole-grain rolls for a satisfying dinner. Since it reheats beautifully, you can batch-cook it for quick lunches all week. Whether you prioritize gut health, immunity, or just wholesome comfort food, Cozy Chicken Soup Recipe checks all the boxes.
A comforting and hearty chicken soup perfect for chilly days.
Ingredients
Scale
For the Crust:
1 lb boneless, skinless chicken breasts
8 cups chicken broth
2 carrots, sliced
2 celery stalks, chopped
1 onion, diced
2 cloves garlic, minced
1 tsp dried thyme
1 tsp dried rosemary
Salt and pepper to taste
1 cup egg noodles
Instructions
1. Prepare the Crust:
In a large pot, bring chicken broth to a boil.
Add chicken breasts, carrots, celery, onion, garlic, thyme, and rosemary. Reduce heat and simmer for 20 minutes.
Remove chicken, shred it, and return to the pot.
Add egg noodles and cook for an additional 10 minutes or until noodles are tender.
Season with salt and pepper to taste.
Notes
You can customize the seasonings to taste.
“`html
How to Prepare This Dish
Steps and time-saving tips
Start by heating a large pot over medium heat and drizzle in a bit of olive oil. Toss in diced onions, carrots, and celery, then stir them until they soften, about 5 minutes. Next, add minced garlic and sauté for another minute until fragrant. Pour in low-sodium chicken broth, then drop in boneless, skinless chicken thighs for richer flavor. Bring the mixture to a gentle boil, then reduce the heat and let it simmer for 20 minutes. Meanwhile, shred pre-cooked rotisserie chicken if you’re short on time—this cuts cooking down significantly. Once the thighs cook through, remove them, shred the meat, and return it to the pot. Stir in egg noodles and cook until tender, about 8 minutes. Finally, season with salt, pepper, and fresh parsley. For a creamier texture, whisk in a splash of heavy cream at the end. Serve hot with crusty bread, and enjoy your Cozy Chicken Soup Recipe without the fuss.
and-learned-from">Mistakes I’ve made and learned from
I once rushed the sauté step, skipping the onion’s caramelization, and my Cozy Chicken Soup Recipe tasted bland. Now, I patiently let the veggies soften fully—it builds depth. Another time, I overcooked the noodles by adding them too early, turning them mushy. Lesson learned: add pasta last, or cook it separately if meal prepping. For more on balancing flavors, check out my guide on seasoning secrets. Also, if you’re new to soups, my soup basics post breaks down common pitfalls. Trust me, a little patience and timing make all the difference.
“`
n-and-variations">Cultural Connection and Variations
Where this recipe comes from
Every culture has its own version of Cozy Chicken Soup Recipe, and each one tells a story. In many households, this dish is more than just food—it’s a warm hug in a bowl. For instance, Jewish matzo ball soup transforms the classic recipe with fluffy dumplings, while Mexican sopa de lima brightens it with citrus and spices. Meanwhile, in China, ginger and goji berries often star in their healing chicken soups.
My grandmother’s Cozy Chicken Soup Recipe always included a handful of fresh dill and a splash of lemon juice. She swore it warded off colds, and honestly, it worked like magic. Across the South, cooks might add a dash of hot sauce or a scoop of rice for extra heartiness. No matter the variation, the goal stays the same: comfort, nourishment, and connection.
How it fits in today’s cooking
Today, Cozy Chicken Soup Recipe still holds its place as a timeless staple. Busy parents love it for quick weeknight dinners, while meal preppers stash batches in the freezer for hectic days. Some modern twists, like adding quinoa or spiralized zucchini, keep it fresh for health-conscious eaters. And let’s not forget its starring role during cold season—nothing soothes a sore throat faster.
Holidays also give this
dish a spotlight. Many families serve it as a starter during Thanksgiving or Christmas, pairing it with fluffy dinner rolls for the ultimate comfort meal. Others lean into its simplicity, like pairing it with a crisp green salad for a light yet satisfying lunch. No matter how you enjoy it, Cozy Chicken Soup Recipe remains a beloved tradition in kitchens everywhere.
Taste and Texture
What makes it delicious
Every spoonful of Cozy Chicken Soup Recipe wraps you in warmth, thanks to its rich, savory broth and tender chunks of chicken. The aroma alone—a blend of garlic, thyme, and slow-simmered onions—will make your kitchen smell like comfort. Meanwhile, the carrots and celery add a subtle sweetness and just the right amount of crunch. Whether you savor the silky broth or the hearty bites of chicken and veggies, this Cozy Chicken Soup Recipe delivers a perfectly balanced meal that feels like a hug in a bowl.
Boosting the flavor
For an extra layer of depth, try stirring in a splash of lemon juice or a sprinkle of fresh parsley just before serving. If you love a bit of heat, a pinch of red pepper flakes or a drizzle of homemade chili oil will elevate the flavors. Crusty bread or garlic herb dinner rolls make the perfect side, soaking up every last drop of the delicious broth. With these simple tweaks, your Cozy Chicken Soup Recipe will taste even more irresistible.
For the best Cozy Chicken Soup Recipe, always use fresh vegetables to build a rich flavor base. Simmer the broth gently to keep the chicken tender and avoid overcooking. Additionally, season in layers by adding herbs early and adjusting salt just before serving. Finally, let the soup rest for 10 minutes off the heat to let the flavors meld perfectly.
Mistakes to avoid
One common mistake is boiling the soup too vigorously, which can make the chicken tough. Instead, keep the heat low for a silky texture. Another error is skipping the step of skimming excess fat from the broth, which can result in a greasy finish. For more tips on balancing flavors, check out our guide on seasoning soups. Also, if your broth tastes bland, learn how to fix it with our soup troubleshooting tips.
g-suggestions">Serving and Pairing Suggestions
How to serve this dish
For a comforting presentation, ladle the Cozy Chicken Soup Recipe into warm bowls to keep it piping hot. Top with fresh parsley or a sprinkle of grated Parmesan for a pop of color and flavor. Meanwhile, serve it with crusty bread on the side for dipping, making it perfect for chilly evenings or casual family dinners. If you’re hosting a gathering, consider pairing it with a simple green salad for a balanced meal. Additionally, this soup shines during holiday potlucks or as a starter for Sunday brunch.
What goes well with it
First, try pairing the Cozy Chicken Soup Recipe with a crisp, buttery Chardonnay to enhance its rich flavors. Alternatively, a warm slice of our Honey Oat Bread makes an ideal side for soaking up every last drop. For a heartier meal, serve it alongside our Garlic Herb Roasted Potatoes, which add a savory crunch. Finally, a light citrus salad cuts through the soup’s warmth, creating a refreshing contrast.
math-faq-block">
What’s the secret to making cozy chicken soup taste rich and flavorful?
The key to a rich, flavorful Cozy Chicken Soup Recipe is simmering the broth with aromatics like onions, garlic, and herbs for at least 30 minutes. Adding a splash of lemon juice or apple cider vinegar at the end brightens the flavors, while a parmesan rind or bay leaf deepens the savory notes.
Can I make cozy chicken soup in a slow cooker?
Absolutely! A slow cooker simplifies the Cozy Chicken Soup Recipe—just add chicken, veggies, broth, and seasonings, then cook on low for 6–8 hours. Shred the chicken before serving for tender, melt-in-your-mouth results.
What vegetables work best in cozy chicken soup?
Classic choices for Cozy Chicken Soup Recipe include carrots, celery, and onions, but you can also add leeks, parsnips, or kale for extra depth. Avoid overcooking veggies—add delicate greens like spinach just before serving.
ank-math-faq-item">
How do I thicken cozy chicken soup without cream?
For a thicker Cozy Chicken Soup Recipe, mash a few cooked potatoes or blend a portion of the soup and stir it back in. A roux (butter and flour paste) or a cornstarch slurry also works well for a creamy texture without dairy.