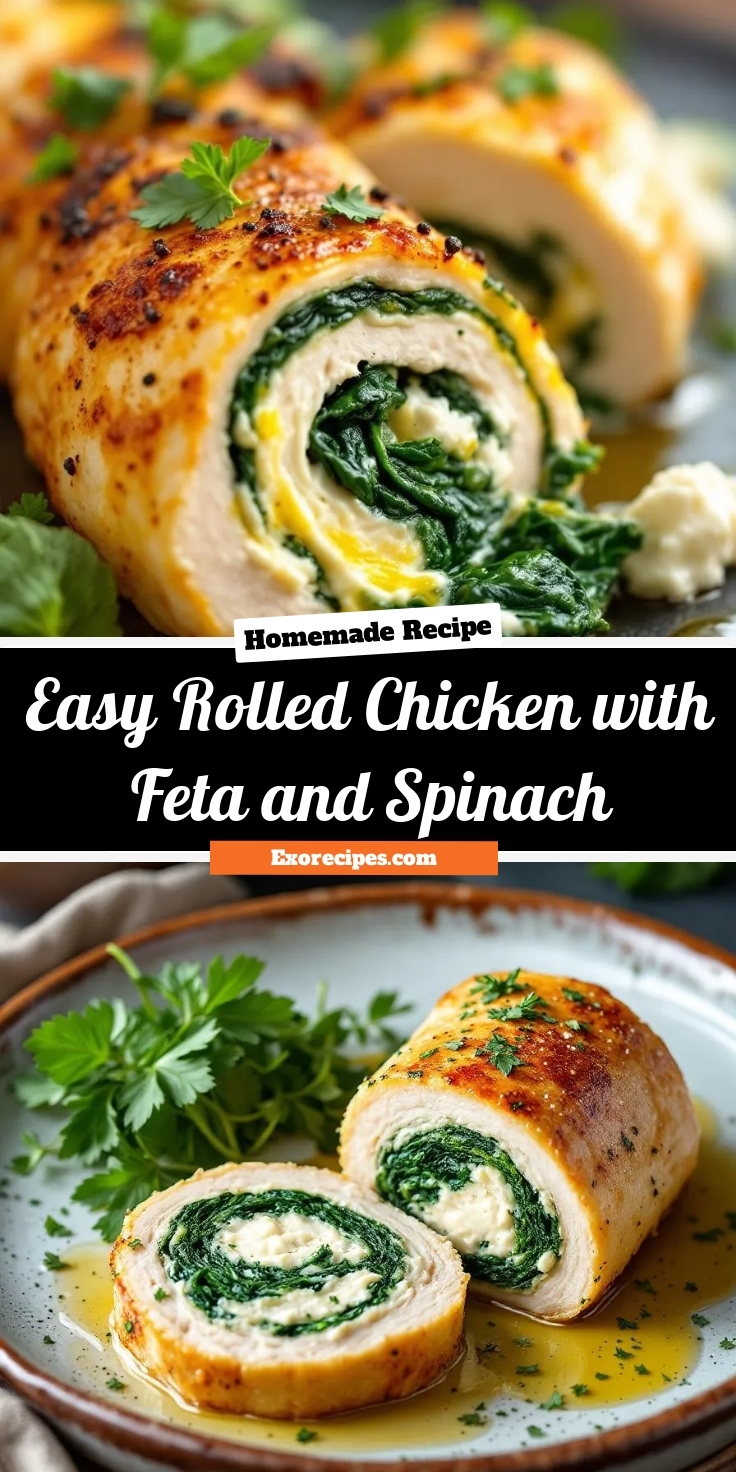
Do you ever crave a meal that feels both incredibly special and surprisingly simple to make? Furthermore, you want something that transforms the humble chicken breast into a stunning centerpiece. If so, you have found your next kitchen triumph. This recipe for Rolled Chicken with Feta and Spinach delivers that perfect combination of elegance and comfort, promising to become a new family favorite.
So, what exactly is Rolled Chicken with Feta and Spinach? Essentially, it is a beautifully prepared dish where we pound chicken breasts thin, stuff them with a vibrant mixture of creamy feta and fresh spinach, and then roll them into neat pinwheels. After that, we sear them to create a gorgeous golden crust and bake them to juicy perfection. This cooking method matters because it solves the common problem of dry, bland chicken. Instead, every single bite bursts with savory flavor and moist texture. Consequently, this dish perfectly fits our blog’s mission to share impressive, restaurant-quality meals that you can confidently recreate at home any night of the week. It is an ideal main course for both busy weeknights and festive dinner parties. Moreover, the process of rolling and stuffing might seem advanced, but we break it down into simple, foolproof steps. Therefore, you can easily master this technique and feel like a gourmet chef. Ultimately, this Rolled Chicken with Feta and Spinach recipe proves that a little effort yields massive flavor rewards.
Why I Love This Recipe
I truly adore this Rolled Chicken with Feta and Spinach because it reminds me of cooking with my grandmother. She taught me that the best meals come from the heart and involve a bit of hands-on love. Every time I prepare this dish, the aroma of garlic and herbs filling my kitchen instantly brings me back to her cozy kitchen. It is my absolute go-to recipe when I need to impress guests without spending all day cooking, and it never fails to receive rave reviews. This recipe represents everything I love about cooking: creativity, delicious flavor, and the joy of sharing something wonderful.
Health and Nutrition
Why it’s good for your body
This Rolled Chicken with Feta and Spinach packs a powerful nutritional punch. First, the lean chicken breast provides a fantastic source of high-quality protein. Consequently, this protein helps build and repair muscle tissue and keeps you feeling full and satisfied long after your meal. Moreover, the fresh spinach tucked inside delivers a wealth of essential vitamins like A, C, and K.
Additionally, spinach offers important minerals such as iron and magnesium. The creamy feta cheese contributes a satisfying richness along with a good dose of calcium for strong bones. Furthermore, olive oil and the natural juices from the cooking process create a sauce that contains healthy monounsaturated fats. These fats support heart health and help your body absorb the fat-soluble vitamins from the spinach.
Ultimately, every component in this Rolled Chicken with Feta and Spinach works together synergistically. Therefore, you get a meal that fuels your body efficiently. Finally, enjoying this dish means you are treating yourself to a flavor experience that also prioritizes your well-being.
How it fits in a healthy lifestyle
This Rolled Chicken with Feta and Spinach fits beautifully into a balanced eating plan. It naturally aligns with a high-protein diet, making it an excellent choice for supporting fitness goals and promoting satiety. The dish is also inherently gluten-free, so it’s a wonderful option for anyone with those dietary needs.
For a complete, well-rounded dinner, consider pairing it with a side of quinoa or a simple green salad. If you are looking for more inspiration for high-protein meals that don’t sacrifice flavor, explore our guide to easy meal prep recipes. This recipe is also a great example of how to eat for heart health without feeling deprived. The lean protein and healthy fats from olive oil make it a smart choice.
Cooking a nutritious meal from scratch might seem daunting on a busy weeknight, but it’s entirely achievable. For more tips on pulling off healthy dinners even when time is tight, check out our strategies for quick weeknight dinners. This dish proves that eating well can be simple, delicious, and deeply satisfying.
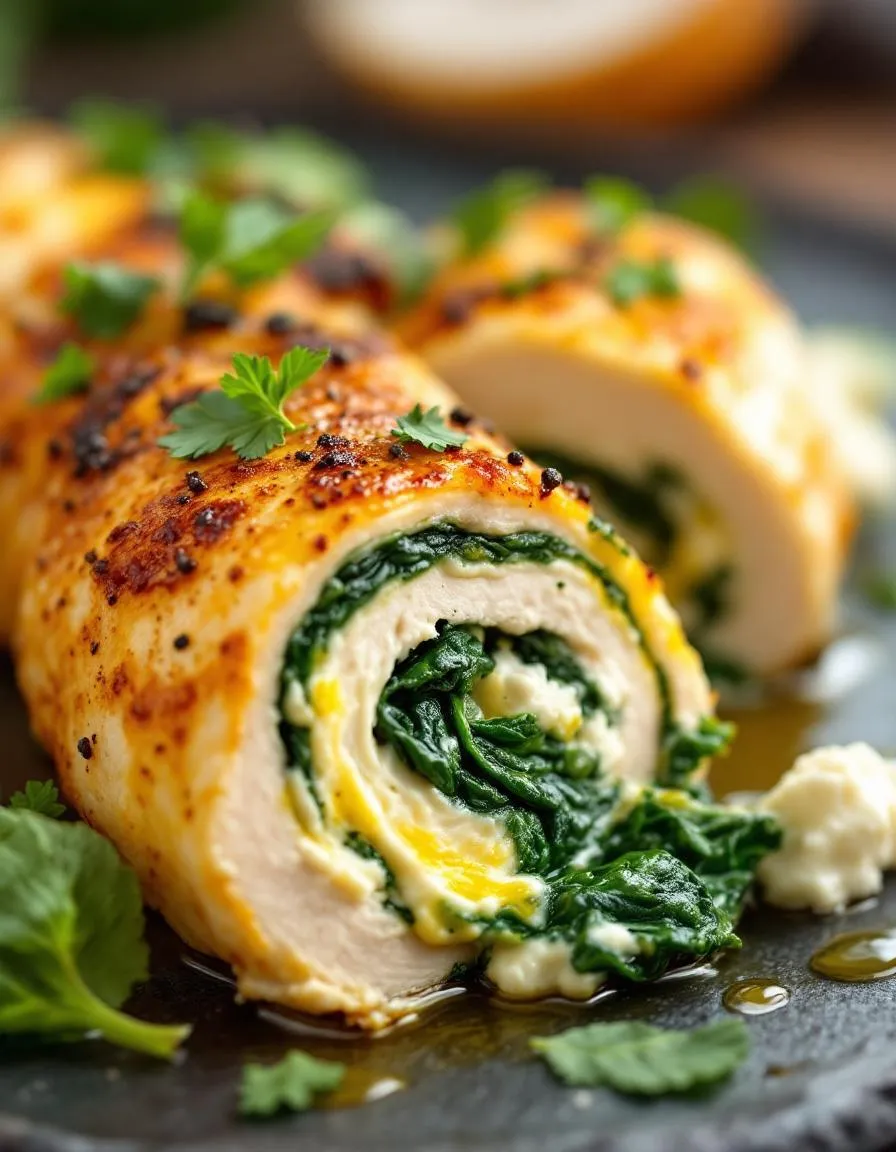
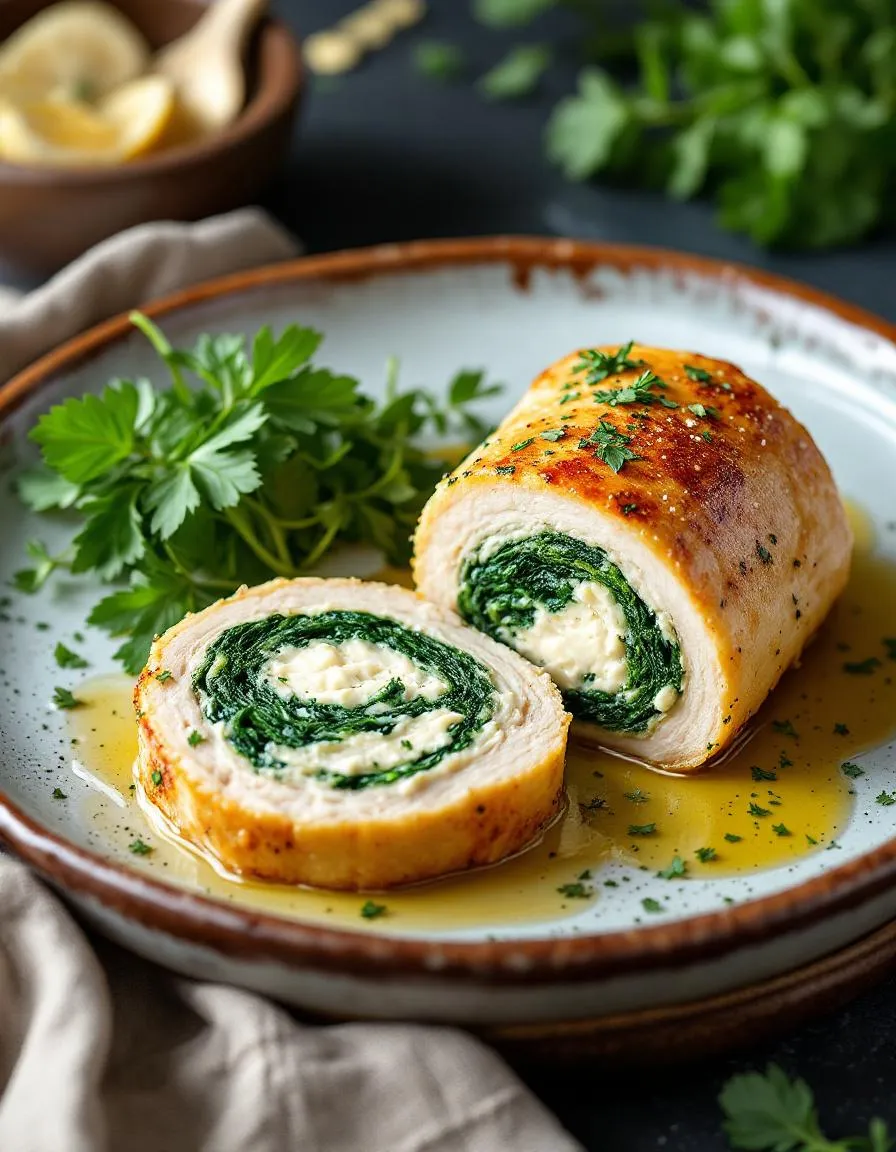
Tender chicken breasts stuffed with creamy feta and fresh spinach, rolled and baked to perfection.
Ingredients
Scale
For the Crust:
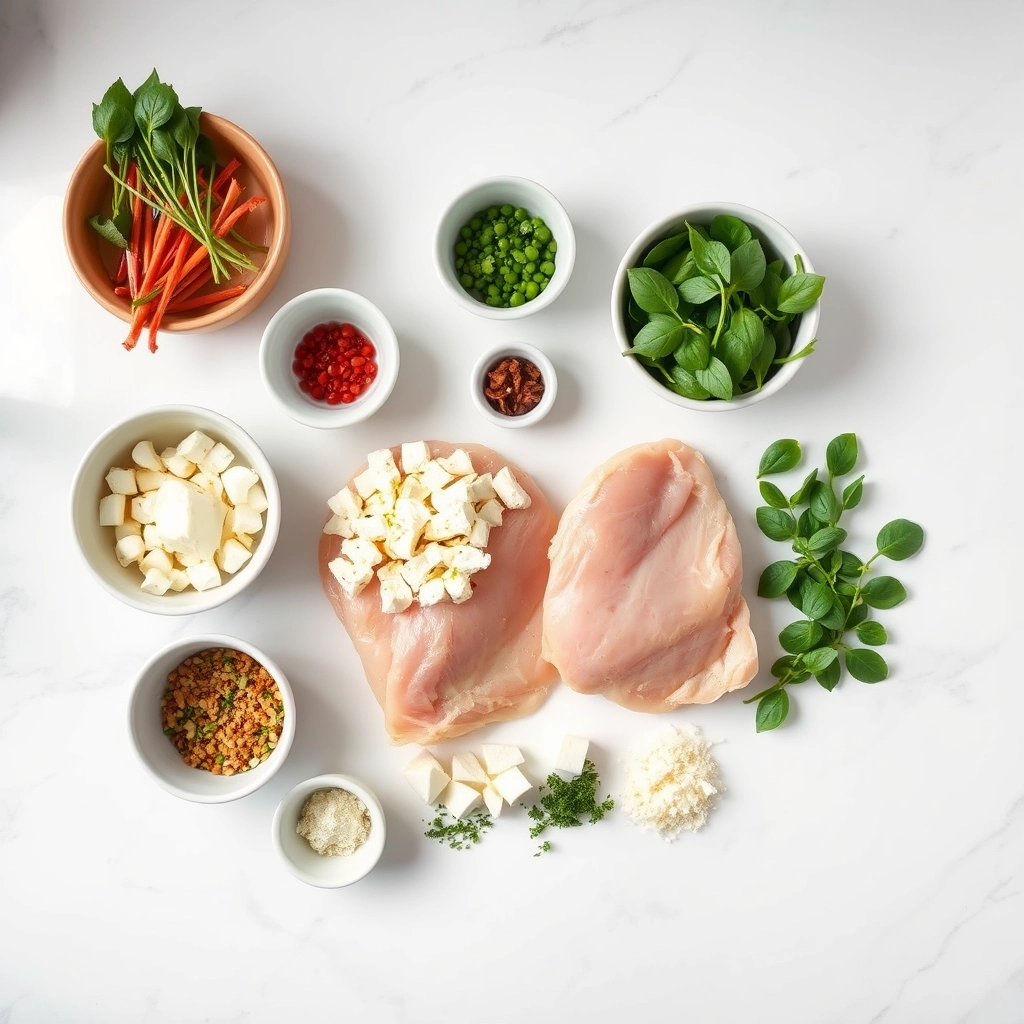
4 boneless, skinless chicken breasts
1 cup fresh spinach, chopped
1/2 cup crumbled feta cheese
2 cloves garlic, minced
1 tbsp olive oil
1 tsp dried oregano
Salt and pepper to taste
Toothpicks for securing
Instructions
1. Prepare the Crust:
Preheat oven to 375°F (190°C). Pound chicken breasts to 1/4-inch thickness.
In a bowl, mix spinach, feta, garlic, oregano, salt, and pepper.
Spread mixture evenly over each chicken breast, then roll tightly and secure with toothpicks.
Heat olive oil in an oven-safe skillet over medium-high heat. Sear chicken rolls on all sides until golden.
Transfer skillet to oven and bake for 20-25 minutes, until chicken is cooked through.
Rest for 5 minutes before slicing and serving.
Notes
You can customize the seasonings to taste.
s-dish">How to Prepare This Dish
Steps and time-saving tips
First, lay your chicken breasts flat on a cutting board and carefully slice each one horizontally, but do not cut all the way through. Next, place the chicken between two sheets of plastic wrap and gently pound it to an even thickness. This crucial step ensures your Rolled Chicken with Feta and Spinach cooks uniformly. Meanwhile, quickly wilt your fresh spinach in a hot pan with a tiny drizzle of olive oil; it takes just a minute. Then, transfer the spinach to a bowl and let it cool for a moment. Now, combine the feta cheese, cream cheese, garlic, and your cooled spinach in that bowl, mixing everything thoroughly with a fork. Generously spread this creamy filling over each pounded chicken breast, leaving a small border around the edges. Carefully roll the chicken up tightly, starting from the smaller end, and secure the seam with a couple of toothpicks. Finally, season the outside generously with salt, pepper, and a bit of paprika for a beautiful color. For a major time-saver, you can assemble these rolls a day ahead and simply keep them refrigerated until you are ready to bake. Just pop them in a preheated oven until the chicken is cooked through and the outside is gloriously golden.
Mistakes I’ve made and learned from
I have definitely learned a few lessons the hard way with this recipe. My biggest mistake was not securing the rolls properly; I once used only one toothpick, and the entire thing unraveled in the oven, creating a cheesy, spinach-filled mess. Now, I always use two or three toothpicks to ensure everything stays perfectly rolled. Another common error I made was overcooking the chicken, which resulted in a dry texture. Using a simple meat thermometer completely solved that problem, guaranteeing juicy perfection every single time. Also, I used to skip the step of cooling the spinach, which made the filling too watery and difficult to handle. Taking that extra minute to let it cool makes the assembly process so much smoother. For more tips on getting your fillings just right, my guide on creating the perfect cheese blend has all the details you need for success.
n-and-variations">Cultural Connection and Variations
Where this recipe comes from
My yia-yia always told me that good food tells a story. Her version of Rolled Chicken with Feta and Spinach did exactly that. She brought this concept with her from a small village in the Peloponnese, where stuffing meat was a practical way to stretch a meal and celebrate big family gatherings. However, her neighbors each added their own signature twist. Some families used tangy kefalotyri cheese, while others added a pinch of nutmeg or fresh dill to the filling.
This dish truly embodies the spirit of Mediterranean home cooking. Across Greece and into Turkey, you find similar rolls, often called roulades. For instance, many Turkish cooks might add pine nuts and currants for a sweet and savory contrast. In my own kitchen, I honor my grandmother’s memory by using plenty of fresh oregano from my garden. Ultimately, preparing Rolled Chicken with Feta and Spinach feels like connecting with generations of home cooks who valued flavor and resourcefulness above all else.
How it fits in today’s cooking
This classic dish fits perfectly into our modern need for meals that are both impressive and manageable. Busy home cooks love that they can prepare the rolls ahead of time and simply pop them in the oven later. Furthermore, its elegant presentation makes it a fantastic centerpiece for a dinner party menu without requiring professional skills.
Today, we also see many
creative adaptations. Some people swap the feta for goat cheese or add sun-dried tomatoes for a deeper flavor. Others lean into healthier eating by using chicken breast and loading the filling with extra spinach. Moreover, its balanced profile of protein and veggies aligns so well with contemporary wellness goals. You can easily pair it with a simple side, perhaps a light cucumber salad, for a complete and satisfying weeknight meal. This versatility ensures that Rolled Chicken with Feta and Spinach remains a beloved recipe for today’s tables.
Taste and Texture
What makes it delicious
This Rolled Chicken with Feta and Spinach delivers a truly satisfying and savory experience. Firstly, the tender, juicy chicken breast wraps around a wonderfully creamy and tangy filling. The feta cheese crumbles melt slightly, creating pockets of salty richness that perfectly complement the earthy, fresh spinach. As you bake it, the entire kitchen fills with an incredibly fragrant aroma of herbs and roasting garlic. Ultimately, each bite of this Rolled Chicken with Feta and Spinach offers a delightful contrast between the lean, succulent meat and the soft, flavorful interior.
Boosting the flavor
For an even more vibrant dish, consider a few simple tweaks. You can easily amplify the Mediterranean flavors by adding a spoonful of sun-dried tomatoes or a sprinkle of oregano to the filling. Furthermore, a bright, herby sauce served on the side introduces a fresh counterpoint to the rich, savory roll. A simple lemon herb sauce drizzled over the top just before serving cuts through the richness beautifully. Alternatively, if you enjoy a bit of heat, a pinch of red pepper flakes or a smear of harissa paste will add a welcome kick. For a complete meal, consider pairing it with a light, complementary side like this refreshing cucumber salad.
First, always pound your chicken breasts to an even quarter-inch thickness for consistent cooking and easy rolling. Furthermore, thoroughly squeeze all excess moisture from your thawed spinach to prevent a soggy filling. Use full-fat feta cheese, as it delivers superior flavor and creaminess compared to low-fat versions. Finally, secure your Rolled Chicken with Feta and Spinach tightly with toothpicks to maintain its perfect shape while baking.
Mistakes to avoid
Avoid overstuffing the chicken, as this common error causes the filling to leak out during cooking. Instead, use just a few tablespoons of filling per piece. Additionally, do not skip searing the rolls before baking them. Searing creates a flavorful golden crust that locks in the juices. For more on getting that perfect sear, explore our guide on how to sear chicken. Moreover, always let your cooked Rolled Chicken with Feta and Spinach rest for five minutes before slicing; this crucial step allows the juices to redistribute for incredibly moist meat. Consequently, if you find your chicken is often dry, our tips for keeping chicken moist will be a great help.
g-suggestions">Serving and Pairing Suggestions
How to serve this dish
Present your Rolled Chicken with Feta and Spinach beautifully for any occasion. First, let the roast rest for five minutes before slicing it into elegant pinwheels. Consequently, you will reveal the stunning spiral of green spinach and white feta. For a final touch, drizzle a little extra pan sauce over the top and garnish with fresh chopped parsley or a sprinkle of paprika. This impressive presentation makes Rolled Chicken with Feta and Spinach perfect for a holiday dinner or a special date night at home. Alternatively, serve it whole on a rustic wooden board for a family-style gathering that invites everyone to dig in.
What goes well with it
Pair your Rolled Chicken with Feta and Spinach with sides that balance its rich, savory flavors. For instance, a light and citrusy Lemon Herb Quinoa Salad cuts through the richness beautifully. Moreover, its bright notes perfectly complement the creamy feta filling. Additionally, simple roasted asparagus or garlicky sautéed green beans make excellent vegetable partners. Finally, a crisp, chilled glass of Sauvignon Blanc or a light Pinot Noir enhances the entire meal without overpowering the main dish.
math-faq-block">
How do you keep chicken rolls from falling apart?
To prevent your Rolled Chicken with Feta and Spinach from falling apart, make sure to pound the chicken breasts to an even thickness so they roll easily. Secure the rolls tightly with kitchen twine or toothpicks before cooking, and always sear them seam-side down first in a hot pan to create a seal that holds everything together during baking.
Can I use frozen spinach for rolled chicken breast?
Yes, you can use frozen spinach, but it’s crucial to thaw it completely and squeeze out all the excess moisture with a clean kitchen towel. If the spinach is too wet, it will make the filling runny and steam the chicken instead of baking it, which can ruin the texture of your Rolled Chicken with Feta and Spinach.
What can I substitute for feta cheese in this recipe?
If you’re not a fan of feta, you can substitute it with other crumbly, tangy cheeses that hold their shape when baked. Good alternatives for this Rolled Chicken dish include goat cheese (chèvre), ricotta salata, or even a well-drained cottage cheese mixed with herbs for a similar creamy and salty profile.
ank-math-faq-item">
What side dishes go well with spinach and feta stuffed chicken?
The Mediterranean flavors of this dish pair beautifully with simple sides like lemon rice, roasted potatoes, or a light orzo salad. For a low-carb option, serve your Rolled Chicken with Feta and Spinach alongside a crisp garden salad, steamed asparagus, or grilled zucchini.
Best Pumpkin S’mores Cookies Recipe
Introduction
Is there anything more comforting than the nostalgic crackle of a graham cracker or the gooey pull of melted marshmallow? Now, imagine those classic campfire flavors embracing the warm, spicy essence of autumn. That is the exact feeling we capture in every single batch of these Pumpkin S’mores Cookies. Ultimately, this recipe is your new favorite fall baking project, promising to fill your kitchen with an incredible aroma and deliver the most deliciously soft and chewy cookie you will ever taste.
Pumpkin S’mores Cookies are a seasonal twist on two beloved classics. Essentially, we combine a soft, cake-like pumpkin cookie base with the iconic components of a s’more. Consequently, each cookie boasts pockets of melted chocolate and toasted marshmallow, all grounded by the distinct, wholesome flavor of graham cracker. This creation matters because it solves a key dilemma for home bakers: how to enjoy the essence of s’mores when the weather turns chilly. Furthermore, it brilliantly utilizes that can of pumpkin puree you likely already have in your pantry. This recipe fits our blog’s tone perfectly, as we always strive to create approachable, crowd-pleasing dishes that inspire joy in the kitchen. For instance, if you enjoy these, you might also love our other creative cookie mashups. The process is straightforward and rewarding, making it an ideal activity for a cozy weekend afternoon. Moreover, the final product is utterly impressive, guaranteeing you rave reviews from anyone lucky enough to try one. These Pumpkin S’mores Cookies are not just a treat; they are a memorable experience that bridges summer nostalgia with autumn’s cozy comforts.
Why I Love This Recipe
I absolutely adore this recipe because it brings my family together. Every fall, my kids eagerly anticipate our first baking day, and these Pumpkin S’mores Cookies always kick off the season. I genuinely love watching their faces light up when they see the marshmallows get all toasty and golden under the broiler. The recipe reminds me of bonfire nights from my own childhood, but it translates those memories into a simple, bake-sale worthy treat that we can enjoy any day. It truly feels like we are creating our own delicious new tradition, one perfectly spiced, marshmallow-topped cookie at a time.
Health and Nutrition
Why it’s good for your body
These Pumpkin S’mores Cookies offer a surprisingly wholesome twist on a classic treat. First, pumpkin puree provides a powerful dose of vitamin A, which actively supports your immune system and vision. Furthermore, this key ingredient also delivers essential fiber, promoting healthy digestion and helping you feel satisfied. Consequently, you can enjoy a delicious dessert while also giving your body beneficial nutrients.
Additionally, pumpkin contributes a natural moisture and sweetness. This often allows for a modest reduction in added sugars compared to traditional cookie recipes. Moreover, the warming spices like cinnamon not only create that iconic fall flavor but also bring their own antioxidant properties to the party. Ultimately, each bite of these Pumpkin S’mores Cookies delivers more than just incredible taste.
Finally, let’s not forget the joy factor. Importantly, treating yourself to a homemade Pumpkin S’mores Cookies can significantly boost your mood and satisfaction. This makes them a genuinely feel-good food in every sense.
How it fits in a healthy lifestyle
Enjoying a Pumpkin S’mores Cookie fits perfectly into a balanced approach to eating. Think of it as a satisfying treat that rewards your healthy habits without derailing them. You can mindfully savor one with an afternoon coffee to avoid the vending machine run or pack one in your lunchbox for a planned indulgence that keeps you on track.
For those with specific dietary goals, this recipe is wonderfully adaptable. You can easily use a gluten-free flour blend to make them celiac-friendly. If you are monitoring your sugar intake, consider using a sugar alternative you love. Remember, the key is finding what works for you, much like exploring our tips for healthy meal prep to set your week up for success. Baking a batch yourself puts you in control of the ingredients, allowing you to create a treat that aligns with your wellness journey.
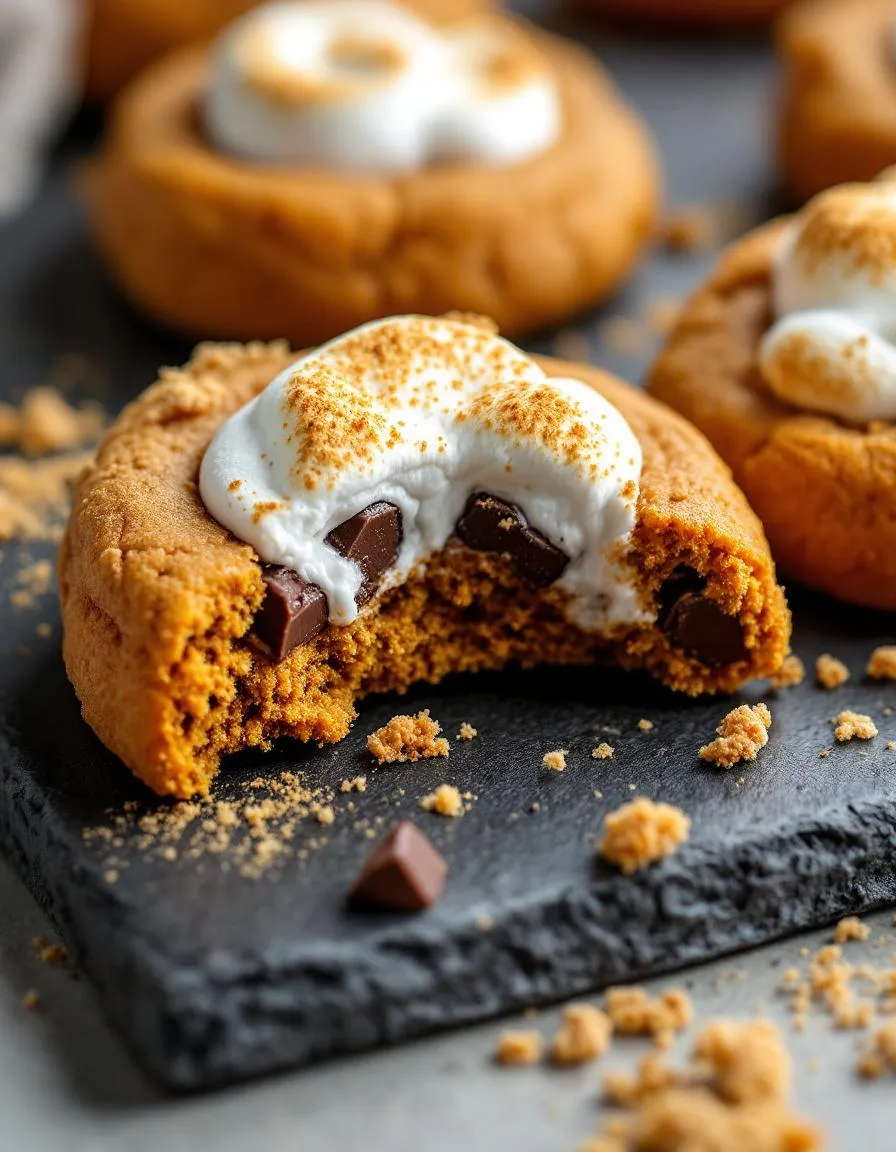
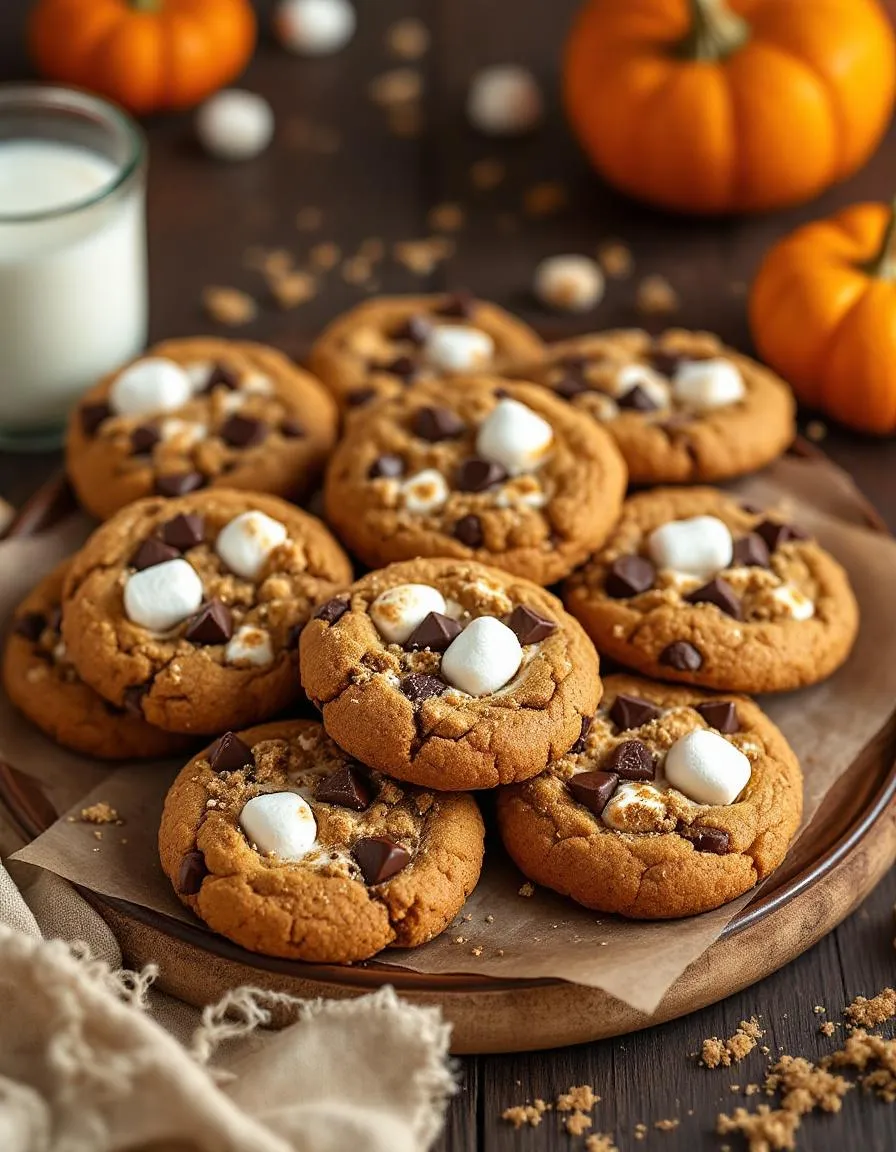
Soft pumpkin cookies with gooey marshmallow and chocolate chunks, combining the flavors of fall and classic s’mores.
Ingredients
Scale
For the Crust:
1 cup pumpkin puree
1/2 cup unsalted butter, softened
3/4 cup brown sugar
1/4 cup granulated sugar
1 large egg
1 tsp vanilla extract
2 1/4 cups all-purpose flour
1 tsp baking soda
1 tsp cinnamon
1/2 tsp nutmeg
1/4 tsp ginger
1/4 tsp salt
1 cup chocolate chunks
1 cup mini marshmallows
1/2 cup graham cracker crumbs
Instructions
1. Prepare the Crust:
Preheat oven to 350°F (175°C). Line baking sheets with parchment paper.
In a large bowl, cream together butter, brown sugar, and granulated sugar until fluffy. Beat in pumpkin puree, egg, and vanilla.
In another bowl, whisk flour, baking soda, cinnamon, nutmeg, ginger, and salt. Gradually mix into wet ingredients.
Fold in chocolate chunks, mini marshmallows, and graham cracker crumbs until just combined.
Drop rounded tablespoons of dough onto prepared sheets. Bake for 12-14 minutes until edges are golden. Cool on wire racks.
Notes
You can customize the seasonings to taste.
How to Prepare This Dish
Steps and time-saving tips
First, preheat your oven and line your baking sheets with parchment paper. Meanwhile, whisk your dry ingredients together in a medium bowl. In a larger separate bowl, cream the softened butter with both sugars until the mixture becomes light and fluffy. Next, beat in the pumpkin puree, egg, and vanilla. Gradually add your dry ingredients to this wet mixture, stirring just until the flour disappears. Gently fold in the chocolate chips and graham cracker pieces. Scoop generous tablespoons of dough onto your prepared sheets, ensuring you leave room for spreading. For a true s’mores experience, press a marshmallow half into the center of each dough ball before baking. Bake until the edges look set but the centers remain soft. Finally, let your Pumpkin S’mores Cookies cool on the pan for a few minutes before moving them. This patience prevents breakage. For a quick cleanup, use the same bowl for your dry ingredients that you used for creaming the butter. Additionally, a cookie scoop guarantees uniform size and even baking, saving you from rotating pans.
and-learned-from">Mistakes I’ve made and learned from
I learned the hard way that using cold butter is a major misstep. It simply will not cream properly with the sugars, resulting in a oddly textured dough that spreads too thin in the oven. Now, I always take the time to truly soften my butter to room temperature first. Another classic error I made was overbaking these Pumpkin S’mores Cookies. I once left them in just a minute too long, hoping for a crispier result. Unfortunately, they turned out far too hard after cooling, completely losing that delightfully soft and cakey texture we love. Remember, they continue to cook on the hot baking sheet after you remove them from the oven. For more on mastering textures, my guide on common baking mistakes dives deeper. Also, if your pumpkin puree seems watery, definitely take a moment to blot it. This little tip, which I cover in my pumpkin baking tips post, makes a world of difference for the perfect cookie consistency.
Cultural Connection and Variations
Where this recipe comes from
This recipe feels like a love letter to autumn. It marries two iconic American traditions: the cozy, spiced flavors of pumpkin baking and the nostalgic, open-fire joy of s’mores. My family always craved something new for our annual Halloween party, something that would surprise our guests. We started experimenting, and eventually, we created the ultimate fall mashup. The goal was to capture that feeling of a crisp October night around a firepit, all in a portable, chewy cookie.
Different regions put t
heir own spin on similar concepts. For instance, some bakers in the South might add a pinch of cayenne for a subtle kick, while others in the Midwest may use a hearty whole wheat flour. My version, however, stays true to that classic pumpkin pie spice blend. The beauty of these Pumpkin S’mores Cookies is their adaptability. You truly can make them your own.
How it fits in today’s cooking
Today, this recipe perfectly fits our desire for seasonal, shareable treats. It brings a sense of occasion to any fall day, not just a holiday. Modern home cooks love how it combines two familiar favorites into one exciting new dessert. Furthermore, it’s a fantastic recipe to make with kids, creating those sweet kitchen memories we all cherish.
Many bakers now adapt it for different diets, using gluten-free flour or a vegan marshmallow. You can easily find inspiration for other seasonal twists by exploring our complete collection of fall baking recipes. Ultimately, a batch of warm Pumpkin S’mores Cookies offers the ultimate comfort. They pair wonderfully with a hot drink, making them a perfect addition to your lineup of coffee cake ideas for a weekend brunch or a casual get-together.
>Taste and Texture
What makes it delicious
These Pumpkin S’mores Cookies deliver a warm, spiced aroma that fills your kitchen with the essence of autumn. Initially, your teeth sink through a delightfully crisp, toasted marshmallow top into a supremely chewy center. The rich, buttery graham cracker base provides a satisfying crunch that contrasts beautifully with the soft, spiced pumpkin dough. Meanwhile, pockets of melted chocolate offer a creamy, bittersweet counterpoint to the sweet marshmallow and fragrant spices like cinnamon and nutmeg. Ultimately, each bite of these Pumpkin S’mores Cookies creates a cozy campfire experience with a festive, pumpkin twist.
Boosting the flavor
For an even more decadent experience, consider a few simple tweaks. First, try rolling your dough balls in crushed graham cracker crumbs before baking; this creates an extra crunchy exterior. Alternatively, a sprinkle of flaky sea salt on top right after baking enhances the chocolate’s richness. If you adore that warm spice profile, a dash of cardamom or a pinch of black pepper will wonderfully deepen the flavor. For another creative autumn treat that uses similar spices, explore our popular Pumpkin Cinnamon Rolls. Furthermore, serving these cookies warm with a side of homemade salted caramel sauce for dipping takes them to an utterly irresistible level.
Tips for Success
Best practices for results
Always chill your cookie dough for at least thirty minutes because this crucial step prevents the Pumpkin S’mores Cookies from overspreading in the oven. Furthermore, use a cookie scoop to guarantee each portion is uniform, which ensures even baking. For the best texture and easy cleanup, you must line your baking sheets with parchment paper. Finally, press the marshmallow and chocolate pieces gently into the warm cookies right after they come out of the oven.
Mistakes to avoid
Avoid measuring your flour incorrectly, as too much will create a dry and crumbly dough; instead, always spoon and level your flour for accuracy. Consequently, do not overmix your cookie dough once you add the dry ingredients, since this overdevelops the gluten and leads to tough cookies. If your cookies consistently spread too thin, your butter was likely too warm; therefore, please check out our guide on how to properly soften butter for the perfect consistency. Moreover, do not overbake the cookies if you desire a soft and chewy center; they will continue to firm up as they cool on the baking sheet. For more detailed troubleshooting, our resource on common baking mistakes and fixes is incredibly helpful.
Serving and Pairing Suggestions
How to serve this dish
Present your freshly baked Pumpkin S’mores Cookies on a rustic wooden board for a cozy, autumnal feel. Moreover, arrange them in a circular pattern with a small bowl of extra marshmallow fluff for dipping in the center. For special occasions like Thanksgiving or a Halloween party, stack them into a miniature tower and dust the top cookie lightly with cinnamon. Ultimately, serving these warm cookies straight from the oven makes the marshmallow and chocolate gloriously gooey.
h-it">What goes well with it
A tall glass of cold milk perfectly complements the rich, spiced flavors of these Pumpkin S’mores Cookies. Alternatively, a hot mug of our creamy slow cooker hot chocolate creates the ultimate cozy dessert experience. For a delightful brunch spread, serve these cookies alongside a slice of our popular pumpkin cheesecake bread. Finally, a scoop of vanilla bean ice cream turns them into an incredible à la mode treat.
Can I make Pumpkin S’mores Cookies ahead of time?
Yes, you can prepare the dough for Pumpkin S’mores Cookies ahead of time. Simply scoop the dough onto a baking sheet, freeze until solid, and then transfer the balls to a freezer bag for up to 3 months. Bake them directly from frozen, adding a couple extra minutes to the baking time.
ank-math-faq-item">
How do you keep s’mores cookies from getting soggy?
The key is to use mini marshmallows instead of large ones and to ensure your graham cracker pieces are completely coated in dough. For the best texture, enjoy your Pumpkin S’mores Cookies within 1-2 days, as the marshmallows will start to soften the cookie over time.
What is a good substitute for graham crackers in baking?
If you don’t have graham crackers, digestive biscuits are the closest substitute for your Pumpkin S’mores Cookies. Other good options include vanilla wafers, crushed Biscoff cookies, or even crushed pretzels for a sweet and salty twist.
Why are my pumpkin cookies cakey?
Pumpkin puree adds a lot of moisture, which can lead to a cakey texture. To achieve a chewier cookie, make sure you are using pure pumpkin puree, not pumpkin pie filling, and avoid overmixing the dough. These steps will help you get the perfect texture for your Pumpkin S’mores Cookies.
div>
Easy 20-Minute Cheesy Quesadilla with Cumin Lime Crema
Introduction
We all have those nights. You know the ones, where time evaporates and everyone’s hungry, but your energy for cooking has completely vanished. Frankly, you need something fast, delicious, and utterly satisfying without any fuss. This is precisely why our 20-Minute Cheesy Quesadilla with Cumin Lime Crema is your new weeknight superhero. It swoops in to save the day, turning simple ingredients into a meal that feels special and will absolutely delight your entire family.
So, what exactly is this 20-Minute Cheesy Quesadilla with Cumin Lime Crema? Essentially, it is a masterclass in efficient, flavor-packed cooking. We take a classic, crowd-pleasing quesadilla and elevate it with a simple yet transformative dipping sauce. The crema, a creamy blend of tangy lime and warm, earthy cumin, cuts through the rich, melted cheese perfectly. This recipe matters because it proves that a truly great meal does not require hours in the kitchen or a long list of complicated ingredients. Instead, it celebrates smart cooking and bold flavors. Moreover, it fits our blog’s mission to deliver reliable, family-friendly recipes that respect your time and tantalize your taste buds. For instance, if you love quick meals, you will definitely appreciate our collection of easy weeknight dinners. Furthermore, this dish is incredibly versatile. You can easily customize the fillings based on what you have on hand, making it a perfect solution for using up leftovers. Ultimately, this approach to cooking—fast, flexible, and full of flavor—is what we champion. It is the kind of recipe you will return to again and again, and it pairs wonderfully with a refreshing side, like our popular mango avocado salsa.
Why I Love This Recipe
This recipe holds a special place in my heart because it was my go-to meal in college. I would make these quesadillas for my roommates after late study sessions, and the combination of crispy tortilla, gooey cheese, and that zesty crema always brought everyone together. It reminds me of simple times, good friends, and the undeniable power of a hot, cheesy meal to turn any bad day around. I love that I can now share that same feeling of comfort and joy with my own family on our busiest evenings.
Health and Nutrition
Why it’s good for your body
This 20-Minute Cheesy Quesadilla with Cumin Lime Crema delivers a powerful nutritional punch. First, the black beans provide a fantastic source of plant-based protein and fiber. Consequently, this combination helps you feel full and satisfied, which supports healthy digestion and steady energy levels.
Moreover, the spices, particularly the cumin in the crema, offer more than just flavor. In fact, cumin possesses natural anti-inflammatory properties and may even aid in digestion. Additionally, the lime juice contributes a healthy dose of vitamin C. This essential vitamin boosts your immune system and helps your body absorb iron from the beans more effectively.
Furthermore, you can easily customize this meal to boost its benefits. For instance, using a whole-wheat tortilla adds extra fiber, while opting for a reduced-fat cheese keeps it lighter. Ultimately, this 20-Minute Cheesy Quesadilla with Cumin Lime Crema proves that quick food can also be incredibly nourishing for your body.
How it fits in a healthy lifestyle
This 20-Minute Cheesy Quesadilla with Cumin Lime Crema fits perfectly into a balanced eating plan. It delivers a great mix of protein, complex carbs, and healthy fats that keep you energized. You can easily make it gluten-free by choosing corn tortillas, and it’s a fantastic option for a high-protein dinner that satisfies.
We believe healthy eating should be flexible and enjoyable. This quick recipe helps you avoid less nutritious takeout on busy nights. For more inspiration on building wholesome meals that taste amazing, explore our guide to creating a balanced plate. This quesadilla is a delicious example of how simple, real ingredients come together to support your wellness goals without sacrificing flavor.
Quick and flavorful quesadillas filled with melted cheese and served with a zesty cumin lime crema for dipping.
Ingredients
Scale
For the Crust:
4 large flour tortillas
2 cups shredded Monterey Jack cheese
1/2 cup sour cream
1 lime, juiced
1 tsp ground cumin
Salt to taste
2 tbsp chopped fresh cilantro
Cooking spray or butter for frying
Instructions
1. Prepare the Crust:
Prepare the crema by mixing sour cream, lime juice, cumin, and salt in a small bowl. Stir in cilantro and set aside.
Heat a non-stick skillet over medium heat. Place one tortilla in the skillet and sprinkle with 1/2 cup cheese. Top with another tortilla.
Cook for 2-3 minutes per side until golden brown and cheese is melted. Repeat with remaining tortillas and cheese.
Cut each quesadilla into wedges and serve immediately with the cumin lime crema for dipping.
Notes
You can customize the seasonings to taste.
s-dish">How to Prepare This Dish
Steps and time-saving tips
First, let’s whip up the star of the show, the cumin lime crema. Simply whisk together sour cream, a generous squeeze of fresh lime juice, a pinch of ground cumin, and a tiny bit of salt in a small bowl. Then, set this zesty sauce aside so the flavors can meld beautifully. Meanwhile, grab your favorite large skillet and place it over medium heat. Next, lay one flour tortilla flat in the dry, heating skillet. Quickly sprinkle a hearty handful of shredded cheese over one half of the tortilla, leaving a small border around the edge. Furthermore, you can add any pre-cooked fillings like black beans or shredded chicken now for extra heartiness. Carefully fold the bare half over the cheesy side, press down gently, and let it cook for about 2-3 minutes. After that, confidently flip your quesadilla with a spatula; it should be golden brown and perfectly crisp. Finally, cook the other side until it matches that gorgeous golden hue and the cheese is utterly molten. Slide your masterpiece onto a cutting board, drizzle lavishly with the cool crema, slice into wedges, and serve immediately for the ultimate experience.
Mistakes I’ve made and learned from
I used to crank my stove to high heat, desperately trying to speed things up, but I always ended up with a burnt shell and unmelted cheese inside. Now, I religiously keep the heat at a steady medium, which guarantees that perfect, crispy golden brown exterior every single time. Another classic blunder of mine was overstuffing the quesadilla with too many ingredients, which caused a major structural failure upon flipping. I learned that a moderate, even layer of cheese acts as the glue, and for heavier add-ins, checking the doneness of my proteins first is a non-negotiable step for both safety and success. Speaking of cheese, choosing the wrong type led to a greasy mess instead of a creamy melt. Through some delicious trial and error, I found that a blend of Monterey Jack and a sharp cheddar works best, a tip I picked up from my deep dive into perfect cheese blends for Mexican food.
n-and-variations">Cultural Connection and Variations
Where this recipe comes from
My love for quesadillas started in a tiny, sun-drenched Mexican kitchen. However, the 20-Minute Cheesy Quesadilla with Cumin Lime Crema tells its own modern story. Fundamentally, it draws from the beautiful simplicity of Northern Mexican cuisine, where flour tortillas cradle simple, hearty fillings over a hot comal. Meanwhile, families in Oaxaca might stuff their versions with stringy quesillo and earthy huitlacoche. Conversely, home cooks in Texas often add a generous sprinkle of cumin to their ground beef, creating a distinct Tex-Mex flair.
In my own family, we treat this dish as a blank canvas for weekly clean-out-the-fridge creativity. My abuela always used a dry skillet, but I adore the crispy, buttery exterior a little oil provides. Furthermore, that cool, tangy crema is my personal twist, inspired by the creamy sauces drizzled over tacos al pastor. Ultimately, this quick and delicious 20-Minute Cheesy Quesadilla with Cumin Lime Crema celebrates adaptability, proving that great food needs no complicated rules.
How it fits in today’s cooking
This dish absolutely thrives in our fast-paced modern world. It seamlessly fits into busy weeknights, after-school snack time, and even casual entertaining. Moreover, its versatility speaks directly to today’s cooking trends. For instance, you can easily adapt it for plant-based diets by using our favorite vegan breakfast burrito fillings and a dairy-free cheese. The recipe also encourages using whatever you have on hand, reducing food waste brilliantly.
Conversely, it also sta
rs as the ultimate comfort food. There’s something incredibly soothing about that melted cheese and crispy tortilla. Finally, you can turn it into a full fiesta by pairing it with other quick sides. For a complete spread, consider serving it alongside a refreshing mango avocado salsa that cuts through the richness perfectly. This quesadilla truly earns its place as a beloved, modern classic.
Taste and Texture
What makes it delicious
This 20-Minute Cheesy Quesadilla with Cumin Lime Crema delivers a truly satisfying experience. Firstly, you bite through a wonderfully crisp, golden-brown tortilla that gives way to a molten, stretchy core of savory cheese. Meanwhile, the cumin lime crema introduces a brilliantly cool and creamy contrast with its zesty tang and earthy, aromatic warmth. Consequently, every mouthful balances rich, gooey comfort with a bright, fragrant kick that makes it incredibly moreish. Ultimately, the combination of textures and flavors in this 20-Minute Cheesy Quesadilla with Cumin Lime Crema creates a quick meal that feels both indulgent and refreshing.
Boosting the flavor
You can easily amplify this dish with a few creative twists. For instance, try adding a spoonful of pickled jalapeños or a smoky chipotle powder to the cheese filling for a spicy kick. Alternatively, top your finished quesadilla with a fresh, crunchy cabbage slaw or a dollop of creamy avocado salsa. Furthermore, a squeeze of fresh lime juice just before serving always brightens all the flavors beautifully. Ultimately, these simple additions personalize your meal while complementing its core deliciousness.
First, always warm your tortillas for thirty seconds in a hot skillet before you add the filling; this makes them more pliable and prevents cracking. Furthermore, shred your own cheese from a block, as pre-shredded varieties contain anti-caking agents that prevent optimal melting. For the best flavor in your 20-Minute Cheesy Quesadilla with Cumin Lime Crema, generously spread the crema on the inside of the tortilla before adding the cheese. Finally, resist the urge to press down on the quesadilla while it cooks, which can force the delicious filling out.
Mistakes to avoid
A common error is overfilling the tortilla, which leads to a messy spillage of cheese and other ingredients. Instead, use a moderate amount of filling and leave a clear border around the edge to ensure a clean seal. Additionally, many people cook quesadillas on too high of a heat, resulting in a burnt exterior and cold, unmelted cheese inside. For perfect results, use a medium-low heat and cook until the cheese is fully melted and the tortilla is golden brown, just like our guide for achieving the perfect golden brown on a grilled cheese. Also, do not forget to let your quesadilla rest for a minute before slicing; this allows the cheese to set slightly. For more tips on handling melty ingredients, our article on keeping breakfast burritos intact offers great foundational advice.
g-suggestions">Serving and Pairing Suggestions
How to serve this dish
Present your 20-Minute Cheesy Quesadilla with Cumin Lime Crema on a vibrant, colorful platter for maximum visual appeal. For instance, slice each quesadilla into triangles and arrange them in a sunburst pattern. Drizzle the bright, zesty crema artfully over the top just before serving. Furthermore, a final flourish of fresh chopped cilantro or a few thin slices of jalapeño adds a beautiful pop of color and freshness. This dish truly shines at casual gatherings, making it a perfect centerpiece for game day or a fun family movie night. Ultimately, its quick preparation also makes it an ideal last-minute option for busy weeknights when you need something both delicious and impressive.
What goes well with it
A crisp, light side salad perfectly balances the rich, cheesy goodness of this meal. Specifically, a simple Mexican Street Corn Salad offers a smoky, tangy counterpoint that complements every bite. For a heartier spread, consider serving a bowl of spicy black bean soup on the side. Moreover, the cool, creamy texture of the crema pairs wonderfully with the heat from a fresh mango habanero salsa. To complete the experience, a classic margarita or an ice-cold Mexican lager cuts through the richness and refreshes your palate. Finally, for a non-alcoholic option, a sparkling lime agua fresca provides a similarly bright and fizzy contrast.
math-faq-block">
What is cumin lime crema made of?
Cumin lime crema is a simple, tangy sauce made from sour cream or Mexican crema, fresh lime juice, ground cumin, and a pinch of salt. It’s the perfect cool and creamy topping to balance the warm, cheesy flavors of your 20-Minute Cheesy Quesadilla with Cumin Lime Crema. You can also add a touch of garlic powder or cilantro for extra flavor.
Can I make these quesadillas ahead of time?
You can prepare the filling and the cumin lime crema sauce separately up to a day in advance and store them in airtight containers in the refrigerator. For the best texture, assemble and cook the 20-Minute Cheesy Quesadilla with Cumin Lime Crema just before serving, as storing cooked quesadillas can make the tortilla soggy.
What kind of cheese is best for quesadillas?
A good melting cheese is key. A blend of Monterey Jack and sharp cheddar is a classic choice, offering both excellent melt and flavor. Oaxaca or Asadero cheese are also fantastic authentic options that provide the perfect stretchy, gooey texture for your 20-Minute Cheesy Quesadilla.
ank-math-faq-item">
How do you keep quesadillas crispy?
The key is to cook them in a preheated, dry skillet over medium heat without overcrowding the pan. Avoid adding oil or butter, which can make them greasy instead of crisp. Letting them rest for a minute on a wire rack after cooking prevents steam from softening the tortilla, ensuring a crispy shell for your Cumin Lime Crema topping.
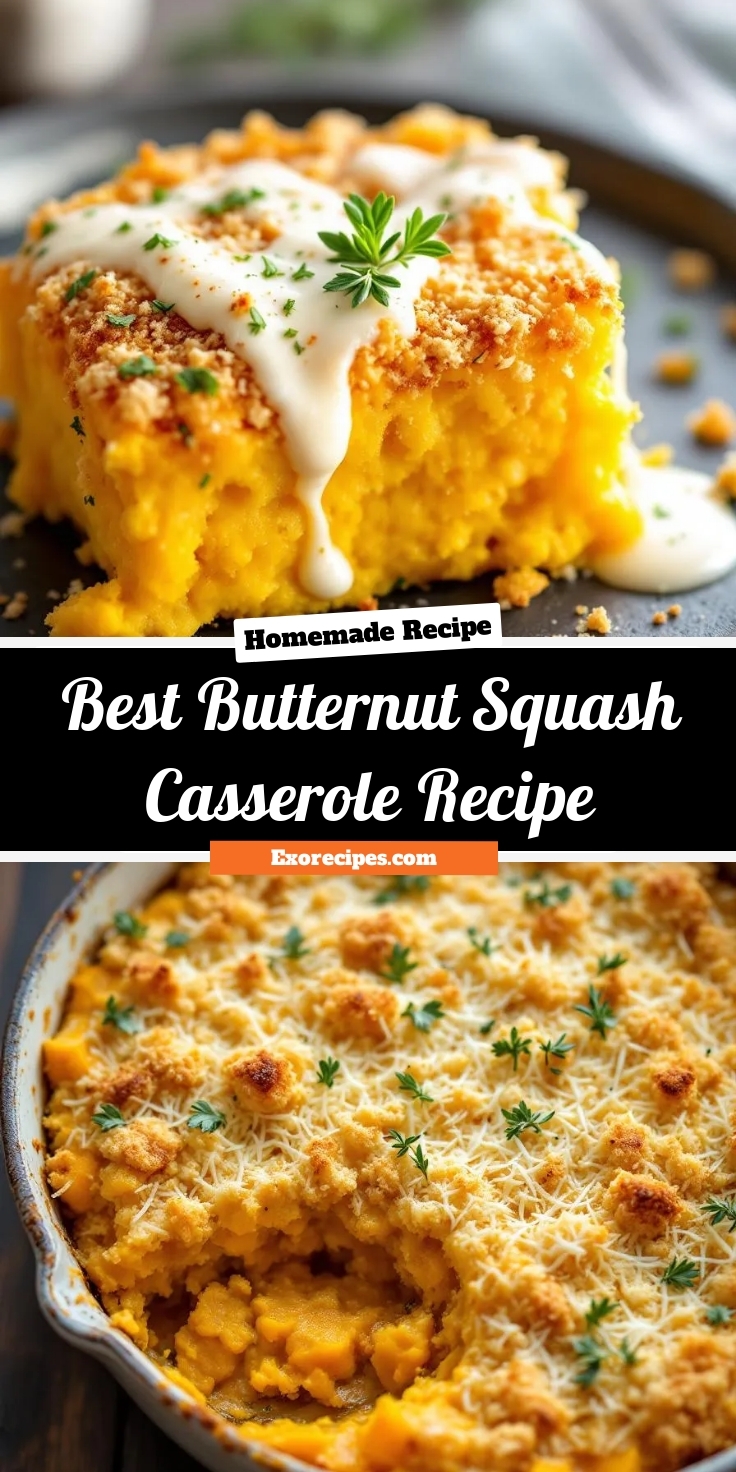
Best Butternut Squash Casserole Recipe
Introduction
Is there anything more comforting than the warm, spiced aroma of a home-cooked dish filling your kitchen? Honestly, it feels like a hug in a bowl, especially when the weather turns chilly. This particular recipe for Butternut Squash Casserole captures that exact feeling of cozy contentment. Furthermore, it transforms simple, wholesome ingredients into a stunning centerpiece that will have everyone asking for seconds. Ultimately, it is the perfect dish to bring people together around your table.
Butternut Squash Casserole is a quintessential fall and winter dish that celebrates the sweet, nutty flavor of its namesake ingredient. Traditionally, people bake it until the squash becomes incredibly tender and often top it with a crunchy, buttery streusel or toasted marshmallows. This dish matters because it masterfully bridges the gap between a savory side and a dessert-like treat, making it a versatile star on any holiday spread or weeknight dinner table. Consequently, it appeals to both kids and adults, pleasing a variety of palates with its harmonious blend of flavors and textures. On our blog, we champion recipes that are both approachable and impressive, and this Butternut Squash Casserole recipe fits that mission perfectly. It uses real, whole foods to create something truly special, much like our popular Creamy Garlic Mashed Potatoes. Moreover, preparing a from-scratch casserole might seem daunting, but we break it down into simple, manageable steps. This method ensures you achieve a spectacular result without any stress, proving that fantastic homemade food is always within your reach. Additionally, the process of making this casserole fills your home with an inviting fragrance that promises a delicious meal, building anticipation for everyone gathered. For another fantastic seasonal side dish that follows a similar philosophy, you must try our Herb Roasted Brussels Sprouts.
Why I Love This Recipe
This Butternut Squash Casserole holds a special place in my heart because it reminds me of my grandmother’s kitchen every Thanksgiving. She always let me sprinkle the topping on, and I vividly remember feeling so proud of my contribution to our family feast. Now, I carry on that tradition with my own family, and the smell of it baking instantly brings back those cherished memories. Ultimately, I love how this dish creates new connections while honoring old ones, all while tasting absolutely incredible.
Health and Nutrition
Why it’s good for your body
This Butternut Squash Casserole actively nourishes your body with a powerful combination of vitamins and fiber. For instance, the star ingredient, butternut squash, delivers a massive dose of vitamin A, which directly supports healthy vision and a strong immune system. Furthermore, its vibrant orange flesh provides significant antioxidants like beta-carotene that help combat oxidative stress. Consequently, enjoying a serving of this casserole contributes to your overall cellular health.
Additionally, this dish offers a fantastic source of dietary fiber, which promotes excellent digestive regularity and gut health. Moreover, the fiber content helps you feel full and satisfied after your meal, which can support healthy weight management goals. Therefore, this Butternut Squash Casserole acts as a delicious and satisfying centerpiece for any lunch or dinner. Finally, when you prepare this recipe, you create a meal that truly loves your body back with every wholesome bite.
How it fits in a healthy lifestyle
This Butternut Squash Casserole fits beautifully into a balanced and mindful eating plan. You can confidently serve it as a hearty main for a meatless Monday or as a stellar side dish alongside a lean protein like grilled chicken or fish. It naturally aligns with a gluten-free lifestyle when you use certified gluten-free oats, and its base of whole foods makes it a fantastic heart-healthy option packed with nutrients that support cardiovascular wellness.
For those tracking their nutrition, this casserole is a winner. You can easily adjust portion sizes to meet your specific calorie needs without sacrificing flavor or satisfaction. If you are looking for more ways to incorporate healthy, vegetable-forward dishes into your weekly rotation, explore our complete guide to easy weekly meal prep. And remember, balancing a dish like this with other nutrient-dense choices is key; find more inspiration for building a perfect plate in our tips for a balanced diet.
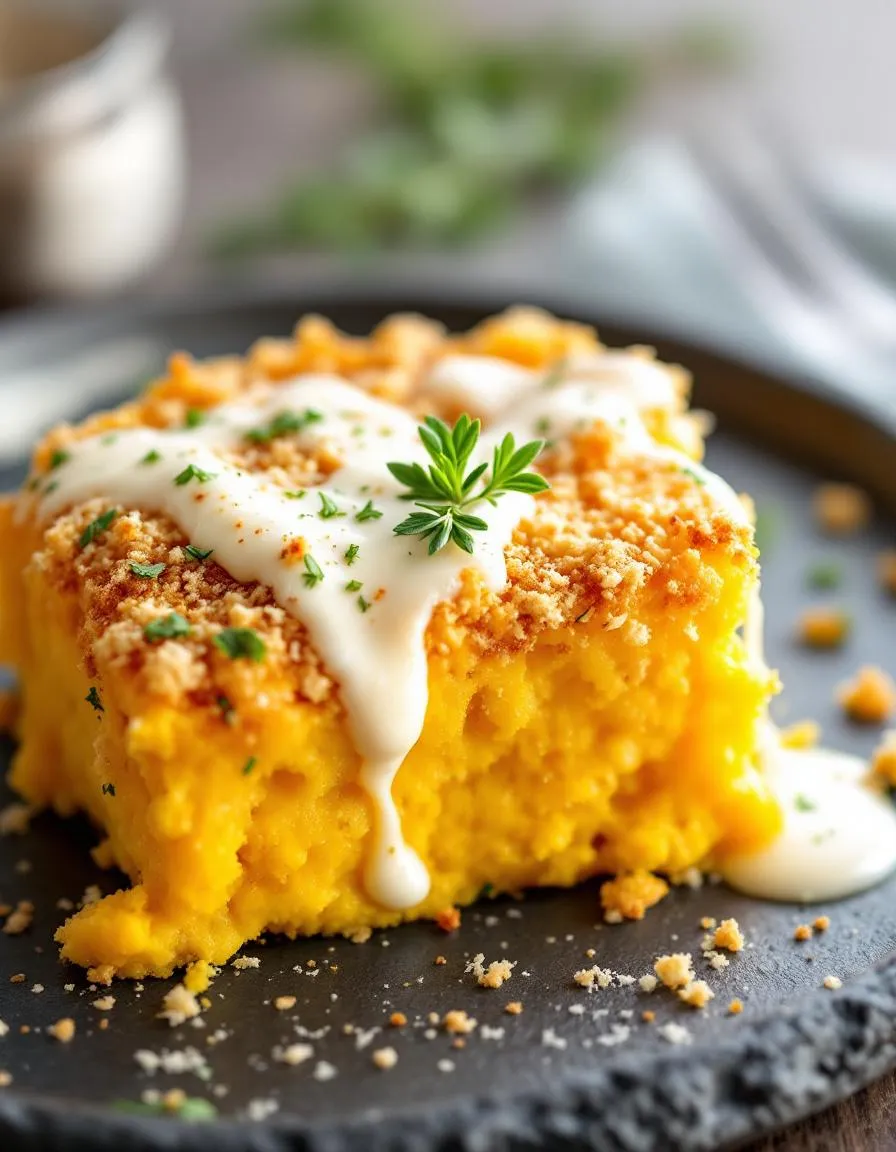
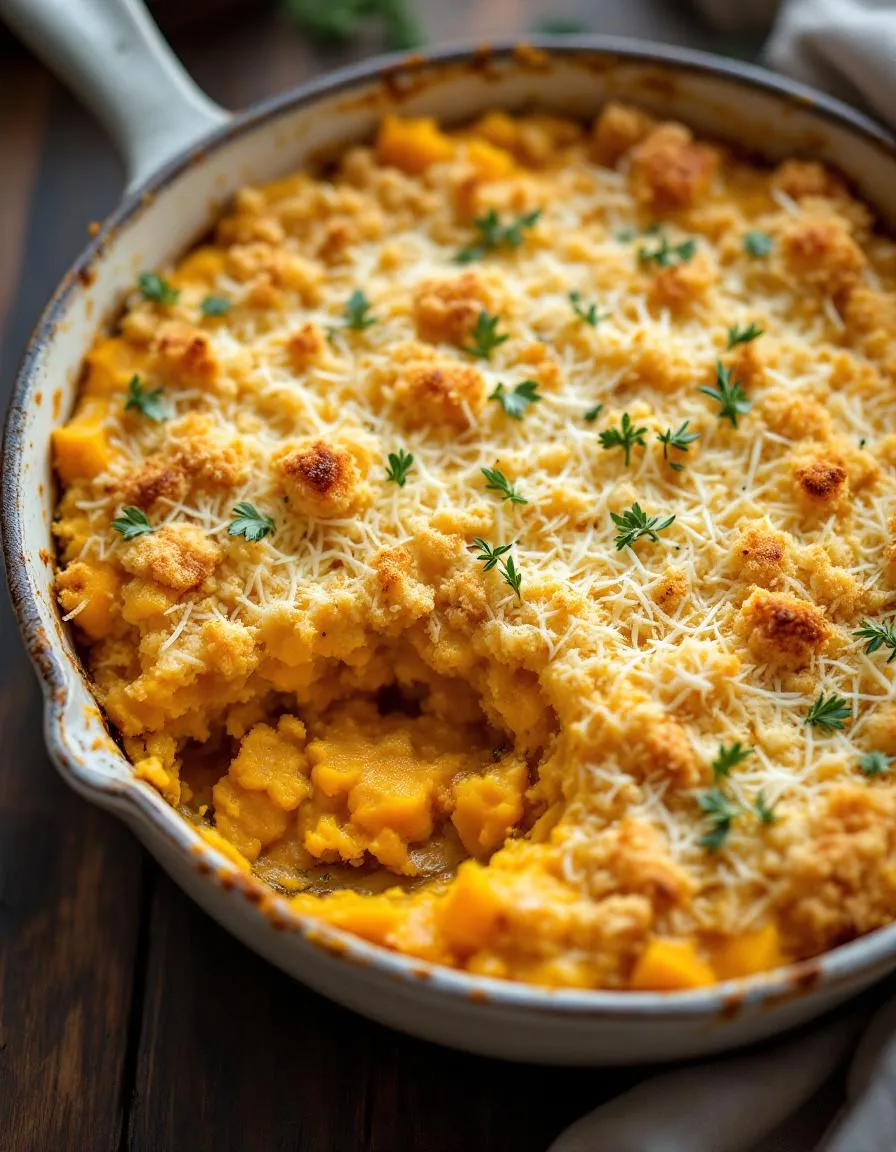
A creamy, savory casserole with roasted butternut squash, herbs, and a crispy topping.
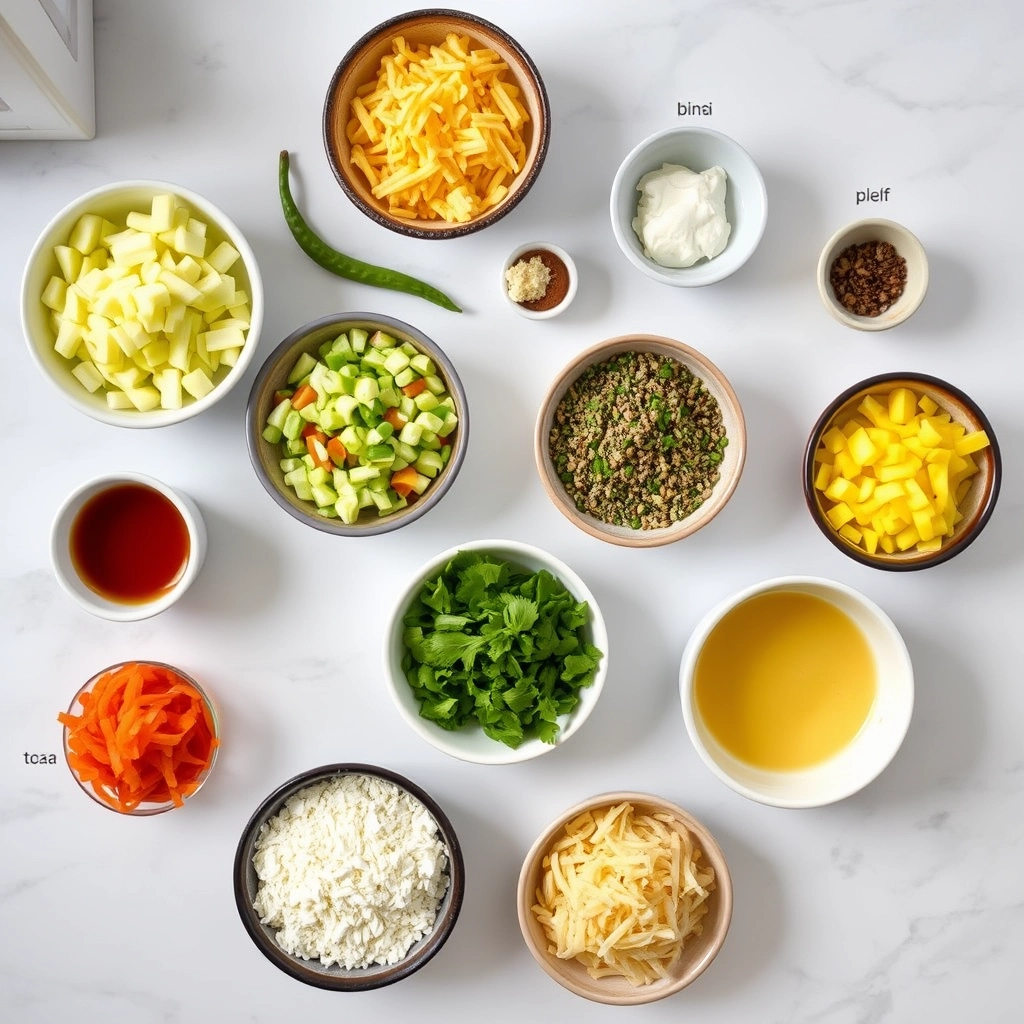
Ingredients
Scale
For the Crust:
1 large butternut squash, peeled and cubed
2 tablespoons olive oil
1 teaspoon salt
1/2 teaspoon black pepper
1 teaspoon dried thyme
1/2 teaspoon garlic powder
1/2 cup heavy cream
1/2 cup grated Parmesan cheese
1/2 cup breadcrumbs
2 tablespoons melted butter
Instructions
1. Prepare the Crust:
Preheat oven to 400°F (200°C). Toss butternut squash cubes with olive oil, salt, pepper, thyme, and garlic powder.
Spread squash on a baking sheet and roast for 25 minutes, until tender.
Transfer roasted squash to a bowl, mash slightly, then stir in heavy cream and half of the Parmesan cheese.
Spread mixture into a greased casserole dish. Combine breadcrumbs, melted butter, and remaining Parmesan; sprinkle over top.
Bake at 375°F (190°C) for 20 minutes, until topping is golden and crispy.
Notes
You can customize the seasonings to taste.
How to Prepare This Dish
Steps and time-saving tips
First, preheat your oven to 375°F and grease your baking dish. Meanwhile, tackle the butternut squash. For a major time-saver, use pre-cubed squash from the grocery store. Alternatively, roast halved squash halves face-down on a sheet pan until the flesh becomes incredibly tender. Scoop it out easily after roasting. Then, transfer the soft squash to a large mixing bowl. Mash it thoroughly with a potato masher until it’s smooth. Next, add your brown sugar, eggs, milk, and melted butter. Whisk everything together with enthusiasm until the mixture looks perfectly combined and silky. Consequently, the consistency should be like a thick batter.
Pour this beautiful mix
ture into your prepared dish and spread it into a perfectly even layer. Now, for the crowning glory, make the streusel topping. Simply combine flour, more brown sugar, and cold cubed butter in a separate bowl. Use your fingers to work the butter into the dry ingredients until the mixture resembles coarse, delicious crumbs. Sprinkle this over your butternut squash casserole base uniformly. Finally, bake your creation for about 35-40 minutes. You will know it’s done when the top turns a beautiful golden brown and the edges bubble gently. Let it rest for a few minutes before serving. This allows it to set beautifully for perfect slices.
Mistakes I’ve made and learned from
I’ve definitely learned a few things the hard way with this dish. My biggest mistake was undercooking the squash initially, which resulted in a watery, lumpy casserole base that never quite set. Now, I always make sure the squash is fork-tender and I drain any excess liquid after mashing. Another lesson was overmixing the topping; I used to blend it until it was like a paste, which baked into a hard sheet instead of a delicate crumble. Using cold butter and a light touch is absolutely non-negotiable. If you’re new to working with winter squash, my guide on how to cut butternut squash safely will save you so much frustration. And for more savory inspiration that uses similar techniques, our popular savory breakfast casserole has a topping method you can master here too.
n-and-variations">Cultural Connection and Variations
Where this recipe comes from
My grandmother always made her famous Butternut Squash Casserole for our Thanksgiving feast. Consequently, the aroma of roasting squash, cinnamon, and brown sugar instantly transports me back to her warm, bustling kitchen. While we know it as a classic American side dish, its roots actually stretch across the pond. Essentially, settlers likely brought over the concept of savory vegetable puddings from Europe. However, they found a wonderful new ingredient waiting for them: native squash.
Different regions put their own spin on this comforting dish. For instance, in the American South, cooks often add a crunchy pecan streusel topping for extra texture. Meanwhile, some families might stir in tart apples or dried cranberries for a sweet and tangy twist. Alternatively, a savory version with herbs, onions, and a crispy breadcrumb topping is just as beloved. Ultimately, every family seems to have its own cherished version of Butternut Squash Casserole that tells a story.
How it fits in today’s cooking
This casserole absolutely earns its place on the modern table. It beautifully bridges the gap between nostalgic tradition and contemporary eating habits. Furthermore, its natural sweetness and creamy texture make it a huge hit with kids and adults alike. Many health-conscious cooks now adapt the recipe by using coconut milk or almond milk for a dairy-free version. They might also swap in maple syrup or coconut sugar instead of refined brown sugar.
You can easily enjoy th
is dish beyond the holidays. For example, it makes a fantastic make-ahead option for busy weeknights. Simply pair it with a simple roasted chicken for a complete, comforting meal. If you are looking for more seasonal inspiration, our guide on how to make pumpkin puree can help you create other autumnal favorites. Additionally, for a sweet finish to any dinner, this casserole pairs wonderfully with our popular classic cinnamon roll recipe. Ultimately, this versatile dish continues to bring warmth and comfort to our tables all season long.
Taste and Texture
What makes it delicious
This Butternut Squash Casserole delivers a beautiful harmony of sweet and savory notes. First, the roasted squash itself offers a velvety, almost creamy texture that melts in your mouth. Its natural sweetness deepens in the oven, creating a rich, caramelized flavor base. Meanwhile, the aromatic sage and earthy thyme weave a fragrant, savory thread through every bite. Finally, a buttery, crisp pecan topping provides a delightful crunch, contrasting the soft filling perfectly. The overall experience is deeply comforting and complex, making this Butternut Squash Casserole a true celebration of fall flavors.
Boosting the flavor
For an even more decadent experience, consider a few simple tweaks. A drizzle of warm maple syrup just before serving enhances the natural sweetness of the squash. Alternatively, a sprinkle of crispy fried onions or toasted pumpkin seeds adds a fantastic salty crunch. If you love warm spices, a pinch of nutmeg or a dash of cayenne pepper can introduce a subtle, warming heat. For a creamy, tangy counterpoint, a dollop of our herb yogurt sauce cuts through the richness beautifully. Furthermore, serving it alongside a simple apple pecan salad creates a refreshing and complete meal. Ultimately, feel free to get creative and make this dish your own.
First, always roast your squash until it becomes very tender; this step deepens the flavor and guarantees a creamy texture in your final Butternut Squash Casserole. Furthermore, make sure you drain any excess liquid from your cooked squash to prevent a soggy dish. For the best consistency, use a potato masher instead of a food processor, which can make the filling too smooth. Finally, always taste your mixture before baking and adjust the seasoning accordingly.
Mistakes to avoid
A common error involves undercooking the squash initially, which results in a lumpy and hard texture. Therefore, you must cook it until a fork slides in effortlessly. Additionally, many people overmix the topping, which then bakes into a dense layer instead of a crispy one. Instead, use a light hand to sprinkle it over your casserole. For more guidance on perfecting vegetable dishes, explore our tips on how to roast vegetables. Moreover, do not skip the step of greasing your baking dish, as this prevents your beautiful Butternut Squash Casserole from sticking. If you are considering a different type of squash, first read our guide on winter squash varieties to choose the best substitute.
g-suggestions">Serving and Pairing Suggestions
How to serve this dish
Present your Butternut Squash Casserole straight from the oven in its beautiful baking dish. For a special touch, garnish individual portions with a sprinkle of fresh thyme or crispy fried sage leaves. Alternatively, a dollop of herb-infused sour cream adds a lovely creamy contrast. This dish truly shines during holiday feasts, yet it also makes a comforting centerpiece for a cozy family dinner. Serve it hot and watch the cheesy, golden-brown top delight everyone at your table.
What goes well with it
This savory Butternut Squash Casserole pairs wonderfully with a simple green salad. The fresh, crisp greens offer a light counterpoint to the rich, creamy casserole. For a heartier meal, consider serving it alongside our juicy Herb Roasted Chicken. The savory herbs from the chicken beautifully complement the sweet and earthy notes of the squash. Finally, a chilled glass of unoaked Chardonnay or a sparkling apple cider completes the experience by cutting through the richness perfectly. Don’t forget to finish your meal with a slice of our decadent Classic New York Cheesecake for a truly memorable dessert.
math-faq-block">
Can you make butternut squash casserole ahead of time?
Absolutely! You can assemble the entire butternut squash casserole a day in advance. Simply cover it tightly with plastic wrap or aluminum foil and store it in the refrigerator. Before baking, let it sit at room temperature for about 30 minutes, then bake as directed.
What is a good substitute for heavy cream in butternut squash casserole?
A great substitute for heavy cream is half-and-half or whole milk for a lighter option. For a dairy-free version, full-fat canned coconut milk provides a rich, creamy texture that complements the flavors in your butternut squash casserole beautifully.
How do you thicken butternut squash casserole?
To thicken your casserole, ensure you drain any excess liquid from the cooked squash after mashing it. Adding a binder like eggs, a small amount of flour, or even a sprinkle of breadcrumbs to the mixture will also help achieve a perfect, set consistency for your butternut squash casserole.
ank-math-faq-item">
Do you peel butternut squash for casserole?
Yes, the tough, inedible skin of a butternut squash must be peeled before making your casserole. Use a sharp vegetable peeler or a sturdy knife to remove the skin completely. This step is essential for achieving the soft, creamy texture that makes this dish so delicious.
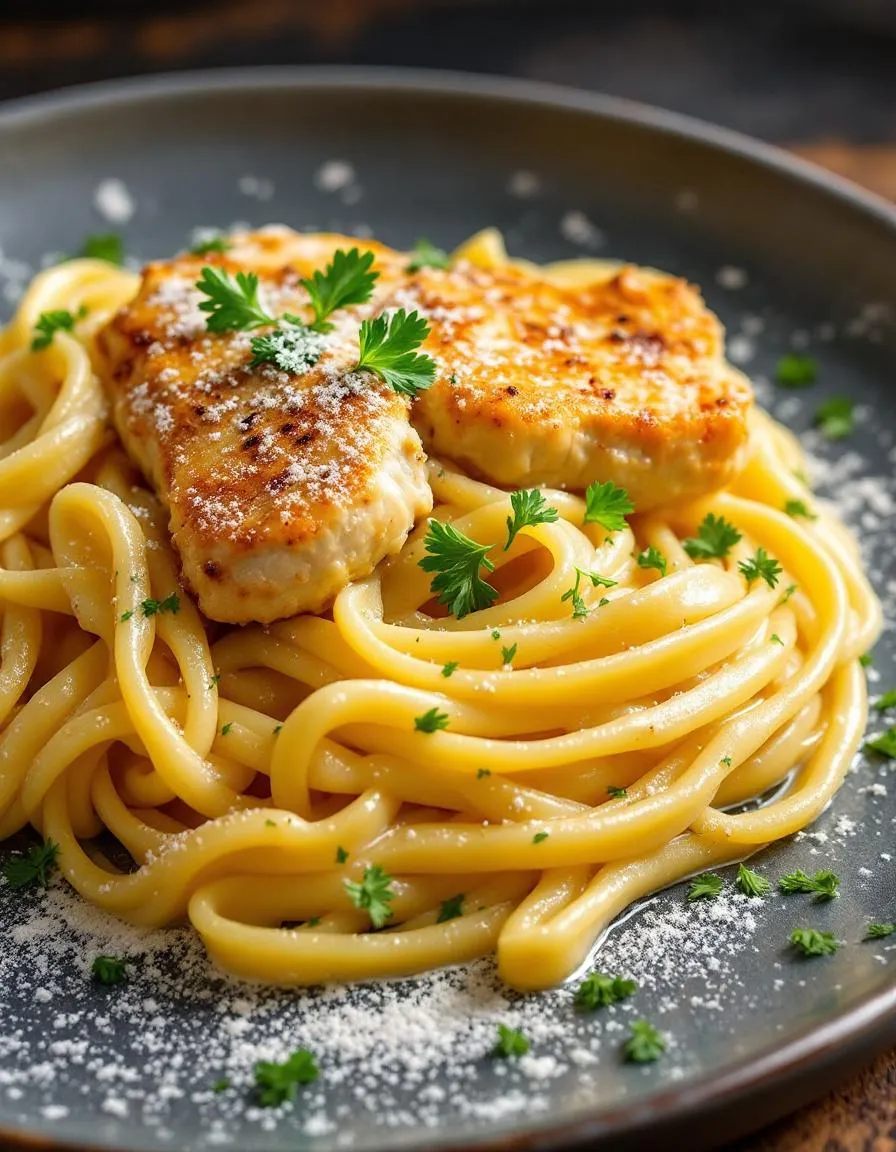
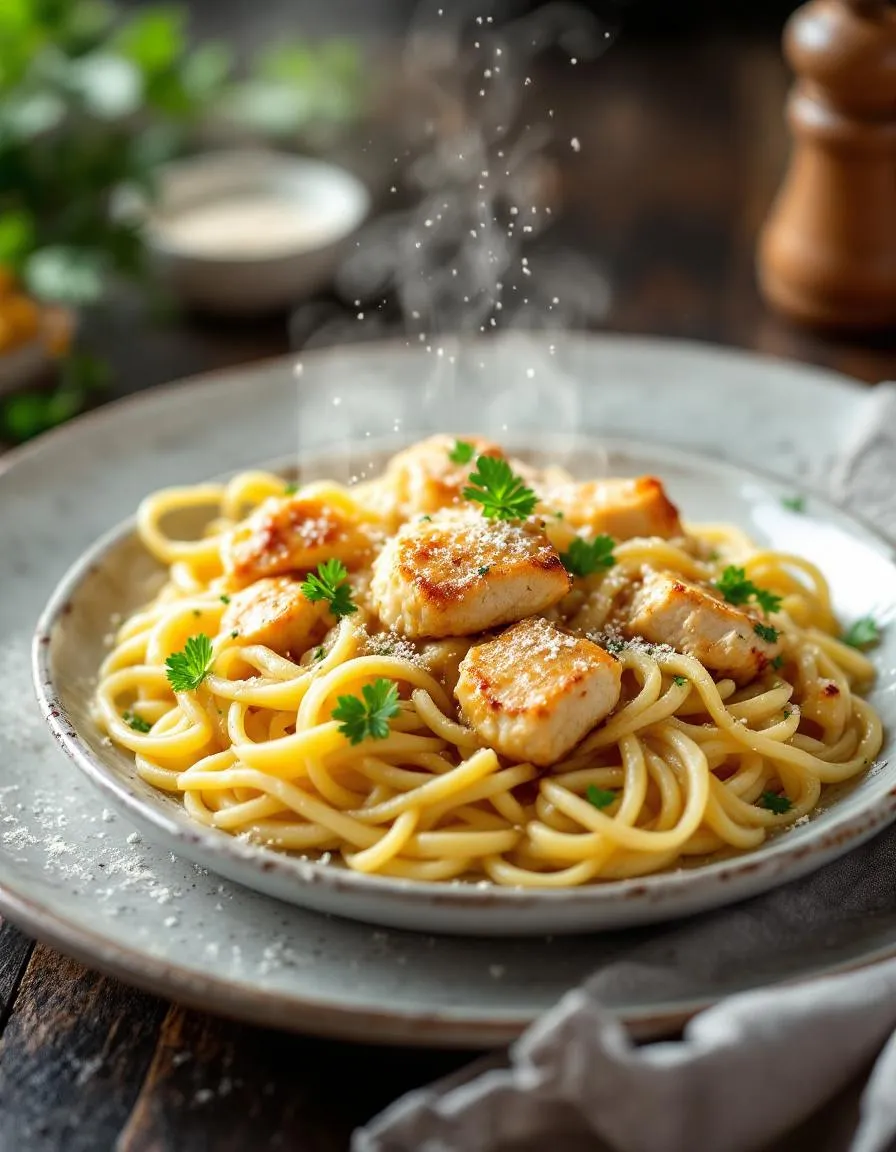
Easy Parmesan Chicken Pasta Recipe
Introduction
Do you ever crave a meal that feels like a warm hug after a long day? Perhaps you need a reliable, crowd-pleasing dinner that you can get on the table without a huge fuss. This incredibly delicious Parmesan Chicken Pasta answers that call perfectly. It combines tender chicken and al dente pasta in a luxuriously creamy, cheesy sauce that everyone adores. Ultimately, this dish promises to become a cherished staple in your weekly rotation, delivering comfort and flavor in every single bite.
Parmesan Chicken Pasta is a beloved classic for a very good reason. This dish typically features sautéed chicken breast pieces tossed with pasta and a rich, creamy Parmesan cheese sauce. The magic happens when the sharp, salty flavor of the Parmesan cheese melds with garlic and herbs, creating a simple yet profoundly satisfying sauce that clings to every noodle and piece of chicken. Furthermore, it matters because it represents the ideal weeknight dinner; it is approachable, quick to prepare, and universally loved by both kids and adults. Consequently, it solves the eternal question of what to make for dinner without resorting to takeout. This recipe fits our blog’s tone because we champion food that is both unpretentious and spectacular. We believe that the best meals are the ones that bring people together without requiring advanced culinary skills or obscure ingredients. For instance, if you enjoy this combination of pasta and creamy sauce, you might also love our Creamy Garlic Chicken Pasta. Additionally, mastering a great pasta dish is a fundamental skill for any home cook. Therefore, we focus on providing clear, reliable recipes that build confidence in the kitchen. This particular Parmesan Chicken Pasta is a fantastic gateway to exploring more complex recipes, much like our popular guide on How to Cook Chicken Breast perfectly. Ultimately, this dish embodies our core philosophy: incredible food should be accessible to everyone, any night of the week.
Why I Love This Recipe
This Parmesan Chicken Pasta holds a special place in my heart because it was the first meal I ever confidently cooked for my now-husband. I remember wanting to impress him but feeling incredibly nervous in the kitchen. This recipe, with its straightforward steps and forgiving nature, gave me the courage to create something truly wonderful. The look on his face after that first bite is a memory I will always cherish. Now, we make it together whenever we need a taste of comfort and a reminder of where we started. It is more than just food; it is a delicious piece of our story.
Health and Nutrition
Why it’s good for your body
This Parmesan Chicken Pasta delivers a powerful combination of essential nutrients your body needs. For instance, the lean chicken breast provides a fantastic source of high-quality protein, which actively supports muscle repair and keeps you feeling full. Meanwhile, the whole wheat pasta offers complex carbohydrates for sustained energy release throughout your day.
Furthermore, the Parmesan cheese contributes a significant calcium boost for strong bones. Additionally, it adds a rich, savory flavor that means you need less salt. Consequently, you can enjoy a deeply satisfying meal without overdoing the sodium. Moreover, you can easily incorporate vegetables like spinach or broccoli into this dish for extra fiber and vitamins.
Ultimately, this well-rounded Parmesan Chicken Pasta combines protein, complex carbs, and healthy fats in one delicious bowl. Therefore, it stands as a nutritious choice that fuels your body and pleases your palate. You will love how this version of Parmesan Chicken Pasta makes eating well so simple and enjoyable.
How it fits in a healthy lifestyle
This Parmesan Chicken Pasta fits beautifully into a balanced eating plan. You can easily tailor it to meet specific health goals without sacrificing an ounce of flavor. For a higher-protein version, simply add more grilled chicken. If you follow a gluten-free diet, swap the regular pasta for your favorite gluten-free alternative.
The dish also supports heart-healthy habits when you use olive oil and keep cheese portions moderate. It exemplifies how you can build a satisfying meal around lean protein and complex carbs. For more ideas on crafting nutritious weekly menus, explore our guide on easy meal prep ideas. Remember, healthy eating is all about balance and enjoyment. Pair this pasta with a light side salad for a complete, fulfilling dinner that aligns with your wellness journey. Discover more tips for building a wholesome plate in our post on creating a balanced diet.
A creamy and comforting pasta dish with tender chicken and rich Parmesan cheese sauce.
Ingredients
Scale
For the Crust:
8 oz fettuccine pasta
2 boneless, skinless chicken breasts, sliced
1 cup grated Parmesan cheese
1 cup heavy cream
2 cloves garlic, minced
2 tbsp olive oil
1 tsp Italian seasoning
Salt and pepper to taste
Fresh parsley for garnish
Instructions
1. Prepare the Crust:
Cook pasta according to package directions until al dente. Drain and set aside.
Heat olive oil in a large skillet over medium heat. Add chicken, season with salt, pepper, and Italian seasoning, and cook until golden and cooked through, about 6-7 minutes. Remove chicken and set aside.
In the same skillet, add garlic and sauté for 30 seconds until fragrant. Pour in heavy cream and bring to a simmer. Stir in Parmesan cheese until melted and smooth.
Return cooked chicken to the skillet, add the cooked pasta, and toss to coat in the sauce. Cook for 2-3 minutes until heated through.
Garnish with fresh parsley and additional Parmesan before serving.
Notes
You can customize the seasonings to taste.
How to Prepare This Dish
Steps and time-saving tips
First, preheat your oven to 400°F and grab a large baking dish. Meanwhile, whisk together olive oil, minced garlic, and Italian seasoning in a small bowl. Next, toss your chicken breasts in this flavorful mixture until they are fully coated. Then, arrange the chicken in your baking dish and generously cover it with a layer of grated parmesan cheese. Bake the chicken for about 25 minutes, or until it is perfectly cooked through and the cheese turns a beautiful golden brown. While the chicken bakes, you can focus on the pasta. Simply bring a large pot of salted water to a rolling boil and cook your favorite pasta shape according to the package directions. For a fantastic time-saving tip, use pre-shredded parmesan cheese and a store-bought rotisserie chicken to cut your prep time in half. Finally, slice the baked parmesan chicken into strips and gently fold them into the drained, hot pasta. Drizzle everything with a bit of high-quality olive oil and give it one final stir before serving immediately.
and-learned-from">Mistakes I’ve made and learned from
I have absolutely learned the hard way that overcooking chicken breasts is the fastest route to a dry, disappointing meal. My first attempt at this Parmesan Chicken Pasta resulted in rubbery chicken because I kept checking the oven, which caused major temperature fluctuations. Now, I swear by using a simple meat thermometer to pull the chicken out exactly at 165°F for perfect juiciness every single time. Another common mistake I made was using finely grated parmesan from a canister, which often clumps and doesn’t melt as beautifully. I’ve since learned that freshly grated parmesan cheese makes a world of difference in both flavor and texture. For more on getting chicken just right, my guide on how to cook chicken breast covers all the basics. And if you’re curious about which cheese works best, my breakdown of parmesan vs pecorino will help you choose the right one for your dish.
Cultural Connection and Variations
Where this recipe comes from
My grandmother first introduced me to Parmesan Chicken Pasta. She would make it every Sunday after church. Her version featured thin cutlets she pounded herself. She always said the key was the three-step dredge in flour, egg, and seasoned breadcrumbs. This method, however, has roots far beyond her kitchen. Essentially, we celebrate an Italian-American fusion. The dish beautifully marries the Italian tradition of scaloppine, or thinly sliced meat, with the American love for hearty, cheesy pasta bakes. Consequently, it creates a uniquely comforting hybrid.
Different regions put t
heir own spin on it, of course. In some parts of Italy, you might find a similar dish called chicken parmigiana. But they often serve it with just a simple side salad. Meanwhile, in the United States, we proudly pile the crispy chicken onto a mountain of spaghetti. Some families add a layer of mozzarella for that iconic stretch. Others might mix provolone into the sauce for extra sharpness. Ultimately, every family claims their Parmesan Chicken Pasta is the best. And honestly, they are all correct.
How it fits in today’s cooking
This classic dish absolutely thrives in modern kitchens. It remains a superstar of comfort food for a simple reason: it delivers every single time. Busy weeknights call for streamlined versions. Many cooks now use an air fryer for the chicken to cut down on oil. Meanwhile, meal preppers often bake a large batch to enjoy for days. Furthermore, it holds a place of honor at countless family gatherings and holiday tables. Its crowd-pleasing nature makes it a guaranteed hit.
Today’s cooks also love to adapt it with dietary twists. For instance, they might use gluten-free panko or plant-based chicken alternatives. The core experience of crispy, saucy, and cheesy goodness never changes. If you adore these kinds of adaptable, family-friendly meals, you must explore our collection of easy weeknight dinners. For a different but equally comforting pasta experience, our perfect creamy tomato rigatoni offers a fantastic meat-free option. Ultimately, Parmesan Chicken Pasta continues to connect generations around the dinner table.
>Taste and Texture
What makes it delicious
This Parmesan Chicken Pasta delivers a truly comforting experience. First, you smell the fragrant, savory garlic and herbs wafting from the bowl. Each bite combines tender, juicy chicken with perfectly al dente pasta. Meanwhile, the rich, creamy sauce coats your mouth luxuriously. Furthermore, the generous sprinkle of parmesan cheese adds a sharp, salty kick and a slightly grainy texture. Ultimately, this dish creates a symphony of savory, cheesy, and herbal notes in every single forkful. You will absolutely adore this hearty Parmesan Chicken Pasta.
Boosting the flavor
You can easily elevate your Parmesan Chicken Pasta with a few clever tweaks. For instance, try adding a pinch of red pepper flakes to introduce a gentle, warming heat. Alternatively, stir in a handful of fresh spinach or sun-dried tomatoes for a pop of color and a tangy sweetness. Moreover, a squeeze of fresh lemon juice just before serving brightens the entire rich, creamy dish. Consider topping your bowl with extra crispy bacon or toasted pine nuts for a delightful crunch. For more inspiration on building incredible flavors, explore our guide on creating flavorful sauces. Additionally, pairing this meal with a simple side salad makes a perfect complement; find our favorite easy salad dressings to complete your dinner table.
Tips for Success
Best practices for results
First, always cook your chicken to an internal temperature of 165°F for perfect safety and juiciness. Furthermore, reserve a cup of starchy pasta water before draining, as this helps your sauce cling beautifully to every noodle. For the best flavor, use freshly grated Parmesan cheese because it melts more smoothly and evenly into your sauce. Finally, toss your Parmesan Chicken Pasta vigorously in the pan to fully emulsify the sauce and coat every single ingredient.
Mistakes to avoid
One common error is overcooking the chicken, which results in a dry and tough texture. Instead, use a meat thermometer to pull it from the heat at the exact right moment, just like we recommend in our guide on how to cook chicken breast. Another mistake is adding too much pasta water at once and creating a soupy sauce. Consequently, you should add the reserved water a few tablespoons at a time until your sauce reaches the ideal creamy consistency. Additionally, avoid using pre-shredded cheese bags, as they contain anti-caking agents that prevent proper melting. For more insights on building the perfect creamy base, check out our tips for creamy garlic sauce.
Serving and Pairing Suggestions
How to serve this dish
Immediately serve this Parmesan Chicken Pasta while it is still hot and wonderfully aromatic. For a truly beautiful presentation, twirl the pasta into a low bowl using tongs. Next, artfully arrange the golden chicken cutlets on top. Finally, garnish everything with a final snowfall of freshly grated Parmesan and a bright sprinkle of chopped parsley.
This cozy dish truly su
its any occasion, from a simple weeknight family dinner to a more festive holiday gathering. For a special date night at home, consider lighting some candles and pairing your Parmesan Chicken Pasta with a crisp white wine.
What goes well with it
Firstly, a simple, crisp side salad perfectly cuts through the rich and creamy notes of the Parmesan Chicken Pasta. We highly recommend our classic Easy House Salad with its light lemon vinaigrette for a refreshing contrast.
Secondly, no Italian feast feels complete without a side of warm, crusty bread. A slice of garlic bread is ideal for scooping up every last bit of the delicious sauce from your plate. For an incredible homemade option, try our fan-favorite Cheesy Garlic Bread recipe that bakes in just minutes.
Finally, a glass of chi
lled Pinot Grigio or a light Chardonnay makes a fantastic beverage pairing. These wines complement the meal beautifully because their acidity balances the dish’s creamy Parmesan sauce.
What is the best pasta to use for Parmesan Chicken Pasta?
Short, sturdy pasta shapes like penne, rigatoni, or fusilli work best for Parmesan Chicken Pasta. These shapes hold the creamy sauce well and are easy to eat alongside the chicken pieces. Avoid very delicate pasta like angel hair, as it can become mushy under the weight of the sauce and chicken.
ank-math-faq-item">
Can I use pre-cooked chicken for this recipe?
Yes, using pre-cooked rotisserie chicken or leftover grilled chicken is a fantastic time-saver for Parmesan Chicken Pasta. Simply shred or cube the cooked chicken and stir it into the sauce to warm through at the end. This method ensures your chicken stays tender and prevents it from becoming overcooked and dry.
How do I keep the chicken from drying out?
The key to juicy chicken is to avoid overcooking it. Pound boneless, skinless chicken breasts to an even thickness so they cook uniformly. Cook them just until they reach an internal temperature of 165°F (74°C), then let them rest for a few minutes before slicing and adding to your Parmesan Chicken Pasta.
What can I add to my Parmesan Chicken Pasta for more flavor?
For a flavor boost, try adding a pinch of red pepper flakes for heat, a handful of fresh spinach or sun-dried tomatoes, or some cooked bacon or pancetta. Fresh herbs like basil or parsley stirred in at the end also elevate the dish significantly, making your Parmesan Chicken Pasta even more delicious.