Is there anything more comforting than a warm, creamy bowl of soup on a crisp day? Honestly, we think not. This particular recipe, however, transforms a simple classic into something truly extraordinary. Get ready to fall in love with a bowl of pure, cheesy bliss that will warm you from the inside out. Today, we are making the ultimate Roasted Broccoli and Cheddar Soup.
So, what exactly is Roasted Broccoli and Cheddar Soup? Fundamentally, it is a creamy, dreamy blend of deeply roasted broccoli florets and sharp, tangy cheddar cheese, all brought together in a velvety smooth base. This soup matters because it elevates a familiar flavor combination through the simple, yet transformative, power of roasting. This process caramelizes the natural sugars in the broccoli, consequently adding a rich, nutty depth that boiling simply cannot achieve. Moreover, this recipe fits our blog’s tone perfectly as we champion approachable cooking techniques that deliver restaurant-quality results right in your own kitchen. Furthermore, it is a fantastic way to enjoy a healthy vegetable in the most deliciously indulgent way possible. You can easily pair this hearty soup with a slice of our favorite No-Knead Artisan Bread for the perfect dipping experience. Ultimately, this Roasted Broccoli and Cheddar Soup is a testament to how a few quality ingredients and one key step can create a meal that feels both gourmet and deeply familiar.
Why I Love This Recipe
This Roasted Broccoli and Cheddar Soup holds a special place in my heart because it was the first meal I truly mastered after moving into my own apartment. The rich aroma of roasting broccoli and melting cheese always fills my kitchen with a sense of accomplishment and warmth. I love how this recipe feels like a generous hug in a bowl, providing both incredible comfort and robust flavor. It consistently reminds me that the most satisfying dishes often come from the simplest, most honest ingredients.
Health and Nutrition
Why it’s good for your body
This Roasted Broccoli and Cheddar Soup delivers a powerful nutritional punch. First, roasting the broccoli caramelizes its natural sugars, but more importantly, it helps preserve key vitamins. Consequently, you get a generous serving of vitamins C and K, which support your immune system and bone health.
Furthermore, broccoli is a fantastic source of fiber. This fiber promotes healthy digestion and helps you feel full and satisfied. Meanwhile, the sharp cheddar cheese contributes a significant amount of calcium and protein for strong muscles. Therefore, each bowl of this Roasted Broccoli and Cheddar Soup builds a foundation for overall wellness.
Additionally, this soup contains antioxidants from the broccoli. These compounds fight oxidative stress in your body. Ultimately, enjoying a warm bowl of this Roasted Broccoli and Cheddar Soup is a delicious way to nourish yourself from the inside out.
How it fits in a healthy lifestyle
This soup fits perfectly into a balanced eating plan. It works wonderfully as a satisfying main course for a light lunch or a comforting dinner. You can easily pair it with a side salad or a slice of whole-grain bread for a complete meal.
For those following specific diets, this recipe is naturally gluten-free when you use a proper thickener. It also provides a solid amount of protein from the cheese, which helps with muscle maintenance. If you are looking for more ways to incorporate vegetables into your day, check out our guide on easy meal prep ideas that save time. Moreover, the simple ingredients support a heart-healthy lifestyle when enjoyed in moderation. For another nutrient-packed meal that supports your goals, try our popular lemon herb quinoa salad.
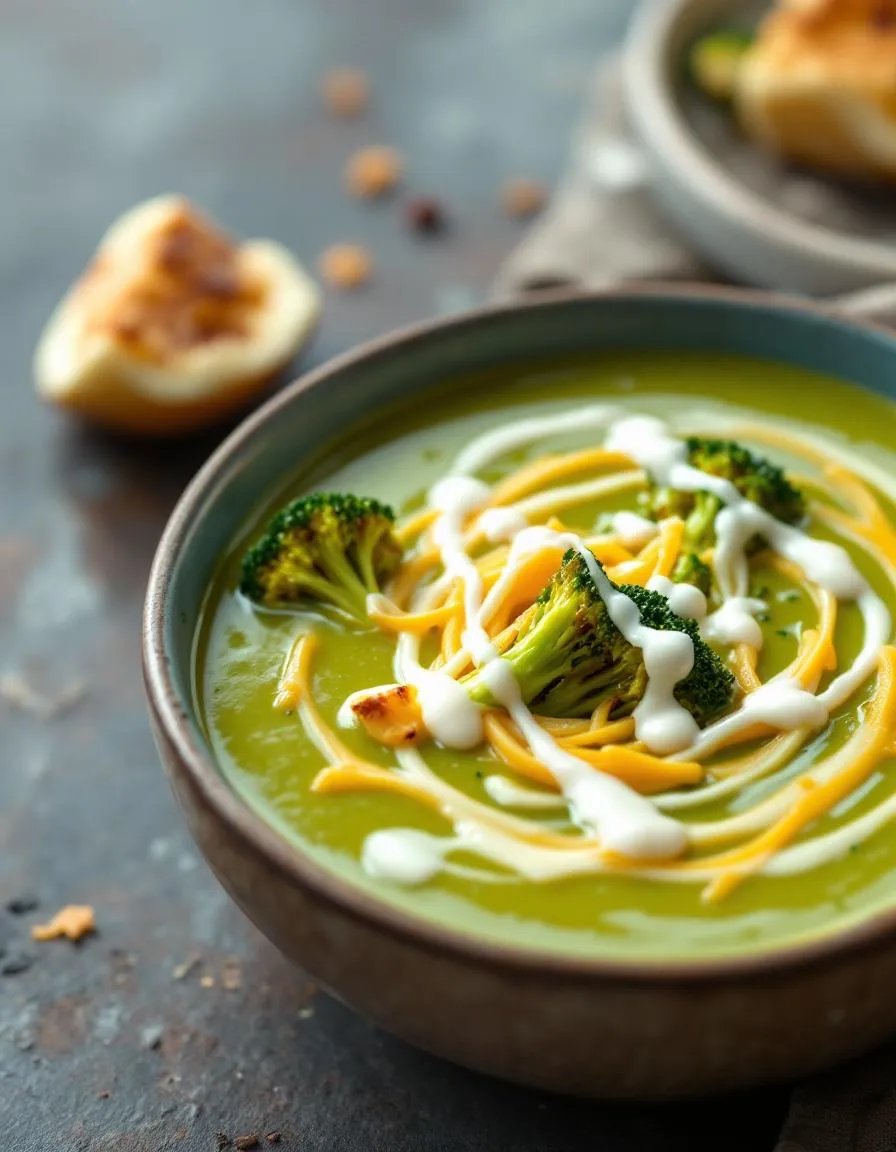
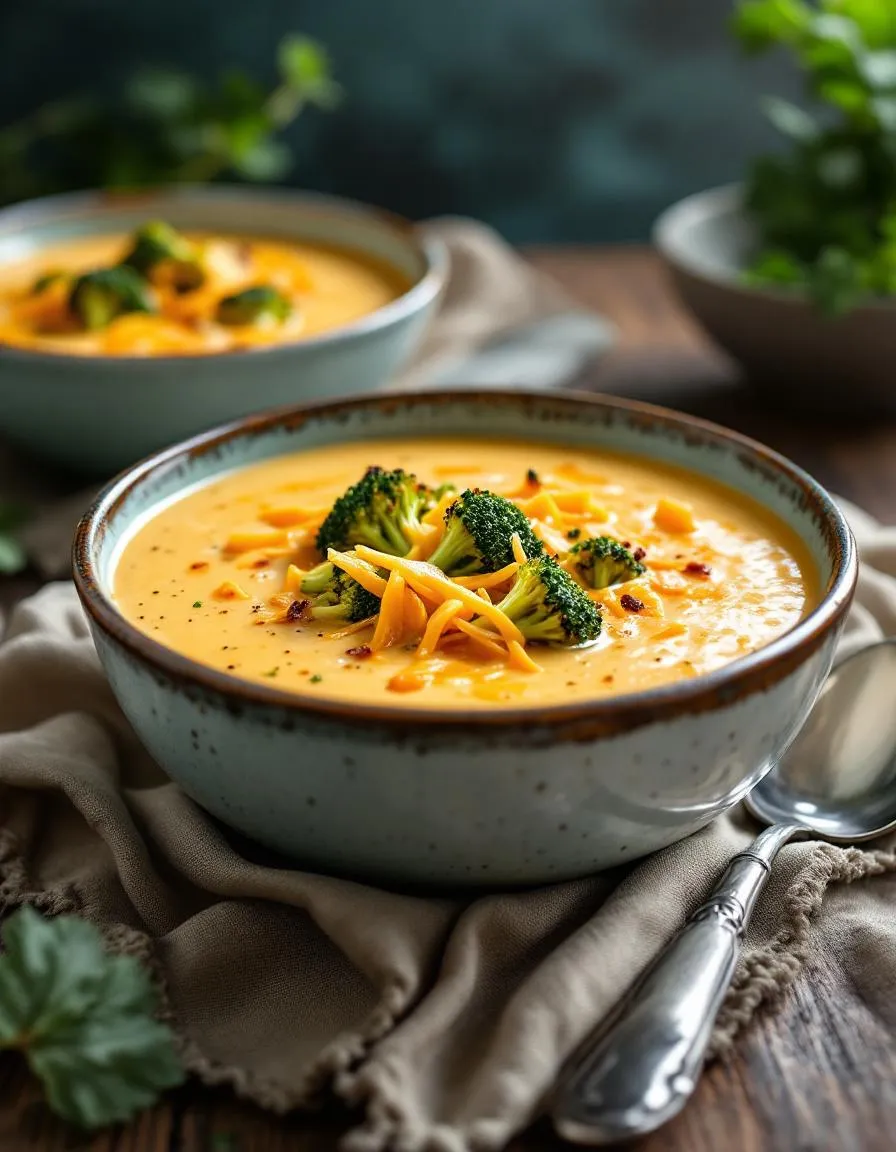
A creamy and comforting soup featuring roasted broccoli and sharp cheddar cheese.
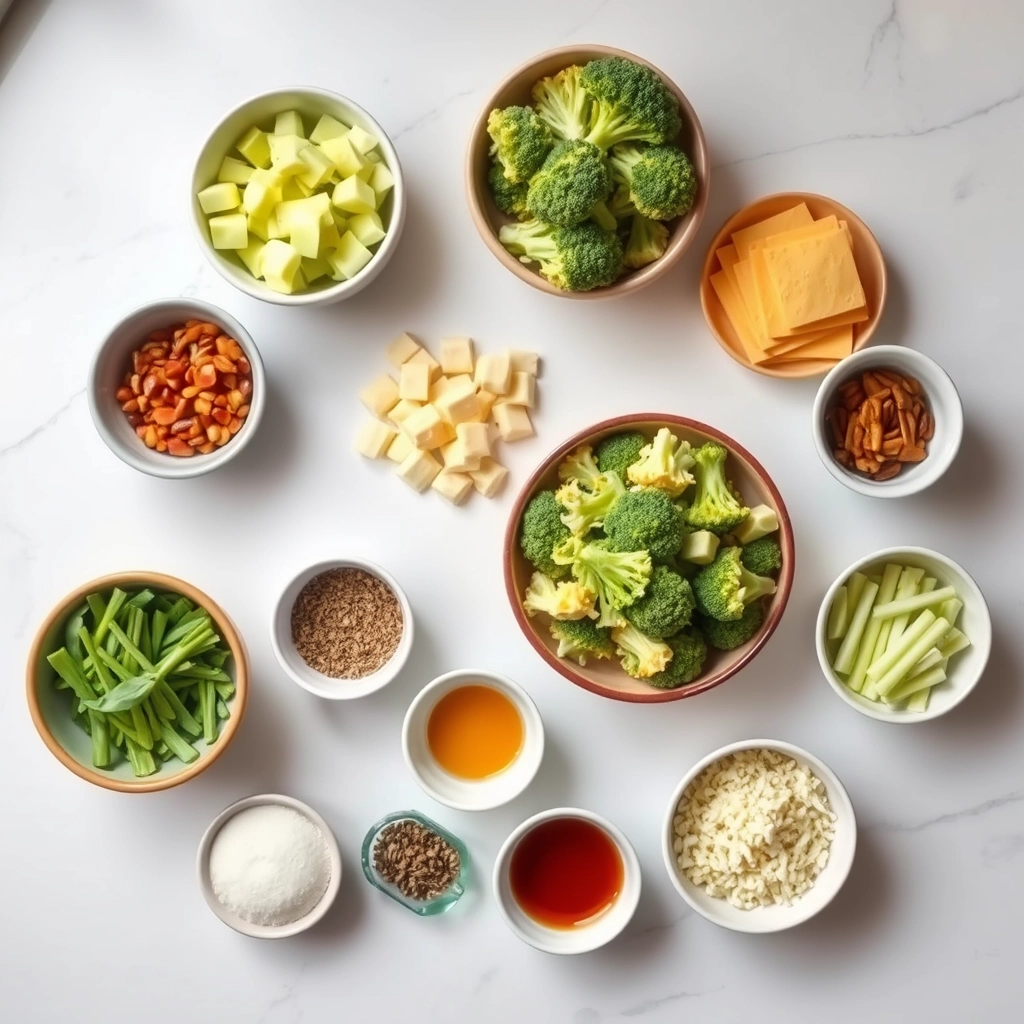
Ingredients
Scale
For the Crust:
1 large head broccoli, cut into florets
2 tablespoons olive oil
1 medium onion, diced
2 cloves garlic, minced
4 cups vegetable broth
1 cup heavy cream
2 cups shredded sharp cheddar cheese
Salt and black pepper to taste
Instructions
1. Prepare the Crust:
Preheat oven to 400°F (200°C). Toss broccoli florets with 1 tablespoon olive oil, salt, and pepper. Roast for 20 minutes until tender and slightly charred.
In a large pot, heat remaining olive oil over medium heat. Add onion and cook until softened, about 5 minutes. Add garlic and cook for 1 minute more.
Add roasted broccoli and vegetable broth to the pot. Bring to a simmer and cook for 10 minutes. Blend until smooth using an immersion blender or regular blender.
Stir in heavy cream and cheddar cheese until melted and smooth. Season with salt and pepper to taste. Serve hot.
Notes
You can customize the seasonings to taste.
s-dish">How to Prepare This Dish
Steps and time-saving tips
First, preheat your oven to 425°F to get it ready for roasting. Meanwhile, chop your broccoli florets and onion into even pieces; this ensures everything cooks at the same rate. Toss them on a large baking sheet with a generous drizzle of olive oil, salt, and pepper. Roast the vegetables for about 20 minutes until they develop beautiful, crispy edges and a deep, nutty flavor. This roasting step is the secret to an incredible soup base, so don’t rush it. While that’s happening, you can multitask by grating your cheddar cheese and preparing your other ingredients. Next, melt butter in a large pot over medium heat and sauté the garlic for just a minute until it’s fragrant. Then, whisk in the flour to create a roux, which will thicken your soup beautifully. Gradually pour in the broth and milk, whisking constantly to avoid any lumps. Finally, add your roasted broccoli and onion to the pot, bring everything to a simmer, and then carefully blend until smooth with an immersion blender. Stir in the shredded cheddar until it melts into creamy perfection. For a final touch, ladle your Roasted Broccoli and Cheddar Soup into bowls and top with extra cheese. This entire process is straightforward and yields a restaurant-quality dish right at home.
Mistakes I’ve made and learned from
I’ve definitely had my share of kitchen blunders with this Roasted Broccoli and Cheddar Soup. My biggest mistake was using pre-shredded cheese from a bag, which resulted in a grainy, unpleasant texture instead of that velvety smoothness we all crave. I learned that block cheese you grate yourself melts far more smoothly because it lacks the anti-caking agents. Another error was overcrowding the baking sheet when roasting the veggies. They ended up steaming instead of caramelizing, which robbed the soup of its signature deep, roasted flavor. Now I always use two sheets if necessary. Getting the roux right was another hurdle; I used to burn it by having the heat too high. A gentle heat and constant whisking are non-negotiable for a lump-free base. For more on mastering these fundamental techniques, my guide on how to make a roux breaks it down simply. And if you’re looking for another fantastic way to use broccoli, my Cheesy Broccoli Rice Casserole is a guaranteed crowd-pleaser that taught me a lot about balancing cheese sauces.
n-and-variations">Cultural Connection and Variations
Where this recipe comes from
My love for Roasted Broccoli and Cheddar Soup started in my grandmother’s kitchen, a place where humble ingredients transformed into something magical. She never followed a fancy recipe. Instead, she would roast broccoli florets until their edges crisped, claiming it brought out their “sweet, nutty soul.” Then, she would stir them into a sharp cheddar base. This method created a depth of flavor that boiling simply cannot achieve. Her version of this classic comfort food felt uniquely ours.
Around the world, cooks put their own spin on this idea. In Britain, for instance, they often prepare a smoother, more refined broccoli and stilton soup. Meanwhile, across the American Midwest, you might find a richer, creamier version loaded with extra cheese. Some families add potatoes for body, while others toss in a pinch of cayenne for a subtle kick. Ultimately, the beauty of Roasted Broccoli and Cheddar Soup lies in its adaptability. Every cook and every region seems to impart its own signature.
Furthermore, the act of roasting the broccoli first feels like a modern tribute to older, slower cooking traditions. It adds a layer of complexity that turns a simple weeknight dinner into something special. This small, intentional step connects us to a time when meals demanded more care. Consequently, each bowl carries not just flavor, but a story of patience and technique.
ays-cooking">How it fits in today’s cooking
Today, this soup perfectly fits our desire for meals that are both comforting and nutritious. It has become a staple for crisp autumn evenings and a reliable star for holiday gatherings. Moreover, modern cooks brilliantly adapt the recipe to fit various dietary needs. They might use vegetable broth for a vegan version or blend in cauliflower for an extra veggie boost. It seamlessly transitions from a quick family dinner to an elegant starter for guests.
Its versatility also makes it a perfect make-ahead meal. You can easily prepare a large batch for weekly lunches, ensuring a healthy and satisfying option is always on hand. For a complete and cozy meal, many people love to pair it with a fresh, warm side. A slice of crusty bread or a simple green salad often does the trick. In fact, our Ultimate Winter Salad provides a fantastic, crunchy contrast to the soup’s creamy richness.
Additionally, this dish embodies the trend of “root-to-stem” cooking. Resourceful home chefs now often chop the broccoli stems and roast them alongside the florets, minimizing waste. This soup proves that classic comfort food can absolutely be both wholesome and exciting. For another comforting classic that everyone loves, explore our popular Best Ever Meatloaf recipe. It shares the same soul-warming, crowd-pleasing qualities that make a meal truly memorable.
>Taste and Texture
What makes it delicious
This Roasted Broccoli and Cheddar Soup delivers a deeply savory and comforting experience. The roasting process caramelizes the broccoli, creating a wonderfully nutty and almost sweet flavor that forms the soul of the dish. Simultaneously, you get a sharp, tangy punch from the high-quality aged cheddar that melts luxuriously into every spoonful. Moreover, the texture is an incredible combination of velvety smoothness from the pureed vegetables and satisfying little bites of tender broccoli florets. Ultimately, the aroma is a hearty and inviting blend of roasted garlic, earthy broccoli, and rich, cheesy goodness that fills your kitchen. Each bowl of this Roasted Broccoli and Cheddar Soup feels like a warm, creamy hug.
Boosting the flavor
You can easily elevate your soup with a few creative additions. For instance, try crumbling crispy bacon or toasted nuts on top for a fantastic crunch that contrasts the creamy base. Furthermore, a dash of smoked paprika or a pinch of cayenne pepper will introduce a subtle warmth that complements the cheddar beautifully. Alternatively, stir in a spoonful of sour cream or Greek yogurt for extra tang and richness right before serving. Consider pairing it with a simple side salad for a complete meal. For more inspiration on perfect pairings, explore our favorite easy weeknight dinners. Finally, a warm, crusty roll is the ultimate partner for dipping; our guide to homemade bread basics can help you create the perfect loaf.
Tips for Success
Best practices for results
Always roast your broccoli until you see those delicious caramelized edges for maximum flavor in your Roasted Broccoli and Cheddar Soup. Furthermore, shred your own cheese from a block to guarantee a luxuriously smooth and creamy melt. For a truly velvety texture, carefully use an immersion blender directly in the pot. Additionally, season your soup in stages, tasting as you go, to build a perfectly balanced flavor profile.
Mistakes to avoid
Avoid adding cold dairy directly to your hot soup base, as this can easily cause it to curdle; instead, always temper it by slowly whisking in a ladle of hot soup first. Moreover, do not over-blend your potatoes once you add them, unless you want a gluey consistency. For more guidance on getting your soup textures just right, check out our guide on common soup mistakes. Also, resist the urge to crank the oven temperature to save time when roasting the broccoli, because you will steam it rather than caramelize it. Consequently, for perfect vegetable roasting every time, our tips for perfect roasted vegetables are a fantastic resource.
Serving and Pairing Suggestions
How to serve this dish
Ladle your Roasted Broccoli and Cheddar Soup into a warm, rustic bowl to keep it cozy. For a beautiful finish, crown it with a sprinkle of sharp cheddar, a few extra roasted broccoli florets, and a crack of black pepper. Alternatively, drizzle a little cream or olive oil on top for an elegant touch. This dish truly shines at a casual family dinner or as a comforting starter for a holiday meal. Ultimately, its rich color and inviting aroma make it a visual and culinary delight.
h-it">What goes well with it
For the ultimate cozy meal, pair your Roasted Broccoli and Cheddar Soup with a thick slice of crusty artisan bread. This classic combination is perfect for dipping and sopping up every last delicious bit. Furthermore, a crisp, green side salad provides a refreshing contrast to the soup’s creamy richness. Finally, a chilled glass of pale ale or a tart apple cider beautifully cuts through the decadent cheese flavor, cleansing your palate between each wonderful spoonful of Roasted Broccoli and Cheddar Soup.
What is the best way to roast broccoli for soup?
For the best flavor in your Roasted Broccoli and Cheddar Soup, cut the broccoli into uniform florets, toss them with olive oil, salt, and pepper, and spread them in a single layer on a baking sheet. Roast at 425°F (220°C) for 20-25 minutes until the edges are crispy and caramelized. This deep, nutty flavor from roasting is what sets this soup apart from versions made with steamed broccoli.
ank-math-faq-item">
Can I use frozen broccoli for roasted broccoli cheddar soup?
While fresh broccoli is ideal for achieving a proper roast, you can use frozen broccoli in a pinch. Thaw and pat the florets completely dry before tossing them with oil to help them roast rather than steam. Be aware that frozen broccoli may release more water and result in a slightly less caramelized, but still delicious, Roasted Broccoli and Cheddar Soup.
What kind of cheddar cheese is best for broccoli cheddar soup?
A sharp or extra-sharp cheddar cheese is highly recommended for its robust flavor that stands up to the roasted broccoli. For the creamiest texture, grate your own cheese from a block, as pre-shredded cheese contains anti-caking agents that can make the soup grainy. A high-quality cheddar will melt smoothly into your Roasted Broccoli and Cheddar Soup, creating a rich and velvety base.
How can I make my broccoli cheddar soup thicker?
To thicken your soup, create a simple roux by melting butter and whisking in an equal amount of flour before adding your broth. You can also puree a portion of the roasted broccoli and soup base with an immersion blender before adding the cheese. For a low-carb option, a small amount of cornstarch slurry stirred in at the end will also effectively thicken the consistency.
div>
Easy One Pot Gnocchi Chicken Pot Pie Recipe
Introduction
Craving the ultimate comfort food but dreading the mountain of dishes that always seems to follow? We completely understand. There is nothing more soul-satisfying than a classic chicken pot pie, yet the process can feel overwhelmingly complex. That is precisely why we created this incredibly simple and deeply comforting One Pot Gnocchi Chicken Pot Pie. It delivers every bit of that nostalgic, creamy flavor you adore, but it cleverly streamlines the entire process into a single, magical pot. Furthermore, you get a deliciously fluffy, dumpling-like topping without any of the fuss of making a pastry crust.
So, what exactly is this dish? Essentially, our One Pot Gnocchi Chicken Pot Pie reimagines the beloved classic with a brilliant, modern twist. Instead of a traditional pie crust, we use soft, pillowy gnocchi that cook directly in the rich, savory filling. As they simmer, the gnocchi absorb the incredible flavors of the creamy sauce, tender chicken, and mixed vegetables, transforming into the most perfect dumpling-like topping. This recipe matters because it solves a real problem for busy home cooks: how to get a spectacular, home-cooked meal on the table with minimal effort and cleanup. It fits our blog’s tone perfectly because we specialize in recipes that are both approachable and exceptionally delicious, just like our popular Creamy Tuscan Chicken. This one-pot wonder is the epitome of comfort food efficiency, proving you do not need to sacrifice flavor for convenience. Moreover, it is an incredibly versatile dish that you can easily adapt based on what you have in your pantry, making it a reliable go-to for any night of the week.
Why I Love This Recipe
This One Pot Gnocchi Chicken Pot Pie holds a special place in my heart because it became a weeknight hero during a particularly chaotic time. I needed a meal that felt like a warm hug but required the absolute minimum energy to prepare. The moment I took that first bite, I was completely sold. The creamy sauce and tender gnocchi create the most comforting texture, while the familiar flavors instantly transport me back to family dinners from my childhood. It is the recipe I now share most often with friends who claim they cannot cook, because it consistently builds their confidence and earns rave reviews. Ultimately, it proves that the best meals are not always the most complicated ones.
Health and Nutrition
Why it’s good for your body
This One Pot Gnocchi Chicken Pot Pie delivers a powerful combination of lean protein and wholesome vegetables. Consequently, it provides a fantastic foundation for a nourishing meal. The chicken breast offers a high-quality, complete protein, which actively supports muscle repair and keeps you feeling full and satisfied for hours. Moreover, the carrots, peas, and celery contribute essential vitamins, minerals, and dietary fiber. These nutrients collectively promote healthy digestion and overall well-being.
Additionally, this comforting dish cleverly uses gnocchi as its base. Therefore, it creates a hearty texture that feels indulgent without relying on heavy, traditional pie crusts. You can easily find whole-wheat or cauliflower-based gnocchi to further boost the fiber content. Ultimately, this One Pot Gnocchi Chicken Pot Pie becomes a fantastic vehicle for getting more vegetables into your family’s diet. Finally, the cooking method itself is a health benefit; by preparing everything in one pot, you naturally retain more of the vegetables’ water-soluble vitamins.
How it fits in a healthy lifestyle
This One Pot Gnocchi Chicken Pot Pie fits beautifully into a balanced eating plan. It combines protein, carbohydrates, and vegetables in a single, satisfying bowl, making portion control straightforward. For those focused on muscle building or recovery, the lean chicken provides an excellent protein source. You can easily tailor the recipe to suit your needs by opting for a low-sodium broth or loading it up with even more veggies from your fridge.
If you love the convenience of one-pot meals that support your health goals, explore our guide to easy weekly meal prep ideas. Furthermore, understanding how to build a nourishing plate is key. This dish is a perfect practical example of the principles we discuss in our article on creating a truly balanced diet. It proves that comfort food can absolutely be part of a healthy, everyday lifestyle without any compromise on flavor.
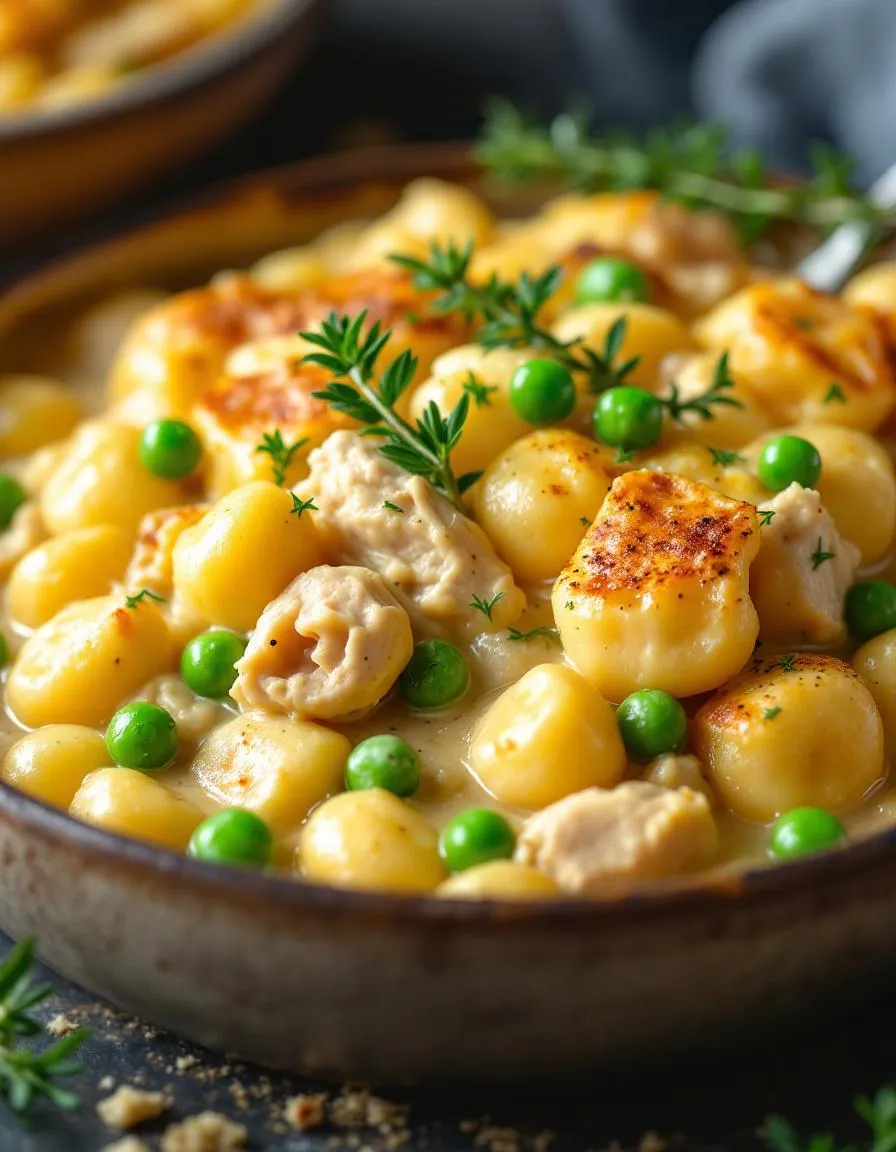
A comforting twist on classic chicken pot pie, made easy with pillowy gnocchi and cooked entirely in one pot for minimal cleanup.
Ingredients
Scale
For the Crust:
1 lb boneless, skinless chicken breasts, cubed
1 tbsp olive oil
1 small onion, diced
2 carrots, diced
2 celery stalks, diced
2 cloves garlic, minced
1/4 cup all-purpose flour
2 cups chicken broth
1 cup whole milk
1 cup frozen peas
1 tsp dried thyme
1 tsp salt
1/2 tsp black pepper
16 oz package potato gnocchi
1/4 cup grated Parmesan cheese
Instructions
1. Prepare the Crust:
Heat olive oil in a large oven-safe skillet over medium heat. Add chicken and cook until no longer pink, about 5-7 minutes. Remove and set aside.
In the same skillet, add onion, carrots, and celery. Cook until softened, about 5 minutes. Add garlic and cook for 1 minute more.
Sprinkle flour over vegetables and stir to coat. Gradually pour in chicken broth and milk, stirring constantly until sauce thickens.
Stir in cooked chicken, frozen peas, thyme, salt, and pepper. Bring to a simmer.
Gently fold in gnocchi and Parmesan cheese. Transfer skillet to preheated 375°F oven and bake for 20-25 minutes until gnocchi is tender and top is golden.
Notes
You can customize the seasonings to taste.
How to Prepare This Dish
Steps and time-saving tips
First, gather all your ingredients to make the process seamless. Next, preheat your oven to 400°F. Grab a large oven-safe skillet and melt your butter over medium heat. Then, add your diced onion, carrots, and celery, cooking them until they soften. After that, whisk in the flour to create your roux, which will beautifully thicken the filling for your One Pot Gnocchi Chicken Pot Pie. Gradually pour in the chicken broth and milk, stirring constantly until the sauce becomes smooth and creamy. Now, fold in your shredded chicken, frozen peas, and the star of the show, the gnocchi. Season everything generously with salt, pepper, and thyme. Finally, let the mixture simmer for just a few minutes so the gnocchi begins to cook through. Meanwhile, unroll your puff pastry sheet and lay it directly over the top of the skillet. Brush the pastry with an egg wash for that perfect golden finish. Carefully transfer the entire skillet to the preheated oven and bake for about 20 minutes. You will know your One Pot Gnocchi Chicken Pot Pie is ready when the filling is bubbly and the pastry is puffed and golden brown. Let it rest for five minutes before serving. For a true time-saver, use a store-bought rotisserie chicken and pre-chopped mirepoix. This entire dish comes together in one pan, making cleanup an absolute breeze.
Mistakes I’ve made and learned from
I have definitely learned a few lessons the hard way with this dish. Initially, I would make the classic mistake of overcrowding my skillet with vegetables, which caused them to steam instead of sauté, resulting in a soggy filling. Now, I cook them in batches if my pan is too small. Another common error was boiling the gnocchi in the sauce for too long; they can quickly turn from pillowy to mushy. I discovered that a brief simmer is all they need to become tender. For anyone new to working with pastry, my best advice is to properly thaw your puff pastry. I once tried to rush it, and it cracked terribly. For more on mastering doughs, my guide on how to make perfect pie crust has some great transferable tips. Also, if your sauce seems too thin, don’t panic. Simply let it reduce a bit longer before adding the pastry top. You can find more solutions for common sauce issues in my troubleshooting post on how to fix a too-thin sauce. Trust me, a little patience makes all the difference.
My grandmother always said the best recipes tell a story. This One Pot Gnocchi Chicken Pot Pie spins a tale of immigrant ingenuity. Italian families brought their beloved potato gnocchi to America. Meanwhile, settlers from England carried the concept of a savory meat pie. Eventually, these traditions met in bustling kitchens, creating beautiful fusion food. Families adapted based on what they had. For instance, some used leftover roast chicken while others swapped in seasonal vegetables.
Around the world, people put their own spin on this idea. In parts of France, they might use a flaky pastry crust instead of gnocchi. Conversely, a Hungarian cook may add a generous pinch of paprika for warmth. My own family’s version always includes a splash of white wine for extra depth. This dish truly celebrates the idea of comfort food that knows no borders. Ultimately, this One Pot Gnocchi Chicken Pot Pie represents a beautiful mash-up of culinary heritage.
ays-cooking">How it fits in today’s cooking
This dish fits perfectly into our modern need for cozy, efficient meals. Busy weeknights demand satisfying dinners that minimize cleanup. Fortunately, our One Pot Gnocchi Chicken Pot Pie delivers immense comfort with just one dish. It’s a fantastic way to use up leftover rotisserie chicken or holiday turkey. Furthermore, it brings everyone to the table for a shared, hearty experience.
Today’s cooks also love to adapt it for their dietary needs. Many easily make it gluten-free by using the right gnocchi. Others load it up with extra veggies from their weekly haul. It’s a brilliant recipe for quick weeknight dinners that feel special. Additionally, its creamy, carb-filled goodness makes it a prime candidate for a comfort food classics rotation. This timeless dish continues to warm bellies and hearts in kitchens today.
Taste and Texture
What makes it delicious
This One Pot Gnocchi Chicken Pot Pie delivers a deeply comforting and savory experience. Tender, shredded chicken mingles with soft, pillowy gnocchi in a luxuriously creamy sauce. Each bite bursts with the earthy sweetness of carrots and peas, while the aromatic trio of thyme, rosemary, and sage provides a fragrant, herbaceous backbone. Ultimately, the dish feels incredibly rich and cohesive, making this One Pot Gnocchi Chicken Pot Pie a modern twist on a beloved classic.
r">Boosting the flavor
For an extra flavor boost, consider a few simple tweaks. First, stir in a tablespoon of Dijon mustard or a splash of white wine to the creamy sauce for a bright, tangy depth. Next, top your finished bowl with a sprinkle of crispy, crumbled bacon or fresh, chopped parsley for contrasting texture and color. If you love exploring new flavors, our guide on creating your own spice blends can inspire a custom poultry seasoning. Finally, a dollop of creamy garlic herb sauce on the side introduces a fantastic, pungent kick that complements the dish beautifully.
Tips for Success
Best practices for results
First, always use a heavy-bottomed pot or Dutch oven for even heat distribution and to prevent the bottom from scorching. Furthermore, do not thaw your frozen vegetables beforehand; simply add them directly from the freezer to maintain the perfect texture. For the ultimate comfort food experience, use high-quality, shelf-stable gnocchi for your One Pot Gnocchi Chicken Pot Pie. Finally, let the finished dish rest for about five minutes before serving, as this allows the sauce to thicken beautifully.
>Mistakes to avoid
A common mistake is boiling the mixture instead of letting it simmer gently; consequently, the gnocchi can become mushy and fall apart. Instead, maintain a low simmer after adding the gnocchi. Additionally, avoid overcooking your chicken, which can make it dry and tough. For perfectly cooked protein every time, check out our guide on how to cook chicken breast. Moreover, do not skip the step of deglazing the pot with chicken broth after cooking the aromatics, as this lifts all the flavorful browned bits from the bottom. If you are new to this technique, our article on how to degrease a soup offers fantastic foundational knowledge for building flavor in any one-pot meal.
Serving and Pairing Suggestions
How to serve this dish
Immediately serve your One Pot Gnocchi Chicken Pot Pie straight from the skillet for a rustic, family-style presentation that maximizes its cozy appeal. For a more elegant touch, carefully ladle individual portions into shallow bowls. Furthermore, garnish each serving with a fresh sprinkle of chopped parsley or thyme to add a pop of color and a hint of freshness. This comforting One Pot Gnocchi Chicken Pot Pie truly shines as the centerpiece of a holiday potluck or a simple weeknight dinner. Ultimately, its all-in-one nature makes it a fantastic choice for any gathering where you desire minimal fuss and maximum flavor.
What goes well with it
A simple, crisp side salad perfectly cuts through the richness of the One Pot Gnocchi Chicken Pot Pie. For instance, our classic Herb Vinaigrette offers a bright, tangy contrast that wonderfully complements the creamy sauce. Additionally, a chilled glass of unoaked Chardonnay or a light Pinot Noir makes an excellent beverage pairing, as their crisp profiles balance the hearty dish. Finally, complete your meal with something sweet; a slice of our famous Decadent Chocolate Cake provides the ultimate satisfying finish.
Can I use frozen gnocchi for One Pot Gnocchi Chicken Pot Pie?
Yes, you can absolutely use frozen gnocchi. There’s no need to thaw them first; simply add the frozen gnocchi directly to the pot as directed in the recipe. The gnocchi will cook perfectly in the simmering sauce of your One Pot Gnocchi Chicken Pot Pie.
What can I use instead of heavy cream in chicken pot pie?
For a lighter option, you can substitute half-and-half or whole milk for the heavy cream, though the sauce will be slightly less rich. For a dairy-free version, full-fat canned coconut milk is an excellent alternative that still provides a creamy texture for your One Pot Gnocchi Chicken Pot Pie.
ank-math-faq-item">
How do I store and reheat leftover gnocchi chicken pot pie?
Store leftovers in an airtight container in the refrigerator for up to 3 days. The best way to reheat it is gently on the stovetop over medium-low heat, adding a splash of broth or milk to loosen the sauce if it has thickened too much.
Can I make this recipe ahead of time?
You can prepare the entire dish ahead of time and store it in the refrigerator for up to a day before baking. Let it sit at room temperature for about 20-30 minutes before heating it through in the oven. This makes One Pot Gnocchi Chicken Pot Pie a fantastic option for easy meal prep.
Easy Buffalo Garlic Chicken Bites Recipe
Introduction
Are you craving that perfect game day snack or a seriously satisfying weeknight dinner that everyone will devour? Furthermore, do you dream of that iconic spicy, tangy flavor but want something a bit more gourmet? Look no further, because these Buffalo Garlic Chicken Bites are about to become your new favorite obsession. They deliver all the classic comfort you love with an irresistible garlicky twist that makes them utterly unforgettable.
Buffalo Garlic Chicken Bites are the ultimate crowd-pleasing appetizer or main course. Essentially, they consist of tender, juicy chunks of chicken that we coat in a seasoned batter, bake or fry to crispy perfection, and then toss in a signature sauce. This sauce brilliantly combines the spicy, vinegar-forward kick of traditional Buffalo sauce with the rich, savory depth of roasted garlic. Consequently, this fusion creates a more complex and addictive flavor profile than standard wings. This recipe matters because it solves the eternal problem of what to serve when you need a guaranteed hit. Whether for a big party, a family dinner, or your personal meal prep, these bites always impress. They fit our blog’s tone perfectly as we focus on approachable recipes for real life that deliver restaurant-quality results without any fuss. For another fantastic way to enjoy chicken, explore our popular Lemon Herb Roasted Chicken. Moreover, if you enjoy balancing spicy flavors with cool, creamy dips, our Creamy Avocado Cilantro Dip is the perfect pairing for these fiery bites.
Why I Love This Recipe
I absolutely love this recipe for Buffalo Garlic Chicken Bites because it reminds me of my family’s football Sundays. My dad always made traditional wings, but I wanted to create a version that felt uniquely mine yet still honored that tradition. The first time I added a generous amount of fresh garlic to the sauce, the entire kitchen smelled incredible, and everyone immediately asked for the recipe. Now, these bites are a non-negotiable part of our gathering spread. They represent my own culinary twist on a beloved classic, and seeing people’s faces light up after the first bite never gets old.
Health and Nutrition
Why it’s good for your body
Buffalo Garlic Chicken Bites pack a powerful nutritional punch. First, they offer a fantastic source of lean protein from chicken breast. Consequently, this protein helps your body build and repair muscle tissue efficiently. Moreover, it keeps you feeling full and satisfied for longer, which can really help with managing your appetite throughout a busy day.
Additionally, this dish provides a significant dose of essential nutrients. For instance, garlic contributes allicin, a compound with noted antioxidant properties. Furthermore, the hot sauce base often contains capsaicin, which may support a healthy metabolism. Therefore, you get more than just incredible flavor with every bite of Buffalo Garlic Chicken Bites.
Ultimately, you can feel good about enjoying this meal. Unlike many traditional fried appetizers, this version bakes to crispy perfection. As a result, you significantly reduce the amount of unnecessary fats and oils. Finally, you create a meal that supports your wellness goals without sacrificing an ounce of taste, making Buffalo Garlic Chicken Bites a brilliant choice.
How it fits in a healthy lifestyle
These Buffalo Garlic Chicken Bites fit seamlessly into a balanced and healthy lifestyle. They perfectly support high-protein dietary goals, making them an excellent post-workout meal to help with muscle recovery. You can also easily pair them with a big fresh salad or some crunchy vegetable sticks for a complete, nutrient-dense lunch or dinner that keeps you energized.
If you follow a gluten-free diet, you can absolutely enjoy this recipe by simply ensuring your hot sauce and other condiments are certified gluten-free. For those monitoring their sodium intake, you have full control to adjust the amount of hot sauce or use a low-sodium alternative. This flexibility makes it a great heart-healthy option you can tailor to your needs. Exploring our meal prep strategies can show you how to incorporate these bites into your weekly plan. For more inspiration on building a balanced plate, check out our guide to creating perfect side dishes that complement a main like this.
Crispy, bite-sized chicken pieces coated in a spicy buffalo garlic sauce, perfect for game day or as a flavorful appetizer.
Ingredients
Scale
For the Crust:
1 lb boneless, skinless chicken breasts, cut into 1-inch pieces
1/2 cup all-purpose flour
1 tsp garlic powder
1/2 tsp paprika
1/2 tsp salt
1/4 tsp black pepper
1/2 cup hot sauce (such as Frank’s RedHot)
1/4 cup melted butter
2 cloves garlic, minced
1 tbsp honey
Vegetable oil for frying
Ranch or blue cheese dressing for serving
Instructions
1. Prepare the Crust:
In a bowl, mix flour, garlic powder, paprika, salt, and pepper. Dredge chicken pieces in the flour mixture until evenly coated.
Heat vegetable oil in a large skillet over medium-high heat. Fry chicken bites in batches for 5-6 minutes, until golden and cooked through. Drain on paper towels.
In a separate bowl, whisk together hot sauce, melted butter, minced garlic, and honey.
Toss the fried chicken bites in the buffalo garlic sauce until fully coated. Serve immediately with ranch or blue cheese dressing.
Notes
You can customize the seasonings to taste.
How to Prepare This Dish
Steps and time-saving tips
First, preheat your oven to 400°F and line a baking sheet with parchment paper. Meanwhile, grab a large bowl and whisk together your flour and spices for the coating. In a second bowl, beat a couple of eggs until they are perfectly smooth. Now, take your bite-sized chicken pieces and dredge them thoroughly in the flour mixture. Next, dip each piece into the egg wash, letting any excess drip off. Finally, return the chicken to the flour mixture for a second coat; this double-dredge is the secret to an extra crispy exterior. Arrange the coated bites on your prepared baking sheet in a single layer, ensuring they do not touch. Bake for 18-20 minutes, flipping them halfway through, until they are golden brown and cooked through. While the chicken bakes, quickly whisk together your buffalo sauce and melted butter in a large bowl. As soon as the chicken bites come out of the oven, immediately toss them in the buffalo sauce mixture until every piece is gloriously coated. Serve right away with your favorite dipping sauce!
Mistakes I’ve made and learned from
I have absolutely ruined a batch by overcrowding the baking sheet, which resulted in steamed, soggy Buffalo Garlic Chicken Bites instead of crispy perfection. Now, I always use two sheets if my batch is large, because giving each piece some breathing room is non-negotiable for that ideal crunch. Another common error I made was tossing the baked chicken in the sauce too early, which also made the coating soft. The key is to let the bites rest for just a minute after baking so they can firm up before their saucy bath. This simple waiting period makes all the difference. I also learned the hard way that not all hot sauces are created equal for this recipe; using a super-vinegary one straight from the bottle once made the flavor far too sharp. Now, I always balance it with melted butter and a touch of garlic powder, a trick I picked up from my experiments with other easy game day appetizers. For more on getting that sauce consistency just right, my guide on perfect wing sauce breaks it all down.
Our story begins, of course, in Buffalo, New York. The iconic sauce itself famously burst onto the scene in the 1960s, forever changing how we enjoy chicken wings. Consequently, this recipe for Buffalo Garlic Chicken Bites takes that legendary flavor profile and makes it even more irresistible for modern appetites. Families across the American South and Midwest, for instance, often add a generous spoonful of brown sugar or honey to their sauce, creating a sweeter, stickier glaze that kids absolutely adore. Meanwhile, my own family gatherings always feature a double batch because my uncle insists on tossing his portion in an extra-virgin olive oil and herb infusion before hitting the sauce, claiming it adds a Mediterranean freshness. Ultimately, whether you keep it classic or add your own twist, these Buffalo Garlic Chicken Bites carry the spirit of American innovation in every single bite.
Globally, chefs put their own spin on the concept. In South Korea, they might coat similar bites in a gochujang-based sauce for a fermented, spicy kick. Alternatively, in the UK, you may find them served with a side of chips (fries) rather than celery sticks. The beauty of this dish truly lies in its adaptability. Therefore, feel free to experiment and make it your own.
ays-cooking">How it fits in today’s cooking
Buffalo Garlic Chicken Bites absolutely thrive in our current food culture. They perfectly fit the bill for everything from a quick weeknight dinner to the star of your game day spread. Furthermore, their built-in portion control makes them a fantastic option for party platters and gatherings. Modern home cooks brilliantly adapt the recipe to suit various dietary needs; for example, many readily use an air fryer to achieve that crispy texture with significantly less oil.
This dish also seamlessly integrates into our meal planning routines. You can easily pair a lighter version with a fresh avocado salad for a balanced weeknight meal. Meanwhile, for a truly indulgent comfort food experience, serve them alongside some perfectly crispy air fryer french fries. Ultimately, their versatility and crowd-pleasing flavor ensure these bites remain a beloved classic for years to come.
Taste and Texture
What makes it delicious
These Buffalo Garlic Chicken Bites deliver a powerful one-two punch of flavor and texture. First, you experience a satisfyingly crisp, golden-brown exterior that gives way to incredibly juicy and tender chicken inside. The bold, tangy heat from the Buffalo sauce immediately hits your palate, followed closely by the rich, savory aroma of roasted garlic. Ultimately, this combination creates a truly addictive snack. Each bite of these Buffalo Garlic Chicken Bites perfectly balances spicy, savory, and garlicky notes for a mouthwatering experience.
r">Boosting the flavor
For an even more dynamic flavor profile, consider a few simple tweaks. Firstly, toss your finished Buffalo Garlic Chicken Bites in a dusting of grated Parmesan cheese and fresh chopped parsley; this adds a salty, umami depth and a pop of freshness. Alternatively, serve them alongside a cool, creamy dipping sauce to complement the heat. A side of homemade creamy avocado dip provides a fantastic cooling contrast. Furthermore, if you enjoy an extra kick, a dash of smoked paprika or a sprinkle of cayenne pepper before baking will amplify the spice level beautifully. For another delicious pairing, try serving them with these easy seasoned fries for the ultimate game-day spread.
Tips for Success
Best practices for results
First, always pat your chicken pieces completely dry with paper towels before seasoning them. This crucial step helps the coating achieve maximum crispiness. Furthermore, use a thermometer to check that your oil reaches the perfect 375°F for frying. Consequently, you will get a golden, crunchy exterior every single time. For the ultimate flavor, toss your hot Buffalo Garlic Chicken Bites in the sauce immediately after they come out of the oil. Finally, serve them right away for the best texture and temperature.
>Mistakes to avoid
Avoid overcrowding your pot or fryer with too many chicken pieces at once. Otherwise, the oil temperature will drop drastically and result in soggy, greasy bites instead of crispy ones. Additionally, do not pour all of your sauce onto the chicken at once. Instead, add it gradually and toss gently to coat everything evenly without making the coating fall off. Remember, letting your oil come back to temperature between batches is essential for perfect results. For more guidance on getting crispy chicken every time, check out our guide on managing frying temperatures. If you are looking for a fantastic sauce to pair with your meal, our creamy blue cheese dressing recipe is the perfect complement.
Serving and Pairing Suggestions
How to serve this dish
Immediately present your Buffalo Garlic Chicken Bites straight from the oven for maximum crispiness. For a casual game day spread, simply pile them high in a rustic basket lined with parchment paper. Conversely, elevate them for a dinner party by arranging them neatly on a sleek white platter. Always garnish with a generous drizzle of extra sauce and a sprinkle of fresh chives or crumbled blue cheese. Ultimately, these versatile Buffalo Garlic Chicken Bites shine as a centerpiece for any gathering.
What goes well with it
Cool, creamy dips perfectly balance the spicy kick of Buffalo Garlic Chicken Bites. Therefore, a classic blue cheese or ranch dressing is an absolute must for dipping. For side dishes, a crisp, refreshing salad provides a light contrast. Alternatively, our crowd-pleasing Air Fryer French Fries make a fantastic and easy pairing. Finally, consider serving these zesty bites alongside our creamy Classic Macaroni Salad for a complete and satisfying meal that everyone will love.
What is the best way to cook Buffalo Garlic Chicken Bites?
The best way to cook Buffalo Garlic Chicken Bites is to bake or air fry them. Baking gives a crispy exterior with less oil, while air frying achieves a similar deep-fried texture much faster. Both methods ensure your Buffalo Garlic Chicken Bites are juicy on the inside and perfectly coated with sauce.
Can I make Buffalo Garlic Chicken Bites ahead of time?
Yes, you can prepare Buffalo Garlic Chicken Bites ahead of time for easy entertaining. You can bread the raw chicken pieces and keep them refrigerated for up to 24 hours before cooking. For best results, toss them in the buffalo garlic sauce immediately before serving to keep them crispy.
ank-math-faq-item">
What do you serve with Buffalo Garlic Chicken Bites?
Buffalo Garlic Chicken Bites pair perfectly with classic cooling dips like blue cheese or ranch dressing. Serve them with celery sticks, carrot sticks, and cucumber slices to balance the heat. They also make a great addition to a game day platter alongside other finger foods.
How do you keep breading from falling off chicken bites?
To keep the breading from falling off your Buffalo Garlic Chicken Bites, pat the chicken pieces completely dry before coating them. Then, follow a standard breading procedure: dredge in flour, dip in beaten egg, and then coat in breadcrumbs or panko, pressing gently to adhere. This creates a solid foundation for the sauce.
Easy Peanut Butter Spider Cookies for Halloween
Introduction
Do you remember the pure, unadulterated joy of baking with someone you loved as a child? That magical feeling of creating something fun and delicious from a few simple ingredients is a tradition worth passing on. These Easy Peanut Butter Spider Cookies capture that exact spirit, offering a wonderfully spooky and incredibly simple baking project that will have everyone giggling. Ultimately, they are the perfect way to create new, happy memories in your own kitchen without any stress.
Easy Peanut Butter Spider Cookies are a playful, no-bake treat that transforms a classic peanut butter cookie into a fuzzy, eight-legged friend. This recipe matters because it demystifies baking, making it an accessible and joyful activity for parents and kids to share. Furthermore, it perfectly fits our blog’s core mission: to deliver incredibly approachable recipes that guarantee success and bring people together. You do not need any special skills, just a willingness to have a little fun. In fact, this is one of our favorite easy Halloween treats for busy families. The process is straightforward, and the result is a delightfully creepy cookie that is sure to be the hit of any party or classroom event. Moreover, this activity encourages creativity, as each spider can have its own unique personality. We always focus on recipes that build confidence in the kitchen, and this one is a fantastic starting point for novice bakers of all ages. It also pairs wonderfully with other simple creations, like our popular no bake desserts, for a complete hassle-free menu.
Why I Love This Recipe
This recipe holds a special place in my heart because it was the first one I ever made with my niece. I vividly remember her concentration as she carefully placed each candy eye and her triumphant smile when her army of peanut butter spiders was complete. That afternoon of laughter and sticky fingers is a core memory for me. These cookies are more than just a snack; they are a tool for connection and a guaranteed source of joy, which is exactly why I love sharing them with you.
Health and Nutrition
Why it’s good for your body
These Easy Peanut Butter Spider Cookies offer more than just a fun treat; they also provide some genuine nutritional perks. First and foremost, peanut butter serves as the star ingredient, packing a powerful punch of plant-based protein. This protein content helps your body build and repair tissues while also promoting a feeling of fullness. Furthermore, peanut butter delivers healthy monounsaturated fats, which actively support heart health and help manage cholesterol levels.
Moreover, these delightful cookies bring a good dose of essential nutrients to your table. For instance, they supply magnesium for muscle and nerve function, alongside vitamin E, a potent antioxidant that protects your cells. Consequently, enjoying an Easy Peanut Butter Spider Cookie means you are giving your body valuable fuel. Ultimately, this combination of protein, healthy fats, and key vitamins makes each bite a smarter choice than many conventional desserts.
How it fits in a healthy lifestyle
You can absolutely enjoy Easy Peanut Butter Spider Cookies as part of a balanced diet. Think of them as a satisfying snack that provides lasting energy, making them a perfect pre- or post-workout bite. Their macronutrient profile helps curb cravings, so you are less likely to reach for less nutritious options later.
For anyone following a specific eating plan, these cookies are naturally gluten-free if you use certified oats, and they offer a great source of plant-based protein. Remember, balance is everything. Pairing a cookie with a piece of fruit makes a well-rounded snack. If you are looking for more ideas on mindful eating, explore our guide on building healthy eating habits. And for another delicious treat that fits a nutritious lifestyle, try our wholesome banana oatmeal cookies.
Fun and spooky peanut butter cookies decorated to look like spiders, perfect for Halloween or any occasion.
Ingredients
Scale
For the Crust:
1 cup creamy peanut butter
1 cup granulated sugar
1 large egg
1 tsp vanilla extract
48 chocolate chips
24 mini pretzel twists
Instructions
1. Prepare the Crust:
Preheat oven to 350°F (175°C) and line a baking sheet with parchment paper.
In a bowl, mix peanut butter, sugar, egg, and vanilla until well combined.
Roll dough into 1-inch balls and place on baking sheet. Flatten slightly with a fork.
Bake for 10-12 minutes until edges are golden. Immediately press two chocolate chips for eyes and pretzel twists for legs into each cookie while warm.
Cool completely on wire rack before serving.
Notes
You can customize the seasonings to taste.
How to Prepare This Dish
Steps and time-saving tips
First, preheat your oven to 350°F and line your baking sheets with parchment paper. This simple step prevents sticking and makes cleanup a breeze. Meanwhile, cream together your room-temperature butter, peanut butter, and sugars until the mixture becomes light and fluffy. Next, beat in the egg and vanilla extract until everything is perfectly combined. In a separate bowl, whisk your dry ingredients—flour, baking soda, and salt—together. Gradually add these dry ingredients to your wet mixture, mixing just until a soft dough forms. For a major time-saving tip, use a cookie scoop to portion your dough; this ensures every Easy Peanut Butter Spider Cookie bakes evenly and saves you from messy hands. Roll each portion into a smooth ball and place them a couple of inches apart on your prepared sheets. Then, gently press each ball down with a fork to create that classic crisscross pattern. Bake your cookies for about 8 to 10 minutes, or until the edges just start to turn a beautiful golden brown. Finally, let them cool on the baking sheet for five minutes before transferring them to a wire rack. This patience prevents breakage and lets them set perfectly.
Mistakes I’ve made and learned from
I have absolutely overmixed this dough in a rush, which resulted in tough cookies instead of the soft, crumbly texture we all love. Now, I mix the dry ingredients in by hand just until no flour streaks remain. Another common blunder was using cold, hard butter straight from the fridge, which never creams properly with the sugar and leads to a greasy, dense cookie. I always make sure my butter is perfectly softened now for a light and airy dough. For more on getting your ingredients just right, my guide on common ingredient substitutions has saved me more than once. Also, I learned the hard way that baking time is everything; just one extra minute can turn a chewy masterpiece into a crispy disappointment. Using an oven thermometer completely changed my game, a tip I picked up from my post on essential baking tools that every kitchen needs.
Honestly, the story of Easy Peanut Butter Spider Cookies starts in countless American kitchens every October. Parents and kids alike crave a simple, fun baking project that builds Halloween magic without any fuss. Consequently, this treat became a seasonal staple, weaving itself into the fabric of autumn traditions. Families often pass down their own little twists, too. For instance, some use round pretzels for the spider body while others might use black licorice for extra legs.
Around the world, people put their own spin on similar festive treats. Meanwhile, in Mexico, pan de muerto honors loved ones during Dia de los Muertos. Similarly, in Italy, families enjoy ossa dei morti, or “bones of the dead,” cookies. However, our friendly Easy Peanut Butter Spider Cookies carry a lighter, playful spirit. Ultimately, they turn a potentially spooky symbol into something deliciously goofy that everyone can enjoy together.
ays-cooking">How it fits in today’s cooking
These cookies absolutely thrive in modern cooking because they deliver maximum fun for minimal effort. Today’s busy families constantly search for quick, engaging activities, and this recipe fits the bill perfectly. Furthermore, it’s incredibly adaptable for various diets; you can easily find gluten-free pretzels or use a dairy-free chocolate alternative for the melts.
Their relevance extends beyond just Halloween, too. For example, teachers often use them for classroom parties, and they’re a huge hit at any fall gathering. Moreover, the basic peanut butter cookie dough is a fantastic, forgiving base for creativity. You can even use the same dough to make other shapes, much like you would with a classic vanilla cupcake recipe for different holidays. Ultimately, this enduring recipe continues to create sweet memories and silly moments in kitchens today.
Taste and Texture
What makes it delicious
These Easy Peanut Butter Spider Cookies deliver a wonderfully rich and nutty flavor that fills your kitchen with a warm, toasty aroma as they bake. The texture is a perfect contrast, featuring a crisp, sugary edge that gives way to a fantastically soft and chewy center. Creamy peanut butter creates a deeply savory backbone, while the classic addition of chocolate chips provides sweet, melty pockets that balance the saltiness. Ultimately, every bite of these Easy Peanut Butter Spider Cookies offers a satisfying, homestyle comfort that is both familiar and utterly delightful.
r">Boosting the flavor
For an even more decadent treat, consider rolling your dough balls in coarse sugar before baking; this creates a delightful sparkle and an extra crunch. Alternatively, you can press a dark chocolate kiss into the center of each warm cookie for a gooey, fudgy surprise. If you love a hint of salt to cut through the sweetness, a light sprinkle of flaky sea salt right after they come out of the oven works wonders. For more creative cookie ideas that pack a flavor punch, explore our guide on secret weapon cookie add-ins. Furthermore, pairing these with a cold glass of milk or a scoop of our simple vanilla bean ice cream turns them into an unforgettable dessert experience.
Tips for Success
Best practices for results
First, always use parchment paper on your baking sheets because it prevents sticking and promotes even browning. Furthermore, chill your dough for at least thirty minutes so your Easy Peanut Butter Spider Cookies hold their perfect shape. For the best texture, use a standard measuring spoon to ensure each cookie is the same size. Consequently, you will get a batch that bakes uniformly. Finally, press the spider body and legs together gently to make sure they adhere during baking.
>Mistakes to avoid
Avoid overmixing your cookie dough after you add the flour, as this can develop too much gluten and lead to tough cookies. Instead, mix just until you see no more dry streaks. Additionally, do not use natural peanut butter that separates, because the extra oil will change your dough’s consistency and cause spreading. For more on this, read our guide on why your cookies spread. Also, make sure your cookies cool completely on the baking sheet for a few minutes before you transfer them to a wire rack; otherwise, they might break. If you find your treats are too crumbly, our tips for how to keep cookies soft can help you achieve a perfect chew every time.
Serving and Pairing Suggestions
How to serve this dish
Presentation truly elevates these fun treats. For instance, arrange your Easy Peanut Butter Spider Cookies on a rustic wooden board to create a spooky scene. Alternatively, place each cookie on a small, colorful napkin for a festive individual serving. Moreover, a light dusting of powdered sugar “cobweb” adds a magical touch. These cookies absolutely shine at Halloween parties, yet they also make a delightful surprise in any lunchbox. Finally, remember that kids love helping assemble the spider legs, making baking these a fantastic family activity.
What goes well with it
A cold glass of milk remains the ultimate partner for Easy Peanut Butter Spider Cookies, as it perfectly cuts through the rich peanut butter flavor. For a festive gathering, consider pairing them with a warm mug of our homemade hot chocolate; the creamy chocolate wonderfully complements the sweet cookie. Furthermore, a scoop of vanilla bean ice cream turns these treats into a decadent dessert. Conversely, a fresh fruit platter with apple slices and strawberries offers a light, healthy balance to your indulgent snack. You can also serve them alongside other spooky treats like our delicious pumpkin bread for a complete thematic spread.
Can I use natural peanut butter for spider cookies?
We do not recommend using natural or oily peanut butter for these Easy Peanut Butter Spider Cookies. The excess oil can cause the dough to become too greasy and spread excessively while baking, which can ruin the spider shape. For the best structural results, use a standard, shelf-stable creamy peanut butter like Jif or Skippy.
What can I use for spider legs if I don’t have pretzel sticks?
If you don’t have pretzel sticks, you have a few great options for creating the legs on your Easy Peanut Butter Spider Cookies. Thin licorice laces or strings (like black Twizzlers Pull-n-Peel) can be cut to size. You can also use chow mein noodles, which provide a similar crunchy texture and are easy to insert into the cookie’s sides.
ank-math-faq-item">
How far in advance can I make peanut butter spider cookies?
You can assemble these fun Halloween treats up to 2-3 days in advance. For the best texture, store the completely cooled Easy Peanut Butter Spider Cookies in a single layer in an airtight container at room temperature. Wait to add the candy eyes until just before serving if you are concerned about them softening.
Are peanut butter spider cookies no-bake?
Most recipes for Easy Peanut Butter Spider Cookies, including the classic version, are baked cookies. They start with a standard peanut butter cookie dough that is rolled into a ball and baked. The decorative spider elements, like the pretzel legs and candy eyes, are added after the cookies have baked and cooled slightly so they don’t melt.
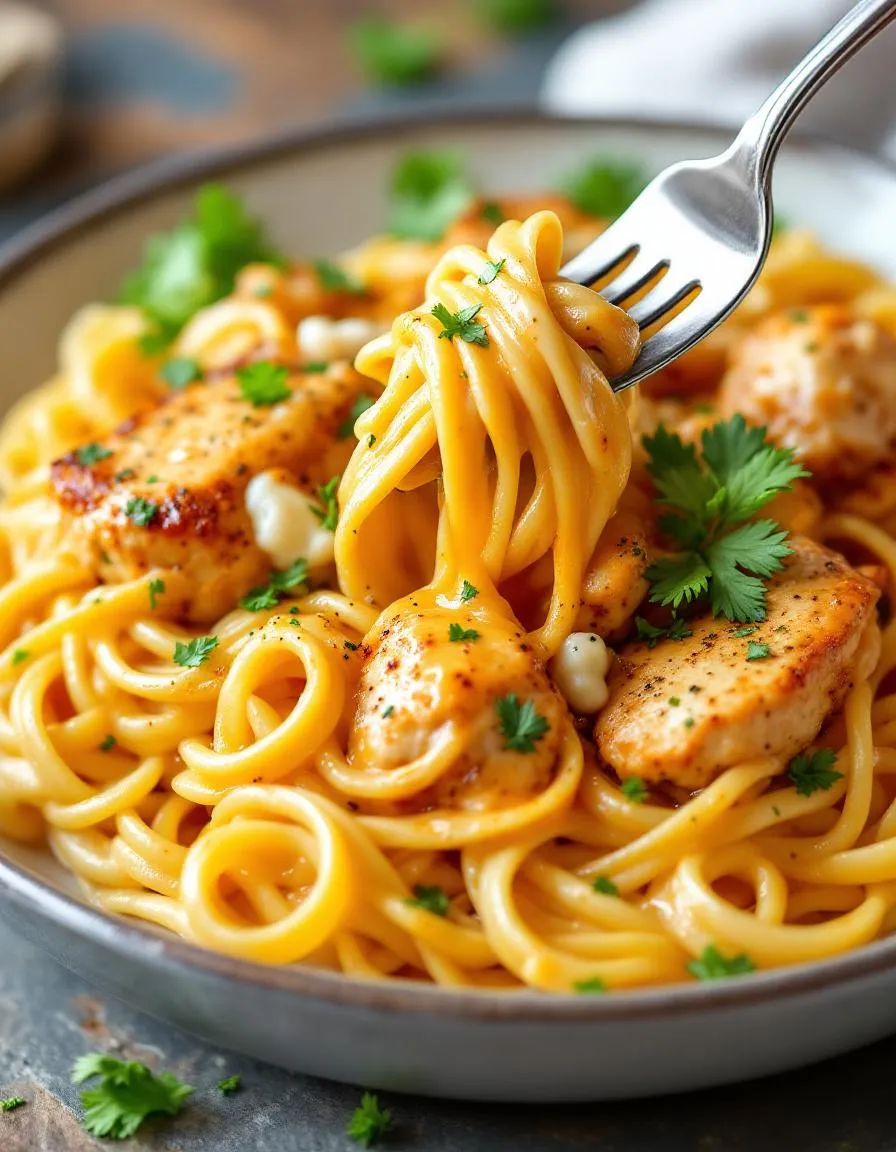
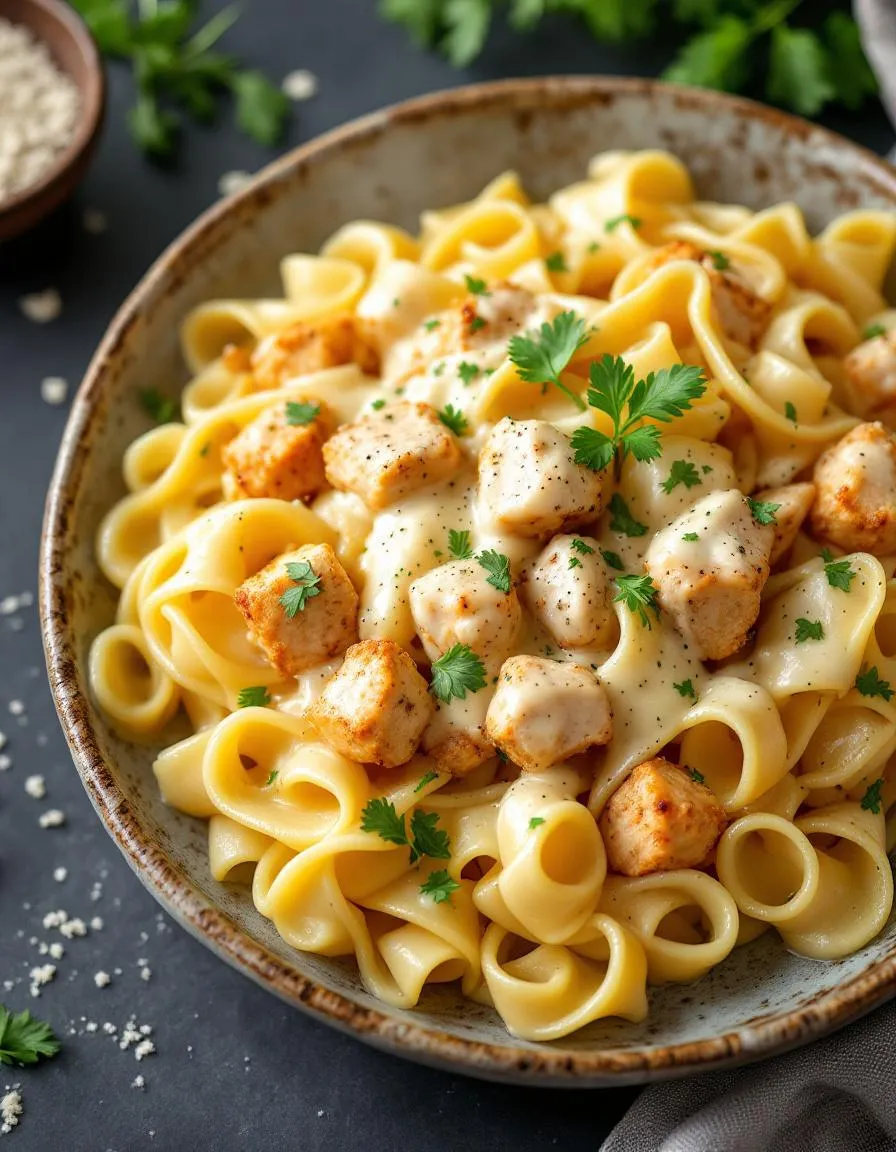
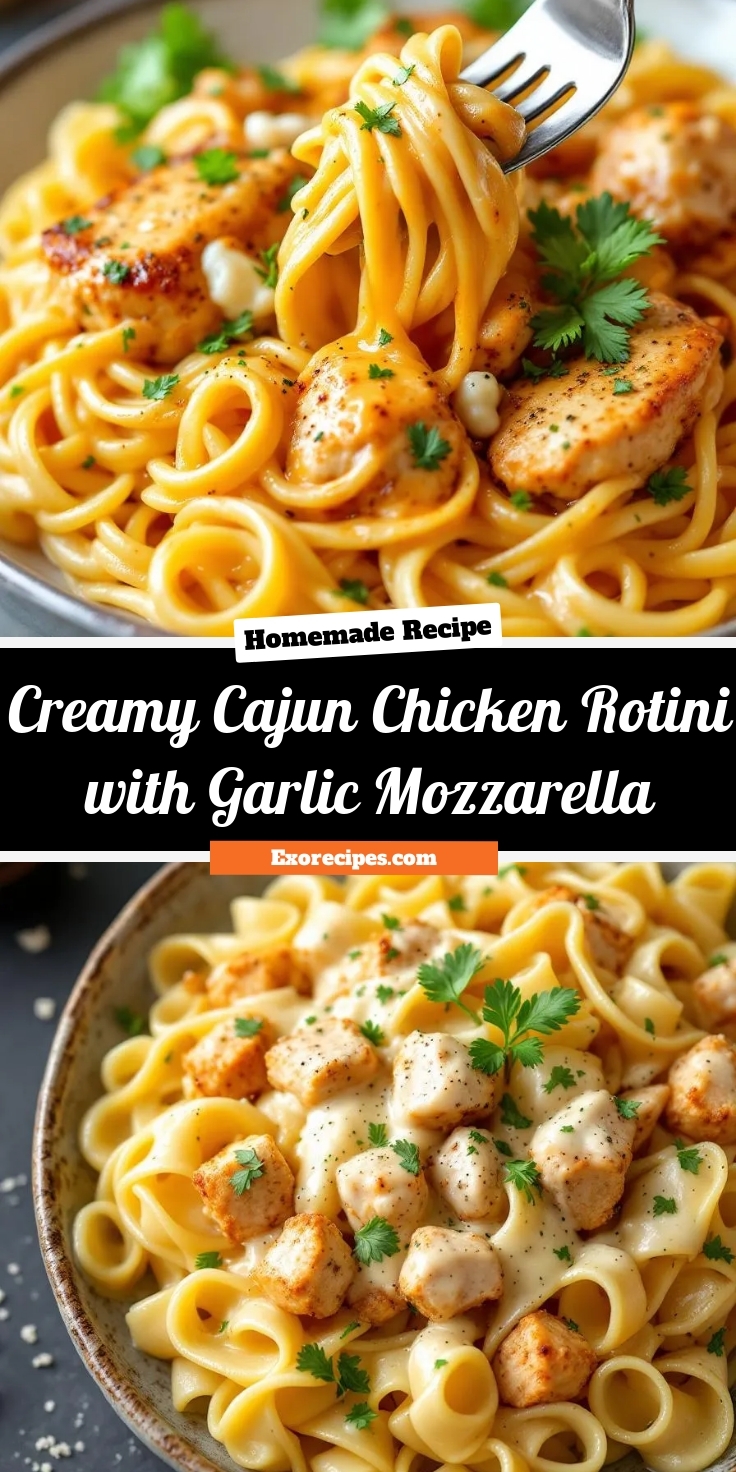
Creamy Cajun Chicken Rotini with Garlic Mozzarella
Introduction
Do you ever crave a meal that feels like a warm, comforting hug but also delivers a serious kick of excitement? Moreover, you want something that looks and tastes like it came from a fancy restaurant, yet you can whip it up on a busy weeknight without any stress. This exact feeling is why I created this incredible dish. Ultimately, get ready to fall in love with every single bite of this Creamy Cajun Chicken Rotini with Garlic Mozzarella Sauce.
Creamy Cajun Chicken Rotini with Garlic Mozzarella Sauce is a vibrant and satisfying pasta dish that masterfully combines bold Southern spices with rich, Italian-inspired creaminess. The recipe features tender chicken breast, generously coated in a homemade Cajun seasoning blend, which we sear until perfectly blackened. Subsequently, we toss the chicken with rotini pasta, a shape specifically chosen because its twists and turns hold the luxurious sauce in every nook and cranny. Speaking of the sauce, it is a spectacularly simple combination of fresh garlic, butter, cream, and mozzarella cheese that melts into a velvety, dreamy coating. This dish matters because it solves the eternal dinner dilemma, offering maximum flavor with surprisingly minimal effort. It fits our blog’s tone perfectly as we specialize in approachable gourmet meals, like our popular One Pan Lemon Herb Salmon, that empower home cooks to create restaurant-quality food. Furthermore, the recipe is highly adaptable; for instance, you can easily swap the protein or adjust the spice level to suit your family’s preferences, much like you can with the versatile bases in our Creamy Tuscan Soup. You are not just making pasta; you are creating a memorable dining experience that will have everyone asking for seconds.
Why I Love This Recipe
This Creamy Cajun Chicken Rotini with Garlic Mozzarella Sauce holds a special place in my heart because it truly represents my cooking philosophy. I first perfected this recipe for a friend who needed a serious pick-me-up, and the joy it brought to her table was instantly contagious. Furthermore, the process of making it centers me; the sizzle of the spices hitting the hot pan and the incredible aroma of garlic melting into the cream is my kind of kitchen therapy. Every time I serve it, I watch as people’s eyes light up after the first bite, and that reaction is absolutely priceless. It is my ultimate go-to for impressing guests without any fuss, and it never fails to deliver pure comfort and excitement in a single bowl.
Health and Nutrition
Why it’s good for your body
Creamy Cajun Chicken Rotini with Garlic Mozzarella Sauce offers a powerful combination of lean protein and complex carbohydrates. Consequently, this dish provides sustained energy to fuel your day. The chicken breast delivers a high-quality protein punch, which is essential for building and repairing muscle tissue.
Moreover, the garlic and spices in the sauce do more than just add flavor. Garlic contains allicin, a compound known for its potential immune-boosting properties. Additionally, the Cajun seasoning blend often includes paprika and cayenne pepper, which may help support a healthy metabolism.
Furthermore, the mozzarella cheese contributes calcium for strong bones. While this meal feels indulgent, it balances richness with nourishment. You can feel good about serving Creamy Cajun Chicken Rotini with Garlic Mozzarella Sauce to your family. Finally, the rotini pasta offers a satisfying base that helps keep you full and focused.
How it fits in a healthy lifestyle
This creamy pasta dish fits beautifully into a balanced lifestyle when enjoyed as part of a varied diet. For those focused on fitness, the high protein content from the chicken supports muscle recovery after a workout. You can easily tailor the ingredients to meet your goals; for instance, using a whole-grain rotini adds extra fiber.
If you are managing your carb intake, simply practice mindful portion control with the pasta and load up on the chicken and sauce. The key is pairing it with a simple side salad or some steamed vegetables to create a complete, satisfying meal. For more ideas on building a nutritious plate, explore our guide on meal prepping for the week. Remember, healthy eating is all about balance and enjoying the foods you love. If you have specific dietary needs, check out our tips for adapting recipes to be gluten-free.
A spicy and creamy pasta dish featuring tender Cajun-spiced chicken and rotini pasta tossed in a rich garlic mozzarella sauce.
Ingredients
Scale
For the Crust:
1 lb boneless, skinless chicken breasts, cubed
2 tbsp Cajun seasoning
12 oz rotini pasta
3 tbsp olive oil
4 cloves garlic, minced
1 cup heavy cream
1 cup shredded mozzarella cheese
1/2 cup grated Parmesan cheese
Salt and black pepper to taste
Fresh parsley, chopped (for garnish)
Instructions
1. Prepare the Crust:
Season chicken cubes with Cajun seasoning. Heat 2 tbsp olive oil in a large skillet over medium-high heat. Cook chicken until browned and cooked through, about 6-8 minutes. Remove and set aside.
Cook rotini according to package directions until al dente. Drain and set aside.
In the same skillet, heat remaining 1 tbsp olive oil. Add minced garlic and sauté for 1 minute until fragrant. Pour in heavy cream and bring to a simmer.
Reduce heat to low. Stir in mozzarella and Parmesan cheeses until melted and smooth. Season sauce with salt and pepper.
Add cooked chicken and pasta to the skillet. Toss until evenly coated with the sauce. Garnish with fresh parsley before serving.
Notes
You can customize the seasonings to taste.
s-dish">How to Prepare This Dish
Steps and time-saving tips
First, generously season your chicken breasts with that bold Cajun spice blend. Meanwhile, get a large pot of salted water boiling for your rotini. Next, heat a tablespoon of oil in a large skillet over medium-high heat. Then, cook the chicken for about 6-7 minutes per side until it is beautifully golden and cooked through. After that, transfer the chicken to a plate to rest. Consequently, the pasta should go into the boiling water now. In the same skillet, melt your butter and sauté the minced garlic until it becomes fragrant. Immediately, whisk in the flour to create a simple roux. Gradually, pour in the heavy cream and chicken broth, whisking constantly to avoid any lumps. Soon, you will have a smooth, bubbling sauce. Finally, reduce the heat and stir in the shredded mozzarella until it melts into a glorious, creamy garlic sauce. Drain your cooked rotini and slice the rested chicken. Gently, fold the pasta and chicken into the sauce, ensuring everything gets a luxurious coat. Serve immediately for the best experience.
Mistakes I’ve made and learned from
I have absolutely learned this the hard way, but adding cheese to a sauce that is too hot is a recipe for disaster. The mozzarella will seize up and become a stringy, greasy mess instead of melting into a smooth, creamy Cajun Chicken Rotini sauce. Now, I always take the skillet off the direct heat before stirring in the cheese, and the results are perfectly silky every single time. Another common blunder? Overcooking the chicken, which makes it tough. Using a simple instant-read thermometer takes all the guesswork out of it. Also, do not forget to salt your pasta water aggressively. It is your one chance to season the pasta itself, and it makes a huge difference in the final flavor of your Creamy Cajun Chicken Rotini with Garlic Mozzarella Sauce. For more on building flavor from the start, my guide on building a flavor base really breaks it down.
n-and-variations">Cultural Connection and Variations
Where this recipe comes from
This dish tells a beautiful story of culinary travel. It marries the rustic, soulful heat of Cajun country with the creamy, comforting embrace of Italian-American cooking. My own family often prepares this for big, noisy gatherings where everyone needs a hearty plate of food. We might swap the protein for spicy andouille sausage sometimes, or even blacken the chicken extra dark for more kick. Meanwhile, other regions put their own spin on it. For instance, some cooks in Louisiana might use a classic holy trinity base and serve it over rice instead of pasta. Conversely, in Italy, they would likely use a fresher, lighter tomato-based sauce and perhaps some pancetta. Ultimately, the magic of this Creamy Cajun Chicken Rotini with Garlic Mozzarella Sauce recipe is its incredible flexibility. It welcomes you to make it your own.
Furthermore, the recipe feels deeply seasonal to me. It perfectly bridges the gap between late summer and early fall. You can use the last of the garden’s bell peppers and then lean into the warming spices as the evenings get cooler. This particular version of Creamy Cajun Chicken Rotini with Garlic Mozzarella Sauce is our ultimate comfort food. It always brings everyone to the table with its incredible aroma. Honestly, every family seems to have their own secret twist, and that is the best part.
How it fits in today’s cooking
This recipe absolutely thrives in modern kitchens because it delivers maximum flavor without maximum fuss. Busy home cooks love how easily it comes together for a satisfying weeknight dinner. Moreover, its all-in-one-pan nature makes cleanup a breeze, which is a huge win for today’s schedules. You can also easily adapt it for various dietary needs. For example, use gluten-free pasta or a plant-based chicken alternative without losing any of that signature creamy, spicy goodness. It is the kind of versatile dish that fits right into your regular meal rotation.
Consequently, it has be
come a go-to for casual entertaining and potlucks. It feeds a crowd beautifully and always earns rave reviews. If you are looking for other crowd-pleasing ideas, our Sheet Pan Harvest Chicken Dinner offers that same convenient, one-pan magic. Additionally, for those who adore the creamy, cheesy element, this pasta shares a comforting DNA with classics like our Creamy Tuscan Chicken Pasta. Ultimately, this dish remains relevant because it consistently delivers comfort, excitement, and convenience in every single bite.
Taste and Texture
What makes it delicious
This Creamy Cajun Chicken Rotini with Garlic Mozzarella Sauce delivers a powerful and comforting sensory experience. First, your kitchen fills with the smoky, fragrant aroma of toasted paprika and garlic, which perfectly signals the feast to come. Each forkful combines tender, chewy rotini pasta with juicy, perfectly seasoned chicken. The sauce itself is incredibly rich and velvety, coating every single ingredient. Moreover, the sharp, savory notes from the mozzarella and parmesan cheese beautifully balance the warm, earthy heat from the Cajun spices. Ultimately, every bite of this Creamy Cajun Chicken Rotini with Garlic Mozzarella Sauce offers a harmonious and deeply satisfying blend of creamy, spicy, and cheesy flavors.
Boosting the flavor
You can easily customize this dish to suit your taste preferences. For instance, try adding a splash of heavy cream or a extra handful of parmesan to make the sauce even richer and more decadent. If you enjoy more heat, stir in an extra teaspoon of cayenne pepper or top your bowl with some sliced jalapeños. Conversely, for a fresh contrast, a bright squeeze of lemon juice or a sprinkle of fresh parsley cuts through the richness beautifully. Consider serving it alongside a simple side salad for a complete meal. Furthermore, a warm, buttery slice of our Garlic Bread is the perfect tool for soaking up every last bit of that incredible sauce. Finally, for a different but equally delicious creamy pasta night, our Creamy Tuscan Chicken offers another fantastic flavor profile to explore.
Always cook your chicken to an internal temperature of 165°F for perfect safety and texture. Furthermore, reserve a cup of starchy pasta water before draining the rotini; consequently, you can use it to adjust the sauce consistency at the end. Use fresh, high-quality mozzarella for the smoothest, most luxurious melt in your Garlic Mozzarella Sauce. Finally, toast the Cajun spices in the pan for a minute before adding other ingredients to unlock their full, deep flavor in your Creamy Cajun Chicken Rotini with Garlic Mozzarella Sauce.
Mistakes to avoid
Avoid adding cheese to a sauce that is too hot, as this often causes it to become grainy and separate. Instead, always remove the pan from the heat before stirring in the mozzarella for a perfectly smooth sauce. Moreover, do not overcook your pasta; al dente rotini holds up much better against the rich, creamy sauce. For more guidance on getting this right, check out our guide on how to cook pasta al dente. Additionally, remember to taste your dish before adding extra salt, since Cajun seasoning blends already contain a fair amount. If you are unsure about your spice level, our article on understanding Cajun seasoning can help you master the balance.
g-suggestions">Serving and Pairing Suggestions
How to serve this dish
Immediately serve your Creamy Cajun Chicken Rotini with Garlic Mozzarella Sauce while it is still hot and wonderfully aromatic. For a beautiful presentation, twirl the pasta into a neat nest using tongs. Subsequently, place a few tender chicken pieces on top. Finally, garnish with a sprinkle of fresh chopped parsley and a light dusting of grated Parmesan cheese for a pop of color and extra flavor.
This stunning dish truly shines as a centerpiece for a cozy date night in. Alternatively, it makes a fantastic family dinner that everyone will request again. For special occasions, consider serving it in a large, elegant ceramic bowl to create a warm, inviting family-style meal.
What goes well with it
Firstly, a crisp, cool side salad perfectly balances the rich and spicy notes of the Creamy Cajun Chicken Rotini. A simple mix of romaine lettuce with a tangy vinaigrette cuts through the decadent garlic mozzarella sauce beautifully. We highly recommend our ultimate Easy Caesar Salad Recipe for a classic pairing.
Secondly, a slice of cr
usty artisan bread is absolutely essential. Importantly, it soaks up every last bit of the incredible sauce. For a delightful homemade option, our soft and buttery Garlic Herb Focaccia Bread complements the Cajun spices wonderfully.
Finally, consider a beverage pairing. A chilled glass of pale ale or a slightly sweet white wine like Riesling contrasts the dish’s heat. Consequently, each sip will refresh your palate for the next delicious bite.
math-faq-block">
What is the best pasta to use for Creamy Cajun Chicken Rotini?
Rotini is the ideal pasta for this dish because its corkscrew shape perfectly captures the creamy Garlic Mozzarella Sauce. While rotini is traditional, you can substitute other short, sturdy pasta shapes like penne or fusilli. The key is to use a pasta that can hold onto the rich sauce in every bite of your Creamy Cajun Chicken Rotini.
How do I make the sauce creamy without it breaking?
The secret to a smooth, unbroken sauce is to keep the heat low when adding the dairy. Always let your cream and milk come to room temperature before incorporating them into the roux. Continuously whisk the sauce as you slowly add the shredded mozzarella to ensure it melts evenly and creates a luxuriously creamy texture for your Garlic Mozzarella Sauce.
Can I make this dish ahead of time?
Yes, you can prepare components ahead of time, but for the best texture, combine the pasta and sauce just before serving. You can cook the chicken, make the sauce, and even boil the pasta a day in advance, storing them separately in airtight containers in the refrigerator. Gently reheat the sauce and toss with freshly warmed pasta to serve your Creamy Cajun Chicken Rotini.
ank-math-faq-item">
What can I use instead of heavy cream for a lighter version?
For a lighter sauce, you can substitute half-and-half or whole milk for the heavy cream, though the sauce will be slightly less rich. To help maintain a creamy consistency, create a slurry with a tablespoon of cornstarch and a quarter cup of milk before stirring it into the warming sauce. This helps thicken it without relying solely on the fat content.