This Sourdough Discard Banana Bread is soft, moist, and packed with rich banana flavor and a subtle tang from your sourdough starter. It’s the perfect way to use up sourdough discard without wasting a drop! Great for breakfast, snacks, or cozy baking days. Save this easy no-waste recipe now!
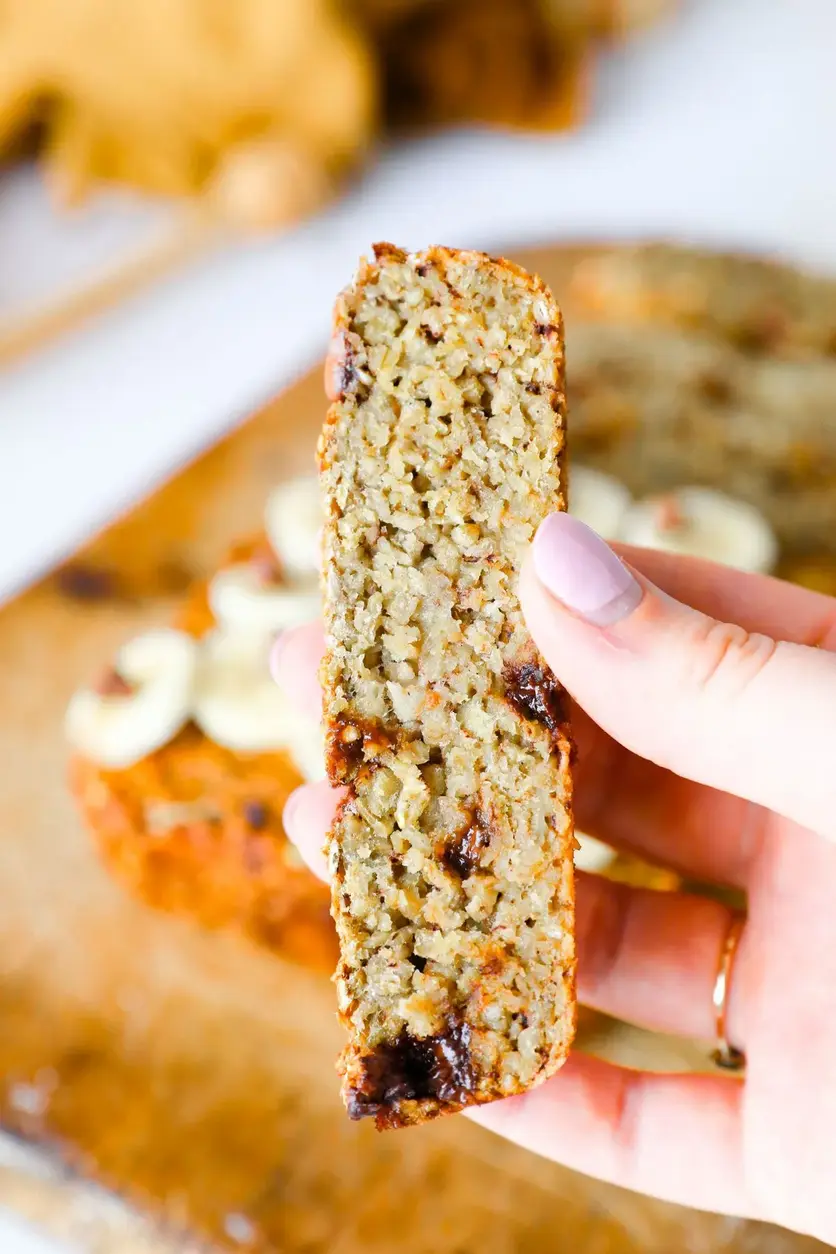
Discover the ultimate gluten-free recipe with our scrumptious oatmeal banana bread! Easy to make, this is a healthy dessert idea and delicious for the whole family. Your new go-to treat awaits! This is one of the breakfast recipes you’ll want to try over and over again.
This Oatmeal Banana Bread is moist, flourless, and sweet. It’s a healthy dessert or just an easy breakfast recipe when you’re craving something sweet.
Ingredients
Scale
3 medium ripe bananas
2 large eggs
1/4 cup maple syrup or honey
1 tsp vanilla extract
1 tsp baking soda
2 cups rolled oats
1/4 cup chocolate chips
Instructions
Preheat the oven to 180C/350F. Spray a 5’’x9’’ loaf pan with oil or grease it with butter.
In a large bowl, mash the bananas.
Add in eggs, maple syrup, vanilla extract, and baking soda, and mix all of the ingredients as well as you can using a whisk.
Add the rolled oats and chocolate chips and combine all the ingredients.
Pour the batter into the loaf pan and add some chocolate chips.
Bake in the oven for 30-35 minutes and let it cool down inside the loaf pan before serving.
Nutrition
Calories:129kcal
Sugar:12g
Protein:3.3g
Strawberry Cinnamon Rolls with Cream Cheese Icing: A Fruity Delight
Indulge in these easy, homemade strawberry cinnamon rolls with a delicious twist! Made from scratch, these fluffy and soft rolls are filled with a sweet strawberry filling and topped with a luscious strawberry cream cheese glaze. Perfect for strawberry lovers, this fruity and delicious recipe is sure to become a favorite for breakfast or dessert. These rolls are a delightful way to savor the flavors of fresh strawberries.
Strawberry cinnamon rolls filled with homemade strawberry compote and topped with a creamy strawberry cream cheese glaze. Soft, fluffy rolls with real strawberry flavor (makes 12 rolls).
Ingredients
Scale
260 ml (1 cup) warm milk
10 g (1 tbsp) instant dry yeast
540 g (4 ¼ cups) flour
65 g ( cup) granulated sugar
1 tsp salt
1 egg, room temperature
80 g ( cup) unsalted butter, very soft
250 g ( 1 ¾ cups) strawberries
50 g (¼ cup) granulated sugar
Juice of half a lemon
100 g (½ cup) cream cheese – Philadelphia
40 g (3 tbsp) unsalted butter, softened
60 g (½ cup) powdered sugar
1 tsp vanilla extract
2 tbsp strawberry puree, cold (from the filling)
Instructions
Place the fresh or frozen strawberries in a saucepan with the lemon juice and granulated sugar.
Cook over medium heat for about 10 minutes, stirring occasionally, until the mixture thickens until thick and jam-like.
Remove from heat and blend with an immersion blender or in a food processor until smooth.
Cover with plastic wrap and refrigerate until cool.
In the bowl of your stand mixer fitted with a dough hook, combine the dry ingredients: flour, granulated sugar, salt, and instant dry yeast. (If using active dry yeast, rehydrate it in warm milk for 10 minutes before starting the recipe.)
Mix with the dough hook, then add the warm milk, softened butter, and the egg, and the egg.
Knead for 5 to 7 minutes on medium speed until the dough is smooth and slightly pulls away from the sides of the bowl.
Cover the dough with a cloth and let it rise for about 2 hours, until doubled in size. (See notes for overnight rising in the fridge or accelerated rising in the oven.)
Roll out the dough on a lightly floured surface to form a large rectangle, about 40 x 30 cm. Spread a layer of cooled strawberry filling evenly over the surface.
Cut the dough into 12 strips using a pizza cutter. Gently roll up the strips and place them in a large, greased baking dish.
Cover again with a cloth and let rise for about 30 minutes to 1 hour.
Preheat the oven to 180°C (350°F) and bake the rolls for about 20-25 minutes until lightly golden and soft. Allow the cinnamon rolls to cool slightly in the dish.
In a bowl, beat the cream cheese, softened butter, powdered sugar, vanilla, and strawberry puree with an electric mixer for 1-2 minutes until smooth and pink.
Spread the glaze over slightly warm rolls.
Notes
Storage: Store strawberry cinnamon rolls in an airtight container in the fridge for up to 4 days. Reheat briefly before serving for best texture.
Tips:
Cheap and Delicious Cream Cheese Cruffins to Try
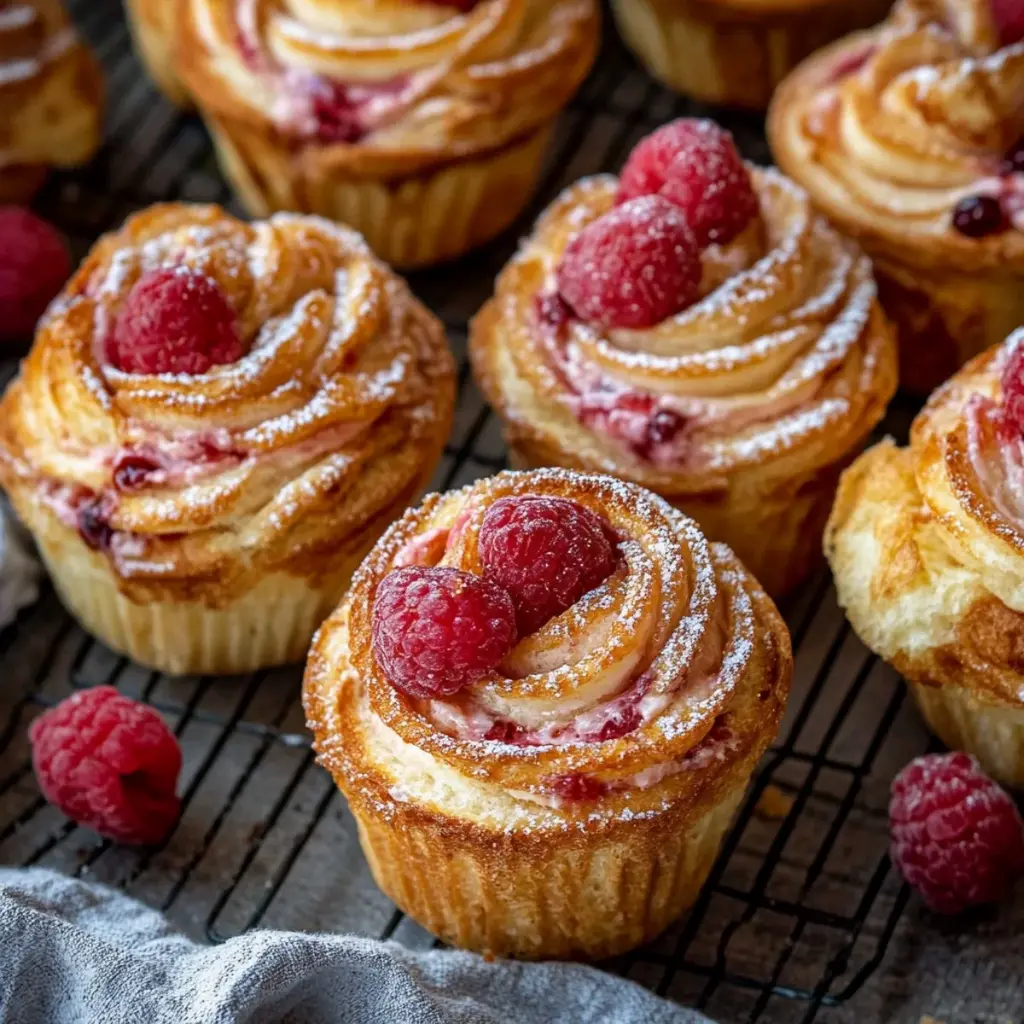
On a budget but still want bakery-style sweet pastries? These raspberry cream cheese cruffins use affordable crescent dough and just a few pantry staples. Pin this now and grab the full recipe for cheap and easy cruffins.
Bakery-style Raspberry Cream Cheese Cruffins made with buttery puff pastry, tangy cream cheese, and raspberry preserves. Flaky, golden layers with a sweet-tart center perfect for brunch or a special breakfast treat.
Ingredients
Scale
2 sheets puff pastry thawed if frozen
6 oz cream cheese softened
¼ cup powdered sugar for mixing into cream cheese
½ teaspoon vanilla extract
cup raspberry preserves or raspberry jam
1 tablespoon butter melted for brushing (optional)
powdered sugar for dusting after baking (optional)
Instructions
Preheat oven to 375°F (190°C).
Roll out puff pastry on a floured surface.
Spread cream cheese mixture over pastry.
Add raspberry preserves in a thin layer.
Roll pastry into a log and cut into strips.
Twist each piece and place in muffin tin.
Bake for 2225 minutes until golden.
Cool slightly, dust with powdered sugar.
Notes
Nutrition information is automatically calculated, so should only be used as an approximation.
Did you know that over 70% of home cooks seek recipes that deliver maximum flavor with minimal weekday effort? If you’re searching for a crowd-pleasing, cheesy, and pepperoni-filled stromboli that fits that exact description, you’ve landed in the right place. This Tremendous Cheesy Pepperoni Stromboli is more than just rolled-up pizza; it’s a golden-brown, bubbling masterpiece of melted cheeses and savory pepperoni, all wrapped in a perfectly baked, soft-yet-crispy dough. The magic happens when you slice into it, revealing those irresistible, oozing layers, ready to be dunked into a tangy marinara sauce. It’s the ultimate comfort food that transforms simple ingredients into a show-stopping meal, perfect for game day, family dinner, or a satisfying weekend project. Let’s dive into how you can create this culinary triumph in your own kitchen.
Ingredients List
Gather these simple ingredients for a stromboli that promises a symphony of textures and flavors. The key is quality and balance.
1 lb pizza dough (store-bought or homemade): Look for a dough that’s soft and pliable. A good, fresh dough should have a slightly sweet, yeasty aroma and stretch without tearing easily.
2 cups shredded mozzarella cheese: The star of the show! Use whole-milk, low-moisture mozzarella for the best melt and stretch. Substitution: For a sharper flavor, swap half for provolone or a mild cheddar.
40-50 slices of pepperoni: Opt for a thicker-cut pepperoni for a meatier bite and better texture. You’ll love the slight curl and crispy edges they get while baking.
1/2 cup ricotta cheese: Adds a creamy, luxurious layer that balances the saltiness. Substitution: Cottage cheese (drained and blended smooth) or mascarpone for extra richness.
1/4 cup grated Parmesan cheese: Provides a salty, nutty depth of flavor. Freshly grated is always superior to the pre-grated kind.
1 teaspoon Italian seasoning: A fragrant blend of dried oregano, basil, thyme, and rosemary that infuses the filling with herby goodness.
1/2 teaspoon garlic powder: For that essential, savory backbone.
1 large egg (for egg wash): Creates that beautiful, glossy, golden-brown crust.
1 tablespoon water (for egg wash).
1/4 cup marinara sauce (for dipping, plus more for serving): A vibrant, tangy counterpoint to the rich, cheesy filling.
Flour for dusting.
Timing
Prep Time20 minutes
Cook Time25 minutes
Total Time45 minutes
Compared to the average stromboli or calzone recipe, which can often require lengthy dough-rising times, this version is streamlined for efficiency. By utilizing a quality store-bought dough, you cut down the active prep time significantly, making this a feasible weeknight dinner option. The 25-minute bake time is also quicker than many baked pasta dishes, delivering a hot, cheesy meal in under an hour from start to finish.
Golden, bubbly, and packed with cheesy pepperoni goodness—this stromboli is a visual and culinary delight.
Step-by-Step Instructions
Step 1: Prepare the Dough
Begin by preheating your oven to 375°F (190°C) and lining a large baking sheet with parchment paper. Lightly dust your work surface with flour. Take your pizza dough and gently stretch and shape it into a rough rectangle with your hands. Then, using a rolling pin, roll it out into a larger rectangle, approximately 12×16 inches. Don’t worry about perfect edges; we’re going for an even thickness. Let the dough rest for 5 minutes while you prepare the filling—this relaxes the gluten and prevents it from shrinking back when you add the toppings.
Step 2: Assemble the Filling
In a small bowl, mix the ricotta cheese, half of the Parmesan cheese, Italian seasoning, and garlic powder until well combined. This herby ricotta spread is the secret layer that binds everything together with flavor. Have your shredded mozzarella and pepperoni slices ready and within easy reach. Also, whisk together the egg and 1 tablespoon of water in another small bowl to create your egg wash.
Step 3: Roll and Fill
Now, it’s assembly time! Leaving a 1-inch border around all edges, spread the seasoned ricotta mixture evenly over the rolled-out dough. Next, sprinkle about 1/4 cup of the marinara sauce over the ricotta in a thin, even layer—this adds moisture and tang. Then, create a glorious blanket of shredded mozzarella over the sauce. Finally, artfully arrange the pepperoni slices in a single, overlapping layer until the surface is covered. A little overlap is good; it ensures every bite is packed with pepperoni.
Step 4: Seal and Bake
Carefully start rolling the dough from one of the longer sides, jelly-roll style, keeping it as tight as possible without squeezing the filling out. Once fully rolled, place the stromboli seam-side down on your prepared baking sheet. Tuck the ends underneath to seal them. Using a sharp knife, score the top of the stromboli with 4-5 diagonal slits about 1/2-inch deep—this allows steam to escape and prevents bursting. Generously brush the entire surface with the egg wash, then sprinkle the remaining Parmesan cheese over the top. Bake for 22-27 minutes, or until the crust is a deep, glorious golden brown and the cheese is visibly bubbling through the slits.
Step 5: Slice and Serve
This is the hardest part: letting it rest! Remove the stromboli from the oven and let it cool on the baking sheet for at least 10 minutes. This resting period allows the molten cheese to set slightly, making for cleaner, more photogenic slices. Use a serrated bread knife to cut it into 1.5-inch thick slices. Serve immediately with warm marinara sauce for dipping on the side.
Nutritional Information
The following nutritional estimates are per serving (based on 6 servings per stromboli).
Calories: ~480 kcal
Total Fat: 24g
Saturated Fat: 11g
Cholesterol: 75mg
Sodium: 1120mg
Total Carbohydrates: 42g
Dietary Fiber: 2g
Sugars: 4g
Protein: 22g
Healthier Alternatives
You can easily adapt this recipe to fit various dietary preferences without sacrificing the tremendous flavor.
For Lower Fat: Use part-skim mozzarella and ricotta cheeses. Swap regular pepperoni for a turkey pepperoni variety.
For More Protein/Whole Grains: Seek out a whole-wheat or protein-enriched pizza dough at your grocery store.
For a Veggie-Packed Version: Reduce the pepperoni by half and add a layer of sautéed spinach (thoroughly squeezed dry), sliced mushrooms, or roasted bell peppers.
For Lower Sodium: Look for low-sodium mozzarella and uncured pepperoni, and reduce or omit the added salt in the ricotta mixture.
Serving Suggestions
This stromboli is a complete meal in itself, but pairing it thoughtfully elevates the experience.
The Classic: A simple side salad with a sharp vinaigrette (like balsamic or red wine) cuts through the richness perfectly.
Game Day Spread: Serve alongside wings, celery sticks, and a cool ranch dip for the ultimate snack table.
Family Dinner: Pair with roasted broccoli or garlic knots for a cozy, Italian-inspired feast.
Dipping Variety: Offer a trio of dips: classic marinara, creamy garlic alfredo, and a spicy arrabbiata sauce.
Common Mistakes
Overfilling: It’s tempting to add more cheese, but overfilling leads to leaks and a soggy bottom. Stick to the recommended amounts.
Skipping the Egg Wash: The egg wash is non-negotiable for that professional, glossy, golden finish. Milk can be used in a pinch, but egg is best.
Not Scoring the Top: Forgetting to make those steam vents can cause your beautiful stromboli to burst open messily in the oven.
Slicing Immediately: Cutting into it right out of the oven causes the cheese to gush out. Patience is key for perfect slices.
Using Cold Dough: If your dough is fridge-cold, it will be difficult to roll and may tear. Let it come to room temperature for 30-60 minutes first.
Storing Tips
Refrigeration: Store leftover slices in an airtight container in the refrigerator for up to 4 days.
Freezing: You can freeze the baked and cooled stromboli whole or in slices. Wrap tightly in plastic wrap and then foil. Freeze for up to 2 months. Thaw overnight in the fridge before reheating.
Reheating: To restore the crispy crust, reheat slices in a 350°F (175°C) oven or toaster oven for 10-12 minutes. The microwave will work in a pinch but will result in a softer crust.
Make-Ahead: Assemble the stromboli up to the point of baking, wrap tightly, and refrigerate for up to 24 hours. Brush with egg wash and bake directly from the fridge, adding 3-5 extra minutes to the bake time.
Conclusion
This Tremendous Cheesy Pepperoni Stromboli is proof that incredible, satisfying food doesn’t have to be complicated. With its flaky golden crust, molten cheese center, and savory pepperoni bites, it’s a guaranteed hit that feels special yet is deceptively simple to make. Whether