No-Bake Snickers Bar Pie

No-Bake Snickers Bar Pie: The Only Recipe You’ll Ever Need

If you’re craving a No-Bake Snickers Bar Pie that’s effortlessly indulgent and requires zero oven time, you’re in the right place. Imagine whipping up a dessert that combines the creamy richness of peanut butter and cream cheese with the addictive crunch of Snickers bars, all in under 20 minutes of active prep. This No-Bake Snickers Bar Pie is the ultimate treat for busy home cooks who want a foolproof, extra creamy and crunchy fusion that’ll wow your family and friends without breaking a sweat. Drawing from Chef Mia’s expertise, this recipe transforms simple ingredients into a decadent masterpiece that’s perfect for potlucks or weeknight indulgences—the no-bake method ensures it’s always a hit.

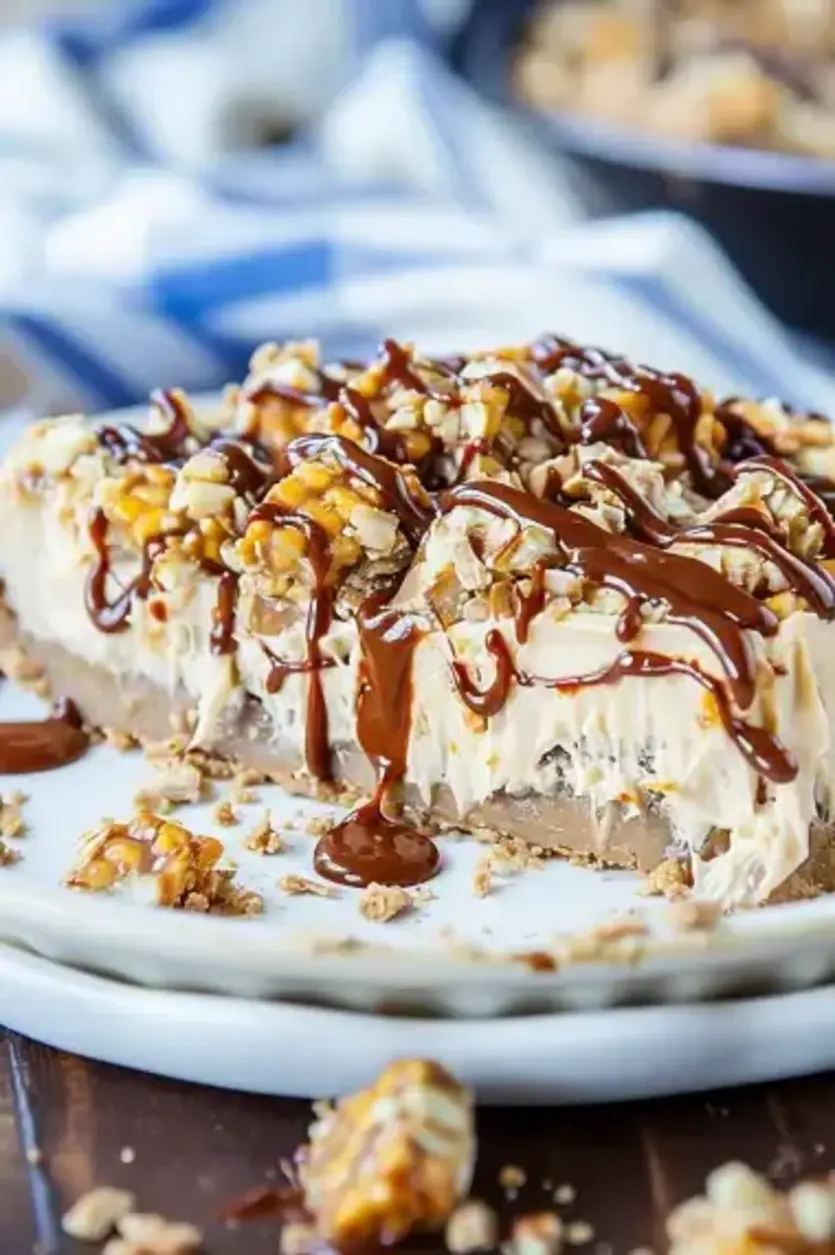
Picture the velvety smoothness of the filling, where softened cream cheese blends seamlessly with peanut butter to create an extra creamy base that’s lightened by fluffy Cool Whip. Each bite delivers a satisfying crunch from chopped Snickers bars and roasted peanuts, balanced by the subtle sweetness of the graham cracker crust. The aromas of melted butter mixing with sugary crumbs will fill your kitchen, building anticipation for that first heavenly forkful. This pie’s texture is a delightful contrast—soft and luscious on the inside, with a firm, buttery edge that holds everything together perfectly, making it an irresistible No-Bake Snickers Bar Pie for all dessert lovers.

What sets this No-Bake Snickers Bar Pie recipe from exorecipes.com apart is our commitment to making it the most reliable and detailed guide online. Tested multiple times in real home kitchens, it incorporates Chef Mia’s secret for an extra creamy and crunchy fusion that elevates ordinary ingredients into something extraordinary. You’ll learn insider tips, like the perfect chilling technique for optimal texture, and how to customize it for dietary needs. Stick around for step-by-step instructions, nutrition facts, and FAQs that ensure your success—plus, discover why this recipe is a game-changer for no-bake desserts enthusiasts.

Prep Time: 20 minutes
Cook Time: 0 minutes
Total Time: 4 hours 20 minutes (including chilling time)
Servings: 8

Why This No-Bake Snickers Bar Pie Recipe is a Game-Changer

The Chef’s Secret: This recipe’s unique angle lies in its extra creamy and crunchy fusion, achieved by carefully blending softened cream cheese with peanut butter and Cool Whip for a luxuriously smooth filling, while incorporating generous chunks of Snickers bars for that irresistible contrast. This technique ensures the pie sets perfectly without baking, creating a dessert that’s not just sweet but texturally dynamic. By folding in the Snickers early, we lock in the crunch while enhancing the overall flavor profile, making your No-Bake Snickers Bar Pie stand out from standard versions.

Unbeatable Texture: The science behind this pie’s texture comes from the emulsion of fats in the cream cheese and peanut butter, which creates a stable, extra creamy base that doesn’t weep or separate. When chilled, the Cool Whip adds airiness, while the graham cracker crust provides a firm foundation that absorbs just enough moisture to stay crisp. This balance prevents sogginess, ensuring every slice of your No-Bake Snickers Bar Pie has that perfect, satisfying bite that keeps everyone coming back for more.

Foolproof for a Reason: We’ve tested this recipe extensively to guarantee success, even for novice bakers. From precise measurements to detailed steps, it’s designed to eliminate common pitfalls, like over-mixing the filling, which could deflate the Cool Whip. With clear instructions and pro tips, your No-Bake Snickers Bar Pie will turn out perfectly every time, making it a trustworthy staple for easy no-bake desserts that impress.

Ingredient Spotlight: Quality Makes the Difference

Graham cracker crumbs are the foundation of this No-Bake Snickers Bar Pie’s buttery crust, providing a neutral, slightly sweet base that complements the rich filling. Using fresh, high-quality crumbs (about 12 crackers) ensures a sturdy structure that holds up during chilling; stale crumbs can lead to a crumbly mess. Opt for whole wheat varieties for a nuttier flavor if desired, but standard ones work best for that classic taste. A great substitution is crushed digestive biscuits for a more European twist, maintaining the pie’s extra creamy and crunchy fusion.

Sugar adds the essential sweetness to balance the savory elements in this No-Bake Snickers Bar Pie. Measure out 1/4 cup precisely to avoid an overly sweet crust; using organic cane sugar enhances the natural flavors without artificial aftertastes. Quality matters because refined sugars can sometimes introduce off-flavors, so choose a brand without additives. If you’re watching your intake, substitute with a natural alternative like coconut sugar, which keeps the recipe’s no-bake integrity while supporting the pie’s creamy texture.

Melted unsalted butter binds the crust together in this No-Bake Snickers Bar Pie, offering a rich, flaky finish that’s crucial for the extra crunchy element. Use high-fat, European-style butter for superior creaminess, as it melts evenly and prevents greasiness. Freshness is key to avoid rancidity, so check the date before use. A solid substitute is coconut oil for a dairy-free version, which maintains the binding properties and enhances the pie’s overall no-bake appeal.

Softened cream cheese is the star of the filling, delivering that signature extra creamy texture in this No-Bake Snickers Bar Pie. It blends smoothly with other ingredients, creating a luscious base that’s essential for the pie’s indulgent mouthfeel. Always use full-fat cream cheese for the best results, as low-fat versions can make the filling watery. For a lighter option, substitute with Greek yogurt, but ensure it’s strained to preserve the creamy consistency and the recipe’s no-bake magic.

Peanut butter adds a nutty depth and helps achieve the extra creamy fusion in this No-Bake Snickers Bar Pie. Choose natural, creamy peanut butter without added oils for authentic flavor and smooth integration; chunky varieties can disrupt the texture. Quality matters to avoid separation, so stir well before use. If allergies are a concern, almond butter makes an excellent substitute, keeping the pie’s no-bake essence intact while offering a similar richness.

Powdered sugar sweetens the filling without grittiness, ensuring the extra creamy result in this No-Bake Snickers Bar Pie. Sift it for lump-free blending, as clumps can affect the smooth texture. Organic options prevent any chemical aftertaste, making the pie even more appealing. Substitute with a powdered erythritol for a lower-sugar version, which dissolves just as well and supports the recipe’s easy no-bake preparation.

Thawed Cool Whip provides the airy lift that defines the extra creamy aspect of this No-Bake Snickers Bar Pie. Using a full 8 oz ensures the filling is light and fluffy; homemade whipped cream can be a fresh substitute, but stabilize it with gelatin to mimic the stability. Quality store-bought options without artificial stabilizers work best for convenience and the pie’s no-bake reliability.

Chopped Snickers bars deliver the iconic crunch and sweetness that make this No-Bake Snickers Bar Pie unforgettable. Use fresh bars to maintain their chewy texture; chopping them finely ensures even distribution without overwhelming the creaminess. For variety, substitute with other chocolate bars like Milky Way, but Snickers’ peanut component is key to the pie’s unique fusion.

Chocolate and caramel syrups add a decadent drizzle, enhancing the extra creamy and crunchy elements of this No-Bake Snickers Bar Pie. Opt for high-quality, real syrups without corn syrup for better taste; they elevate presentation and flavor. Homemade versions can substitute, using melted chocolate and caramel sauce for a personalized touch.

Chopped roasted peanuts provide the final crunch in this No-Bake Snickers Bar Pie, amplifying the nutty theme. Freshly roasted peanuts ensure maximum flavor and texture; avoid salted ones if watching sodium. Substitute with chopped almonds for a different twist, keeping the pie’s no-bake structure intact.

Step-by-Step Instructions

Step 1: Preparing the Crust

In a medium bowl, combine 1 1/2 cups graham cracker crumbs, 1/4 cup sugar, and 7 tablespoons melted unsalted butter until the mixture resembles wet sand and holds together when pressed. Press this evenly into the bottom and up the sides of a 9-inch pie plate using the back of a spoon or a flat-bottomed glass for a uniform base.

Pro Tip: Chill the pie plate in the freezer for 5 minutes before pressing the mixture to make it easier to handle and prevent the crust from sticking, ensuring a perfect, extra creamy and crunchy fusion in your No-Bake Snickers Bar Pie.

Step 2: Chilling the Crust

Once pressed, place the pie plate in the refrigerator and let it chill for at least 30 minutes. This step solidifies the butter, creating a firm base that won’t crumble when you add the filling.

Common Mistake to Avoid: Don’t skip the chilling time, as a warm crust can lead to a soggy pie; always set a timer to ensure it firms up properly for the best no-bake results.

Step 3: Making the Filling

In a large mixing bowl, beat 8 oz softened cream cheese, 1/2 cup peanut butter, and 1 cup powdered sugar with an electric mixer on medium speed until smooth and creamy, about 2-3 minutes. Gently fold in 8 oz thawed Cool Whip and 1 1/2 cups chopped Snickers bars until fully incorporated, being careful not to overmix.

Pro Tip: Use room-temperature cream cheese for effortless blending, which helps achieve that signature extra creamy texture in your No-Bake Snickers Bar Pie without any lumps.

Step 4: Assembling the Pie

Pour the prepared filling into the chilled crust, spreading it evenly with a spatula to reach the edges. Smooth the top for an even finish.

Common Mistake to Avoid: Overfilling the crust can cause the pie to spill over during chilling; measure the filling carefully to keep everything neat and maintain the pie’s structural integrity.

Step 5: Decorating the Pie

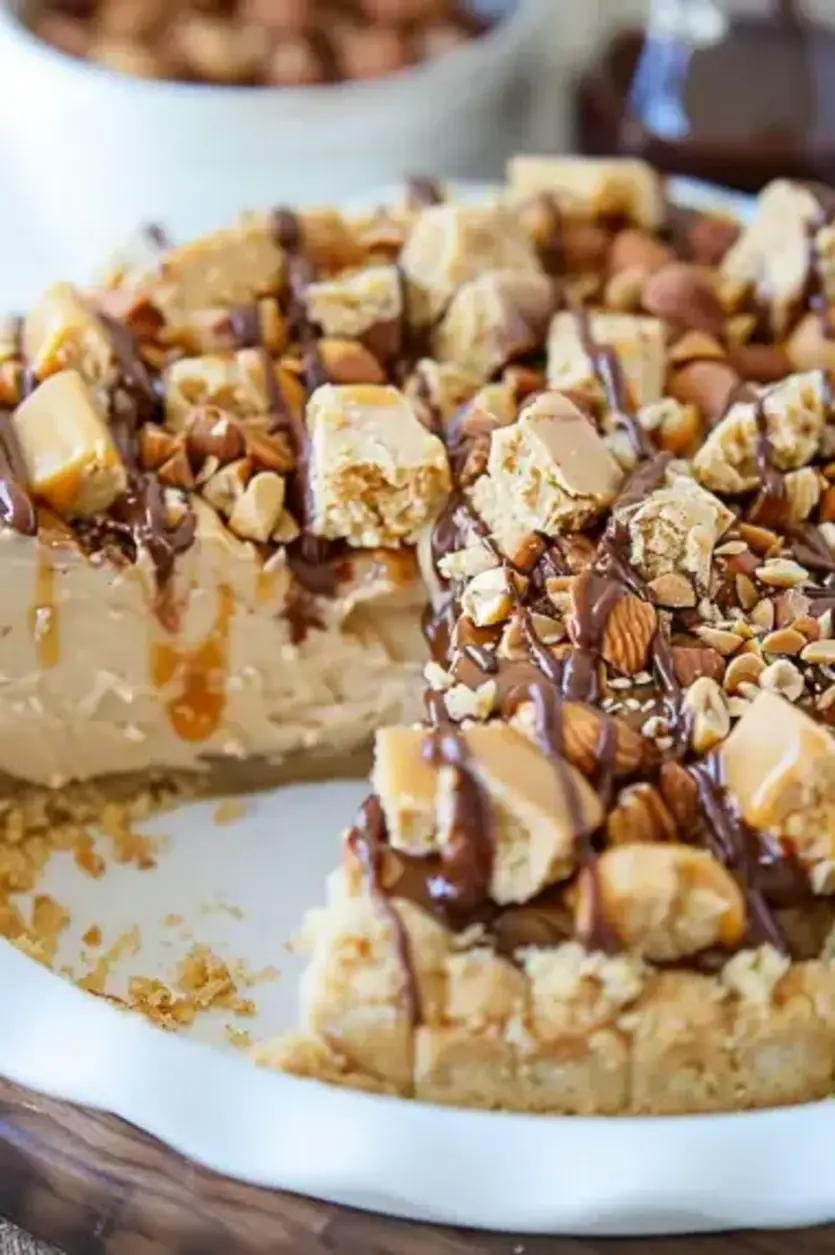
Drizzle chocolate and caramel syrups over the top of the pie, then sprinkle with 1/4 cup chopped roasted peanuts and additional chopped Snickers bars for garnish.

Pro Tip: Add the drizzles just before serving to keep the toppings fresh and crunchy, enhancing the overall appeal of your No-Bake Snickers Bar Pie.

Step 6: Final Chilling

Refrigerate the assembled pie for at least 4 hours, or until fully set, to allow the flavors to meld and the texture to firm up.

Common Mistake to Avoid: Rushing the chilling process can result in a runny pie; plan ahead and chill overnight if possible for the best no-bake dessert experience.

Serving & Presentation

To serve this No-Bake Snickers Bar Pie, slice it with a sharp knife warmed under hot water for clean cuts that showcase the extra creamy filling and crunchy bits. For an impressive presentation, plate each slice on a dessert dish and drizzle with extra chocolate and caramel syrups, then garnish with fresh mint leaves for a pop of color. Complement this pie with simple sides like fresh fruit salad or vanilla ice cream to balance its richness, making it ideal for a casual family dinner or a festive party. Pairing it with coffee or milk enhances the peanut butter notes, turning a simple no-bake treat into a memorable finale.

Make-Ahead & Storage Solutions

Make-Ahead Strategy: Prepare the crust up to 3 days in advance by following Steps 1 and 2, then store it covered in the refrigerator. Make the filling the day before serving—assemble it but hold off on decorating until ready to chill the full pie, ensuring it stays fresh and maintains that extra creamy texture.

Storing Leftovers: Cover any remaining pie tightly with plastic wrap or transfer slices to an airtight container; refrigerate for up to 3 days to preserve freshness. For longer storage, freeze the pie (without toppings) for up to a month, wrapped in foil and placed in a freezer-safe bag.

The Best Way to Reheat: This no-bake pie doesn’t need reheating, but for the optimal texture, thaw frozen slices in the refrigerator overnight. If serving chilled leftovers, let them sit at room temperature for 10-15 minutes to soften slightly, restoring the creamy and crunchy elements without compromising flavor.

Finished recipe photo

Frequently Asked Questions (FAQ)

How do you make a moist chocolate cake at home?

To make a moist chocolate cake at home, start by creaming butter and sugar together until fluffy, then add eggs, vanilla, and wet ingredients like buttermilk for moisture. Use high-quality cocoa powder and don’t overmix the batter to avoid toughness. Bake at 350°F for 25-30 minutes, and let it cool in the pan. This method ensures a tender crumb, similar to the extra creamy texture in our No-Bake Snickers Bar Pie recipes.

Can you substitute cocoa powder with melted chocolate in a chocolate cake recipe?

Yes, you can substitute cocoa powder with melted chocolate in a chocolate cake recipe, but adjust quantities and liquids accordingly. For each 1/4 cup of cocoa powder, use 1 ounce of melted chocolate and reduce the fat in the recipe by about 1 tablespoon to prevent greasiness. This swap can add a richer flavor, much like enhancing the chocolate elements in our No-Bake Snickers Bar Pie for a decadent twist.

How long does it take to bake a chocolate cake from scratch?

Baking a chocolate cake from scratch typically takes about 25-40 minutes at 350°F, depending on the pan size and recipe. Factor in 15-20 minutes for prep and 10-15 minutes for cooling, making the total time around 50-75 minutes. This is quicker than the chilling time for our No-Bake Snickers Bar Pie, offering a fast alternative for chocolate lovers.

What are the best ways to serve chocolate cake for a party?

The best ways to serve chocolate cake for a party include pairing it with fresh berries and whipped cream for a balanced contrast, or frosting it with ganache for an elegant touch. Cut into bite-sized pieces for easy sharing, and add ice cream or a caramel drizzle to mimic the flavors in our No-Bake Snickers Bar Pie. Serve at room temperature for the best texture, and consider thematic decorations to match your event.

Can I add nuts to this No-Bake Snickers Bar Pie for extra crunch?

Absolutely, you can add extra nuts like chopped peanuts or almonds to enhance the crunch in this No-Bake Snickers Bar Pie. Mix them into the filling or use as a topping, but don’t exceed 1/4 cup to maintain the extra creamy balance and prevent the pie from becoming too dense.

Is this No-Bake Snickers Bar Pie suitable for kids?

Yes, this No-Bake Snickers Bar Pie is kid-friendly due to its sweet, familiar flavors, but monitor portions as it’s indulgent. It’s a great way to introduce no-bake desserts, and you can customize it with less sugar if needed.

Can I make this recipe vegan or gluten-free?

To make this No-Bake Snickers Bar Pie vegan, substitute the cream cheese with a plant-based alternative like cashew cream or vegan cream cheese, use coconut whipped topping instead of Cool Whip, and ensure your peanut butter is vegan. For gluten-free, swap graham cracker crumbs with a gluten-free version, such as those made from gluten-free cookies. These changes preserve the extra creamy and crunchy fusion while accommodating dietary needs.

Print
clock clock iconcutlery cutlery iconflag flag iconfolder folder iconinstagram instagram iconpinterest pinterest iconfacebook facebook iconprint print iconsquares squares iconheart heart iconheart solid heart solid icon

No-Bake Snickers Bar Pie

  • Author: Chef mia
  • Prep Time: 20 minutes
  • Cook Time: 0 minutes
  • Total Time: 4 hours 20 minutes (including chilling time)
  • Yield: 1 pie (8 servings) 1x
  • Method: Desserts
  • Cuisine: American

Description

Dive into the decadent world of desserts with this No-Bake Snickers Bar Pie, a perfect blend of creamy, crunchy, and irresistibly sweet flavors! This simple, no-fuss recipe combines rich cream cheese, peanut butter, and chunks of Snickers bars, all nestled in a buttery graham cracker crust.


Ingredients

Scale
  • 1 1/2 cupsgraham cracker crumbs (about12crackers)
  • 1/4 cupsugar
  • 7 tbspmelted unsalted butter
  • 8 ozsoftened cream cheese
  • 1/2 cuppeanut butter
  • 1 cuppowdered sugar
  • 8 ozthawed Cool Whip
  • 1 1/2 cupschopped Snickers bars
  • Chocolate syrup
  • Caramel syrup
  • 1/4 cupchopped roasted peanuts

Instructions

  1. Crust Preparation: Mix graham cracker crumbs with sugar and melted butter until combined. Press into a 9-inch pieplateand chill for 30 minutes.
  2. Filling: Blend cream cheese, peanut butter, and powdered sugar until smooth. Fold in Cool Whip and Snickers bars, then pour into crust.
  3. Decorate: Drizzle with chocolate and caramel syrups, and top with chopped peanuts and Snickers bars.
  4. Chill: Refrigerate for at least 4 hours to set the pie.

Notes

For a firmer crust, optionally bake at 375°F for 7-8 minutes.Substitute Snickers with any favorite candy bar for a twist.Pie can be frozen for up to a month; thaw in the fridge before serving.


Nutrition

  • Calories: 512
  • Sugar: 34
  • Fat: 35
  • Carbohydrates: 45
  • Protein: 8

Conclusion

This No-Bake Snickers Bar Pie is a decadent and effortless dessert that brings together the irresistible combination of chocolate, caramel, and peanuts for a treat reminiscent of your favorite candy bar. Perfect for summer gatherings or anytime you crave something sweet without the hassle of baking, it delivers rich flavors in every bite that’s sure to satisfy your cravings. For the best results, serve it chilled straight from the fridge, or experiment with variations like adding chopped nuts or using different chocolate bars to customize it to your taste.

Crockpot Potato Soup

Crockpot Potato Soup: The Only Recipe You’ll Ever Need

Imagine coming home after a hectic day to the irresistible aroma of a steaming bowl of Crockpot Potato Soup, where the slow cooker does all the work for you. This effortless, extra creamy Crockpot Potato Soup recipe from exorecipes.com is designed for busy families and home cooks who crave comfort without the hassle. In just a few simple steps, you’ll transform basic ingredients into a velvety, satisfying meal that’s perfect for chilly evenings or casual gatherings. Whether you’re a novice in the kitchen or a seasoned chef, this Crockpot Potato Soup stands out for its hands-off preparation and rich, dreamy texture that sets it apart from ordinary soups.

The moment you take your first spoonful of this Crockpot Potato Soup, you’ll be greeted by the velvety smoothness of tender potatoes blended with a luscious creaminess that coats your palate like a warm hug. Picture the earthy, hearty flavors of golden hash-brown potatoes mingling with the subtle savoriness of onions and a hint of black pepper, all enveloped in a creamy base that delivers pure comfort. The aromas wafting from your slow cooker will fill your home with an inviting essence, evoking memories of family dinners and cozy nights in. This soup’s texture is divinely thick yet not heavy, offering a satisfying bite from the potatoes while the cream cheese creates that extra creamy finish that makes every slurp irresistible.

What makes this Crockpot Potato Soup recipe from exorecipes.com the ultimate go-to guide is its foundation in Chef Mia’s expert tips and our thorough testing for foolproof results. We’ve refined this classic American favorite to ensure it’s not just another potato soup recipe—it’s the extra creamy version that elevates your cooking game. In this post, you’ll discover the Chef’s Secret to achieving that unparalleled creaminess, detailed ingredient spotlights, step-by-step instructions with pro tips, and answers to all your burning questions. Plus, learn how to make it ahead or customize it for dietary needs, making this the single best resource for mastering Crockpot Potato Soup on the web.

Prep Time: 10 minutes
Cook Time: 6 hours
Total Time: 6 hours 10 minutes
Servings: 8 servings

Why This Crockpot Potato Soup Recipe is a Game-Changer

The Chef’s Secret lies in the extra creamy texture achieved by incorporating softened cream cheese at the perfect time, which creates a luxurious, velvety base that sets this Crockpot Potato Soup apart from run-of-the-mill versions. This technique ensures the cream cheese melts seamlessly into the soup, avoiding any lumps and delivering a decadently smooth finish that coats every ingredient. By adding it in the final stages, we prevent curdling and enhance the natural flavors of the potatoes and broth, making this recipe a standout for its effortless creaminess.

Unbeatable Texture comes from the science of slow cooking: the low heat gently breaks down the starches in the hash-brown potatoes over hours, releasing natural thickeners that combine with the fats in the cream cheese and cream of chicken soup. This results in a soup that’s luxuriously thick without needing a blender, as the potatoes become tender and integrate perfectly, providing a hearty mouthfeel that’s both comforting and satisfying.

Foolproof for a Reason, this recipe has been tested multiple times in real home kitchens to guarantee consistent results. We’ve adjusted cooking times and stirring techniques to account for variations in crockpot models, ensuring that even beginners can achieve restaurant-quality Crockpot Potato Soup every time. Its reliability makes it ideal for weeknight meals, with minimal active prep and maximum flavor payoff.

Ingredient Spotlight: Quality Makes the Difference

For the 1 bag (30 oz) frozen cubed hash-brown potatoes, these form the hearty base of your Crockpot Potato Soup, providing tender chunks that absorb flavors beautifully during the long cook. Opt for high-quality, fresh-frozen potatoes without additives for the best texture—stale ones can turn mushy. Their role is to create bulk and a satisfying bite, while also thickening the soup naturally. For substitutions, fresh cubed potatoes work if thawed and precooked slightly, but they may alter the cook time; sweet potatoes can add a nutritious twist for a different flavor profile.

The 2 cans (14 oz each) of chicken broth serve as the flavorful liquid foundation, infusing the Crockpot Potato Soup with savory depth and helping to tenderize the potatoes. Choose low-sodium versions to control salt levels, as poor-quality broth can make the soup bland or overly salty. This ingredient keeps everything hydrated and balanced, allowing other flavors to shine. A great substitution is vegetable broth for a lighter, vegetarian option, or homemade stock for enhanced taste, ensuring the soup remains extra creamy without compromising on nutrition.

Don’t overlook the 1 can (10.75 oz) of cream of chicken soup, which adds a rich, creamy element that binds the ingredients together in your Crockpot Potato Soup. Quality matters here—select a brand with real cream for better consistency and flavor, as imitation versions can result in a gritty texture. It acts as a thickener and flavor enhancer, contributing to that extra creamy appeal. For substitutions, cream of mushroom soup works for a vegetarian twist, or a homemade roux-based alternative if you’re avoiding canned goods, though this might require adjusting seasonings.

The 1/2 cup of chopped yellow onions brings a subtle sweetness and aroma to your Crockpot Potato Soup, balancing the savory elements and adding layers of flavor as they cook down. Fresh, firm onions are key to avoid excess moisture that could dilute the soup; quality onions enhance the overall taste without overpowering. They provide a mild crunch initially that softens over time. Substitutions include white onions for a sharper bite or shallots for a more delicate flavor, but reduce the amount to maintain the recipe’s balance.

A dash of 1/4 tsp black pepper adds just the right kick to your Crockpot Potato Soup, enhancing the other ingredients without stealing the show. Freshly ground pepper ensures maximum flavor potency, as pre-ground can lose its edge over time. It plays a crucial role in seasoning, waking up the palate and complementing the creaminess. For alternatives, white pepper offers a milder heat, or cayenne for a spicy variation, but start small to avoid overwhelming the soup’s gentle profile.

Finally, the 1 package (8 oz) softened cream cheese is the star that makes this Crockpot Potato Soup extra creamy, providing a tangy richness that elevates the entire dish. Choose full-fat, high-quality cream cheese for the smoothest results, as low-fat options can separate and affect texture. It melts into the soup for that signature velvety finish. Substitutions include Greek yogurt for a tangier, healthier twist, or vegan cream cheese for dairy-free versions, ensuring the soup remains lusciously thick.

Step-by-Step Instructions

Step 1: Preparing the Ingredients

Start by gathering all your ingredients and combining the hash-brown potatoes, chicken broth, cream of chicken soup, chopped yellow onions, and black pepper in your crockpot. Ensure the potatoes are evenly distributed to promote even cooking. This step sets the foundation for your Crockpot Potato Soup, allowing flavors to begin melding right away. Pro Tip: Measure your ingredients precisely to avoid an overly thick or thin soup—use a kitchen scale for the hash-browns to get the exact 30 oz.

Step 2: Cooking the Soup Base

Cover the crockpot and set it to low heat, cooking the mixture for 5-6 hours until the potatoes are tender. Stir once or twice during this time to prevent sticking and ensure uniform heating. This slow process is key to developing the extra creamy texture in your Crockpot Potato Soup. Common Mistake to Avoid: Don’t lift the lid too often, as it can extend cooking time and release heat; check only if necessary and resume cooking promptly.

Step 3: Adding the Cream Cheese

About 30 minutes before serving, stir in the softened cream cheese until it’s fully incorporated into the soup. Continue cooking on low for another 30 minutes, stirring occasionally to blend smoothly. This step is crucial for achieving that signature extra creamy consistency in your Crockpot Potato Soup. Pro Tip: Soften the cream cheese at room temperature for at least 30 minutes beforehand to make integration easier and prevent lumps.

Step 4: Serving the Soup

Once the soup is creamy and heated through, turn off the crockpot and let it sit for a few minutes before serving hot. Ladle into bowls and garnish as desired for the best experience. This final step ensures your Crockpot Potato Soup is at its peak flavor and texture. Common Mistake to Avoid: Over-stirring at this stage can break down the potatoes too much, so gently mix to maintain some chunkiness for added appeal.

Serving & Presentation

Elevate your Crockpot Potato Soup by plating it in wide, shallow bowls to showcase its extra creamy texture and allow steam to rise invitingly. Top with fresh garnishes like chopped chives, crispy bacon bits, or a dollop of sour cream for a pop of color and contrast. For an impressive presentation, add a sprinkle of shredded cheese or green onions just before serving to enhance visual appeal and flavor depth. Complement this hearty soup with sides like crusty bread for dipping, a simple green salad to balance the richness, or pair it as a starter to a main course such as grilled chicken. This Crockpot Potato Soup shines in casual family dinners or as a cozy appetizer for gatherings, making it versatile and always a hit.

Make-Ahead & Storage Solutions

Make-Ahead Strategy: Prep your ingredients up to 24 hours in advance by chopping onions and measuring out other components, then store them in airtight containers in the fridge. Assemble everything in the crockpot in the morning for a fresh start, or fully prepare the soup base without the cream cheese and refrigerate for up to 3 days—add the cream cheese just before reheating to maintain that extra creamy quality.

Storing Leftovers: Let the soup cool completely before transferring to airtight containers; refrigerate for up to 4 days or freeze in portions for up to 3 months. This prevents bacterial growth and keeps the flavors intact, especially important for the potatoes which can become mushy if not handled properly.

The Best Way to Reheat: For optimal results, reheat on the stovetop over low heat, stirring frequently to restore the extra creamy texture without separating the ingredients. If using a microwave, heat in short bursts with stirring to avoid overheating; add a splash of broth if needed to thin it out and bring back the original consistency of your Crockpot Potato Soup.

Frequently Asked Questions (FAQ)

Finished recipe photo

How long does it take to cook Crockpot Potato Soup?

This Crockpot Potato Soup recipe requires about 6 hours on low heat for the potatoes to become tender, plus an additional 30 minutes after adding the cream cheese, making the total cook time 6 hours and 10 minutes. Prep is quick at just 10 minutes, so it’s ideal for hands-off meals. Factors like your crockpot’s model might vary this slightly, but sticking to low heat ensures the extra creamy results without overcooking.

What are some ingredient substitutions for a Crockpot Potato Soup recipe?

For this Crockpot Potato Soup, you can swap chicken broth with vegetable broth for a vegetarian version, or use cream of mushroom soup instead of cream of chicken to maintain creaminess while altering flavor. If onions aren’t your thing, try leeks for a milder taste, and for the cream cheese, Greek yogurt can add a tangy twist. Always adjust seasonings after substitutions to keep that extra creamy balance, as these changes might affect sodium or thickness.

Can you make Crockpot Potato Soup without cream cheese?

Yes, you can make Crockpot Potato Soup without cream cheese by using alternatives like heavy cream or sour cream stirred in at the end for similar extra creamy results. This keeps the soup rich and velvety, but be mindful that cream cheese provides unique tanginess—adjust with a bit of lemon juice if needed. For dairy-free options, coconut milk works well, though it will impart a subtle sweetness to the dish.

What are the best ways to decorate and serve a Crockpot Potato Soup?

To decorate and serve Crockpot Potato Soup, focus on simple, appealing garnishes like fresh herbs, shredded cheese, or crumbled bacon on top for added texture and visual interest. Serve it hot in individual bowls alongside warm bread or a light salad to make it a complete meal. For special occasions, pair it with wine or as a starter, emphasizing its extra creamy appeal to impress guests with its comforting presentation.

Is Crockpot Potato Soup suitable for dietary restrictions?

Absolutely, this Crockpot Potato Soup can be adapted for various dietary needs. For gluten-free, ensure your cream of chicken soup is certified gluten-free, and use appropriate broths. To make it vegan, substitute chicken broth with vegetable broth, cream of chicken with a plant-based alternative, and cream cheese with a vegan version like cashew cream. Always taste and adjust for the extra creamy texture you love.

How can I thicken my Crockpot Potato Soup if it’s too thin?

If your Crockpot Potato Soup turns out too thin, simply mash some of the potatoes in the pot to release starches and thicken naturally, or stir in a cornstarch slurry (1 tablespoon cornstarch mixed with 2 tablespoons water) during the last 30 minutes. Avoid adding flour directly, as it can clump; this method preserves the extra creamy consistency while enhancing the overall texture.

Print
clock clock iconcutlery cutlery iconflag flag iconfolder folder iconinstagram instagram iconpinterest pinterest iconfacebook facebook iconprint print iconsquares squares iconheart heart iconheart solid heart solid icon

Crockpot Potato Soup

  • Author: Chef mia
  • Prep Time: 10 minutes
  • Cook Time: 6 hours
  • Total Time: 6 hours 10 minutes
  • Yield: 8 servings 1x
  • Method: Soup
  • Cuisine: American

Description

Embrace the comforting embrace of our Crockpot Potato Soup, a creamy, hearty delight that cooks itself to perfection while you go about your day. With tender potatoes, rich cream cheese, and a touch of seasoning, this soup promises a deliciously warm welcome after a long day. Perfect for busy weeknights or a cozy weekend meal!


Ingredients

Scale
  • 1bag (30 oz) frozen cubed hash-brown potatoes
  • 2cans (14 oz each) chicken broth
  • 1can (10.75 oz) cream of chicken soup
  • 1/2 cupchopped yellow onions
  • 1/4 tspblack pepper, or to taste
  • 1package (8 oz) cream cheese, softened

Instructions

  1. In a crockpot, combine the hash-brown potatoes, chicken broth, cream of chicken soup, onions, and black pepper.
  2. Cook on low for 5-6 hours until potatoes are tender.
  3. Stir in softened cream cheese 30 minutes before serving. Cook on low for another 30 minutes, stirring occasionally until creamy.
  4. Serve hot, garnished with optional toppings as desired.

Notes

Stir the soup several times towards the end to ensure the cream cheese blends smoothly.Adjust the soup’s thickness by adding more chicken broth if needed.For a vegetarian version, use vegetable broth and cream of mushroom soup instead of chicken ingredients.


Nutrition

  • Calories: 230
  • Sugar: 3
  • Fat: 12
  • Carbohydrates: 25
  • Protein: 5

Conclusion

In conclusion, this Crockpot Potato Soup delivers a creamy, comforting bowl of goodness that’s perfect for cozy family dinners or chilly evenings, with tender potatoes soaking up flavorful herbs and broth for an irresistible taste. Its hands-off cooking method makes it a go-to for busy weeknights, allowing you to focus on other tasks while it simmers to perfection. For a fun variation, try topping it with crispy bacon or fresh chives, and serve it alongside warm crusty bread for a satisfying meal.

Twinkie Pineapple Cake

Twinkie Pineapple Cake: The Only Recipe You’ll Ever Need

Imagine transforming store-bought Twinkies into a decadent, no-bake Twinkie Pineapple Cake that’s perfect for summer gatherings or quick weeknight treats. This easy dessert combines the nostalgic charm of golden Twinkies with the refreshing burst of fresh pineapple, creating a creamy, dreamy fusion that’s irresistibly light and tropical. As a no-bake recipe, it’s ideal for busy home cooks who want impressive results without turning on the oven. With its unique angle of a seamless, no-fuss assembly that delivers an extra creamy texture from whipped cream and pudding, this Twinkie Pineapple Cake is about to become your go-to for effortless indulgence.

The first bite of this Twinkie Pineapple Cake reveals a symphony of textures and flavors that dance on your palate. The soft, spongy Twinkies provide a pillowy base, contrasted by the juicy, tangy pineapple that adds a tropical zing with every forkful. The creamy whipped topping envelopes everything in a velvety smoothness, while hints of vanilla and coconut extract infuse a subtle, aromatic warmth that evokes beachside vacations. You’ll notice the light crunch from toasted coconut on top, offering a delightful contrast that makes this dessert not just satisfying, but memorably crave-worthy for anyone with a sweet tooth.

What sets this Twinkie Pineapple Cake recipe apart, straight from the trusted kitchens at exorecipes.com, is our commitment to making it foolproof and customizable for all skill levels. Drawing from Chef Mia’s expertise, we’ve incorporated a Chef’s Secret that elevates the creaminess while ensuring it’s gluten-friendly with simple tweaks. In this post, you’ll discover step-by-step guidance, ingredient spotlights, and pro tips that guarantee success every time. Whether you’re a novice or a seasoned baker, this will be your definitive guide to mastering this delightful treat, complete with make-ahead strategies and FAQs for ultimate confidence.

Prep Time: 20 minutes
Cook Time: 0 minutes (no bake)
Total Time: 20 minutes
Servings: 12 servings

Why This Twinkie Pineapple Cake Recipe is a Game-Changer

The Chef’s Secret behind this Twinkie Pineapple Cake lies in the harmonious blend of coconut extract with the whipped cream, creating a no-bake creamy fusion that amplifies the tropical essence without overwhelming the other flavors. By adding just 1/2 teaspoon of coconut extract to the whipped topping, we enhance the dessert’s aroma and depth, making it stand out from standard pineapple cakes. This subtle twist ensures a more luxurious mouthfeel, turning a simple assembly into an elevated experience that feels homemade yet professional.

For unbeatable texture, the science is in the pudding layer: whisking instant vanilla pudding with milk creates a stable, creamy base that sets perfectly when chilled. This acts as a binder, preventing the cake from becoming soggy while locking in the pineapple’s moisture, resulting in a dessert that’s firm yet tender. The high-fat content in the heavy whipping cream further contributes to that extra creamy fusion, forming stiff peaks that hold their shape, ensuring your Twinkie Pineapple Cake slices beautifully and maintains its appeal.

This recipe is foolproof because it’s been rigorously tested in our exorecipes.com kitchen multiple times, adjusting for common pitfalls like over-whipping the cream or uneven layering. With clear instructions and pro tips, it’s designed for 100% success, even for beginners, making it the most reliable Twinkie Pineapple Cake resource online. Expect consistent results that impress family and friends every time.

Ingredient Spotlight: Quality Makes the Difference

Twinkies, specifically 9 halved lengthwise, form the heart of this Twinkie Pineapple Cake. These iconic golden cakes provide a soft, spongy base that’s both nostalgic and convenient. Their role is to absorb flavors without dissolving, creating a sturdy foundation. Opt for fresh, unexpired Twinkies from a reliable brand to ensure the best texture—stale ones can make the cake mushy. If you’re out of Twinkies, substitute with pound cake slices for a similar effect, though the classic taste will differ.

Crushed pineapple from a 20 oz can, lightly drained, adds the tropical zing that defines this Twinkie Pineapple Cake. It brings acidity and moisture, balancing the sweetness and preventing the dessert from being overly rich. Choose canned pineapple in juice over syrup for a more natural flavor; high-quality options minimize additives. For a substitution, fresh pineapple works, but drain it thoroughly to avoid excess liquid that could water down the layers—dice it finely for even distribution.

Vanilla instant pudding (3.4 oz package) mixed with 2 cups of milk creates the essential pudding layer that binds everything together in this Twinkie Pineapple Cake. It provides creaminess and a subtle vanilla note, acting as a stabilizer for the no-bake structure. Always use name-brand pudding for consistent thickening; generic versions might not set as well. Vegans can swap with a plant-based pudding mix and non-dairy milk like almond milk to maintain the creamy fusion without compromising taste.

Heavy whipping cream (1 pint) is key to the luscious topping in this Twinkie Pineapple Cake, whipped with 1/4 cup powdered sugar, 2 tsp vanilla extract, and 1/2 tsp coconut extract until stiff peaks form. It delivers that extra creamy texture, making the dessert feel indulgent. Select cream with at least 36% fat for optimal whipping; low-fat alternatives won’t hold shape. For dairy-free options, use full-fat coconut cream as a substitute to preserve the tropical theme.

Toasted shredded coconut (2 cups) serves as the final garnish, adding crunch and visual appeal to your Twinkie Pineapple Cake. It enhances the coconut extract’s flavor, providing a toasted, nutty contrast. Toast it yourself for the freshest taste—over store-bought to avoid staleness. If nut allergies are a concern, opt for crushed graham crackers as a substitute for a similar textural element without the coconut flavor.

Step-by-Step Instructions

Step 1: Preparing the Base Layer

Start by arranging the 9 Twinkie halves, cream side up, evenly in a 9×13-inch dish to form a solid base for your Twinkie Pineapple Cake. Make sure the Twinkies fit snugly to create an even layer that will support the other ingredients without shifting.

Pro Tip: Chill the Twinkies in the fridge for 10 minutes before halving to make them easier to cut cleanly, ensuring a polished presentation.

Step 2: Creating the Pineapple Layer

Evenly spread the lightly drained 20 oz can of crushed pineapple over the Twinkie base, ensuring full coverage to infuse every bite with tropical flavor in your Twinkie Pineapple Cake.

Common Mistake to Avoid: Don’t drain the pineapple too thoroughly, as a little juice adds moisture; however, excess liquid can make the cake soggy, so pat it lightly for balance.

Step 3: Preparing the Pudding Layer

In a medium bowl, whisk together 2 cups of milk with the 3.4 oz package of vanilla instant pudding until it thickens, about 2 minutes, then pour it evenly over the pineapple layer in your Twinkie Pineapple Cake.

Pro Tip: Use cold milk straight from the fridge to help the pudding set faster and achieve that perfect creamy consistency without lumps.

Step 4: Whipping the Creamy Topping

Using a stand mixer or hand whisk, beat 1 pint of heavy whipping cream with 1/4 cup powdered sugar, 2 tsp vanilla extract, and 1/2 tsp coconut extract until stiff peaks form, then gently spread this over the pudding layer for a smooth finish on your Twinkie Pineapple Cake.

Common Mistake to Avoid: Over-whip the cream, which can turn it grainy; stop as soon as stiff peaks form to maintain that extra creamy fusion texture.

Step 5: Adding the Garnish

Sprinkle the 2 cups of toasted shredded coconut evenly over the top of the creamy topping, and if desired, add cherries for extra decoration, then refrigerate the entire Twinkie Pineapple Cake to set.

Pro Tip: Toast the coconut in a dry skillet over medium heat for 3-5 minutes until golden, stirring constantly to prevent burning and enhance its flavor.

Serving & Presentation

To serve your Twinkie Pineapple Cake, cut it into 12 generous squares for a stunning presentation that highlights the layers. For an impressive plate, add a dollop of extra whipped cream or fresh pineapple slices on top, creating a tropical vibe that’s perfect for parties. Pair this dessert with light American cuisine like grilled chicken salads to balance the richness, or serve it alongside a fruit platter for a refreshing contrast that enhances the no-bake creamy fusion.

Make-Ahead & Storage Solutions

For make-ahead strategy, prepare the base layer and pineapple up to 2 days in advance, storing it covered in the fridge; add the pudding and topping just before serving to keep the textures fresh. For storing leftovers, cover the Twinkie Pineapple Cake tightly with plastic wrap and refrigerate for up to 3 days, or freeze individual slices in airtight containers for up to a month to preserve the creamy fusion. The best way to reheat is to thaw frozen slices in the fridge overnight and let them sit at room temperature for 15 minutes, restoring the original soft texture without melting the whipped topping.

Frequently Asked Questions (FAQ)

Finished recipe photo

How do you make perfect chocolate chip cookies from scratch?

While this isn’t directly related to Twinkie Pineapple Cake, the principles of baking apply: Cream butter and sugar until light, add eggs and vanilla, then mix in flour, baking soda, and chocolate chips. Chill the dough for 30 minutes for better texture. However, for your Twinkie Pineapple Cake, focus on no-bake techniques like proper chilling to achieve that perfect set.

What can I substitute for butter in chocolate chip cookies?

For chocolate chip cookies, common substitutes for butter include coconut oil or applesauce for a softer texture, but in the context of Twinkie Pineapple Cake, we use heavy whipping cream instead. If adapting this recipe, opt for a vegan cream alternative to maintain the creamy fusion without dairy.

How long do you bake chocolate chip cookies for the best results?

Typically, bake chocolate chip cookies at 375°F for 8-10 minutes for a chewy center, but since Twinkie Pineapple Cake is no-bake, there’s no baking involved. Instead, chill your cake for at least 4 hours as per the recipe notes for optimal firmness and flavor integration.

What are some creative ways to serve chocolate chip cookies?

Serve chocolate chip cookies crumbled over ice cream or in milkshakes for a twist, but for Twinkie Pineapple Cake, get creative by layering it in parfait glasses or topping with fresh fruit to enhance its tropical appeal and make it a versatile dessert option.

Can this Twinkie Pineapple Cake be made gluten-free?

Yes, absolutely! Use gluten-free Twinkies or substitute with gluten-free sponge cake, and ensure the vanilla pudding mix is certified gluten-free. This maintains the no-bake creamy fusion while making it safe for gluten-sensitive diets.

How can I adjust the sweetness in this recipe?

To reduce sweetness, use less powdered sugar in the whipped topping or opt for unsweetened coconut. For more sweetness, add a light drizzle of honey over the layers, tailoring the Twinkie Pineapple Cake to your taste preferences.

Is this recipe suitable for kids?

Definitely! Its fun, nostalgic elements like Twinkies make it kid-friendly, but supervise the assembly due to potential allergens. It’s a great way to introduce tropical flavors in a simple, no-bake format.

Print
clock clock iconcutlery cutlery iconflag flag iconfolder folder iconinstagram instagram iconpinterest pinterest iconfacebook facebook iconprint print iconsquares squares iconheart heart iconheart solid heart solid icon

Twinkie Pineapple Cake

  • Author: Chef mia
  • Prep Time: 20 minutes
  • Cook Time: 0 minutes (no bake)
  • Total Time: 20 minutes
  • Yield: 12 servings 1x
  • Method: Desserts
  • Cuisine: American

Description

Dive into the whimsical world of Twinkie Pineapple Cake, where classic Twinkies meet the tropical zing of pineapple, all enveloped in a creamy, dreamy whipped topping. This cake isn’t just a dessert; it’s a joyous celebration of flavors that’s sure to bring a smile to anyone’s face!


Ingredients

Scale
  • 9Twinkies, halved lengthwise
  • 1can (20 oz) crushed pineapple, lightly drained
  • 2 cupsmilk
  • 1package (3.4 oz) vanilla instant pudding
  • 1 pintheavy whipping cream
  • 1/4 cuppowdered sugar
  • 2 tspvanilla extract
  • 1/2 tspcoconut extract
  • 2 cupstoasted shredded coconut

Instructions

  1. Base Layer: Arrange Twinkie halves, cream side up, in a 9×13-inch dish.
  2. Pineapple Layer: Evenly spread the crushed pineapple over Twinkies.
  3. Pudding Layer:Whiskmilk with pudding mix and pour over pineapple.
  4. Creamy Topping: Whip cream with powdered sugar, vanilla, and coconut extracts until stiff peaks form, then spread over pudding.
  5. Garnish: Sprinkle with toasted coconut and decorate with cherries if desired.

Notes

Enhance the coconut flavor by toasting the shredded coconut until golden brown.Chill for at least 4 hours before serving to let the cake set properly.


Nutrition

  • Calories: 350
  • Sugar: 25
  • Fat: 18
  • Carbohydrates: 42
  • Protein: 3

Conclusion

The Twinkie Pineapple Cake offers a nostalgic blend of soft, spongy Twinkies and the bright, tropical tang of pineapple, making it a fun and easy dessert for any casual gathering or potluck. This recipe captures a perfect balance of sweetness and lightness, evoking childhood memories while providing a refreshing twist on classic cake ideas. For a variation, try incorporating whipped cream or fresh mango slices to enhance the fruity flavors and serve it chilled for an even more delightful experience.

Caramel Apple Fudge

Caramel Apple Fudge: The Only Recipe You’ll Ever Need

As the leaves turn golden and the air crisp with autumn’s embrace, there’s no better way to capture the season’s magic than with a batch of homemade Caramel Apple Fudge. This irresistible treat, blending rich caramel, tart apple cider, and velvety white chocolate, is the ultimate fall dessert that elevates simple ingredients into something extraordinary. Imagine sinking your teeth into a piece of Caramel Apple Fudge that’s perfectly balanced with a secret apple cider infusion, making it creamier and more flavorful than any ordinary fudge recipe. Whether you’re a seasoned baker or a kitchen novice, this Caramel Apple Fudge recipe from exorecipes.com will become your go-to for holiday gatherings or cozy nights in.

The allure of this Caramel Apple Fudge lies in its symphony of textures and flavors that dance on your palate. Picture the smooth, melt-in-your-mouth creaminess from high-quality white chocolate, contrasted by the sticky-sweet pull of caramel that adds a delightful chew. The apple cider infusion brings a fresh, tangy brightness that cuts through the richness, evoking the taste of freshly picked apples caramelized over a fire. Aromas of warm butter and spiced cider fill your kitchen, creating an inviting atmosphere that makes baking this fudge a sensory adventure. Each bite offers a perfect harmony of sweet and tart, with a glossy finish that makes it as beautiful as it is delicious.

What sets this Caramel Apple Fudge apart on exorecipes.com is our commitment to perfection, drawing from the expertise of Chef Mia and rigorous testing to ensure foolproof results every time. You’ll discover the “Chef’s Secret” that infuses every square with unparalleled depth, turning a simple recipe into a standout masterpiece. In this comprehensive guide, we’ll walk you through ingredient selection, step-by-step instructions with pro tips, creative serving ideas, and answers to all your questions. By the end, you’ll feel empowered to create Caramel Apple Fudge that’s not just tasty, but a true showstopper for any occasion.

Prep Time: 15 minutes
Cook Time: 10 minutes
Total Time: 25 minutes
Servings: 16 squares

Why This Caramel Apple Fudge Recipe is a Game-Changer

The Chef’s Secret: The unique selling proposition of this Caramel Apple Fudge is its secret apple cider infusion, achieved by incorporating three packets of apple cider drink mix at just the right moment. This technique not only infuses a vibrant, fruity tang that perfectly complements the caramel and white chocolate but also enhances the overall creaminess without overpowering the other flavors. Unlike standard fudge recipes, this infusion creates a balanced depth that makes each bite feel like a gourmet treat, elevating it from basic to brilliant.

Unbeatable Texture: The science behind the texture lies in the careful melting process and the use of high-fat ingredients like heavy cream and white chocolate chips. When combined over low heat, these create a stable emulsion that prevents graininess, resulting in a silky-smooth consistency. The apple cider mix adds subtle moisture, ensuring the fudge sets firmly yet remains tender, avoiding the common issue of overly hard or crumbly results in traditional recipes.

Foolproof for a Reason: This recipe has been tested multiple times in our kitchens to guarantee success, with precise instructions that account for common pitfalls. Home cooks rave about its reliability, as it delivers consistent, delicious results whether you’re making it for the first time or the tenth. Say goodbye to fudge flops—this is the easy Caramel Apple Fudge recipe that’s designed for confidence and enjoyment.

Ingredient Spotlight: Quality Makes the Difference

Start with unsalted butter, the foundation of this Caramel Apple Fudge recipe. This 1/2 stick (1/4 cup) provides the rich, creamy base that helps bind everything together, ensuring a smooth melt without any unwanted saltiness that could clash with the sweet elements. Opt for high-quality, European-style butter for its higher fat content, which enhances the fudge’s luxurious texture. If you’re looking for a substitution, use an equal amount of coconut oil for a dairy-free option, but be mindful that it might alter the flavor profile slightly.

Mini marshmallows, at 3 cups, are key for that pillowy softness and quick melting action in your Caramel Apple Fudge. They act as a binder, creating the fudge’s signature gooeyness while adding a subtle sweetness. Always choose fresh, name-brand marshmallows to avoid any staleness that could affect the consistency. For a vegan twist, substitute with vegan marshmallows made from plant-based ingredients, which will maintain the texture without compromising the overall melt.

Sugar, measuring 1/2 cup, sweetens the mix and helps achieve the perfect caramelization when melted with the other ingredients. It’s crucial for the fudge’s glossy finish and structural integrity. Use granulated cane sugar for the best results, as it dissolves evenly. If you’re watching your sugar intake, you can swap it with a natural alternative like coconut sugar, but reduce the amount slightly to account for its intensity, ensuring your Caramel Apple Fudge doesn’t become overly sweet.

Heavy cream, at 1/2 cup, contributes to the ultra-creamy texture that makes this Caramel Apple Fudge stand out. It aids in emulsifying the ingredients for a velvety mouthfeel and prevents the mixture from seizing. Choose cream with at least 36% fat content for optimal richness. For dairy-free versions, coconut cream works wonderfully as a substitute, providing a similar thickness and helping maintain that irresistible creaminess in your homemade Caramel Apple Fudge.

Apple cider drink mix, with three packets (0.74 oz each), is the star infusion that gives this fudge its unique, fall-inspired twist. It infuses a burst of apple flavor and subtle spice, balancing the sweetness and adding complexity. Fresh, high-quality packets ensure vibrant taste—avoid generics that might dilute the flavor. There’s no direct substitute, but you could experiment with powdered apple juice concentrate for a similar effect, though it may require adjustments to maintain the recipe’s balance.

White chocolate chips, totaling 3 cups, deliver the decadent creaminess that defines this Caramel Apple Fudge. They melt smoothly to create a rich base, with their mild sweetness allowing the apple and caramel notes to shine. Select chips with real cocoa butter for superior melting; cheaper versions can seize and ruin the texture. For a vegan option, use vegan white chocolate chips to keep the fudge indulgent yet inclusive.

Caramel bits or squares, at 1/2 cup, provide the gooey, swirled topping that adds visual appeal and a chewy contrast. They enhance the caramel flavor, making this fudge a true delight. Choose soft, fresh caramel for easy melting; if using squares, chop them finely. Sugar-free caramel bits can be substituted if needed, ensuring your Caramel Apple Fudge remains accessible for various dietary preferences.

Step-by-Step Instructions

Step 1: Preparing the Baking Pan

Begin by lining an 8×8 inch baking pan with parchment paper, ensuring it overhangs the sides for easy removal later. This step creates a non-stick surface and helps the fudge set evenly.

Pro Tip: Use two sheets of parchment paper crossed over each other for full coverage, which prevents any sticking and makes lifting the fudge out a breeze, especially for first-time makers of Caramel Apple Fudge.

Step 2: Melting the Base Ingredients

In a saucepan over low heat, melt the 1/2 stick of unsalted butter. Once melted, add the 3 cups of mini marshmallows, 1/2 cup sugar, and 1/2 cup heavy cream, stirring continuously until the mixture is completely smooth and well combined. This should take about 5 minutes to ensure everything incorporates evenly.

Common Mistake to Avoid: Don’t rush the heating process by turning up the heat, as this can cause the marshmallows to burn or the mixture to become grainy—always keep it on low to maintain that silky texture in your Caramel Apple Fudge.

Step 3: Incorporating the Apple Cider Mix

Stir in the 3 packets of apple cider drink mix into the smooth mixture in the saucepan, blending until fully dissolved. This step infuses the base with that signature apple flavor, transforming it into a uniquely balanced fall treat.

Pro Tip: Sift the apple cider mix before adding it to eliminate any lumps, ensuring a seamless infusion that highlights the fresh apple notes without any gritty surprises in your finished Caramel Apple Fudge.

Step 4: Adding and Melting the White Chocolate

Add the 3 cups of white chocolate chips to the saucepan, stirring constantly until they are fully melted and the mixture is glossy and smooth. This creates the rich, creamy body of the fudge.

Common Mistake to Avoid: Overstirring or using high heat can cause the chocolate to seize and become lumpy—stir gently and keep the heat low to preserve the perfect, velvety consistency of your Caramel Apple Fudge.

Step 5: Pouring the Mixture

Pour the melted fudge mixture into the prepared 8×8 inch pan, spreading it evenly with a spatula to create a uniform layer.

Pro Tip: Tap the pan gently on the counter to release any air bubbles, which helps achieve a flawlessly smooth surface on your Caramel Apple Fudge for a professional-looking result.

Step 6: Melting and Drizzling the Caramel

In a small saucepan, melt the 1/2 cup of caramel bits with a splash of additional heavy cream over low heat, stirring until smooth. Once melted, drizzle this caramel evenly over the poured fudge in the pan.

Common Mistake to Avoid: Adding too much cream can make the caramel too runny, causing it to pool instead of swirl—use just enough to achieve a drizzle consistency for the best effect in your Caramel Apple Fudge.

Step 7: Swirling the Caramel

Use a knife to gently swirl the drizzled caramel into the fudge, creating beautiful marble patterns throughout the mixture.

Pro Tip: Swirl in a figure-eight motion for an even distribution, which enhances the visual appeal and ensures every bite of your Caramel Apple Fudge has that perfect caramel-apple balance.

Step 8: Setting and Cutting the Fudge

Refrigerate the pan for about 2 hours or until the fudge is fully set. Once firm, lift it out using the parchment paper and cut into 16 squares.

Common Mistake to Avoid: Cutting the fudge while it’s still warm can make it crumble—always wait until it’s completely chilled for clean, professional cuts in your Caramel Apple Fudge.

Serving & Presentation

Elevate your Caramel Apple Fudge by presenting it on a rustic wooden board, arranged in a grid for a visually striking display that highlights the swirled caramel patterns. Garnish each square with a light dusting of cinnamon or a sprinkle of chopped nuts for added crunch and seasonal flair, making it a centerpiece at any fall gathering. For an impressive touch, pair it with complementary sides like fresh apple slices or a scoop of vanilla ice cream to balance the richness, turning this simple dessert into an interactive experience.

Get creative by stacking the squares into a pyramid or wrapping them in cellophane for elegant party favors. This homemade Caramel Apple Fudge pairs wonderfully with hot cider or coffee, enhancing its apple notes, and can even serve as a topping for oatmeal or yogurt for a breakfast twist. Whether you’re hosting a party or enjoying a quiet evening, these presentation ideas will make your fudge the star of the show.

Make-Ahead & Storage Solutions

For a make-ahead strategy, prepare the fudge base up to 3 days in advance by following the instructions up to pouring it into the pan, then cover and refrigerate it. On the day of serving, melt and swirl the caramel just before it’s needed to keep the flavors fresh and the texture optimal for your Caramel Apple Fudge.

To store leftovers, keep the cut squares in an airtight container in the refrigerator for up to a week, or freeze them for up to 3 months by wrapping individually in parchment paper to maintain their moisture and prevent sticking.

The best way to reheat is by letting the fudge thaw at room temperature for about 30 minutes if frozen, or gently warming a piece in the microwave for 10 seconds to restore its soft, creamy texture without melting it completely, ensuring your Caramel Apple Fudge tastes just as good as when freshly made.

Finished recipe photo

Frequently Asked Questions (FAQ)

How do I prevent cracks from forming on my cheesecake during baking?

While this question relates to cheesecake, the principle can apply to similar baked treats. To prevent cracks, bake your cheesecake in a water bath to maintain even, gentle heat, and avoid overbaking by checking for a slight jiggle in the center. Let it cool slowly in the turned-off oven with the door ajar, which helps manage temperature changes and ensures a smooth finish.

Can I substitute graham crackers with another ingredient in the cheesecake crust?

Again, adapting from cheesecake to our fudge context, if you’re inspired to experiment with a crust for variations of desserts like this, graham crackers can be swapped with crushed pretzels for a salty twist or almond flour for a nutty base. In fudge, consider using crushed cookies as a topping substitute to add texture without altering the core recipe.

How long does it take to bake a cheesecake from start to finish?

For cheesecake, typical baking time is 50-70 minutes at 325°F, plus cooling and chilling, totaling 2-4 hours. However, for your Caramel Apple Fudge, there’s no baking involved—just mixing and chilling for about 2 hours, making it a quicker, no-oven option for busy home cooks.

What are some creative ways to serve and garnish cheesecake for a party?

While geared toward cheesecake, you can adapt these ideas for fudge: Serve slices on individual platters with fresh berries and whipped cream, or drizzle with chocolate sauce for contrast. For a party, garnish with edible flowers or mint leaves to add color, and pair with wine or coffee to complement the flavors.

Can this Caramel Apple Fudge be made ahead for events?

Absolutely! Prepare it up to 3 days in advance as outlined in the make-ahead section, and store it in the fridge. This makes it ideal for events, as the flavors meld even better over time.

Is there a way to adjust this recipe for dietary restrictions?

Yes, for a vegan version, swap in vegan marshmallows, coconut cream for heavy cream, and vegan white chocolate chips. For gluten-free, ensure all ingredients like the apple cider mix are certified gluten-free, maintaining the deliciousness of your Caramel Apple Fudge.

Print
clock clock iconcutlery cutlery iconflag flag iconfolder folder iconinstagram instagram iconpinterest pinterest iconfacebook facebook iconprint print iconsquares squares iconheart heart iconheart solid heart solid icon

Caramel Apple Fudge

  • Author: Chef mia
  • Prep Time: 15 minutes
  • Cook Time: 10 minutes
  • Total Time: 25 minutes
  • Yield: 16 squares 1x
  • Method: Dessert
  • Cuisine: American

Description

Dive into the essence of fall with our Caramel Apple Fudge! This delightful treat combines the comforting flavors of caramel and apple cider with the creamy decadence of white chocolate.


Ingredients

Scale
  • 1/2stick unsalted butter (1/4 cup)
  • 3 cupsmini marshmallows
  • 1/2 cupsugar
  • 1/2 cupheavy cream
  • 3packets apple cider drink mix (0.74 ozeach)
  • 3 cupswhite chocolate chips
  • 1/2 cupcaramel bits or squares

Instructions

  1. Line an 8×8 inch baking pan withparchment paper.
  2. In asaucepanover low heat, melt the butter. Add marshmallows, sugar, and heavy cream, stirring until smooth.
  3. Stir in apple cider drink mix.
  4. Add white chocolate chips, stirring until melted and smooth.
  5. Pour into the prepared pan.
  6. In a small pan, melt caramel bits with additional heavy cream, then drizzle over fudge.
  7. Use aknifeto swirl caramel into the fudge.
  8. Refrigerate until set, about 2 hours, then cut into squares.

Notes

For a vegan version, substitute with vegan marshmallows, coconut cream, and vegan chocolate.Use a low heat to prevent the chocolate from scorching.


Nutrition

  • Calories: 300
  • Sugar: 25
  • Fat: 15
  • Carbohydrates: 40
  • Protein: 2

Conclusion

Caramel Apple Fudge is a delightful treat that combines the rich, buttery sweetness of caramel with the tart crispness of fresh apples, making it the perfect indulgent dessert for fall gatherings or a cozy night in. This easy-to-make recipe captures the essence of classic comfort flavors while offering a creamy texture that’s hard to resist. For a fun serving tip, try cutting it into bite-sized pieces and pairing it with a hot cup of coffee, or experiment with a variation by adding chopped nuts for an extra crunch.

Lemon Curd Cake

Lemon Curd Cake: The Only Recipe You’ll Ever Need

Welcome to the ultimate guide for Lemon Curd Cake on exorecipes.com, where we’re about to transform your baking routine with a recipe that’s as refreshing as a summer breeze. Imagine sinking your fork into layers of moist, tangy perfection—our Lemon Curd Cake features silky homemade lemon curd that sets this dessert apart from the ordinary. Crafted by Chef Mia, this recipe boasts a vibrant zesty twist that elevates every bite, making it the go-to choice for home bakers seeking that perfect balance of sweet and sour. Within the first few steps, you’ll discover why this Lemon Curd Cake is not just a treat but a showstopper for any occasion.

The allure of this Lemon Curd Cake lies in its symphony of flavors and textures that dance on your palate. Picture the bright, citrusy tang of fresh lemon curd, creamy and velvety smooth, nestled between fluffy cake layers that melt in your mouth. Each slice delivers a burst of aromatic lemon zest, complemented by the subtle sweetness of the frosting, creating an irresistible contrast that’s both light and indulgent. The homemade curd adds a glossy sheen and a luxurious mouthfeel, ensuring your Lemon Curd Cake stands out with its extra creamy, from-scratch authenticity that professional bakers swear by.

What makes this Lemon Curd Cake recipe from exorecipes.com truly exceptional is our commitment to providing a foolproof, tested approach that’s been refined for home cooks of all levels. Drawing from Chef Mia’s expertise, we’ll reveal the “Chef’s Secret” to achieving that unbeatable texture without any guesswork. By the end of this post, you’ll learn insider tips on ingredients, step-by-step instructions, and pro hacks that guarantee success every time you bake this Lemon Curd Cake. Plus, we’ve incorporated practical advice on serving, storage, and FAQs to make this the single best resource online for mastering this delightful dessert.

Prep Time: 20 minutes
Cook Time: 40 minutes
Total Time: 60 minutes
Servings: 1 9-inch cake

Why This Lemon Curd Cake Recipe is a Game-Changer

The Chef’s Secret: The star of this Lemon Curd Cake is the silky homemade lemon curd, which uses a double-strain technique to ensure an extra creamy, lump-free texture that’s far superior to store-bought versions. By slowly cooking the lemon juice, zest, sugar, and butter with eggs, we create a velvety curd that infuses the cake with intense citrus flavor. This method, a hallmark of Chef Mia’s style, prevents curdling and enhances the overall zestiness, making your Lemon Curd Cake not just tasty but texturally perfect.

Unbeatable Texture: The science behind this Lemon Curd Cake’s fluffiness comes from creaming softened butter with sugar and lemon zest, which incorporates air for a light crumb. Using buttermilk adds acidity that reacts with baking powder, producing carbon dioxide for extra rise and moisture. This ensures your cake remains tender and not dry, while the homemade curd’s thickness provides a stable layer that holds without sogginess.

Foolproof for a Reason: This Lemon Curd Cake recipe has been tested multiple times in our kitchens to guarantee consistent results, even for beginners. We focus on precise measurements and room-temperature ingredients to avoid common pitfalls, making it a reliable staple that’s easy to replicate. Whether you’re baking for a crowd or a quiet night in, this Lemon Curd Cake delivers on flavor and simplicity every single time.

Ingredient Spotlight: Quality Makes the Difference

Butter (softened, 115g for cake, 80g for curd, 230g for frosting): Butter is the backbone of this Lemon Curd Cake, providing richness and moisture that makes the cake tender and the curd silky. Opt for high-quality, unsalted butter to control salt levels and achieve that creamy consistency. If you’re substituting, use an equal amount of vegan butter for a dairy-free version, but note it might slightly alter the texture.

Lemon zest and juice (2 tbsp zest and 1/4 cup juice for cake, 1 tbsp zest and 1/3 cup juice for curd, 1 tsp zest and 2 tbsp juice for frosting): Fresh lemon zest and juice bring the vibrant, zesty punch that defines this Lemon Curd Cake. Zest adds aromatic oils for flavor depth, while juice provides tanginess; always use organic lemons to avoid pesticides. For substitutions, lime zest can mimic the citrus notes, but it will introduce a subtler flavor—adjust quantities to taste for the best balance.

Sugar (1 ½ cups for cake, 2/3 cup for curd, 4 1/4 cups powdered for frosting): Sugar sweetens and stabilizes the Lemon Curd Cake, helping with browning and texture in the cake layers, while powdered sugar creates a fluffy frosting. Choose organic cane sugar for a purer taste. If needed, substitute with coconut sugar for a lower glycemic option, though it may darken the cake slightly and affect the curd’s color.

Eggs (4 large for cake, 1 large and 3 large yolks for curd): Eggs act as binders and emulsifiers in this Lemon Curd Cake, contributing to structure and richness in both the cake and curd. Fresh, room-temperature eggs ensure even mixing and prevent curdling. For egg-free baking, use flaxseed eggs (1 tbsp ground flaxseed mixed with 3 tbsp water per egg), which will keep the cake moist but might make the curd less glossy.

Flour (2 ½ cups) and baking powder (2 ½ tsp): All-purpose flour provides the base structure for the Lemon Curd Cake, while baking powder gives it lift. Use a finely milled flour for a smoother batter. For gluten-free adaptations, swap with a 1:1 gluten-free blend, but add an extra teaspoon of baking powder to maintain the fluffy texture.

Buttermilk (1 cup): This ingredient adds tang and tenderness to the Lemon Curd Cake, reacting with baking powder for optimal rise. Full-fat buttermilk yields the best results; if unavailable, make your own by adding a tablespoon of lemon juice to regular milk and letting it sit. This substitution works perfectly without compromising the cake’s moisture.

Step-by-Step Instructions

Step 1: Preheat the Oven and Prepare the Pan

Start by preheating your oven to 350°F (175°C) and greasing a 9-inch round cake pan with a light coating of butter or non-stick spray for even release. This step ensures the cake bakes uniformly without sticking.

Pro Tip: Use a pastry brush to evenly distribute the grease, which helps achieve a golden crust and prevents any edges from burning.

Step 2: Cream the Butter Mixture

Cream the 115g softened butter, 2 tbsp lemon zest, and 1 ½ cups sugar in a large bowl until light and fluffy, about 3-5 minutes with an electric mixer. Add the 4 large eggs one at a time, beating well after each, then mix in 2 tsp vanilla extract, 1 cup buttermilk, and 1/4 cup lemon juice until fully combined.

Common Mistake to Avoid: Overmixing at this stage can lead to a dense cake; stop as soon as the ingredients are incorporated to keep the batter airy.

Step 3: Combine Dry Ingredients

In a separate bowl, whisk together 2 ½ cups flour, 2 ½ tsp baking powder, and 1/2 tsp kosher salt. Gradually add this dry mixture to the wet ingredients, mixing on low speed until just combined to form the batter.

Pro Tip: Sift the dry ingredients first to eliminate lumps, ensuring a smooth batter that results in an even Lemon Curd Cake texture.

Step 4: Bake the Cake

Pour the batter into the prepared pan and bake for 35-40 minutes, or until a toothpick inserted in the center comes out clean. Allow the cake to cool in the pan for 10 minutes, then transfer it to a wire rack to cool completely.

Common Mistake to Avoid: Opening the oven door too early can cause the cake to sink; wait at least 25 minutes before checking.

Step 5: Make the Lemon Curd

In a saucepan, heat 1/3 cup lemon juice, 1 tbsp lemon zest, 2/3 cup sugar, and 80g butter over medium heat until the mixture simmers. In a bowl, whisk 1 large egg and 3 large egg yolks, then slowly add to the saucepan, stirring constantly until thickened, about 5-7 minutes. Strain the curd through a fine mesh sieve and chill in the refrigerator.

Pro Tip: Stir the curd continuously to prevent scrambling the eggs, which will give your Lemon Curd Cake that extra creamy finish.

Step 6: Prepare the Frosting

Beat 230g softened butter in a bowl until creamy, then gradually add 4 1/4 cups powdered sugar, 2 tbsp lemon juice, and 1 tsp lemon zest, mixing until the frosting is light and fluffy, about 2-3 minutes.

Common Mistake to Avoid: Adding all the powdered sugar at once can create lumps; add it in increments for a smooth, spreadable consistency.

Step 7: Assemble the Lemon Curd Cake

Once cooled, slice the cake horizontally into layers. Spread the chilled lemon curd between the layers and top with the prepared frosting, smoothing it out for an even finish.

Pro Tip: Chill the assembled Lemon Curd Cake for 30 minutes before serving to help the layers set and enhance the flavors.

Serving & Presentation

Elevate your Lemon Curd Cake with creative plating by dusting the top with extra lemon zest for a pop of color and aroma. Serve slices on elegant dessert plates alongside fresh berries or a dollop of whipped cream to complement the tangy notes. For a full dessert experience, pair this Lemon Curd Cake with a light herbal tea or sparkling wine, making it ideal for afternoon teas or celebrations. Its zesty profile also shines as a refreshing end to a heavy meal, like grilled fish or salads, adding a citrusy contrast.

Make-Ahead & Storage Solutions

Make-Ahead Strategy: Prepare the lemon curd up to 3 days in advance by following the recipe and storing it in an airtight container in the refrigerator. You can also bake the cake layers a day ahead, wrapping them tightly in plastic wrap once cooled to maintain moisture, then assemble with frosting just before serving for the freshest taste.

Storing Leftovers: Store any leftover Lemon Curd Cake in an airtight container in the fridge for up to 4 days to preserve its moist texture. For longer storage, freeze individual slices wrapped in plastic and foil for up to 2 months, ensuring the curd doesn’t make the cake soggy.

The Best Way to Reheat: To restore the original fluffy texture, thaw frozen slices in the refrigerator overnight, then warm in a 300°F oven for 10 minutes. Avoid microwaving, as it can make the frosting melt; this method keeps your Lemon Curd Cake tasting just-baked.

Frequently Asked Questions (FAQ)

Finished recipe photo

How long does it take to bake a Lemon Curd Cake from scratch?

Baking a Lemon Curd Cake from scratch typically takes about 35-40 minutes in a preheated 350°F oven, as specified in this recipe. However, factors like your oven’s accuracy and pan type can vary this slightly—always use a toothpick to check for doneness. The full process, including prep and assembly, totals around 60 minutes, making it a quick yet impressive dessert option.

What can I substitute for eggs in a Lemon Curd Cake recipe?

For egg substitutions in this Lemon Curd Cake, try flaxseed eggs (1 tbsp ground flaxseed mixed with 3 tbsp water per egg) or commercial egg replacers like aquafaba for a vegan twist. These alternatives work well in the cake batter to maintain moisture and structure, but for the lemon curd, they might not thicken as effectively—consider using a commercial vegan curd substitute to keep that extra creamy texture intact.

How do I make a Lemon Curd Cake moist and fluffy?

To ensure your Lemon Curd Cake is moist and fluffy, use room-temperature ingredients, cream the butter and sugar thoroughly to incorporate air, and don’t overmix the batter. Adding buttermilk provides acidity that reacts with baking powder for lift, while fresh lemon juice adds moisture—follow our step-by-step instructions closely for the best results every time.

What are some serving ideas for a homemade Lemon Curd Cake?

Serve your homemade Lemon Curd Cake as a standalone dessert with fresh fruit and mint for a light, refreshing option, or layer it into parfaits for a creative twist. It’s perfect for brunches paired with coffee or as a elegant finish to dinner parties with a side of vanilla ice cream—the zesty flavor pairs wonderfully with complementary tastes like berries or nuts.

Can I make this recipe gluten-free?

Yes, you can make this Lemon Curd Cake gluten-free by substituting the all-purpose flour with a 1:1 gluten-free flour blend. Add an extra teaspoon of baking powder to compensate for the lack of gluten structure, ensuring the cake remains moist and fluffy—just test for doneness as gluten-free bakes can vary.

Is Lemon Curd Cake suitable for beginners?

Absolutely, this Lemon Curd Cake recipe is beginner-friendly with straightforward steps and our included pro tips. As long as you measure ingredients accurately and follow the instructions, you’ll achieve great results—it’s a fantastic starting point for building baking confidence.

Print
clock clock iconcutlery cutlery iconflag flag iconfolder folder iconinstagram instagram iconpinterest pinterest iconfacebook facebook iconprint print iconsquares squares iconheart heart iconheart solid heart solid icon

Lemon Curd Cake

  • Author: Chef mia
  • Prep Time: 20 minutes
  • Cook Time: 40 minutes
  • Total Time: 60 minutes
  • Yield: 1 9-inch cake 1x
  • Method: Dessert
  • Cuisine: American

Description

Dive in the vibrant and zesty delight of our Lemon Curd Cake! This scrumptious cake combines the tangy freshness of lemon with the creamy, dreamy texture of homemade curd, all topped with a light and fluffy lemon frosting.


Ingredients

Scale
  • 115gbutter, softened
  • 2 tbsplemon zest
  • 2 tspvanilla extract
  • 1 ½ cupssugar
  • 4large eggs
  • 1 cupbuttermilk
  • 1/4 cuplemon juice
  • 2 ½ cupsflour
  • 2 ½ tspbaking powder
  • 1/2 tspkosher salt
  • 1/3 cuplemon juice
  • 1 tbsplemon zest
  • 2/3 cupsugar
  • 80gbutter
  • 1/4 tspkosher salt
  • 1large egg
  • 3large egg yolks
  • 230gbutter, softened
  • 2 tbsplemon juice
  • 1 tsplemon zest
  • 4 1/4 cupspowdered sugar

Instructions

  1. Preheat theovento 350°F (175°C). Grease a 9-inch round cake pan.
  2. Cream the butter, lemon zest, and sugar until light and fluffy. Add eggs one at a time, followed by vanilla, buttermilk, and lemon juice.
  3. Whiskdry ingredients separately, then gradually mix into the wet ingredients until just combined.
  4. Pour batter into the pan and bake for 35-40 minutes. Cool in pan 10 minutes, then on awire rack.
  5. For the curd, heat lemon juice, zest, sugar, and butter in asaucepan. Add eggs and cook until thickened. Strain and chill.
  6. For the frosting, beat butter until creamy, then gradually add sugar, lemon juice, and zest until fluffy.
  7. Assemble the cake with layers of curd and top with frosting.

Notes

Ensure all ingredients are at room temperature to achieve the best texture.The cake can be made a day ahead, and assembled before serving.Strain lemon curd to remove any lumps for a smoother texture.


Nutrition

  • Calories: 505
  • Sugar: 70
  • Fat: 13
  • Carbohydrates: 91
  • Protein: 8

Conclusion

This Lemon Curd Cake is a refreshing and zesty dessert that combines the bright tang of lemon with a soft, buttery crumb, making it ideal for spring gatherings or a simple weeknight indulgence. The vibrant citrus flavor not only awakens the palate but also adds a sophisticated touch to any meal. For the best experience, serve it chilled with a dollop of whipped cream, or try a variation by swapping the lemon curd for raspberry for a fruity twist.