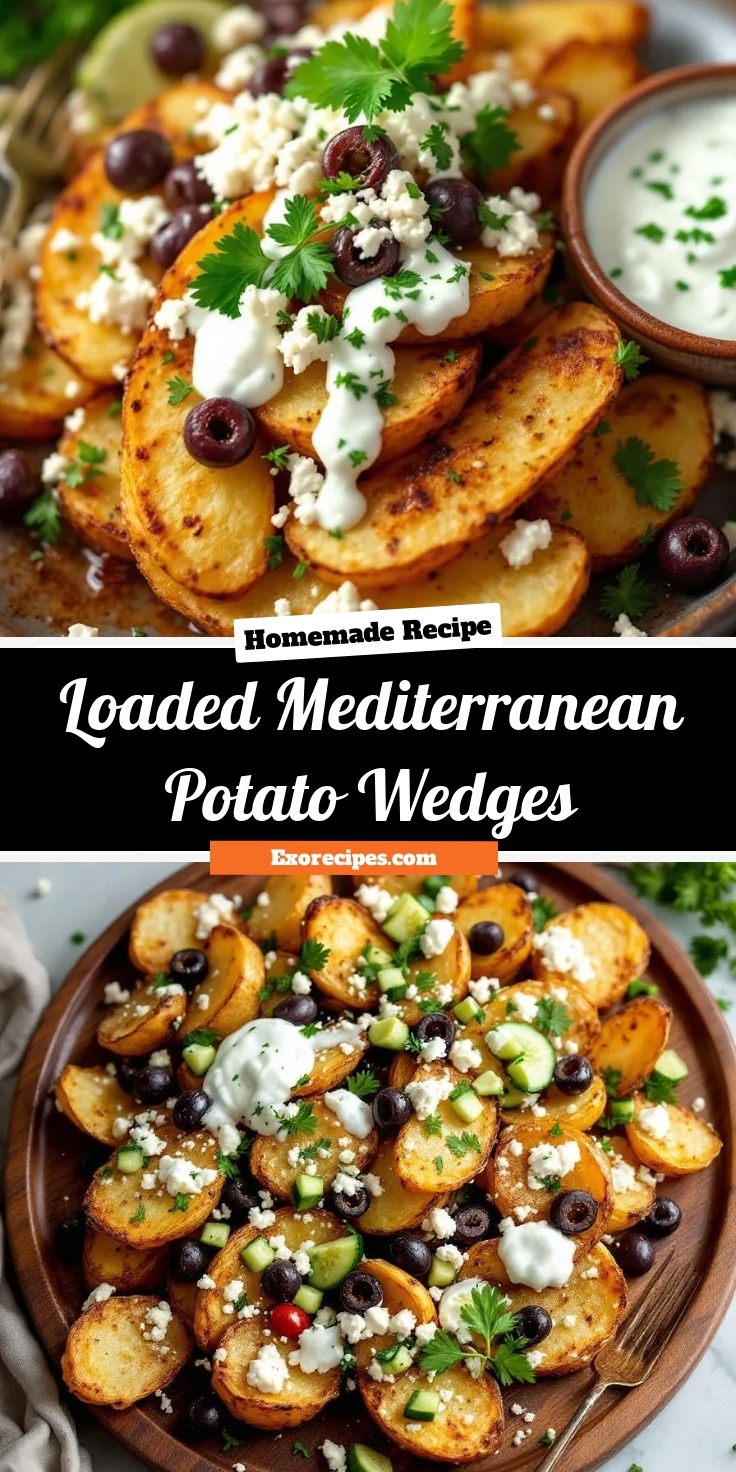
If you’re craving a dish that’s both comforting and vibrant, you’re in the right place. Today, I’m sharing my Loaded Mediterranean Potato Wedges—a recipe that brings together crispy potatoes, bold flavors, and a touch of sunshine. Whether you need a crowd-pleasing appetizer or a hearty side, this dish delivers. Plus, it’s packed with fresh ingredients that make every bite feel like a celebration. Trust me, once you try these wedges, they’ll become a staple in your kitchen.
Loaded Mediterranean Potato Wedges are more than just a side dish. They’re a flavor-packed experience that combines crispy roasted potatoes with tangy feta, briny olives, and a drizzle of creamy tzatziki. What makes them special? They strike the perfect balance between indulgence and freshness, making them ideal for everything from weeknight dinners to festive gatherings. If you love Mediterranean flavors, you’ll adore how the herbs, lemon, and garlic elevate humble potatoes into something extraordinary. And since brekcakes.com is all about approachable yet impressive recipes, this one fits right in. For more inspiration, check out my Mediterranean diet favorites or explore easy weeknight dinners that save time without sacrificing taste.
Why I Love This Recipe
These Loaded Mediterranean Potato Wedges hold a special place in my heart because they remind me of lazy summer evenings spent sharing food with friends. The first time I made them, I knew I’d stumbled onto something magical—the way the crispy edges give way to fluffy centers, the burst of flavor from the toppings, and the joy of seeing everyone reach for seconds. It’s the kind of dish that turns a simple meal into a memory, and that’s exactly what cooking should be about.
Health and Nutrition
Why it’s good for your body
Loaded Mediterranean Potato Wedges pack a nutritious punch while satisfying your cravings. First, the dish features heart-healthy olive oil, which provides monounsaturated fats to support cardiovascular health. Additionally, the potatoes deliver a steady energy boost thanks to their complex carbohydrates and fiber. Meanwhile, the fresh vegetables like tomatoes and red onions add antioxidants that help combat inflammation.
Moreover, Loaded Mediterranean Potato Wedges include protein-rich feta cheese and Greek yogurt, both of which promote muscle repair and satiety. The herbs and spices, such as oregano and garlic, not only enhance flavor but also offer immune-boosting properties. Furthermore, this dish avoids processed ingredients, making it a cleaner choice compared to typical fried snacks.
Finally, the Mediterranean-inspired ingredients work together to create a balanced meal. For instance, the combination of healthy fats, fiber, and protein helps stabilize blood sugar levels. Whether you enjoy it as a side or a main, Loaded Mediterranean Potato Wedges provide both taste and nourishment in every bite.
How it fits in a healthy lifestyle
Loaded Mediterranean Potato Wedges fit seamlessly into a balanced diet. They work well for gluten-free eaters since potatoes and fresh toppings naturally lack gluten. If you follow a heart-healthy eating plan, the olive oil and vegetables align perfectly with Mediterranean diet principles. For those tracking macros, the dish offers a good mix of carbs, protein, and fats.
You can easily pair these wedges with a lean protein like grilled chicken or a light salad for a complete meal. They also make a great alternative to heavy appetizers when you want something satisfying but nutritious. If you love meal prepping, try our easy meal prep ideas to incorporate them into your weekly routine. And if you’re exploring more Mediterranean flavors, check out our guide to Mediterranean diet tips for inspiration.
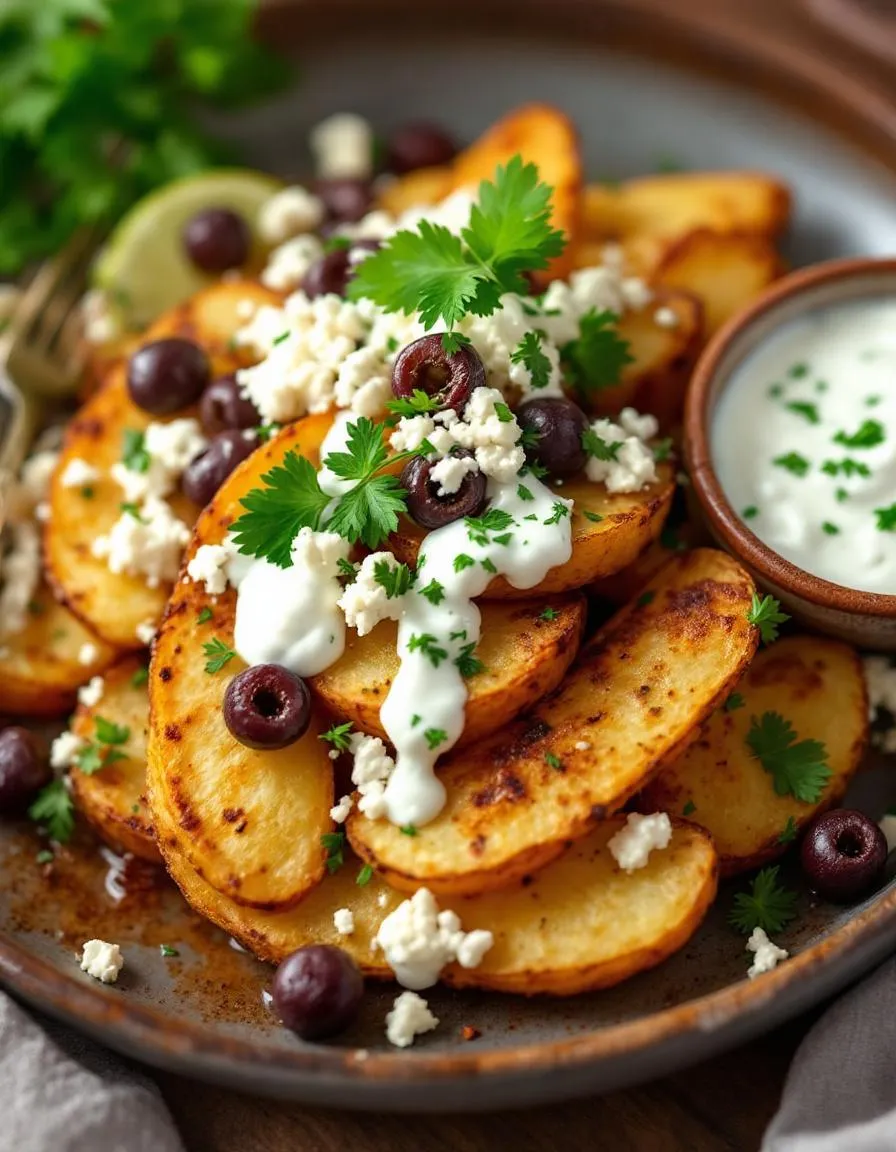
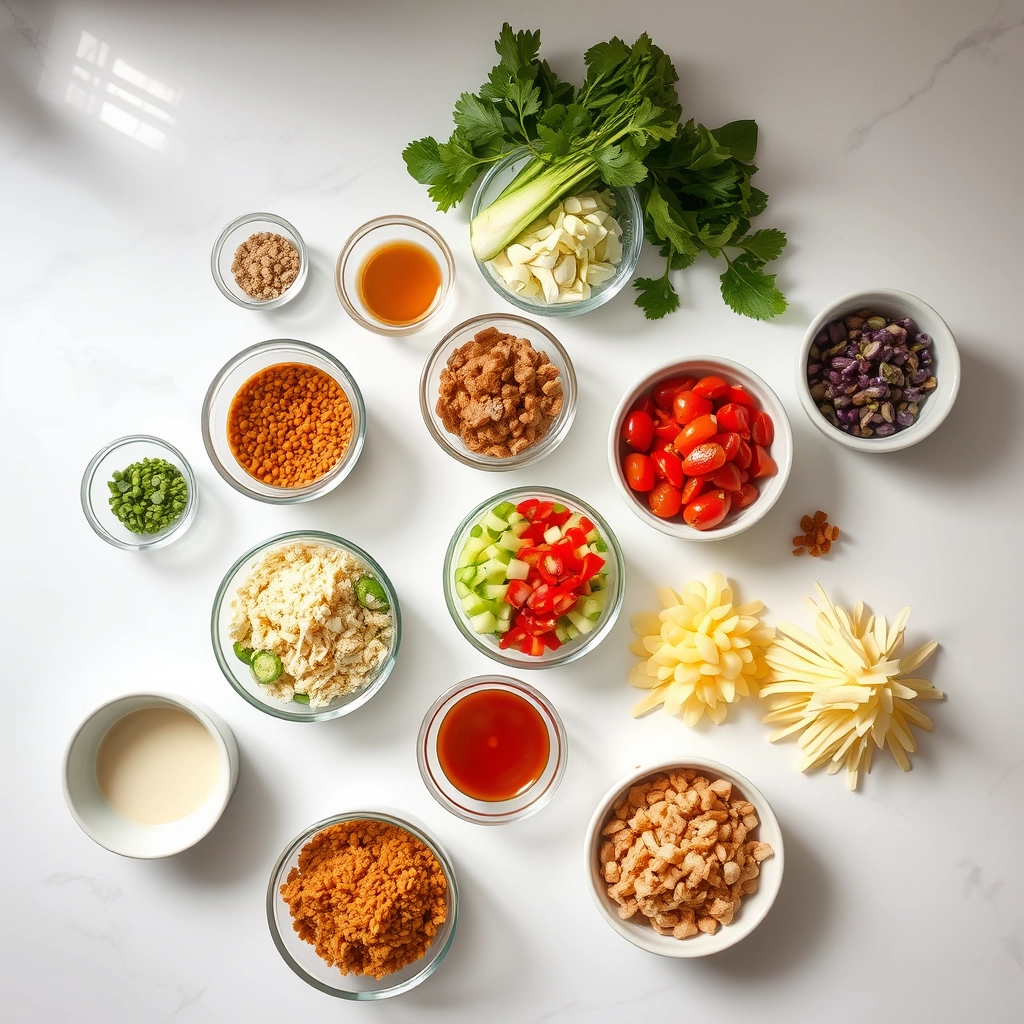
Crispy potato wedges topped with fresh Mediterranean flavors like feta, olives, and herbs.
Ingredients
Scale
For the Crust:
4 large russet potatoes, cut into wedges
3 tbsp olive oil
1 tsp garlic powder
1 tsp dried oregano
1/2 tsp salt
1/2 tsp black pepper
1/2 cup crumbled feta cheese
1/4 cup sliced Kalamata olives
1/4 cup diced cucumber
1/4 cup chopped fresh parsley
1/4 cup tzatziki sauce
Instructions
1. Prepare the Crust:
Preheat oven to 425°F (220°C). Line a baking sheet with parchment paper.
In a large bowl, toss potato wedges with olive oil, garlic powder, oregano, salt, and pepper until evenly coated.
Arrange wedges in a single layer on the prepared baking sheet. Bake for 25-30 minutes, flipping halfway, until golden and crispy.
Remove from oven and transfer to a serving platter. Top with feta cheese, olives, cucumber, and parsley.
Drizzle with tzatziki sauce and serve immediately.
Notes
You can customize the seasonings to taste.
“`html
="how-to-prepare-this-dish">How to Prepare This Dish
Steps and time-saving tips
Start by preheating your oven to 425°F to ensure it’s hot enough for crispy Loaded Mediterranean Potato Wedges. While the oven heats, scrub and dry your potatoes thoroughly, then cut them into even wedges so they cook uniformly. Toss the wedges in a large bowl with olive oil, salt, and your favorite Mediterranean spices like oregano, garlic powder, and smoked paprika. Spread them in a single layer on a parchment-lined baking sheet—this prevents sticking and makes cleanup a breeze. Bake for 25-30 minutes, flipping halfway, until golden and crisp. Meanwhile, whip up a quick tzatziki sauce by whisking Greek yogurt, grated cucumber, lemon juice, and minced garlic. Once the wedges are done, layer them with crumbled feta, diced tomatoes, Kalamata olives, and a generous drizzle of tzatziki. For a time-saving hack, prep the toppings while the potatoes bake, or use store-bought tzatziki if you’re short on time. Serve immediately while the wedges are still warm and crispy for the best texture.
Mistakes I’ve made and learned from
I’ve learned the hard way that unevenly cut potato wedges lead to some pieces burning while others stay undercooked. Now, I use a sharp knife and take my time to ensure uniform thickness. Another blunder? Skipping the parchment paper—trust me, scraping stuck-on potatoes is no fun. If you’re new to Mediterranean flavors, don’t overdo the spices like I once did; start with a light hand and adjust to taste. For more tips on balancing bold flavors, check out my guide on Mediterranean spice blends. And if your wedges turn out soggy, try patting the potatoes dry before seasoning—moisture is the enemy of crispiness! For extra troubleshooting, my post on perfectly roasted vegetables has saved many of my dishes.
Loaded Mediterranean Potato Wedges carry the vibrant spirit of coastal kitchens, where fresh herbs, tangy cheeses, and sun-ripened ingredients turn humble potatoes into a feast. Originally inspired by Greek and Turkish meze platters, this dish takes crispy potato wedges and tops them with feta, olives, and a drizzle of lemon-infused yogurt. In some regions, cooks swap the feta for halloumi or add roasted red peppers for extra sweetness. Meanwhile, Italian versions might lean into rosemary and Parmesan, proving how versatile these wedges can be.
My family puts its own
spin on Loaded Mediterranean Potato Wedges by tossing the potatoes with za’atar before roasting, a trick I learned from a Lebanese friend. During summer gatherings, we pile them high with diced cucumbers and mint for a refreshing crunch. No matter where you go, though, the heart of the dish stays the same: it’s about sharing bold flavors and turning simple ingredients into something unforgettable.
How it fits in today’s cooking
Today, Loaded Mediterranean Potato Wedges fit perfectly into our love for global comfort food. They’re a hit at casual dinners, game-day spreads, or even as a hearty side for grilled chicken skewers. Busy home cooks appreciate how easily they adapt—swap toppings for seasonal produce or use air-fried wedges for a lighter twist. Plus, they’re a crowd-pleaser for plant-based diets when topped with dairy-free alternatives.
What keeps them relevant? Their flexibility. Whether you’re meal-prepping for the week or hosting a last-minute gathering, these wedges deliver big flavor with minimal effort. Pair them with a crisp salad or serve alongside garlic herb focaccia, and you’ve got a meal that feels both familiar and exciting. In a world where we crave connection through food, Loaded Mediterranean Potato Wedges bridge the gap between tradition and modern convenience.
>Taste and Texture
What makes it delicious
Loaded Mediterranean Potato Wedges deliver a bold, satisfying experience with every bite. The crispy-edged wedges soak up smoky paprika and garlic, while their fluffy centers melt in your mouth. Tangy feta crumbles add a salty creaminess, and briny Kalamata olives bring a punch of umami. Fresh parsley and lemon zest brighten each forkful, cutting through the richness with a zesty finish. Meanwhile, a drizzle of cool tzatziki ties everything together with its refreshing, herby tang. Every layer of Loaded Mediterranean Potato Wedges creates a harmony of textures—crunchy, creamy, and chewy—that keeps you reaching for more.
Boosting the flavor
For an extra flavor kick, try swapping feta for creamy goat cheese or adding a sprinkle of za’atar for earthy depth. A squeeze of fresh lemon juice right before serving enhances the Mediterranean vibes, while a handful of toasted pine nuts adds buttery crunch. If you love bold dips, pair these wedges with a smoky roasted red pepper hummus or a drizzle of garlic herb tahini. Experiment with sun-dried tomatoes or marinated artichokes for even more savory complexity. The possibilities are endless!
Tips for Success
Best practices for results
Always cut your potatoes into even wedges so they cook uniformly. Meanwhile, toss them generously with olive oil and seasoning before baking for maximum flavor. Additionally, roast the Loaded Mediterranean Potato Wedges on the center rack to ensure crisp edges without burning. Finally, let them cool slightly before adding toppings to keep the texture perfect.
Mistakes to avoid
Avoid overcrowding the baking sheet, as this steams the wedges instead of crisping them. Instead, spread them in a single layer with space between each piece. Furthermore, don’t skip preheating the oven—consistent heat guarantees golden-brown results every time. For more on perfect roasting techniques, check out our guide on roasting vegetables. Also, resist adding toppings too early; wait until after baking to preserve crunch. Learn how to balance flavors with our Mediterranean flavor pairing tips.
Serving and Pairing Suggestions
How to serve this dish
Loaded Mediterranean Potato Wedges shine as a vibrant centerpiece for casual gatherings or a hearty side for weeknight dinners. For a stunning presentation, arrange them on a rustic wooden board or a colorful platter, then drizzle extra tzatziki and sprinkle crumbled feta on top. Fresh herbs like parsley or dill add a pop of color and freshness. These wedges also make a fantastic addition to brunch spreads or holiday appetizer tables, especially when paired with other Mediterranean-inspired dishes. To keep things fun, serve them family-style with small bowls of toppings so everyone can customize their bites.
h-it">What goes well with it
Pair Loaded Mediterranean Potato Wedges with a crisp Greek salad for a light yet satisfying meal. The tangy dressing and crunchy veggies balance the richness of the potatoes perfectly. If you love dips, try our creamy hummus recipe for an extra layer of flavor. For drinks, a chilled glass of lemon mint iced tea or a light white wine like Sauvignon Blanc complements the dish’s zesty notes. Craving something heartier? Serve these wedges alongside our grilled lemon herb chicken for a complete Mediterranean feast.
What toppings go best on Loaded Mediterranean Potato Wedges?
Loaded Mediterranean Potato Wedges pair perfectly with toppings like crumbled feta cheese, Kalamata olives, diced cucumbers, and a drizzle of tzatziki sauce. For extra flavor, add chopped fresh herbs like parsley or dill. These toppings enhance the Mediterranean vibe of the dish while keeping it fresh and satisfying.
rank-math-faq-item">
How do you make Loaded Mediterranean Potato Wedges crispy?
To achieve crispy Loaded Mediterranean Potato Wedges, soak the cut wedges in cold water for 30 minutes to remove excess starch, then pat them dry before baking. Toss them in olive oil and bake at 425°F (220°C) on a parchment-lined tray, flipping halfway through. This method ensures a golden, crunchy exterior while keeping the inside tender.
Can you make Loaded Mediterranean Potato Wedges ahead of time?
Yes, you can prep Loaded Mediterranean Potato Wedges ahead by par-baking the wedges and storing them in the fridge for up to 24 hours. When ready to serve, reheat them in the oven until crispy, then add fresh toppings. Avoid adding toppings like tzatziki or herbs until just before serving to maintain texture and flavor.
Are Loaded Mediterranean Potato Wedges gluten-free?
Loaded Mediterranean Potato Wedges are naturally gluten-free if you use gluten-free seasonings and toppings. Always check labels on pre-made ingredients like tzatziki or spice blends to ensure they meet gluten-free standards. This dish is a great option for those avoiding gluten while still enjoying bold Mediterranean flavors.
>
Best Southwest Chicken Salad – Easy & Flavorful Recipe
Introduction
If you’re craving a meal that’s both vibrant and satisfying, you’re in the right place. Today, I’m sharing my take on Southwest Chicken Salad—a dish that bursts with bold flavors and fresh ingredients. Whether you need a quick lunch or a crowd-pleasing dinner, this recipe delivers. Plus, it’s packed with protein and veggies, making it as nutritious as it is delicious. Trust me, one bite and you’ll understand why it’s a staple in my kitchen.
Southwest Chicken Salad combines tender grilled chicken, crisp greens, creamy avocado, and a smoky lime dressing for a meal that’s anything but ordinary. What sets it apart is the perfect balance of textures and flavors, from the juicy corn to the tangy black beans. Not only does it taste incredible, but it also fits seamlessly into busy weeknights or relaxed weekend gatherings. If you love easy, flavorful recipes like my Healthy Meal Prep Ideas, you’ll appreciate how versatile this salad is. It’s a fantastic way to enjoy a restaurant-quality dish at home without the fuss. And if you’re looking for more inspiration, check out my Summer Salad Recipes for fresh twists on classic favorites.
Why I Love This Recipe
This Southwest Chicken Salad holds a special place in my heart because it reminds me of family trips to the Southwest, where bold flavors and fresh ingredients reign. Every time I make it, I’m transported back to those sunlit evenings sharing stories over a hearty meal. It’s more than just a recipe—it’s a celebration of simplicity, flavor, and the joy of cooking for the people you love.
Health and Nutrition
Why it’s good for your body
Southwest Chicken Salad packs a powerful nutritional punch while keeping flavors bold and satisfying. First, the lean chicken breast delivers high-quality protein to help build and repair muscles. Additionally, the black beans and corn add plant-based protein and fiber, which keep you full longer and support digestion. Moreover, the colorful veggies like bell peppers and tomatoes provide antioxidants that fight inflammation.
Beyond protein and fiber, Southwest Chicken Salad offers healthy fats from avocado, which promote heart health and brain function. The olive oil in the dressing also contributes monounsaturated fats, known to lower bad cholesterol. Meanwhile, the spices like cumin and chili powder not only enhance flavor but also boost metabolism and immunity.
Finally, Southwest Chicken Salad balances macronutrients without excessive calories. The combination of protein, fiber, and healthy fats stabilizes blood sugar, making it a great choice for sustained energy. Whether you need a post-workout meal or a light yet filling lunch, this dish covers all the bases.
How it fits in a healthy lifestyle
Southwest Chicken Salad fits seamlessly into a balanced diet, whether you’re focusing on high-protein meals, gluten-free eating, or heart-healthy choices. The lean chicken and beans make it ideal for muscle recovery, while the absence of gluten-containing ingredients ensures it’s safe for those with sensitivities. For meal prep enthusiasts, it stores well and stays fresh for days, making healthy eating convenient.
If you’re tracking macros, Southwest Chicken Salad offers a flexible foundation. You can easily adjust portions or toppings to meet your goals, like adding extra avocado for healthy fats or doubling the chicken for more protein. Pair it with a nutritious side for a complete meal, or enjoy it solo for a light yet satisfying option.
For those prioritizing heart health, the ingredients in Southwest Chicken Salad align perfectly with Mediterranean diet principles. The olive oil, veggies, and lean protein support cardiovascular wellness. If you’re looking for more ways to incorporate balanced meals, check out our guide to easy meal planning to stay on track without sacrificing flavor.
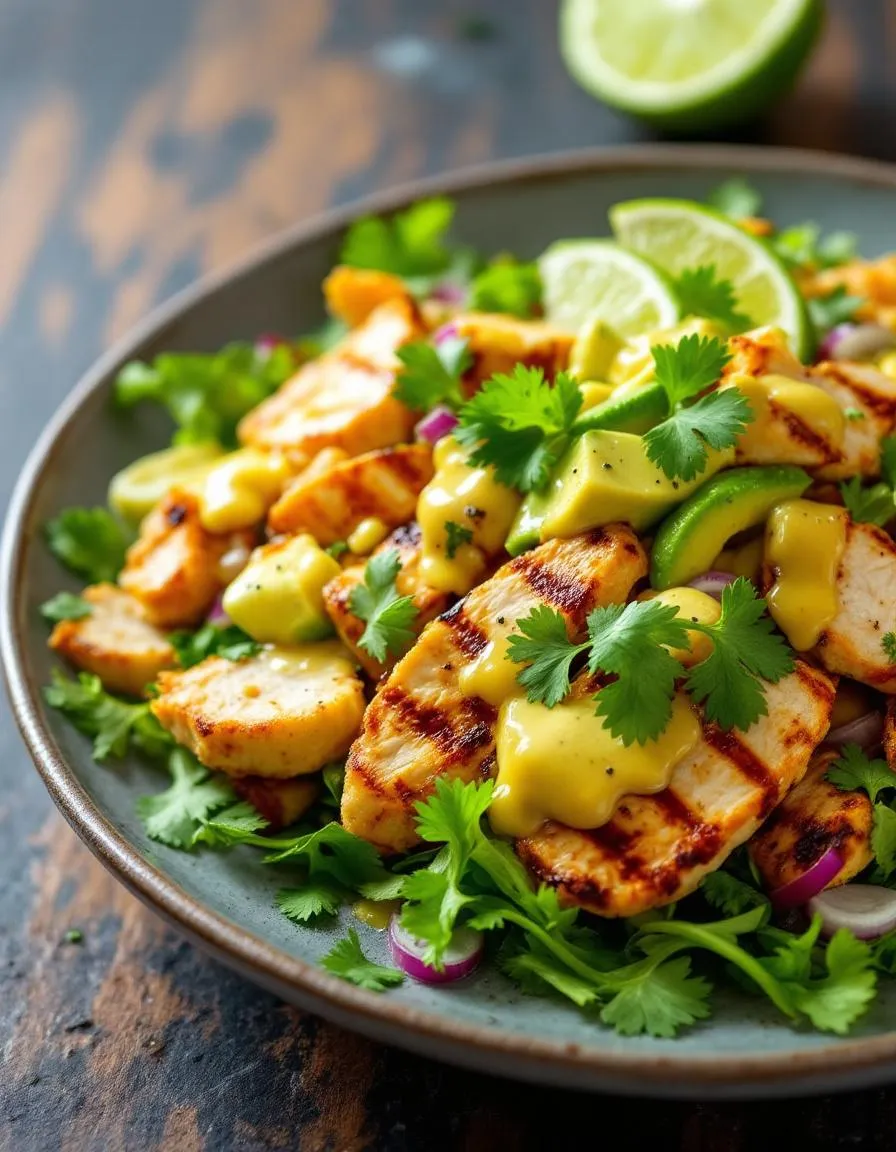
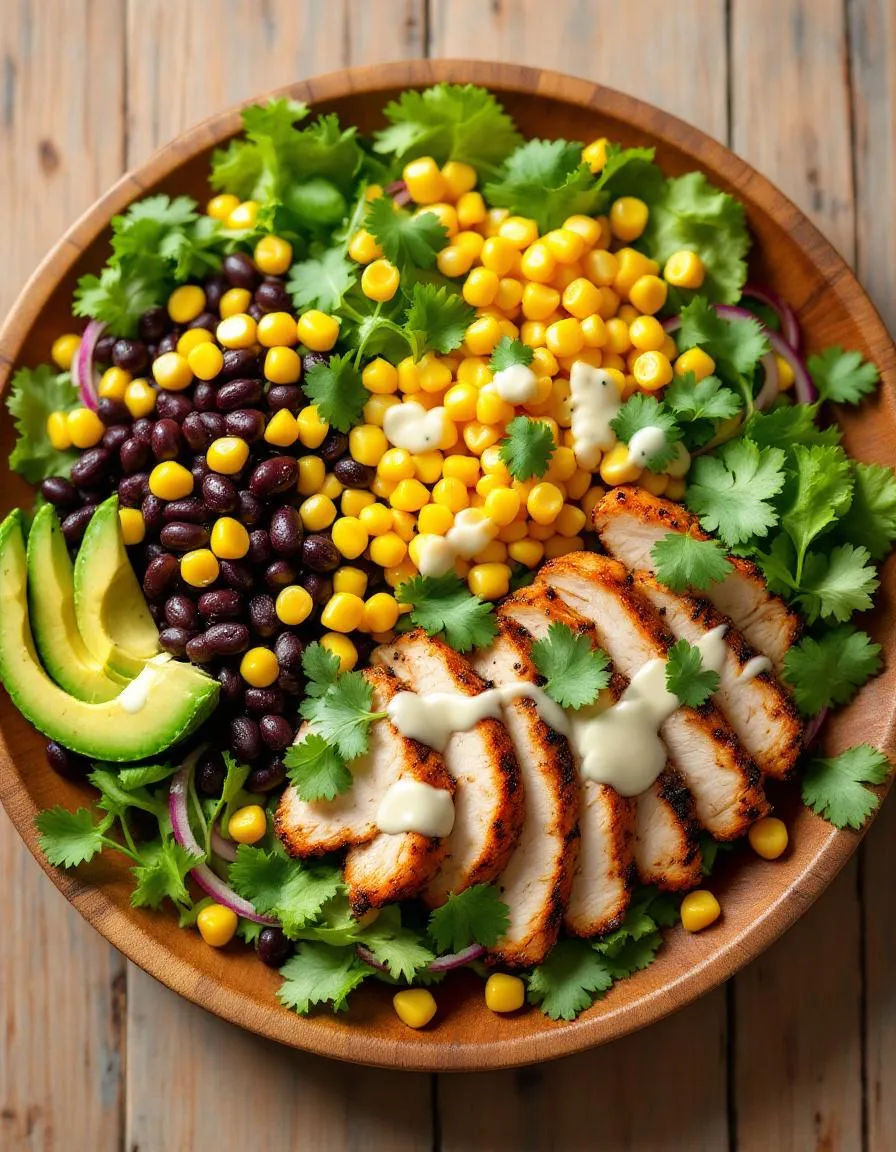
A zesty and colorful salad with grilled chicken, black beans, corn, and avocado, topped with a creamy lime dressing.
Ingredients
Scale
For the Crust:
2 boneless, skinless chicken breasts
1 tbsp olive oil
1 tsp chili powder
1 tsp cumin
1/2 tsp garlic powder
1/2 tsp salt
1/4 tsp black pepper
1 can (15 oz) black beans, rinsed and drained
1 cup corn kernels (fresh or frozen)
1 avocado, diced
1/2 red onion, finely chopped
1/4 cup chopped cilantro
1 lime, juiced
1/4 cup sour cream
4 cups mixed greens
Instructions
1. Prepare the Crust:
Preheat grill or grill pan over medium-high heat. Rub chicken breasts with olive oil and season with chili powder, cumin, garlic powder, salt, and black pepper.
Grill chicken for 6-7 minutes per side, or until fully cooked. Let rest for 5 minutes, then slice into strips.
In a large bowl, combine black beans, corn, avocado, red onion, and cilantro.
In a small bowl, whisk together lime juice and sour cream to make the dressing.
Arrange mixed greens on plates, top with the black bean mixture, sliced chicken, and drizzle with the lime dressing.
Notes
You can customize the seasonings to taste.
How to Prepare This Dish
Steps and time-saving tips
Start by seasoning your chicken breasts with a blend of chili powder, cumin, and garlic salt for that bold Southwest flavor. Heat a skillet over medium-high and cook the chicken until golden and fully cooked, about 6 minutes per side. Let it rest before slicing into strips—this keeps the juices locked in. Meanwhile, toss chopped romaine, black beans, corn, diced tomatoes, and avocado in a large bowl. For a creamy dressing, whisk together lime juice, Greek yogurt, and a dash of hot sauce. Drizzle it over the salad just before serving to keep everything crisp. If you’re short on time, use pre-cooked chicken or a store-bought rotisserie bird. Another trick? Prep the veggies and dressing the night before, then assemble right before eating. The Southwest Chicken Salad stays fresh and vibrant this way, making it perfect for meal prep or a quick dinner.
and-learned-from">Mistakes I’ve made and learned from
Early on, I’d drown my Southwest Chicken Salad in dressing, turning it soggy within minutes. Now, I serve the dressing on the side or add it last minute. Another blunder? Overcooking the chicken, leaving it dry and tough. I’ve since learned to pull it off the heat at 165°F and let it rest—game changer! If you struggle with timing, my meal prep guide has more tricks to streamline cooking. Also, skipping the avocado’s lime squeeze was a regret—it browns fast. For more storage tips, check out my avocado freshness post. Trust me, these small tweaks make all the difference.
Cultural Connection and Variations
Where this recipe comes from
Southwest Chicken Salad bursts with flavors that tell a story of borderland cuisine, where Mexican and American traditions collide. Originating in the sun-drenched regions of Arizona, New Mexico, and Texas, this dish celebrates bold spices, fresh produce, and grilled proteins. Families in the Southwest often pass down their own versions, tweaking the heat level or adding extras like roasted corn or avocado. Meanwhile, in Mexico, you might find a similar salad with more citrusy dressings or extra cilantro.
Beyond North America, c
ultures worldwide put their spin on Southwest Chicken Salad. In Australia, cooks might swap black beans for chickpeas, while in Europe, they often lighten the dressing with yogurt. My grandma’s version always included a smoky chipotle twist, proving how personal this recipe can be. Whether served at summer barbecues or as a hearty winter lunch, Southwest Chicken Salad adapts effortlessly to local tastes and traditions.
How it fits in today’s cooking
Today, Southwest Chicken Salad remains a go-to for busy home cooks and meal-prep enthusiasts. Its balanced mix of protein, veggies, and carbs makes it a weekday superstar, especially for those following healthy meal plans. Modern twists, like adding quinoa or swapping chicken for tofu, keep it fresh for diverse diets. Plus, its vibrant colors and customizable toppings make it a hit at potlucks and weeknight dinners alike.
Seasonally, this salad shines year-round. In summer, it’s a cool, crunchy side for grilled feasts. Come fall, warm roasted veggies give it a cozy upgrade. No matter how you tweak it, Southwest Chicken Salad proves that timeless flavors always find a place at our tables.
>Taste and Texture
What makes it delicious
Southwest Chicken Salad bursts with bold, vibrant flavors and satisfying textures. The juicy, smoky grilled chicken pairs perfectly with crisp romaine lettuce and crunchy tortilla strips, while creamy avocado adds a buttery richness. Tangy lime dressing brightens every bite, and black beans bring a hearty, slightly chewy contrast. Fresh cilantro and a hint of cumin infuse the dish with a fragrant, earthy aroma. Together, these elements make Southwest Chicken Salad a refreshing yet deeply flavorful meal that keeps you coming back for more.
Boosting the flavor
For an extra kick, try tossing your Southwest Chicken Salad with a smoky chipotle dressing or sprinkling crumbled cotija cheese on top. If you love heat, diced jalapeños or a dash of hot sauce will elevate the spice level. Alternatively, roasted corn adds a sweet, charred depth—just like in our Southwest Salad Dressing recipe. For a creamier twist, swap the dressing with avocado lime crema, inspired by our Avocado Lime Dressing. Small tweaks can transform this salad into a whole new experience!
Tips for Success
Best practices for results
Always marinate the chicken for at least 30 minutes to lock in bold Southwest flavors. Meanwhile, chop your vegetables uniformly so every bite of Southwest Chicken Salad has perfect texture. For extra creaminess, blend the dressing until smooth before tossing it with the salad. Finally, refrigerate the assembled dish for 15 minutes to let the flavors meld beautifully.
Mistakes to avoid
Overcooking the chicken will make it dry, so use a meat thermometer to check for 165°F. Additionally, skipping the resting time for the grilled chicken strips can cause them to lose juices—let them sit for 5 minutes before slicing. If your dressing tastes too tangy, balance it with a touch of honey, as explained in our salad dressing guide. Lastly, avoid soggy greens by patting them dry thoroughly, just like we recommend in our crispy salad tips.
Serving and Pairing Suggestions
How to serve this dish
For a vibrant presentation, serve Southwest Chicken Salad in a large wooden bowl or colorful ceramic dish to highlight its fresh ingredients. Top it with extra avocado slices, a sprinkle of cilantro, and a drizzle of lime crema for a restaurant-worthy finish. Alternatively, layer it in mason jars for a portable lunch or picnic option. This dish shines at summer barbecues, potlucks, or even as a light yet satisfying weeknight dinner. To make it extra special, pair it with warm tortilla chips or serve it over crisp romaine for a hearty salad bowl.
h-it">What goes well with it
Cool off with a tangy mango margarita, which balances the smoky flavors of Southwest Chicken Salad perfectly. For a non-alcoholic option, try our refreshing cucumber limeade, a crisp contrast to the dish’s bold spices. If you’re craving sides, roasted sweet potato wedges add a touch of sweetness, while our creamy black bean dip enhances the Southwestern vibe. Finally, round out the meal with a slice of moist cornbread for a comforting touch.
What dressing goes best with Southwest Chicken Salad?
A creamy cilantro lime dressing or a spicy ranch pairs perfectly with Southwest Chicken Salad. For a lighter option, try a simple avocado lime vinaigrette to complement the bold flavors. The dressing should enhance the smoky, tangy notes of the salad without overpowering it.
rank-math-faq-item">
Can I make Southwest Chicken Salad ahead of time?
Yes! Southwest Chicken Salad stores well for up to 3 days if you keep the dressing separate until serving. The flavors often deepen when marinated, making it a great meal prep option. Just add fresh toppings like avocado or tortilla strips right before eating.
Is Southwest Chicken Salad healthy?
Southwest Chicken Salad can be a nutritious choice when loaded with lean protein, veggies, and healthy fats like avocado. Opt for grilled chicken, skip fried toppings, and use a light dressing to keep it balanced. It’s packed with fiber and vitamins from ingredients like black beans and bell peppers.
What protein can I substitute for chicken in Southwest Chicken Salad?
Shredded pork, grilled shrimp, or seasoned tofu work well as alternatives in Southwest Chicken Salad. For a vegetarian twist, try doubling the black beans or adding roasted sweet potatoes. The key is maintaining the Southwest flavors with smoky spices and fresh ingredients.
>
Best Red, White and Blue Trifle Recipe
Introduction
Nothing brings people together quite like a stunning dessert, and that’s exactly why I adore this Red, White and Blue Trifle. Whether you’re hosting a Fourth of July barbecue or simply craving a patriotic treat, this layered masterpiece delivers both flavor and nostalgia. Plus, it’s as fun to assemble as it is to devour. Trust me, one bite will transport you to summer evenings filled with laughter and celebration.
Red, White and Blue Trifle is a showstopping dessert that combines fluffy cake, creamy custard, and fresh berries in perfect harmony. Not only does it look like a festive flag in a bowl, but it also tastes like pure joy. What makes it special is its versatility. You can customize it with your favorite cake flavors or swap in different fruits to suit the season. For busy hosts, the best part is that you can prepare it ahead of time, letting the flavors meld while you focus on other dishes. If you love easy yet impressive desserts, you’ll also enjoy my No-Bake Cheesecake or this Berry Chantilly Cake. Both share the same effortless elegance that makes entertaining a breeze.
Why I Love This Recipe
This Red, White and Blue Trifle holds a special place in my heart because it reminds me of family gatherings under the stars. My grandmother used to make a similar version with whatever berries she had on hand, and I’d always sneak extra spoonfuls when she wasn’t looking. Now, whenever I serve it, I see the same delight in my kids’ eyes. It’s more than just a dessert. It’s a sweet tradition that bridges generations and celebrates the simple pleasures of good food and great company.
Health and Nutrition
Why it’s good for your body
Red, White and Blue Trifle isn’t just a festive dessert—it also packs a surprising nutritional punch. First, the fresh berries in this dish deliver antioxidants, which help combat inflammation and support heart health. Strawberries, blueberries, and raspberries add vibrant color while boosting your vitamin C intake. Plus, the Greek yogurt or whipped cream layers provide a dose of protein and probiotics, aiding digestion and keeping you satisfied longer.
Additionally, Red, White and Blue Trifle balances indulgence with wholesome ingredients. Unlike heavy cakes or cookies, this dessert feels lighter yet still satisfies your sweet tooth. The natural sugars from the fruit reduce the need for excessive added sweeteners. Meanwhile, the layers of angel food cake or sponge cake offer a lower-fat alternative to traditional desserts. Whether you serve it at a party or enjoy a small portion as a treat, this trifle brings both flavor and nutrients to the table.
Finally, Red, White and Blue Trifle encourages mindful eating. The combination of textures and flavors slows you down, helping you savor each bite. With every spoonful, you get fiber from the fruit, calcium from dairy, and energy from balanced carbs. It’s a dessert that tastes decadent but aligns with your wellness goals.
How it fits in a healthy lifestyle
Red, White and Blue Trifle fits seamlessly into a balanced diet when enjoyed in moderation. For gluten-free eaters, simply swap the cake layer for a gluten-free alternative or extra berries. If you’re watching your sugar intake, reduce the syrup or opt for unsweetened yogurt. This dessert also works well as part of a heart-healthy lifestyle, thanks to the berries’ fiber and healthy fats from nuts or coconut toppings.
Pairing this trifle with protein-rich meals, like our grilled chicken salad, ensures a satisfying and nutritious day of eating. For those focusing on gut health, the probiotics in yogurt layers complement fermented foods like our homemade sauerkraut. Whether you’re celebrating or craving a sweet finish to dinner, Red, White and Blue Trifle proves that delicious and nutritious can go hand in hand.
Start by gathering all your ingredients for the Red, White and Blue Trifle to streamline the process. First, whip the heavy cream until stiff peaks form, then gently fold in the vanilla pudding for a light, fluffy texture. Meanwhile, slice the strawberries and rinse the blueberries to ensure they’re ready for layering. If you’re short on time, use store-bought pound cake or angel food cake—just cube it into bite-sized pieces. Next, drizzle the cake cubes with a splash of lemon juice or simple syrup to keep them moist. Now, grab your trifle dish and begin layering: start with cake, then add a generous spread of the cream mixture, followed by a vibrant mix of strawberries and blueberries. Repeat the layers until you reach the top, finishing with a final swirl of cream and a handful of berries for a stunning presentation. Chill the Red, White and Blue Trifle for at least two hours before serving to let the flavors meld. For a quicker set, pop it in the freezer for 30 minutes. Pro tip: Prep the components ahead and assemble just before serving to save time without sacrificing freshness.
Mistakes I’ve made and learned from
I’ll admit, my first attempt at Red, White and Blue Trifle was a soggy mess—I over-soaked the cake, turning it into a mushy disaster. Now, I lightly drizzle the syrup or juice and let it absorb for just a minute before layering. Another blunder? Skipping the chill time. Rushing meant the cream didn’t set, and my layers slid everywhere. Patience pays off! If you’re new to trifles, check out my guide to layering desserts for foolproof tips. Also, I once used under-ripe berries, which threw off the sweetness. Now, I taste-test first or macerate them with a bit of sugar, as I explain in my berry selection post. Trust me, these small tweaks make all the difference between a wobbly mess and a showstopper.
The Red, White and Blue Trifle has roots in British cuisine, where trifles first gained popularity as a layered dessert in the 18th century. Over time, this festive dish crossed the Atlantic and became a star at American celebrations, especially the Fourth of July. Families love how the red berries, white custard, and blue whipped cream mirror the colors of the flag. Meanwhile, in Australia, trifles often feature tropical fruits like mango, while Germans might swap custard for quark. My grandma, however, always added a splash of bourbon to her Red, White and Blue Trifle, making it the talk of every summer potluck.
Interestingly, regional twists keep this dessert exciting. In the South, some cooks layer in banana pudding, while coastal areas might top it with toasted coconut. No matter where you go, though, the Red, White and Blue Trifle stays a crowd-pleaser because it’s endlessly customizable. Whether you use pound cake or sponge cake, fresh berries or jam, the spirit of celebration stays the same.
ays-cooking">How it fits in today’s cooking
Today, the Red, White and Blue Trifle shines as both a nostalgic treat and a modern shortcut. Busy hosts appreciate how they can prep it ahead, like many no-bake desserts, while food bloggers give it a health spin with Greek yogurt instead of custard. It’s also a staple for patriotic holidays, but creative cooks serve it year-round—think Valentine’s Day with raspberries or winter gatherings with sugared cranberries.
Moreover, the trifle fits perfectly into today’s visual food culture. Its vibrant layers pop on Instagram, and swaps like gluten-free cake or dairy-free cream make it inclusive. For more inspiration, check out these easy party desserts that pair well with it. Whether you stick to tradition or experiment, the Red, White and Blue Trifle keeps bringing people together, one spoonful at a time.
Taste and Texture
What makes it delicious
Red, White and Blue Trifle delivers a symphony of flavors and textures in every bite. First, the fluffy layers of vanilla cake soak up the creamy custard, creating a melt-in-your-mouth softness. Meanwhile, juicy strawberries and plump blueberries burst with natural sweetness, balancing the rich, velvety whipped cream. The dessert smells like a summer picnic, with fragrant berries and a hint of vanilla dancing in the air. Every spoonful of Red, White and Blue Trifle feels indulgent yet refreshing, thanks to the contrast between the silky custard and the bright, tangy fruit.
r">Boosting the flavor
For an extra flavor boost, try swapping the vanilla custard for a homemade vanilla pudding—its deeper vanilla notes elevate the entire trifle. Alternatively, sprinkle toasted coconut or crushed almonds between layers for a subtle crunch. If you love citrus, a drizzle of zesty lemon curd adds a tangy twist that complements the berries beautifully. Whether you stick to the classic recipe or experiment, Red, White and Blue Trifle stays a crowd-pleaser.
Tips for Success
Best practices for results
Always layer your Red, White and Blue Trifle evenly to create a balanced bite of cake, fruit, and cream. For the best texture, chill the trifle for at least two hours before serving so the flavors meld together. Additionally, use fresh berries when possible—they add a vibrant taste and color that frozen fruit can’t match. If you want extra stability, lightly coat the cake layers with whipped cream before adding the fruit to prevent sogginess. Finally, garnish with mint leaves for a refreshing finish that complements the sweetness.
>Mistakes to avoid
Avoid over-soaking the cake layers, as they can turn mushy and ruin the trifle’s structure. Instead, lightly brush them with juice or syrup for subtle moisture. Also, don’t skip the chilling step—serving Red, White and Blue Trifle too soon often leads to a runny mess. For more layering tips, check out our guide on how to layer a trifle. Another common mistake is using watery fruit, which can dilute the cream. Pat berries dry before adding them, or learn how to prevent soggy desserts for foolproof results every time.
Serving and Pairing Suggestions
How to serve this dish
Showcase your Red, White and Blue Trifle in a clear glass bowl or individual dessert cups to highlight its vibrant layers. For a festive touch, top it with fresh blueberries, raspberries, and a sprinkle of coconut flakes. This dessert shines at summer barbecues, Fourth of July celebrations, or even as a sweet finale for brunch. Meanwhile, if you want to impress guests, layer it just before serving to keep the textures perfect.
What goes well with it
Pair your Red, White and Blue Trifle with a chilled glass of lemonade or sparkling rosé for a refreshing contrast. Alternatively, serve it alongside our Berry Chia Pudding for a light yet satisfying spread. If you crave something richer, try it with a scoop of vanilla bean ice cream—the creamy sweetness balances the trifle’s fruity layers. For more inspiration, check out our Summer Fruit Salad, which complements the trifle’s fresh flavors beautifully.
What are the best berries to use in a Red, White and Blue Trifle?
For the perfect Red, White and Blue Trifle, use fresh strawberries (red), blueberries (blue), and raspberries or whipped cream (white). These berries hold their shape well and add vibrant color. Avoid overly soft fruits to prevent a soggy trifle.
Can I make Red, White and Blue Trifle ahead of time?
Yes! Assemble your Red, White and Blue Trifle up to 24 hours in advance, but add fresh whipped cream and berries just before serving. This keeps the layers firm and prevents sogginess. It’s a great make-ahead dessert for parties.
rank-math-faq-item">
What’s a good substitute for pound cake in a Red, White and Blue Trifle?
Angel food cake or sponge cake works well as a lighter alternative to pound cake in a Red, White and Blue Trifle. For a gluten-free option, try vanilla-flavored gluten-free cake or ladyfingers. The key is using a sturdy base that soaks up flavors without crumbling.
How do you layer a Red, White and Blue Trifle for maximum visual impact?
Start with cake cubes at the bottom, then add a creamy layer (like pudding or whipped cream), followed by alternating red and blue berries. Repeat layers, finishing with a generous topping of whipped cream and berries. A clear trifle bowl showcases the patriotic colors of your Red, White and Blue Trifle.
Best Rainbow Waffles – Easy Homemade Recipe
Introduction
If you’ve ever wanted to brighten your mornings with something as joyful as a sunrise, you’re in the right place. Today, I’m sharing my beloved Rainbow Waffles Recipe—a dish that turns ordinary breakfasts into celebrations. Whether you’re making them for kids, hosting a brunch, or simply treating yourself, these waffles bring color, flavor, and a little extra happiness to your table. Plus, they’re easier to make than you might think!
Rainbow Waffles Recipe is exactly what it sounds like: fluffy, golden waffles bursting with vibrant colors. Unlike traditional waffles, this version layers each hue separately, creating a stunning visual effect that’s as fun to make as it is to eat. What makes this recipe special isn’t just its appearance—it’s the way it transforms a simple breakfast into a moment of pure joy. Perfect for birthdays, holidays, or just because, these waffles fit right into the playful yet practical spirit of brekcakes.com. If you love creative twists on classic recipes, you’ll also adore my Fluffy Pancakes or Homemade Syrups to pair with them. Trust me, once you try these, you’ll never look at waffles the same way again.
Why I Love This Recipe
Rainbow Waffles Recipe holds a special place in my heart because it reminds me of my niece’s fifth birthday. She asked for “breakfast that looks like a party,” and these waffles delivered. Seeing her eyes light up as she cut into each colorful layer made me realize how food can create unforgettable memories. Now, I make them whenever I need a little extra cheer—because sometimes, happiness starts with a rainbow on your plate.
Health and Nutrition
Why it’s good for your body
Rainbow Waffles Recipe packs a colorful punch of nutrients to fuel your day. First, the whole-grain flour base delivers fiber, which keeps digestion smooth and helps maintain steady energy levels. Additionally, the natural food coloring from fruits and veggies like spinach, beets, and blueberries adds antioxidants that fight inflammation. These vibrant ingredients also provide vitamins A, C, and K, supporting immunity and overall wellness.
Moreover, Rainbow Waffles Recipe includes protein-rich ingredients like eggs or Greek yogurt, which help build and repair muscles. The healthy fats from ingredients like almond butter or coconut oil promote brain health and keep you satisfied longer. Unlike sugary breakfast options, this recipe balances sweetness with wholesome ingredients, so you avoid energy crashes later.
Finally, Rainbow Waffles Recipe makes eating healthy fun. The bright colors encourage kids and adults alike to enjoy nutrient-dense foods without sacrificing flavor. Whether you top them with fresh fruit or a drizzle of honey, you’ll get a delicious meal that nourishes your body from the inside out.
How it fits in a healthy lifestyle
Rainbow Waffles Recipe fits perfectly into a balanced diet. For gluten-free eaters, simply swap the flour for a gluten-free blend like almond or oat flour. If you’re focused on heart health, the recipe’s minimal added sugar and use of unsaturated fats align with heart-smart eating habits. Pair it with a protein-packed smoothie bowl for a complete, energizing breakfast.
Busy mornings? Prep Rainbow Waffles Recipe ahead and freeze them for a quick, wholesome meal. They’re also versatile enough to suit different dietary goals. For extra protein, add a scoop of collagen powder or serve with a side of avocado toast. Whether you’re meal-prepping or enjoying a leisurely weekend brunch, this recipe keeps nutrition simple and satisfying.
Start by preheating your waffle iron so it’s ready when the batter is. Meanwhile, whisk the dry ingredients—flour, sugar, baking powder, and salt—in a large bowl. In another bowl, beat the eggs lightly before adding milk, melted butter, and vanilla. Pour the wet mixture into the dry ingredients and stir just until combined; overmixing makes waffles tough. Divide the batter into separate bowls and stir in gel food coloring for vibrant rainbow waffles. Pro tip: Use a ladle or measuring cup to pour batter evenly onto the hot waffle iron, spreading it slightly to the edges. Close the lid and cook until steam stops escaping, about 3-5 minutes. For extra crispiness, let the waffles rest on a wire rack instead of stacking them. Serve warm with syrup, whipped cream, or fresh fruit. To save time, mix dry ingredients the night before or use a stand mixer for faster blending.
Mistakes I’ve made and learned from
My first batch of rainbow waffles turned out dull because I used liquid food coloring instead of gel, which diluted the batter. Now I swear by gel colors for bold hues. Another blunder? Peeking too soon—I’d lift the waffle iron lid impatiently, tearing the waffles. Waiting for the steam to stop ensures they release cleanly. If your waffles stick, try brushing the iron with oil between batches, like I learned from my fluffy waffle troubleshooting experiments. For perfect texture, avoid overloading the iron; thinner layers cook evenly. And if you’re new to waffle-making, my beginner’s guide covers more pitfalls to skip. Trust me, these tweaks make all the difference!
Rainbow Waffles Recipe brings a burst of joy to the breakfast table, but its roots stretch far beyond just colorful batter. Many cultures celebrate vibrant foods, from Mexico’s pan dulce to India’s Holi festival sweets. While waffles themselves trace back to medieval Europe, the rainbow twist reflects modern creativity. Families worldwide adapt the concept, whether by layering natural dyes like matcha or beet powder or using fruit purees for a healthier spin.
In my kitchen, Rainbow Waffles Recipe became a weekend tradition after my niece begged for “unicorn food.” We experimented with spirulina for blue and turmeric for yellow, laughing over our messy counter. Meanwhile, in Japan, some cooks achieve pastel hues with sakura extracts, while Brazilian versions might feature açaí for deep purple. No matter the method, the goal stays the same: turning a simple meal into a celebration.
ays-cooking">How it fits in today’s cooking
Today, Rainbow Waffles Recipe fits perfectly into our love for Instagram-worthy brunches and kid-friendly cooking. Busy parents appreciate how easily the batter adapts to meal prep, freezing well for quick weekday treats. Health-conscious cooks swap artificial dyes for superfood powders, blending them into protein-packed batters without losing the fun.
Seasonally, these waffles shine at pride parades, Easter gatherings, or even as a surprise snow-day pick-me-up. Food bloggers keep reinventing them, too—think matcha swirls or ombre layers for bridal showers. Whether you stick to tradition or go wild with toppings, Rainbow Waffles Recipe proves that food should be as joyful as it is nourishing.
Taste and Texture
What makes it delicious
Rainbow Waffles Recipe delivers a burst of joy with every bite. The golden exterior crisps perfectly, giving way to a fluffy, cloud-like center. Vibrant colors hint at subtle vanilla sweetness, while a hint of butter adds richness. Each bite feels light yet satisfying, with a slight chewiness that keeps you coming back. Meanwhile, the aroma of warm batter and caramelized edges fills the air, making it irresistible. Rainbow Waffles Recipe shines because of its playful balance—sweet but not overwhelming, crisp yet tender, and visually stunning.
r">Boosting the flavor
For an extra flavor kick, try folding mini chocolate chips or rainbow sprinkles into the batter before cooking. Alternatively, drizzle your waffles with homemade caramel sauce for a buttery depth, or top with fresh berries for a tangy contrast. A dusting of powdered sugar or a scoop of vanilla bean ice cream elevates the experience even further. Experiment with spices like cinnamon or nutmeg in the batter for a cozy twist. The possibilities are endless!
Tips for Success
Best practices for results
Always preheat your waffle iron thoroughly before pouring the batter for your Rainbow Waffles Recipe. This ensures even cooking and crisp edges. Additionally, use gel food coloring instead of liquid for vibrant, streak-free hues. Meanwhile, lightly grease the iron between batches to prevent sticking without altering the texture. For fluffier results, let the batter rest for 5 minutes before cooking. Finally, serve the waffles immediately to maintain their signature crunch.
>Mistakes to avoid
Avoid overmixing the batter, as this can make your Rainbow Waffles Recipe dense instead of light. Instead, gently fold the wet and dry ingredients until just combined. Another common error is overcrowding the waffle iron, which leads to uneven cooking. For perfect portions, follow the manufacturer’s guidelines on batter quantity. If you struggle with soggy waffles, check out our guide on how to keep waffles crispy. Also, resist the urge to peek too early—wait for the steam to slow before opening. For more troubleshooting, explore our tips on fixing soggy waffles.
Serving and Pairing Suggestions
How to serve this dish
Brighten up any breakfast or brunch table with these vibrant Rainbow Waffles Recipe. For a stunning presentation, stack them high and drizzle with maple syrup or honey to let the colors pop. Alternatively, arrange them in a fan shape on a large platter for a festive touch at birthday parties or holiday gatherings. Top with fresh berries, whipped cream, or a dusting of powdered sugar to enhance both flavor and visual appeal. Whether you serve them as a weekend treat or a special occasion centerpiece, these waffles will delight both kids and adults.
What goes well with it
Pair your Rainbow Waffles Recipe with a refreshing glass of homemade strawberry lemonade for a sweet and tangy contrast. If you prefer something richer, try a creamy vanilla latte or hot chocolate to balance the waffles’ playful flavors. For a heartier meal, serve them alongside crispy bacon or scrambled eggs. Don’t forget to explore our fluffy buttermilk pancakes or crispy hash browns for more brunch inspiration. Each pairing adds a delicious twist to your colorful waffle experience.
How do you make rainbow waffles without food coloring?
You can create natural rainbow waffles by using colorful ingredients like beet powder (red), turmeric (yellow), matcha (green), and blue spirulina (blue). Layer or swirl the colored batters before cooking for a vibrant Rainbow Waffles Recipe that’s free from artificial dyes.
What’s the best waffle batter consistency for rainbow waffles?
A slightly thick batter works best for rainbow waffles to prevent colors from bleeding together. Aim for a pancake-like consistency—thick enough to hold its shape but fluid enough to spread evenly in the waffle iron for perfect Rainbow Waffles Recipe results.
rank-math-faq-item">
Can you make rainbow waffles ahead of time?
Yes! Cook and cool your rainbow waffles completely, then freeze them in a single layer for up to 2 months. Reheat in a toaster for crispy results—this makes your Rainbow Waffles Recipe perfect for quick breakfasts or meal prep.
What toppings go well with rainbow waffles?
Keep toppings light to showcase the colors—try whipped cream, fresh berries, or a drizzle of white chocolate. For extra fun, match toppings to the rainbow layers in your Rainbow Waffles Recipe (like strawberries with red batter sections).
Best Air Fryer Zucchini Fries – Crispy & Easy Recipe
Introduction
If you’re craving a crispy, guilt-free snack that’s packed with flavor, you’re in the right place. Air Fryer Zucchini Fries have become a staple in my kitchen, and I can’t wait to share why they’re such a game-changer. Whether you’re looking for a quick appetizer or a fun side dish, these golden fries deliver crunch without the guilt. Plus, they’re a fantastic way to sneak more veggies into your day—something my family always appreciates!
Air Fryer Zucchini Fries are exactly what they sound like: tender zucchini strips coated in a crispy, seasoned breading and cooked to perfection in the air fryer. Unlike traditional deep-fried versions, they use little to no oil, making them a healthier alternative without sacrificing texture. This recipe matters because it proves that eating well doesn’t mean giving up on indulgence. It fits perfectly with brekcakes.com’s mission to create approachable, wholesome recipes that everyone can enjoy. For more inspiration, check out my favorite air fryer recipes or explore other healthy snack ideas that keep flavor front and center.
Why I Love This Recipe
Air Fryer Zucchini Fries hold a special place in my heart because they remind me of summer evenings spent with my grandparents. They grew zucchini in their garden, and we’d turn the harvest into all kinds of dishes. These fries capture that same simplicity and joy, but with a modern twist. Every time I make them, I’m transported back to those moments—proof that food isn’t just about nourishment, but also about the memories we create around it.
Health and Nutrition
Why it’s good for your body
Air Fryer Zucchini Fries pack a nutritious punch while satisfying your craving for something crispy. First, zucchini delivers a hefty dose of vitamins A and C, which boost immunity and support healthy skin. Unlike traditional fries, these air-fried zucchini sticks skip the heavy oil, cutting calories without sacrificing crunch. Plus, zucchini’s high water content keeps you hydrated and helps you feel full longer.
Another benefit of Air Fryer Zucchini Fries is their fiber content. Fiber aids digestion and stabilizes blood sugar levels, making them a smarter choice for sustained energy. Additionally, air frying preserves more nutrients than deep frying, so you get more vitamins and antioxidants in every bite. If you’re watching your sodium intake, you can easily control the seasoning to keep these fries heart-healthy.
Finally, Air Fryer Zucchini Fries offer a clever way to sneak more veggies into your diet. Kids and picky eaters often enjoy the crispy texture, making it easier to meet daily vegetable goals. Whether you serve them as a snack or a side, these fries turn a simple vegetable into a crowd-pleasing favorite.
How it fits in a healthy lifestyle
Air Fryer Zucchini Fries fit seamlessly into a balanced diet. They work well for gluten-free eaters since you can use almond flour or breadcrumbs instead of traditional coatings. If you’re aiming for a heart-healthy meal, pair them with a lean protein like grilled chicken or baked salmon. The light preparation also makes them ideal for weight management, offering a satisfying alternative to greasy snacks.
For meal preppers, these fries store and reheat easily, so you can enjoy them throughout the week. They also complement other veggie-forward dishes, like a colorful summer vegetable salad or a protein-packed quinoa bowl. Whether you’re following a specific diet or just want a smarter snack, Air Fryer Zucchini Fries keep your meals fresh and nutritious.
Crispy, golden zucchini fries made in the air fryer for a healthier alternative to traditional fries.
Ingredients
Scale
For the Crust:
2 medium zucchinis, cut into fries
1/2 cup breadcrumbs
1/4 cup grated Parmesan cheese
1 teaspoon garlic powder
1/2 teaspoon paprika
1/4 teaspoon salt
1/4 teaspoon black pepper
2 eggs, beaten
Cooking spray
Instructions
1. Prepare the Crust:
Preheat the air fryer to 400°F (200°C).
In a shallow bowl, mix breadcrumbs, Parmesan cheese, garlic powder, paprika, salt, and black pepper.
Dip zucchini fries into the beaten eggs, then coat with the breadcrumb mixture.
Place the coated zucchini fries in the air fryer basket in a single layer, making sure they don’t overlap. Lightly spray with cooking spray.
Air fry for 10-12 minutes, flipping halfway through, until golden and crispy.
Serve immediately with your favorite dipping sauce.
Notes
You can customize the seasonings to taste.
“`html
s-dish">How to Prepare This Dish
Steps and time-saving tips
Start by slicing your zucchini into even, fry-sized sticks—about ¼-inch thick. This ensures they cook uniformly in the air fryer. Next, set up your breading station with three shallow bowls: one for flour, one for beaten eggs, and one for a mix of breadcrumbs, Parmesan, and seasonings. Dredge each zucchini stick in the flour first, shaking off excess, then dip it into the egg, and finally coat it thoroughly in the breadcrumb mixture. For extra crispiness, lightly spray the coated fries with olive oil before air frying. Preheat your air fryer to 400°F for 3 minutes, then arrange the zucchini fries in a single layer, leaving space between them. Air fry for 8-10 minutes, flipping halfway, until golden and crispy. If you’re short on time, prep the zucchini sticks ahead and refrigerate them for up to an hour before air frying. Serve immediately with a side of marinara or ranch dressing for dipping.
Mistakes I’ve made and learned from
I’ve learned the hard way that overcrowding the air fryer basket leads to soggy zucchini fries. Early on, I’d pile them in, only to end up with unevenly cooked results. Now, I cook in batches—it’s worth the extra few minutes for perfect crispiness. Another lesson? Don’t skip the flour step! Once, I tried coating the zucchini directly in egg, and the breadcrumbs slid right off. For more air fryer troubleshooting, check out my guide on common air fryer mistakes. Also, if your zucchini fries turn out too soft, you might be using overly thick slices. For ideal veggie prep, my knife skills tutorial covers how to cut zucchini evenly every time.
Air Fryer Zucchini Fries might feel like a modern twist on a classic snack, but their roots stretch back to Mediterranean and Southern European kitchens. Farmers often battered and fried seasonal zucchini as a quick, flavorful way to use up summer harvests. In Italy, they call them “frittelle di zucchine,” often served with a squeeze of lemon or a dollop of herbed yogurt. Meanwhile, in Greece, cooks might toss them with oregano and feta for extra tang.
My grandma put her own spin on Air Fryer Zucchini Fries by using cornmeal instead of breadcrumbs for extra crunch. She’d say the secret was letting the zucchini sweat first to avoid sogginess. Today, you’ll find regional riffs everywhere—some cooks add Parmesan, others swear by panko, and a few even sneak in chili flakes for heat. No matter the variation, the goal stays the same: crispy, golden bites that make veggies irresistible.
ays-cooking">How it fits in today’s cooking
Air Fryer Zucchini Fries fit perfectly into today’s crave for healthier, fuss-free comfort food. Busy parents love them as a sneaky way to get kids to eat greens, while meal preppers stash batches for easy weeknight sides. Since air fryers cut oil without sacrificing crunch, they’ve become a staple for guilt-free snacking. Plus, they’re a hit at summer potlucks alongside grilled mains or stacked on fresh salads for extra texture.
Modern twists keep the recipe fresh too. Some swap traditional flour for almond meal, while others dunk fries in sriracha mayo instead of ketchup. Whether you’re serving them as game-day appetizers or a light lunch, Air Fryer Zucchini Fries prove that old-school flavors can thrive in today’s kitchens.
Taste and Texture
What makes it delicious
Air Fryer Zucchini Fries deliver a crave-worthy contrast of textures and flavors. The outside turns golden and irresistibly crisp, while the inside stays tender and almost creamy. Lightly seasoned with garlic and Parmesan, each bite offers a savory, umami-rich punch. Meanwhile, the natural sweetness of fresh zucchini shines through, balanced by a subtle earthiness. Best of all, the air fryer locks in moisture, so every piece feels satisfyingly juicy without greasiness. Serve them hot, and you’ll catch the warm, toasty aroma of breadcrumbs mingling with herbs—making Air Fryer Zucchini Fries impossible to resist.
r">Boosting the flavor
Elevate your Air Fryer Zucchini Fries with bold twists. For extra zing, toss them in lemon zest and a pinch of chili flakes before air frying. Alternatively, swap Parmesan for smoked Gouda to add a deeper, smoky note. Pair them with a creamy dipping sauce like garlic ranch dressing or a tangy sriracha mayo for a cooling or spicy kick. Fresh herbs like dill or basil also brighten the flavor, while a sprinkle of nutritional yeast boosts cheesiness without dairy. Get creative—every tweak makes these fries even more addictive.
Tips for Success
Best practices for results
Pat the zucchini dry before coating to help the breading stick better. Meanwhile, always preheat your air fryer for a few minutes to ensure even cooking. For extra crispiness, lightly spray the Air Fryer Zucchini Fries with oil after arranging them in a single layer. Additionally, shake the basket halfway through cooking to prevent sticking and promote browning. Finally, serve them immediately for the best texture.
>Mistakes to avoid
Avoid overcrowding the air fryer basket, as this steams the fries instead of crisping them. Instead, cook in batches if needed. Also, skip skipping the drying step, since excess moisture makes the coating soggy. For more air fryer troubleshooting, check out our guide on common air fryer mistakes. Furthermore, don’t forget to season well—bland zucchini benefits from spices like those in our favorite seasoning blends.
Serving and Pairing Suggestions
How to serve this dish
For a fun twist, serve Air Fryer Zucchini Fries in a paper-lined basket or on a wooden board for a casual, shareable vibe. Meanwhile, if you want to elevate the presentation, arrange them in a spiral on a sleek white plate with a side of dipping sauce drizzled artistically around the edges. These crispy fries shine at summer barbecues, game-day gatherings, or even as a light appetizer before dinner. To add color, sprinkle fresh parsley or grated Parmesan on top right before serving. Kids and adults alike will love the crunch and flavor.
What goes well with it
Pair Air Fryer Zucchini Fries with a creamy garlic aioli or spicy sriracha mayo for dipping—their crisp texture balances perfectly with rich, tangy sauces. For a heartier meal, serve them alongside a juicy air fryer burger or a fresh garden salad. If you’re hosting a brunch, they complement fluffy buttermilk pancakes surprisingly well, adding a savory contrast to sweet maple syrup. Finally, a chilled lemonade or crisp lager ties everything together for a refreshing finish.
How long do you cook zucchini fries in an air fryer?
Air Fryer Zucchini Fries typically take 10–12 minutes at 400°F (200°C). Flip them halfway through for even crispiness. Cooking time may vary slightly depending on your air fryer model and how thick you cut the zucchini.
Do you need to bread zucchini fries for the air fryer?
Yes, breading helps Air Fryer Zucchini Fries get crispy. A light coating of breadcrumbs or panko mixed with Parmesan works best. For a healthier option, you can use almond flour or skip breading altogether, though the fries will be less crunchy.
rank-math-faq-item">
Why are my air fryer zucchini fries soggy?
Soggy Air Fryer Zucchini Fries often result from overcrowding the basket or skipping the pre-salting step. Pat the zucchini dry after salting to remove excess moisture, and cook in batches if needed. Higher heat (400°F+) also helps achieve crispiness.
What dipping sauces go well with air fryer zucchini fries?
Air Fryer Zucchini Fries pair perfectly with marinara, ranch, or garlic aioli. For a spicy kick, try sriracha mayo, or mix Greek yogurt with lemon and dill for a lighter option. The mild flavor of zucchini complements both creamy and tangy dips.