Best Gingerbread Men Pancakes – Easy Holiday Recipe
Introduction
There’s something undeniably special about waking up to the cozy aroma of warm spices filling the air. If you’re looking for a breakfast that feels like a hug, these Gingerbread Men Pancakes will steal your heart. Not only do they bring festive cheer to any morning, but they also let you savor the nostalgic flavors of the holidays year-round. Whether you’re baking with kids or treating yourself to a whimsical meal, this recipe promises joy in every bite.
Gingerbread Men Pancakes are a playful twist on classic pancakes, infused with molasses, cinnamon, and ginger to capture the essence of everyone’s favorite holiday cookie. What makes them stand out? They’re fun to make, even more fun to decorate, and deliver that perfect balance of sweetness and spice. Unlike traditional pancakes, these little guys come to life with simple toppings like icing eyes and candy buttons, making them a hit with both kids and adults. If you’ve ever tried my Fluffy Buttermilk Pancakes, you’ll love how this recipe builds on that same light, airy texture while adding a festive kick. Plus, they’re a fantastic way to introduce seasonal flavors without waiting for December—because who says gingerbread should be limited to Christmas? For more creative breakfast ideas, check out my Cinnamon Roll Pancakes, another family favorite that turns ordinary mornings into something extraordinary.
Why I Love This Recipe
Gingerbread Men Pancakes hold a special place in my heart because they remind me of baking with my grandma during the holidays. She taught me that food isn’t just about taste—it’s about creating memories. Now, whenever I make these pancakes, I feel that same childlike wonder, especially when I see the smiles they bring to my own family’s faces. They’re more than just a meal; they’re a little edible celebration of love and tradition.
Health and Nutrition
Why it’s good for your body
Gingerbread Men Pancakes pack a flavorful punch while offering surprising health perks. First, the warming spices like ginger and cinnamon boost digestion and reduce inflammation. Additionally, these spices add natural sweetness, so you can cut back on refined sugar without sacrificing taste. Moreover, the whole wheat or oat flour in many recipes provides fiber, which keeps you full longer and supports gut health.
Beyond spices, Gingerbread Men Pancakes often include nutrient-rich ingredients like molasses. This sticky sweetener delivers iron and calcium, which are essential for energy and bone strength. Meanwhile, eggs or plant-based alternatives in the batter contribute protein, helping to stabilize blood sugar levels. As a result, you get a satisfying breakfast that fuels your morning without a crash.
Finally, these pancakes are versatile. You can easily tweak them to fit dietary needs, like using almond flour for a gluten-free version. Whether you top them with Greek yogurt or fresh fruit, Gingerbread Men Pancakes turn a treat into a balanced meal. With every bite, you’re enjoying comfort food that loves you back.
How it fits in a healthy lifestyle
Gingerbread Men Pancakes fit seamlessly into a balanced diet when you pair them with smart choices. For a protein boost, try adding a dollop of nut butter or a side of scrambled eggs. If you’re watching sugar intake, skip the syrup and opt for mashed bananas or a drizzle of honey instead.
These pancakes also work well for meal prep. Make a batch ahead and freeze them for quick weekday breakfasts. For gluten-free eaters, swap regular flour with our favorite gluten-free pancake mix. If you’re focused on heart health, use heart-smart oils like avocado oil in the batter. For more ideas on balancing indulgences, check out our tips for healthy breakfast swaps.
Ultimately, Gingerbread Men Pancakes prove that nutritious eating doesn’t mean skipping fun flavors. With mindful tweaks, they become a guilt-free part of your routine.
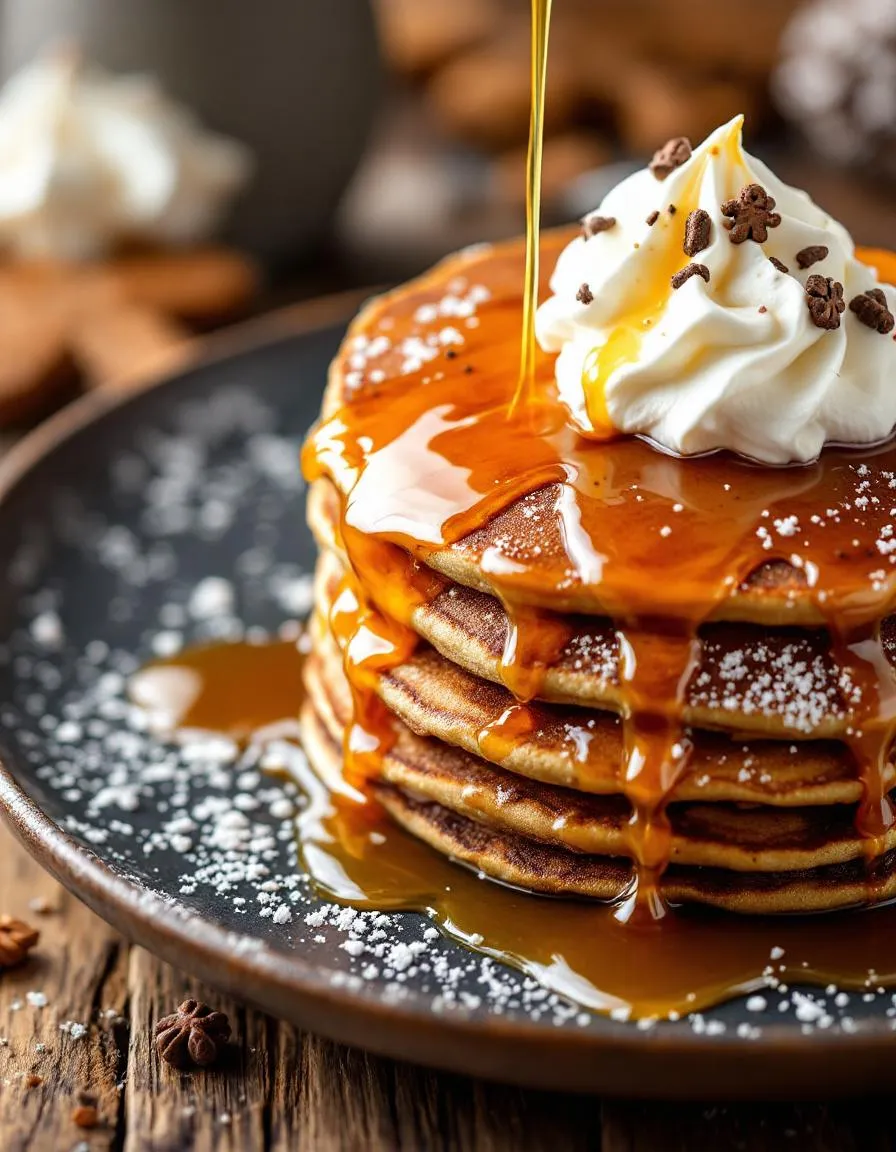
Festive and flavorful gingerbread men-shaped pancakes perfect for holiday breakfasts.
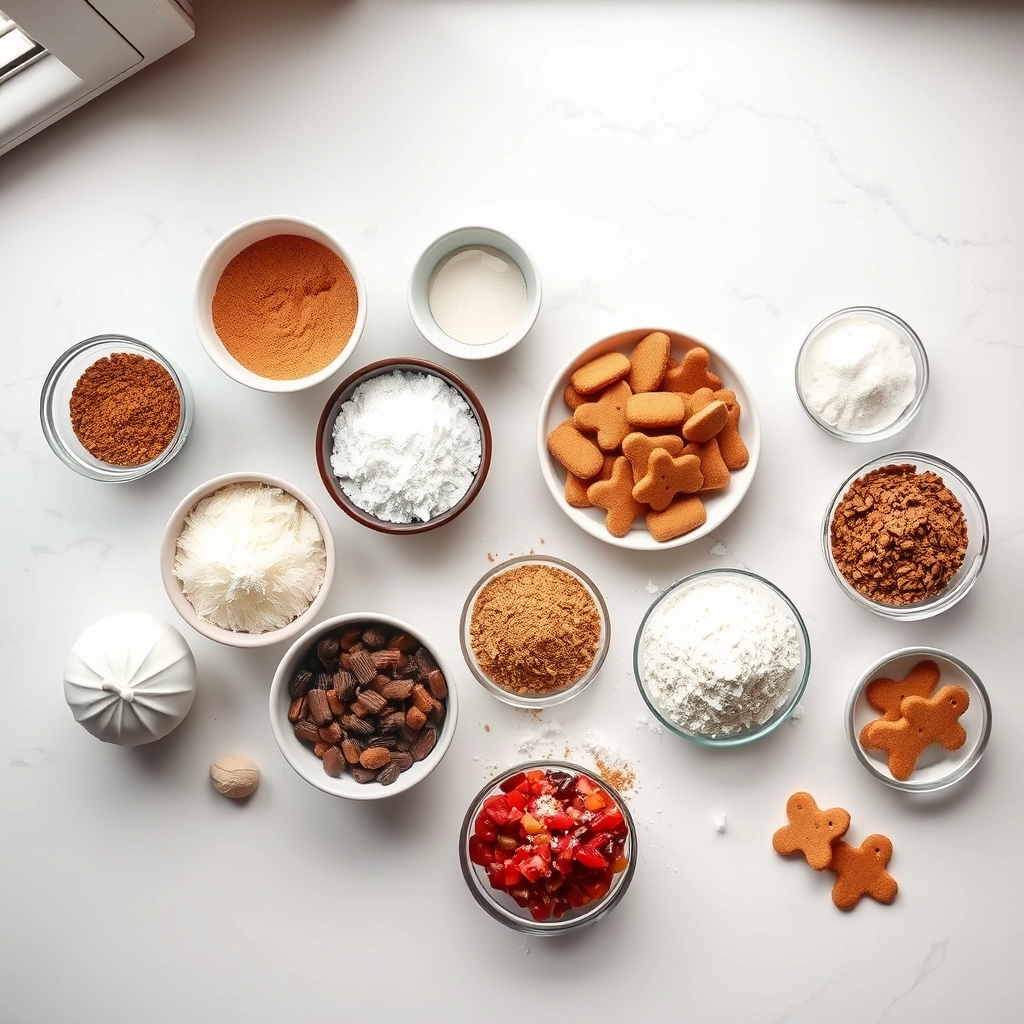
Ingredients
Scale
For the Crust:
1 1/2 cups all-purpose flour
1 tsp baking powder
1/2 tsp baking soda
1 tsp ground ginger
1 tsp ground cinnamon
1/4 tsp ground cloves
1/4 tsp salt
1 large egg
1/4 cup molasses
1 1/4 cups buttermilk
2 tbsp melted butter
1 tbsp brown sugar
Cooking spray or extra butter for greasing
Instructions
1. Prepare the Crust:
In a large bowl, whisk together flour, baking powder, baking soda, ginger, cinnamon, cloves, and salt.
In another bowl, beat the egg, then mix in molasses, buttermilk, melted butter, and brown sugar until smooth.
Pour the wet ingredients into the dry ingredients and stir until just combined. Let the batter rest for 5 minutes.
Heat a griddle or non-stick pan over medium heat. Lightly grease with cooking spray or butter.
Pour batter into a squeeze bottle or piping bag and pipe gingerbread men shapes onto the griddle.
Cook until bubbles form on the surface, then flip and cook the other side until golden brown.
Serve warm with maple syrup or whipped cream.
Notes
You can customize the seasonings to taste.
How to Prepare This Dish
Steps and time-saving tips
Start by whisking together the dry ingredients—flour, baking powder, ginger, cinnamon, and a pinch of salt—in a large bowl. Meanwhile, melt the butter and let it cool slightly before mixing it with milk, an egg, and molasses in a separate bowl. Pour the wet ingredients into the dry mixture and gently stir until just combined; overmixing will make your Gingerbread Men Pancakes tough. Heat a nonstick skillet or griddle over medium-low heat and lightly grease it with butter or oil. Pour small circles of batter to form the heads, then add elongated dollops for the arms and legs. Cook until bubbles form on the surface, then flip carefully with a spatula. For a time-saving trick, use a squeeze bottle to control the batter flow and perfect those gingerbread shapes. Keep finished pancakes warm in a low oven while you cook the rest. Serve with a drizzle of maple syrup or a dusting of powdered sugar for extra charm.
and-learned-from">Mistakes I’ve made and learned from
My first batch of Gingerbread Men Pancakes turned into lumpy blobs because I rushed the batter—turns out, letting it rest for 5 minutes helps the flour hydrate and prevents uneven cooking. Another time, I cranked the heat too high, scorching the edges before the centers cooked through. Now I swear by medium-low heat and patience, just like I use for my Fluffy Buttermilk Pancakes. And if your shapes go rogue? No stress! A cookie cutter can tidy them up post-cooking, or embrace the whimsy like I did with these Imperfect Pancake Art ideas. The key is to have fun and remember—even misshapen gingerbread tastes delicious.
Cultural Connection and Variations
Where this recipe comes from
Gingerbread Men Pancakes weave together the cozy charm of holiday traditions with the everyday joy of breakfast. Originating from European gingerbread customs, this playful twist transforms classic cookie shapes into fluffy, spiced pancakes. Families in Germany and Scandinavia often bake gingerbread during winter festivals, but flipping them into pancake form adds a whimsical breakfast twist. Meanwhile, in the U.S., creative home cooks love adapting the recipe—some add molasses for depth, while others swap cinnamon for cardamom to match their pantry staples.
Across cultures, Ginger
bread Men Pancakes take on unique personalities. In Sweden, cooks might top them with lingonberry jam for a tart contrast. Down South, a drizzle of bourbon-infused syrup turns them into a grown-up treat. My grandma, for instance, always sneaked orange zest into the batter, claiming it brightened the spices. Whether you stick to tradition or riff on flavors, these pancakes carry the warmth of shared stories—one bite at a time.
How it fits in today’s cooking
Today, Gingerbread Men Pancakes bridge nostalgia and modern convenience. Busy parents stack them as festive weekend treats, while food bloggers spotlight them as holiday breakfast showstoppers. Thanks to pre-mixed spice blends and pancake molds, even beginners can nail the recipe. Plus, health-conscious cooks tweak them with whole-grain flour or plant-based milk, proving tradition can adapt without losing soul.
Beyond December, these pancakes sneak into year-round rotations. Some serve them as comfort food classics during rainy mornings, while others miniaturize them for toddler-friendly brunches. However you enjoy them, Gingerbread Men Pancakes remind us that food connects—whether through heritage, creativity, or simply the joy of a syrup-drenched smile on a plate.
>Taste and Texture
What makes it delicious
Gingerbread Men Pancakes deliver a warm, spiced aroma that fills the kitchen with holiday nostalgia. Each bite combines fluffy, tender pancake layers with the rich, molasses-kissed flavor of gingerbread. The subtle heat from cinnamon and ginger lingers on your tongue, while a hint of brown sugar adds caramel-like sweetness. Meanwhile, the edges crisp up slightly, creating a delightful contrast to the soft, pillowy centers. Whether drizzled with syrup or enjoyed plain, Gingerbread Men Pancakes bring cozy comfort to every forkful.
Boosting the flavor
For an extra flavor boost, try folding minced crystallized ginger into the batter for a spicy, chewy surprise. A dollop of whipped cinnamon honey butter melts beautifully over the warm Gingerbread Men Pancakes, amplifying their warmth. If you love texture, sprinkle crushed pecans or candied walnuts on top for a nutty crunch. Pair them with a spiced maple syrup or our homemade caramel sauce for a decadent twist. For more pancake inspiration, explore our guide to fluffy pancake secrets to perfect your technique.
Tips for Success
Best practices for results
Always measure your dry ingredients precisely for Gingerbread Men Pancakes, as too much flour can make them dense. Meanwhile, heat your griddle or pan over medium-low heat to prevent burning before the batter cooks through. Additionally, let the batter rest for 5 minutes after mixing to activate the leavening agents for fluffier results. Finally, use a squeeze bottle or piping bag to shape your Gingerbread Men Pancakes neatly—this ensures crisp edges and even cooking.
Mistakes to avoid
Avoid overmixing the batter, as this develops gluten and leads to tough Gingerbread Men Pancakes. Instead, gently fold the wet and dry ingredients until just combined. Furthermore, don’t flip the pancakes too early—wait for bubbles to form on the surface, just like with classic fluffy pancakes. Also, skip the high heat; gingerbread batter browns faster than regular pancake batter, so keep the temperature moderate. For more troubleshooting, check our guide to perfect pancake texture every time.
Serving and Pairing Suggestions
How to serve this dish
Turn your Gingerbread Men Pancakes into a festive centerpiece by stacking them playfully on a large platter. Drizzle warm maple syrup over the top and sprinkle powdered sugar for a snowy effect. Meanwhile, for holiday brunches, arrange them around a bowl of whipped cream or yogurt for dipping. If you’re serving kids, add mini chocolate chips as buttons or eyes to make the pancakes even more fun. These charming Gingerbread Men Pancakes also shine at winter gatherings, especially when paired with seasonal decor like cinnamon sticks or fresh cranberries.
h-it">What goes well with it
Pair your Gingerbread Men Pancakes with a spiced chai latte for a cozy flavor match. The warm spices in both the pancakes and the drink create a harmonious winter treat. Alternatively, try them with a scoop of vanilla bean ice cream for a decadent twist. For a balanced brunch, serve them alongside crispy air fryer bacon or fresh fruit salad. If you love sweet and savory combos, our cinnamon roll pancakes make a delightful addition to the spread.
How do you make gingerbread men pancakes from scratch?
To make gingerbread men pancakes, mix flour, baking powder, ginger, cinnamon, and nutmeg in a bowl. Combine wet ingredients like molasses, milk, and egg, then stir into the dry mix. Cook the batter on a griddle in gingerbread man shapes for festive, spiced pancakes.
rank-math-faq-item">
Can you use cookie cutters for gingerbread men pancakes?
Yes! Place metal gingerbread man cookie cutters on a greased griddle, pour batter inside, and cook until bubbles form. Remove the cutter carefully before flipping. This method ensures perfect gingerbread men pancakes every time.
What toppings go well with gingerbread men pancakes?
Gingerbread men pancakes pair beautifully with whipped cream, maple syrup, or a dusting of powdered sugar. For extra flavor, add candied ginger, cinnamon butter, or a drizzle of caramel to enhance the spiced taste.
Are gingerbread men pancakes kid-friendly?
Absolutely! Kids love the fun shapes and warm spices in gingerbread men pancakes. They’re a hit for holiday breakfasts or themed parties, and you can even let little ones decorate them with edible markers or sprinkles.
>
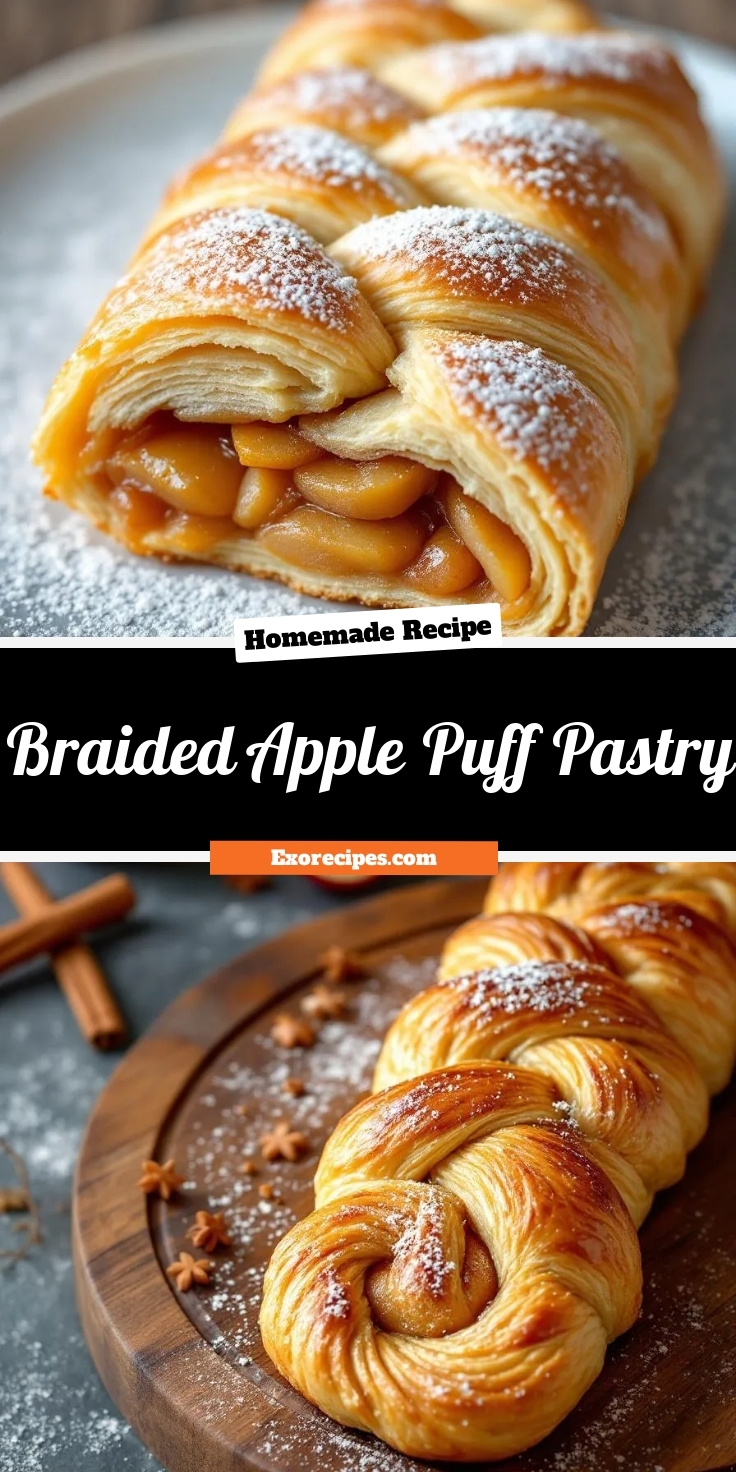
Easy Braided Apple Puff Pastry – Quick Dessert Recipe
Introduction
There’s something undeniably comforting about the aroma of baked apples and buttery pastry filling the air. Whether you’re hosting a cozy brunch or simply craving a sweet treat, this Braided Apple Puff Pastry delivers warmth and nostalgia in every bite. Moreover, it’s surprisingly easy to make, yet impressive enough to wow your guests. Trust me, once you try it, you’ll understand why this recipe holds a special place in my kitchen—and hopefully, in yours too.
Braided Apple Puff Pastry is a delightful twist on classic apple desserts, combining flaky, golden puff pastry with a spiced apple filling. Unlike traditional pies or tarts, this recipe weaves the pastry into a beautiful braid, creating a stunning centerpiece that’s as fun to make as it is to eat. Perfect for fall gatherings or even a lazy Sunday morning, it strikes the perfect balance between simplicity and elegance. If you love easy yet impressive desserts, you’ll adore this recipe just as much as my Cinnamon Roll Apple Pie or my Homemade Apple Fritters. The best part? You can customize it with your favorite spices or even a drizzle of caramel for extra indulgence.
Why I Love This Recipe
This Braided Apple Puff Pastry reminds me of crisp autumn mornings spent baking with my grandmother. She taught me that food isn’t just about taste—it’s about the memories we create while making it. Every time I prepare this recipe, I feel that same joy and connection. Plus, the way the pastry puffs up into golden layers never fails to amaze me. It’s a little piece of magic that always brings smiles to the table.
Health and Nutrition
Why it’s good for your body
Braided Apple Puff Pastry offers a delightful mix of flavor and nutrition. First, apples bring natural sweetness along with fiber, which supports digestion and keeps you feeling full longer. Additionally, the cinnamon often used in this recipe provides antioxidants that may help reduce inflammation.
Moreover, Braided Apple Puff Pastry can be a smarter indulgence compared to heavier desserts. By using puff pastry, you get a lighter texture without excessive heaviness. Meanwhile, the apples contribute vitamins like vitamin C, which boosts immunity, and potassium, which supports heart health.
Finally, this treat balances indulgence with wholesome ingredients. For example, you can easily adjust the sugar content to suit your preferences. Whether you enjoy it warm or at room temperature, Braided Apple Puff Pastry satisfies cravings while offering some nutritional perks.
How it fits in a healthy lifestyle
Braided Apple Puff Pastry fits well into a balanced diet when enjoyed mindfully. Pair it with a protein-rich breakfast like Greek yogurt to create a satisfying meal. If you’re watching sugar intake, try reducing the added sweetener or opting for naturally sweet apples like Honeycrisp.
For those with dietary preferences, you can explore gluten-free puff pastry options to make this recipe celiac-friendly. If heart health is a priority, consider using a butter alternative or checking out our guide on heart-healthy baking swaps. Craving more fruit-forward treats? Our easy fruit desserts roundup includes lighter options that complement this pastry perfectly.
Enjoy Braided Apple Puff Pastry as an occasional treat or share it with friends to keep portions reasonable. With simple tweaks, it can align with various health goals without sacrificing flavor.
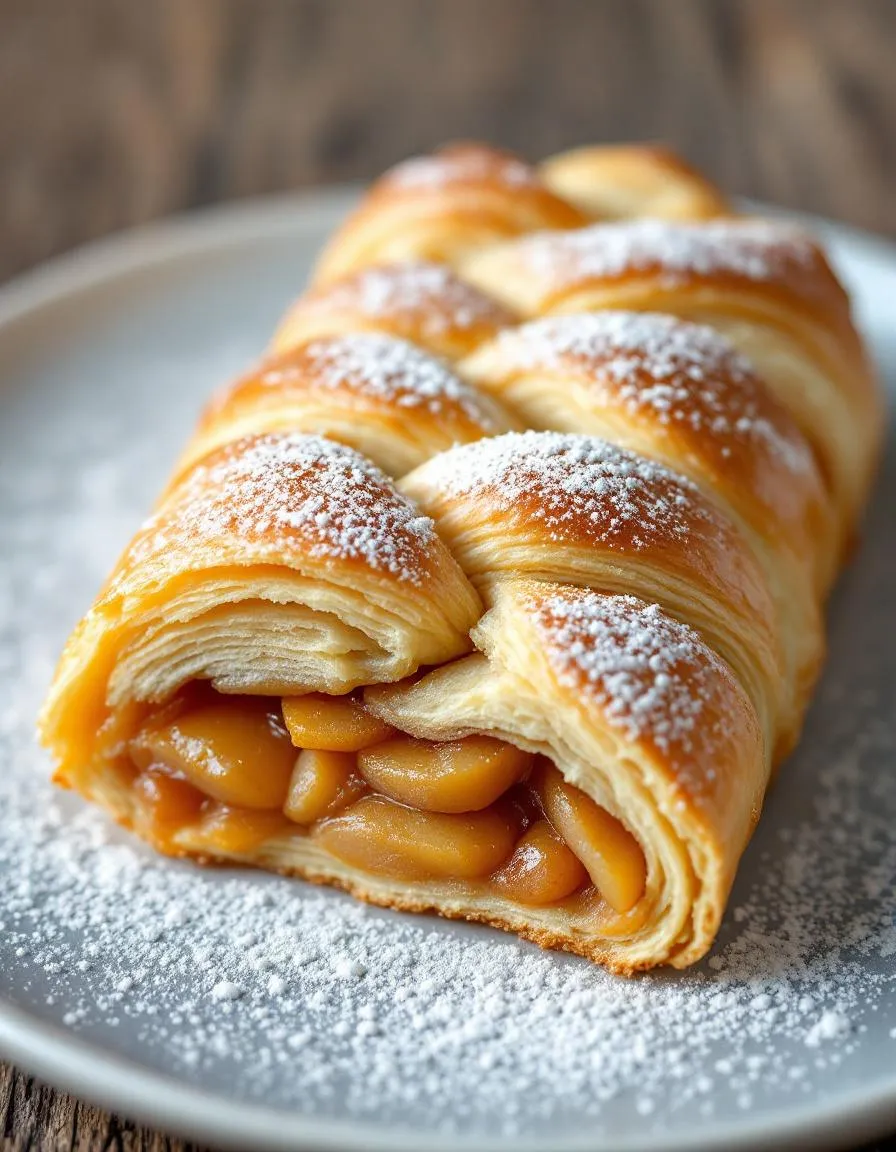
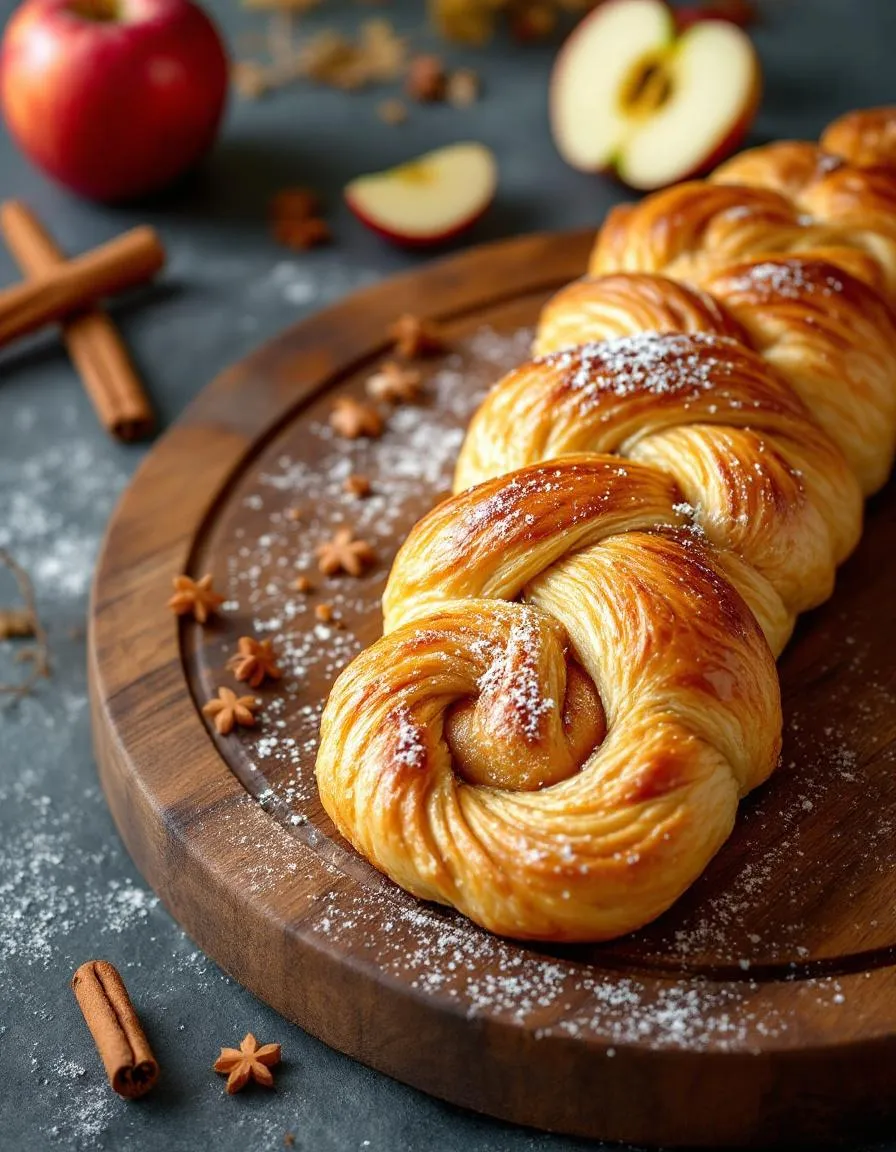
A delicious and flaky puff pastry filled with spiced apples, braided for a beautiful presentation.
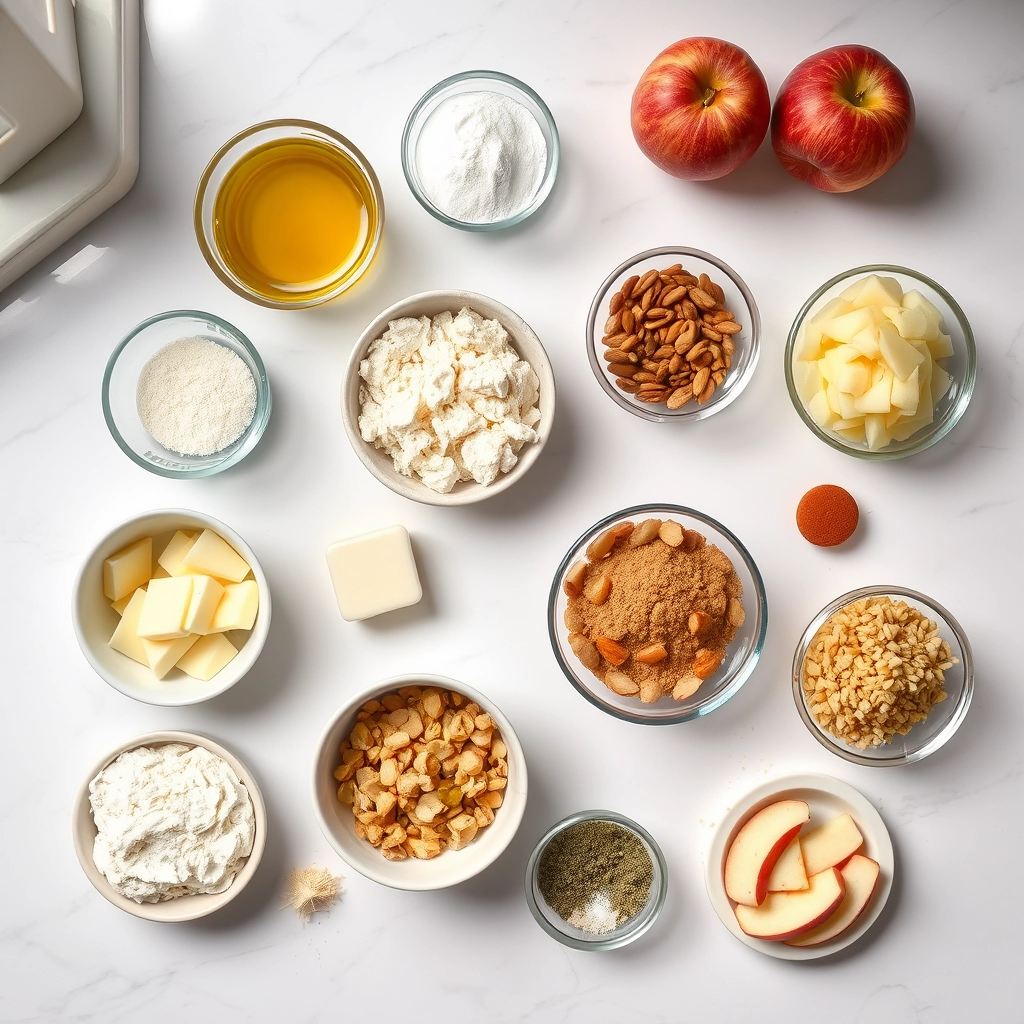
Ingredients
Scale
For the Crust:
1 sheet puff pastry, thawed
2 medium apples, peeled and diced
2 tbsp brown sugar
1 tsp cinnamon
1/4 tsp nutmeg
1 tbsp lemon juice
1 egg, beaten (for egg wash)
1 tbsp powdered sugar (for dusting)
Instructions
1. Prepare the Crust:
Preheat oven to 375°F (190°C) and line a baking sheet with parchment paper.
In a bowl, mix diced apples, brown sugar, cinnamon, nutmeg, and lemon juice until well combined.
Roll out the puff pastry sheet on the prepared baking sheet. Spoon the apple mixture down the center of the pastry, leaving about 2 inches on each side.
Cut diagonal strips along the sides of the pastry, then fold them over the apple filling, alternating sides to create a braided effect.
Brush the pastry with beaten egg for a golden finish.
Bake for 25-30 minutes or until the pastry is puffed and golden brown.
Let cool slightly, then dust with powdered sugar before serving.
Notes
You can customize the seasonings to taste.
s-dish">How to Prepare This Dish
Steps and time-saving tips
Start by preheating your oven to 375°F so it’s ready when you finish assembling the Braided Apple Puff Pastry. While it heats, peel and thinly slice two medium apples, then toss them with cinnamon, sugar, and a squeeze of lemon juice to prevent browning. Next, roll out a sheet of thawed puff pastry on a lightly floured surface into a rectangle. Spoon the apple mixture down the center, leaving a 2-inch border on each side. Use a sharp knife to cut diagonal strips along the edges, then fold them over the apples in a crisscross pattern to create the braid. Brush the pastry with an egg wash for a golden finish, and if you’re short on time, skip the braiding and simply fold the pastry over the filling for a rustic turnover. Bake for 25-30 minutes until the Braided Apple Puff Pastry puffs and turns golden brown. Let it cool slightly before drizzling with a simple powdered sugar glaze for extra sweetness.
Mistakes I’ve made and learned from
I once rushed the thawing process for my puff pastry, which caused it to tear when I tried to roll it out. Now I let it sit at room temperature for exactly 40 minutes—no shortcuts! Another time, I overfilled the Braided Apple Puff Pastry, and the filling bubbled out during baking, making a sticky mess. A light hand with the apples keeps everything intact. If you’re new to working with puff pastry, check out my guide to handling puff pastry for more foolproof tricks. And if your glaze turns out too thick, thin it with a teaspoon of milk—a lesson I learned after serving a few overly sweet, lumpy batches. For more dessert troubleshooting, my common baking mistakes post covers these fixes in detail.
n-and-variations">Cultural Connection and Variations
Where this recipe comes from
Braided Apple Puff Pastry weaves together the warmth of European baking traditions with the simplicity of modern desserts. Originally inspired by Austrian and German strudels, this dish takes flaky puff pastry and fills it with spiced apples, creating a treat that feels both rustic and elegant. In some regions, bakers add raisins or nuts for extra texture, while others drizzle caramel for a sweeter finish. My grandmother, for instance, always sprinkled cinnamon sugar on top before baking, turning it into a golden, fragrant centerpiece at family gatherings.
Across Europe, you’ll find similar pastries with local twists. The French might layer theirs with almond cream, while Scandinavians often pair apples with cardamom. Even in the U.S., home cooks adapt Braided Apple Puff Pastry by using store-bought dough for convenience or swapping in pears for a seasonal twist. No matter the variation, the dish carries a sense of comfort—whether served at a cozy breakfast or as a showstopper at holiday feasts.
How it fits in today’s cooking
Today, Braided Apple Puff Pastry remains a favorite for its versatility. Busy bakers love how quickly it comes together, especially when using pre-made puff pastry. Meanwhile, food bloggers and home chefs elevate it with gourmet touches, like adding a scoop of vanilla ice cream or a drizzle of salted caramel. It’s also a star during fall and winter, when apples shine in seasonal baking.
Modern twists keep the
recipe fresh. Some cooks fold in cranberries for a tart contrast, while others serve it alongside spiced chai for a cozy afternoon treat. Whether you’re making it for a special occasion or a simple weekend indulgence, Braided Apple Puff Pastry bridges tradition and today’s kitchen effortlessly.
Taste and Texture
What makes it delicious
Braided Apple Puff Pastry delights the senses with its buttery, flaky layers and sweet-tart apple filling. Each bite offers a crisp, golden exterior that shatters to reveal tender, cinnamon-spiced apples inside. The warmth of baked vanilla and nutmeg fills the air, while a hint of lemon zest brightens the rich caramelized notes. Meanwhile, the pastry itself stays light yet indulgent, with a melt-in-your-mouth texture that contrasts perfectly with the juicy apple chunks. Whether served warm or at room temperature, Braided Apple Puff Pastry balances comfort and sophistication in every slice.
Boosting the flavor
Elevate your Braided Apple Puff Pastry by drizzling it with a glossy vanilla glaze or a spoonful of salted caramel for extra decadence. For a spiced twist, toss the apples with cardamom or a pinch of clove before baking. Alternatively, serve it alongside a scoop of cinnamon ice cream to amplify the cozy flavors. A sprinkle of toasted pecans or walnuts adds crunch, while a dusting of powdered sugar keeps it effortlessly elegant. With these tweaks, your pastry will shine even brighter.
Always thaw puff pastry in the fridge overnight for even texture, and keep it cold until ready to use. Roll the dough gently to avoid tearing, and use a sharp knife for clean cuts when shaping your Braided Apple Puff Pastry. For golden perfection, brush the pastry with an egg wash before baking, and space the braids evenly so they bake uniformly. Finally, let the pastry cool slightly before slicing to keep the layers crisp.
Mistakes to avoid
Overfilling the pastry with apples can cause leaks and soggy bottoms, so stick to a thin, even layer. Also, skip the urge to open the oven door too often, as temperature fluctuations prevent the Braided Apple Puff Pastry from rising properly. If your dough feels sticky, lightly dust the surface with flour, but avoid overworking it. For more troubleshooting, check our guide on fixing soggy pastry or tips for perfect puff pastry every time.
g-suggestions">Serving and Pairing Suggestions
How to serve this dish
For a stunning presentation, slice your Braided Apple Puff Pastry into thick portions and arrange them on a rustic wooden board. Meanwhile, dust each piece with powdered sugar just before serving to add a touch of elegance. If you want to impress guests, drizzle warm caramel sauce over the top and garnish with fresh mint leaves. This dish shines at brunch gatherings or holiday breakfasts, especially when paired with a cozy coffee station. Alternatively, serve it as a dessert with a scoop of vanilla ice cream for a delightful contrast of textures.
What goes well with it
Pair your Braided Apple Puff Pastry with a spiced chai latte to enhance its warm cinnamon notes. The creamy, aromatic drink balances the flaky pastry perfectly. For a refreshing contrast, try a scoop of homemade vanilla bean ice cream or a dollop of whipped cream. If you love fruity flavors, serve it alongside our berry chia jam for a tangy twist. Finally, for a brunch spread, complement it with our savory herb scones to balance sweet and savory tastes.
math-faq-block">
How do you make braided apple puff pastry from scratch?
To make Braided Apple Puff Pastry from scratch, start by rolling out store-bought or homemade puff pastry. Layer thinly sliced apples mixed with cinnamon and sugar down the center, then cut diagonal strips along the sides and braid them over the filling. Bake until golden brown for a flaky, delicious dessert.
Can you use canned apples for braided apple puff pastry?
Yes, you can use canned apples for Braided Apple Puff Pastry, but drain them well to avoid excess moisture. Fresh apples provide better texture, but canned apples work in a pinch—just adjust the sugar since they’re often pre-sweetened.
What’s the best type of apple for braided apple puff pastry?
Firm, slightly tart apples like Granny Smith or Honeycrisp work best for Braided Apple Puff Pastry. They hold their shape during baking and balance the sweetness of the pastry. Avoid overly soft varieties that turn mushy.
rank-math-faq-item">
How do you keep braided apple puff pastry from getting soggy?
To prevent soggy Braided Apple Puff Pastry, pat apple slices dry and sprinkle a thin layer of breadcrumbs or crushed amaretti cookies under the filling. Bake on a preheated sheet until the bottom is crisp, and serve warm.
Best Raspberry Cream Pie – Easy Homemade Recipe
Introduction
There’s something undeniably special about desserts that balance tartness with creamy sweetness, and that’s exactly why this Raspberry Cream Pie Recipe holds a special place in my heart. Whether you’re celebrating a milestone or simply treating yourself after a long day, this pie delivers a burst of summer flavor in every bite. Plus, with its no-bake filling and buttery crust, it’s surprisingly simple to make—even for beginners. Trust me, one slice will have you hooked.
This Raspberry Cream Pie Recipe combines a crisp graham cracker crust with a luscious, velvety filling infused with fresh raspberries. The tartness of the fruit cuts through the richness of the cream, creating a dessert that feels both indulgent and refreshing. Unlike heavier pies, this one stays light, making it perfect for warm-weather gatherings or cozy nights in. Over the years, I’ve shared countless variations of this recipe, but this version—with its smooth texture and vibrant color—has become a reader favorite. If you’ve ever tried my no-bake desserts, you’ll recognize the same fuss-free approach here. And if you’re new to baking, don’t worry—this pie is as forgiving as it is delicious. For more tips on working with fresh berries, check out my guide to berry recipes.
Why I Love This Recipe
This Raspberry Cream Pie Recipe reminds me of lazy summer afternoons at my grandmother’s house, where she’d let me crush the graham crackers for the crust while she whipped the filling by hand. Even now, the scent of raspberries takes me back to those sunlit kitchens and the joy of sharing something homemade. It’s more than just a dessert—it’s a little slice of nostalgia, and I hope it becomes a cherished recipe in your home too.
Health and Nutrition
Why it’s good for your body
Raspberry Cream Pie Recipe packs a nutritious punch while satisfying your sweet tooth. First, raspberries deliver a hefty dose of antioxidants, which help combat inflammation and support overall wellness. Additionally, the natural sweetness of raspberries means you can enjoy this dessert with less added sugar. Plus, the creamy filling often includes dairy or plant-based alternatives, offering a good source of calcium or healthy fats.
Moreover, Raspberry Cream Pie Recipe incorporates fiber-rich ingredients like whole-grain crusts or fresh fruit toppings. Fiber aids digestion and keeps you feeling full longer, preventing unnecessary snacking. Meanwhile, the balance of macronutrients—carbs, proteins, and fats—ensures steady energy levels without drastic blood sugar spikes. For a treat, it’s surprisingly mindful of your health.
Finally, Raspberry Cream Pie Recipe can easily adapt to include superfood boosters like chia seeds or Greek yogurt. These tweaks enhance the protein content or add omega-3s, making each slice even more nourishing. Whether you savor it as an occasional indulgence or a smarter dessert choice, this pie proves that delicious and nutritious can go hand in hand.
How it fits in a healthy lifestyle
Raspberry Cream Pie Recipe fits seamlessly into a balanced diet when enjoyed in moderation. If you follow a gluten-free lifestyle, simply swap the crust for a nut-based or oat alternative. For those focused on heart health, the berries’ potassium and fiber content support cardiovascular function. Even better, the recipe pairs well with lighter meals, like a fresh summer salad, to keep your day nutritionally diverse.
Planning ahead helps too. Bake Raspberry Cream Pie Recipe for gatherings, so you control portions without feeling deprived. If you’re meal prepping, slice and freeze individual servings for a quick treat. For more ideas on balancing treats with wholesome eating, explore our meal prep guide. With smart choices, this dessert becomes a delightful part of your healthy routine.
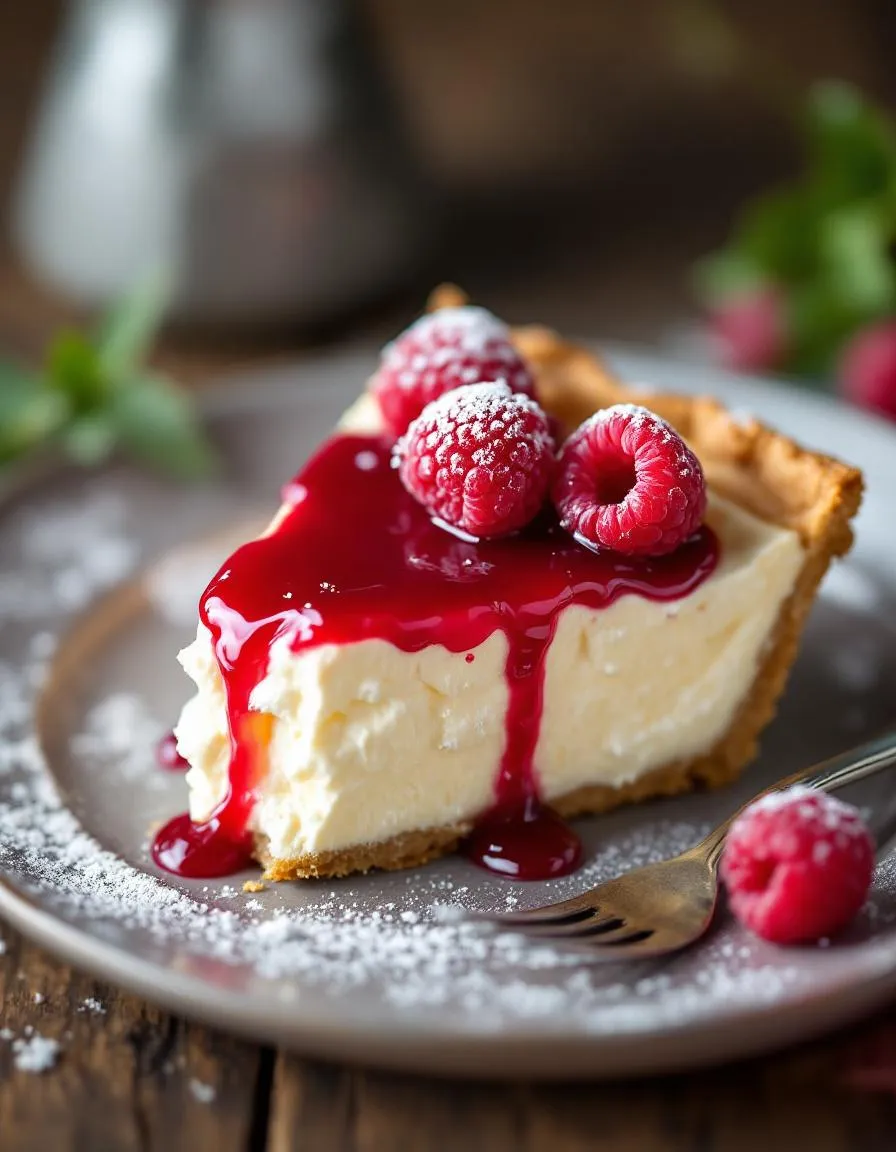
A delicious and creamy raspberry pie with a buttery crust.
Ingredients
Scale
For the Crust:
1 1/2 cups graham cracker crumbs
1/3 cup melted butter
1/4 cup granulated sugar
8 oz cream cheese, softened
1/2 cup powdered sugar
1 tsp vanilla extract
1 cup heavy whipping cream
2 cups fresh raspberries
1/4 cup raspberry jam
Instructions
1. Prepare the Crust:
Preheat oven to 350°F (175°C).
Mix graham cracker crumbs, melted butter, and granulated sugar in a bowl. Press into a 9-inch pie dish and bake for 10 minutes. Let cool.
Beat cream cheese, powdered sugar, and vanilla until smooth. In a separate bowl, whip the heavy cream until stiff peaks form, then fold into the cream cheese mixture.
Spread the cream mixture over the cooled crust. Arrange raspberries on top.
Warm raspberry jam slightly and drizzle over the raspberries. Chill for at least 2 hours before serving.
Start by preheating your oven to 350°F to save time while you prepare the crust. Meanwhile, mix the graham cracker crumbs, melted butter, and sugar in a bowl until the texture resembles wet sand. Press this mixture firmly into a pie dish, making sure to evenly cover the bottom and sides. Bake the crust for 10 minutes, then let it cool completely while you work on the filling. For the raspberry cream layer, whisk the cream cheese and powdered sugar until smooth, then gently fold in the whipped cream to keep it light and fluffy. Spread half of this mixture over the cooled crust, creating an even layer. Next, spoon the raspberry preserves over the cream layer, leaving a small border for a cleaner look. Top with the remaining cream mixture and smooth it with a spatula. Chill the pie for at least 4 hours, or overnight for the best results. If you’re short on time, pop it in the freezer for 1-2 hours instead. Just before serving, garnish with fresh raspberries and a drizzle of melted chocolate for an elegant finish.
Mistakes I’ve made and learned from
One of my biggest mistakes with this Raspberry Cream Pie Recipe was rushing the cooling process. I once added the filling to a warm crust, and the result was a soggy mess. Now, I always let the crust cool completely—sometimes even sticking it in the fridge for a bit. Another lesson? Overmixing the cream filling. I used to whisk it vigorously, which made it dense instead of airy. A gentle fold works wonders, as I learned from my perfect whipped cream guide. Also, if your raspberry preserves are too thick, warm them slightly for easier spreading. Trust me, it’s a game-changer. For more tips on avoiding common pie pitfalls, check out my pie crust troubleshooting post. These small adjustments make all the difference between a good pie and a great one.
The Raspberry Cream Pie Recipe carries a sweet nostalgia, blending summer berry traditions with creamy indulgence. Many trace its roots to Midwestern potlucks, where fresh raspberries and cool custard fillings made it a warm-weather staple. However, variations pop up worldwide. In France, chefs might layer raspberry coulis between delicate pastry cream, while British bakers often fold whipped cream into their versions for a lighter texture. Families in the American South sometimes add a splash of bourbon to the filling, giving it a grown-up twist.
My grandmother’s Raspberry Cream Pie Recipe always starred at Fourth of July gatherings, with a buttery graham cracker crust that soaked up the tart berry juices. Some regions swap raspberries for blackberries or strawberries, depending on what’s ripe. Others skip the crust entirely, opting for a no-bake parfait style. No matter the tweaks, the heart of the dish stays the same—a celebration of fresh fruit and velvety cream.
ays-cooking">How it fits in today’s cooking
Today, the Raspberry Cream Pie Recipe fits perfectly into modern cooking, whether as a showstopping dessert for holidays or a quick treat for weeknights. Many home cooks lighten it up with Greek yogurt or coconut milk, keeping the luscious texture while cutting calories. It’s also a hit at summer BBQs, pairing beautifully with grilled peaches or a scoop of homemade vanilla ice cream.
Busy bakers love that they can prep the pie ahead, making it ideal for entertaining. Some even turn it into individual jars for picnics, riffing on the classic. For those craving more decadence, adding a layer of chocolate ganache underneath the raspberry filling creates a crowd-pleasing twist. No matter how you slice it, this pie bridges tradition and today’s tastes effortlessly.
Taste and Texture
What makes it delicious
Every bite of Raspberry Cream Pie Recipe delivers a dreamy contrast of flavors and textures. The velvety cream filling melts on your tongue, while the buttery crust adds a satisfying crunch. Fresh raspberries burst with tangy sweetness, balancing the rich, smooth custard. A hint of vanilla and citrus zest brightens each layer, making the pie fragrant and irresistible. Whether served chilled or slightly cool, Raspberry Cream Pie Recipe feels light yet indulgent—perfect for any occasion.
r">Boosting the flavor
For an extra flavor kick, try swirling in a spoonful of raspberry jam before baking to intensify the berry taste. A sprinkle of toasted almond slices or a drizzle of homemade chocolate sauce adds crunch and depth. If you love citrus, fold lemon zest into the cream filling or serve with a side of vanilla-infused whipped cream. These small tweaks elevate Raspberry Cream Pie Recipe without overpowering its delicate balance.
Tips for Success
Best practices for results
Always chill your crust before baking to prevent shrinking and ensure a crisp texture for your Raspberry Cream Pie Recipe. Meanwhile, use full-fat cream cheese for the filling, as it creates a richer, smoother consistency. For the best flavor, fold in fresh raspberries gently to avoid crushing them. Additionally, let the pie set in the fridge for at least four hours before slicing so the layers hold their shape perfectly.
>Mistakes to avoid
Avoid overmixing the filling, as this can make it too runny instead of luxuriously thick. Instead, blend just until smooth for the ideal Raspberry Cream Pie Recipe texture. Also, skip the temptation to slice the pie too soon—waiting ensures clean cuts and neat layers. For more crust tips, check out our guide to perfect pie crust. If your filling ever splits, our troubleshooting guide can help you rescue it easily.
Serving and Pairing Suggestions
How to serve this dish
For a stunning presentation, slice your Raspberry Cream Pie Recipe into elegant wedges and plate them on chilled dessert plates. Top each slice with fresh raspberries, a dusting of powdered sugar, or a dollop of whipped cream for extra flair. Alternatively, serve it family-style on a decorative cake stand for gatherings. This pie shines at summer barbecues, holiday dinners, or even as a sweet finale to a brunch spread. If you want to impress guests, drizzle a raspberry coulis around the plate for a restaurant-worthy touch.
What goes well with it
Pair your Raspberry Cream Pie Recipe with a hot cup of Earl Grey tea, as the bergamot notes beautifully balance the tart raspberry filling. For a refreshing contrast, try it alongside a scoop of vanilla bean ice cream or a glass of sparkling rosé. If you’re serving it as part of a larger dessert spread, consider adding our Lemon Bars for a citrusy companion or our Chocolate Truffles for a decadent twist. Each pairing enhances the pie’s creamy texture and fruity brightness.
What are the key ingredients for a perfect raspberry cream pie?
A classic Raspberry Cream Pie Recipe requires fresh raspberries, heavy cream, cream cheese, sugar, and a pre-baked pie crust. For extra flavor, add a touch of vanilla extract or lemon zest. These ingredients create a creamy, tangy filling that pairs perfectly with the sweet-tart raspberries.
Can I use frozen raspberries instead of fresh in a raspberry cream pie?
Yes, frozen raspberries work well in a Raspberry Cream Pie Recipe, but thaw and drain them first to avoid excess moisture. Pat them dry with a paper towel to prevent a soggy crust. Fresh raspberries offer brighter flavor, but frozen are a great year-round alternative.
rank-math-faq-item">
How do I prevent my raspberry cream pie from getting watery?
To avoid a watery Raspberry Cream Pie Recipe, mix the raspberries with a bit of sugar and let them sit for 10 minutes, then drain the juice. Also, ensure your cream filling is well-chilled before assembling. A layer of pastry cream or thickened custard can help absorb excess moisture.
How long does raspberry cream pie last in the fridge?
A Raspberry Cream Pie Recipe stays fresh for 2-3 days in the refrigerator if covered tightly with plastic wrap. The crust may soften over time, so enjoy it within 48 hours for the best texture. For longer storage, freeze individual slices for up to a month.
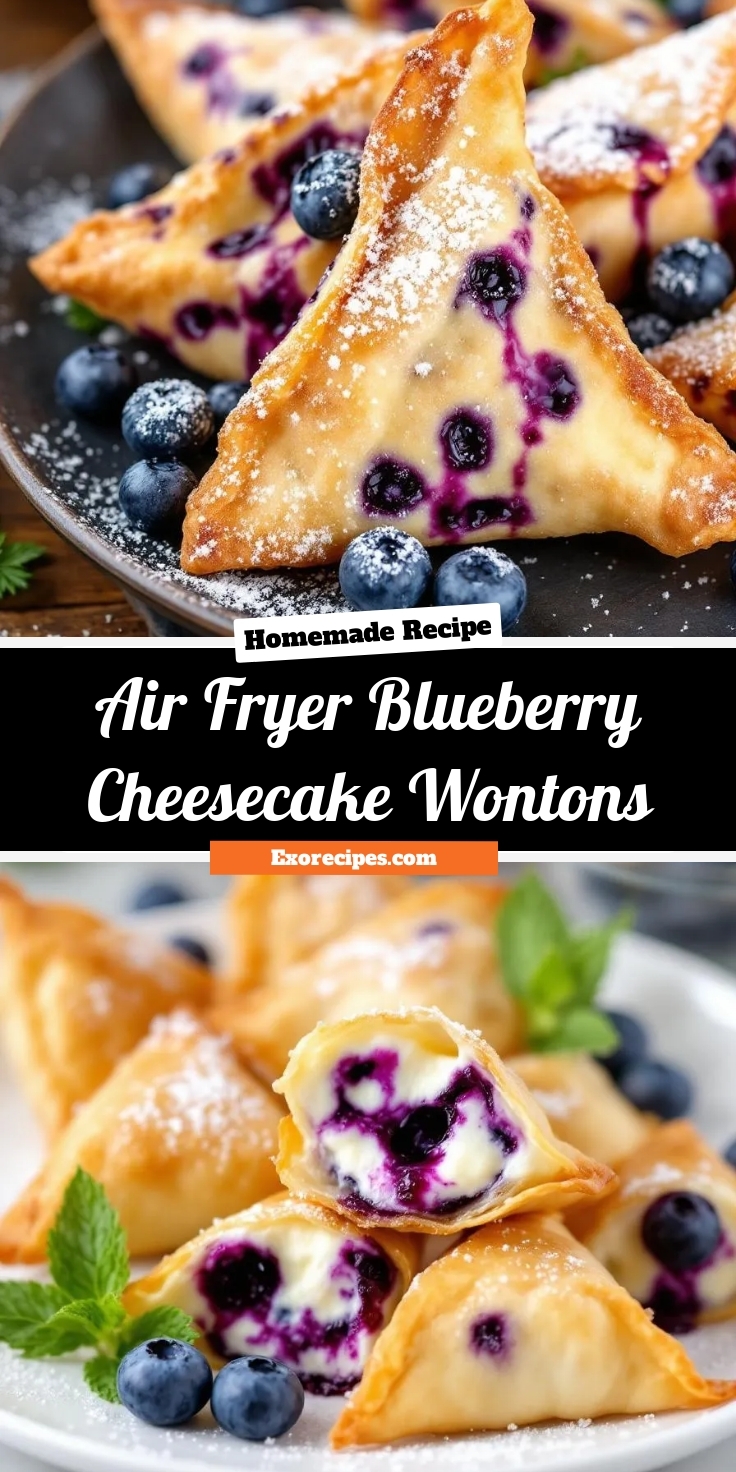
Easy Air Fryer Blueberry Cheesecake Wontons
If you’re craving a dessert that’s crispy, creamy, and bursting with fruity flavor, you’re in the right place. Air Fryer Blueberry Cheesecake Wontons deliver all that and more. Whether you need a quick sweet fix or a show-stopping party snack, these little bites pack big satisfaction. Plus, they’re surprisingly easy to make, so you can enjoy restaurant-quality treats without leaving your kitchen.
Air Fryer Blueberry Cheesecake Wontons combine the best of two worlds: the light crunch of fried wonton wrappers and the rich, tangy sweetness of blueberry cheesecake filling. Unlike traditional deep-fried versions, the air fryer gives them a golden crispness with minimal oil, making them a slightly lighter indulgence. They’re perfect for anyone who loves creative desserts but wants to keep things simple. On brekcakes.com, we celebrate recipes that balance flavor and convenience, and this one fits right in. For more air fryer inspiration, check out our air fryer dessert collection, or if you’re new to wonton wrappers, our wonton wrapper guide will help you get started.
Why I Love This Recipe
Air Fryer Blueberry Cheesecake Wontons remind me of lazy Sunday afternoons experimenting with my mom’s leftover ingredients. We’d stuff wonton wrappers with whatever sweet fillings we had, and the blueberry-cheesecake combo always stole the show. Now, I love how this recipe turns humble components into something special—just like those childhood moments. Every bite takes me back, and I hope it brings a little joy to your kitchen too.
“`
Health and Nutrition
Why it’s good for your body
Air Fryer Blueberry Cheesecake Wontons pack a surprising nutritional punch while satisfying your sweet tooth. First, blueberries deliver antioxidants that fight inflammation and support brain health. Additionally, the air fryer method cuts down on excess oil, making these treats lighter than traditional fried desserts. Moreover, the cream cheese provides a dose of protein and calcium, which help maintain strong bones and muscles.
Furthermore, the wonton wrappers offer a crispy texture without heavy batter. Since you use minimal oil in the air fryer, you reduce unnecessary fats while keeping the dish delicious. Meanwhile, the natural sweetness of blueberries means you can enjoy Air Fryer Blueberry Cheesecake Wontons with less added sugar. As a result, you get a balanced dessert that doesn’t compromise on flavor or health benefits.
Finally, the combination of protein, fiber, and antioxidants makes these wontons a smarter indulgence. Whether you need a quick snack or a dessert, Air Fryer Blueberry Cheesecake Wontons deliver satisfaction without the guilt. So go ahead and enjoy every bite knowing you’re treating your body right.
How it fits in a healthy lifestyle
Air Fryer Blueberry Cheesecake Wontons fit perfectly into a balanced diet when enjoyed in moderation. For those watching their gluten intake, simply swap regular wonton wrappers for gluten-free alternatives. If you’re focused on heart health, the reduced oil content helps keep saturated fats in check. Plus, the blueberries contribute fiber, which supports digestion and keeps you fuller longer.
Pair these wontons with a protein-rich meal or enjoy them as a post-workout treat. For more ideas on healthy dessert swaps, check out our guide to healthy dessert alternatives. And if you’re curious about other air fryer recipes that balance taste and nutrition, explore our air fryer favorites. With mindful eating and smart choices, Air Fryer Blueberry Cheesecake Wontons can be part of your everyday wellness routine.
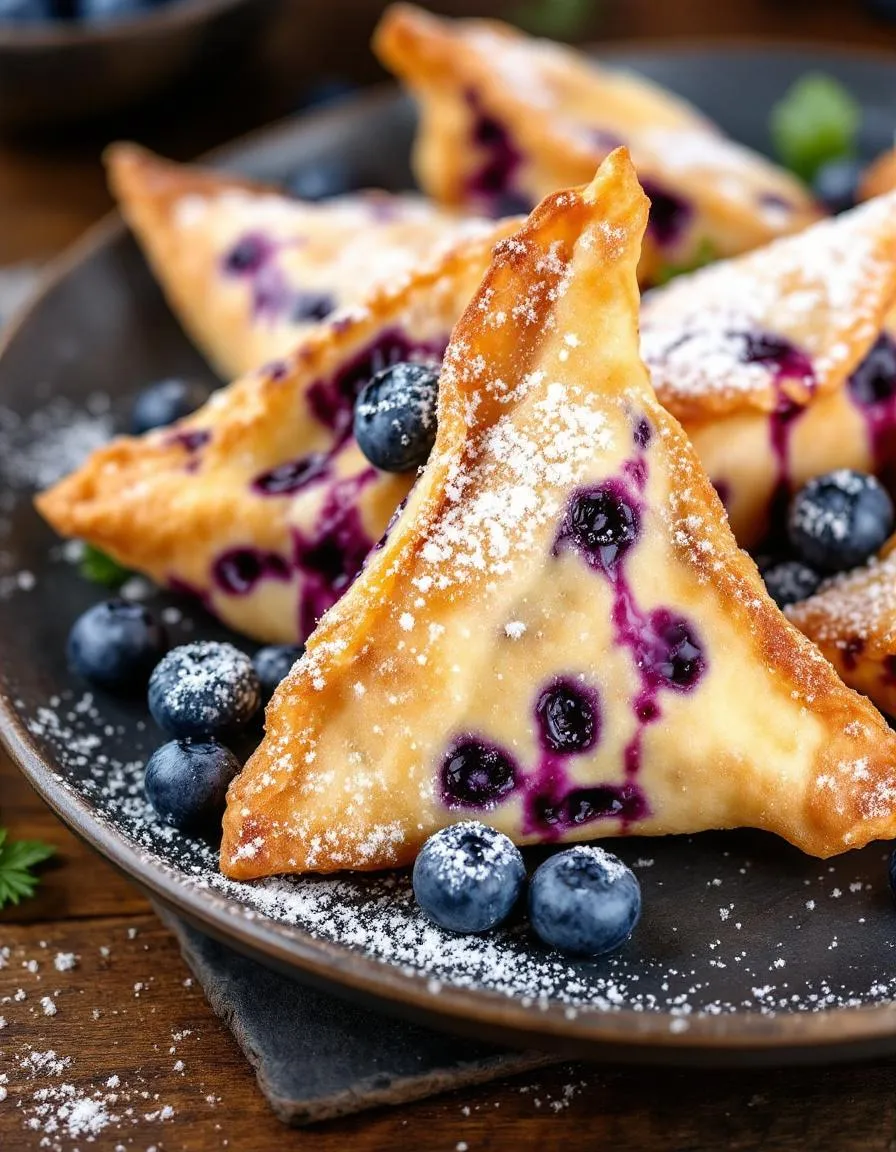
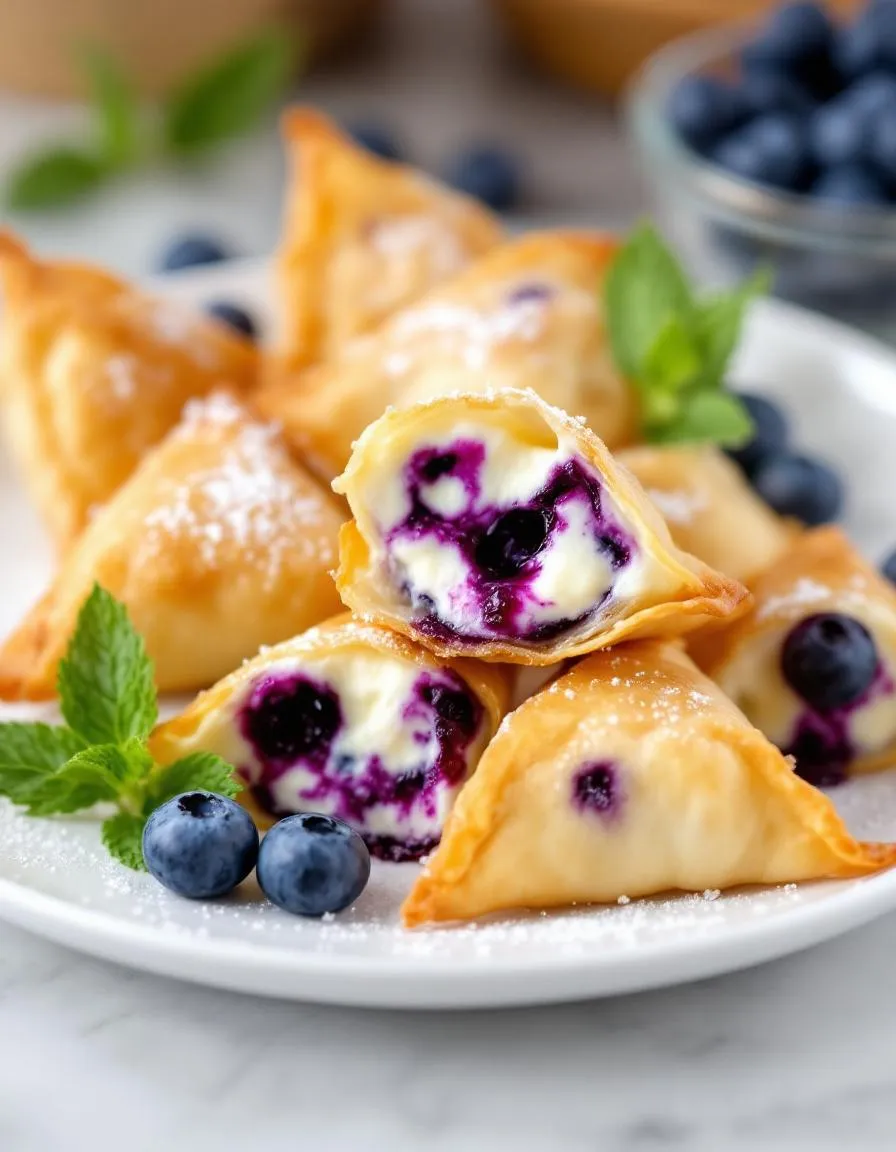
Crispy wonton wrappers filled with creamy cheesecake and sweet blueberries, cooked to perfection in the air fryer.
Ingredients
Scale
For the Crust:
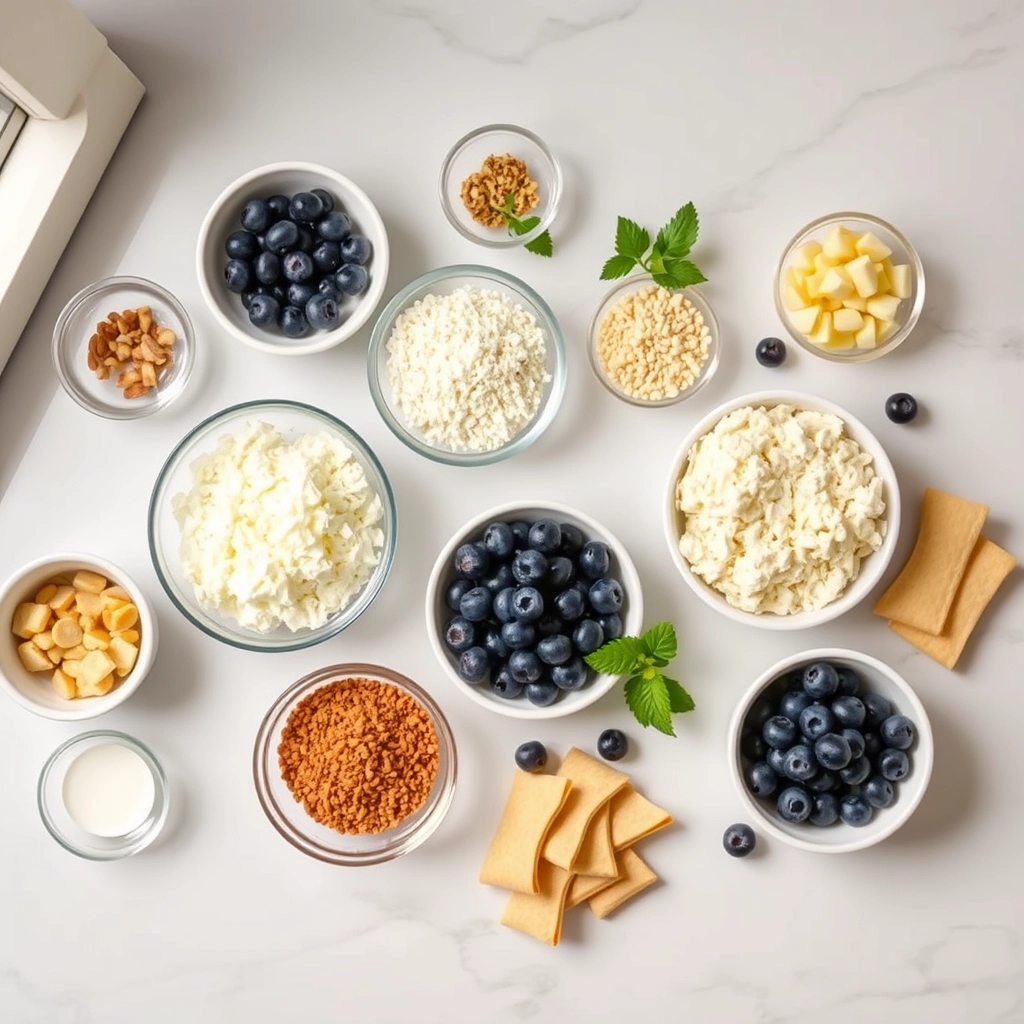
8 oz cream cheese, softened
1/4 cup granulated sugar
1 tsp vanilla extract
1/2 cup fresh blueberries
24 wonton wrappers
1 tbsp water
1 tbsp powdered sugar (for dusting)
Instructions
1. Prepare the Crust:
In a bowl, mix cream cheese, sugar, and vanilla until smooth.
Gently fold in blueberries.
Place 1 tsp of the mixture in the center of each wonton wrapper.
Brush edges with water, fold into triangles, and press to seal.
Preheat air fryer to 350°F (175°C).
Arrange wontons in a single layer in the air fryer basket, working in batches if needed.
Cook for 5-6 minutes until golden and crispy.
Dust with powdered sugar before serving.
Notes
You can customize the seasonings to taste.
s-dish">How to Prepare This Dish
Steps and time-saving tips
Start by mixing cream cheese, powdered sugar, and vanilla extract in a bowl until smooth. Meanwhile, gently fold fresh blueberries into the mixture for a burst of flavor. Next, lay out wonton wrappers on a clean surface and spoon a teaspoon of the filling into the center of each. Brush the edges with water, then fold them diagonally to form triangles, pressing firmly to seal. Preheat your air fryer to 350°F for even cooking. Lightly spray the wontons with cooking oil to ensure a golden, crispy texture. Arrange them in a single layer in the air fryer basket, leaving space between each to prevent sticking. Cook for 6-8 minutes, flipping halfway through, until they turn golden brown. For a quicker cleanup, line the basket with parchment paper. Finally, dust the Air Fryer Blueberry Cheesecake Wontons with powdered sugar or drizzle with honey before serving. If you’re short on time, prepare the filling ahead and refrigerate it overnight.
Mistakes I’ve made and learned from
I once overfilled the wonton wrappers, thinking more filling would make them tastier. Instead, they burst open in the air fryer, creating a sticky mess. Now I stick to a teaspoon per wrapper—just enough for flavor without the spillage. Another lesson? Skipping the oil spray led to uneven browning, so I never skip that step anymore. If you’re new to air frying, check out my guide on air fryer tips for beginners to avoid common pitfalls. Also, if your blueberries are too tart, try tossing them with a bit of sugar first, as I explain in my blueberry dessert hacks post. Trust me, these small tweaks make all the difference.
n-and-variations">Cultural Connection and Variations
Where this recipe comes from
Air Fryer Blueberry Cheesecake Wontons blend two beloved traditions into one irresistible treat. Cheesecake traces its roots back to ancient Greece, while wonton wrappers hail from Chinese cuisine. Yet, somewhere along the way, creative home cooks merged them, crafting a fusion dessert that feels both nostalgic and fresh. In my family, we make these during summer when blueberries peak, turning them into a sweet celebration of seasonal fruit.
Around the world, variations pop up in playful ways. Some bakers swap blueberries for cherries or apples, while others drizzle chocolate instead of powdered sugar. In the South, you might find a cream cheese-stuffed version with a pecan crunch. Meanwhile, street vendors in Asia sometimes serve a savory-sweet twist with red bean paste. No matter the adaptation, Air Fryer Blueberry Cheesecake Wontons keep their charm—crispy outside, creamy inside, and bursting with flavor.
How it fits in today’s cooking
Today, this recipe shines as a quick, crowd-pleasing dessert that fits modern lifestyles. Busy cooks love how the air fryer cuts cooking time without sacrificing crunch, making it perfect for weeknight treats or last-minute gatherings. Plus, it’s a fun way to repurpose leftover wonton wrappers—just like these Air Fryer Apple Pie Wontons.
Seasonal flexibility ke
eps it relevant, too. Serve it warm in winter with a scoop of vanilla ice cream or fresh in summer alongside a berry salad. For healthier spins, some opt for low-fat cream cheese or bake instead of fry. And if you’re craving more air fryer magic, try pairing it with Air Fryer Churro Bites for a dessert spread that delights every time.
Taste and Texture
What makes it delicious
Air Fryer Blueberry Cheesecake Wontons deliver a mouthwatering contrast of textures and flavors. The golden, crispy wonton wrapper shatters with each bite, giving way to a lusciously creamy cheesecake filling. Juicy blueberries burst with tangy sweetness, while a hint of vanilla and lemon zest brightens every bite. Meanwhile, the air fryer ensures the exterior stays irresistibly light and crunchy without feeling greasy. Warm, fragrant, and perfectly balanced, Air Fryer Blueberry Cheesecake Wontons taste like a dessert lover’s dream—indulgent yet surprisingly easy to enjoy.
Boosting the flavor
Elevate your Air Fryer Blueberry Cheesecake Wontons with a drizzle of honey or a dusting of powdered sugar for extra sweetness. For a zesty twist, fold in a pinch of cinnamon or orange zest into the cream cheese filling. Alternatively, serve them with a scoop of vanilla ice cream or a dollop of whipped cream to amplify the richness. If you love fruity desserts, try pairing them with our homemade berry compote for a vibrant, syrupy finish. Craving more crunch? Sprinkle crushed graham crackers on top, inspired by our cheesecake bites recipe, for a delightful texture contrast.
Always chill your cream cheese filling for at least 30 minutes before assembling Air Fryer Blueberry Cheesecake Wontons. This step prevents the filling from leaking during cooking. Meanwhile, use parchment paper in your air fryer basket to ensure even cooking and a crisp texture. For the best results, lightly brush the wonton wrappers with melted butter before air frying. Finally, let the wontons cool for a few minutes after cooking so the filling sets properly.
Mistakes to avoid
Avoid overfilling the wonton wrappers, as this can cause them to burst open in the air fryer. Instead, use just one teaspoon of filling per wrapper. Additionally, don’t skip preheating your air fryer, as this helps the Air Fryer Blueberry Cheesecake Wontons cook evenly. If you’re new to air frying, check out our air fryer troubleshooting guide for more tips. Also, remember to space the wontons apart in the basket to prevent sticking. For perfect folding techniques, explore our wonton folding methods to keep your dessert intact.
g-suggestions">Serving and Pairing Suggestions
How to serve this dish
Make your Air Fryer Blueberry Cheesecake Wontons shine by arranging them on a sleek white platter with a dusting of powdered sugar. For a pop of color, scatter fresh blueberries and mint leaves around the edges. Meanwhile, serve them warm for a gooey, melty center that guests will love. These wontons work perfectly for brunch spreads, holiday dessert tables, or even as a fun twist on game-day snacks. Finally, drizzle them with honey or melted chocolate for an extra indulgent touch.
What goes well with it
Pair your Air Fryer Blueberry Cheesecake Wontons with a scoop of vanilla ice cream for a classic contrast of warm and cold textures. Alternatively, try them alongside a refreshing glass of homemade sparkling lemonade to balance the richness. For a cozy brunch pairing, serve them with a warm cup of cinnamon-spiced tea, which enhances the blueberry flavors beautifully. Each option elevates the dish while keeping the focus on those crispy, creamy bites.
math-faq-block">
Can you make Air Fryer Blueberry Cheesecake Wontons ahead of time?
Yes! You can assemble Air Fryer Blueberry Cheesecake Wontons up to a day in advance and store them covered in the fridge. Just air fry them right before serving for the crispiest results. The filling stays fresh, and the wonton wrappers won’t get soggy if layered with parchment paper.
What dipping sauce goes well with Air Fryer Blueberry Cheesecake Wontons?
A simple vanilla glaze, caramel sauce, or even a dusting of powdered sugar pairs perfectly with Air Fryer Blueberry Cheesecake Wontons. For a tangy contrast, try a raspberry coulis or lemon curd. The creamy cheesecake filling and sweet blueberries balance well with these sauces.
How do you prevent Air Fryer Blueberry Cheesecake Wontons from bursting open?
To keep Air Fryer Blueberry Cheesecake Wontons intact, avoid overfilling them—use about 1 tsp of filling per wrapper. Seal the edges tightly with water or egg wash, and press out any air pockets. Lightly spraying the wontons with oil before air frying also helps them crisp without splitting.
rank-math-faq-item">
Can you freeze Air Fryer Blueberry Cheesecake Wontons?
Absolutely! Freeze unbaked Air Fryer Blueberry Cheesecake Wontons in a single layer on a tray, then transfer to a freezer bag. Cook them straight from frozen, adding 1–2 extra minutes in the air fryer. They’re a great make-ahead dessert for quick cravings.
Easy Gluten-Free Breakfast Hash Recipe
Introduction
Mornings can feel rushed, but they don’t have to be bland or stressful. That’s why I adore this Gluten-Free Breakfast Hash—it’s hearty, flavorful, and packed with wholesome ingredients to kickstart your day. Whether you’re juggling a busy schedule or simply craving a nourishing meal, this dish brings comfort and energy in every bite. Plus, it’s versatile enough to suit your favorite veggies or proteins, making it a staple in my kitchen and hopefully yours too.
Gluten-Free Breakfast Hash is a vibrant, one-pan wonder that combines crispy potatoes, fresh vegetables, and your choice of protein for a satisfying morning meal. Unlike traditional breakfast hashes that rely on gluten-heavy ingredients, this version keeps things light and nutritious without sacrificing flavor. It’s perfect for those with dietary restrictions, but honestly, everyone at my table loves it. The beauty of this dish lies in its simplicity and adaptability. You can toss in seasonal produce, swap sweet potatoes for russets, or add a sprinkle of cheese for extra richness. If you’re looking for more gluten-free inspiration, check out my fluffy gluten-free pancakes or explore these healthy breakfast ideas to round out your morning routine. Above all, this recipe embodies what brekcakes.com stands for: delicious, approachable food that fuels both body and soul.
Why I Love This Recipe
This Gluten-Free Breakfast Hash holds a special place in my heart because it reminds me of lazy Sunday mornings with my family. I love how the sizzle of potatoes in the pan fills the kitchen with warmth, and how everyone gathers around the table, eager to dig in. It’s more than just a meal—it’s a moment of connection. Plus, knowing I’m serving something wholesome and gluten-free makes it even better. Every time I make it, I’m reminded why cooking is my greatest joy: it brings people together, one delicious bite at a time.
Health and Nutrition
Why it’s good for your body
Gluten-Free Breakfast Hash packs a nutritious punch while keeping your mornings delicious. First, it combines fiber-rich vegetables like sweet potatoes and bell peppers, which support digestion and keep you full longer. Additionally, the dish often includes lean proteins like eggs or turkey sausage, helping you build and repair muscles effortlessly.
Moreover, Gluten-Free Breakfast Hash avoids refined grains, making it a smart choice for those with gluten sensitivities or anyone aiming to reduce inflammation. The healthy fats from ingredients like avocado or olive oil also promote heart health and steady energy levels. Since it’s naturally nutrient-dense, you’ll fuel your body without the crash that comes from sugary breakfast options.
Finally, this dish adapts easily to boost specific nutrients. For instance, you can add spinach for iron or swap regular potatoes for cauliflower to lower carbs. Whether you prioritize gut health, energy, or balanced macros, Gluten-Free Breakfast Hash delivers.
How it fits in a healthy lifestyle
Gluten-Free Breakfast Hash fits seamlessly into a balanced diet, whether you’re gluten-free, keto, or simply mindful of whole foods. Its versatile ingredients let you customize it for high-protein or low-carb goals, making it a staple for meal preppers. Pair it with a gluten-free smoothie bowl for a complete breakfast or enjoy it solo for a hearty start.
For those managing dietary restrictions, this dish avoids common allergens while maximizing flavor. It’s also ideal for active lifestyles since the protein and complex carbs sustain energy. If you’re exploring more gluten-free ideas, check out our gluten-free meal prep guide to keep your week on track. With Gluten-Free Breakfast Hash, you’ll nourish your body without sacrificing taste or convenience.
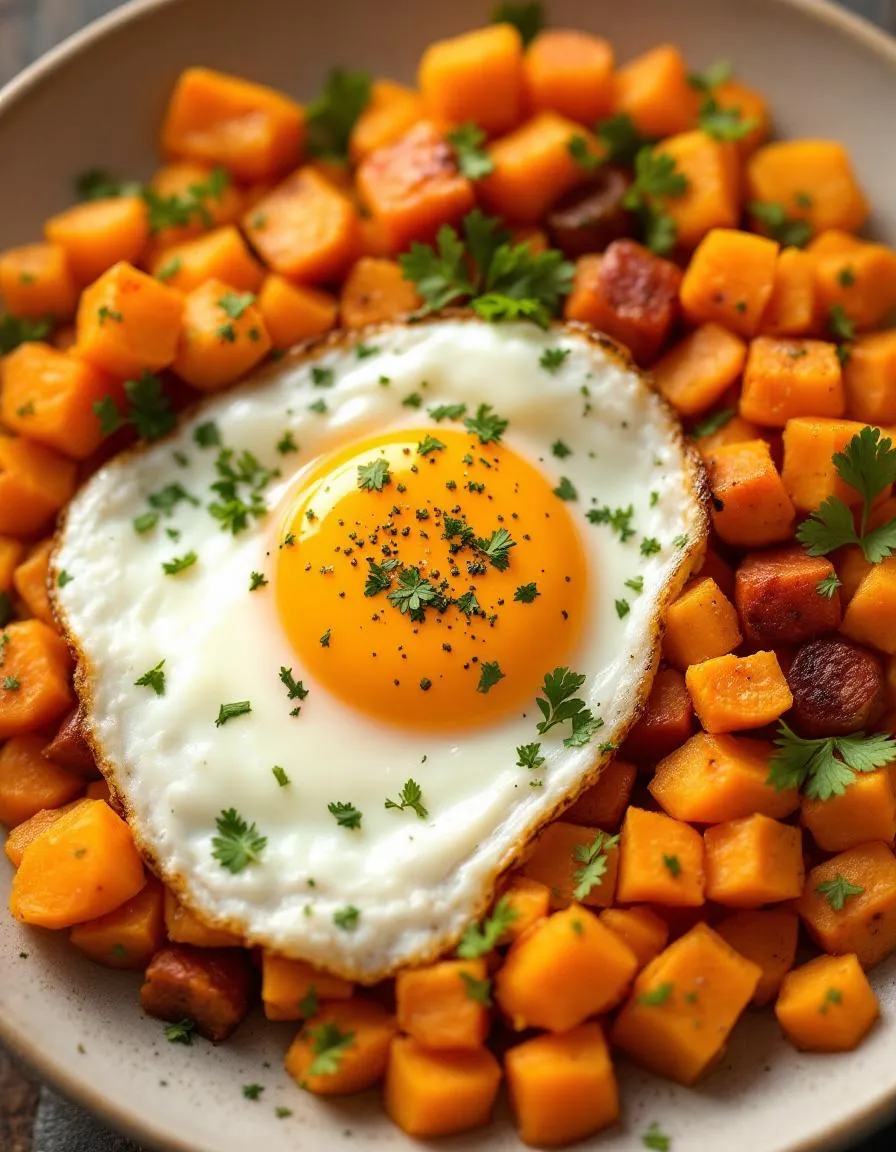
A hearty and healthy breakfast hash made with sweet potatoes, bell peppers, and eggs, perfect for a gluten-free morning meal.
Ingredients
Scale
For the Crust:
2 medium sweet potatoes, diced
1 red bell pepper, diced
1 yellow bell pepper, diced
1 small red onion, diced
2 tbsp olive oil
1 tsp smoked paprika
1/2 tsp garlic powder
Salt and pepper to taste
4 large eggs
Fresh parsley for garnish (optional)
Instructions
1. Prepare the Crust:
Heat olive oil in a large skillet over medium heat.
Add diced sweet potatoes and cook for 10 minutes, stirring occasionally, until they start to soften.
Add diced bell peppers and red onion to the skillet. Stir in smoked paprika, garlic powder, salt, and pepper. Cook for another 10 minutes until vegetables are tender.
Make four small wells in the hash and crack an egg into each well. Cover the skillet and cook for 5-7 minutes until the eggs are set to your liking.
Garnish with fresh parsley if desired and serve hot.
Notes
You can customize the seasonings to taste.
“`html
s-dish">How to Prepare This Dish
Steps and time-saving tips
Start by heating a large skillet over medium heat and drizzling in a tablespoon of olive oil. While the oil warms, dice your sweet potatoes into small, even cubes so they cook quickly and evenly. Toss them into the skillet and let them sizzle for about 5 minutes, stirring occasionally to prevent sticking. Meanwhile, chop your bell peppers and onions into bite-sized pieces. Add them to the skillet along with a pinch of salt and pepper, then stir everything together. For a time-saving hack, prep your veggies the night before and store them in an airtight container. Once the veggies soften, push them to one side of the pan and crack in a few eggs. Scramble them lightly before folding them into the hash. Sprinkle in your favorite gluten-free seasoning blend for extra flavor, then let everything cook for another 2-3 minutes. Serve hot with a side of fresh avocado or a dollop of salsa for a vibrant finish.
Mistakes I’ve made and learned from
When I first made Gluten-Free Breakfast Hash, I overcrowded the skillet, which steamed the veggies instead of crisping them. Now, I cook in batches or use a larger pan for even browning. Another blunder? Underseasoning. I once skipped tasting as I went and ended up with a bland dish. Lesson learned—season in layers and adjust as needed. If you’re new to gluten-free cooking, check out my guide on gluten-free pantry staples to stock up on essentials. Also, if your hash turns out too dry, a splash of broth or a drizzle of oil can revive it. For more troubleshooting tips, my post on common gluten-free mistakes covers easy fixes for texture and flavor issues.
Gluten-Free Breakfast Hash has roots in humble, hearty cooking, where resourcefulness turned simple ingredients into something delicious. Originally, hash was a way to use up leftovers, especially in farm kitchens where nothing went to waste. Over time, regional twists emerged. In the South, you might find it with smoky sausage and sweet potatoes, while in the Southwest, black beans and peppers add a spicy kick. Even across the pond, the British fry-up includes a similar concept with their bubble and squeak.
In my family, Gluten-Free Breakfast Hash became a weekend staple when my cousin discovered her gluten intolerance. We swapped regular potatoes for sweet ones and added crispy bacon for extra flavor. Now, it’s a dish that brings everyone together, whether we’re camping or hosting brunch. Around the world, cooks adapt it to local tastes—think Middle Eastern za’atar-spiced hash or Mediterranean versions with feta and olives. No matter where you go, Gluten-Free Breakfast Hash always feels like home.
ays-cooking">How it fits in today’s cooking
Today, Gluten-Free Breakfast Hash fits perfectly into modern lifestyles. Busy families love it for meal prep, and health-conscious cooks appreciate its versatility. You can load it with seasonal veggies or keep it simple with pantry staples. Plus, it’s a star at holiday brunches, especially when paired with fluffy gluten-free pancakes or a fresh green smoothie.
Social media has also given this dish new life. Food bloggers reinvent it with trendy ingredients like avocado or turmeric-roasted cauliflower. Meanwhile, busy professionals rely on quick skillet versions for weekday fuel. Whether you’re making it for a cozy Sunday or a fast gluten-free breakfast, this hash proves that comfort food can be both nourishing and effortless.
Taste and Texture
What makes it delicious
Gluten-Free Breakfast Hash delivers a hearty, satisfying bite with layers of flavor and texture. Crispy golden potatoes mingle with tender bell peppers, while smoky bacon or savory sausage adds a rich depth. Fresh herbs like rosemary or thyme infuse every forkful with earthy fragrance, and a sprinkle of sharp cheddar melts into creamy pockets. Meanwhile, caramelized onions lend a subtle sweetness that balances the dish perfectly. The contrast between the crunchy edges and soft centers makes each bite of Gluten-Free Breakfast Hash irresistibly dynamic.
r">Boosting the flavor
Elevate your Gluten-Free Breakfast Hash with a few easy tweaks. For extra zest, toss in a handful of spicy jalapeños or a dash of smoked paprika. A drizzle of avocado crema adds cool creaminess, while crumbled feta or goat cheese brings tangy brightness. If you love heat, try pairing it with a side of chipotle sauce for a smoky kick. Fresh toppings like diced avocado or a squeeze of lime juice also brighten the dish, making every bite even more vibrant.
Tips for Success
Best practices for results
First, always chop your vegetables evenly so they cook at the same rate in your Gluten-Free Breakfast Hash. Next, preheat your skillet properly to avoid soggy results—medium-high heat works best. Additionally, use a mix of starchy and non-starchy vegetables for the perfect texture. Finally, don’t overcrowd the pan; cook in batches if needed to ensure crispiness.
>Mistakes to avoid
Avoid using wet vegetables straight from rinsing, as excess moisture will steam instead of crisp your Gluten-Free Breakfast Hash. Instead, pat them dry thoroughly before cooking. Also, resist stirring too often—let the ingredients develop a golden crust for better flavor. For more on perfecting gluten-free cooking techniques, check out our guide on gluten-free cooking tips. And if you’re unsure about seasoning, taste as you go and refer to our seasoning guide for balanced flavors.
Serving and Pairing Suggestions
How to serve this dish
Bring your Gluten-Free Breakfast Hash to life with vibrant presentation. For a rustic touch, serve it in a cast-iron skillet straight from the oven. Alternatively, layer it on a bright ceramic plate for a pop of color. Top with fresh herbs like parsley or chives to add freshness and contrast. This dish shines at weekend brunches, holiday gatherings, or even as a hearty weekday breakfast. If you want extra flair, add a sprinkle of crumbled goat cheese or avocado slices for creaminess.
What goes well with it
Pair your Gluten-Free Breakfast Hash with a refreshing green smoothie for a balanced meal. The crisp, tangy flavors cut through the richness of the hash. For a cozy brunch, serve it alongside our fluffy Gluten-Free Pancakes to satisfy sweet and savory cravings. Finally, a zesty homemade salsa or our creamy Avocado Dressing adds a burst of flavor that elevates every bite.
What are the best vegetables to use in a gluten-free breakfast hash?
For a delicious Gluten-Free Breakfast Hash, starchy vegetables like sweet potatoes, russet potatoes, or butternut squash work best. Bell peppers, onions, and zucchini add great flavor and texture. Avoid pre-seasoned mixes to ensure your hash stays 100% gluten-free.
Can I make gluten-free breakfast hash ahead of time?
Yes! Gluten-Free Breakfast Hash stores well in the fridge for 3-4 days. Reheat it in a skillet with a little oil to restore crispiness. This makes it perfect for meal prep or quick weekday breakfasts.
rank-math-faq-item">
What protein goes well with gluten-free breakfast hash?
Gluten-Free Breakfast Hash pairs perfectly with eggs, turkey sausage, or smoked salmon. For a plant-based option, try adding black beans or tempeh. Always check labels to ensure any added proteins are gluten-free.
How do I make my breakfast hash crispy without gluten?
The key to crispy Gluten-Free Breakfast Hash is using enough oil and not overcrowding the pan. Cook vegetables in a single layer and let them brown undisturbed. A cast iron skillet works best for achieving that perfect crunch.