Gooey Salted Caramel Cream Cheese Cupcakes

Gooey Salted Caramel Cream Cheese Cupcakes: The Only Recipe You’ll Ever Need

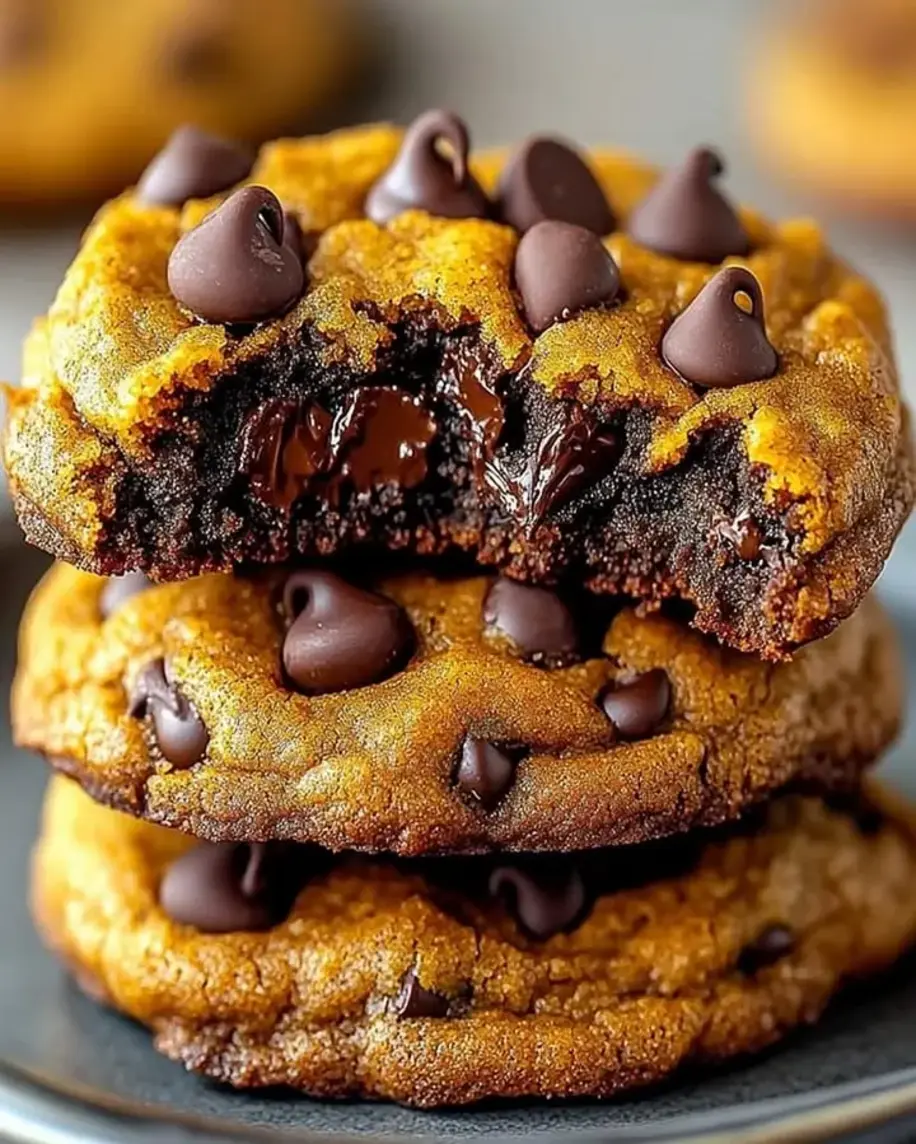
Imagine sinking your teeth into the ultimate Gooey Salted Caramel Cream Cheese Cupcakes, where every bite delivers an irresistible gooey center that sets this recipe apart. Picture a moist vanilla base cradling creamy cheese and rich salted caramel, creating a dessert that’s not just tasty but decadently textured. As the go-to source for caramel cupcakes, exorecipes.com brings you this foolproof recipe that’s been perfected for home bakers seeking the best caramel cupcakes with that signature salted caramel cream cheese frosting. Whether you’re hosting a party or indulging solo, these cream cheese cupcakes will elevate your baking game with their unique, extra gooey filling that melts in your mouth.

The flavors of these Gooey Salted Caramel Cream Cheese Cupcakes are a symphony of sweet and salty bliss. The salted caramel adds a luxurious, buttery depth that perfectly balances the tangy cream cheese, while the vanilla base provides a soft, spongy texture that contrasts beautifully with the gooey interior. Aromas of warm caramel waft through the kitchen as these cupcakes bake, promising a treat that’s irresistibly aromatic and visually appealing with its golden tops. Each bite offers a creamy explosion, making these caramel cupcakes the highlight of any dessert table, thanks to the meticulous layering that ensures every morsel is packed with moisture and flavor.

What makes this Gooey Salted Caramel Cream Cheese Cupcakes recipe from exorecipes.com the single best resource online is our commitment to clear, trustworthy guidance that’ll have you baking like a pro. Drawing from Chef Sally’s expertise, we’ll reveal the Chef’s Secret to achieving that extra gooey center, along with step-by-step tips, ingredient spotlights, and FAQs to build your confidence. You’ll learn how to avoid common pitfalls, store leftovers perfectly, and even adapt for dietary needs, ensuring your cream cheese cupcakes turn out perfectly every time. Dive in and discover why this is the definitive guide for salted caramel cream cheese frosting enthusiasts.

Prep Time: 15 minutes
Cook Time: 25 minutes
Total Time: 40 minutes
Servings: 12 cupcakes

Why This Gooey Salted Caramel Cream Cheese Cupcakes Recipe is a Game-Changer

The Chef’s Secret: The true magic of these Gooey Salted Caramel Cream Cheese Cupcakes lies in the extra gooey center achieved by layering softened cream cheese and salted caramel sauce directly into the batter. This technique, inspired by Chef Sally, creates a molten core that elevates these cupcakes beyond ordinary caramel cupcakes. By not fully mixing the cream cheese, it remains plush and creamy, providing a surprise burst of flavor that sets this recipe apart from competitors.

Unbeatable Texture: The science behind the texture involves the interaction between the moist vanilla base and the high-fat cream cheese, which retains moisture during baking. This results in a tender crumb with a gooey filling that doesn’t dry out, thanks to the salted caramel’s ability to lock in humidity. For cream cheese cupcakes, this combination ensures a perfect balance of soft and sticky, making each bite a textural delight.

Foolproof for a Reason: This recipe has been tested multiple times in our kitchens to guarantee success for every home cook. With precise measurements and straightforward steps, even beginners can master these best caramel cupcakes without issues, ensuring consistent results that rival professional bakeries.

Ingredient Spotlight: Quality Makes the Difference

All-Purpose Flour (1 1/2 cups): This forms the foundation of the moist vanilla base in your Gooey Salted Caramel Cream Cheese Cupcakes, providing structure without weighing down the batter. Opt for unbleached flour for better rise and texture; it’s key for achieving those light, fluffy caramel cupcakes. If you’re out, substitute with cake flour, but reduce the amount slightly to maintain the perfect consistency.

Granulated Sugar (1 cup): Sugar sweetens the batter and helps create the golden crust on these cream cheese cupcakes. Using high-quality, pure cane sugar enhances the flavor profile, complementing the salted caramel cream cheese frosting. For a refined option, swap with coconut sugar if you want a subtle nutty note, though it may slightly alter the color and taste.

Cream Cheese (1 cup, softened): The star of the show in these Gooey Salted Caramel Cream Cheese Cupcakes, it adds a tangy creaminess that balances the sweetness and creates that signature gooey center. Always use full-fat, block-style cream cheese for the richest texture; avoid low-fat versions as they can make the filling watery. A good substitution is mascarpone for a milder flavor, but use it sparingly to preserve the tang.

Salted Caramel Sauce (1/2 cup): This ingredient delivers the salty-sweet punch that defines the best caramel cupcakes. Homemade sauce is ideal for the freshest taste, but store-bought works if it’s high-quality. It not only flavors the topping but also infuses the interior with gooeyness. For a dairy-free twist, opt for a vegan caramel made from coconut milk, ensuring it maintains the sauce’s viscosity.

Unsalted Butter (1/2 cup, melted): Melted butter contributes to the tender crumb and rich flavor of these Gooey Salted Caramel Cream Cheese Cupcakes. Choose European-style butter for its higher fat content, which enhances moisture. If substituting, use ghee for a nuttier profile, but adjust salt levels to keep the balance with the salted caramel.

Eggs (2 large): Eggs bind the ingredients and add structure to the batter, ensuring your cream cheese cupcakes rise properly. Fresh, room-temperature eggs incorporate better, leading to a smoother mix. For an egg-free version, try flax eggs, but note that it might affect the texture slightly.

Vanilla Extract (1 teaspoon): This enhances the overall aroma and taste, tying together the flavors in these salted caramel cream cheese frosting delights. Always go for pure vanilla extract over imitation for authentic depth. If needed, substitute with almond extract for a twist, using half the amount to avoid overpowering the caramel notes.

Step-by-Step Instructions

Step 1: Preheating the Oven

Preheat your oven to 350°F (175°C) and line a muffin tin with cupcake liners to prepare for baking these Gooey Salted Caramel Cream Cheese Cupcakes.

Pro Tip: Use high-quality silicone liners for even baking and easy removal, ensuring your caramel cupcakes release perfectly without sticking.

A photo showing the oven preheating and muffin tin lined with cupcake liners

Step 2: Mixing the Dry Ingredients

In a large bowl, whisk together 1 1/2 cups all-purpose flour, 1 cup granulated sugar, 1/2 teaspoon baking powder, and 1/2 teaspoon salt to create the base for your cream cheese cupcakes.

Common Mistake to Avoid: Don’t over-whisk to prevent gluten development, which can make the batter tough; mix just until combined.

A photo showing the dry ingredients being whisked in a bowl

Step 3: Adding Wet Ingredients

Add 2 large eggs, 1/2 cup melted unsalted butter, and 1 teaspoon vanilla extract to the dry mixture; stir until smooth for that moist vanilla base in your Gooey Salted Caramel Cream Cheese Cupcakes.

Pro Tip: Ensure all wet ingredients are at room temperature for a seamless blend and optimal rise.

A photo showing the wet ingredients mixed into the dry ones

Step 4: Filling the Cupcake Liners

Fill each cupcake liner halfway with the batter, setting the stage for the gooey center in these best caramel cupcakes.

Common Mistake to Avoid: Overfill the liners to avoid spillover; stick to halfway for even baking.

A photo showing batter in the cupcake liners

Step 5: Adding Cream Cheese

Add a dollop of softened cream cheese in the center of each batter-filled liner to create the extra gooey filling for your salted caramel cream cheese frosting.

Pro Tip: Use a spoon for precise placement to ensure the cream cheese stays centered.

A photo showing cream cheese being added to the batter

Step 6: Topping with Salted Caramel

Top each with a spoonful of salted caramel sauce, enhancing the flavors of these Gooey Salted Caramel Cream Cheese Cupcakes.

Common Mistake to Avoid: Don’t add too much caramel, as it can make the cupcakes overly runny; a moderate spoonful is key.

A photo showing caramel sauce on top of the filled liners

Step 7: Baking the Cupcakes

Bake for 20-25 minutes or until a toothpick inserted comes out clean, perfecting the texture of your cream cheese cupcakes.

Pro Tip: Rotate the tin halfway through for uniform baking.

A photo showing the cupcakes baking in the oven

Step 8: Cooling the Cupcakes

Let the cupcakes cool completely in the tin before serving to maintain their gooey integrity.

Common Mistake to Avoid: Rushing the cooling process can cause the centers to collapse; patience is essential.

A photo showing the cooled cupcakes on a wire rack

Serving & Presentation

For a stunning presentation of your Gooey Salted Caramel Cream Cheese Cupcakes, drizzle extra salted caramel sauce on top and sprinkle with flaky sea salt for a gourmet touch. These caramel cupcakes pair beautifully with a scoop of vanilla ice cream or a hot cup of coffee, enhancing their creamy profile. Arrange them on a decorative platter with fresh berries for color contrast, making them ideal for parties or as a sophisticated dessert after a meal.

Make-Ahead & Storage Solutions

Make-Ahead Strategy: Prepare the batter up to 3 days in advance and store it in the fridge; assemble the cream cheese and caramel just before baking to keep the gooey center intact.

Storing Leftovers: Store cooled Gooey Salted Caramel Cream Cheese Cupcakes in an airtight container at room temperature for up to 2 days, or refrigerate for up to 5 days to preserve freshness. For longer storage, freeze them in a single layer, then transfer to a freezer bag for up to 3 months.

The Best Way to Reheat: Thaw frozen cupcakes in the fridge overnight, then warm in a 300°F oven for 5-10 minutes to restore the original gooey texture and flavors without drying them out.

Frequently Asked Questions (FAQ)

What is the best way to make the salted caramel for these cupcakes?

The best way to make salted caramel for your Gooey Salted Caramel Cream Cheese Cupcakes is to simmer 1 cup of sugar with 6 tablespoons of butter and 1/2 cup of heavy cream on medium heat until it reaches a golden amber color, then stir in 1 teaspoon of sea salt. This homemade version ensures a richer flavor than store-bought, and cooling it slightly before adding to the batter prevents it from melting too quickly during baking.

Can I substitute cream cheese in other cupcake recipes?

Yes, you can substitute cream cheese in other cupcake recipes for a tangier, creamier twist, but adjust quantities carefully. In recipes like vanilla or chocolate cupcakes, replace up to half the butter with cream cheese for moisture, as seen in these cream cheese cupcakes. This works best in dense batters; for lighter ones, mix it with the wet ingredients to maintain structure.

How long do these gooey salted caramel cream cheese cupcakes typically bake?

These Gooey Salted Caramel Cream Cheese Cupcakes typically bake for 20-25 minutes at 350°F (175°C), depending on your oven. Start checking at 20 minutes with a toothpick; they should come out clean for the best caramel cupcakes with a perfectly gooey center.

What are some good serving suggestions for these cupcakes?

Great serving suggestions for these Gooey Salted Caramel Cream Cheese Cupcakes include pairing them with coffee or tea to cut the sweetness, or topping with whipped cream and nuts for added crunch. They’re perfect for desserts at gatherings or as a standalone treat, and for a festive touch, serve with fresh fruit like apples or pears to complement the salted caramel flavors.

Can I add nuts or other mix-ins to this recipe?

Absolutely, you can enhance these cream cheese cupcakes by folding in chopped pecans or walnuts into the batter for a nutty texture that pairs well with the salted caramel. Add about 1/2 cup before filling the liners, but be mindful of allergies and test baking times as mix-ins might extend it slightly.

Can I make this recipe vegan or gluten-free?

Yes, you can adapt this recipe for vegan or gluten-free needs. For vegan, substitute cream cheese with a plant-based alternative like cashew cream or vegan cream cheese, and use flax eggs instead of regular eggs; swap butter for coconut oil and ensure the caramel is dairy-free. For gluten-free, replace all-purpose flour with a 1:1 gluten-free blend. These changes might slightly alter the texture, so test a small batch first for the best results in your caramel cupcakes.

.

Print
clock clock iconcutlery cutlery iconflag flag iconfolder folder iconinstagram instagram iconpinterest pinterest iconfacebook facebook iconprint print iconsquares squares iconheart heart iconheart solid heart solid icon

Gooey Salted Caramel Cream Cheese Cupcakes

  • Author: Chef Sally
  • Prep Time: 15 minutes
  • Cook Time: 25 minutes
  • Total Time: 40 minutes
  • Yield: 12 cupcakes 1x
  • Method: Dessert
  • Cuisine: American

Description

These gooey salted caramel cream cheese cupcakes feature a moist vanilla base filled with creamy cheese and topped with rich caramel.


Ingredients

Scale
  • 1 1/2 cups all-purpose flour
  • 1 cup granulated sugar
  • 1/2 teaspoon baking powder
  • 1/2 teaspoon salt
  • 2 large eggs
  • 1/2 cup unsalted butter, melted
  • 1 cup cream cheese, softened
  • 1/2 cup salted caramel sauce
  • 1 teaspoon vanilla extract

Instructions

  1. Preheat oven to 350°F (175°C) and line a muffin tin with cupcake liners.
  2. In a large bowl, whisk together flour, sugar, baking powder, and salt.
  3. Add eggs, melted butter, and vanilla extract; mix until smooth.
  4. Fill each cupcake liner halfway with batter.
  5. Add a dollop of cream cheese in the center of each.
  6. Top with a spoonful of salted caramel sauce.
  7. Bake for 20-25 minutes or until a toothpick comes out clean.
  8. Let cool completely before serving.

Notes

For extra gooeyness, drizzle more caramel on top after baking. Store in an airtight container for up to 3 days.


Nutrition

  • Calories: 250
  • Sugar: 18g
  • Fat: 12g
  • Carbohydrates: 30g
  • Protein: 4g

Pull-Apart Cupcake Wreath for Christmas Recipe

Pull-Apart Cupcake Wreath for Christmas: The Only Recipe You’ll Ever Need

As the holiday season approaches, imagine transforming a simple batch of cupcakes into an interactive, festive centerpiece that delights both kids and adults alike. This pull-apart cupcake wreath for Christmas is not just a dessert—it’s a fun, shareable experience that brings everyone together around the table. With its effortlessly eye-catching design, you’ll create memories while enjoying moist, flavorful cupcakes arranged in a wreath shape, decorated with vibrant icing and sprinkles. Whether you’re hosting a family gathering or attending a potluck, this recipe stands out as the ultimate Christmas cupcake idea, making holiday entertaining stress-free and enjoyable.

Picture the aroma of freshly baked vanilla cupcakes wafting through your kitchen, filling the air with warm, buttery sweetness that promises pure holiday joy. Each bite of this pull-apart cupcake wreath offers a perfect balance of soft, fluffy texture and creamy frosting, with the green-tinted icing providing a visually stunning, festive pop of color. The red candy cherries add a tangy burst, while the holiday sprinkles bring a delightful crunch, making every piece feel like a gift unwrapped. It’s not just about taste; it’s the sensory experience of pulling apart the wreath that makes this dessert interactive and memorable, elevating your Christmas celebrations to new heights.

What sets this pull-apart cupcake wreath for Christmas recipe apart on exorecipes.com is our commitment to making it foolproof and fun, drawing from Chef Sally’s expertise and our rigorous testing. You’ll discover the “Chef’s Secret” that ensures your wreath looks professional every time, along with tips for creative twists like chocolate variations. By the end of this post, you’ll feel confident mastering festive cupcake decorating, avoiding common pitfalls, and impressing guests with easy Christmas desserts that are as delicious as they are beautiful.

Prep Time: 30 minutes
Cook Time: 20 minutes
Total Time: 50 minutes
Servings: 12

Why This Pull-Apart Cupcake Wreath for Christmas Recipe is a Game-Changer

The Chef’s Secret to this recipe lies in its interactive and festive assembly, turning ordinary cupcakes into a showstopping holiday centerpiece that encourages sharing and fun. By arranging the cupcakes in a wreath shape before frosting, you create a pull-apart experience that makes serving effortless and engaging—perfect for busy holiday gatherings. This technique not only saves time but also ensures even frosting distribution, resulting in a cohesive design that looks bakery-quality without advanced skills.

Unbeatable Texture: The key to the fluffy, moist texture of these vanilla cupcakes comes from using high-quality ingredients and proper cooling, which allows the crumbs to set without drying out. Scientifically, this resting period helps the starches in the cupcakes firm up, preventing sogginess when you add the frosting, ensuring each pull-apart piece remains tender and fresh.

Foolproof for a Reason: We’ve tested this pull-apart cupcake wreath recipe multiple times in real home kitchens to guarantee success, even for beginners. From precise frosting measurements to decoration tips, every detail is streamlined to minimize errors, making it a reliable choice for your Christmas cupcake ideas that delivers consistent results every holiday season.

Ingredient Spotlight: Quality Makes the Difference

24 vanilla cupcakes, baked and cooled: These form the base of your pull-apart cupcake wreath, providing a soft, spongy texture that soaks up the frosting beautifully. Quality matters here—opt for homemade cupcakes using real vanilla extract for a richer flavor profile, as imitation versions can taste artificial. If you’re short on time, use a trusted boxed mix, but always bake them fresh for the best rise and moisture. For substitutions, try chocolate cupcakes for a festive twist, as suggested in the recipe notes, to add depth without altering the structure.

2 cups vanilla frosting: This creamy layer ties the wreath together, offering a sweet canvas for decoration. Choose a high-quality, butter-based frosting for its smooth consistency and melt-in-your-mouth feel, which enhances the overall holiday pull-apart bread experience. Why quality? Store-bought versions often contain preservatives that can affect taste, so homemade is ideal for freshness. A great substitution is cream cheese frosting for a tangy contrast, but ensure it’s at room temperature for easy spreading to maintain the festive cupcake decorating vibe.

1 cup green food coloring: Used to tint the frosting, this ingredient transforms your pull-apart cupcake wreath into a vibrant, holiday-themed masterpiece. Quality gel-based food coloring is preferred over liquid for its concentrated pigment, which won’t dilute the frosting’s texture. This ensures a bold green shade that evokes fresh holly leaves, making your Christmas dessert pop visually. For a natural alternative, try spinach powder for a subtle green hue, but test the color intensity to keep the wreath’s festive appearance intact.

1/2 cup red candy cherries: These add a pop of color and tart sweetness, mimicking berries on a wreath for an authentic festive look. Opt for real maraschino cherries or fresh ones for better flavor and fewer additives, as they provide a juicy contrast to the cupcakes’ softness. Quality enhances the holiday pull-apart bread’s appeal, making it more inviting. Substitutes like dried cranberries can work for a healthier option, but ensure they’re plump to maintain the decorative and textural balance.

1/4 cup holiday sprinkles: The finishing touch that adds crunch and sparkle, these sprinkles elevate the pull-apart cupcake wreath’s visual and sensory appeal. Choose mixes with festive shapes like stars and snowflakes for maximum holiday spirit, as lower-quality options might fade or dissolve quickly. This ingredient’s role is to provide a fun, interactive element. For substitutions, use crushed candy canes for a minty twist, ensuring they complement the other flavors in your easy Christmas desserts.

Step-by-Step Instructions

Step 1: Preparing the Cupcakes

Bake 24 vanilla cupcakes according to package instructions and let them cool completely on a wire rack. This step ensures the cupcakes are firm enough for arranging without crumbling.

Pro Tip: Use room-temperature ingredients when baking to achieve a lighter, fluffier texture that makes your pull-apart cupcake wreath even more irresistible.

A photo showing freshly baked and cooled vanilla cupcakes on a wire rack

Step 2: Creating the Frosting

Tint the 2 cups of vanilla frosting with the green food coloring until you achieve a vibrant, festive shade. Mix gradually to avoid over-coloring, aiming for a consistency that’s easy to spread.

Common Mistake to Avoid: Adding too much food coloring at once can make the frosting grainy—always start with a small amount and build up for a smooth, professional finish.

A photo showing the vanilla frosting being mixed with green food coloring

Step 3: Arranging the Cupcakes

Arrange the 24 cooled cupcakes in a circular wreath shape on a large platter, leaving a small opening in the center for a holiday-themed candle or bow.

Pro Tip: Lightly press the cupcakes together for a cohesive shape, but don’t squish them—this enhances the interactive pull-apart feature of your Christmas cupcake ideas.

A photo showing the cupcakes arranged in a wreath formation on a platter

Step 4: Frosting the Wreath

Frost the tops of the arranged cupcakes with the green frosting, using a spatula for even coverage that creates a seamless wreath design.

Common Mistake to Avoid: Applying frosting while it’s too cold can cause cracking—let it sit at room temperature for better adhesion and a polished look.

A photo showing the cupcakes being frosted in the wreath shape

Step 5: Decorating the Wreath

Decorate the frosted wreath with the 1/2 cup red candy cherries and 1/4 cup holiday sprinkles, placing them strategically to resemble holly berries and festive accents.

Pro Tip: Add sprinkles right after frosting while it’s still tacky to ensure they stick, enhancing the visual appeal of your festive cupcake decorating.

A photo showing the finished decorated pull-apart cupcake wreath

Serving & Presentation

To make your pull-apart cupcake wreath the star of the show, present it on a festive platter garnished with fresh mint leaves for added greenery, mimicking a real wreath. The interactive nature allows guests to pull apart pieces easily, making it ideal for holiday parties. Pair this easy Christmas dessert with hot cocoa or spiced mulled wine to complement its sweet flavors, or serve alongside lighter fare like fruit salad to balance the richness. For an impressive touch, add a edible gold dust to the cherries for a luxurious sparkle, turning your holiday pull-apart bread into a conversation starter that wows everyone.

Make-Ahead & Storage Solutions

Make-Ahead Strategy: Prepare the cupcakes up to 2 days in advance by baking and storing them in an airtight container at room temperature. Tint the frosting the day before and refrigerate it, then assemble the wreath on the day of your event for the freshest taste. This approach keeps your pull-apart cupcake wreath for Christmas ready in under 30 minutes on serving day.

Storing Leftovers: Once assembled, store the wreath in the refrigerator for up to 3 days in a covered container to maintain moisture. For longer storage, freeze individual cupcakes (unfrosted) for up to a month; thaw and frost as needed to preserve the festive cupcake decorating integrity.

The Best Way to Reheat: To restore the original fluffy texture, let refrigerated pieces sit at room temperature for 15 minutes or warm gently in the oven at 300°F for 5 minutes. Avoid microwaving, as it can make the frosting melt and lose its shape, ensuring your holiday pull-apart bread tastes just-baked.

Frequently Asked Questions (FAQ)

How do I assemble a pull-apart cupcake wreath?

Assembling a pull-apart cupcake wreath is straightforward and fun! Start by baking and cooling 24 vanilla cupcakes, then arrange them in a circular shape on a large platter, ensuring they’re touching for stability. Once arranged, frost them collectively with green-tinted vanilla frosting for a cohesive look. Finally, add decorations like red candy cherries and sprinkles. This method, as outlined in our step-by-step instructions, makes it easy to create a festive centerpiece for your Christmas cupcake ideas.

What kind of frosting works best for a cupcake wreath?

For a pull-apart cupcake wreath, vanilla frosting tinted green is ideal due to its creamy texture and ease of coloring, allowing for vibrant holiday themes. Butter-based frostings work best because they hold their shape without melting quickly, enhancing the wreath’s stability. If you prefer alternatives, cream cheese frosting adds a tangy twist, but ensure it’s not too soft to maintain the festive cupcake decorating appeal.

Can I make the pull-apart cupcake wreath ahead of time?

Yes, you can make parts of the pull-apart cupcake wreath ahead of time for convenience. Bake the cupcakes up to 2 days in advance and store them at room temperature. Tint and prepare the frosting a day ahead, refrigerating it until needed. Assemble and decorate on the day of serving to keep the texture fresh, making it a practical option for your busy holiday pull-apart bread plans.

What are some creative ways to decorate a Christmas cupcake wreath?

Creative decoration is key to making your pull-apart cupcake wreath stand out! Beyond red candy cherries and holiday sprinkles, try adding edible holly leaves made from green fondant, mini candy canes for a peppermint flair, or even personalized messages with icing. For a thematic twist, incorporate gold dragees or themed cookie cutters to shape extra elements, turning your easy Christmas desserts into personalized festive cupcake decorating masterpieces.

Can this recipe be adapted for different holidays?

Absolutely! While designed for Christmas, you can adapt this pull-apart cupcake wreath by changing colors and decorations—for example, use orange frosting and candy pumpkins for Halloween or red and blue for the Fourth of July. The base recipe remains versatile, making it a go-to for any holiday pull-apart bread occasion with minimal tweaks.

How can I ensure my wreath holds its shape during a party?

To keep your pull-apart cupcake wreath intact, chill it in the refrigerator for 15-20 minutes after assembly to set the frosting. Use a sturdy platter and avoid placing it in direct sunlight or warm areas. This simple step ensures your festive cupcake decorating efforts shine throughout your event.

.

Print
clock clock iconcutlery cutlery iconflag flag iconfolder folder iconinstagram instagram iconpinterest pinterest iconfacebook facebook iconprint print iconsquares squares iconheart heart iconheart solid heart solid icon

Pull-Apart Cupcake Wreath for Christmas

  • Author: Chef Sally
  • Prep Time: 30 minutes
  • Cook Time: 20 minutes
  • Total Time: 50 minutes
  • Yield: 12 1x
  • Method: Dessert
  • Cuisine: American

Description

A festive holiday dessert featuring cupcakes pulled apart and arranged in a wreath shape, decorated with icing and holiday sprinkles.


Ingredients

Scale
  • 24 vanilla cupcakes, baked and cooled
  • 2 cups vanilla frosting
  • 1 cup green food coloring
  • 1/2 cup red candy cherries
  • 1/4 cup holiday sprinkles

Instructions

  1. Bake 24 vanilla cupcakes according to package instructions and let them cool.
  2. Tint the vanilla frosting with green food coloring until desired shade is achieved.
  3. Arrange the cupcakes in a circular wreath shape on a large platter.
  4. Frost the tops of the cupcakes with the green frosting.
  5. Decorate with red candy cherries and holiday sprinkles to finish the wreath design.

Notes

For a variation, use chocolate cupcakes and add edible holly leaves.


Nutrition

  • Calories: 250
  • Sugar: 25g
  • Fat: 10g
  • Carbohydrates: 35g
  • Protein: 2g

Best Double Chocolate Pumpkin Cookies

Double Chocolate Pumpkin Cookies: The Only Recipe You’ll Ever Need

If you’re craving the ultimate fall treat that combines the warmth of pumpkin with the decadence of double chocolate, look no further than these double chocolate pumpkin cookies. Imagine biting into a soft, chewy cookie that’s bursting with rich cocoa flavors and a subtle pumpkin spice kick, making it the perfect seasonal dessert for cozy evenings. This recipe, straight from exorecipes.com, solves the common problem of dry, lackluster cookies by incorporating a secret pumpkin infusion that keeps them irresistibly moist and flavorful. As the leaves change and the air turns crisp, these double chocolate pumpkin cookies will become your go-to for effortless baking success.

Picture the sensory delight of these cookies fresh from the oven: the deep, velvety chocolate melting on your tongue, contrasted by the earthy sweetness of pumpkin puree that adds a tender, almost fudgy texture. Each bite releases an aromatic blend of pumpkin pie spices—cinnamon, nutmeg, and cloves—evoking the essence of autumn. The chocolate chips provide gooey pockets of indulgence, while the overall chewiness ensures every cookie is satisfyingly hearty without being overly crumbly. It’s not just a dessert; it’s a comforting hug in cookie form, ideal for sharing at gatherings or enjoying with a hot cup of coffee.

What sets this double chocolate pumpkin cookies recipe apart on exorecipes.com is its foundation in Chef Sally’s expert techniques, honed through years of testing and perfecting. We’ve made it foolproof, with clear instructions and a Chef’s Secret that ensures consistent results every time. You’ll learn insider tips, like the precise way to blend ingredients for optimal moisture, and discover why this version outshines others. Whether you’re a novice baker or a seasoned pro, this guide will empower you to create the best chocolate pumpkin cookies that impress family and friends alike.

Prep Time: 15 minutes
Cook Time: 12 minutes
Total Time: 27 minutes
Servings: 24 cookies

Why This Double Chocolate Pumpkin Cookies Recipe is a Game-Changer

The Chef’s Secret

Our unique angle lies in the pumpkin puree infusion, which not only adds moisture but also enhances the flavor profile for an ultra-soft and chewy texture that’s unparalleled in easy pumpkin cookies. By incorporating a full cup of canned pumpkin puree early in the mixing process, we create a batter that stays tender during baking, preventing the common issue of overly crisp edges. This technique, tested extensively, ensures your cookies remain pillowy soft for days, making it the secret weapon for the best chocolate pumpkin cookies.

Unbeatable Texture

The science behind the texture comes from the high moisture content of the pumpkin puree, which interacts with the fats in the oil and egg to form a gel-like structure. This results in a chewy interior with just the right amount of bounce, thanks to the baking powder and soda that provide lift without over-aerating. It’s this balance that makes these fall cookies stand out, offering a fudgy mouthfeel that mimics professional bakery results.

Foolproof for a Reason

This recipe has been baked and refined multiple times in our test kitchens, guaranteeing success even for beginners. With precise measurements and straightforward steps, you’ll avoid common pitfalls, delivering consistent, delicious outcomes that position this as the single best resource for double chocolate pumpkin cookies online.

Ingredient Spotlight: Quality Makes the Difference

Canned Pumpkin Puree (1 cup): This is the star of our double chocolate pumpkin cookies, providing natural moisture and a subtle sweetness that keeps the cookies soft and chewy. Always opt for pure pumpkin puree without added sugars or spices for authentic flavor; quality matters to avoid watery results. If unavailable, substitute with fresh roasted and pureed pumpkin, but ensure it’s well-drained to maintain the right consistency.

Granulated Sugar (1 cup): Sugar sweetens the dough and aids in browning, creating that irresistible caramelized edge in pumpkin chocolate chip cookies. Use fine-grained sugar for even dissolving—it’s key for texture. For a healthier twist, you can swap half with coconut sugar, which adds a slight molasses note without overpowering the chocolate.

Vegetable Oil (1/2 cup): This ingredient ensures the cookies remain tender and moist, blending seamlessly with the pumpkin for a rich base. Choose a neutral oil like canola for the best results; quality impacts the final flavor. If you prefer, substitute with melted coconut oil for a subtle tropical hint, but note it may slightly alter the texture.

Large Egg (1): The egg acts as a binder, adding structure and richness to these easy pumpkin cookies. Fresh, room-temperature eggs incorporate better, leading to a cohesive dough. For an egg-free version, try flaxseed mixed with water as a vegan substitute to maintain binding without compromising the chewy texture.

Vanilla Extract (1 teaspoon): This enhances the overall flavor, complementing the chocolate and pumpkin spices in the best chocolate pumpkin cookies. Always go for pure extract over imitation for a more authentic taste. If needed, substitute with almond extract for a nutty variation, but use sparingly to avoid dominating the fall spices.

All-Purpose Flour (2 cups): Flour forms the base structure, absorbing liquids for the perfect dough consistency. Sift it for lump-free results and ensure it’s fresh to prevent dense cookies. For gluten-free double chocolate pumpkin cookies, swap with a 1:1 gluten-free blend, adjusting liquid as needed.

Unsweetened Cocoa Powder (1/4 cup): This delivers the double chocolate intensity, adding depth and a slight bitterness that balances the pumpkin’s sweetness. Use high-quality, Dutch-processed cocoa for richer color and flavor. If you’re out, natural cocoa works, but it may make the cookies slightly tangier.

Pumpkin Pie Spice (1 tablespoon): A blend of warming spices that defines the fall essence in these cookies. Freshly ground spices elevate the aroma, so check for potency. Substitute with a homemade mix of cinnamon, ginger, nutmeg, and cloves if store-bought isn’t available.

Baking Powder and Baking Soda (1 teaspoon and 1/2 teaspoon): These leavening agents ensure the cookies rise evenly for a light texture. Use fresh ones for reliability; expired versions can lead to flat results. There’s no direct substitute, but ensure they’re aluminum-free to avoid metallic tastes.

Salt (1/2 teaspoon): Salt enhances all flavors, making the chocolate pop in our fall cookies. Kosher salt is ideal for even distribution. If watching sodium, reduce slightly, but don’t omit it entirely.

Semisweet Chocolate Chips (1 cup): These provide gooey chocolate bursts, elevating the recipe to double chocolate pumpkin cookies delight. Choose high-quality chips with real cocoa butter for better melt. For variations, use dark chocolate chips for a richer twist or white chocolate for contrast.

Step-by-Step Instructions

Step 1: Preheat the Oven

Preheat your oven to 350°F (175°C) and line baking sheets with parchment paper to prevent sticking.

Pro Tip: Use high-quality parchment paper for even baking and easy cleanup.

A photo showing the oven preheating with lined baking sheets

Step 2: Mix the Wet Ingredients

In a large bowl, mix together the pumpkin puree, sugar, oil, egg, and vanilla extract until well combined for your double chocolate pumpkin cookies.

Common Mistake to Avoid: Overmixing can make the dough tough; stop once smooth to keep cookies tender.

A photo showing the wet ingredients being mixed in a bowl

Step 3: Whisk the Dry Ingredients

In another bowl, whisk together the flour, cocoa powder, pumpkin pie spice, baking powder, baking soda, and salt until evenly blended.

Pro Tip: Sift the dry ingredients to ensure no lumps, which helps in creating the perfect texture for easy pumpkin cookies.

A photo showing the dry ingredients being whisked

Step 4: Combine Wet and Dry Ingredients

Gradually add the dry ingredients to the wet ingredients, stirring until just combined to form the dough base.

Common Mistake to Avoid: Don’t over-stir; this preserves the moisture from the pumpkin infusion for chewy results.

A photo showing the dough coming together

Step 5: Fold in the Chocolate Chips

Fold in the chocolate chips gently to distribute them evenly throughout the dough.

Pro Tip: Use chilled chips to prevent them from melting too quickly during baking, enhancing the gooey centers in best chocolate pumpkin cookies.

A photo showing chocolate chips being folded into the dough

Step 6: Scoop and Place Dough

Drop tablespoon-sized scoops of dough onto the prepared baking sheets, spacing them about 2 inches apart.

Common Mistake to Avoid: Overcrowding the sheets can cause uneven baking; give them room to spread.

A photo showing dough scoops on the baking sheet

Step 7: Bake the Cookies

Bake for 10-12 minutes, or until the edges are set, to achieve that perfect golden finish on your fall cookies.

Pro Tip: Rotate the sheets halfway through for even browning, ensuring consistent results.

A photo showing cookies baking in the oven

Step 8: Cool the Cookies

Allow the cookies to cool on the baking sheets for 5 minutes before transferring to a wire rack to cool completely.

Pro Tip: This resting period helps set the structure, making them easier to handle.

A photo showing cookies cooling on a rack

Serving & Presentation

Elevate your double chocolate pumpkin cookies with creative plating for maximum appeal. Arrange them on a rustic wooden board alongside seasonal fruits like sliced apples or pears to complement the fall flavors. For an impressive garnish, dust with a light sprinkle of powdered sugar or drizzle a simple chocolate glaze made from melted chocolate chips and a touch of cream. These easy pumpkin cookies pair wonderfully with a scoop of vanilla ice cream for a warm-cookie sundae or as a side to a spiced latte, making them ideal for dessert tables at Thanksgiving gatherings or casual coffee breaks.

Make-Ahead & Storage Solutions

Make-Ahead Strategy: Prepare the dough up to 3 days in advance by mixing all ingredients except the chocolate chips, then refrigerating in an airtight container. Add the chips just before baking to maintain their texture, allowing for fresh-baked double chocolate pumpkin cookies on demand.

Storing Leftovers: Store cooled cookies in an airtight container at room temperature for up to 3 days, or refrigerate for up to a week to preserve moisture. For longer storage, freeze the baked cookies in a freezer-safe bag for up to 2 months, separating layers with parchment paper.

The Best Way to Reheat: To restore the original chewy texture, reheat frozen or refrigerated cookies in a 300°F oven for 5 minutes or microwave for 10-15 seconds. This gently warms them without drying out, keeping your best chocolate pumpkin cookies tasting freshly baked.

Frequently Asked Questions (FAQ)

What is the best way to mix the ingredients for double chocolate pumpkin cookies?

The best way is to first combine the wet ingredients—pumpkin puree, sugar, oil, egg, and vanilla—in a large bowl until smooth, then gradually add the dry ingredients to avoid overmixing. This ensures even distribution and maintains the moisture from the pumpkin for that signature chewy texture in your fall cookies.

Can I substitute butter for oil in double chocolate pumpkin cookie recipes?

Yes, you can substitute butter for oil, but it will slightly change the texture. Use 1/2 cup of melted unsalted butter instead, which adds a richer flavor. However, for the ultra-moist results in this recipe, oil works best as it keeps the cookies softer; if using butter, chill the dough briefly to prevent spreading.

How long should double chocolate pumpkin cookies bake for?

Bake them for 10-12 minutes at 350°F until the edges are set but the centers remain soft. This timing is key for achieving the perfect chewy consistency in easy pumpkin cookies—overbaking can make them dry, so start checking at 10 minutes for the best results.

What are some good frosting or glaze ideas for double chocolate pumpkin cookies?

For added indulgence, try a cream cheese frosting infused with pumpkin pie spice for a tangy contrast to the chocolate. Alternatively, a simple chocolate glaze made from melted semisweet chocolate and a bit of cream works wonderfully, or go for a maple glaze by mixing powdered sugar with maple syrup to enhance the fall flavors in your double chocolate pumpkin cookies.

Are double chocolate pumpkin cookies suitable for kids?

Absolutely! These cookies are kid-friendly with their sweet chocolate and pumpkin combo, but monitor sugar intake as each has about 12g. They’re perfect for baking with children, offering a fun, hands-on activity that introduces them to seasonal baking.

How can I make these cookies healthier?

To make them healthier, substitute half the sugar with applesauce or a natural sweetener like honey, and use whole-wheat flour for added fiber. Additionally, opt for dark chocolate chips to boost antioxidants, while keeping the pumpkin puree for moisture without extra calories.

Can I add nuts or other mix-ins to this recipe?

Yes, you can enhance these double chocolate pumpkin cookies with add-ins like chopped walnuts or pecans for crunch, or dried cranberries for a tart twist. Add about 1/2 cup to the dough, ensuring not to overcrowd to maintain the cookie’s structure.

.

Print
clock clock iconcutlery cutlery iconflag flag iconfolder folder iconinstagram instagram iconpinterest pinterest iconfacebook facebook iconprint print iconsquares squares iconheart heart iconheart solid heart solid icon

Double Chocolate Pumpkin Cookies

  • Author: Chef Sally
  • Prep Time: 15 minutes
  • Cook Time: 12 minutes
  • Total Time: 27 minutes
  • Yield: 24 cookies 1x
  • Method: Dessert
  • Cuisine: American

Description

These soft and chewy cookies combine the rich flavors of chocolate and pumpkin for a delightful treat.


Ingredients

Scale
  • 1 cup canned pumpkin puree
  • 1 cup granulated sugar
  • 1/2 cup vegetable oil
  • 1 large egg
  • 1 teaspoon vanilla extract
  • 2 cups all-purpose flour
  • 1/4 cup unsweetened cocoa powder
  • 1 tablespoon pumpkin pie spice
  • 1 teaspoon baking powder
  • 1/2 teaspoon baking soda
  • 1/2 teaspoon salt
  • 1 cup semisweet chocolate chips

Instructions

  1. Preheat your oven to 350°F (175°C) and line baking sheets with parchment paper.
  2. In a large bowl, mix together the pumpkin puree, sugar, oil, egg, and vanilla extract until well combined.
  3. In another bowl, whisk together the flour, cocoa powder, pumpkin pie spice, baking powder, baking soda, and salt.
  4. Gradually add the dry ingredients to the wet ingredients, stirring until just combined.
  5. Fold in the chocolate chips.
  6. Drop tablespoon-sized scoops of dough onto the prepared baking sheets, spacing them about 2 inches apart.
  7. Bake for 10-12 minutes, or until the edges are set.
  8. Allow the cookies to cool on the baking sheets for 5 minutes before transferring to a wire rack to cool completely.

Notes

For a softer cookie, avoid overbaking. Store in an airtight container for up to 3 days.


Nutrition

  • Calories: 150
  • Sugar: 12g
  • Fat: 7g
  • Carbohydrates: 20g
  • Protein: 2g

Easy Roasted Sweet Potato Pomegranate Stacks

Roasted Sweet Potato Pomegranate Stacks: The Only Recipe You’ll Ever Need

Imagine hosting a holiday gathering where your table steals the show with a dish that’s as visually captivating as it is delicious. Roasted Sweet Potato Pomegranate Stacks are the perfect vegetarian holiday appetizer that combines layers of golden, caramelized sweet potatoes with jewel-like pomegranate seeds, creating a festive stacked presentation that’s sure to impress. This sweet potato pomegranate appetizer isn’t just another side dish—it’s a vibrant, nutrient-packed option that’s easy to prepare yet elegant enough for special occasions. Whether you’re looking for a festive side dish or a healthy starter, this recipe from exorecipes.com will elevate your meals with its burst of flavors and stunning design, all in under 40 minutes.

Picture the sweet, earthy aroma of roasted sweet potatoes filling your kitchen, mingling with the tart, juicy pop of fresh pomegranate seeds. Each bite offers a delightful contrast in textures: the soft, tender sweet potato slices provide a comforting base, while the crunchy pomegranate seeds add a refreshing burst that awakens your palate. The natural sweetness from the potatoes caramelizes beautifully in the oven, balanced by the slight tanginess of the seeds, making this a harmonious blend of savory and sweet that feels indulgent yet light. It’s a sweet potato stacks recipe that not only tastes amazing but also looks like a work of art, perfect for those vegetarian holiday appetizers that keep guests coming back for more.

What sets this Roasted Sweet Potato Pomegranate Stacks recipe apart on exorecipes.com is our commitment to making it foolproof and exceptional, drawing from Chef Sally’s expertise. We’ve tested this recipe multiple times to ensure every detail is optimized for home cooks, revealing the Chef’s Secret: a simple roasting technique that maximizes caramelization for unbeatable flavor. You’ll learn pro tips for even cooking, stunning presentations, and smart substitutions, turning you into a kitchen confident with this festive side dish. Stick around for comprehensive FAQs and make-ahead strategies that make this the single best resource for sweet potato pomegranate appetizer success.

Prep Time: 15 minutes
Cook Time: 25 minutes
Total Time: 40 minutes
Servings: 4 servings

Why This Roasted Sweet Potato Pomegranate Stacks Recipe is a Game-Changer

The Chef’s Secret lies in the festive stacked presentation, where layering roasted sweet potato slices and topping them with fresh pomegranate seeds creates a visually striking “tree” effect that’s both artistic and appetizing. This technique elevates the dish by allowing the pomegranate’s tart juices to infuse the sweet potatoes as they cool, adding a burst of moisture and flavor that transforms a simple side into a gourmet vegetarian holiday appetizer. Unlike traditional sweet potato recipes, this method ensures each stack is a self-contained flavor bomb, making it perfect for parties where presentation matters.

Unbeatable Texture: The science behind this comes from roasting at 400°F (200°C), which triggers the Maillard reaction on the sweet potatoes. This caramelizes their natural sugars, creating a crispy exterior while keeping the inside tender and fluffy. The olive oil helps conduct heat evenly, preventing sogginess and ensuring a perfect golden brown that’s irresistible in every sweet potato pomegranate appetizer.

Foolproof for a Reason: We’ve rigorously tested this recipe to guarantee success, even for beginners. Every step, from slicing to stacking, has been refined to minimize errors, making it a reliable festive side dish that’s ready in just 40 minutes. Readers love how this sweet potato stacks recipe turns out consistently, earning rave reviews for its ease and wow factor.

Ingredient Spotlight: Quality Makes the Difference

Sweet Potatoes: The star of this Roasted Sweet Potato Pomegranate Stacks recipe, sweet potatoes provide a hearty, nutrient-rich base that’s packed with vitamins A and C. Their natural sweetness intensifies when roasted, creating that caramelized goodness we all crave in a sweet potato pomegranate appetizer. Always choose firm, evenly sized potatoes for consistent cooking—organic ones are best to avoid pesticides. If you’re out of sweet potatoes, yams make a great substitute, though they offer a slightly earthier flavor that pairs well with the tart pomegranate.

Fresh Pomegranate Seeds: These ruby-red gems add a burst of tartness and crunch, turning your sweet potato stacks into a festive side dish that’s as beautiful as it is tasty. Quality matters here; opt for ripe, fresh seeds rather than store-bought ones to ensure maximum juiciness and flavor. They not only enhance the visual appeal with their vibrant color but also provide antioxidants and a refreshing contrast to the roasted sweetness. For a substitution, try cranberries for a similar tartness, especially if you’re aiming for a holiday vibe in your vegetarian holiday appetizer.

Olive Oil: This simple ingredient is key to achieving the perfect roast, coating the sweet potato slices for even browning and a subtle earthy flavor. Extra-virgin olive oil is recommended for its high quality and health benefits, ensuring your sweet potato pomegranate appetizer remains light and not greasy. If you’re watching your oil intake, a light spray of avocado oil works as a substitute, offering a similar smoke point and neutral taste that won’t overpower the dish’s natural flavors.

Salt and Pepper: These seasonings might seem basic, but they enhance the overall flavor profile of your Roasted Sweet Potato Pomegranate Stacks. Use fresh-ground sea salt and black pepper for the best taste, as they bring out the sweetness of the potatoes and balance the tartness of the pomegranate. If you’re on a low-sodium diet, try using herbs like rosemary as a flavorful alternative to amp up the seasoning without the salt.

Fresh Herbs (Optional): For garnish, fresh herbs like mint or parsley add a fragrant, herbaceous note that elevates the presentation of this festive side dish. They provide a pop of green color and a fresh aroma, making your sweet potato stacks look like they came from a professional kitchen. If herbs aren’t available, microgreens offer a similar visual and taste enhancement, keeping your vegetarian holiday appetizer light and airy.

Step-by-Step Instructions

Step 1: Preparing the Sweet Potatoes

Start by preheating your oven to 400°F (200°C) as per the recipe instructions. This ensures even heat distribution for perfect roasting. Peel and slice 2 large sweet potatoes into 1/4-inch rounds, using a sharp knife for uniformity.

Pro Tip: Slice the potatoes as evenly as possible to promote uniform cooking and avoid any underdone pieces in your sweet potato pomegranate appetizer.

A photo showing evenly sliced sweet potato rounds ready for roasting

Step 2: Tossing the Sweet Potato Slices

In a large bowl, toss the sweet potato slices with 2 tablespoons of olive oil, salt, and pepper until they’re evenly coated. This step infuses flavor and helps with browning during roasting.

Common Mistake to Avoid: Don’t overcrowd the bowl; over-mixing can bruise the slices, leading to mushy textures instead of the desired caramelized finish in your festive side dish.

A photo showing sweet potato slices being tossed in a bowl with oil and seasonings

Step 3: Roasting the Sweet Potatoes

Arrange the coated sweet potato slices on a baking sheet in a single layer. Roast in the preheated oven for 20-25 minutes, or until they’re tender and slightly caramelized, flipping halfway through for even cooking.

Pro Tip: Use a lined baking sheet to prevent sticking and make cleanup easier, ensuring your Roasted Sweet Potato Pomegranate Stacks turn out picture-perfect every time.

A photo showing golden-brown roasted sweet potato slices on a baking sheet

Step 4: Cooling the Roasted Sweet Potatoes

Once roasted, remove the sweet potatoes from the oven and let them cool slightly on the baking sheet for about 5 minutes. This allows them to firm up, making stacking easier.

Common Mistake to Avoid: Rushing this step can cause the slices to break when stacking, ruining the festive stacked presentation of your sweet potato stacks.

A photo showing cooled sweet potato slices ready for assembly

Step 5: Stacking and Topping

On serving plates, stack the roasted sweet potato slices into towers and top generously with 1 cup of fresh pomegranate seeds. Aim for 3-4 slices per stack for an impressive height.

Pro Tip: Build the stacks carefully to maintain their shape, enhancing the visual appeal of this vegetarian holiday appetizer.

A photo showing the final stacked presentation with pomegranate seeds

Step 6: Garnishing and Serving

Garnish the stacks with fresh herbs if desired, and serve immediately to enjoy the full flavors and textures.

Common Mistake to Avoid: Waiting too long to serve can make the pomegranate seeds lose their crunch, so time it right for the best sweet potato pomegranate appetizer experience.

A photo showing the garnished stacks ready to serve

Serving & Presentation

To make your Roasted Sweet Potato Pomegranate Stacks truly stand out, focus on creative plating by arranging the stacks on a festive platter with a sprinkle of extra pomegranate seeds for a “tree-like” effect, perfect for holiday tables. Pair this vegetarian holiday appetizer with grilled proteins like chicken or tofu for a balanced meal, or serve it alongside other festive side dishes such as green salads or roasted Brussels sprouts. The vibrant colors and fresh flavors make it an ideal sweet potato pomegranate appetizer for Thanksgiving or Christmas dinners, impressing guests with its elegant, stacked design.

Make-Ahead & Storage Solutions

Make-Ahead Strategy: You can prepare the sweet potato slices up to 3 days in advance by slicing, tossing with oil, salt, and pepper, then storing them in an airtight container in the fridge. Roast them fresh when ready to assemble your Roasted Sweet Potato Pomegranate Stacks, ensuring they retain their texture and flavor for your festive side dish.

Storing Leftovers: Refrigerate any uneaten stacks in an airtight container for up to 2 days to maintain freshness. For freezing, cool the roasted slices completely, then freeze in a single layer on a baking sheet before transferring to a freezer bag; they last up to a month, making this sweet potato stacks recipe versatile for busy schedules.

The Best Way to Reheat: To restore the original caramelized texture, reheat in a 350°F oven for 5-7 minutes. Avoid microwaving, as it can make the potatoes soggy, preserving the integrity of your vegetarian holiday appetizer.

Frequently Asked Questions (FAQ)

How do I ensure sweet potatoes cook evenly for the stacks?

To achieve even cooking in your Roasted Sweet Potato Pomegranate Stacks, start with uniformly sliced potatoes—aim for 1/4-inch rounds using a mandoline for precision. Toss them thoroughly in oil to coat evenly, and spread them out on the baking sheet without overlapping. Flip halfway through roasting at 400°F, and use a timer to check doneness, ensuring a perfect sweet potato pomegranate appetizer every time.

What’s the best way to cut sweet potatoes for a stacked presentation?

For an impressive stacked look in this festive side dish, use a sharp knife or mandoline to cut sweet potatoes into even 1/4-inch rounds. This thickness allows them to roast quickly while holding their shape for stacking. Always pat them dry after slicing to remove excess moisture, preventing steaming instead of roasting and maintaining the crisp edges of your sweet potato stacks.

Can I make these Roasted Sweet Potato Pomegranate Tree Stacks ahead of time?

Yes, you can! Prepare the sliced and seasoned sweet potatoes up to 3 days ahead, storing them in the fridge. Roast them just before serving to keep the texture optimal, or assemble the stacks earlier and reheat gently. For best results in this sweet potato pomegranate appetizer, add fresh pomegranate seeds right before serving to preserve their crunch and vibrancy.

What are some good vegan substitutions for ingredients in this recipe?

This recipe is already naturally vegan, but if you need swaps, use the same ingredients as listed—olive oil is plant-based, and there’s no animal products. For variety, substitute olive oil with coconut oil for a subtle tropical twist, or add vegan herbs like basil instead of traditional garnishes, keeping your vegetarian holiday appetizer fully aligned with a vegan diet.

Is this recipe suitable for a gluten-free diet?

Absolutely, this Roasted Sweet Potato Pomegranate Stacks recipe is naturally gluten-free, with no grains or additives. Just ensure your seasonings are certified gluten-free, and you’re good to go for a safe, delicious sweet potato pomegranate appetizer option.

How can I adjust the recipe for more servings?

To scale up for larger gatherings, simply double the ingredients—for example, use 4 sweet potatoes and 2 cups of pomegranate seeds for 8 servings. Keep roasting times consistent by using multiple baking sheets if needed, ensuring your festive side dish serves a crowd without compromising quality.

.

Print
clock clock iconcutlery cutlery iconflag flag iconfolder folder iconinstagram instagram iconpinterest pinterest iconfacebook facebook iconprint print iconsquares squares iconheart heart iconheart solid heart solid icon

Roasted Sweet Potato Pomegranate Tree Stacks

  • Author: Chef Sally
  • Prep Time: 15 minutes
  • Cook Time: 25 minutes
  • Total Time: 40 minutes
  • Yield: 4 servings 1x
  • Method: Side Dish
  • Cuisine: American

Description

Layers of roasted sweet potatoes topped with fresh pomegranate seeds for a vibrant and flavorful dish.


Ingredients

Scale
  • 2 large sweet potatoes, peeled and sliced into 1/4-inch rounds
  • 1 cup fresh pomegranate seeds
  • 2 tablespoons olive oil
  • Salt and pepper to taste
  • Optional: Fresh herbs for garnish

Instructions

  1. Preheat the oven to 400°F (200°C).
  2. Toss the sweet potato slices with olive oil, salt, and pepper in a bowl until evenly coated.
  3. Arrange the slices on a baking sheet and roast in the preheated oven for 20-25 minutes, or until tender and slightly caramelized.
  4. Remove from the oven and let cool slightly.
  5. Stack the roasted sweet potato slices on plates and top with fresh pomegranate seeds.
  6. Garnish with fresh herbs if desired, and serve immediately.

Notes

For the best results, use ripe pomegranate seeds and ensure the sweet potatoes are evenly sliced. This dish pairs well with grilled meats.


Nutrition

  • Calories: 180
  • Sugar: 8g
  • Fat: 7g
  • Carbohydrates: 28g
  • Protein: 2g

Cranberry Camembert Christmas Tree Pastry

Cranberry, Camembert Pistachio Christmas Tree Puff Pastry: The Only Recipe You’ll Ever Need

Imagine transforming your holiday table into a dazzling display of festive cheer with this irresistible Cranberry Camembert Christmas Tree puff pastry appetizer. As the holidays approach, nothing beats the joy of creating a show-stopping, easy holiday recipe that’s as fun to make as it is to eat. This unique angle—the perfect harmony of tart cranberry, creamy camembert, and crunchy pistachios—elevates this festive finger food into a crowd-pleasing masterpiece that’s impressively flaky and full of holiday spirit. Whether you’re hosting a cozy family gathering or a glamorous Christmas party, this recipe promises to be the star, blending simplicity with elegance in just 40 minutes.

The allure of this Cranberry Camembert Christmas Tree lies in its symphony of textures and flavors that dance on your palate. Picture the buttery, golden puff pastry enveloping a luscious layer of cranberry sauce, its tangy sweetness cutting through the rich, velvety camembert cheese that melts into gooey perfection. Each bite delivers a satisfying crunch from the pistachios, evoking the essence of fresh holiday nuts, while aromatic rosemary sprigs add a fragrant, earthy note that fills your kitchen with the warm scents of the season. It’s not just a puff pastry appetizer; it’s a textural adventure that’s crispy on the outside and delightfully soft within, making it an unforgettable Christmas appetizer for all.

What sets this Cranberry Camembert Christmas Tree recipe apart on exorecipes.com is our commitment to making it the most reliable and innovative version you’ll find online. Crafted by Chef Sally and rigorously tested for foolproof results, we’ll reveal the Chef’s Secret to achieving an evenly puffed pastry that wows every time. Dive into detailed tips, ingredient spotlights, and step-by-step guidance that empower home cooks to succeed with confidence. From easy holiday recipes to creative serving ideas, this post has everything you need to master this festive finger food and impress your guests.

Prep Time: 15 minutes
Cook Time: 25 minutes
Total Time: 40 minutes
Servings: 6-8

Why This Cranberry Camembert Christmas Tree Puff Pastry Recipe is a Game-Changer

The Chef’s Secret to this recipe lies in the meticulous layering technique that ensures an unbeatable festive and flaky texture, making it stand out among other Christmas appetizers. By spreading the cranberry sauce evenly and sealing the edges with egg wash before baking, we lock in moisture and create a barrier that allows the puff pastry to rise uniformly, resulting in that signature light, airy lift. This method, combined with the tart cranberry’s natural acidity, enhances the creamy camembert’s melt, preventing sogginess and delivering a perfect balance of flavors in every bite.

Unbeatable Texture: The science behind the flaky crust comes from the high-quality puff pastry’s laminated layers, which expand when baked due to trapped steam. Our recipe uses ready-rolled puff pastry for ease, but chilling it briefly before assembly ensures even puffing by maintaining those layers’ integrity, avoiding deflation during the oven’s heat.

Foolproof for a Reason: This recipe has been tested multiple times in our kitchens to guarantee success, even for beginners. With precise instructions and tips, you’ll avoid common pitfalls, making it a reliable go-to for easy holiday recipes that always impress.

Ingredient Spotlight: Quality Makes the Difference

Ready-Rolled Puff Pastry: This is the foundation of your Cranberry Camembert Christmas Tree, providing that essential flaky base that makes this puff pastry appetizer so irresistible. Opt for a high-quality, all-butter version for superior layering and taste; artificial shortenings can lead to a greasy result. If you’re short on time, this ingredient is a lifesaver for easy holiday recipes, but for substitutions, try using homemade rough puff pastry if you have the skills—it’s more time-intensive but rewards with extra flakiness.

Camembert Cheese: The creamy heart of this festive finger food, camembert adds a luxurious, melt-in-your-mouth richness that pairs beautifully with the tart cranberry. Always choose a ripened wheel for the best flavor and texture; unripe camembert can be bland. Quality matters here as it melts evenly without separating. For substitutions, brie works wonderfully if camembert is unavailable, offering a similar creamy profile, but avoid harder cheeses like cheddar, which won’t achieve the same gooey consistency.

Cranberry Sauce: Bringing the festive tartness that defines this Christmas appetizer, cranberry sauce balances the richness of the camembert and adds a vibrant pop of color. Use homemade for the freshest taste, but store-bought is fine if it’s pure and not overly sweetened. This ingredient’s acidity helps prevent the pastry from becoming soggy. A good substitute is fresh cranberry compote, or for a twist, raspberry jam if cranberries are out of season, though it will alter the holiday essence slightly.

Shelled Pistachios: These provide the satisfying crunch that makes this Cranberry Camembert Christmas Tree a textural delight, adding a nutty contrast to the soft cheese and sauce. Choose unsalted, roasted pistachios for the best flavor without overwhelming saltiness. Quality ensures they don’t go rancid quickly. If nuts are an issue, swap with chopped almonds or walnuts for similar crunch, but pistachios’ unique green hue enhances the festive appeal.

Egg for Egg Wash: This simple ingredient is key to achieving that golden, glossy finish on your puff pastry appetizer. It acts as a sealant and helps the pastry brown evenly. For a vegan option, substitute with a mixture of almond milk and oil to mimic the wash without compromising the bake. Fresh eggs ensure the best adhesion and shine.

Fresh Rosemary Sprigs: As the final touch, rosemary infuses an aromatic, herbaceous note that evokes the holidays, making this easy holiday recipe visually and olfactorily appealing. Use fresh for potency; dried won’t have the same impact. If unavailable, thyme can substitute for a similar earthy flavor, though it might not match the visual garnish.

Step-by-Step Instructions

Step 1: Preheat the Oven and Prepare the Baking Sheet

Preheat the oven to 200°C (180°C fan) and line a baking sheet with parchment paper as per the instructions. This step ensures even baking and prevents sticking.

Pro Tip: Double-check your oven temperature with an oven thermometer to avoid undercooking; this is crucial for that perfect puff in your Cranberry Camembert Christmas Tree.

A photo showing the oven preheating and baking sheet lined with parchment

Step 2: Unroll and Prepare the Puff Pastry

Unroll the puff pastry sheet on a lightly floured surface, ensuring it’s at room temperature for easy handling. Gently roll it out if needed to achieve an even thickness.

Common Mistake to Avoid: Don’t overwork the pastry, as it can make it tough; handle it minimally to keep those layers intact for maximum flakiness in your festive finger food.

A photo showing the puff pastry unrolled on a floured surface

Step 3: Spread the Cranberry Sauce

Spread the cranberry sauce evenly over the pastry, leaving a 1-inch border around the edges to prevent overflow during baking.

Pro Tip: Use a silicone spatula for smooth application; warming the sauce slightly makes it easier to spread without tearing the pastry.

A photo showing cranberry sauce being spread on the pastry

Step 4: Arrange the Camembert and Pistachios

Arrange the camembert slices and chopped pistachios on top of the cranberry sauce, distributing them evenly for balanced flavor in every slice.

Common Mistake to Avoid: Overloading with toppings can weigh down the pastry, so stick to the quantities to ensure even puffing.

A photo showing cheese and pistachios arranged on the sauce

Step 5: Shape the Pastry into a Christmas Tree

Fold and shape the pastry into a Christmas tree form, sealing the edges with egg wash to keep the fillings secure.

Pro Tip: Use a sharp knife to trim edges neatly, then brush with egg wash for a professional seal that locks in the festive flavors.

A photo showing the pastry being shaped into a tree

Step 6: Brush with Egg Wash and Bake

Brush the entire tree with the beaten egg and bake in the preheated oven for 20-25 minutes until golden and puffed.

Common Mistake to Avoid: Avoid opening the oven door too early, as it can cause the pastry to deflate; let it bake undisturbed.

A photo showing the brushed pastry ready for the oven

Step 7: Cool and Garnish

Allow the baked tree to cool slightly before garnishing with rosemary sprigs and serving warm.

Pro Tip: Cooling for 5 minutes helps set the cheese, making it easier to slice without mess.

A photo showing the finished tree garnished with rosemary

Serving & Presentation

Elevate your Cranberry Camembert Christmas Tree with creative plating that turns it into the centerpiece of your holiday spread. Arrange it on a festive platter, perhaps on a bed of fresh greens or surrounded by edible flowers for a pop of color, enhancing its visual appeal as a puff pastry appetizer. For impressive garnishes, add a light dusting of powdered sugar or extra pistachios for texture contrast. This Christmas appetizer pairs beautifully with complementary sides like charcuterie boards, crisp crackers, or a selection of wines—think a chilled rosé to balance the tart cranberry. For main courses, serve it alongside roasted turkey or a vegetarian feast to kick off the meal with festive finger food vibes.

Make-Ahead & Storage Solutions

Make-Ahead Strategy: Prepare the assembled Christmas tree up to 24 hours in advance by shaping it, brushing with egg wash, and refrigerating it on the baking sheet covered with plastic wrap. For components, you can make the cranberry sauce and chop pistachios up to 3 days ahead, storing them separately in airtight containers in the fridge to maintain freshness.

Storing Leftovers: Once cooled, wrap any leftovers tightly in plastic wrap or place in an airtight container; refrigerate for up to 2 days to preserve the flaky texture. For longer storage, freeze the baked tree for up to a month—first flash-freeze on a tray, then transfer to a freezer bag.

The Best Way to Reheat: To restore the original flaky texture, reheat in a preheated oven at 180°C for 5-7 minutes until warmed through, avoiding the microwave which can make it soggy. This method ensures your easy holiday recipes taste as fresh as when first baked.

Frequently Asked Questions (FAQ)

How do I get my puff pastry to puff up evenly for the Christmas tree?

To achieve even puffing in your Cranberry Camembert Christmas Tree puff pastry appetizer, ensure the pastry is cold before baking—this helps the layers separate properly. Roll it out on a cool surface, avoid over-filling, and seal edges tightly with egg wash. Additionally, preheat your oven accurately and don’t open the door during baking to prevent temperature drops. For best results, chill the assembled tree for 10-15 minutes in the fridge before baking.

Can I use a different type of cheese besides Camembert in this Christmas tree pastry?

Yes, you can substitute Camembert with other creamy cheeses to suit your preferences in this festive finger food. Brie is an excellent alternative, offering a similar melt and flavor profile that pairs well with cranberry. For a sharper taste, try goat cheese, but reduce the quantity as it’s tangier. Avoid hard cheeses like cheddar, as they won’t melt as desired; always aim for something soft to maintain the gooey center in your easy holiday recipes.

What are good dipping sauces or serving ideas for the cranberry, Camembert, and pistachio Christmas tree?

For serving your Cranberry Camembert Christmas Tree, consider complementary dipping sauces like a simple honey mustard for a sweet-savory kick, or a balsamic reduction to enhance the tart cranberry notes. Other ideas include pairing it with creamy dips such as garlic aioli or a fresh herb yogurt sauce. Serve it as part of a appetizer platter with cured meats, fruits, and crackers for a balanced Christmas appetizer experience, making it interactive and fun for guests.

How long does it take to bake this Christmas tree puff pastry and what temperature should I use?

This Cranberry Camembert Christmas Tree bakes at 200°C (180°C fan) for 20-25 minutes, resulting in a golden, puffed pastry that’s ready in under half an hour total. Monitor it closely after 20 minutes to prevent over-browning, and ensure your oven is properly preheated for even cooking—this is key for achieving that perfect texture in your puff pastry appetizer.

Can I prepare this recipe ahead of time for a holiday party?

Absolutely, you can assemble the Christmas tree up to 24 hours in advance and refrigerate it, then bake just before serving to keep it fresh. This makes it an ideal easy holiday recipe for busy hosts, but avoid baking too far ahead as the pastry is best enjoyed warm and flaky.

Is this recipe suitable for vegetarians, and what adjustments are needed?

Yes, this recipe is naturally vegetarian, but to ensure it’s suitable, verify that your cranberry sauce and puff pastry are free from animal-derived ingredients. For a vegan version, swap the camembert with a plant-based cheese alternative and use a vegan egg wash like aquafaba; these changes keep the festive finger food delicious and inclusive.

.

Print
clock clock iconcutlery cutlery iconflag flag iconfolder folder iconinstagram instagram iconpinterest pinterest iconfacebook facebook iconprint print iconsquares squares iconheart heart iconheart solid heart solid icon

Cranberry, Camembert Pistachio Christmas Tree Puff Pastry

  • Author: Chef Sally
  • Prep Time: 15 minutes
  • Cook Time: 25 minutes
  • Total Time: 40 minutes
  • Yield: 6-8 1x
  • Method: Appetizer
  • Cuisine: Fusion

Description

A festive puff pastry Christmas tree appetizer filled with cranberry sauce, creamy camembert cheese, and crunchy pistachios, perfect for holiday gatherings.


Ingredients

Scale
  • 1 sheet of ready-rolled puff pastry
  • 150g camembert cheese, sliced
  • 100g cranberry sauce
  • 50g shelled pistachios, chopped
  • 1 egg, beaten for egg wash
  • Fresh rosemary sprigs for decoration
  • Salt and pepper to taste

Instructions

  1. Preheat the oven to 200°C (180°C fan) and line a baking sheet with parchment paper.
  2. Unroll the puff pastry sheet on a lightly floured surface.
  3. Spread the cranberry sauce evenly over the pastry, leaving a border around the edges.
  4. Arrange the camembert slices and chopped pistachios on top of the cranberry sauce.
  5. Fold and shape the pastry into a Christmas tree form, sealing the edges with egg wash.
  6. Brush the entire tree with the beaten egg and bake in the preheated oven for 20-25 minutes until golden and puffed.
  7. Allow to cool slightly before garnishing with rosemary and serving.

Notes

For a vegetarian option, ensure all ingredients are plant-based; serve warm for the best texture and flavor.


Nutrition

  • Calories: 350
  • Sugar: 8g
  • Fat: 22g
  • Carbohydrates: 28g
  • Protein: 9g