Best Clam Chowder Recipe – Classic & Creamy

best-clam-chowder-recipe-classic

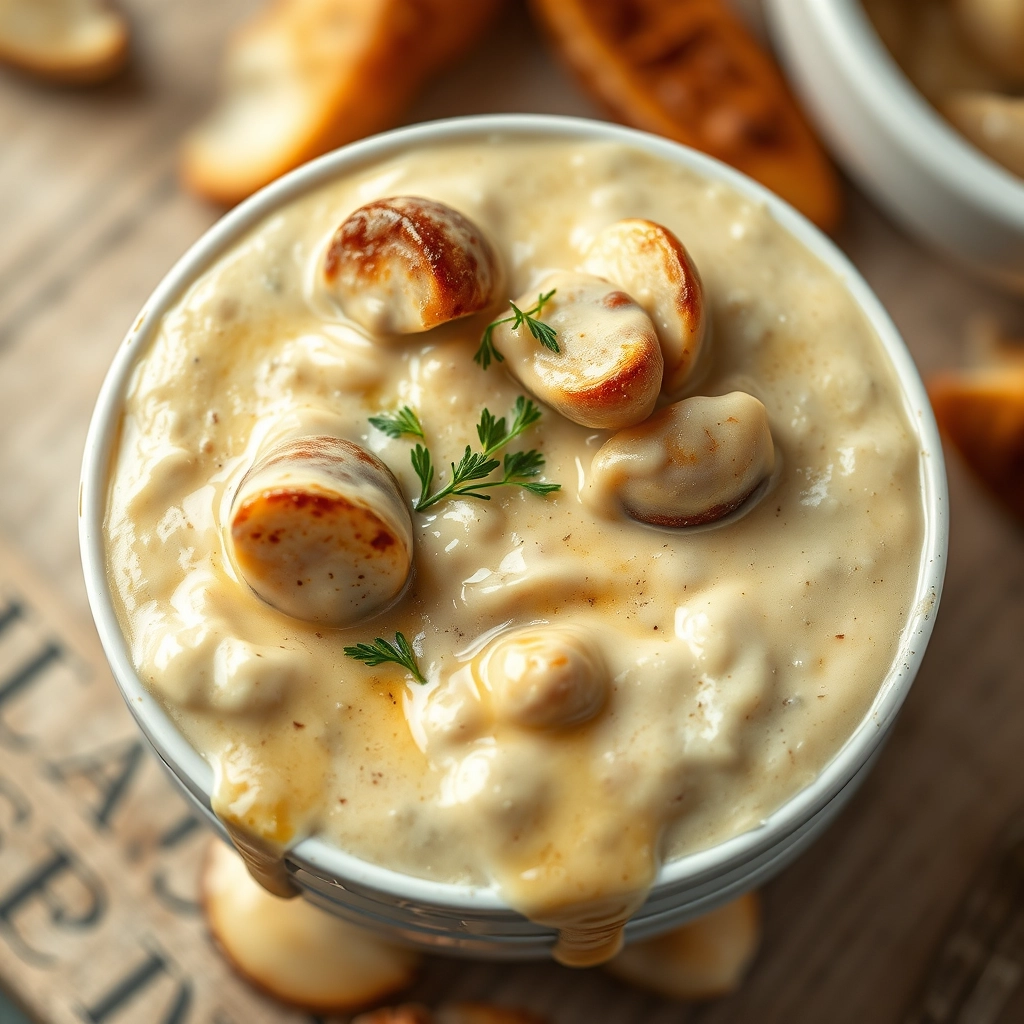
A Bowl of Comfort: My Classic & Creamy Clam Chowder

There’s something about clam chowder that feels like a warm hug from the sea. I still remember the first time I tasted a truly great bowl—it was at a tiny seaside shack in Maine, the kind with peeling paint and the salty breeze tangled in your hair. The chowder was rich, creamy, and brimming with tender clams, and I knew right then I had to recreate that magic at home. After years of tweaking (and many happy taste-testers), this recipe is my love letter to that memory—a classic, velvety chowder that’s cozy enough for a rainy night but special enough to serve to guests.

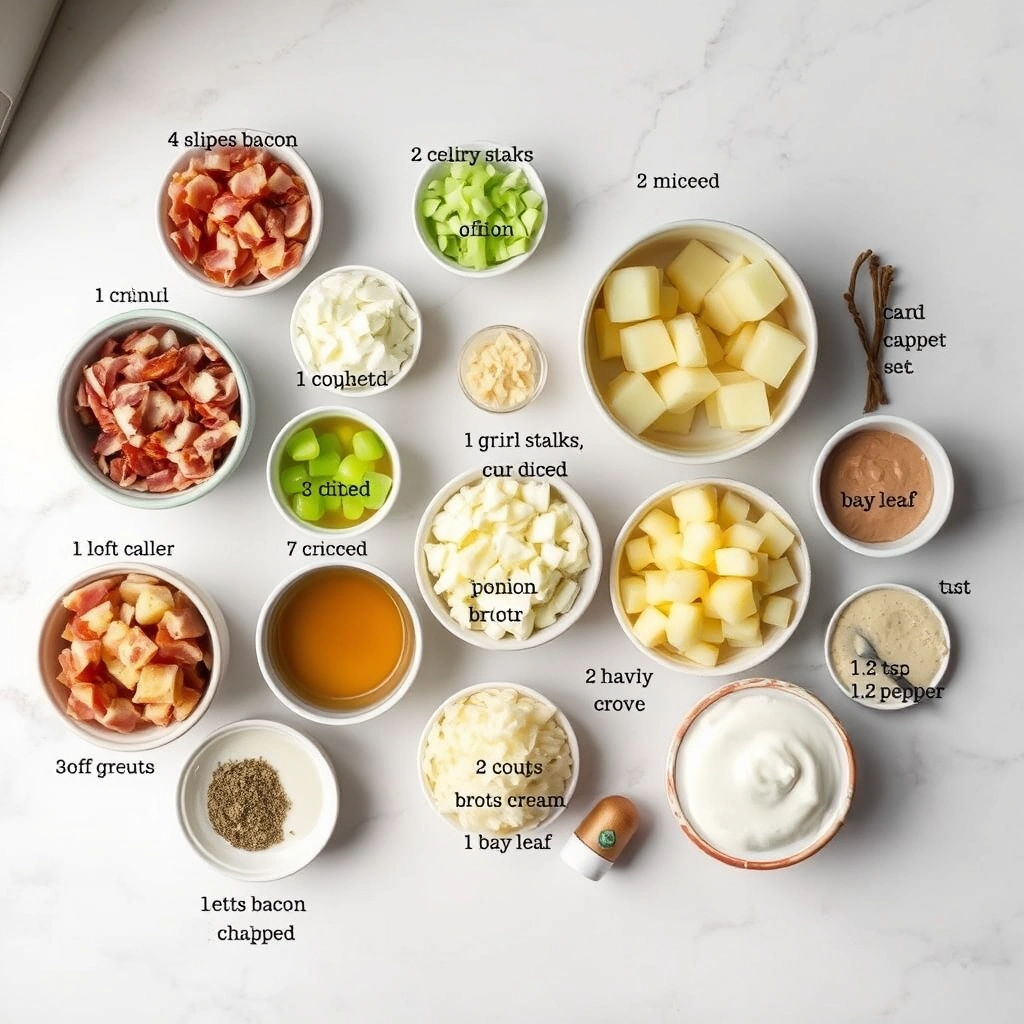
The Ingredients: Simple, Fresh, and Full of Flavor

  • 4 cups chopped clams (with their juice) – I prefer fresh cherrystones, but canned clams in juice work beautifully in a pinch. Just don’t drain that briny liquid—it’s gold!
  • 4 slices thick-cut bacon, diced – Because everything starts with bacon. It adds a smoky depth that makes this chowder unforgettable.
  • 1 large yellow onion, finely chopped – Sweet and mellow, it melts into the broth like a whisper.
  • 3 celery stalks, diced – For that subtle crunch and freshness.
  • 3 garlic cloves, minced – Because garlic makes everything better.
  • 4 cups Yukon gold potatoes, cubed – Creamy and buttery, they hold their shape just right.
  • 3 cups fish or vegetable stock – Homemade is dreamy, but a good-quality store-bought works too.
  • 2 cups heavy cream – This is where the luxury happens. For a lighter version, half-and-half does the trick.
  • 3 tbsp butter – Because richness never hurt anybody.
  • 2 tbsp all-purpose flour – Our secret for a perfectly thickened chowder.
  • 1 tsp fresh thyme leaves – Earthy and fragrant, it ties everything together.
  • Salt, black pepper, and a pinch of cayenne – To taste. That hint of heat? Chef’s kiss.
  • Oyster crackers & fresh parsley – For serving, obviously. The crackers are non-negotiable in my book!

Let’s Make Chowder Magic: Step by Step

Step 1: Bacon First, Always
In a large Dutch oven or heavy-bottomed pot, cook the diced bacon over medium heat until crispy. Use a slotted spoon to transfer the bacon to a paper towel-lined plate, but leave that glorious fat in the pot—that’s your flavor base!

Step 2: Sauté the Aromatics
Add the onion and celery to the bacon fat, stirring occasionally until they soften (about 5 minutes). Toss in the garlic and thyme, letting their fragrance bloom for just 30 seconds—don’t let the garlic brown!

Step 3: Build the Broth
Sprinkle in the flour and stir to coat the veggies, cooking for a minute to remove the raw taste. Slowly pour in the stock, scraping up any browned bits from the bottom of the pot. Add the potatoes and clam juice (yes, all of it!), then bring to a gentle simmer. Let it bubble away until the potatoes are fork-tender, about 15 minutes.

Step 4: Creamy Indulgence
Reduce the heat to low and stir in the heavy cream and butter. Now, the clams join the party—gently fold them in and let the chowder warm through (about 5 minutes). Overcooking the clams makes them rubbery, so be patient here!

Pro Tips for the Best Clam Chowder

Making clam chowder is simple, but a few little tricks can take it from good to unforgettable:

  • Use fresh clams if possible: While canned clams work well, fresh clams steamed in white wine or beer add incredible depth of flavor.
  • Don’t skip the bacon: That smoky richness is what makes this chowder so comforting. For a vegetarian version, try smoked paprika instead.
  • Let it rest: Like many soups, clam chowder tastes even better the next day as the flavors meld together.
  • Thicken it naturally: If you prefer a thicker chowder, mash some of the potatoes against the side of the pot before adding the cream.

Delicious Variations to Try

This classic recipe is wonderfully adaptable:

  • Manhattan Style: Swap the cream for tomato juice or crushed tomatoes for a lighter, brinier version.
  • New England Twist: Add a splash of sherry or a bay leaf while simmering for extra complexity.
  • Corn Chowder Hybrid: Stir in fresh or frozen corn kernels along with the potatoes for sweetness.
  • Spicy Kick: Add a pinch of red pepper flakes or diced jalapeños with the onions.

What to Serve with Clam Chowder

This creamy chowder is a meal in itself, but these pairings make it even better:

  • Crusty sourdough bread or oyster crackers for dipping
  • A simple green salad with lemon vinaigrette
  • Buttery grilled cheese sandwiches (the ultimate comfort combo)
  • A crisp white wine like Sauvignon Blanc or Chardonnay

Storing and Reheating Your Chowder

Leftovers? Lucky you! Here’s how to keep your chowder tasting fresh:

  • Refrigerate: Store in an airtight container for up to 3 days.
  • Freeze: Cream-based soups can separate when frozen. If you must freeze, stir well when reheating and add a splash of cream.
  • Reheat gently: Warm on the stovetop over low heat, stirring frequently to prevent scorching. Add a little broth or milk if it’s too thick.

Clam Chowder FAQs

Can I use milk instead of heavy cream?
Yes! Whole milk or half-and-half will work, though the chowder won’t be quite as rich. Avoid skim milk as it can make the soup watery.

How do I make gluten-free clam chowder?
Simply substitute the flour with cornstarch or a gluten-free flour blend. Use 1 tablespoon cornstarch mixed with 2 tablespoons cold water instead of the flour roux.

Why is my chowder too thin?
Let it simmer uncovered for 5-10 minutes to reduce, or make a quick slurry of 1 tablespoon cornstarch with 2 tablespoons cold water and stir it in.

Can I make this in a slow cooker?
Absolutely! Sauté the bacon and vegetables first, then transfer everything except the cream to the slow cooker. Cook on low 6-8 hours, stir in cream before serving.

Final Thoughts

There’s something magical about a steaming bowl of homemade clam chowder. Whether you’re serving it on a chilly evening or as the star of a seaside picnic, this recipe is guaranteed to warm both bellies and hearts. The creamy broth, tender clams, and comforting potatoes come together in perfect harmony – a taste of coastal comfort that never goes out of style. Don’t be surprised if this becomes your family’s new favorite soup night tradition. Now go grab that big soup pot and get cooking – your perfect bowl of chowder awaits!

Print
clock clock iconcutlery cutlery iconflag flag iconfolder folder iconinstagram instagram iconpinterest pinterest iconfacebook facebook iconprint print iconsquares squares iconheart heart iconheart solid heart solid icon

Clam Chowder Recipe

  • Author: Trusted Blog

Description

A creamy and hearty clam chowder with tender clams, potatoes, and smoky bacon.


Ingredients

Scale

For the Crust:

  • 4 slices bacon, chopped
  • 1 onion, diced
  • 2 celery stalks, diced
  • 3 garlic cloves, minced
  • 3 cups potatoes, diced
  • 2 cups chicken broth
  • 2 cups heavy cream
  • 2 (6.5 oz) cans chopped clams, with juice
  • 1 bay leaf
  • 1/2 tsp thyme
  • Salt and pepper to taste

Instructions

1. Prepare the Crust:

  1. In a large pot, cook bacon over medium heat until crispy. Remove and set aside, leaving the fat in the pot.
  2. Add onion, celery, and garlic to the pot. Sauté until softened, about 5 minutes.
  3. Stir in potatoes, chicken broth, heavy cream, clams with juice, bay leaf, and thyme. Bring to a simmer.
  4. Reduce heat and cook for 20-25 minutes, or until potatoes are tender.
  5. Season with salt and pepper to taste. Remove bay leaf before serving.
  6. Garnish with crispy bacon and serve hot.

Notes

You can customize the seasonings to taste.

Best Carrot Cake Recipe – Moist and Fluffy

best-moist-fluffy-carrot-cake

The Best Carrot Cake Recipe – A Slice of Sunshine

There’s something magical about carrot cake, isn’t there? The way the warm spices mingle with the sweetness of grated carrots, the tender crumb that melts in your mouth, and that irresistible cream cheese frosting—it’s like a hug in dessert form. I remember the first time I baked this cake for my grandmother’s birthday. She took one bite, closed her eyes, and sighed, “Now that’s how carrot cake should taste.” Since then, this recipe has been my go-to for celebrations, rainy afternoons, and every moment in between.

Why You’ll Love This Recipe

This isn’t just any carrot cake—it’s moist, fluffy, and packed with flavor. The secret? A perfect balance of spices, freshly grated carrots (none of that pre-shredded stuff!), and a touch of pineapple for natural sweetness. Plus, it’s forgiving—whether you’re a baking novice or a seasoned pro, this cake will never let you down.

Ingredients You’ll Need

  • 2 cups all-purpose flour – The foundation of our cake. Spoon and level it to avoid a dense texture.
  • 2 tsp baking powder – Our little lift for that perfect fluffiness.
  • 1 tsp baking soda – Helps the cake rise beautifully.
  • 1 ½ tsp ground cinnamon – Warm and cozy, just like autumn.
  • ½ tsp ground nutmeg – A whisper of earthy sweetness.
  • ½ tsp salt – Balances all the flavors.
  • 1 cup granulated sugar – Sweetness without overpowering.
  • 1 cup brown sugar – Adds depth and moisture.
  • 4 large eggs – Room temperature, please! They blend better.
  • 1 cup vegetable oil – The key to that melt-in-your-mouth texture.
  • 2 tsp vanilla extract – Pure, not imitation—trust me on this.
  • 3 cups grated carrots – Freshly grated for the best texture and sweetness.
  • ½ cup crushed pineapple (drained) – The secret ingredient for extra moisture and a hint of tropical sweetness.
  • ½ cup chopped walnuts or pecans (optional) – For a little crunch, if you’re feeling fancy.

Step-by-Step Instructions

  1. Preheat and Prep – Preheat your oven to 350°F (175°C). Grease and flour two 9-inch round cake pans or line them with parchment paper. There’s nothing worse than a cake that sticks!
  2. Whisk the Dry Ingredients – In a large bowl, whisk together the flour, baking powder, baking soda, cinnamon, nutmeg, and salt. Set aside. This ensures every bite is perfectly spiced.
  3. Cream the Sugars and Wet Ingredients – In another bowl, beat the granulated sugar, brown sugar, and eggs until light and fluffy. Slowly drizzle in the oil while mixing, then add the vanilla. The mixture should look smooth and slightly glossy.
  4. Combine with Care – Gradually add the dry ingredients to the wet mixture, mixing just until combined. Overmixing = tough cake, and we don’t want that!
  5. Fold in the Good Stuff – Gently stir in the grated carrots, pineapple, and nuts (if using). The batter will be thick and speckled with orange—that’s how you know it’s right.

Now, we’re ready to bake! But before we pop these beauties into the oven, here’s a little tip: tap the pans lightly on the counter to release any air bubbles. It’s the little things that make a big difference.

Pro Tips, Variations, and Substitutions

Every baker has their own little secrets, and here are a few of mine to make your carrot cake even more special:

  • For extra moisture: Add a tablespoon of crushed pineapple (drained) to the batter. It keeps the cake tender without overpowering the flavor.
  • Nut lovers: Fold in ½ cup of chopped walnuts or pecans for a delightful crunch.
  • Gluten-free option: Swap the all-purpose flour for a 1:1 gluten-free flour blend—no one will know the difference!
  • Spice it up: If you love warm spices, add a pinch of ground cloves or cardamom for extra depth.
  • No buttermilk? Make your own by mixing 1 cup of milk with 1 tablespoon of lemon juice or vinegar. Let it sit for 5 minutes before using.

What to Serve With Carrot Cake

While this cake is heavenly on its own, a few accompaniments can take it to the next level:

  • A dollop of whipped cream cheese frosting (or a classic cream cheese frosting if you prefer it richer).
  • A scoop of vanilla ice cream for a warm-and-cold contrast.
  • A drizzle of caramel sauce or a sprinkle of toasted coconut flakes for extra indulgence.
  • A hot cup of chai tea or coffee to balance the sweetness.

Storage and Reheating Tips

This carrot cake stays moist for days if stored properly:

  • Room temperature: Keep it in an airtight container for up to 3 days (if frosted, refrigerate after the first day).
  • Refrigerator: Store in the fridge for up to a week, tightly wrapped to prevent drying out.
  • Freezing: Wrap individual slices in plastic wrap and freeze for up to 3 months. Thaw at room temperature before serving.
  • Reheating: Warm slices in the microwave for 10-15 seconds for that fresh-from-the-oven feel.

Frequently Asked Questions

Can I use pre-shredded carrots?
While convenient, pre-shredded carrots tend to be drier. Freshly grated carrots give the best texture and moisture.

Why did my cake sink in the middle?
This usually happens if the cake is underbaked or if the oven temperature is too low. Always do the toothpick test—it should come out clean!

Can I make this into cupcakes?
Absolutely! Divide the batter into a lined muffin tin and bake at 350°F for 18-22 minutes. Perfect for parties!

Can I reduce the sugar?
Yes, you can cut the sugar by ¼ cup without major changes, but keep in mind it may affect the cake’s moisture and browning.

A Final Slice of Warmth

There’s something truly magical about a homemade carrot cake—the way the spices fill the kitchen, the tender crumb that melts in your mouth, and the joy of sharing it with loved ones. Whether it’s for a special occasion or just because, this recipe is a little piece of comfort you’ll return to again and again. So go ahead, bake with love, and savor every bite. Happy baking!

Print
clock clock iconcutlery cutlery iconflag flag iconfolder folder iconinstagram instagram iconpinterest pinterest iconfacebook facebook iconprint print iconsquares squares iconheart heart iconheart solid heart solid icon

Classic Carrot Cake

  • Author: Trusted Blog

Description

A moist and flavorful carrot cake with cream cheese frosting, perfect for any occasion.


Ingredients

Scale

For the Crust:

  • 2 cups all-purpose flour
  • 2 teaspoons baking powder
  • 1 teaspoon baking soda
  • 1 teaspoon ground cinnamon
  • 1/2 teaspoon ground nutmeg
  • 1/2 teaspoon salt
  • 1 cup granulated sugar
  • 1 cup brown sugar
  • 1 cup vegetable oil
  • 4 large eggs
  • 2 teaspoons vanilla extract
  • 3 cups grated carrots
  • 1 cup chopped walnuts (optional)
  • 8 oz cream cheese, softened
  • 1/2 cup unsalted butter, softened
  • 4 cups powdered sugar
  • 1 teaspoon vanilla extract

Instructions

1. Prepare the Crust:

  1. Preheat oven to 350°F (175°C). Grease and flour two 9-inch round cake pans.
  2. In a large bowl, whisk together flour, baking powder, baking soda, cinnamon, nutmeg, and salt.
  3. In another bowl, beat granulated sugar, brown sugar, oil, eggs, and vanilla until smooth.
  4. Gradually mix the dry ingredients into the wet ingredients until just combined.
  5. Fold in grated carrots and walnuts (if using). Divide batter evenly between the prepared pans.
  6. Bake for 25-30 minutes or until a toothpick inserted into the center comes out clean. Cool in pans for 10 minutes, then transfer to wire racks to cool completely.
  7. For the frosting, beat cream cheese and butter until smooth. Gradually add powdered sugar and vanilla, beating until fluffy.
  8. Frost the cooled cake layers and serve.

Notes

You can customize the seasonings to taste.

Easy Fried Mashed Potato Patties – Crispy & Delicious

easy-fried-mashed-potato-patties

Easy Fried Mashed Potato Patties: A Crispy Little Miracle

There’s something magical about leftovers—especially when they transform into something even better than the original. Take mashed potatoes, for example. As much as I adore a creamy, buttery mound of them fresh from the pot, I’ll admit I sometimes make extra just so I can fry them up the next day. These golden, crispy-edged patties are the ultimate comfort food encore—crunchy on the outside, fluffy within, and just begging to be dipped in something tangy. Whether you’re rescuing last night’s side dish or whipping up a batch from scratch (no judgment here), these patties are pure joy on a plate.

Ingredients You’ll Need:

  • 2 cups cold mashed potatoes – Day-old works best! If they’re too soft, add a sprinkle of flour to firm them up.
  • 1 egg, lightly beaten – Our trusty binder to hold everything together.
  • ¼ cup grated Parmesan or cheddar cheese – For a little salty depth (optional, but highly recommended).
  • 2 tablespoons finely chopped chives or green onions – A pop of freshness to balance the richness.
  • ½ teaspoon garlic powder – Because everything’s better with garlic.
  • ¼ teaspoon black pepper – Freshly cracked, if you’re feeling fancy.
  • ½ cup breadcrumbs or panko – For that irresistible golden crust.
  • 2 tablespoons butter + 1 tablespoon olive oil – The dynamic duo for frying—butter for flavor, oil to prevent burning.
  • Pinch of salt – Taste your mashed potatoes first; they might already be seasoned enough!

Let’s Make Those Patties:

Step 1: In a large bowl, gently mix the cold mashed potatoes, egg, cheese, chives, garlic powder, and pepper. If the mixture feels too wet (this depends on your potatoes!), sprinkle in a tablespoon of flour or breadcrumbs until it holds together when pressed.

Step 2: Shape the mixture into small patties, about ½-inch thick. I like using a ¼-cup measure for even sizing—just scoop, press lightly into a disk, and place on a parchment-lined tray. Pro tip: Wet your hands slightly to prevent sticking!

Step 3: Spread the breadcrumbs on a shallow plate and lightly coat each patty, pressing gently so they adhere. Don’t worry about perfection—rustic edges mean extra crispiness!

Step 4: Heat the butter and oil in a skillet over medium heat until shimmering. Carefully add the patties (don’t crowd the pan!) and cook for 3-4 minutes per side, until deeply golden and crisp. Resist the urge to flip too soon—let that crust form!


“`html

Pro Tips, Variations, and Substitutions

Making fried mashed potato patties is wonderfully forgiving, but a few tricks can take them from good to great:

  • Extra Crispy: For an ultra-crunchy exterior, add a tablespoon of cornstarch to the mashed potatoes before shaping.
  • Cheesy Twist: Fold in ½ cup shredded cheddar, Parmesan, or crumbled feta for a melty surprise.
  • Herb It Up: Fresh chives, dill, or rosemary add a bright, fresh flavor.
  • Gluten-Free: Swap breadcrumbs for almond flour or gluten-free panko.
  • Leftover Magic: Stir in finely chopped leftover roasted veggies or bacon bits for extra texture.

What to Serve With Fried Mashed Potato Patties

These golden patties are versatile enough for any meal! Try them with:

  • A dollop of sour cream and chives for a classic touch
  • Fried eggs and avocado for a hearty breakfast
  • Roasted chicken or meatloaf for comfort food perfection
  • A simple green salad to balance the richness
  • Applesauce or cranberry sauce for a sweet-savory contrast

Storage and Reheating Tips

Leftovers? Lucky you! Here’s how to keep them tasting fresh:

  • Fridge: Store in an airtight container for up to 3 days.
  • Freezer: Layer patties between parchment paper and freeze for up to 2 months.
  • Reheating: For maximum crispiness, reheat in a skillet over medium heat with a touch of oil. The microwave works in a pinch but will soften the crust.

Frequently Asked Questions

Can I use instant mashed potatoes?

Yes! Just make sure they’re thick (reduce water slightly) so the patties hold their shape.

Why do my patties fall apart?

If the mixture is too wet, add more breadcrumbs or an extra egg. Chilling the patties before frying also helps.

Can I bake these instead of frying?

Absolutely! Brush with oil and bake at 400°F (200°C) for 20–25 minutes, flipping halfway.

What’s the best oil for frying?

Neutral oils like canola, vegetable, or avocado oil work best for high heat and clean flavor.

Final Thoughts

There’s something deeply comforting about transforming humble leftovers into something crispy, golden, and utterly irresistible. Whether you’re serving these patties as a side dish, snack, or the star of the plate, they’re bound to bring smiles (and maybe a few recipe requests). So next time you spot that bowl of mashed potatoes in the fridge, know that a delicious second act is just a skillet away. Happy cooking!

“`
Print

clock clock iconcutlery cutlery iconflag flag iconfolder folder iconinstagram instagram iconpinterest pinterest iconfacebook facebook iconprint print iconsquares squares iconheart heart iconheart solid heart solid icon

Fried Mashed Potato Patties

  • Author: Trusted Blog

Description

Crispy on the outside and creamy on the inside, these fried mashed potato patties are a delicious way to use up leftover mashed potatoes.


Ingredients

Scale

For the Crust:

  • 2 cups leftover mashed potatoes
  • 1/2 cup shredded cheddar cheese
  • 1/4 cup finely chopped green onions
  • 1 large egg, beaten
  • 1/2 cup breadcrumbs
  • 1/2 teaspoon garlic powder
  • 1/2 teaspoon salt
  • 1/4 teaspoon black pepper
  • 2 tablespoons vegetable oil for frying

Instructions

1. Prepare the Crust:

  1. In a large bowl, mix mashed potatoes, cheddar cheese, green onions, egg, breadcrumbs, garlic powder, salt, and pepper until well combined.
  2. Form the mixture into small patties, about 1/2-inch thick.
  3. Heat vegetable oil in a skillet over medium heat.
  4. Carefully place the patties in the skillet and cook for 3-4 minutes on each side, until golden brown and crispy.
  5. Transfer to a paper towel-lined plate to drain excess oil.
  6. Serve warm with your favorite dipping sauce.

Notes

You can customize the seasonings to taste.

Best Beef Cutlets – Crispy and Juicy Recipe

best-beef-cutlets-crispy-juicy

The Secret to Perfectly Crispy, Juicy Beef Cutlets

There’s something deeply comforting about biting into a golden, crispy beef cutlet—crunchy on the outside, tender and juicy on the inside. It reminds me of Sunday dinners at my grandmother’s house, where the kitchen always smelled like sizzling butter and herbs. She’d serve them with a simple salad and a dollop of tangy sauce, and we’d all fight over the last one. Today, I’m sharing her recipe (with a few tweaks of my own) so you can bring that same warmth to your table.

Ingredients You’ll Need

Gathering the right ingredients is the first step to cutlet perfection. Here’s what you’ll need:

  • 1 lb ground beef (80/20 blend) – The fat keeps the cutlets juicy, so don’t go too lean!
  • 1 small onion, finely grated – Grating ensures it blends seamlessly into the meat.
  • 2 garlic cloves, minced – Because everything’s better with garlic.
  • 1 egg – Our binding agent, ensuring the cutlets hold their shape.
  • 1/2 cup breadcrumbs – Panko works wonders for extra crispiness.
  • 1 tsp paprika – For a subtle smoky sweetness.
  • 1 tsp dried oregano – A nod to my grandma’s secret herb mix.
  • Salt and pepper to taste – Season generously—this is where the magic happens.
  • 1/2 cup flour – For dredging, creating that perfect crust.
  • Oil for frying – A neutral oil like canola or vegetable works best.

Step-by-Step: Crafting the Perfect Cutlet

Now, let’s get cooking! Follow these steps for cutlets that are crispy on the outside and melt-in-your-mouth tender inside.

1. Mix the Meat Mixture

In a large bowl, combine the ground beef, grated onion, minced garlic, egg, breadcrumbs, paprika, oregano, salt, and pepper. Use your hands to mix everything gently—overworking the meat can make the cutlets tough. Pro tip: Wet your hands with cold water to prevent sticking!

2. Shape with Love

Divide the mixture into equal portions (about 8-10, depending on size). Shape each into a flattened oval or round patty, about 1/2-inch thick. Press lightly—you want them compact enough to hold together but not dense.

3. The Dredging Dance

Set up a dredging station: one plate with flour, another with beaten egg (optional for extra crispiness), and a third with breadcrumbs. Coat each cutlet in flour, dip in egg if using, then press into breadcrumbs, ensuring full coverage. Lay them on a tray and let them rest for 10 minutes—this helps the coating adhere.

4. Fry to Golden Perfection

Heat oil in a skillet over medium-high heat. You’ll know it’s ready when a breadcrumb sizzles upon contact. Fry the cutlets in batches, about 3-4 minutes per side, until deeply golden. Don’t overcrowd the pan, or they’ll steam instead of crisp! Drain on a paper towel-lined plate.

Pro Tips for Perfect Beef Cutlets Every Time

After making these cutlets dozens of times, I’ve picked up some tricks that make all the difference:

  • Chill before frying: Let the shaped cutlets rest in the fridge for 30 minutes – this helps the coating stick better
  • Double dip for extra crunch: For an ultra-crispy exterior, dip in egg wash and breadcrumbs twice
  • Oil temperature matters: Use a thermometer to maintain 350°F – too hot burns the coating before the inside cooks
  • Patience pays off: Resist flipping too soon! Let them get golden before turning

Delicious Variations to Try

This recipe is wonderfully adaptable:

  • Cheesy surprise: Stuff each cutlet with a cube of mozzarella before breading
  • Spicy kick: Add 1 tsp cayenne or chopped jalapeños to the meat mixture
  • Herb garden: Mix in fresh parsley, thyme or rosemary for freshness
  • Turkey twist: Substitute ground turkey for a lighter version

What to Serve With Your Beef Cutlets

These golden beauties pair beautifully with:

  • Creamy mashed potatoes and gravy
  • A crisp green salad with lemon vinaigrette
  • Buttered egg noodles
  • Roasted vegetables
  • For a fun twist, serve slider-style on mini buns with pickles

Storage and Reheating Tips

Leftovers (if you have any!) keep well:

  • Fridge: Store in airtight container for 3-4 days
  • Freezer: Freeze before frying for up to 3 months (fry from frozen, adding 1-2 minutes cooking time)
  • Reheating: For best texture, reheat in a 375°F oven for 10-12 minutes until crispy
  • Air fryer magic: 3-4 minutes at 380°F brings back the crunch perfectly

Frequently Asked Questions

Can I bake these instead of frying?

Absolutely! Brush with oil and bake at 400°F for 20-25 minutes, flipping halfway. They won’t be quite as crispy but still delicious.

What’s the best breadcrumb substitute?

Panko gives extra crunch, or try crushed cornflakes for texture. For gluten-free, almond flour or gluten-free breadcrumbs work well.

Why do my cutlets fall apart when frying?

This usually means the mixture needs more binder. Add another egg or 1 tbsp flour to help hold everything together.

Can I make these ahead?

Yes! Prep the cutlets up to the breading stage and refrigerate overnight. Fry just before serving for best results.

Final Thoughts

There’s something so comforting about biting into a perfectly crisp beef cutlet with that juicy, flavorful center. Whether you’re making these for a weeknight dinner or a special occasion, I hope this recipe becomes a staple in your kitchen just like it is in mine. Don’t be afraid to make them your own – cooking is all about joy, experimentation, and sharing delicious food with the people you love. Now go forth and fry up some happiness!

Print
clock clock iconcutlery cutlery iconflag flag iconfolder folder iconinstagram instagram iconpinterest pinterest iconfacebook facebook iconprint print iconsquares squares iconheart heart iconheart solid heart solid icon

Beef Cutlets

  • Author: Trusted Blog

Description

Juicy and flavorful beef cutlets that are perfect for a quick dinner or as a party appetizer.


Ingredients

Scale

For the Crust:

  • 1 lb ground beef
  • 1/2 cup breadcrumbs
  • 1 egg
  • 1 small onion, finely chopped
  • 2 cloves garlic, minced
  • 1 tsp salt
  • 1/2 tsp black pepper
  • 1/2 tsp paprika
  • 2 tbsp vegetable oil

Instructions

1. Prepare the Crust:

  1. In a large bowl, combine ground beef, breadcrumbs, egg, onion, garlic, salt, pepper, and paprika. Mix well.
  2. Shape the mixture into small patties or cutlets.
  3. Heat vegetable oil in a skillet over medium heat.
  4. Cook the cutlets for 4-5 minutes per side, or until golden brown and cooked through.
  5. Remove from skillet and drain on paper towels before serving.

Notes

You can customize the seasonings to taste.

Best Cloud Cake Recipe – Light and Airy Dessert

best-cloud-cake-recipe

The Best Cloud Cake Recipe: A Slice of Heaven on Your Plate

There’s something magical about a dessert that feels like you’re biting into a fluffy cloud. I still remember the first time I tasted a cloud cake—it was at a tiny patisserie in Paris, tucked away on a cobblestone street. The moment that airy, delicate crumb melted on my tongue, I knew I had to recreate it at home. After countless trials (and a few kitchen mishaps), I’ve perfected this light-as-air cloud cake that’s sure to make any occasion feel special. Whether you’re celebrating or just craving something sweet and ethereal, this recipe is your ticket to dessert bliss.

Ingredients You’ll Need

Gathering the right ingredients is the first step to creating this dreamy cake. Here’s what you’ll need:

  • 6 large egg whites – Room temperature is key for achieving maximum volume when whipping. Save the yolks for custard or carbonara!
  • 1 cup granulated sugar – Superfine sugar works best, but regular sugar will do if you give it a quick blitz in the blender.
  • 1 teaspoon cream of tartar – This little helper stabilizes the egg whites, ensuring your cloud cake stays lofty.
  • 1 teaspoon pure vanilla extract – A splash of vanilla adds warmth and depth. For a twist, try almond extract.
  • 1/2 cup cake flour – Sifted twice for the lightest texture possible. All-purpose flour can work in a pinch, but cake flour is ideal.
  • A pinch of salt – Just a whisper to balance the sweetness.

Step-by-Step: Baking Your Cloud Cake

Now, let’s turn these simple ingredients into a masterpiece. Follow these steps, and don’t rush—patience is the secret ingredient!

1. Prep Your Pan and Preheat

Start by preheating your oven to 325°F (165°C). Take an ungreased 9-inch tube pan (yes, ungreased—this helps the cake cling and rise properly). If your pan has a removable bottom, even better!

2. Whip the Egg Whites to Stiff Peaks

In a spotlessly clean bowl (any grease can sabotage your fluff!), beat the egg whites on medium speed until frothy. Add the cream of tartar and salt, then gradually sprinkle in the sugar while beating. Turn the speed up to high and whip until glossy, stiff peaks form. This should take about 5-7 minutes. Pro tip: The meringue should hold its shape when you lift the beaters.

3. Gently Fold in the Vanilla and Flour

Add the vanilla extract and give it a quick mix. Then, sift the cake flour over the meringue in three additions, folding gently with a spatula after each. Think of it as coaxing the flour into the mix—no heavy-handed stirring!

4. Bake to Golden Perfection

Pour the batter into your pan and smooth the top with a spatula. Bake for 35-40 minutes, or until the top is golden and springs back when lightly touched. Resist the urge to open the oven door too early—this cake is delicate and needs steady heat.

And that’s where we’ll pause for now! In the next half, I’ll walk you through cooling, unmolding, and the finishing touches that make this cloud cake truly unforgettable. Trust me, the aroma filling your kitchen right now is just the beginning of the magic.

Pro Tips for the Perfect Cloud Cake

Creating this dreamy dessert is easier than you think, but a few expert tricks will take it to the next level:

  • Room temperature eggs are crucial for maximum volume when whipping
  • Fold the flour in gently using a figure-eight motion to maintain airiness
  • For extra stability, add 1/2 tsp cream of tartar to the egg whites
  • Always use a clean, grease-free bowl when whipping egg whites

Delicious Variations to Try

This versatile recipe welcomes creativity:

  • Lemon Cloud Cake: Add 2 tbsp lemon zest and 1 tsp lemon extract
  • Chocolate Cloud: Substitute 1/4 cup flour with cocoa powder
  • Berry Bliss: Fold in 1 cup fresh raspberries before baking
  • Coconut Dream: Mix in 1/2 cup toasted coconut flakes

Perfect Pairings

This ethereal cake shines when served with:

  • A dollop of freshly whipped cream
  • Warm berry compote or fruit coulis
  • Light vanilla custard or crème anglaise
  • Dusting of powdered sugar and edible flowers

Storage and Reheating Tips

To keep your cloud cake heavenly:

  • Store at room temperature under a cake dome for up to 2 days
  • For longer storage, freeze whole or in slices for up to 1 month
  • Revive day-old cake with a quick 10-second microwave zap
  • Never refrigerate – it will make the texture gummy

Cloud Cake FAQs

Can I make this gluten-free?
Absolutely! Substitute the flour with an equal amount of your favorite gluten-free flour blend. The texture will be slightly denser but still delicious.

Why did my cake collapse?
This usually happens if the egg whites were under-whipped or if you opened the oven door too early. Make sure your whites form stiff peaks and resist peeking for at least the first 20 minutes!

Can I use this recipe for cupcakes?
Yes! Divide the batter into lined muffin tins and bake at 325°F for 18-22 minutes. They make adorable “cloudlet” cupcakes.

Is this the same as angel food cake?
Similar, but our cloud cake is slightly richer thanks to the addition of egg yolks. It’s like angel food cake’s more indulgent cousin!

A Sweet Final Thought

There’s something magical about watching this cake rise into pillowy perfection in the oven, then seeing the delight on your loved ones’ faces when they take that first airy bite. Whether you’re celebrating a special occasion or just want to bring a little sweetness to an ordinary day, this cloud cake is guaranteed to lift spirits. Don’t be surprised if it becomes your new go-to dessert – light enough to enjoy any time, yet special enough to feel like a treat. Happy baking!

Print
clock clock iconcutlery cutlery iconflag flag iconfolder folder iconinstagram instagram iconpinterest pinterest iconfacebook facebook iconprint print iconsquares squares iconheart heart iconheart solid heart solid icon

Cloud Cake

  • Author: Trusted Blog

Description

A light and fluffy cake that resembles a cloud, perfect for any occasion.


Ingredients

Scale

For the Crust:

  • 1 1/2 cups all-purpose flour
  • 1 cup granulated sugar
  • 1/2 teaspoon baking powder
  • 1/2 teaspoon baking soda
  • 1/4 teaspoon salt
  • 1/2 cup unsalted butter, softened
  • 2 large eggs
  • 1 teaspoon vanilla extract
  • 1/2 cup buttermilk

Instructions

1. Prepare the Crust:

  1. Preheat oven to 350°F (175°C) and grease a 9-inch round cake pan.
  2. In a bowl, whisk together flour, sugar, baking powder, baking soda, and salt.
  3. In another bowl, beat the butter until creamy. Add eggs one at a time, then mix in vanilla.
  4. Alternately add the dry ingredients and buttermilk to the butter mixture, mixing until just combined.
  5. Pour the batter into the prepared pan and bake for 25-30 minutes, or until a toothpick comes out clean.
  6. Let the cake cool in the pan for 10 minutes, then transfer to a wire rack to cool completely.

Notes

You can customize the seasonings to taste.