“`html
Table of Contents
- Introduction: The Ultimate Party Pleaser
- Ingredients: A Flavor Revolution
- Timing is Everything
- Step-by-Step Instructions: Crafting Your Masterpieces
- Nutritional Information
- Healthier Alternatives: Indulge Wisely
- Serving Suggestions: Elevate Your Appetizer
- Common Mistakes to Avoid
- Storing and Reheating Tips
- Conclusion: Your New Go-To Appetizer
- Frequently Asked Questions
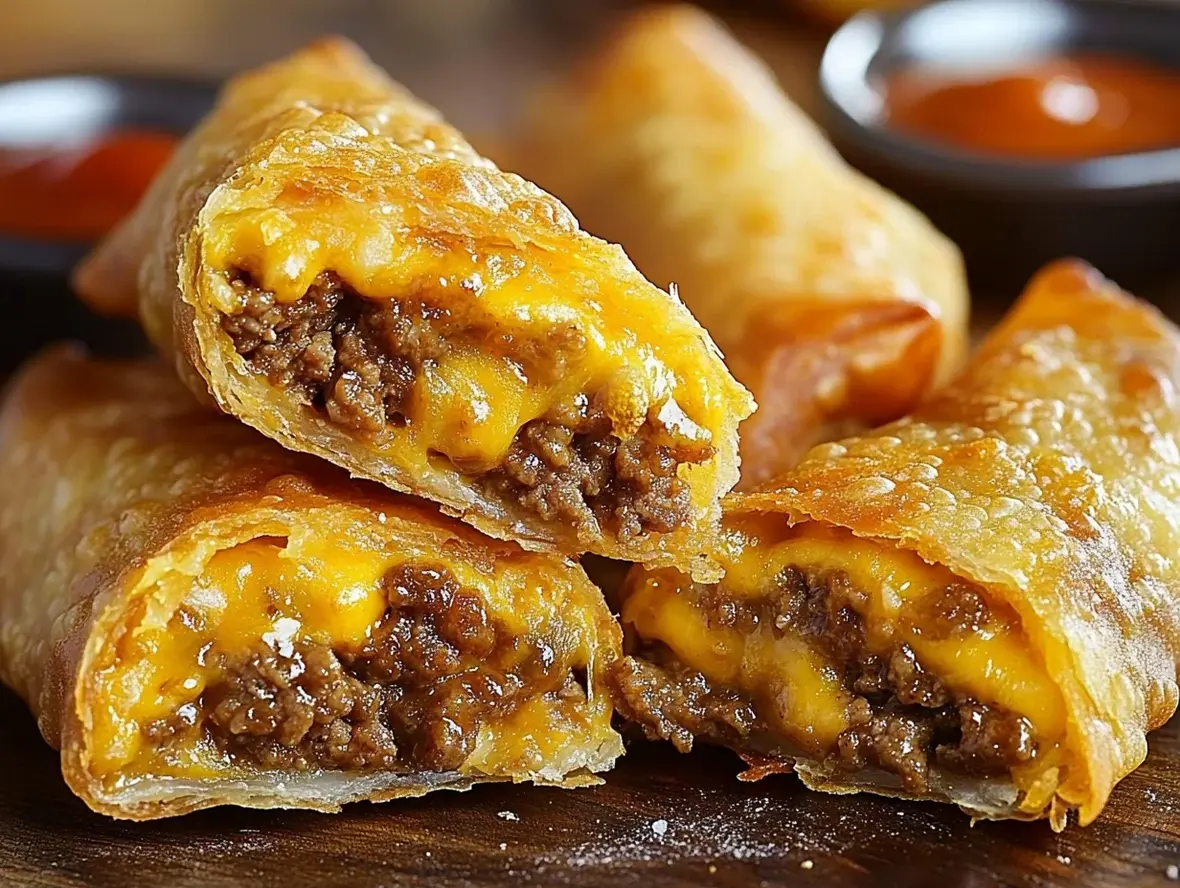
Cheeseburger Egg Rolls: The Ultimate Party Appetizer Recipe
Introduction: The Ultimate Party Pleaser
Are you searching for an appetizer that will wow your guests and disappear in minutes? Imagine all the savory, comforting flavors of a classic cheeseburger, but in a crispy, delightful, bite-sized package. That’s exactly what these Cheeseburger Egg Rolls deliver! Perfect for game days, holiday gatherings, or just a fun family dinner, this recipe transforms a beloved classic into an innovative and incredibly satisfying party appetizer. Forget boring dips and predictable snacks; these cheeseburger egg rolls are guaranteed to be the star of your next event. With a simple preparation and a sensational outcome, you’ll wonder why you haven’t made them sooner.
Ingredients: A Flavor Revolution
The magic of these cheeseburger egg rolls lies in the harmonious blend of classic cheeseburger components, expertly wrapped and fried to crispy perfection. We’ve focused on quality ingredients to ensure maximum flavor in every bite.
For the Cheeseburger Filling
- 1 pound ground beef (80/20 blend for best flavor and moisture) – the backbone of our delicious filling
- 1/2 cup finely diced yellow onion (about 1/2 small onion) – adds a subtle sweetness and aromatic depth
- 1/4 cup finely diced dill pickle (or sweet pickle, for tang) – essential for that classic cheeseburger zing
- 1 teaspoon Worcestershire sauce – adds a savory, umami complexity
- 1/2 teaspoon garlic powder – for that essential savory kick
- 1/2 teaspoon onion powder – enhances the overall savory profile
- Salt and black pepper to taste – to season perfectly
- 4 ounces shredded cheddar cheese (or a blend of cheddar and Monterey Jack) – for that gooey, irresistible cheese pull
- Substitution: For a leaner option, use 90/10 ground beef. If you’re not a fan of dill pickles, try sweet relish for a different kind of tang.
For the Egg Roll Assembly
- 24-30 egg roll wrappers (standard size, found in the refrigerated section of most grocery stores) – your crispy vehicle for flavor
- 1 large egg, beaten (for egg wash) – to seal the wrappers beautifully
- Vegetable oil or other neutral frying oil, for frying (about 3-4 cups) – for achieving that signature golden crispness
- Substitution: If you can’t find standard egg roll wrappers, spring roll wrappers can be used, though they might be slightly thinner.
Optional Dipping Sauces
- Ketchup
- Mustard
- Special Sauce (mayonnaise, ketchup, pickle relish, a dash of hot sauce)
- Ranch dressing
Timing is Everything
On average, recipes for similar appetizers require about 45 minutes of preparation and 15 minutes of cooking. Our Cheeseburger Egg Rolls are slightly more involved due to the cooking and chilling of the filling, but the payoff is absolutely worth it!

Step-by-Step Instructions: Crafting Your Masterpieces
Let’s get cooking! Follow these simple steps to create your own batch of irresistible Cheeseburger Egg Rolls.
Step 1: Prepare the Burger Filling
In a large skillet over medium-high heat, cook the ground beef, breaking it up with a spoon, until browned. Drain off any excess grease. Add the finely diced onion to the skillet and cook for about 3-5 minutes until softened and translucent. Stir in the diced pickle, Worcestershire sauce, garlic powder, onion powder, salt, and pepper. Cook for another 2 minutes, allowing the flavors to meld beautifully. Remove the skillet from the heat and let it cool slightly for about 5-10 minutes. Once slightly cooled, stir in the shredded cheese until it’s just melted and evenly distributed into the beef mixture.
Step 2: Chill the Filling
This is a crucial step for easier assembly! Spread the cheeseburger mixture onto a plate or baking sheet in an even layer. Cover with plastic wrap and refrigerate for at least 30 minutes, or until completely cooled. A chilled filling won’t make the wrappers soggy and will be much easier to handle.
Step 3: Assemble the Egg Rolls
Prepare your workspace: lay out a few egg roll wrappers on a clean, dry surface with one corner pointing towards you (like a diamond). Spoon about 2 to 3 tablespoons of the chilled cheeseburger filling onto the center of the wrapper. Fold the bottom corner up over the filling, then fold in the left and right sides (like an envelope). Moisten the top corner with a little of the beaten egg wash, and then tightly roll the entire package upwards to seal. Ensure there are no gaps. Repeat with the remaining wrappers and filling.
Step 4: Fry to Golden Perfection
Pour enough vegetable oil into a deep skillet or Dutch oven to reach a depth of about 2-3 inches. Heat the oil over medium-high heat until it reaches 350°F (175°C). Carefully place 3-4 egg rolls into the hot oil, making sure not to overcrowd the pan. Fry for 3-5 minutes, turning occasionally, until they are golden brown and crispy on all sides. Remove the cooked egg rolls with a slotted spoon and place them on a wire rack set over a baking sheet to drain any excess oil. Repeat with the remaining egg rolls.
Step 5: Serve and Savor
Serve your hot, crispy Cheeseburger Egg Rolls immediately with your favorite dipping sauces. The contrast between the crunchy exterior and the warm, cheesy, beefy interior is pure bliss!
Nutritional Information
Please note: Nutritional information is an estimate and can vary based on specific ingredients and portion sizes. This is calculated per egg roll, assuming 28 servings.
- Calories: Approximately 180-220 kcal
- Protein: 7-10g
- Fat: 10-14g
- Carbohydrates: 12-15g
- Fiber: <1g
Healthier Alternatives: Indulge Wisely
Looking for ways to make these delicious bites a bit lighter without sacrificing flavor? Try these swaps:
- Leaner Meat: Use 90% lean ground turkey or chicken instead of beef.
- Baked Version: Instead of frying, lightly brush the assembled egg rolls with oil and bake at 400°F (200°C) for 15-20 minutes, flipping halfway, until golden brown and crispy. This dramatically reduces fat content.
- Veggies Galore: Finely shred and sauté mushrooms, zucchini, or bell peppers along with the onions to add volume and nutrients.
- Lighter Cheese: Use a reduced-fat cheddar cheese.
Serving Suggestions: Elevate Your Appetizer
These egg rolls are fantastic on their own, but here are a few ideas to make them even more special:
- Dipping Sauce Bar: Offer a variety of dipping sauces like classic ketchup, mustard, a tangy special sauce, or even a spicy sriracha mayo.
- Garnish: Top with a sprinkle of sesame seeds, finely chopped chives, or a tiny dollop of sour cream for an extra touch.
- Party Platter: Arrange them on a platter with a side of small salad or coleslaw for a more complete appetizer experience.
Common Mistakes to Avoid
- Overfilling the wrappers: This makes them difficult to seal and can cause them to burst during frying.
- Not cooling the filling properly: A hot filling will steam the wrappers, making them soggy and hard to handle.
- Overcrowding the fryer: This lowers the oil temperature, resulting in greasy egg rolls rather than crispy ones. Fry in batches.
- Not sealing wrappers completely: Use enough egg wash and ensure a tight seal to prevent the filling from leaking out.
- Using wrappers that are too dry: If wrappers feel dry, cover them with a damp paper towel for a few minutes to make them pliable.
Storing and Reheating Tips
To Store: If you have leftovers, allow the egg rolls to cool completely. Store them in an airtight container in the refrigerator for up to 2-3 days. For best results, store them in a single layer to prevent them from sticking together.
To Reheat: For the crispiest results, reheat in a preheated oven at 375°F (190°C) for 8-10 minutes, or in an air fryer at 350°F (175°C) for 4-6 minutes until heated through and crispy. Avoid reheating in the microwave, as this can make them soggy.
Conclusion: Your New Go-To Appetizer
There you have it – the ultimate guide to creating incredibly delicious Cheeseburger Egg Rolls! This recipe takes a familiar favorite and gives it a fun, exciting twist that’s perfect for any occasion. They’re easy to make, a joy to eat, and sure to be a crowd-pleaser. So, gather your ingredients, preheat your oil, and get ready to impress your friends and family with this unforgettable appetizer. Happy cooking!
Frequently Asked Questions
Can I make the cheeseburger filling ahead of time?
Absolutely! The filling can be made a day in advance and stored in an airtight container in the refrigerator. This makes assembly even quicker on the day of your party.
Can I freeze these egg rolls?
Yes, you can freeze the assembled, uncooked egg rolls. Place them on a baking sheet in a single layer and freeze until solid. Then, transfer them to a freezer-safe bag or container. Fry directly from frozen, adding a few extra minutes to the cooking time, or bake at a slightly higher temperature (around 400°F/200°C) until golden and heated through.
What kind of cheese melts best?
Cheddar cheese, Monterey Jack, or a blend of both work exceptionally well for their melting properties, giving you that desirable gooeyness. Avoid pre-shredded cheeses that contain anti-caking agents, as they may not melt as smoothly.
How do I prevent the egg rolls from bursting when frying?
Ensure you don’t overfill the wrappers and that they are sealed tightly. Also, avoid overcrowding the pan, which causes the oil temperature to drop and can lead to a less desirable texture and an increased risk of breakage.
Can I make these vegetarian?
Yes! You can substitute the ground beef with a mixture of sautéed mushrooms, black beans, and your favorite spices to create a delicious vegetarian filling.

Cheeseburger Egg Rolls
Description
TheseCheeseburger Egg Rollsare a delicious twist on two comfort food favorites! Packed with gooey cheese, seasoned ground beef, and tangy pickles, they make the perfect appetizer or snack. Serve them with your favorite dipping sauce like ketchup, mustard, or a creamy ranch dressing for the ultimate treat.
Ingredients
- 1pound ground beef1 cupshredded cheddar cheese1/2 cupdiced pickles1/2 cupdiced onions1/4 cupketchup2 tablespoonsmustardSalt and pepper, to taste
- 1 cupshredded cheddar cheese1/2 cupdiced pickles1/2 cupdiced onions1/4 cupketchup2 tablespoonsmustardSalt and pepper, to taste
- 1/2 cupdiced pickles1/2 cupdiced onions1/4 cupketchup2 tablespoonsmustardSalt and pepper, to taste
- 1/2 cupdiced onions1/4 cupketchup2 tablespoonsmustardSalt and pepper, to taste
- 1/4 cupketchup2 tablespoonsmustardSalt and pepper, to taste
- 2 tablespoonsmustardSalt and pepper, to taste
- Salt and pepper, to taste
- 12egg roll wrappersOil for frying
- Oil for frying
Instructions
- 1️⃣Prepare the Filling:In a skillet over medium heat, cook the ground beef until fully browned. Drain excess fat.2️⃣Add Flavor:Stir in diced onions, pickles, ketchup, mustard, salt, and pepper. Simmer for about 5 minutes to blend the flavors.3️⃣Incorporate Cheese:Remove the skillet from heat and allow the mixture to cool slightly. Stir in shredded cheddar cheese until it melts and becomes gooey.4️⃣Fill the Wrappers:Lay an egg roll wrapper on a clean, dry surface with one corner pointing toward you. Spoon about 2 tablespoons of the cheeseburger filling into the center.5️⃣Fold and Roll:Fold the bottom corner over the filling, then fold in the sides. Roll the wrapper tightly to enclose the filling. Use a dab of water on the top corner to seal.6️⃣Repeat:Continue filling and rolling until all the wrappers and filling are used.7️⃣Fry the Egg Rolls:Heat oil in a large skillet or deep fryer to 350°F (175°C). Fry the egg rolls in batches, turning occasionally, until golden brown, about 3-4 minutes.8️⃣Drain and Serve:Remove the egg rolls from the oil and drain on paper towels. Serve hot with your favorite dipping sauces.
- 2️⃣Add Flavor:Stir in diced onions, pickles, ketchup, mustard, salt, and pepper. Simmer for about 5 minutes to blend the flavors.
- 3️⃣Incorporate Cheese:Remove the skillet from heat and allow the mixture to cool slightly. Stir in shredded cheddar cheese until it melts and becomes gooey.4️⃣Fill the Wrappers:Lay an egg roll wrapper on a clean, dry surface with one corner pointing toward you. Spoon about 2 tablespoons of the cheeseburger filling into the center.5️⃣Fold and Roll:Fold the bottom corner over the filling, then fold in the sides. Roll the wrapper tightly to enclose the filling. Use a dab of water on the top corner to seal.6️⃣Repeat:Continue filling and rolling until all the wrappers and filling are used.7️⃣Fry the Egg Rolls:Heat oil in a large skillet or deep fryer to 350°F (175°C). Fry the egg rolls in batches, turning occasionally, until golden brown, about 3-4 minutes.8️⃣Drain and Serve:Remove the egg rolls from the oil and drain on paper towels. Serve hot with your favorite dipping sauces.
- 4️⃣Fill the Wrappers:Lay an egg roll wrapper on a clean, dry surface with one corner pointing toward you. Spoon about 2 tablespoons of the cheeseburger filling into the center.5️⃣Fold and Roll:Fold the bottom corner over the filling, then fold in the sides. Roll the wrapper tightly to enclose the filling. Use a dab of water on the top corner to seal.6️⃣Repeat:Continue filling and rolling until all the wrappers and filling are used.7️⃣Fry the Egg Rolls:Heat oil in a large skillet or deep fryer to 350°F (175°C). Fry the egg rolls in batches, turning occasionally, until golden brown, about 3-4 minutes.8️⃣Drain and Serve:Remove the egg rolls from the oil and drain on paper towels. Serve hot with your favorite dipping sauces.
- 5️⃣Fold and Roll:Fold the bottom corner over the filling, then fold in the sides. Roll the wrapper tightly to enclose the filling. Use a dab of water on the top corner to seal.
- 6️⃣Repeat:Continue filling and rolling until all the wrappers and filling are used.7️⃣Fry the Egg Rolls:Heat oil in a large skillet or deep fryer to 350°F (175°C). Fry the egg rolls in batches, turning occasionally, until golden brown, about 3-4 minutes.8️⃣Drain and Serve:Remove the egg rolls from the oil and drain on paper towels. Serve hot with your favorite dipping sauces.
- 7️⃣Fry the Egg Rolls:Heat oil in a large skillet or deep fryer to 350°F (175°C). Fry the egg rolls in batches, turning occasionally, until golden brown, about 3-4 minutes.8️⃣Drain and Serve:Remove the egg rolls from the oil and drain on paper towels. Serve hot with your favorite dipping sauces.
- 8️⃣Drain and Serve:Remove the egg rolls from the oil and drain on paper towels. Serve hot with your favorite dipping sauces.
Notes
Air Fryer Option:To make these lighter, brush the egg rolls with oil and air fry at 375°F (190°C) for 10-12 minutes, flipping halfway.Customization:Add crumbled bacon or jalapeños for an extra kick!Storage:Leftover egg rolls can be refrigerated in an airtight container for up to 3 days. Reheat in the oven or air fryer for crispiness.
Customization:Add crumbled bacon or jalapeños for an extra kick!Storage:Leftover egg rolls can be refrigerated in an airtight container for up to 3 days. Reheat in the oven or air fryer for crispiness.
Storage:Leftover egg rolls can be refrigerated in an airtight container for up to 3 days. Reheat in the oven or air fryer for crispiness.
“`