“`html
Table of Contents
- Craving a Cheesy, Comforting Meal?
- Mouthwatering Ingredients for Your Cheeseburger Tortellini
- Speedy Preparation and Delicious Results
- Crafting Your One-Pot Cheeseburger Tortellini
- Nutritional Snapshot
- Healthier Twists on a Classic
- Perfect Pairings for Your Tortellini
- Avoiding Common Cheeseburger Tortellini Pitfalls
- Storing Your Delicious Creation
- A Delectable Dinner, Simplified
- Frequently Asked Questions
Cheeseburger Tortellini A One-Pot Dinner Recipe
Craving a Cheesy, Comforting Meal?
Are you on the hunt for a dinner that’s both incredibly satisfying and remarkably easy to make? If the thought of combining the beloved flavors of a juicy cheeseburger with the comforting embrace of cheesy tortellini in a rich, creamy sauce sounds like a dream, then you’re in the right place! This One-Pot Cheeseburger Tortellini Skillet is poised to become your new weeknight hero. Imagine: tender tortellini swimming in a velvety sauce bursting with the savory essence of ground beef, tangy tomato, and melted cheddar – all cooked in a single pot, minimizing cleanup and maximizing flavor. This recipe delivers a hearty, flavorful, and quick meal that’s perfect for busy evenings when you need comfort food without the fuss. Get ready to redefine your weeknight dinners!
Mouthwatering Ingredients for Your Cheeseburger Tortellini
The magic of this dish lies in its simplicity and the harmonious blend of familiar cheeseburger flavors transformed into a pasta dish. Here’s what you’ll need:
The Star: Refrigerated Tortellini
1 (20 ounce) package refrigerated cheese tortellini: These little pillows of joy are the heart of our dish. They cook quickly and absorb the sauce beautifully. You can also use refrigerated spinach or meat tortellini if you prefer.
Lean Ground Beef
1 pound lean ground beef (85% or 90% lean): This provides that classic, savory cheeseburger foundation. Using leaner beef helps prevent the sauce from becoming overly greasy.
Aromatic Onion
1 medium yellow onion, finely chopped: Onions bring essential sweetness and depth. A yellow onion offers a good balance of sweetness and sharpness when cooked.
Pungent Garlic
3-4 cloves garlic, minced: Garlic is non-negotiable for that irresistible aroma and punchy flavor. Mince it finely to distribute its flavor evenly.
Rich Diced Tomatoes
1 (14.5 ounce) can diced tomatoes, undrained: These add a burst of acidity and texture, mimicking the tanginess of a burger’s toppings. Fire-roasted tomatoes can add an extra layer of smoky flavor.
Savory Beef Broth
2 cups beef broth: This forms the base of our luscious sauce, infusing it with deep, savory notes. Low-sodium is recommended to control saltiness.
Luxurious Heavy Cream
1/2 cup heavy cream: This is what brings the luxurious, creamy texture that coats the tortellini and elevates the dish from simple to decadent. For a lighter option, see the Healthier Alternatives section.
Sharp Cheddar Cheese
1 1/2 cups shredded sharp cheddar cheese: The quintessential cheeseburger cheese! Sharp cheddar offers a robust, tangy flavor that stands up well to the other ingredients. Monterey Jack or a mix of cheddar and Colby would also be delicious.
Flavorful Seasonings
1 teaspoon salt, or to taste
1/2 teaspoon black pepper, or to taste
1/2 teaspoon garlic powder
1/2 teaspoon onion powder
Optional: 1 teaspoon Worcestershire sauce for extra umami
Optional Garnishes
Chopped fresh parsley, for color and freshness
Sesame seeds (to mimic a burger bun!)
Diced pickles or relish, for that classic burger tang
Extra shredded cheddar cheese
Speedy Preparation and Delicious Results
Cook time: 25 minutes
Total time: 35 minutes
Compared to traditional homemade pasta dishes or complex casseroles, this one-pot wonder is significantly faster. The average pasta dinner can take anywhere from 30-50 minutes, often involving multiple pots. This Cheeseburger Tortellini clocks in at a speedy 35 minutes, with most of that being hands-off simmering time, making it a genuine weeknight champion.

Crafting Your One-Pot Cheeseburger Tortellini
Follow these simple steps to create your ultimate one-pot meal.
Step 1: Brown the Beef and Aromatics
Grab a large skillet or Dutch oven (at least 10-12 inches). Heat it over medium-high heat. Add the ground beef and cook, breaking it up with a spoon, until it’s browned and no pink remains. Drain off any excess grease.
Add the chopped onion to the skillet with the browned beef. Cook, stirring occasionally, until the onion begins to soften and turn translucent, about 5-7 minutes. Then, stir in the minced garlic and cook for another minute until fragrant. Be careful not to burn the garlic!
Step 2: Add Liquids and Tomatoes
Pour in the undrained diced tomatoes and the beef broth. Add the salt, black pepper, garlic powder, onion powder, and Worcestershire sauce (if using). Stir everything together to combine, scraping up any browned bits from the bottom of the pan – that’s where a lot of the flavor is!
Step 3: Simmer and Thicken the Sauce
Bring the mixture to a simmer. Reduce the heat to medium-low, cover the skillet, and let it simmer gently for about 10 minutes. This allows the flavors to meld beautifully and the sauce to start thickening slightly.
Step 4: Stir in Tortellini and Cheese
Uncover the skillet. Stir in the refrigerated tortellini. Ensure they are submerged in the liquid as much as possible. Cover the skillet again and cook for another 5-7 minutes, or until the tortellini are tender and cooked through. The sauce should have thickened considerably.
Once the tortellini are cooked, remove the skillet from the heat. Stir in the heavy cream and about 1 cup of the shredded cheddar cheese. Stir gently until the cheese is melted and the sauce is wonderfully creamy and cohesive. Taste and adjust seasonings if needed.
Step 5: Serve and Garnish
Ladle the Cheeseburger Tortellini into bowls. Sprinkle with the remaining shredded cheddar cheese for extra gooeyness, and garnish with fresh parsley, sesame seeds, or diced pickles if desired. Serve immediately and enjoy the one-pot magic!
Nutritional Snapshot
While exact nutritional values can vary based on specific ingredients used, a typical serving of this Cheeseburger Tortellini offers:
- Calories: Approximately 550-650 per serving
- Protein: High, from ground beef and tortellini
- Fat: Moderate, primarily from cheese and cream
- Carbohydrates: Moderate, from tortellini and vegetables
(Note: This is an estimation. For precise nutritional data, it’s recommended to use a recipe calculator with your specific ingredients.)
Healthier Twists on a Classic
Looking to lighten up this delicious dish without sacrificing too much flavor? Try these swaps:
- Lighter Cream Base: Substitute half of the heavy cream with whole milk or half-and-half. For an even lighter version, stir in some plain Greek yogurt at the very end, off the heat (be careful, it can curdle if heated too much).
- Leaner Protein: Opt for ground turkey or chicken instead of beef.
- Whole Wheat Tortellini: If available, choose whole wheat tortellini for added fiber.
- Extra Veggies: Stir in some spinach, chopped mushrooms, or bell peppers with the onions for added nutrients and volume.
- Reduced Cheese: Use a sharp cheese and a smaller amount, or opt for a reduced-fat cheddar.
Perfect Pairings for Your Tortellini
This hearty tortellini dish is a meal in itself, but it pairs wonderfully with:
- A simple side salad with a light vinaigrette to cut through the richness.
- Steamed or roasted broccoli or green beans.
- Garlic bread or crusty bread for soaking up any extra sauce.
Avoiding Common Cheeseburger Tortellini Pitfalls
To ensure your recipe turns out perfectly every time:
- Don’t Overcook the Tortellini: They continue to cook slightly in the sauce. Add them towards the end and check for tenderness to avoid mushy pasta.
- Drain Grease Properly: Thoroughly drain the fat from the ground beef after browning to prevent an oily sauce.
- Scrape the Bottom: Those browned bits (fond) stuck to the bottom of the pan are flavor gold! Make sure to scrape them up when adding liquids.
- Don’t Boil the Cream: Add the cream and cheese off the heat or on very low heat to prevent the sauce from separating or curdling.
Storing Your Delicious Creation
Leftovers can be stored in an airtight container in the refrigerator for up to 3-4 days. The sauce may thicken further upon reheating. When reheating, you might want to add a splash of milk or broth to loosen it up.
A Delectable Dinner, Simplified
This Cheeseburger Tortellini Skillet is more than just a meal; it’s an experience. It’s the ultimate comfort food that brings together beloved flavors in a wonderfully easy, one-pot format. Perfect for family dinners, busy weeknights, or whenever you need a burst of cheesy, savory goodness. Give it a try and discover your new favorite go-to dinner recipe!
Frequently Asked Questions
***Can I use dried tortellini instead of fresh?***
Yes, you can! You’ll likely need to adjust the cooking time. Cook the dried tortellini according to package directions until al dente, then drain and add them to the sauce towards the end of the cooking process, similar to step 4. You may need to add a little extra broth or water as dried pasta absorbs more liquid.
***What kind of cheese can I use?***
Cheddar is classic, but feel free to experiment! Monterey Jack, Colby, a blend of mozzarella and cheddar, or even a sharp provolone can work beautifully. Just ensure it’s a good melting cheese.
***Can I make this vegetarian?***
Absolutely! Skip the ground beef and sauté the onions and garlic in a tablespoon of olive oil. You can add extra vegetables like mushrooms, bell peppers, or zucchini to bulk it up. Use vegetable broth instead of beef broth, and you’ll have a delicious vegetarian version.
***Why is my sauce not creamy enough?***
Ensure your tortellini are fully cooked and have absorbed some of the liquid. Adding a bit more heavy cream or a tablespoon of butter at the end can also help achieve that desired creamy consistency. Make sure you’re using actual heavy cream for the best richness.
***Can I freeze leftovers?***
While it’s best enjoyed fresh, you can freeze leftovers. The texture of the tortellini may change slightly upon thawing, becoming softer. Freeze in an airtight container for up to 2-3 months. Thaw in the refrigerator overnight and reheat gently.
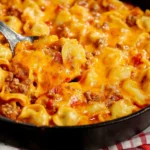
Cheeseburger Tortellini Skillet
Description
This one-panCheeseburger Tortellini Skilletcombines the comforting flavors of a cheeseburger with cheesy tortellini in a creamy, flavorful sauce. A perfect weeknight meal that’s quick, hearty, and satisfying!
Ingredients
- 1lb lean ground beef1 cupdiced yellow onion1/2 tspsalt1/2 tsppepper1 tbspminced garlic19 ozfrozen cheese tortellini10.5 ozcondensed cheddar soup10 ozRotel diced tomatoes and green chilies (not drained)1 cupmilk1 tbspyellow mustard1/4 cupketchup2 cupsshredded cheddar cheese
- 1 cupdiced yellow onion1/2 tspsalt1/2 tsppepper1 tbspminced garlic19 ozfrozen cheese tortellini10.5 ozcondensed cheddar soup10 ozRotel diced tomatoes and green chilies (not drained)1 cupmilk1 tbspyellow mustard1/4 cupketchup2 cupsshredded cheddar cheese
- 1/2 tspsalt1/2 tsppepper1 tbspminced garlic19 ozfrozen cheese tortellini10.5 ozcondensed cheddar soup10 ozRotel diced tomatoes and green chilies (not drained)1 cupmilk1 tbspyellow mustard1/4 cupketchup2 cupsshredded cheddar cheese
- 1/2 tsppepper1 tbspminced garlic19 ozfrozen cheese tortellini10.5 ozcondensed cheddar soup10 ozRotel diced tomatoes and green chilies (not drained)1 cupmilk1 tbspyellow mustard1/4 cupketchup2 cupsshredded cheddar cheese
- 1 tbspminced garlic19 ozfrozen cheese tortellini10.5 ozcondensed cheddar soup10 ozRotel diced tomatoes and green chilies (not drained)1 cupmilk1 tbspyellow mustard1/4 cupketchup2 cupsshredded cheddar cheese
- 19 ozfrozen cheese tortellini10.5 ozcondensed cheddar soup10 ozRotel diced tomatoes and green chilies (not drained)1 cupmilk1 tbspyellow mustard1/4 cupketchup2 cupsshredded cheddar cheese
- 10.5 ozcondensed cheddar soup10 ozRotel diced tomatoes and green chilies (not drained)1 cupmilk1 tbspyellow mustard1/4 cupketchup2 cupsshredded cheddar cheese
- 10 ozRotel diced tomatoes and green chilies (not drained)1 cupmilk1 tbspyellow mustard1/4 cupketchup2 cupsshredded cheddar cheese
- 1 cupmilk1 tbspyellow mustard1/4 cupketchup2 cupsshredded cheddar cheese
- 1 tbspyellow mustard1/4 cupketchup2 cupsshredded cheddar cheese
- 1/4 cupketchup2 cupsshredded cheddar cheese
- 2 cupsshredded cheddar cheese
Instructions
- 1️⃣Cook the Ground Beef:
- Place a large, oven-safe skillet over medium-high heat and add the ground beef and diced onions.Stir and crumble the beef as it cooks, ensuring the onions soften.Once the beef is fully browned, drain any excess grease.2️⃣Season the Beef:Add the salt, pepper, and minced garlic to the skillet. Stir well and cook for one more minute to release the garlic’s aroma.3️⃣Add Tortellini and Base Ingredients:Stir the frozen cheese tortellini into the skillet.Add the condensed cheddar soup and the Rotel (with its juices), stirring until well combined.4️⃣Create the Sauce:Pour in the milk, yellow mustard, and ketchup. Stir thoroughly.Bring the mixture to a boil.5️⃣Simmer the Tortellini:Reduce the heat to medium-low and cover the skillet with a lid.Allow the tortellini to simmer for 5-6 minutes, stirring once halfway through to prevent sticking.6️⃣Melt the Cheese:Remove the lid and stir well to combine everything.Sprinkle the shredded cheddar cheese evenly over the top.Place the skillet under the broiler for 2-3 minutes, or until the cheese is melted and golden brown. Alternatively, you can cover the skillet with the lid and let the cheese melt on the stovetop.7️⃣Rest and Serve:Remove the skillet from the oven and let it rest for a few minutes.Serve hot and enjoy your cheeseburger-inspired tortellini dish!
- Stir and crumble the beef as it cooks, ensuring the onions soften.Once the beef is fully browned, drain any excess grease.2️⃣Season the Beef:Add the salt, pepper, and minced garlic to the skillet. Stir well and cook for one more minute to release the garlic’s aroma.3️⃣Add Tortellini and Base Ingredients:Stir the frozen cheese tortellini into the skillet.Add the condensed cheddar soup and the Rotel (with its juices), stirring until well combined.4️⃣Create the Sauce:Pour in the milk, yellow mustard, and ketchup. Stir thoroughly.Bring the mixture to a boil.5️⃣Simmer the Tortellini:Reduce the heat to medium-low and cover the skillet with a lid.Allow the tortellini to simmer for 5-6 minutes, stirring once halfway through to prevent sticking.6️⃣Melt the Cheese:Remove the lid and stir well to combine everything.Sprinkle the shredded cheddar cheese evenly over the top.Place the skillet under the broiler for 2-3 minutes, or until the cheese is melted and golden brown. Alternatively, you can cover the skillet with the lid and let the cheese melt on the stovetop.7️⃣Rest and Serve:Remove the skillet from the oven and let it rest for a few minutes.Serve hot and enjoy your cheeseburger-inspired tortellini dish!
- Once the beef is fully browned, drain any excess grease.
- 2️⃣Season the Beef:Add the salt, pepper, and minced garlic to the skillet. Stir well and cook for one more minute to release the garlic’s aroma.3️⃣Add Tortellini and Base Ingredients:Stir the frozen cheese tortellini into the skillet.Add the condensed cheddar soup and the Rotel (with its juices), stirring until well combined.4️⃣Create the Sauce:Pour in the milk, yellow mustard, and ketchup. Stir thoroughly.Bring the mixture to a boil.5️⃣Simmer the Tortellini:Reduce the heat to medium-low and cover the skillet with a lid.Allow the tortellini to simmer for 5-6 minutes, stirring once halfway through to prevent sticking.6️⃣Melt the Cheese:Remove the lid and stir well to combine everything.Sprinkle the shredded cheddar cheese evenly over the top.Place the skillet under the broiler for 2-3 minutes, or until the cheese is melted and golden brown. Alternatively, you can cover the skillet with the lid and let the cheese melt on the stovetop.7️⃣Rest and Serve:Remove the skillet from the oven and let it rest for a few minutes.Serve hot and enjoy your cheeseburger-inspired tortellini dish!
- Add the salt, pepper, and minced garlic to the skillet. Stir well and cook for one more minute to release the garlic’s aroma.3️⃣Add Tortellini and Base Ingredients:Stir the frozen cheese tortellini into the skillet.Add the condensed cheddar soup and the Rotel (with its juices), stirring until well combined.4️⃣Create the Sauce:Pour in the milk, yellow mustard, and ketchup. Stir thoroughly.Bring the mixture to a boil.5️⃣Simmer the Tortellini:Reduce the heat to medium-low and cover the skillet with a lid.Allow the tortellini to simmer for 5-6 minutes, stirring once halfway through to prevent sticking.6️⃣Melt the Cheese:Remove the lid and stir well to combine everything.Sprinkle the shredded cheddar cheese evenly over the top.Place the skillet under the broiler for 2-3 minutes, or until the cheese is melted and golden brown. Alternatively, you can cover the skillet with the lid and let the cheese melt on the stovetop.7️⃣Rest and Serve:Remove the skillet from the oven and let it rest for a few minutes.Serve hot and enjoy your cheeseburger-inspired tortellini dish!
- 3️⃣Add Tortellini and Base Ingredients:
- Stir the frozen cheese tortellini into the skillet.Add the condensed cheddar soup and the Rotel (with its juices), stirring until well combined.4️⃣Create the Sauce:Pour in the milk, yellow mustard, and ketchup. Stir thoroughly.Bring the mixture to a boil.5️⃣Simmer the Tortellini:Reduce the heat to medium-low and cover the skillet with a lid.Allow the tortellini to simmer for 5-6 minutes, stirring once halfway through to prevent sticking.6️⃣Melt the Cheese:Remove the lid and stir well to combine everything.Sprinkle the shredded cheddar cheese evenly over the top.Place the skillet under the broiler for 2-3 minutes, or until the cheese is melted and golden brown. Alternatively, you can cover the skillet with the lid and let the cheese melt on the stovetop.7️⃣Rest and Serve:Remove the skillet from the oven and let it rest for a few minutes.Serve hot and enjoy your cheeseburger-inspired tortellini dish!
- Add the condensed cheddar soup and the Rotel (with its juices), stirring until well combined.4️⃣Create the Sauce:Pour in the milk, yellow mustard, and ketchup. Stir thoroughly.Bring the mixture to a boil.5️⃣Simmer the Tortellini:Reduce the heat to medium-low and cover the skillet with a lid.Allow the tortellini to simmer for 5-6 minutes, stirring once halfway through to prevent sticking.6️⃣Melt the Cheese:Remove the lid and stir well to combine everything.Sprinkle the shredded cheddar cheese evenly over the top.Place the skillet under the broiler for 2-3 minutes, or until the cheese is melted and golden brown. Alternatively, you can cover the skillet with the lid and let the cheese melt on the stovetop.7️⃣Rest and Serve:Remove the skillet from the oven and let it rest for a few minutes.Serve hot and enjoy your cheeseburger-inspired tortellini dish!
- 4️⃣Create the Sauce:
- Pour in the milk, yellow mustard, and ketchup. Stir thoroughly.Bring the mixture to a boil.5️⃣Simmer the Tortellini:Reduce the heat to medium-low and cover the skillet with a lid.Allow the tortellini to simmer for 5-6 minutes, stirring once halfway through to prevent sticking.6️⃣Melt the Cheese:Remove the lid and stir well to combine everything.Sprinkle the shredded cheddar cheese evenly over the top.Place the skillet under the broiler for 2-3 minutes, or until the cheese is melted and golden brown. Alternatively, you can cover the skillet with the lid and let the cheese melt on the stovetop.7️⃣Rest and Serve:Remove the skillet from the oven and let it rest for a few minutes.Serve hot and enjoy your cheeseburger-inspired tortellini dish!
- Bring the mixture to a boil.5️⃣Simmer the Tortellini:Reduce the heat to medium-low and cover the skillet with a lid.Allow the tortellini to simmer for 5-6 minutes, stirring once halfway through to prevent sticking.6️⃣Melt the Cheese:Remove the lid and stir well to combine everything.Sprinkle the shredded cheddar cheese evenly over the top.Place the skillet under the broiler for 2-3 minutes, or until the cheese is melted and golden brown. Alternatively, you can cover the skillet with the lid and let the cheese melt on the stovetop.7️⃣Rest and Serve:Remove the skillet from the oven and let it rest for a few minutes.Serve hot and enjoy your cheeseburger-inspired tortellini dish!
- 5️⃣Simmer the Tortellini:
- Reduce the heat to medium-low and cover the skillet with a lid.Allow the tortellini to simmer for 5-6 minutes, stirring once halfway through to prevent sticking.6️⃣Melt the Cheese:Remove the lid and stir well to combine everything.Sprinkle the shredded cheddar cheese evenly over the top.Place the skillet under the broiler for 2-3 minutes, or until the cheese is melted and golden brown. Alternatively, you can cover the skillet with the lid and let the cheese melt on the stovetop.7️⃣Rest and Serve:Remove the skillet from the oven and let it rest for a few minutes.Serve hot and enjoy your cheeseburger-inspired tortellini dish!
- Allow the tortellini to simmer for 5-6 minutes, stirring once halfway through to prevent sticking.6️⃣Melt the Cheese:Remove the lid and stir well to combine everything.Sprinkle the shredded cheddar cheese evenly over the top.Place the skillet under the broiler for 2-3 minutes, or until the cheese is melted and golden brown. Alternatively, you can cover the skillet with the lid and let the cheese melt on the stovetop.7️⃣Rest and Serve:Remove the skillet from the oven and let it rest for a few minutes.Serve hot and enjoy your cheeseburger-inspired tortellini dish!
- 6️⃣Melt the Cheese:
- Remove the lid and stir well to combine everything.Sprinkle the shredded cheddar cheese evenly over the top.Place the skillet under the broiler for 2-3 minutes, or until the cheese is melted and golden brown. Alternatively, you can cover the skillet with the lid and let the cheese melt on the stovetop.7️⃣Rest and Serve:Remove the skillet from the oven and let it rest for a few minutes.Serve hot and enjoy your cheeseburger-inspired tortellini dish!
- Sprinkle the shredded cheddar cheese evenly over the top.Place the skillet under the broiler for 2-3 minutes, or until the cheese is melted and golden brown. Alternatively, you can cover the skillet with the lid and let the cheese melt on the stovetop.7️⃣Rest and Serve:Remove the skillet from the oven and let it rest for a few minutes.Serve hot and enjoy your cheeseburger-inspired tortellini dish!
- Place the skillet under the broiler for 2-3 minutes, or until the cheese is melted and golden brown. Alternatively, you can cover the skillet with the lid and let the cheese melt on the stovetop.
- 7️⃣Rest and Serve:Remove the skillet from the oven and let it rest for a few minutes.Serve hot and enjoy your cheeseburger-inspired tortellini dish!
- Remove the skillet from the oven and let it rest for a few minutes.Serve hot and enjoy your cheeseburger-inspired tortellini dish!
- Serve hot and enjoy your cheeseburger-inspired tortellini dish!
Notes
Customizations:Add crumbled cooked bacon, diced pickles, or even a drizzle of BBQ sauce for a twist.Storage:Refrigerate leftovers in an airtight container for up to 3 days. Reheat on the stovetop or in the microwave, adding a splash of milk if the sauce thickens.Make It Spicy:Use spicy Rotel or add a dash of hot sauce for a little heat.
Storage:Refrigerate leftovers in an airtight container for up to 3 days. Reheat on the stovetop or in the microwave, adding a splash of milk if the sauce thickens.Make It Spicy:Use spicy Rotel or add a dash of hot sauce for a little heat.
Make It Spicy:Use spicy Rotel or add a dash of hot sauce for a little heat.
“`