“`html
Table of Contents
Easy Baked Shrimp Scampi Recipe for Dinner Tonight
Craving a quick yet elegant weeknight dinner?
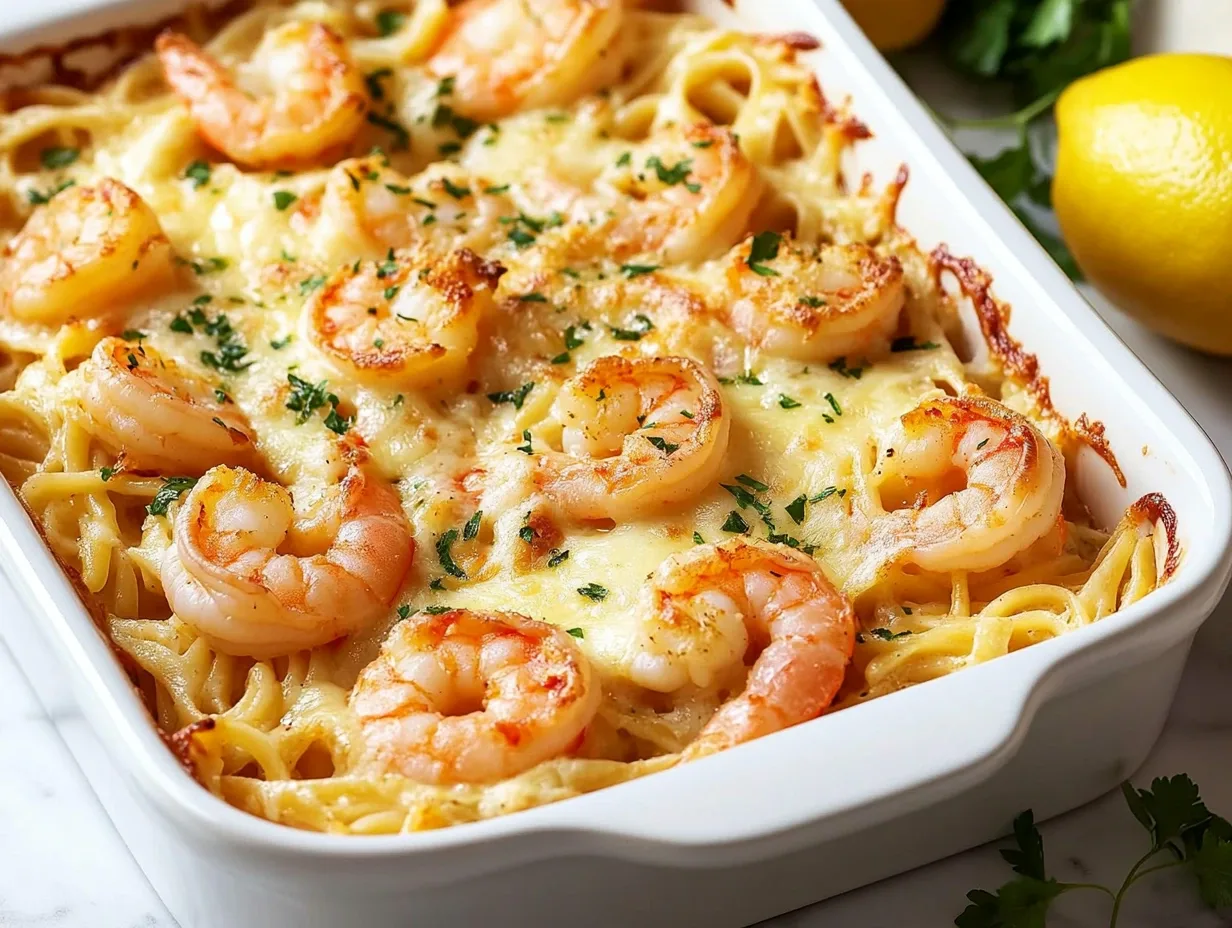
Are you searching for a dinner recipe that feels sophisticated enough for guests but is surprisingly easy to whip up on a busy weeknight? If you’re like most home cooks, you’re likely looking for ways to elevate your weeknight meals without spending hours in the kitchen. The good news is, you can achieve both with this Easy Baked Shrimp Scampi Recipe! This Shrimp Scampi Pasta Bake takes all the beloved flavors of traditional shrimp scampi – garlic, butter, lemon, and tender shrimp – and transforms them into a comforting, cheesy, baked pasta dish. It’s the perfect solution for when you want a delicious, satisfying meal that’s also a showstopper. Get ready to impress your family and friends (or just treat yourself!) with a dish that’s as comforting as it is elegant.
Ingredients to Elevate Your Scampi
The magic of this baked shrimp scampi lies in its fresh, vibrant ingredients. Each component plays a crucial role in creating that irresistible melody of flavors and textures. Here’s what you’ll need:
- 1 pound large shrimp, peeled and deveined: Aim for plump, juicy shrimp that will become tender and sweet when cooked. Ensure they are completely thawed if using frozen. (Substitution: Medium shrimp will also work, but adjust cooking time slightly).
- 8 ounces pasta: Linguine or spaghetti are classic choices for scampi, but fettuccine or even short pasta shapes like penne can be used. Look for bronze-cut pasta for a rougher texture that sauce clings to beautifully.
- 4 tablespoons unsalted butter: The foundation of any good scampi! Use good quality butter for the richest flavor. (Substitution: Ghee or a high-quality oil blend like avocado oil can be used, though the flavor will be slightly different).
- 4-6 cloves garlic, minced: Fresh garlic is key! The aroma alone will make your kitchen smell divine. Adjust the amount based on your love for garlic. (Substitution: 1.5 teaspoons of pre-minced garlic from a jar can work in a pinch, but fresh is always superior).
- 1/4 cup dry white wine: Such as Pinot Grigio or Sauvignon Blanc. It adds a subtle acidity and depth to the sauce. (Substitution: Chicken or vegetable broth can be used, or even a splash of extra lemon juice if you prefer not to use alcohol. The sauce will be less complex but still delicious).
- 1/2 cup chicken or vegetable broth: This adds liquid to the sauce and deepens the savory notes.
- 1/2 cup heavy cream: For that luxurious, creamy texture that makes this bake so comforting. (Substitution: Half-and-half offers a lighter option, while full-fat coconut milk can be used for a dairy-free alternative, though it will impart a slight coconut flavor).
- 1/4 cup grated Parmesan cheese, plus more for topping: Adds a salty, nutty kick and helps thicken the sauce.
- Zest and juice of 1 lemon: The bright, citrusy punch that cuts through the richness and defines scampi. Don’t skip the zest; it carries so much of the lemon’s aromatic oils!
- 2 tablespoons chopped fresh parsley: For a pop of fresh green color and herbaceous flavor. (Substitution: Dried parsley can be used, but fresh adds a much more vibrant taste. Use about 2 teaspoons of dried).
- 1/4 teaspoon red pepper flakes (optional): For a hint of gentle heat.
- Salt and freshly ground black pepper to taste: Essential for balancing all the flavors.
Timing Your Delicious Dinner
Compared to traditional shrimp scampi which might be ready in under 30 minutes, this baked version adds a few extra minutes for pasta cooking and baking, making it slightly longer but incredibly hands-off once it’s in the oven. This timing is excellent for a weeknight meal!
Step-by-Step Instructions
Step 1: Prep the Shrimp
Start by ensuring your shrimp are peeled and deveined. If you bought them frozen, make sure they are fully thawed. Pat them completely dry with paper towels; this is crucial for getting a nice sear if you were to pan-fry them, but even for baking, it helps prevent a watery sauce. Set them aside. If you’re feeling adventurous, you can marinate them in a little lemon juice and garlic for about 15 minutes while you get other things going.
Step 2: Sauté Aromatics
In a large, oven-safe skillet (or a skillet that you can easily transfer to a baking dish), melt the unsalted butter over medium heat. Once melted and shimmering, add the minced garlic and red pepper flakes (if using). Sauté for about 1-2 minutes until fragrant, being careful not to burn the garlic. Burnt garlic tastes bitter and will ruin the dish.
Step 3: Cook the Shrimp
Add the prepared shrimp to the skillet. Season them with salt and freshly ground black pepper. Cook for just 1-2 minutes per side, until they turn pink and are about halfway cooked through. You don’t want to fully cook them in the pan, as they will continue to cook in the oven.
Step 4: Create the Creamy Sauce
Pour in the dry white wine (or broth substitute) and let it bubble and reduce slightly for about a minute, scraping up any browned bits from the bottom of the skillet. This deglazing process adds immense flavor. Then, stir in the chicken or vegetable broth and bring to a gentle simmer. Reduce the heat to low and whisk in the heavy cream and grated Parmesan cheese. Stir until the cheese is melted and the sauce is smooth and slightly thickened. Add the lemon zest and half of the fresh parsley. Taste and adjust seasoning with salt and pepper as needed.
Step 5: Combine and Bake
If your skillet isn’t oven-safe, transfer the creamy shrimp mixture to a 9×13 inch baking dish. Add your cooked pasta directly to the skillet or baking dish and toss everything gently to coat the pasta and shrimp evenly in the luscious sauce. Ensure the shrimp are distributed throughout the pasta. Sprinkle a little extra Parmesan cheese over the top.
Place the skillet or baking dish in a preheated oven at 400°F (200°C). Bake for 10-15 minutes, or until the sauce is bubbly and the shrimp are fully cooked through and opaque. The cheese on top should be melted and lightly golden.
Step 6: Rest and Serve
Once out of the oven, let the baked shrimp scampi rest for about 5 minutes. This allows the sauce to set slightly, making it less soupy. Garnish generously with the remaining fresh parsley and serve immediately. Enjoy the warm, comforting embrace of this incredible dish!
Nutritional Information (Approximate per Serving)
- Calories: 450-550
- Protein: 25-35g
- Fat: 20-30g
- Carbohydrates: 30-40g
(Note: Nutritional values are estimates and can vary based on specific ingredients and portion sizes used.)
Healthier Alternatives
Want to lighten up this shrimp scampi bake? You can make simple swaps without sacrificing too much flavor:
- Pasta Choice: Opt for whole wheat pasta or legume-based pasta (like chickpea or lentil pasta) for added fiber and protein. Zucchini noodles (zoodles) or spaghetti squash can also be used for a low-carb option, though they will require a slightly different cooking method to avoid excess moisture.
- Creaminess: Replace heavy cream with half-and-half for a lighter sauce. For a dairy-free version, full-fat coconut milk is a good substitute, but be mindful of its subtle flavor. Evaporated milk can also work.
- Fat Content: Reduce the amount of butter slightly and supplement with olive oil. Ensure you use lean broth.
- Portion Control: Naturally, serving a slightly smaller portion will reduce overall calories and macronutrients.
Serving Suggestions
This baked shrimp scampi is a complete meal on its own, but it pairs beautifully with a few accompaniments:
- Crusty Bread: Perfect for soaking up any leftover delicious sauce.
- Light Salad: A simple green salad with a vinaigrette offers a refreshing contrast.
- Steamed or Roasted Asparagus: A classic pairing that adds a touch of green and vegetable goodness.
- Garlic Bread: For an extra punch of garlic flavor!
Common Mistakes to Avoid
To ensure your baked shrimp scampi turns out perfectly every time, steer clear of these common pitfalls:
- Overcooking the Shrimp: Shrimp cook very quickly. Overcooking them before baking will result in tough, rubbery seafood. Cook them only until they are pink and slightly opaque in the skillet.
- Burning the Garlic: Always sauté garlic over medium or medium-low heat and watch it carefully. Burnt garlic is bitter and will overpower the dish.
- Watery Sauce: Ensure your shrimp are patted dry. Don’t add too much liquid initially, and allow the sauce to simmer and reduce slightly before baking.
- Undercooked Pasta: If you’re pre-cooking your pasta, make sure it’s al dente, as it will continue to cook in the oven.
Storing Tips
Leftovers can be stored in an airtight container in the refrigerator for up to 3 days. Reheat gently on the stovetop over low heat or in the microwave, adding a splash of broth or water if the sauce seems too thick. While delicious reheated, it’s best enjoyed fresh for optimal texture and flavor.
Conclusion
This Easy Baked Shrimp Scampi Recipe is a testament to how simple, quality ingredients can come together to create a truly memorable meal. It’s the perfect balance of comforting pasta, succulent shrimp, and a rich, garlicky, lemony sauce, all baked to bubbly perfection. Whether you’re a seasoned cook or just starting out, this recipe is designed for success and is sure to become a go-to in your dinner rotation. So, gather your ingredients, preheat your oven, and get ready to enjoy a fantastic dinner tonight!
Did you try this recipe? We’d love to hear about your experience! Share your thoughts and any variations you discovered in the comments below. Your feedback helps our community of home cooks thrive!
Frequently Asked Questions
***What kind of pasta is best for baked shrimp scampi?***
Linguine, spaghetti, or fettuccine are classic choices that hold the sauce well. However, short pasta shapes like penne, fusilli, or rotini also work wonderfully as they catch the sauce in their nooks and crannies.
***Can I use frozen shrimp?***
Yes, absolutely! Just make sure to thaw them completely before using. Pat them very dry with paper towels to remove excess moisture, which is important for both flavor and texture.
***How do I prevent the sauce from being too thin?***
Ensure your pasta is cooked al dente (slightly undercooked) as it will finish cooking in the oven. Also, allow the sauce to simmer and reduce slightly in the skillet before adding the pasta and baking. Adding a bit more Parmesan cheese can also help thicken the sauce.
***Can I make this recipe dairy-free?***
Yes! You can use a dairy-free butter substitute, full-fat coconut milk for the cream (note: this will impart a subtle coconut flavor), and dairy-free Parmesan cheese or nutritional yeast for a cheesy flavor. Ensure your pasta isn’t made with egg.
***Can I add vegetables to this dish?***
Definitely! Spinach wilts beautifully into the sauce. You can also add blanched broccoli florets, peas, or sautéed mushrooms for extra flavor and nutrition. Add heartier vegetables in the last 10 minutes of baking.
Shrimp Scampi Pasta Bake
Description
ThisShrimp Scampi Pasta Bakecombines the classic flavors of shrimp scampi with a creamy, cheesy twist, baked to perfection. Perfect for a family dinner or special occasion, it’s a crowd-pleaser that’s both elegant and comforting.
Ingredients
- 12 ozlinguine or spaghetti1lb large shrimp, peeled and deveined4 tablespoonsbutter4cloves garlic, minced¼ teaspoonred pepper flakes½ cupwhite wine (or chicken broth for non-alcoholic option)1lemon, juiced and zested1 cupheavy cream½ cupgrated Parmesan cheese1 cupshredded mozzarella cheeseSalt and pepper, to taste2 tablespoonschopped fresh parsley
- 1lb large shrimp, peeled and deveined4 tablespoonsbutter4cloves garlic, minced¼ teaspoonred pepper flakes½ cupwhite wine (or chicken broth for non-alcoholic option)1lemon, juiced and zested1 cupheavy cream½ cupgrated Parmesan cheese1 cupshredded mozzarella cheeseSalt and pepper, to taste2 tablespoonschopped fresh parsley
- 4 tablespoonsbutter4cloves garlic, minced¼ teaspoonred pepper flakes½ cupwhite wine (or chicken broth for non-alcoholic option)1lemon, juiced and zested1 cupheavy cream½ cupgrated Parmesan cheese1 cupshredded mozzarella cheeseSalt and pepper, to taste2 tablespoonschopped fresh parsley
- 4cloves garlic, minced¼ teaspoonred pepper flakes½ cupwhite wine (or chicken broth for non-alcoholic option)1lemon, juiced and zested1 cupheavy cream½ cupgrated Parmesan cheese1 cupshredded mozzarella cheeseSalt and pepper, to taste2 tablespoonschopped fresh parsley
- ¼ teaspoonred pepper flakes½ cupwhite wine (or chicken broth for non-alcoholic option)1lemon, juiced and zested1 cupheavy cream½ cupgrated Parmesan cheese1 cupshredded mozzarella cheeseSalt and pepper, to taste2 tablespoonschopped fresh parsley
- ½ cupwhite wine (or chicken broth for non-alcoholic option)1lemon, juiced and zested1 cupheavy cream½ cupgrated Parmesan cheese1 cupshredded mozzarella cheeseSalt and pepper, to taste2 tablespoonschopped fresh parsley
- 1lemon, juiced and zested1 cupheavy cream½ cupgrated Parmesan cheese1 cupshredded mozzarella cheeseSalt and pepper, to taste2 tablespoonschopped fresh parsley
- 1 cupheavy cream½ cupgrated Parmesan cheese1 cupshredded mozzarella cheeseSalt and pepper, to taste2 tablespoonschopped fresh parsley
- ½ cupgrated Parmesan cheese1 cupshredded mozzarella cheeseSalt and pepper, to taste2 tablespoonschopped fresh parsley
- 1 cupshredded mozzarella cheeseSalt and pepper, to taste2 tablespoonschopped fresh parsley
- Salt and pepper, to taste2 tablespoonschopped fresh parsley
- 2 tablespoonschopped fresh parsley
Instructions
- 1️⃣Preheat Oven:
- Preheat your oven to 375°F (190°C).2️⃣Cook Pasta:Boil linguine or spaghetti in salted water according to package instructions until al dente.Drain and set aside.3️⃣Sauté Aromatics:In a large skillet, melt butter over medium heat.Add minced garlic and red pepper flakes, sautéing for about 1 minute until fragrant.4️⃣Cook Shrimp:Add shrimp to the skillet and cook for 3–4 minutes, or until pink and opaque.Remove the shrimp from the skillet and set aside.5️⃣Prepare Sauce:Deglaze the skillet by pouring in white wine (or chicken broth), scraping up any browned bits from the bottom of the pan.Let it simmer for 2 minutes.Stir in lemon juice, lemon zest, and heavy cream. Bring the mixture to a gentle simmer.6️⃣Toss Pasta:Add the cooked pasta to the skillet and toss until the noodles are evenly coated in the creamy sauce.Season with salt and pepper to taste.7️⃣Assemble Dish:Transfer the pasta and sauce mixture to a large baking dish, spreading it out evenly.Arrange the cooked shrimp on top of the pasta.8️⃣Add Cheese:Sprinkle the grated Parmesan cheese and shredded mozzarella evenly over the pasta and shrimp.9️⃣Bake:Place the baking dish in the preheated oven and bake for 15–20 minutes, or until the cheese is melted and bubbly.🔟Garnish and Serve:Remove the dish from the oven. Garnish with chopped fresh parsley and serve hot.
- 2️⃣Cook Pasta:Boil linguine or spaghetti in salted water according to package instructions until al dente.Drain and set aside.3️⃣Sauté Aromatics:In a large skillet, melt butter over medium heat.Add minced garlic and red pepper flakes, sautéing for about 1 minute until fragrant.4️⃣Cook Shrimp:Add shrimp to the skillet and cook for 3–4 minutes, or until pink and opaque.Remove the shrimp from the skillet and set aside.5️⃣Prepare Sauce:Deglaze the skillet by pouring in white wine (or chicken broth), scraping up any browned bits from the bottom of the pan.Let it simmer for 2 minutes.Stir in lemon juice, lemon zest, and heavy cream. Bring the mixture to a gentle simmer.6️⃣Toss Pasta:Add the cooked pasta to the skillet and toss until the noodles are evenly coated in the creamy sauce.Season with salt and pepper to taste.7️⃣Assemble Dish:Transfer the pasta and sauce mixture to a large baking dish, spreading it out evenly.Arrange the cooked shrimp on top of the pasta.8️⃣Add Cheese:Sprinkle the grated Parmesan cheese and shredded mozzarella evenly over the pasta and shrimp.9️⃣Bake:Place the baking dish in the preheated oven and bake for 15–20 minutes, or until the cheese is melted and bubbly.🔟Garnish and Serve:Remove the dish from the oven. Garnish with chopped fresh parsley and serve hot.
- Boil linguine or spaghetti in salted water according to package instructions until al dente.
- Drain and set aside.3️⃣Sauté Aromatics:In a large skillet, melt butter over medium heat.Add minced garlic and red pepper flakes, sautéing for about 1 minute until fragrant.4️⃣Cook Shrimp:Add shrimp to the skillet and cook for 3–4 minutes, or until pink and opaque.Remove the shrimp from the skillet and set aside.5️⃣Prepare Sauce:Deglaze the skillet by pouring in white wine (or chicken broth), scraping up any browned bits from the bottom of the pan.Let it simmer for 2 minutes.Stir in lemon juice, lemon zest, and heavy cream. Bring the mixture to a gentle simmer.6️⃣Toss Pasta:Add the cooked pasta to the skillet and toss until the noodles are evenly coated in the creamy sauce.Season with salt and pepper to taste.7️⃣Assemble Dish:Transfer the pasta and sauce mixture to a large baking dish, spreading it out evenly.Arrange the cooked shrimp on top of the pasta.8️⃣Add Cheese:Sprinkle the grated Parmesan cheese and shredded mozzarella evenly over the pasta and shrimp.9️⃣Bake:Place the baking dish in the preheated oven and bake for 15–20 minutes, or until the cheese is melted and bubbly.🔟Garnish and Serve:Remove the dish from the oven. Garnish with chopped fresh parsley and serve hot.
- 3️⃣Sauté Aromatics:In a large skillet, melt butter over medium heat.Add minced garlic and red pepper flakes, sautéing for about 1 minute until fragrant.4️⃣Cook Shrimp:Add shrimp to the skillet and cook for 3–4 minutes, or until pink and opaque.Remove the shrimp from the skillet and set aside.5️⃣Prepare Sauce:Deglaze the skillet by pouring in white wine (or chicken broth), scraping up any browned bits from the bottom of the pan.Let it simmer for 2 minutes.Stir in lemon juice, lemon zest, and heavy cream. Bring the mixture to a gentle simmer.6️⃣Toss Pasta:Add the cooked pasta to the skillet and toss until the noodles are evenly coated in the creamy sauce.Season with salt and pepper to taste.7️⃣Assemble Dish:Transfer the pasta and sauce mixture to a large baking dish, spreading it out evenly.Arrange the cooked shrimp on top of the pasta.8️⃣Add Cheese:Sprinkle the grated Parmesan cheese and shredded mozzarella evenly over the pasta and shrimp.9️⃣Bake:Place the baking dish in the preheated oven and bake for 15–20 minutes, or until the cheese is melted and bubbly.🔟Garnish and Serve:Remove the dish from the oven. Garnish with chopped fresh parsley and serve hot.
- In a large skillet, melt butter over medium heat.
- Add minced garlic and red pepper flakes, sautéing for about 1 minute until fragrant.4️⃣Cook Shrimp:Add shrimp to the skillet and cook for 3–4 minutes, or until pink and opaque.Remove the shrimp from the skillet and set aside.5️⃣Prepare Sauce:Deglaze the skillet by pouring in white wine (or chicken broth), scraping up any browned bits from the bottom of the pan.Let it simmer for 2 minutes.Stir in lemon juice, lemon zest, and heavy cream. Bring the mixture to a gentle simmer.6️⃣Toss Pasta:Add the cooked pasta to the skillet and toss until the noodles are evenly coated in the creamy sauce.Season with salt and pepper to taste.7️⃣Assemble Dish:Transfer the pasta and sauce mixture to a large baking dish, spreading it out evenly.Arrange the cooked shrimp on top of the pasta.8️⃣Add Cheese:Sprinkle the grated Parmesan cheese and shredded mozzarella evenly over the pasta and shrimp.9️⃣Bake:Place the baking dish in the preheated oven and bake for 15–20 minutes, or until the cheese is melted and bubbly.🔟Garnish and Serve:Remove the dish from the oven. Garnish with chopped fresh parsley and serve hot.
- 4️⃣Cook Shrimp:Add shrimp to the skillet and cook for 3–4 minutes, or until pink and opaque.Remove the shrimp from the skillet and set aside.5️⃣Prepare Sauce:Deglaze the skillet by pouring in white wine (or chicken broth), scraping up any browned bits from the bottom of the pan.Let it simmer for 2 minutes.Stir in lemon juice, lemon zest, and heavy cream. Bring the mixture to a gentle simmer.6️⃣Toss Pasta:Add the cooked pasta to the skillet and toss until the noodles are evenly coated in the creamy sauce.Season with salt and pepper to taste.7️⃣Assemble Dish:Transfer the pasta and sauce mixture to a large baking dish, spreading it out evenly.Arrange the cooked shrimp on top of the pasta.8️⃣Add Cheese:Sprinkle the grated Parmesan cheese and shredded mozzarella evenly over the pasta and shrimp.9️⃣Bake:Place the baking dish in the preheated oven and bake for 15–20 minutes, or until the cheese is melted and bubbly.🔟Garnish and Serve:Remove the dish from the oven. Garnish with chopped fresh parsley and serve hot.
- Add shrimp to the skillet and cook for 3–4 minutes, or until pink and opaque.
- Remove the shrimp from the skillet and set aside.5️⃣Prepare Sauce:Deglaze the skillet by pouring in white wine (or chicken broth), scraping up any browned bits from the bottom of the pan.Let it simmer for 2 minutes.Stir in lemon juice, lemon zest, and heavy cream. Bring the mixture to a gentle simmer.6️⃣Toss Pasta:Add the cooked pasta to the skillet and toss until the noodles are evenly coated in the creamy sauce.Season with salt and pepper to taste.7️⃣Assemble Dish:Transfer the pasta and sauce mixture to a large baking dish, spreading it out evenly.Arrange the cooked shrimp on top of the pasta.8️⃣Add Cheese:Sprinkle the grated Parmesan cheese and shredded mozzarella evenly over the pasta and shrimp.9️⃣Bake:Place the baking dish in the preheated oven and bake for 15–20 minutes, or until the cheese is melted and bubbly.🔟Garnish and Serve:Remove the dish from the oven. Garnish with chopped fresh parsley and serve hot.
- 5️⃣Prepare Sauce:Deglaze the skillet by pouring in white wine (or chicken broth), scraping up any browned bits from the bottom of the pan.Let it simmer for 2 minutes.Stir in lemon juice, lemon zest, and heavy cream. Bring the mixture to a gentle simmer.6️⃣Toss Pasta:Add the cooked pasta to the skillet and toss until the noodles are evenly coated in the creamy sauce.Season with salt and pepper to taste.7️⃣Assemble Dish:Transfer the pasta and sauce mixture to a large baking dish, spreading it out evenly.Arrange the cooked shrimp on top of the pasta.8️⃣Add Cheese:Sprinkle the grated Parmesan cheese and shredded mozzarella evenly over the pasta and shrimp.9️⃣Bake:Place the baking dish in the preheated oven and bake for 15–20 minutes, or until the cheese is melted and bubbly.🔟Garnish and Serve:Remove the dish from the oven. Garnish with chopped fresh parsley and serve hot.
- Deglaze the skillet by pouring in white wine (or chicken broth), scraping up any browned bits from the bottom of the pan.
- Let it simmer for 2 minutes.Stir in lemon juice, lemon zest, and heavy cream. Bring the mixture to a gentle simmer.6️⃣Toss Pasta:Add the cooked pasta to the skillet and toss until the noodles are evenly coated in the creamy sauce.Season with salt and pepper to taste.7️⃣Assemble Dish:Transfer the pasta and sauce mixture to a large baking dish, spreading it out evenly.Arrange the cooked shrimp on top of the pasta.8️⃣Add Cheese:Sprinkle the grated Parmesan cheese and shredded mozzarella evenly over the pasta and shrimp.9️⃣Bake:Place the baking dish in the preheated oven and bake for 15–20 minutes, or until the cheese is melted and bubbly.🔟Garnish and Serve:Remove the dish from the oven. Garnish with chopped fresh parsley and serve hot.
- Stir in lemon juice, lemon zest, and heavy cream. Bring the mixture to a gentle simmer.6️⃣Toss Pasta:Add the cooked pasta to the skillet and toss until the noodles are evenly coated in the creamy sauce.Season with salt and pepper to taste.7️⃣Assemble Dish:Transfer the pasta and sauce mixture to a large baking dish, spreading it out evenly.Arrange the cooked shrimp on top of the pasta.8️⃣Add Cheese:Sprinkle the grated Parmesan cheese and shredded mozzarella evenly over the pasta and shrimp.9️⃣Bake:Place the baking dish in the preheated oven and bake for 15–20 minutes, or until the cheese is melted and bubbly.🔟Garnish and Serve:Remove the dish from the oven. Garnish with chopped fresh parsley and serve hot.
- 6️⃣Toss Pasta:
- Add the cooked pasta to the skillet and toss until the noodles are evenly coated in the creamy sauce.Season with salt and pepper to taste.7️⃣Assemble Dish:Transfer the pasta and sauce mixture to a large baking dish, spreading it out evenly.Arrange the cooked shrimp on top of the pasta.8️⃣Add Cheese:Sprinkle the grated Parmesan cheese and shredded mozzarella evenly over the pasta and shrimp.9️⃣Bake:Place the baking dish in the preheated oven and bake for 15–20 minutes, or until the cheese is melted and bubbly.🔟Garnish and Serve:Remove the dish from the oven. Garnish with chopped fresh parsley and serve hot.
- Season with salt and pepper to taste.7️⃣Assemble Dish:Transfer the pasta and sauce mixture to a large baking dish, spreading it out evenly.Arrange the cooked shrimp on top of the pasta.8️⃣Add Cheese:Sprinkle the grated Parmesan cheese and shredded mozzarella evenly over the pasta and shrimp.9️⃣Bake:Place the baking dish in the preheated oven and bake for 15–20 minutes, or until the cheese is melted and bubbly.🔟Garnish and Serve:Remove the dish from the oven. Garnish with chopped fresh parsley and serve hot.
- 7️⃣Assemble Dish:
- Transfer the pasta and sauce mixture to a large baking dish, spreading it out evenly.Arrange the cooked shrimp on top of the pasta.8️⃣Add Cheese:Sprinkle the grated Parmesan cheese and shredded mozzarella evenly over the pasta and shrimp.9️⃣Bake:Place the baking dish in the preheated oven and bake for 15–20 minutes, or until the cheese is melted and bubbly.🔟Garnish and Serve:Remove the dish from the oven. Garnish with chopped fresh parsley and serve hot.
- Arrange the cooked shrimp on top of the pasta.8️⃣Add Cheese:Sprinkle the grated Parmesan cheese and shredded mozzarella evenly over the pasta and shrimp.9️⃣Bake:Place the baking dish in the preheated oven and bake for 15–20 minutes, or until the cheese is melted and bubbly.🔟Garnish and Serve:Remove the dish from the oven. Garnish with chopped fresh parsley and serve hot.
- 8️⃣Add Cheese:
- Sprinkle the grated Parmesan cheese and shredded mozzarella evenly over the pasta and shrimp.9️⃣Bake:Place the baking dish in the preheated oven and bake for 15–20 minutes, or until the cheese is melted and bubbly.🔟Garnish and Serve:Remove the dish from the oven. Garnish with chopped fresh parsley and serve hot.
- 9️⃣Bake:Place the baking dish in the preheated oven and bake for 15–20 minutes, or until the cheese is melted and bubbly.🔟Garnish and Serve:Remove the dish from the oven. Garnish with chopped fresh parsley and serve hot.
- Place the baking dish in the preheated oven and bake for 15–20 minutes, or until the cheese is melted and bubbly.
- 🔟Garnish and Serve:Remove the dish from the oven. Garnish with chopped fresh parsley and serve hot.
- Remove the dish from the oven. Garnish with chopped fresh parsley and serve hot.
Notes
Add Veggies:For extra nutrition, stir in some steamed broccoli or sautéed spinach before baking.Gluten-Free Option:Use gluten-free pasta if needed.Storage:Leftovers can be stored in an airtight container in the refrigerator for up to 3 days. Reheat in the oven at 350°F (175°C) until warmed through.
Gluten-Free Option:Use gluten-free pasta if needed.Storage:Leftovers can be stored in an airtight container in the refrigerator for up to 3 days. Reheat in the oven at 350°F (175°C) until warmed through.
Storage:Leftovers can be stored in an airtight container in the refrigerator for up to 3 days. Reheat in the oven at 350°F (175°C) until warmed through.
“`