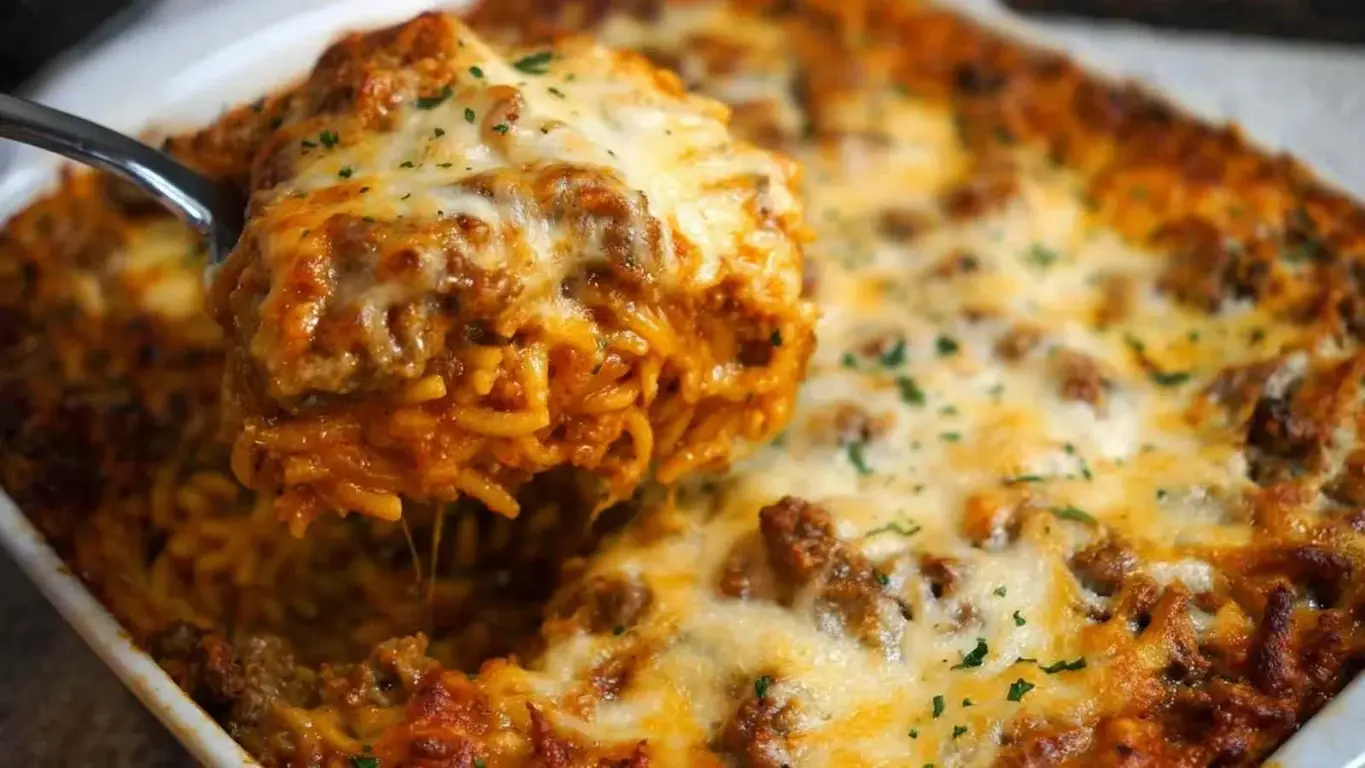
Blueberry Pastry Rings with Vanilla Cream

“`html

Blueberry Pastry Rings with Vanilla Cream

Elevate Your Baking with Café-Inspired Blueberry Pastry Rings

Statistics show that bakery-style pastries are highly sought after, with fruit-filled bakes often topping the popularity charts. Blueberry pastries, in particular, boast widespread appeal, consistently ranking as a favorite among consumers. This recipe aims to demystify the creation of these delightful blueberry pastry rings, filled with a luscious vanilla cream. Forget complicated techniques; we’re focusing on readily available ingredients and straightforward steps to bring that professional bakery charm to your table. These rings are not just a treat for the taste buds; they are a testament to what you can create with a little patience and a lot of love. Get ready to impress yourself and your loved ones!

The Heart of the Rings: Ingredients You’ll Need

Crafting these beautiful pastry rings requires attention to detail, but the ingredients are wonderfully accessible. Each component plays a crucial role in delivering that perfect bite.

For the Flaky Pastry Dough:

  • 2 ½ cups All-Purpose Flour: The foundation of our flaky layers. Sifted flour ensures a lighter texture.
  • 1 teaspoon Salt: Enhances the overall flavor profile and balances the sweetness.
  • 1 cup (2 sticks) Cold Unsalted Butter, cubed: Crucial for flakiness. Ensure it’s very cold and cut into small, even cubes. Substitution: You can use a high-quality European-style butter for a richer flavor or even a mix of butter and shortening, though butter yields the best taste.
  • ½ cup Ice Water (or as needed): Binds the dough. The colder, the better to keep the butter solid.
  • 1 tablespoon White Vinegar or Lemon Juice: Helps tenderize the dough and makes it easier to work with.

For the Sweet Blueberry Filling:

  • 2 cups Fresh or Frozen Blueberries: The star of our show! Fresh berries offer a brighter flavor, while frozen ones are convenient and work just as well (don’t thaw completely before using).
  • ¼ cup Granulated Sugar: To sweeten the berries and help them break down slightly during baking. Adjust to your sweetness preference.
  • 2 tablespoons Cornstarch: Our thickening agent, ensuring a jammy consistency that won’t run out.
  • 1 tablespoon Lemon Juice: Adds a zesty brightness that complements the blueberries beautifully.
  • ½ teaspoon Vanilla Extract: For a warm aromatic note.

For the Velvety Vanilla Cream:

  • 8 ounces Cream Cheese, softened: The creamy base. Ensure it’s at room temperature for smooth mixing. Substitution: Mascarpone cheese can be used for an even richer, more decadent cream.
  • ½ cup Powdered Sugar, sifted: For sweetness and a silky smooth texture. Sifting prevents lumps.
  • 1 teaspoon Vanilla Extract: Enhances the creamy flavor. Use good quality extract for best results.
  • ¼ cup Heavy Cream (optional): For a lighter, more whipped consistency.

For the Egg Wash and Topping:

  • 1 Large Egg, beaten with 1 tablespoon Milk or Water: For a beautiful golden-brown sheen.
  • 1 tablespoon Turbinado Sugar or Coarse Sugar (optional): For a delightful crunch on top.

Timing is Everything: Prep, Cook, and Enjoy

Let’s break down the time commitment for these delightful pastry rings. While baking from scratch takes time, the results are incredibly rewarding!

Prep Time: 45 minutes

Includes dough chilling time.
Cook Time: 20-25 minutes

Baking time until golden and delicious.
Total Time: 1 hour 10 minutes (plus chilling)

A reasonable time for impressive homemade pastries.

Compared to the average complex puff pastry recipe which can take hours due to extensive chilling and folding, this simplified pastry dough is a more manageable weeknight or weekend project, offering a similar delightful texture with less fuss.

Blueberry Pastry Rings with Vanilla Cream

Step-by-Step Guide to Blueberry Pastry Perfection

Follow these detailed steps to create your stunning blueberry pastry rings. We’ve broken it down to make it as simple as possible!

Step 1: Prepare the Pastry Dough

In a large bowl, whisk together the flour and salt. Cut in the cold, cubed butter using a pastry blender, your fingertips, or a food processor until the mixture resembles coarse crumbs with some pea-sized pieces of butter remaining. In a small bowl, whisk together the ice water and vinegar. Gradually add the ice water mixture to the flour mixture, a tablespoon at a time, mixing until the dough just comes together. Be careful not to overmix. Turn the dough out onto a lightly floured surface, gently form it into a disc, wrap it in plastic wrap, and refrigerate for at least 30 minutes. This chilling period is vital for developing the gluten and firming up the butter, which leads to flakier pastry.

Step 2: Whip Up the Vanilla Cream

While the dough is chilling, prepare the vanilla cream. In a medium bowl, beat the softened cream cheese with an electric mixer until smooth and creamy. Gradually beat in the sifted powdered sugar until well combined. Stir in the vanilla extract. If you desire a lighter, more whipped cream, gradually add the heavy cream and beat until fluffy. Set aside. This smooth, sweet cream will be the luxurious heart of your pastry rings.

Step 3: Assemble the Pastry Rings

Preheat your oven to 400°F (200°C). Line two baking sheets with parchment paper. On a lightly floured surface, roll out the chilled dough into a rectangle approximately 12×9 inches and about 1/8 inch thick. Trim the edges to make them straight. Spread the prepared vanilla cream filling evenly over the dough, leaving about a ½-inch border on all sides. In a small bowl, gently mix the blueberries, granulated sugar, cornstarch, lemon juice, and vanilla extract for the blueberry filling. Spoon this blueberry mixture evenly over the vanilla cream layer. Fold the longer sides of the dough up and over the filling, creating a log-like shape. Gently press to seal. Then, carefully bring the two shorter ends together, pinching them to form a sealed ring. You should have a filled, ring-shaped pastry. You can also cut the dough rectangle into strips and then fill and roll them into rings if preferred for smaller portions.

Step 4: Bake to Golden Perfection

Carefully transfer the assembled pastry rings to the prepared baking sheets. Brush the tops of the pastry with the prepared egg wash. If using, sprinkle generously with turbinado sugar for a delightful crunch. Using a sharp knife, cut a few small slits on the top of the pastry to allow steam to escape. Bake for 20-25 minutes, or until the pastry is puffed up, golden brown, and the filling is bubbly and set. Keep an eye on them to prevent over-browning.

Step 5: Fill and Decorate (Optional – for pre-baked pastry shells)

(Note: This step is for an alternative method where pastry shells are baked first and then filled. If you followed Step 3 for assembling the filled rings, you will skip this and proceed to serving.) If you’ve baked hollow pastry rings (by cutting out the center or creating decorative shapes), allow them to cool completely. Then, pipe or spoon the vanilla cream into the cooled pastry shells. Top generously with fresh blueberries. You can also add a drizzle of blueberry jam or a dusting of powdered sugar for extra flair.

(Our primary method in Step 3 involves baking the filled pastry rings directly, which is more common for this type of creation.)

Nutritional Snapshot

While exact nutritional values can vary based on ingredient brands and precise measurements, here’s an approximate breakdown per serving (assuming 6 servings):

  • Calories: Approximately 350-450 kcal
  • Protein: 5-7g
  • Fat: 20-28g
  • Carbohydrates: 35-45g
  • Sugar: 18-25g

These are estimates and can fluctuate. For precise tracking, it’s recommended to use a nutrition calculator with your specific ingredients.

Healthier Twists Without Sacrificing Flavor

Looking to lighten up these delightful rings? Here are a few swaps that work beautifully:

  • Whole Wheat Pastry: Substitute half of the all-purpose flour with whole wheat pastry flour for added fiber.
  • Reduced Fat Cream Cheese: Use light cream cheese. Ensure it’s well-softened for smooth mixing.
  • Natural Sweeteners: Consider using maple syrup or honey in moderation for the filling, adjusting sweetness as needed. Be aware this can alter moisture content slightly.
  • Fresh Berries Galore: Increase the proportion of fresh blueberries and slightly reduce added sugar, letting the natural fruit sweetness shine.
  • Omit Egg Wash: For a slightly lower fat option, you can skip the egg wash, though the pastry may not be as glossy.

Serving Suggestions: When and How to Enjoy

These blueberry pastry rings are incredibly versatile:

  • Breakfast Delight: Serve warm with a cup of coffee or tea for a special weekend breakfast.
  • Afternoon Tea Treat: Perfect alongside a selection of teas for a delightful afternoon spread.
  • Elegant Dessert: Serve with a dollop of extra whipped cream or a scoop of vanilla bean ice cream for a more decadent dessert.
  • Brunch Star: A guaranteed crowd-pleaser at any brunch gathering.

Common Mistakes to Avoid

  • Overworking the Dough: This develops too much gluten, resulting in tough, not flaky, pastry. Mix until just combined.
  • Warm Butter: Using butter that isn’t cold will prevent the formation of steam pockets that create flaky layers.
  • Not Chilling the Dough: Proper chilling is essential for the butter to firm up and for the gluten to relax.
  • Overfilling: Too much filling can cause the rings to burst during baking or become soggy.
  • Cutting Slits Too Small: Ensure adequate steam vents to prevent the pastry from bursting unevenly.

Storing Your Pastry Rings

These pastries are best enjoyed fresh. However, if you have leftovers:

  • Room Temperature: Store cooled pastry rings in an airtight container at room temperature for up to 2 days. The pastry may lose some crispness over time.
  • Refrigeration: For longer storage (up to 4 days), keep them in an airtight container in the refrigerator. Gently reheat in a low oven (around 300°F/150°C) for a few minutes to restore some crispness.
  • Freezing: Unfilled, baked pastry rings can be frozen. Wrap them tightly in plastic wrap and then in foil. Thaw at room temperature and fill just before serving. Filled pastries are not ideal for freezing due to the potential for sogginess.

A Taste of Bliss in Every Bite

These blueberry pastry rings with vanilla cream are more than just a recipe; they’re an experience. They bring the charm and delight of a specialty bakery right into your home, offering a perfect blend of textures and flavors. From the crisp, flaky pastry to the sweet, bursting blueberries and the velvety smooth vanilla cream, each element harmonizes beautifully. Whether you’re seeking a delightful breakfast treat, a sophisticated dessert, or a showstopper for your next gathering, this recipe is sure to impress. So, gather your ingredients, embrace the process, and get ready to bake up a batch of pure bliss. Your kitchen is about to smell amazing!

Frequently Asked Questions (FAQs)

Will using frozen blueberries affect the pastry?
Not significantly, as long as you use them directly from frozen (without thawing completely) and ensure the cornstarch in the filling is adequate to thicken any released juices. They might release a bit more liquid, so ensuring proper thickening is key.

***Can I make the dough ahead of time?***
Yes! The pastry dough can be made up to 2 days in advance and kept refrigerated. This is a great make-ahead strategy.

***How do I get perfectly crisp pastry?***
Ensure your butter is very cold when making the dough, don’t overwork the dough, and make sure the oven is preheated to the correct temperature. Proper chilling also helps.

***Can I freeze these once baked and filled?***
It’s generally not recommended to freeze the filled pastries, as the cream and filling can become watery and the pastry can lose its crispness upon thawing. It’s best to freeze unfilled baked shells or bake fresh.

***What if I don’t have cornstarch?***
You can substitute cornstarch with an equal amount of all-purpose flour or tapioca starch for thickening the blueberry filling. Arrowroot powder is another good alternative but may require slightly less.

Print
clock clock iconcutlery cutlery iconflag flag iconfolder folder iconinstagram instagram iconpinterest pinterest iconfacebook facebook iconprint print iconsquares squares iconheart heart iconheart solid heart solid icon

Blueberry Pastry Rings with Vanilla Cream Filling: A Symphony of Sweet Flavors and Textures

  • Author: Chef Sara

Description

Delight in the perfect combination of flaky puff pastry, creamy homemade vanilla filling, and fresh, juicy blueberries. These Blueberry Pastry Rings are easy to make yet elegant enough to impress guests, perfect for brunches, celebrations, or afternoon tea.


Ingredients

  • For the Pastry:
  • For the Vanilla Cream Filling:
  • For the Topping:

Instructions

  1. Prepare the Pastry:Preheatovento 190°C (374°F) and line a baking sheet withparchment paper.Use a pastry cutter to cut circles from the puff pastry. Cut smaller holes in half of the circles to create rings. Stack the rings on top of the solid circles, pressing gently to adhere.Brush the pastry with the egg yolk and milk mixture. Bake for 20 minutes or until golden brown. Cool completely.
  2. Preheatovento 190°C (374°F) and line a baking sheet withparchment paper.
  3. Use a pastry cutter to cut circles from the puff pastry. Cut smaller holes in half of the circles to create rings. Stack the rings on top of the solid circles, pressing gently to adhere.
  4. Brush the pastry with the egg yolk and milk mixture. Bake for 20 minutes or until golden brown. Cool completely.
  5. Make the Vanilla Cream Filling:Heat most of the milk in asaucepanuntil warm. In a bowl,whisktogether the remaining milk, egg yolks, sugar, cornstarch, flour, and salt.Gradually add the warm milk to the bowl, whisking constantly. Return the mixture to thesaucepanand cook over medium heat, stirring, until thickened.Remove from heat and stir in the butter and vanilla extract. Cover withplastic wrap(touching the surface) and let cool.
  6. Heat most of the milk in asaucepanuntil warm. In a bowl,whisktogether the remaining milk, egg yolks, sugar, cornstarch, flour, and salt.
  7. Gradually add the warm milk to the bowl, whisking constantly. Return the mixture to thesaucepanand cook over medium heat, stirring, until thickened.
  8. Remove from heat and stir in the butter and vanilla extract. Cover withplastic wrap(touching the surface) and let cool.
  9. Assemble the Pastries:Spoonor pipe the cooled vanilla cream into the pastry rings.Top with fresh blueberries and dust with powdered sugar for a stunning finish.
  10. Spoonor pipe the cooled vanilla cream into the pastry rings.
  11. Top with fresh blueberries and dust with powdered sugar for a stunning finish.

Notes

Ensure the puff pastry stays cold before baking for the flakiest results.
The vanilla cream can be made a day in advance and stored in the fridge.
For a more festive look, add a drizzle ofhoneyor garnish with mint leaves.


Nutrition

  • Calories: 210
  • Sugar: 9g
  • Fat: 10g
  • Carbohydrates: 24g
  • Protein: 4g

“`

Crispy Fried Cheese Bites Recipe Everyone Loves

“`html

Crispy Fried Cheese Bites Recipe Everyone Loves

Craving That Perfect Crunch?

Are you looking for an appetizer or snack that’s guaranteed to disappear the moment you set it down? If you’re wondering, “How can I make fried cheese bites that are irresistibly crispy and packed with gooey, melted cheese every single time?” then you’ve landed in the right place! This recipe is designed to deliver golden-brown perfection, with a satisfying crunch that gives way to a delightful, molten cheese center. Perfect for game nights, holiday gatherings, or just a special treat, these crispy fried cheese bites are ridiculously easy to make and will have everyone begging for more. Say goodbye to soggy cheese and hello to pure, unadulterated cheesy bliss!

Ingredients: The Building Blocks of Bliss

The magic of these crispy fried cheese bites lies in their simplicity. High-quality cheese and a few pantry staples are all you need. We’ll use a combination of cheeses for the best melt and flavor, but feel free to customize!

  • 1 pound (450g) Cheese: Firm, semi-hard cheeses work best. Think mozzarella (low-moisture, part-skim or whole milk), cheddar (sharp or mild), Monterey Jack, or even provolone. You can also mix and match! For the ultimate melt and pull, shredding your cheese is key. *Substitution: If you can’t find good quality block cheese, pre-shredded will work in a pinch, though it may contain anti-caking agents that slightly affect texture.*
  • 1 cup All-Purpose Flour: This is the first layer that helps the egg adhere.
  • 2 large Eggs: Lightly beaten, these act as the binder for the breadcrumbs.
  • 1 ½ cups Panko Breadcrumbs: Panko is essential for that superior crispiness! Its larger, flaky texture fries up lighter and crunchier than traditional breadcrumbs. *Substitution: If you don’t have panko, you can use regular fine breadcrumbs, but the crunch factor will be reduced.*
  • ½ teaspoon Salt: Enhances the overall flavor.
  • ¼ teaspoon Black Pepper: Adds a subtle warmth.
  • Vegetable Oil or Canola Oil: For deep frying. You’ll need about 3-4 inches in your pot. Ensure it has a high smoke point. *Substitution: Peanut oil or other neutral-flavored oils with a high smoke point are also excellent choices.*
  • Optional Seasonings: A pinch of garlic powder or onion powder can be added to the breadcrumbs for an extra flavor boost.

Timing is Everything

Prep Time: 15 minutes
Cook Time: 10-15 minutes
Total Time: 25-30 minutes

Compared to many elaborate appetizers, this recipe is incredibly quick! Most recipes for fried cheese involve more complex fillings or longer chilling times. Our method prioritizes speed and ease without sacrificing flavor or texture.

Golden brown fried cheese bites ready to be served

Step-by-Step Instructions: Your Path to Crispy Perfection

Step 1: Prep the Cheese

If you’re using block cheese, shredding it is the first step. For the best results and to prevent blowouts during frying, ensure your cheese is cold. You can either shred it into small, bite-sized pieces (about ½-inch cubes) or, for a more classic “mozzarella stick” like experience, cut it into ½-inch by 3-inch sticks. If you’re going for bite-sized pieces, you can lightly press and shape them into balls or logs if they aren’t holding together well. For sticks, you might want to wrap them tightly in plastic wrap and freeze for about 15-20 minutes to firm them up before breading. This is crucial for preventing the cheese from melting out too quickly during frying.

Step 2: Set Up Breading Stations

You’ll need three shallow dishes or bowls for your breading process. This is where the magic of a good coating happens.

Dish 1: Flour. Place your all-purpose flour in the first dish. If you’re adding any optional seasonings like garlic powder or onion powder to the flour, mix them in now.

Dish 2: Eggs. Crack your two large eggs into the second dish and whisk them thoroughly until they are well combined and slightly frothy.

Dish 3: Panko Breadcrumbs. In the third dish, combine your Panko breadcrumbs with the salt and pepper. If you decided to season your flour, you can add a touch more seasoning here if desired. Mix everything together evenly. Using Panko is key for that superior crunch!

Step 3: Bread the Cheese

This triple-layering method ensures a thick, robust crust that seals in the cheesy goodness. Take each piece of cheese (or cheese ball/log) and follow these steps:

1. Flour: Dredge the cheese piece in the flour, ensuring it’s fully coated. Gently shake off any excess.

2. Egg: Dip the floured cheese into the beaten eggs, allowing any excess to drip off. Make sure every surface is coated.

3. Panko: Immediately transfer the egg-coated cheese to the Panko mixture. Press gently to adhere the breadcrumbs all over. Ensure complete coverage for maximum crispiness. Repeat this process for all cheese pieces. For an extra-thick crust, you can double-bread: dip it back into the egg and then into the Panko mixture again. This makes them even more robust and less likely to leak.

Step 4: Preheat the Oil

Pour your chosen frying oil into a heavy-bottomed pot or Dutch oven. You want at least 3-4 inches of oil. Heat the oil over medium-high heat until it reaches 350°F (175°C). A deep-fry thermometer is your best friend here. If you don’t have one, you can test the oil by dropping a tiny bit of the breadcrumb mixture in; it should sizzle immediately and float to the surface. Maintaining the correct oil temperature is critical for achieving crispy, evenly cooked bites.

Step 5: Fry the Bites

Carefully place a few cheese bites into the hot oil. Don’t overcrowd the pot, as this will lower the oil temperature and result in soggy bites. Fry for about 1-2 minutes, or until the crust is a beautiful golden brown and crispy. You’ll see the cheese starting to soften underneath. Keep an eye on them; they cook very quickly!

Step 6: Drain and Serve

Using a slotted spoon or spider strainer, carefully remove the fried cheese bites from the hot oil. Place them on a wire rack set over a baking sheet or on a plate lined with paper towels. This allows excess oil to drain away, keeping them extra crispy. Serve immediately while the cheese is perfectly melty and gooey inside!

Nutritional Information (Approximate Per Serving – 4-6 Bites)

Note: Nutritional values are estimates and can vary based on cheese type and exact portion size.

  • Calories: 250-350 kcal
  • Protein: 10-15g
  • Fat: 15-25g
  • Carbohydrates: 15-20g
  • Sodium: 300-500mg

Healthier Alternatives (Flavor Still Reigns Supreme!)

We love a good indulgence, but if you’re looking for slightly lighter options while still enjoying that cheesy goodness, consider these swaps:

  • Air Fryer Method: Instead of deep-frying, arrange your breaded cheese bites in a single layer in your air fryer basket. Spray lightly with cooking spray. Air fry at 375°F (190°C) for 6-10 minutes, flipping halfway, until golden and crispy. This greatly reduces the oil needed.
  • Oven-Baked: For a less hands-on approach, bake on a parchment-lined baking sheet at 400°F (200°C) for 10-15 minutes, flipping halfway, until golden brown and crispy. While not as intensely crispy as fried, it’s a fantastic lighter alternative.
  • Lighter Cheese: Opt for lower-fat versions of mozzarella or cheddar if available, keeping in mind they might melt slightly differently.
  • Whole Wheat Panko: Use whole wheat Panko breadcrumbs for added fiber.

Serving Suggestions: Dip into Deliciousness!

These crispy cheese bites are fantastic on their own, but they truly shine when paired with the right dips.

  • Marinara Sauce: A classic and always a crowd-pleaser.
  • Ranch Dressing: Creamy and tangy, it’s a perfect contrast.
  • Spicy Aioli: For a little kick.
  • Honey Mustard: Sweet and savory, it’s a delightful combo.
  • Sriracha Mayo: For the heat seekers.

They make an excellent appetizer for parties, a fun addition to a movie night snack board, or even a delightful side dish for a casual dinner.

Common Mistakes to Avoid

To ensure your fried cheese bites are a resounding success, be mindful of these common pitfalls:

  • Using the wrong cheese: Soft cheeses will melt too quickly and leak out before the crust can crisp up.
  • Oil not hot enough: This is the #1 cause of greasy, soggy bites. The oil needs to be at the right temperature (350°F/175°C) to crisp the coating instantly.
  • Overcrowding the pot: Frying too many at once will significantly drop the oil temperature. Fry in small batches.
  • Not double-breading (optional but recommended): For maximum structural integrity, a double coating of egg and Panko offers better protection against cheese leaks.
  • Freezing cheese long enough: If cutting cheese sticks, a quick freeze is essential to keep them solid enough during frying.

Storing Tips: For Later Indulgence

Fried cheese bites are best enjoyed immediately after frying. However, if you have leftovers, you can store them. Allow them to cool completely, then transfer them to an airtight container in the refrigerator for up to 2 days.

Reheating: For the crispiest results, reheat them in a preheated oven or toaster oven at around 375°F (190°C) for 5-8 minutes, or until heated through and crispy again. Microwaving will make them soft and chewy.

Crispy, Cheesy, and Utterly Irresistible!

There you have it – the secrets to making incredibly crispy fried cheese bites that are sure to be a hit! Whether you’re an experienced cook or a beginner, this recipe is straightforward and rewarding. The perfect balance of crunchy exterior and gooey, melted interior makes these bites a culinary triumph. So gather your ingredients, get ready to fry, and prepare to be amazed by how quickly they disappear. Happy snacking!

Frequently Asked Questions

***Can I prepare the cheese bites ahead of time?***

Yes, you can bread the cheese bites and refrigerate them on a parchment-lined baking sheet for up to 24 hours before frying. This allows the coating to set, potentially resulting in an even crispier crust. Just make sure they are well-chilled and fry them directly from the refrigerator.

***What kind of cheese is best for frying?***

Low-moisture mozzarella, cheddar, Monterey Jack, and provolone are excellent choices. They melt well and hold their shape sufficiently to prevent excessive leakage when properly prepared and fried at the correct temperature. Avoid very soft or high-moisture cheeses like fresh mozzarella.

***Why are my fried cheese bites soggy?***

Soggy fried cheese bites are usually a result of the oil not being hot enough, overcrowding the frying pot, or not draining them properly after frying. Ensure your oil is at a consistent 350°F (175°C) and fry in small batches.

***Can I freeze fried cheese bites?***

It’s best to fry them just before serving. However, if you absolutely must, you can freeze the *breaded but uncooked* bites on a baking sheet until solid, then transfer them to a freezer bag. Fry from frozen, adding a few extra minutes to the cooking time. Pre-cooked fried cheese bites tend to lose their crispiness when frozen and reheated.

Print
clock clock iconcutlery cutlery iconflag flag iconfolder folder iconinstagram instagram iconpinterest pinterest iconfacebook facebook iconprint print iconsquares squares iconheart heart iconheart solid heart solid icon

Easy Fried Cheese Bites

  • Author: Chef Sara

Description

Crispy, golden on the outside and melty on the inside, these fried cheese bites are an easy-to-make, irresistible snack. Perfect for parties, game nights, or just indulging in cheesy goodness! Serve with marinara or your favorite dipping sauce for the ultimate treat.


Ingredients

Scale
  • 10 ozmozzarella string cheese (or10sticks)1 cupItalian bread crumbs1 cupflour2eggs1/4 cupmilkCayenne pepper (optional, for added spice)
  • 1 cupItalian bread crumbs1 cupflour2eggs1/4 cupmilkCayenne pepper (optional, for added spice)
  • 1 cupflour2eggs1/4 cupmilkCayenne pepper (optional, for added spice)
  • 2eggs1/4 cupmilkCayenne pepper (optional, for added spice)
  • 1/4 cupmilkCayenne pepper (optional, for added spice)
  • Cayenne pepper (optional, for added spice)

Instructions

  1. 1️⃣Cut the Cheese:Slice each mozzarella stick into bite-sized pieces, about 1-inch long.
  2. Place the flour in one.Whisk together the eggs and milk in the second.Pour the Italian bread crumbs into the third and mix in a pinch of cayenne pepper if you like a little heat.3️⃣Bread the Cheese Bites:Roll each mozzarella piece in the flour, ensuring it’s fully coated. Then dip it into the egg mixture, letting the excess drip off. Finally, coat it evenly with the bread crumbs. Repeat this process for all the cheese pieces.4️⃣Chill:Arrange the breaded cheese bites on a tray and freeze them for at least 20-30 minutes. This step helps them hold their shape during frying.5️⃣Fry:Heat oil in a large skillet or deep fryer to 350°F (175°C). Carefully drop the cheese bites into the hot oil, frying them in small batches to avoid overcrowding. Cook for 1-2 minutes, or until golden and crispy.6️⃣Drain and Serve:Remove the fried cheese bites with a slotted spoon and place them on a paper towel-lined plate to drain excess oil. Serve immediately with marinara sauce, ranch dressing, or your favorite dip.
  3. Whisk together the eggs and milk in the second.
  4. Pour the Italian bread crumbs into the third and mix in a pinch of cayenne pepper if you like a little heat.3️⃣Bread the Cheese Bites:Roll each mozzarella piece in the flour, ensuring it’s fully coated. Then dip it into the egg mixture, letting the excess drip off. Finally, coat it evenly with the bread crumbs. Repeat this process for all the cheese pieces.4️⃣Chill:Arrange the breaded cheese bites on a tray and freeze them for at least 20-30 minutes. This step helps them hold their shape during frying.5️⃣Fry:Heat oil in a large skillet or deep fryer to 350°F (175°C). Carefully drop the cheese bites into the hot oil, frying them in small batches to avoid overcrowding. Cook for 1-2 minutes, or until golden and crispy.6️⃣Drain and Serve:Remove the fried cheese bites with a slotted spoon and place them on a paper towel-lined plate to drain excess oil. Serve immediately with marinara sauce, ranch dressing, or your favorite dip.
  5. 3️⃣Bread the Cheese Bites:Roll each mozzarella piece in the flour, ensuring it’s fully coated. Then dip it into the egg mixture, letting the excess drip off. Finally, coat it evenly with the bread crumbs. Repeat this process for all the cheese pieces.4️⃣Chill:Arrange the breaded cheese bites on a tray and freeze them for at least 20-30 minutes. This step helps them hold their shape during frying.5️⃣Fry:Heat oil in a large skillet or deep fryer to 350°F (175°C). Carefully drop the cheese bites into the hot oil, frying them in small batches to avoid overcrowding. Cook for 1-2 minutes, or until golden and crispy.6️⃣Drain and Serve:Remove the fried cheese bites with a slotted spoon and place them on a paper towel-lined plate to drain excess oil. Serve immediately with marinara sauce, ranch dressing, or your favorite dip.
  6. 4️⃣Chill:Arrange the breaded cheese bites on a tray and freeze them for at least 20-30 minutes. This step helps them hold their shape during frying.
  7. 5️⃣Fry:Heat oil in a large skillet or deep fryer to 350°F (175°C). Carefully drop the cheese bites into the hot oil, frying them in small batches to avoid overcrowding. Cook for 1-2 minutes, or until golden and crispy.6️⃣Drain and Serve:Remove the fried cheese bites with a slotted spoon and place them on a paper towel-lined plate to drain excess oil. Serve immediately with marinara sauce, ranch dressing, or your favorite dip.
  8. 6️⃣Drain and Serve:Remove the fried cheese bites with a slotted spoon and place them on a paper towel-lined plate to drain excess oil. Serve immediately with marinara sauce, ranch dressing, or your favorite dip.

Notes

Freezing the bites before frying is crucial to prevent the cheese from leaking out.For a healthier version, bake the breaded cheese bites at 400°F (200°C) for 10-12 minutes or until golden.Experiment with different cheeses like cheddar or pepper jack for a fun twist!
For a healthier version, bake the breaded cheese bites at 400°F (200°C) for 10-12 minutes or until golden.Experiment with different cheeses like cheddar or pepper jack for a fun twist!
Experiment with different cheeses like cheddar or pepper jack for a fun twist!

“`

Creamy Chicken and Wild Rice Soup Recipes for Cozy Nights

“`html

Creamy Chicken and Wild Rice Soup Recipes for Cozy Nights

Introduction

As the temperatures dip and the nights grow longer, there’s an undeniable craving for dishes that nurture the soul. In the realm of comfort food, few things can rival the satisfying embrace of a creamy, hearty soup. But when it comes to truly decadent yet wholesome options, why does creamy chicken and wild rice soup consistently top the charts for home cooks seeking that perfect blend of texture, flavor, and warmth? This classic dish offers a symphony of tender chicken, chewy wild rice, and a velvety, herbaceous broth that’s both comforting and deeply satisfying. It’s the kind of meal that transforms a regular weeknight into a special occasion, begging to be savored with loved ones. Whether you’re looking for a palate-pleasing dinner that’s surprisingly easy to make or a way to make your guests feel truly cherished, this recipe is your new go-to. Prepare to fall in love with this ultimate comfort food!

Ingredients: The Heart of Your Creamy Chicken and Wild Rice Soup

The magic of this soup lies in its harmonious blend of simple, wholesome ingredients. We’re focusing on quality to bring out the best flavors. Think of each ingredient as a note in a delicious culinary symphony!

For the Creamy Broth:

  • 2 tablespoons unsalted butter: The foundation for sautéing our aromatics, providing a rich, buttery base. (Substitution: Olive oil or ghee for a dairy-free option, though the flavor will be slightly different.)
  • 1 cup chopped yellow onion (about 1 medium): Adds a sweet, pungent depth that mellows as it cooks. (Substitution: Shallots for a milder, sweeter flavor.)
  • 2 medium carrots, peeled and diced (about 1 cup): For a touch of sweetness, vibrant color, and lovely texture. (Substitution: Sweet potatoes for a creamier, sweeter alternative.)
  • 2 celery stalks, diced (about 1 cup): Brings a subtle, fresh, herbaceous note and a slight crunch. (No direct substitution recommended, as celery offers a unique savory profile.)
  • 2 cloves garlic, minced: Essential for that unmistakable aromatic punch. (Substitution: Garlic powder if fresh is unavailable, use about 1/2 teaspoon, added later.)
  • 1/4 cup all-purpose flour: Our thickening agent, creating that signature velvety consistency. (Substitution: Gluten-free all-purpose flour blend, or a cornstarch slurry (2 tbsp cornstarch mixed with 4 tbsp cold water) added at the end.)
  • 6 cups low-sodium chicken broth: The liquid heart of our soup, providing savory depth. (Substitution: Vegetable broth for a vegetarian option, or a mix of chicken and vegetable broth.)
  • 1 cup milk (whole milk recommended for creaminess): To achieve that luxuriously smooth, creamy texture. (Substitution: Half-and-half or heavy cream for ultimate richness, or unsweetened plant-based milk like almond or oat milk for dairy-free.)
  • 1/2 cup heavy cream (optional, for extra decadence): For an even more indulgent, restaurant-worthy finish. (Substitution: More milk, or a swirl of sour cream or Greek yogurt just before serving.)
  • 1 teaspoon dried thyme: An earthy, aromatic herb that pairs beautifully with chicken and rice. (Substitution: Fresh thyme, 1 tablespoon chopped.)
  • 1/2 teaspoon dried rosemary, crushed (optional): Adds a piney, fragrant note that complements the other herbs. (Substitution: Fresh rosemary, 1/2 teaspoon chopped.)
  • Salt and freshly ground black pepper, to taste: To season and enhance all the delicious flavors.

For the Hearty Filling:

  • 2 cups cooked chicken, shredded or diced: The star protein! Use rotisserie chicken for ultimate convenience. (Substitution: Cooked turkey or even tofu for a vegetarian variation.)
  • 1 cup cooked wild rice: Adds a wonderful nutty flavor, satisfying chew, and beautiful color. (Substitution: A mix of wild rice and brown rice, or just brown rice if wild is unavailable.)

Optional Garnishes:

  • Fresh parsley, chopped: For a burst of freshness and color.
  • Crusty bread: For dipping!
  • A dollop of sour cream or Greek yogurt: For extra tang and creaminess.

Timing: When Comfort Calls

This recipe is designed to fit into your busy schedule while delivering maximum comfort. On average, homemade chicken and wild rice soup can take around 45-60 minutes, and this recipe is right in that sweet spot!

Prep time: 15 minutes
Cook time: 35-40 minutes
Total time: 50-55 minutes
A steaming bowl of creamy chicken and wild rice soup, garnished with fresh parsley.

Step-by-Step Instructions: Crafting Your Creamy Masterpiece

Follow these simple steps to create a pot of soup that will warm you from the inside out. Each step is designed to build flavor and texture!

Step 1: Prepare Your Aromatics

Melt the butter in a large pot or Dutch oven over medium heat. Add the chopped onion, carrots, and celery. Sauté for about 5-7 minutes, stirring occasionally, until the vegetables have softened slightly and the onion is translucent. This process builds the foundational savory notes for our soup.

Step 2: Cook the Chicken and Rice

While your aromatics are sautéing, ensure your chicken and wild rice are cooked. If using rotisserie chicken, shred or dice it. If cooking wild rice from scratch, follow package directions (typically about 40-45 minutes simmer in water or broth). You should have about 2 cups of cooked chicken and 1 cup of cooked wild rice.

Step 3: Build the Flavor Base

Add the minced garlic to the pot with the softened vegetables and cook for another minute until fragrant, being careful not to burn it. Sprinkle the flour over the vegetables and stir continuously for 1-2 minutes. This cooks out the raw flour taste and creates a roux that will thicken our soup beautifully.

Step 4: Create the Creamy Broth

Gradually whisk in the chicken broth, a cup at a time, ensuring it’s fully incorporated and smooth after each addition. This prevents lumps from forming. Bring the mixture to a simmer, stirring constantly. Once simmering, reduce the heat to low.

Step 5: Combine and Simmer

Stir in the cooked chicken, cooked wild rice, milk, thyme, and crushed rosemary (if using). Season generously with salt and freshly ground black pepper. Bring the soup back to a very gentle simmer – do not boil, as this can cause the milk to curdle. Let it simmer for at least 15-20 minutes, stirring occasionally, to allow the flavors to meld and the soup to thicken to your desired consistency.

Step 6: Finish and Serve

Taste and adjust seasonings as needed. If you desire an even richer soup, you can stir in the heavy cream now and let it heat through for a few more minutes. Ladle the hot, creamy soup into bowls. Garnish with fresh chopped parsley, a dollop of sour cream or Greek yogurt, and serve immediately with your favorite crusty bread for dipping. Enjoy the ultimate cozy meal!

Nutritional Information: A Wholesome Indulgence

While specific nutritional values can vary based on exact ingredients and portion sizes, a typical serving of this Creamy Chicken and Wild Rice Soup provides:

  • Calories: Approximately 350-450 per serving (without optional heavy cream).
  • Protein: High, from the chicken.
  • Carbohydrates: Moderate, from the rice and vegetables.
  • Fat: Moderate, influenced by butter, milk, and any added cream.
  • Fiber: Good source, from wild rice and vegetables.

Note: Using lower-fat milk and omitting the heavy cream will reduce fat and calorie content.

Healthier Alternatives: Lighter, Yet Delicious

You can easily lighten up this comforting soup without sacrificing flavor:

  • Leaner Protein: Use chicken breast or tenderloin. For a vegetarian option, substitute with firm tofu or white beans.
  • Whole Grains: Opt for brown rice or a blend of wild and brown rice for added fiber and nutrients.
  • Lighter Creaminess: Use 1% or skim milk, or unsweetened cashew milk as a creamy dairy-free alternative. An evaporated milk can also offer creaminess with fewer calories than heavy cream.
  • Reduced Fat: Use a small amount of olive oil instead of butter for sautéing.
  • Thickening: Instead of flour, use a cornstarch slurry (2 tablespoons cornstarch mixed with 4 tablespoons cold water) added at the end of cooking for a smooth, thickened broth without the roux.

Serving Suggestions: Elevate Your Soup Experience

This soup is a complete meal on its own, but here are a few ideas to make it even more special:

  • Crusty Bread: Absolutely essential for dipping up every last drop of that glorious broth. Sourdough, baguette, or a hearty whole-grain loaf all work wonderfully.
  • Simple Salad: A light, crisp green salad with a vinaigrette is a refreshing contrast to the richness of the soup.
  • Herb Butter Crackers: Serve with a side of buttery, herbed crackers for an extra textural element.
  • Garnish Bar: Set out small bowls of chopped fresh parsley, chives, a sprinkle of sharp cheddar or Parmesan cheese, and a dollop of sour cream or Greek yogurt for guests to customize their bowls.

Common Mistakes to Avoid: For Soup Perfection

  • Boiling the Soup After Adding Milk/Cream: This can cause the dairy to curdle, resulting in a grainy texture. Always heat gently after dairy is added.
  • Not Cooking the Flour Properly: If you don’t cook the flour with the vegetables for a minute or two, you might end up with a raw flour taste.
  • Over-Salting: Broth can be salty, so taste as you go and adjust seasoning at the end. It’s easier to add salt than to remove it.
  • Using Undercooked Rice: Ensure your wild rice is cooked through for the best texture and flavor.
  • Forgetting Aromatics: Don’t skip the onion, carrots, celery, and garlic – they build the soup’s essential flavor profile.

Storing Tips: Keeping the Comfort Going

Leftover creamy chicken and wild rice soup can be stored in an airtight container in the refrigerator for 2-3 days. Reheat gently on the stovetop over low heat, stirring frequently. You may need to add a splash of milk or broth to restore the creamy consistency, as it can thicken considerably upon cooling. Freezing creamy soups can sometimes alter their texture, so refrigeration is generally preferred for the best results.

Conclusion: Your Cozy Night Companion

There’s something undeniably special about a bowl of creamy chicken and wild rice soup. It’s more than just a meal; it’s an experience of warmth, comfort, and pure deliciousness. This recipe offers a perfect balance of rich flavors and satisfying textures, making it an ideal choice for any occasion that calls for a little extra coziness. Save this recipe, gather your ingredients, and get ready to create a culinary masterpiece that will be cherished by family and friends. Don’t hesitate to make this your go-to for those chilly evenings or whenever you need a bowl of pure comfort!

FAQs

***For the Creamy Broth***

Yes, you can make a lot of the soup ahead of time. You can cook the chicken and rice, and sauté the vegetables. Store them separately and combine them with the broth and milk when you are ready to finish the soup. This will help maintain the freshest flavor and texture.

***For the Hearty Filling***

Freezing dairy-based soups can sometimes result in a slightly altered texture upon thawing, as the fat and liquid can separate. To minimize this, ensure the soup is completely cooled before freezing in airtight containers. When reheating, stir gently and you may need to whisk in a little extra milk or broth to restore creaminess. It’s generally best enjoyed within 2-3 months of freezing.

***Optional Garnishes***

If your soup is too thin, you can thicken it by making a cornstarch slurry (2 tablespoons cornstarch mixed with 4 tablespoons cold water) and whisking it into the simmering soup. Let it simmer for a few minutes until thickened. Alternatively, you can mash some of the cooked vegetables against the side of the pot, or create a roux from scratch by melting butter, whisking in flour, and then incorporating it into the soup.

***What Kind of Chicken Should I Use?***

Rotisserie chicken is a fantastic shortcut for this recipe as it’s already cooked and seasoned, saving you a lot of time. However, you can also use cooked chicken breast or thighs that you’ve boiled or baked yourself. Just make sure it’s tender and easy to shred or dice.

Print
clock clock iconcutlery cutlery iconflag flag iconfolder folder iconinstagram instagram iconpinterest pinterest iconfacebook facebook iconprint print iconsquares squares iconheart heart iconheart solid heart solid icon

Chicken Mushroom Wild Rice Soup

  • Author: Chef Sara

Description

This rich and heartyChicken Mushroom Wild Rice Soupis the ultimate comfort food, perfect for chilly days. Packed with tender chicken, earthy mushrooms, and nutty wild rice in a creamy broth, it’s a delicious, filling dish the whole family will love.


Ingredients

Scale
  • 1 cupwild rice1lb chicken breast, diced2 cupsmushrooms, sliced1onion, chopped3cloves garlic, minced4 cupschicken broth1 cupheavy cream2 tablespoonsolive oil1 teaspoonthymeSalt and pepper, to taste
  • 1lb chicken breast, diced2 cupsmushrooms, sliced1onion, chopped3cloves garlic, minced4 cupschicken broth1 cupheavy cream2 tablespoonsolive oil1 teaspoonthymeSalt and pepper, to taste
  • 2 cupsmushrooms, sliced1onion, chopped3cloves garlic, minced4 cupschicken broth1 cupheavy cream2 tablespoonsolive oil1 teaspoonthymeSalt and pepper, to taste
  • 1onion, chopped3cloves garlic, minced4 cupschicken broth1 cupheavy cream2 tablespoonsolive oil1 teaspoonthymeSalt and pepper, to taste
  • 3cloves garlic, minced4 cupschicken broth1 cupheavy cream2 tablespoonsolive oil1 teaspoonthymeSalt and pepper, to taste
  • 4 cupschicken broth1 cupheavy cream2 tablespoonsolive oil1 teaspoonthymeSalt and pepper, to taste
  • 1 cupheavy cream2 tablespoonsolive oil1 teaspoonthymeSalt and pepper, to taste
  • 2 tablespoonsolive oil1 teaspoonthymeSalt and pepper, to taste
  • 1 teaspoonthymeSalt and pepper, to taste
  • Salt and pepper, to taste

Instructions

  1. 1️⃣Sauté Aromatics:In a large pot, heat the olive oil over medium heat. Add the chopped onion and minced garlic, sautéing until softened and fragrant, about 3–4 minutes.2️⃣Cook the Chicken:Add the diced chicken to the pot and cook until browned on all sides, about 5–7 minutes.3️⃣Add Mushrooms:Stir in the sliced mushrooms and cook for an additional 5 minutes, allowing them to release their moisture and develop flavor.4️⃣Add Rice and Broth:Stir in the wild rice, chicken broth, thyme, salt, and pepper. Bring the mixture to a boil.5️⃣Simmer:Once boiling, reduce the heat to low and let the soup simmer, uncovered, for 40–45 minutes, or until the wild rice is tender. Stir occasionally.6️⃣Add Cream and Serve:Stir in the heavy cream and heat through for 2–3 minutes. Adjust seasoning as needed. Serve hot, garnished with fresh herbs if desired.
  2. 2️⃣Cook the Chicken:Add the diced chicken to the pot and cook until browned on all sides, about 5–7 minutes.
  3. 3️⃣Add Mushrooms:Stir in the sliced mushrooms and cook for an additional 5 minutes, allowing them to release their moisture and develop flavor.4️⃣Add Rice and Broth:Stir in the wild rice, chicken broth, thyme, salt, and pepper. Bring the mixture to a boil.5️⃣Simmer:Once boiling, reduce the heat to low and let the soup simmer, uncovered, for 40–45 minutes, or until the wild rice is tender. Stir occasionally.6️⃣Add Cream and Serve:Stir in the heavy cream and heat through for 2–3 minutes. Adjust seasoning as needed. Serve hot, garnished with fresh herbs if desired.
  4. 4️⃣Add Rice and Broth:Stir in the wild rice, chicken broth, thyme, salt, and pepper. Bring the mixture to a boil.5️⃣Simmer:Once boiling, reduce the heat to low and let the soup simmer, uncovered, for 40–45 minutes, or until the wild rice is tender. Stir occasionally.6️⃣Add Cream and Serve:Stir in the heavy cream and heat through for 2–3 minutes. Adjust seasoning as needed. Serve hot, garnished with fresh herbs if desired.
  5. 5️⃣Simmer:Once boiling, reduce the heat to low and let the soup simmer, uncovered, for 40–45 minutes, or until the wild rice is tender. Stir occasionally.
  6. 6️⃣Add Cream and Serve:Stir in the heavy cream and heat through for 2–3 minutes. Adjust seasoning as needed. Serve hot, garnished with fresh herbs if desired.

Notes

For a lighter option, substitute the heavy cream with half-and-half or coconut milk.Add fresh spinach or kale at the end for a boost of greens.
Add fresh spinach or kale at the end for a boost of greens.

“`

Slow Cooker Pinto Beans Recipe with Green Chile Flavor

“`html

Slow Cooker Pinto Beans Recipe with Green Chile Flavor

Tired of Bland Beans? Discover the Secret to Flavorful Slow Cooker Pinto Beans

Are you looking for a truly satisfying and flavorful way to prepare pinto beans that doesn’t involve hours of stovetop attention? Many home cooks struggle to achieve that deep, comforting taste in their beans, often ending up with a mushy or bland result. If you find yourself wondering how to infuse your pinto beans with a robust, spicy kick that makes them a star of any meal, you’re in the right place! This Slow Cooker Pinto Beans with Green Chile Flavor recipe is designed to deliver an incredibly rich, savory, and slightly spicy dish with minimal effort. Perfect for busy weeknights or for preparing ahead for potlucks and meal prep, these beans are a game-changer. Let’s unlock the secret to mastering this incredibly easy and mouthwatering recipe today!

The Heart of the Flavor: Ingredients for Green Chile Pinto Beans

The key to exceptional slow cooker pinto beans lies in the quality and combination of simple, yet impactful, ingredients. We’re focusing on building layers of savory depth with a hint of spicy brightness from green chiles. This recipe is forgiving, so feel free to adjust to your preferences!

Beans and Liquids

  • Dried Pinto Beans (1 lb / ~2 cups): The foundation of our dish. Choose good quality beans; they should be relatively uniform in size and color, not too chalky or broken. No soaking required for this slow cooker method!
    • Substitution: While dried beans are best for texture and flavor development, you can use canned beans in a pinch. Drain and rinse two 15-ounce cans and add them in the last hour of cooking, adjusting seasoning as they are already salted.
  • Chicken or Vegetable Broth (6 cups): This provides a flavorful liquid base. Using broth instead of just water significantly boosts the savory notes.
    • Substitution: Water can be used, but the flavor will be less developed. A good quality bouillon cube dissolved in water is also an option.
  • Water (2 cups, or as needed): To ensure beans are fully submerged and have adequate cooking liquid.

Aromatics and Flavor Boosters

  • Onion (1 large, chopped): Sweet and pungent, it softens and melds into the beans. Yellow or white onions work best.
  • Garlic (4 cloves, minced): Adds that essential pungent depth that makes beans irresistible.
  • Canned Green Chiles (1 (4 oz) can, mild or hot, undrained): This is where the magic happens! The brine from the can adds a fantastic layer of flavor. Use mild for a gentle warmth or hot for a spicier kick.
    • Substitution: If you can’t find canned, you can use about 1/2 cup of finely diced fresh green chiles (like Anaheim or Poblano), sautéed briefly with the onions and garlic.
  • Smoked Paprika (1 teaspoon): For a hint of smoky complexity without the need for smoking.
  • Cumin (1 teaspoon): Earthy and warm, it’s a classic pairing with beans.
  • Dried Oregano (1/2 teaspoon): Adds a subtle herbaceous note.
  • Bay Leaf (1): A culinary secret weapon for infusing subtle aroma. Remove before serving.

Optional Finishes (for extra richness)

  • Salt (to taste): Crucial for bringing all the flavors together. Add at the end for best control.
  • Black Pepper (to taste): Freshly ground adds a nice bite.
  • Splash of Apple Cider Vinegar or Lime Juice: A tiny amount at the end brightens everything up.
  • Pinch of Sugar or a drizzle of honey: Balances acidity and sweetness, if desired.

Timing: Your Effortless Culinary Journey

Prep time: 15 minutes
Cook time: 4-6 hours (High) or 8-10 hours (Low)
Total time: 4.25 – 10.25 hours

Compared to traditional stovetop methods that can take 2-3 hours of simmering, this slow cooker recipe significantly reduces active cooking time. While the total time is longer due to the slow cooking process, your hands-on involvement is minimal, making it a true set-it-and-forget-it delight.

A bowl of slow cooker pinto beans with green chiles.

Step-by-Step Guide to Flavorful Slow Cooker Beans

Prepare yourself for the easiest and most delicious pinto beans you’ve ever made. No soaking required!

Step 1: Rinse and Sort Your Beans

Spread your dried pinto beans on a clean surface or baking sheet. Quickly go through them, removing any small stones, debris, or misshapen beans. Then, give them a good rinse under cold running water in a colander until the water runs clear. This removes any dust or potential surface impurities.

Step 2: Combine in Slow Cooker

Place the rinsed and drained pinto beans into your slow cooker insert. Add the chopped onion, minced garlic, undrained canned green chiles, smoked paprika, cumin, dried oregano, and bay leaf. Pour in the broth and water. Stir everything together to distribute the seasonings evenly.

Step 3: Cook Low and Slow

Cover the slow cooker and set it to cook on LOW for 8-10 hours or on HIGH for 4-6 hours. The exact time will depend on your slow cooker model and the age/size of your beans. The goal is for the beans to be tender and creamy, not mushy or undercooked.

Step 4: Check and Season

About 30 minutes before the cooking time is up, check the beans for tenderness. They should be easily mashed with a fork. Once tender, remove the bay leaf. Now is the crucial time to season with salt and pepper to taste. Start with about 1 teaspoon of salt and 1/4 teaspoon of pepper, stir well, and taste. Add more as needed until the flavors sing. If you like, stir in a splash of apple cider vinegar or lime juice to brighten the flavors.

Step 5: Thicken (If Needed)

If your beans are a bit too soupy for your liking, you can thicken them. Ladle out about 1 cup of beans and liquid into a small bowl. Mash the beans with a fork or potato masher, or blend them using an immersion blender until smooth. Stir this thickened mixture back into the slow cooker. Allow to simmer, uncovered, on HIGH for another 15-30 minutes, or until the desired consistency is reached. Alternatively, you can place the lid ajar to allow steam to escape and thicken the beans naturally.

Nutritional Snapshot

While exact nutritional values can vary based on specific ingredients and portion sizes, a typical serving of these slow cooker pinto beans is generally:

  • Calories: Approximately 150-200 per cup.
  • Protein: High, excellent plant-based source.
  • Fiber: Rich in dietary fiber, promoting digestive health.
  • Vitamins & Minerals: Good source of iron, folate, potassium, magnesium.

Note: This is an estimation. For precise information, use a recipe calculator with your exact ingredients.

Healthier Alternatives and Smart Swaps

Looking to make these beans even healthier without sacrificing flavor? Here are a few ideas:

  • Reduce Sodium: Use low-sodium broth and broth-free canned green chiles. Be mindful when adding salt at the end.
  • Omit Fats: This recipe is naturally low in fat. If you typically add bacon or ham hocks for flavor, omit them and rely on the spices, broth, and green chiles for depth.
  • Vegetarian/Vegan: Ensure you use vegetable broth instead of chicken broth. This recipe is otherwise fully vegan!
  • Spice Level: Adjust the type of green chiles (mild vs. hot) to control the heat. For even less heat, you can remove the seeds and membranes from fresh chiles, or use very mild canned varieties.

Serving Suggestions: Beyond the Bowl

These green chile pinto beans are incredibly versatile:

  • Classic Side Dish: Serve alongside grilled meats, roasted chicken, or cornbread.
  • Burritos & Tacos: Mash them slightly and use them as a hearty filling.
  • Nachos: Spread them over tortilla chips with your favorite toppings.
  • Rice Bowl Base: Top with salsa, avocado, and grilled veggies for a complete meal.
  • Soup Base: Thin them out with more broth and add diced vegetables for a hearty bean soup.

Common Mistakes to Avoid

Steer clear of these pitfalls for perfect beans every time:

  • Not Seasoning Enough: Beans are bland without adequate salt. Always taste and adjust seasoning at the end.
  • Overcooking: While slow cookers are forgiving, overcooking can lead to mushy beans that lack texture.
  • Undercooking: Tough or undercooked beans are unpleasant. Ensure they are truly tender before serving.
  • Adding Salt Too Early: Some believe adding salt too early can toughen dried beans. It’s safest to season at the end when the beans are tender.
  • Relying Only on Water: Broth adds a depth of flavor that water alone cannot provide.

Storing Your Delicious Beans

Leftover slow cooker pinto beans are a treasure:

  • Refrigeration: Store cooled beans in an airtight container in the refrigerator for up to 4-5 days.
  • Freezing: For longer storage, freeze cooled beans in freezer-safe containers or heavy-duty zip-top bags for up to 3 months. Portion them out for easy thawing.
  • Reheating: Reheat gently on the stovetop with a splash of water or broth, or in the microwave.

Enjoy Your Flavor-Packed Pinto Beans!

You’ve just unlocked the secret to incredibly flavorful and easy Slow Cooker Pinto Beans with Green Chile Flavor. These beans are more than just a side dish; they’re a versatile pantry staple that brings warmth and satisfaction to any meal. Forget tedious stirring and watching the pot – your slow cooker does the heavy lifting, delivering tender, seasoned perfection every time. Ready to impress yourself and your family with this simple yet spectacular recipe? Give it a try and taste the difference!

Frequently Asked Questions

***Do I really need to soak pinto beans if I’m using a slow cooker?***

No! The long, slow cooking time in a slow cooker effectively tenderizes dried beans, even without soaking. This makes the recipe incredibly convenient.

***Can I use canned pinto beans instead of dried?***

Yes, you can use canned beans. Drain and rinse two 15-ounce cans of pinto beans and add them during the last hour of cooking. You may need to adjust seasoning as canned beans are often pre-salted. The texture will be slightly different than beans cooked from dry.

***How spicy are these beans?***

The spice level depends entirely on the canned green chiles you use. Most standard “mild” canned green chiles provide a gentle warmth without being overly hot. If you prefer more heat, opt for “hot” green chiles or add a pinch of cayenne pepper.

***What if my beans aren’t tender after the suggested cooking time?***

This can happen! Factors like the age of the beans and your specific slow cooker can affect cooking times. Simply continue cooking on Low, covered, checking every 30-60 minutes until they reach your desired tenderness.

***Can I double this recipe?***

Yes, you can double the recipe, but ensure your slow cooker is large enough to accommodate the ingredients without overcrowding. You may need to slightly increase the cooking liquid, especially if doubling on HIGH heat. Always check for proper tenderness.

Print
clock clock iconcutlery cutlery iconflag flag iconfolder folder iconinstagram instagram iconpinterest pinterest iconfacebook facebook iconprint print iconsquares squares iconheart heart iconheart solid heart solid icon

Slow Cooker Pinto Beans, Green Chile, and Beef

  • Author: Chef Sara

Description

A hearty and flavorful dish perfect for busy days, thisSlow Cooker Pinto Beans, Green Chile, and Beefrecipe is packed with tender beans, seasoned ground beef, and zesty green chilies. With minimal prep and a long simmer in the slow cooker, it’s a comforting meal that pairs wonderfully with cornbread, rice, or tortilla chips.


Ingredients

Scale
  • Main Ingredients:1lb ground beef1medium onion, diced4 cupscooked pinto beans (or 2 cans,15 ozeach, drained and rinsed)1can (10 oz) diced tomatoes with green chilies (e.g., Rotel)1can (4 oz) diced green chilies2 cupsbeef brothSeasonings:1 teaspoonchili powder1 teaspooncumin½ teaspoonsmoked paprika½ teaspoongarlic powder¼ teaspoonblack pepperSalt, to tasteOptional Garnish:¼ cupfresh cilantro, chopped
  • 1lb ground beef1medium onion, diced4 cupscooked pinto beans (or 2 cans,15 ozeach, drained and rinsed)1can (10 oz) diced tomatoes with green chilies (e.g., Rotel)1can (4 oz) diced green chilies2 cupsbeef broth
  • 1medium onion, diced4 cupscooked pinto beans (or 2 cans,15 ozeach, drained and rinsed)1can (10 oz) diced tomatoes with green chilies (e.g., Rotel)1can (4 oz) diced green chilies2 cupsbeef broth
  • 4 cupscooked pinto beans (or 2 cans,15 ozeach, drained and rinsed)1can (10 oz) diced tomatoes with green chilies (e.g., Rotel)1can (4 oz) diced green chilies2 cupsbeef broth
  • 1can (10 oz) diced tomatoes with green chilies (e.g., Rotel)1can (4 oz) diced green chilies2 cupsbeef broth
  • 1can (4 oz) diced green chilies2 cupsbeef broth
  • 2 cupsbeef broth
  • Seasonings:1 teaspoonchili powder1 teaspooncumin½ teaspoonsmoked paprika½ teaspoongarlic powder¼ teaspoonblack pepperSalt, to tasteOptional Garnish:¼ cupfresh cilantro, chopped
  • 1 teaspoonchili powder1 teaspooncumin½ teaspoonsmoked paprika½ teaspoongarlic powder¼ teaspoonblack pepperSalt, to taste
  • 1 teaspooncumin½ teaspoonsmoked paprika½ teaspoongarlic powder¼ teaspoonblack pepperSalt, to taste
  • ½ teaspoonsmoked paprika½ teaspoongarlic powder¼ teaspoonblack pepperSalt, to taste
  • ½ teaspoongarlic powder¼ teaspoonblack pepperSalt, to taste
  • ¼ teaspoonblack pepperSalt, to taste
  • Salt, to taste
  • Optional Garnish:¼ cupfresh cilantro, chopped
  • ¼ cupfresh cilantro, chopped

Instructions

  1. 1️⃣Prepare the Ingredients:
  2. In a skillet over medium heat, brown the ground beef with the diced onion until the beef is fully cooked and the onion is softened. Drain any excess fat.2️⃣Combine Ingredients in the Slow Cooker:Transfer the cooked beef and onion mixture to the slow cooker. Add the pinto beans, diced tomatoes with green chilies, diced green chilies, beef broth, chili powder, cumin, smoked paprika, garlic powder, and black pepper.3️⃣Season and Stir:Stir the ingredients together thoroughly. Taste and adjust the salt as needed.4️⃣Cook the Dish:Cover the slow cooker and cook onlow for 6–8 hoursorhigh for 3–4 hours, stirring occasionally if possible.5️⃣Finish and Serve:Just before serving, stir in fresh cilantro if desired.Serve hot with cornbread, rice, or tortilla chips. Add toppings like shredded cheese, sour cream, or avocado for extra richness.
  3. 2️⃣Combine Ingredients in the Slow Cooker:Transfer the cooked beef and onion mixture to the slow cooker. Add the pinto beans, diced tomatoes with green chilies, diced green chilies, beef broth, chili powder, cumin, smoked paprika, garlic powder, and black pepper.3️⃣Season and Stir:Stir the ingredients together thoroughly. Taste and adjust the salt as needed.4️⃣Cook the Dish:Cover the slow cooker and cook onlow for 6–8 hoursorhigh for 3–4 hours, stirring occasionally if possible.5️⃣Finish and Serve:Just before serving, stir in fresh cilantro if desired.Serve hot with cornbread, rice, or tortilla chips. Add toppings like shredded cheese, sour cream, or avocado for extra richness.
  4. Transfer the cooked beef and onion mixture to the slow cooker. Add the pinto beans, diced tomatoes with green chilies, diced green chilies, beef broth, chili powder, cumin, smoked paprika, garlic powder, and black pepper.
  5. 3️⃣Season and Stir:Stir the ingredients together thoroughly. Taste and adjust the salt as needed.4️⃣Cook the Dish:Cover the slow cooker and cook onlow for 6–8 hoursorhigh for 3–4 hours, stirring occasionally if possible.5️⃣Finish and Serve:Just before serving, stir in fresh cilantro if desired.Serve hot with cornbread, rice, or tortilla chips. Add toppings like shredded cheese, sour cream, or avocado for extra richness.
  6. Stir the ingredients together thoroughly. Taste and adjust the salt as needed.4️⃣Cook the Dish:Cover the slow cooker and cook onlow for 6–8 hoursorhigh for 3–4 hours, stirring occasionally if possible.5️⃣Finish and Serve:Just before serving, stir in fresh cilantro if desired.Serve hot with cornbread, rice, or tortilla chips. Add toppings like shredded cheese, sour cream, or avocado for extra richness.
  7. 4️⃣Cook the Dish:
  8. Cover the slow cooker and cook onlow for 6–8 hoursorhigh for 3–4 hours, stirring occasionally if possible.5️⃣Finish and Serve:Just before serving, stir in fresh cilantro if desired.Serve hot with cornbread, rice, or tortilla chips. Add toppings like shredded cheese, sour cream, or avocado for extra richness.
  9. 5️⃣Finish and Serve:Just before serving, stir in fresh cilantro if desired.Serve hot with cornbread, rice, or tortilla chips. Add toppings like shredded cheese, sour cream, or avocado for extra richness.
  10. Just before serving, stir in fresh cilantro if desired.
  11. Serve hot with cornbread, rice, or tortilla chips. Add toppings like shredded cheese, sour cream, or avocado for extra richness.

Notes

Adjust the spice level by using mild, medium, or hot green chilies and tomatoes.For a vegetarian option, omit the beef and use vegetable broth.
For a vegetarian option, omit the beef and use vegetable broth.

“`

Funeral Potatoes

“`html

Funeral Potatoes: The Ultimate Comfort Food Casserole

What Exactly Are Funeral Potatoes?

Are you searching for a dish that’s guaranteed to bring warmth, smiles, and seconds to the table? In a world of fleeting food trends, there’s a timeless classic that consistently delivers pure, unadulterated comfort: Funeral Potatoes. This creamy, cheesy, and perfectly crunchy casserole has earned its beloved status for a reason. Often served at gatherings where community and care are paramount—like funerals or potlucks—Funeral Potatoes are more than just a side dish; they are a hug in a baking dish. But what makes this seemingly simple combination of hash browns, cheese, and a creamy sauce so universally adored? It’s the perfect harmony of textures and flavors: the tender bite of potatoes, the velvety richness of a cheese sauce, and that irresistible, golden-brown, buttery crunch on top. It’s the kind of food that evokes nostalgia and feeds the soul, making it a go-to for holidays, family dinners, and any occasion that calls for a truly satisfying meal.

Irresistible Ingredients for Funeral Potatoes

The beauty of Funeral Potatoes lies in its simplicity, using readily available ingredients to create something extraordinary. The magic happens when these humble components come together in the oven. Here’s what you’ll need to create this comforting classic:

For the Casserole:

  • 2 (30 ounce) packages frozen hash browns, thawed but not drained. These form the tender, comforting base, offering a slightly crisp exterior when baked and a wonderfully soft interior.
    • Substitution: You can use homemade shredded potatoes, but ensure they are well-drained to avoid a watery casserole. Freshly shredded potatoes will have a slightly different texture, potentially more potato-forward.
  • 1 (10.5 ounce) can cream of chicken soup, undiluted. This is the backbone of our creamy sauce, providing a savory depth and luxurious thickness.
    • Substitution: Cream of mushroom soup or cream of celery soup work beautifully. For a dairy-free option, use a dairy-free cream soup alternative or a homemade béchamel sauce enriched with nutritional yeast for cheesiness.
  • 1 (16 ounce) container sour cream. Adds a delightful tang and extra creaminess, balancing the richness of the soup and cheese.
    • Substitution: Plain Greek yogurt can be used for a slightly lighter, tangier option. Ensure it’s full-fat for the best texture.
  • 1 ½ cups shredded sharp cheddar cheese, plus more for topping. The heart of the cheesy goodness! Sharp cheddar provides a robust flavor that doesn’t get lost in the creamy sauce.
    • Substitution: A blend of cheddar and Monterey Jack, or Gruyère, would offer a more complex cheesy profile.
  • ½ cup chopped onion, finely minced. Adds a subtle aromatic sweetness that enhances the overall flavor profile.
    • Substitution: Use ½ teaspoon of onion powder if you prefer not to have visible onion pieces or if fresh onions aren’t available.
  • ¼ cup butter, melted. This is part of our crunchy topping, giving it that beautiful golden hue and delicious buttery flavor.

For the Topping:

  • 1 cup crushed corn flakes OR panko breadcrumbs. This is the key to that irresistible crunchy layer that everyone fights over!
    • Substitution: For a gluten-free crunch, opt for gluten-free breadcrumbs or even finely crushed tortilla chips.
  • ½ cup shredded sharp cheddar cheese. More cheese for more deliciousness on top!
  • ¼ cup butter, melted. To bind the topping and ensure it toasts to golden perfection.

Timing and Preparation

Funeral Potatoes are wonderfully quick to assemble, making them ideal for busy weeknights or last-minute potlucks. The active preparation time is minimal, allowing you to focus on other tasks while this comforting casserole bakes to perfection.

Prep time: 15 minutes
Cook time: 45-50 minutes
Total time: 1 hour – 1 hour 5 minutes

Compared to average casserole recipes which often require more complex sauces or longer baking times, Funeral Potatoes are remarkably efficient, offering maximum comfort for minimum effort.

A golden brown Funeral Potatoes casserole in a baking dish, ready to be served.

Crafting Your Funeral Potatoes

Let’s get started on this comforting classic. Follow these simple steps for a casserole that’s destined to be a favorite.

Step 1: Preheat and Prepare

Begin by preheating your oven to 375°F (190°C). Lightly grease a 9×13 inch baking dish with butter or cooking spray. This prevents the casserole from sticking and ensures easy serving.

Step 2: Mix the Creamy Sauce

In a large mixing bowl, combine the thawed hash browns (don’t drain them!), the undiluted cream of chicken soup, sour cream, 1 cup of the shredded cheddar cheese, and the finely chopped onion. Stir everything together until it’s well incorporated and you have a creamy, cohesive mixture.

Step 3: Combine and Layer

Gently fold the hash brown mixture into the prepared baking dish, spreading it evenly. Ensure it forms a smooth, consistent layer. This is the soul of your casserole!

Step 4: Prepare the Crispy Topping

In a separate small bowl, combine the crushed corn flakes or panko breadcrumbs, the remaining ½ cup of shredded cheddar cheese, and the ¼ cup of melted butter. Stir until the crumbs are well coated in butter and begin to clump together slightly. This mixture will create that delectable crunchy crust.

Step 5: Bake to Perfection

Sprinkle the crunchy topping evenly over the hash brown mixture in the baking dish. Cover the dish tightly with aluminum foil. Place the dish in the preheated oven and bake for 30 minutes. Then, remove the foil and bake for an additional 15-20 minutes, or until the topping is golden brown and the casserole is bubbly around the edges. This double-bake method ensures the center is heated through and the topping is perfectly crisp.

Step 6: Rest and Serve

Once out of the oven, let the Funeral Potatoes rest for about 5-10 minutes before serving. This allows the casserole to set slightly, making it easier to scoop and serve without it falling apart. Serve warm and enjoy the comforting flavors!

Nutritional Insights

While Funeral Potatoes are a rich and decadent comfort food, it’s helpful to have an estimated nutritional breakdown. Please note that these values are approximate and can vary based on exact ingredients and portion sizes.

  • Calories: Approximately 350-450 per serving
  • Protein: Around 10-15g
  • Fat: Approximately 25-35g (primarily from cheese and butter)
  • Carbohydrates: Around 20-30g (from potatoes and corn flakes)
  • Sodium: Can be high due to canned soup and cheese; adjust as needed.

This data is an estimation and will vary based on the specific ingredients and brands used.

Healthier Alternatives

For those looking to make Funeral Potatoes a bit lighter without sacrificing too much flavor or that irresistible comfort, consider these swaps:

  • Reduced-Fat Ingredients: Use reduced-fat cream of mushroom soup, light sour cream, and reduced-fat cheddar cheese.
  • Greek Yogurt: Substitute half of the sour cream with plain Greek yogurt for added protein and a tangy twist.
  • Fresh Vegetables: Add finely chopped steamed broccoli, spinach, or sautéed mushrooms to the casserole mixture for added nutrients and fiber.
  • Whole Wheat Topping: Opt for whole wheat breadcrumbs or a mix of whole grain cereal for the topping.
  • Lean Protein: Incorporate lean cooked chicken or turkey for a more substantial and protein-rich casserole.

Serving Suggestions

Funeral Potatoes are incredibly versatile and pair well with a variety of main dishes. They are a perfect accompaniment to:

  • Roasted meats like turkey, ham, or roast beef.
  • Grilled or baked chicken.
  • Hearty stews or chili.
  • Serve as a stand-alone vegetarian main dish with a fresh green salad.

Common Mistakes to Avoid

To ensure your Funeral Potatoes turn out perfectly every time, steer clear of these common pitfalls:

  • Draining the hash browns too much: The slight moisture from the thawed hash browns contributes to the creamy texture.
  • Overmixing: Be gentle when combining ingredients to avoid a gummy texture.
  • Not covering during initial baking: Covering traps steam, which helps cook the potatoes through and melt the cheese evenly before the topping browns.
  • Skipping the rest time: Allowing the casserole to rest helps it set, preventing a runny dish.
  • Using bland cheese: Opt for sharp cheddar or a flavorful blend for the best taste.

Storing and Reheating Tips

Leftover Funeral Potatoes are a treat! Store any cooled leftovers in an airtight container in the refrigerator for up to 3-4 days. To reheat, you can:

  • Oven: Reheat in a preheated oven at 350°F (175°C) until warmed through. Cover with foil initially, then remove for the last few minutes to re-crisp the topping.
  • Microwave: Reheat individual portions in the microwave for about 1-2 minutes, though this may soften the crunch.

Embrace the Comfort

Funeral Potatoes are more than just a recipe; they are a symbol of warmth, comfort, and shared meals. Their creamy, cheesy, and crunchy perfection makes them an enduring favorite across generations and gatherings. Whether you’re serving them at a solemn occasion or a joyous celebration, this casserole is guaranteed to bring smiles and satisfaction. So, gather your ingredients, follow these simple steps, and create a dish that nourishes the body and soothes the soul.

Frequently Asked Questions

***What kind of hash browns are best for Funeral Potatoes?***

Frozen shredded hash browns are ideal. They provide the perfect texture, and their retained moisture helps create a creamy casserole. Avoid hash brown patties, as they won’t break down as well.

***Can I make Funeral Potatoes ahead of time?***

Yes! You can assemble the casserole completely, cover it tightly, and refrigerate it for up to 24 hours before baking. You may need to add a few extra minutes to the baking time if baking from cold.

***Why is it called Funeral Potatoes?***

It’s traditionally served at funeral receptions and potlucks due to its comforting nature, ease of preparation, and ability to feed a crowd. It’s a dish that offers solace and togetherness during difficult times.

***Can I make this vegetarian?***

Absolutely. Substitute the cream of chicken soup with cream of mushroom or cream of celery soup. Ensure your cheese choices are vegetarian.

***How do I prevent the topping from burning?***

Baking covered for the first 30 minutes allows the casserole to heat through and the topping to toast gently. Remove the foil for the final 15-20 minutes to get it golden and crispy without burning. If it browns too quickly, you can loosely tent it with foil.

Print
clock clock iconcutlery cutlery iconflag flag iconfolder folder iconinstagram instagram iconpinterest pinterest iconfacebook facebook iconprint print iconsquares squares iconheart heart iconheart solid heart solid icon

Funeral Potatoes

  • Author: Chef Sara

Description

Funeral Potatoes are a creamy, cheesy, and crunchy comfort food classic perfect for any occasion. Made with tender hash browns, a rich sour cream and cheese sauce, and a crispy buttery topping, this casserole is a crowd-pleaser at potlucks, holidays, or even a simple family dinner.


Ingredients

Scale
  • 1(32-ounce) bag frozen hash browns (shredded or diced)
  • 1 cupsour cream
  • 1(10.5-ounce) can cream of chicken soup (or cream of mushroom for vegetarian)
  • 2 cupsshredded cheddar cheese
  • 1/2 cupunsalted butter, melted
  • 1 1/2 cupscornflake cereal, crushed (or panko breadcrumbs)
  • 1 tsponion powder
  • 1/2 tspgarlic powder
  • Salt and pepper, to taste
  • Chopped chives for garnish (optional)

Instructions

  1. Preheat the oven to 350°F (175°C). Grease a 9×13-inch baking dish.
  2. In a large mixing bowl, combine sour cream, cream of chicken soup, cheddar cheese, onion powder, garlic powder, salt, and pepper. Mix well.
  3. Add the frozen hash browns to the bowl and gently stir until evenly coated.
  4. Spread the potato mixture evenly into the prepared baking dish.
  5. In a separate small bowl, mix the crushed cornflakes with melted butter. Sprinkle evenly over the top of the casserole.
  6. Bake for 40-50 minutes, or until hot and bubbly, and the topping is golden brown.
  7. Remove from the oven and let cool slightly. Garnish with chopped chives if desired. Serve warm.

Notes

For extra crunch, substitute crushed Ritz crackers or potato chips for the cornflakes.
Add cooked, diced chicken or ham for a more filling casserole.
Leftovers can be refrigerated in an airtight container for up to 3 days or frozen for up to 1 month.
If baking from frozen, cover with foil and bake for an additional 10-15 minutes, removing the foil halfway through baking.

“`