“`html
Table of Contents
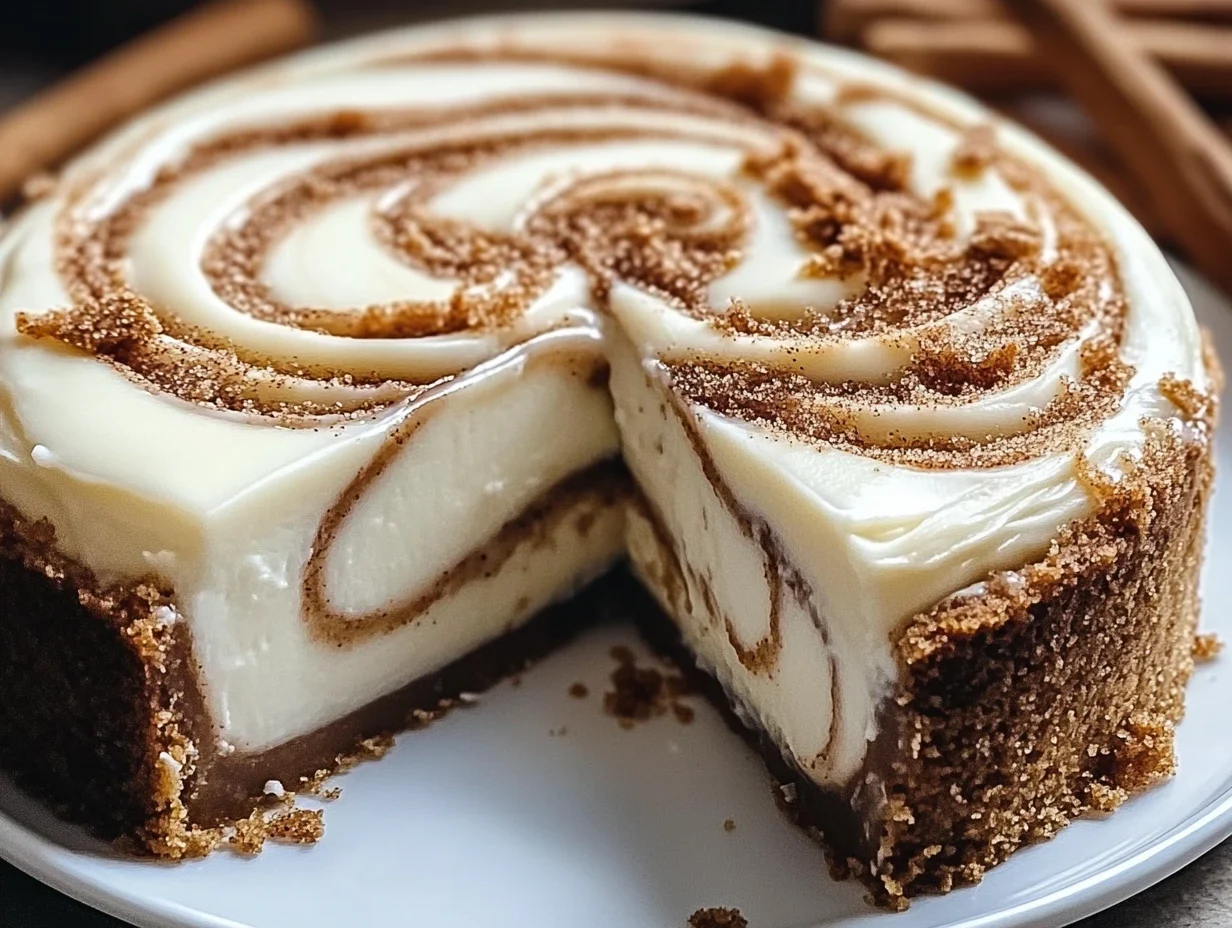
Irresistible Cinnamon Roll Cheesecake Recipes You Need to Try
Craving the Perfect Dessert?
Are you a dessert enthusiast constantly on the hunt for that next showstopper that melts in your mouth and leaves everyone asking for the recipe? If you’ve ever found yourself torn between the comforting embrace of a gooey cinnamon roll and the decadent richness of a classic cheesecake, then you’re in for a treat! This irresistible Cinnamon Roll Cheesecake recipe is the ultimate fusion of these beloved desserts, promising a symphony of warm spices, creamy tang, and sweet bliss in every bite. Get ready to elevate your dessert game.
The Magic Ingredients
Gather these delightful components to bring your Cinnamon Roll Cheesecake to life. We’ve included some notes on their sensory impact and potential substitutions to cater to your preferences.
For the Cinnamon Swirl Layer:
- 1/2 cup (100g) packed light brown sugar: Provides a caramel-like sweetness and moisture, crucial for that gooey texture.
- 2 tablespoons ground cinnamon: The star spice, offering its warm, woody aroma and pungent, sweet flavor.
- 2 tablespoons unsalted butter, melted: Binds the sugar and cinnamon, softening and adding a subtle richness.
- Pinch of salt: Balances the sweetness and enhances the cinnamon flavor.
For the Cheesecake Filling:
- 3 (8-ounce / 225g each) blocks cream cheese, softened: The soul of the cheesecake, lending its signature tangy, creamy, and smooth texture. Ensure it’s fully softened for a lump-free batter.
- 1 1/4 cups (250g) granulated sugar: Sweetens the base, working with the cream cheese to create a rich, luscious custard.
- 3 large eggs: Emulsify the batter, providing structure and a velvety mouthfeel.
- 1 teaspoon vanilla extract: Adds a warm, sweet aroma and depth of flavor that complements both cheesecake and cinnamon.
- 1/4 cup (60ml) sour cream or full-fat Greek yogurt: Contributes moisture and a subtle tang, enhancing the overall creaminess and preventing a dense texture.
For the Crust (Optional, but Recommended):
- 1 1/2 cups (150g) graham cracker crumbs (about 10 full sheets): Provides a crunchy, slightly sweet foundation that contrasts beautifully with the creamy filling.
- 1/4 cup (50g) granulated sugar: Enhances the sweetness of the crust.
- 6 tablespoons (85g) unsalted butter, melted: Binds the crumbs, creating a firm, ready-to-bake crust.
For the Cream Cheese Icing:
- 4 ounces (113g) cream cheese, softened: The creamy, tangy base for our luscious topping.
- 1/4 cup (57g) unsalted butter, softened: Adds richness and a smooth consistency.
- 1 teaspoon vanilla extract: For that classic sweet aroma.
- 1 1/2 – 2 cups (180-240g) powdered sugar, sifted: Sweetens and thickens the icing to drizzling perfection. Adjust for desired consistency.
- 1-2 tablespoons milk or cream: Thins the icing to the perfect drizzling consistency.
Timing is Everything
Compared to a standard cheesecake (which often takes 1-2 hours active prep and bake), this Cinnamon Roll Cheesecake requires a bit more time for the swirling and layering, but the resulting flavor complexity is well worth it. The extended chill time is crucial for the cheesecake to set perfectly.
Crafting Your Masterpiece: Step-by-Step
Let’s embark on this delicious journey together! Follow these steps carefully for a truly magnificent Cinnamon Roll Cheesecake.
Step 1: Prepare the Cinnamon Roll Swirl
In a small bowl, combine the brown sugar, cinnamon, melted butter, and pinch of salt. Mix until it forms a thick, sandy paste. This fragrant mixture will create those beautiful, sweet ribbons throughout your cheesecake.
Step 2: Make the Cheesecake Base
If you’re using a crust, prepare it now. In a separate bowl, whisk together graham cracker crumbs, sugar, and melted butter until it resembles wet sand. Press this mixture firmly into the bottom of a 9-inch springform pan. Bake at 350°F (175°C) for 8-10 minutes until lightly golden. Let it cool while you make the filling.
For the filling: In a large bowl, beat the softened cream cheese on medium speed until completely smooth and creamy, ensuring no lumps remain. Gradually add the granulated sugar and continue beating until well combined and fluffy. Beat in the eggs one at a time, mixing just until each is incorporated. Stir in the vanilla extract and sour cream until smooth. Be careful not to overmix the eggs, as this can lead to cracks.
Step 3: Assemble the Cheesecake
Pour about half of the cheesecake filling over the prepared crust (or directly into the pan if not using a crust). Dollop spoonfuls of the cinnamon swirl mixture evenly over the filling. Pour the remaining cheesecake filling on top. Now, take a knife or a skewer and gently swirl the cinnamon mixture through the cheesecake batter, creating beautiful marble patterns. Don’t over-swirl; you want distinct ribbons!
Step 4: Bake the Cheesecake
Preheat your oven to 325°F (160°C). For the moistest cheesecake, a water bath is highly recommended. Wrap the bottom of your springform pan tightly with heavy-duty aluminum foil to prevent water from seeping in. Place the wrapped pan in a larger roasting pan. Pour about an inch of hot water into the roasting pan, ensuring it comes up around the sides of the springform pan. Carefully place the roasting pan into the preheated oven.
Bake for 60-75 minutes, or until the edges are set and the center is still slightly jiggly. The internal temperature should reach about 150°F (65°C).
Step 5: Chill and Ice
Once baked, turn off the oven and let the cheesecake cool in the oven with the door ajar for about an hour. This slow cooling process helps prevent cracking. Remove from the oven and water bath, then let it cool completely on a wire rack. Once at room temperature, cover the cheesecake tightly with plastic wrap and refrigerate for at least 4 hours, or preferably overnight, until very firm.
While the cheesecake chills, prepare the icing. In a medium bowl, beat together the softened cream cheese and butter until smooth and fluffy. Stir in the vanilla extract. Gradually add the sifted powdered sugar, alternating with milk or cream, until you reach your desired drizzling consistency. If it’s too thick, add a touch more liquid; if too thin, add more powdered sugar.
Once the cheesecake is fully chilled and set, carefully remove the sides of the springform pan. Drizzle the cream cheese icing generously over the top, letting it drip down the sides. Slice and serve!
Nutritional Snapshot
While exact nutritional values can vary based on ingredients and portion sizes, a typical serving of this Cinnamon Roll Cheesecake may contain:
- Calories: 400-550
- Fat: 25-35g
- Carbohydrates: 40-55g
- Protein: 8-12g
- Sugar: 30-45g
(This is an estimation and should not be considered a precise medical or dietary guideline.)
Healthier Twists
Looking to lighten things up without sacrificing flavor? Try these smart swaps:
- Crust: Use crushed oats mixed with a little almond flour and a touch of coconut oil instead of graham crackers.
- Sweetener: Reduce the sugar in the filling and icing, or use a sugar substitute like erythritol or stevia.
- Cream Cheese: Use light cream cheese or a mixture of light cream cheese and Greek yogurt for a tangier, lower-fat filling.
- Icing: A simple drizzle of melted dark chocolate or a glaze made with powdered erythritol and lemon juice can be lighter alternatives.
Perfect Pairings
This Cinnamon Roll Cheesecake is a dessert that stands tall on its own, but here are a few ideas to enhance the experience:
- A dollop of fresh whipped cream.
- A sprinkle of extra cinnamon or a few chopped pecans.
- A side of freshly brewed coffee or a warm chai latte.
- A drizzle of caramel sauce for extra indulgence.
Watch Out for These Pitfalls
Avoid common cheesecake woes with these tips:
- Overmixing the Batter: Incorporating too much air can lead to cracking. Mix until just combined, especially after adding eggs.
- Not Softening Cream Cheese: Lumpy cheesecake is a sad cheesecake. Ensure your cream cheese is at room temperature.
- Sudden Temperature Changes: Rapid cooling causes cracks. Use the oven-door-ajar method and allow gradual cooling.
- Undercooking: A cheesecake that looks “done” but is still very jiggly in the center might collapse. The center should have just a slight wobble.
Keeping It Fresh
Store leftover Cinnamon Roll Cheesecake in an airtight container in the refrigerator for up to 4-5 days. The flavors actually meld and deepen over time, making it even more delicious on the second day!
The Sweet Finale
This Cinnamon Roll Cheesecake is more than just a dessert; it’s an experience. It perfectly marries two beloved classics into a harmonious, utterly delicious treat that’s bound to become a favorite. Whether you’re celebrating a special occasion or simply craving a slice of pure joy, this recipe delivers. So, gather your ingredients, get ready to swirl, and prepare to impress. What are you waiting for? Your Cinnamon Roll Cheesecake adventure begins now!
Share your creation! Tag us on social media and let us know how your Cinnamon Roll Cheesecake turned out. We love seeing your delicious results!
Frequently Asked Questions
***What is the best way to prevent my cheesecake from cracking?***
The key is gentle mixing, gradual cooling (using the oven door ajar method), and avoiding sudden temperature changes. Baking in a water bath also helps maintain a consistent, humid environment, reducing the risk of cracks.
***Can I make this cheesecake ahead of time?***
Absolutely! Cheesecakes are often best made a day in advance. This allows the flavors to meld and fully set, resulting in a firmer and more cohesive dessert.
***What kind of pan should I use?***
A 9-inch springform pan is ideal. It allows for easy removal of the cheesecake without damaging its beautiful structure.
***My cinnamon swirl looks messy, is that okay?***
Yes! The beauty of this dessert lies in its rustic charm. Don’t aim for perfect symmetry; the swirled pattern is meant to be a delightful surprise within each slice, and a little messiness often indicates a generous amount of cinnamon filling!
***Can I freeze this cheesecake?***
Yes, you can freeze the cheesecake before or after icing. Wrap it tightly in plastic wrap, then in foil. Thaw overnight in the refrigerator before serving.
Cinnamon Roll Cheesecake with Cream Cheese Icing
Description
This indulgent dessert combines the best of two worlds: the creamy richness of cheesecake and the warm, spiced sweetness of cinnamon rolls. Topped with a luscious cream cheese icing, it’s a showstopper for any occasion.
Ingredients
- 2 cups(200 g) graham cracker crumbs1/2 cup(115 g) unsalted butter, melted2 tablespoonsgranulated sugar
- 1/2 cup(115 g) unsalted butter, melted2 tablespoonsgranulated sugar
- 2 tablespoonsgranulated sugar
- 3(8 oz / 225 g) packages cream cheese, softened1 cup(200 g) granulated sugar3large eggs1/2 cup(120ml) sour cream1 teaspoonvanilla extract
- 1 cup(200 g) granulated sugar3large eggs1/2 cup(120ml) sour cream1 teaspoonvanilla extract
- 3large eggs1/2 cup(120ml) sour cream1 teaspoonvanilla extract
- 1/2 cup(120ml) sour cream1 teaspoonvanilla extract
- 1 teaspoonvanilla extract
- 1/3 cup(75 g) light brown sugar, packed2 teaspoonsground cinnamon2 tablespoonsunsalted butter, melted
- 2 teaspoonsground cinnamon2 tablespoonsunsalted butter, melted
- 2 tablespoonsunsalted butter, melted
- 4 oz(115 g) cream cheese, softened2 tablespoonsunsalted butter, softened1 cup(120 g) powdered sugar1 teaspoonvanilla extract2–3tablespoons milk (to desired consistency)
- 2 tablespoonsunsalted butter, softened1 cup(120 g) powdered sugar1 teaspoonvanilla extract2–3tablespoons milk (to desired consistency)
- 1 cup(120 g) powdered sugar1 teaspoonvanilla extract2–3tablespoons milk (to desired consistency)
- 1 teaspoonvanilla extract2–3tablespoons milk (to desired consistency)
- 2–3tablespoons milk (to desired consistency)
Instructions
- 1️⃣Preheat: Preheat your oven to 325°F (165°C).2️⃣Mix and press: In a bowl, combine graham cracker crumbs, melted butter, and sugar. Mix until the texture resembles wet sand.3️⃣Bake: Press the mixture firmly into the bottom of a 9-inch springform pan. Bake for 10 minutes, then set aside to cool.Make the cheesecake filling:4️⃣Beat cream cheese: In a large mixing bowl, beat cream cheese and sugar until smooth and creamy.5️⃣Add eggs: Beat in eggs one at a time, ensuring each is fully incorporated.6️⃣Combine rest: Add sour cream and vanilla extract. Mix until the filling is smooth and well combined.Prepare the cinnamon swirl:7️⃣Mix ingredients: In a small bowl, combine brown sugar, cinnamon, and melted butter to form a smooth paste.Assemble the cheesecake:8️⃣Layer and swirl: Pour half of the cheesecake filling over the cooled crust. Drizzle half of the cinnamon swirl mixture over the filling. Use a knife or toothpick to create gentle swirls.9️⃣Repeat: Add the remaining cheesecake filling and swirl in the rest of the cinnamon mixture for a marbled effect.Bake the cheesecake:🔟Bake: Place the springform pan on a baking sheet. Bake for 50–60 minutes, or until the edges are set but the center is slightly jiggly.1️⃣1️⃣Cool in the oven: Turn off the oven, crack the door open, and let the cheesecake cool in the oven for 1 hour to prevent cracking.Chill the cheesecake:1️⃣2️⃣Cool completely: Let the cheesecake cool to room temperature.1️⃣3️⃣Refrigerate: Chill in the refrigerator for at least 4 hours, preferably overnight, to set.Make the cream cheese icing:1️⃣4️⃣Beat the icing: Beat cream cheese and butter until smooth. Gradually add powdered sugar and vanilla extract.1️⃣5️⃣Adjust consistency: Mix in milk, one tablespoon at a time, until the icing is smooth and pourable.Serve:1️⃣6️⃣Top and slice: Spread or drizzle the cream cheese icing over the chilled cheesecake. Slice and serve!
- 4️⃣Beat cream cheese: In a large mixing bowl, beat cream cheese and sugar until smooth and creamy.5️⃣Add eggs: Beat in eggs one at a time, ensuring each is fully incorporated.6️⃣Combine rest: Add sour cream and vanilla extract. Mix until the filling is smooth and well combined.Prepare the cinnamon swirl:7️⃣Mix ingredients: In a small bowl, combine brown sugar, cinnamon, and melted butter to form a smooth paste.Assemble the cheesecake:8️⃣Layer and swirl: Pour half of the cheesecake filling over the cooled crust. Drizzle half of the cinnamon swirl mixture over the filling. Use a knife or toothpick to create gentle swirls.9️⃣Repeat: Add the remaining cheesecake filling and swirl in the rest of the cinnamon mixture for a marbled effect.Bake the cheesecake:🔟Bake: Place the springform pan on a baking sheet. Bake for 50–60 minutes, or until the edges are set but the center is slightly jiggly.1️⃣1️⃣Cool in the oven: Turn off the oven, crack the door open, and let the cheesecake cool in the oven for 1 hour to prevent cracking.Chill the cheesecake:1️⃣2️⃣Cool completely: Let the cheesecake cool to room temperature.1️⃣3️⃣Refrigerate: Chill in the refrigerator for at least 4 hours, preferably overnight, to set.Make the cream cheese icing:1️⃣4️⃣Beat the icing: Beat cream cheese and butter until smooth. Gradually add powdered sugar and vanilla extract.1️⃣5️⃣Adjust consistency: Mix in milk, one tablespoon at a time, until the icing is smooth and pourable.Serve:1️⃣6️⃣Top and slice: Spread or drizzle the cream cheese icing over the chilled cheesecake. Slice and serve!
- 7️⃣Mix ingredients: In a small bowl, combine brown sugar, cinnamon, and melted butter to form a smooth paste.
- 8️⃣Layer and swirl: Pour half of the cheesecake filling over the cooled crust. Drizzle half of the cinnamon swirl mixture over the filling. Use a knife or toothpick to create gentle swirls.9️⃣Repeat: Add the remaining cheesecake filling and swirl in the rest of the cinnamon mixture for a marbled effect.Bake the cheesecake:🔟Bake: Place the springform pan on a baking sheet. Bake for 50–60 minutes, or until the edges are set but the center is slightly jiggly.1️⃣1️⃣Cool in the oven: Turn off the oven, crack the door open, and let the cheesecake cool in the oven for 1 hour to prevent cracking.Chill the cheesecake:1️⃣2️⃣Cool completely: Let the cheesecake cool to room temperature.1️⃣3️⃣Refrigerate: Chill in the refrigerator for at least 4 hours, preferably overnight, to set.Make the cream cheese icing:1️⃣4️⃣Beat the icing: Beat cream cheese and butter until smooth. Gradually add powdered sugar and vanilla extract.1️⃣5️⃣Adjust consistency: Mix in milk, one tablespoon at a time, until the icing is smooth and pourable.Serve:1️⃣6️⃣Top and slice: Spread or drizzle the cream cheese icing over the chilled cheesecake. Slice and serve!
- 🔟Bake: Place the springform pan on a baking sheet. Bake for 50–60 minutes, or until the edges are set but the center is slightly jiggly.1️⃣1️⃣Cool in the oven: Turn off the oven, crack the door open, and let the cheesecake cool in the oven for 1 hour to prevent cracking.Chill the cheesecake:1️⃣2️⃣Cool completely: Let the cheesecake cool to room temperature.1️⃣3️⃣Refrigerate: Chill in the refrigerator for at least 4 hours, preferably overnight, to set.Make the cream cheese icing:1️⃣4️⃣Beat the icing: Beat cream cheese and butter until smooth. Gradually add powdered sugar and vanilla extract.1️⃣5️⃣Adjust consistency: Mix in milk, one tablespoon at a time, until the icing is smooth and pourable.Serve:1️⃣6️⃣Top and slice: Spread or drizzle the cream cheese icing over the chilled cheesecake. Slice and serve!
- 1️⃣2️⃣Cool completely: Let the cheesecake cool to room temperature.1️⃣3️⃣Refrigerate: Chill in the refrigerator for at least 4 hours, preferably overnight, to set.
- 1️⃣4️⃣Beat the icing: Beat cream cheese and butter until smooth. Gradually add powdered sugar and vanilla extract.1️⃣5️⃣Adjust consistency: Mix in milk, one tablespoon at a time, until the icing is smooth and pourable.Serve:1️⃣6️⃣Top and slice: Spread or drizzle the cream cheese icing over the chilled cheesecake. Slice and serve!
- 1️⃣6️⃣Top and slice: Spread or drizzle the cream cheese icing over the chilled cheesecake. Slice and serve!
Notes
Room-temperature ingredients: Ensure cream cheese, eggs, and sour cream are at room temperature for a smooth filling.Avoid overmixing: Overmixing the batter can introduce air, leading to cracks during baking.Water bath option: Place the springform pan in a water bath for extra moisture to prevent cracking.
Avoid overmixing: Overmixing the batter can introduce air, leading to cracks during baking.Water bath option: Place the springform pan in a water bath for extra moisture to prevent cracking.
Water bath option: Place the springform pan in a water bath for extra moisture to prevent cracking.
“`