“`html
Table of Contents
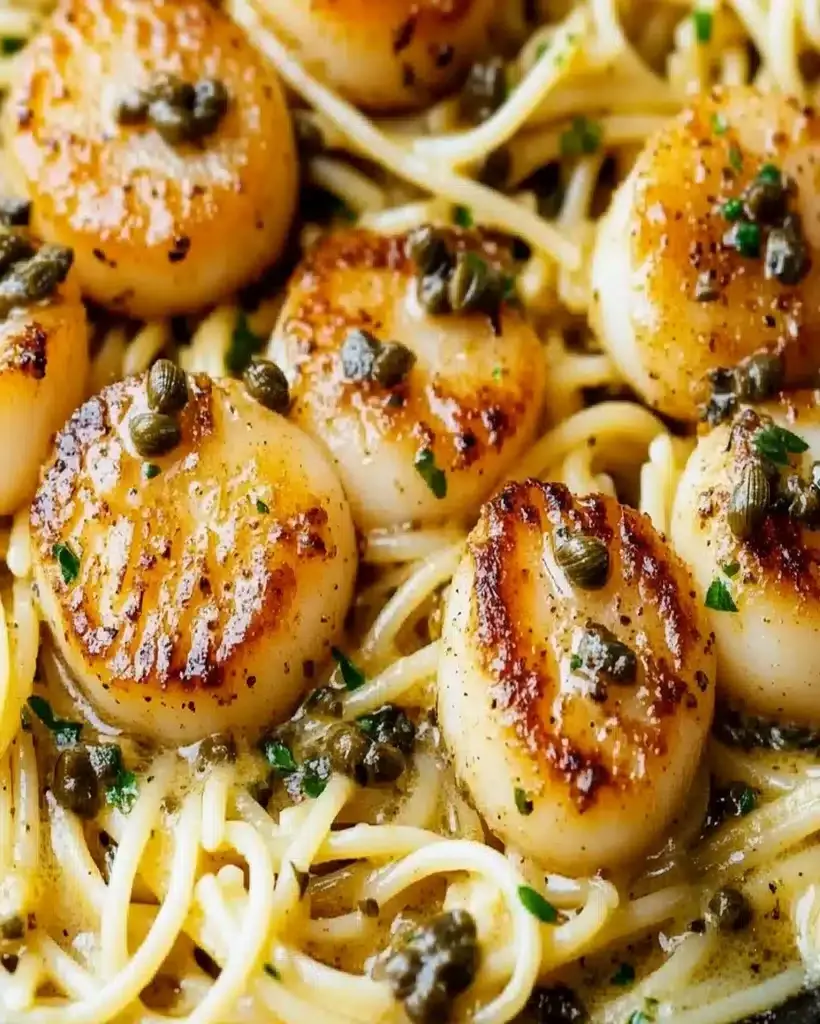
Scallop Pasta with Caper Butter Sauce 🦪 A Must-Try Gourmet Recipe!
Elevate Your Weeknight Dinner: The Allure of Scallop Pasta
Are you searching for a restaurant-quality meal that can be prepared in under an hour, perfect for impressing on date night or simply treating yourself? Look no further than the exquisite world of Scallop Pasta with Caper Butter Sauce! This elegant dish, often found gracing the menus of upscale eateries, is surprisingly achievable in your own kitchen. It’s a testament to how simple, high-quality ingredients can combine to create something truly spectacular. Imagine plump, tender scallops bathing in a zesty, luxurious butter sauce infused with briny capers and a hint of lemon – all tossed with perfectly cooked pasta. This recipe is designed to be approachable for home cooks of all skill levels. Whether you’re a burgeoning chef or a seasoned pro, this scallop pasta promises a memorable dining experience with minimal fuss. We’ll guide you through each step to ensure your success, making this gourmet delight a staple in your recipe repertoire.
Ingredients for Scallop Pasta with Caper Butter Sauce
The magic of this dish lies in its fresh, vibrant ingredients. Using good quality components will shine through in the final flavor profile. For the best results, opt for dry-packed sea scallops, which sear beautifully and have a cleaner taste.
- 1 pound large sea scallops: Look for “dry-packed” scallops; they are firmer and sear better than “wet-packed” ones (which are treated with a solution). They should smell sweet and oceanic, not fishy.
- 8 ounces pasta: Linguine, fettuccine, or spaghetti work wonderfully. Choose a good quality bronze-cut pasta for a better sauce grip. Whole wheat or gluten-free options are also fine.
- 4 tablespoons unsalted butter: Use good quality butter for the richest flavor. Ensure it’s softened for easier melting.
- 2 cloves garlic, minced: Fresh garlic is key for pungency. You can substitute with 1 teaspoon of garlic powder if fresh isn’t available, but the flavor will be milder.
- 2 tablespoons capers, drained: These briny little buds provide a fantastic tangy, salty punch. Rinse them if you prefer less saltiness. Non-pareil capers are ideal.
- 1/4 cup dry white wine: Such as Pinot Grigio or Sauvignon Blanc. This adds acidity and depth. You can substitute with chicken or vegetable broth if avoiding alcohol.
- 1/4 cup fresh lemon juice: Freshly squeezed is non-negotiable for brightness. Bottled juice won’t deliver the same vibrant tang.
- 2 tablespoons fresh parsley, chopped: For a burst of freshness and color. Chives or dill can be used as alternatives.
- Salt and freshly ground black pepper: To taste. Season generously as pasta water and scallops need good seasoning.
- 1 tablespoon olive oil: For searing the scallops. Use a good quality extra virgin olive oil.
- Optional: Red pepper flakes: A pinch for a hint of heat.
Timing Your Gourmet Creation
This Scallop Pasta with Caper Butter Sauce is a fantastic weeknight meal, coming together in just over half an hour. Compared to other gourmet pasta dishes that can take 45 minutes to over an hour, this recipe is wonderfully efficient without sacrificing flavor or elegance. The key is to have all your ingredients prepped and ready before you start cooking, as the sauce comes together very quickly.
Step-by-Step Instructions for Perfect Scallop Pasta
Follow these simple steps to create a restaurant-worthy scallop pasta dish!
Step 1: Prep the Pasta and Scallops
Bring a large pot of generously salted water to a rolling boil for your pasta. While the water heats, prepare your scallops. Pat them thoroughly dry with paper towels – this is crucial for achieving a beautiful sear. Remove the small, tough side muscle if present. Season the scallops generously on both sides with salt and freshly ground black pepper. Mince your garlic and chop your parsley.
Step 2: Create the Caper Butter Sauce
Once the water is boiling, add your pasta and cook according to package directions until al dente. Meanwhile, in a large skillet or sauté pan (big enough to eventually hold the pasta and scallops), melt 2 tablespoons of butter with the olive oil over medium heat. Add the minced garlic and cook for about 30 seconds until fragrant, being careful not to burn it. Pour in the white wine (or broth) and let it simmer for 1 minute, scraping up any bits from the bottom of the pan. Stir in the drained capers and lemon juice. Let the sauce simmer gently while you cook the scallops.
Step 3: Cook the Scallops
Increase the heat under the skillet to medium-high. Add the remaining 2 tablespoons of butter. Once the butter has melted and is shimmering, carefully place the seasoned scallops in the hot pan, ensuring not to overcrowd them (cook in batches if necessary). Sear for 1.5 to 2 minutes per side, until they develop a beautiful golden-brown crust and are just opaque in the center. Avoid overcooking, as they can become tough.
Step 4: Combine and Serve
Just before draining the pasta, reserve about 1/2 cup of the starchy pasta water. Drain the pasta and add it directly to the skillet with the caper butter sauce. Toss to coat. If the sauce seems a little thick, add a splash of the reserved pasta water to loosen it and create a silky emulsion. Gently add the seared scallops to the pan and toss lightly to combine. Stir in the chopped fresh parsley (and optional red pepper flakes). Taste and adjust seasoning if needed. Serve immediately.
Nutritional Snapshot
While exact nutritional values can vary based on portion size and specific ingredients used, a typical serving of this Scallop Pasta with Caper Butter Sauce provides:
- Calories: Approximately 450-600 kcal per serving
- Protein: High (from scallops)
- Fats: Moderate (from butter and olive oil)
- Carbohydrates: Moderate (from pasta)
- Vitamins & Minerals: A good source of B vitamins, selenium, zinc, and omega-3 fatty acids (from scallops), along with vitamin C (from lemon).
Note: This is an estimate. For precise calculations, you would need to input your specific ingredient quantities into a nutrition calculator.
Healthier Alternatives & Flavor-Preserving Swaps
You can make this dish lighter without sacrificing its gourmet appeal:
- Reduce Butter: Use 2 tablespoons of butter and 1 tablespoon of olive oil. You can also use a high-quality butter-flavored olive oil.
- Whole Wheat or Legume-Based Pasta: Swap refined pasta for whole wheat pasta for added fiber, or lentil/chickpea pasta for an extra protein and fiber boost.
- Lighter Liquids: Replace some of the wine with low-sodium vegetable or chicken broth.
- Extra Vegetables: Bulk up the dish with wilted spinach, sautéed zucchini ribbons, or cherry tomatoes added in the last few minutes of cooking the pasta.
- Less Salt: Rely more on lemon juice and herbs for flavor if you’re watching your sodium intake. Draining and rinsing capers can also reduce saltiness.
Serving Suggestions
This Scallop Pasta is a complete meal on its own, but it pairs beautifully with:
- A crisp green salad: A simple arugula or mixed greens salad with a light vinaigrette is a perfect complement.
- Crusty bread: For soaking up any extra sauce.
- Steamed asparagus or green beans: For added color and nutrients.
- A glass of chilled white wine: Like the one used in the sauce (Sauvignon Blanc or Pinot Grigio).
Common Mistakes to Avoid
To ensure culinary success, steer clear of these common pitfalls:
- Overcooking the Scallops: This is the most common mistake. Scallops cook very quickly; overcooked scallops become rubbery and tough. Aim for a golden crust and just-opaque center.
- Not Patting Scallops Dry: Excess moisture prevents scallops from searing properly, resulting in a steamed rather than browned texture.
- Overcrowding the Pan: This lowers the pan temperature and causes scallops to steam instead of sear. Cook in batches if necessary.
- Using Bottled Lemon Juice: Fresh lemon juice is essential for brightness and acidity.
- Salting Too Early: Be mindful of the saltiness from capers and pasta water. Season and taste before adding extra salt.
Storing Tips
This dish is best enjoyed fresh. However, if you have leftovers:
- Refrigeration: Store leftovers in an airtight container in the refrigerator for up to 2 days. The pasta may absorb more sauce and become slightly soft.
- Reheating: Gently reheat on the stovetop over low heat, adding a splash of water or white wine to loosen the sauce. Avoid microwaving, as it can make the scallops rubbery.
Conclusion: A Gourmet Experience at Your Fingertips
Scallop Pasta with Caper Butter Sauce is more than just a meal; it’s an experience. It’s proof that you don’t need to dine out to enjoy sophisticated flavors. With its tender scallops, zesty caper butter sauce, and perfectly cooked pasta, this dish is guaranteed to impress. Whether you’re planning a romantic dinner for two or simply craving a delicious and impressive meal, this recipe delivers. Give it a try and let the vibrant flavors transport you. What’s your favorite way to cook scallops? Let us know in the comments below!
Frequently Asked Questions
***What kind of scallops should I use?***
We recommend using large “sea scallops” and looking for “dry-packed” ones. These are not treated with a solution, so they will sear beautifully and have a cleaner, sweeter taste. Wet-packed scallops tend to release a lot of water, preventing a good sear.
***Can I make this pasta dish without wine?***
Absolutely! If you prefer not to use wine, you can substitute it with an equal amount of low-sodium chicken broth, vegetable broth, or even pasta water. The wine adds a layer of acidity and depth, but the broth will still create a delicious sauce.
***How do I prevent my scallops from tasting “fishy”?***
The key to fresh-tasting scallops is to start with fresh, high-quality scallops and to cook them quickly. Ensure they smell sweet and briny, not strongly of fish. Patting them very dry and searing them on high heat for a short time also helps retain their delicate flavor and texture.
***Can I use pre-cooked pasta?***
While it’s best to cook the pasta al dente just before serving to ensure optimal texture, you can reheat pre-cooked pasta. However, the texture might not be as firm, and it may absorb more sauce. If reheating pre-cooked pasta, be sure to add extra pasta water or a little more liquid to the sauce to prevent it from becoming too dry.
***What can I add to make this dish more substantial?***
If you’d like to add more vegetables, consider adding some steamed or sautéed asparagus, wilted spinach, or cherry tomatoes towards the end of the cooking process. For a heartier meal, you could serve it with a side of crusty bread or a light salad.

Scallop Pasta Recipe – Delicious Pasta with Caper Butter Sauce
Description
Hello, food enthusiasts! If you are looking for a simple yet impressive dish for your next date night, look no further thanScallop Pasta with Caper Butter Sauce. This elegant recipe combines tender scallops with a rich and tangy caper butter sauce, making it an irresistible option for seafood lovers. Whether you’re new to cooking or a seasoned chef, this scallop pasta dish is perfect for making a memorable meal.
Ingredients
- For the caper butter sauce:
Instructions
- Rinse the scallops with cold water and pat them dry with paper towels. This step is crucial to ensure the scallops sear properly in the pan without releasing too much moisture. Season them generously with salt and pepper.
- Boil a large pot of salted water and cook the pasta until al dente, following the package instructions. Reserve a cup of pasta water before draining, as this can help adjust the consistency of your sauce later.
- In a large cast-iron skillet, melt 1 tablespoon of unsalted butter over medium-high heat. Add the scallops in a single layer, ensuring they don’t touch each other. Sear for 1-2 minutes on each side until they turn golden brown and slightly translucent in the center. Remove from the skillet and set aside.
- Using the same skillet, melt the remaining butter. Add the minced garlic and sauté for about 1 minute until fragrant. Next, add the drained capers and sauté for another minute, letting the flavors meld. Season with salt and pepper to taste.
- Add the cooked pasta to the skillet, tossing it in the caper butter sauce. If the sauce appears too thick, add a little of the reserved pasta water until you reach your desired consistency.
- Plate the pasta and top it with the seared scallops. Drizzle any remaining sauce over the dish and garnish with chopped parsley for a fresh finish. Serve immediately and enjoy!
Notes
Use Fresh Ingredients: Fresh scallops and herbs will enhance the overall flavor profile of the dish.
Don’t Overcook the Scallops: Scallops cook quickly, so be mindful not to overcook them. They should have a golden crust and be slightly translucent in the center.
Balance the Saltiness: Since capers can be salty, adjust the seasoning as you go to prevent over-salting.
“`