“`html
Table of Contents
- Introduction: Your Weeknight Dinner Hero
- Herby Feta Lemon Chicken Ingredients
- Perfect Timing for an Effortless Meal
- Step-by-Step: Crafting Your Sheet Pan Delight
- Nutritional Snapshot
- Healthier & Flavor-Boosting Swaps
- Serving Suggestions to Elevate Your Dish
- Avoid These Common Mistakes!
- Smart Storing & Reheating
- The Verdict: Your New Go-To Dinner
- Frequently Asked Questions
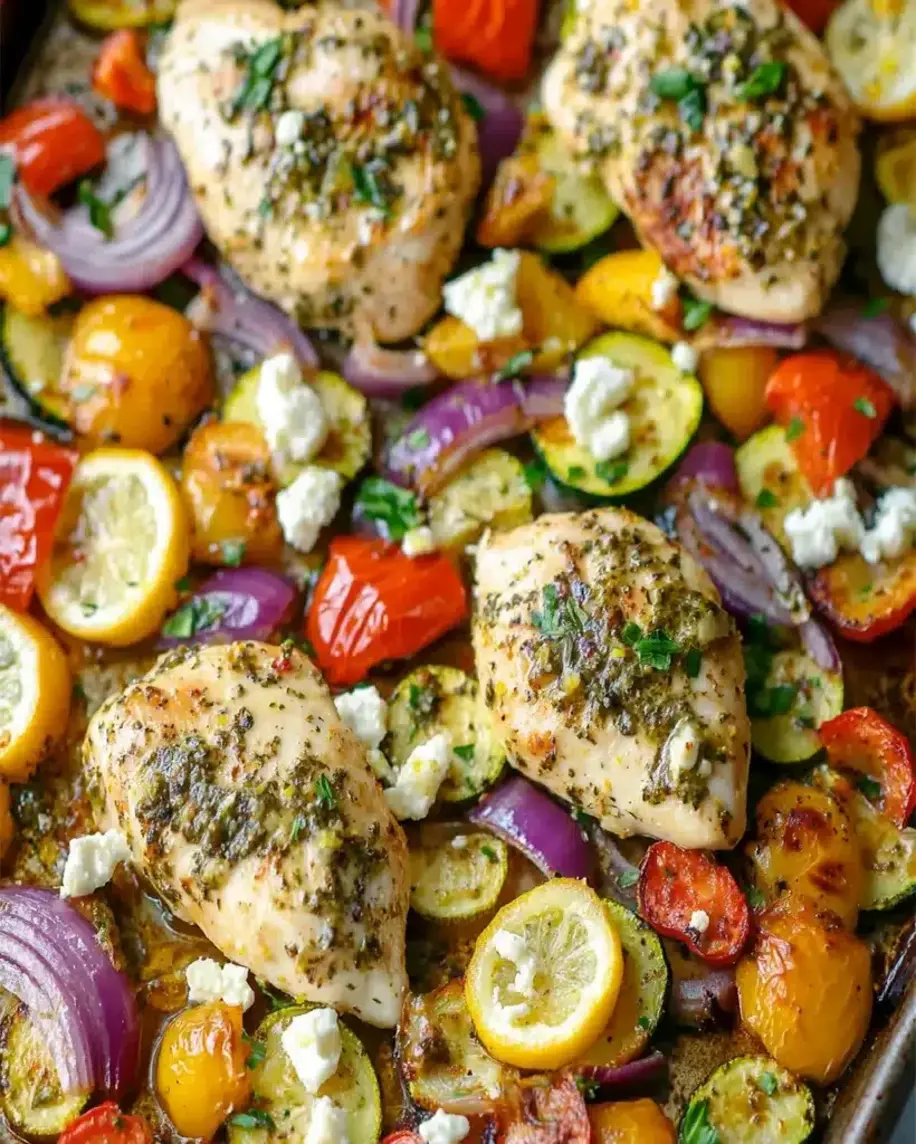
Herby Feta Lemon Chicken Sheet Pan Dinner – So Easy & Flavorful!
Introduction: Your Weeknight Dinner Hero
Are you tired of complicated weeknight dinners that leave you with a mountain of dishes and a stressed-out soul? If so, you’re not alone! On average, home cooks spend over 45 minutes preparing dinner on weeknights, and the cleanup can be just as daunting. But what if there was a way to get a restaurant-quality meal on the table, bursting with vibrant flavors, with minimal effort and just one pan? Welcome, food enthusiasts! If you’re in the mood for a delicious, easy-to-make dinner that’s bursting with flavor, then you’ve come to the right place. This Herby Feta Lemon Chicken and Veggie Sheet Pan Dinner is perfect for weeknights or special family dinners. With juicy chicken, hearty vegetables, and zesty lemon, this dish will become a favorite in no time! It’s the solution you’ve been searching for – a symphony of tender chicken, crisp-tender vegetables, creamy feta, and bright lemon, all roasted to golden perfection on a single sheet pan. Get ready to transform your evenings with this incredibly simple yet utterly satisfying meal.
Herby Feta Lemon Chicken Ingredients
This recipe relies on fresh, aromatic ingredients that come together beautifully. The beauty of a sheet pan dinner is its flexibility, so feel free to adapt based on what you love or have on hand!
-
Chicken: 1.5 lbs boneless, skinless chicken thighs or breasts, cut into 1.5-inch pieces. Chicken thighs offer unparalleled juiciness and flavor, but breasts work too!
- Substitution: Turkey breast or firm tofu (pressed and cubed) can be used. For plant-based, ensure tofu is well-pressed to absorb marinade.
-
Vegetables: 1 lb small red or Yukon Gold potatoes, quartered (or halved if very small); 1 red onion, cut into wedges; 1 red bell pepper, deseeded and chopped into 1-inch pieces; 1 yellow bell pepper, deseeded and chopped into 1-inch pieces; 1 zucchini, chopped into 1-inch rounds.
- Sensory Description: The potatoes offer a grounding earthiness, the onion a sweet-spicy punch, the bell peppers a bright, slightly sweet crunch, and the zucchini a tender, absorbent bite.
- Substitution: Broccoli florets, cauliflower florets, cherry tomatoes, asparagus spears, or Brussels sprouts are excellent additions or replacements. Adjust cooking times for denser vegetables like broccoli or Brussels sprouts by adding them halfway through.
-
For the Marinade/Dressing:
- 1/3 cup olive oil: The foundation for roasting, bringing richness and helping everything brown.
- 1/4 cup fresh lemon juice: For that essential zesty, bright, and tangy kick that cuts through the richness.
- 3 cloves garlic, minced: Aromatic and pungent, adding depth of flavor.
- 1 tablespoon dried oregano: Classic Mediterranean herb with a slightly bitter, earthy note.
- 1 teaspoon dried thyme: Earthy, floral, and slightly minty, pairs beautifully with lemon and chicken.
- 1/2 teaspoon smoked paprika: Adds a hint of smoky depth and a lovely reddish hue.
- Salt and freshly ground black pepper to taste: Essential for enhancing all the other flavors.
-
For Finishing: 4 oz feta cheese, crumbled (about 1 cup).
- Sensory Description: Salty, tangy, and creamy feta melts slightly, creating pockets of delightful richness amongst the roasted ingredients.
- Substitution: Goat cheese or small dollops of ricotta can be used for a milder flavor.
- Optional Garnish: Fresh parsley or dill, chopped. Adds a burst of freshness and color.
Perfect Timing for an Effortless Meal
One of the greatest appeals of this Herby Feta Lemon Chicken Sheet Pan Dinner is its efficiency. Let’s break down the time commitment:
Compared to the average weeknight dinner preparation time of over 45 minutes, this sheet pan meal is a winner for busy evenings, offering a complete, delicious meal with less hands-on effort and significantly less cleanup. The active prep is minimal, leaving you with ample time to relax while it bakes.

Step-by-Step: Crafting Your Sheet Pan Delight
Follow these simple steps to create your spectacular sheet pan dinner. Remember, the key is to get everything on the pan at the right time so it all cooks perfectly.
Step 1: Preheat the Oven & Prep the Veggies
Preheat your oven to 400°F (200°C). Line a large rimmed baking sheet with parchment paper for easy cleanup – trust me, this is a game-changer! If you don’t have parchment, a light greasing with olive oil will suffice, but cleanup will be a bit more involved.
Wash and chop all your vegetables as listed in the ingredients. For the potatoes, ensure they are cut small enough to cook through in the allotted time. If using denser vegetables like broccoli or Brussels sprouts, consider cutting them into slightly larger pieces or plan to add them to the pan about 15-20 minutes into the chicken’s cooking time.
Step 2: Marinate the Chicken
In a medium bowl, whisk together the olive oil, fresh lemon juice, minced garlic, dried oregano, dried thyme, smoked paprika, salt, and pepper. This is your flavor powerhouse!
Add the chicken pieces to the bowl with the marinade. Toss to ensure each piece is well-coated. Let it marinate for at least 10 minutes while you prepare the vegetables, or up to 30 minutes at room temperature for a deeper flavor infusion. If marinating for longer, cover the bowl and refrigerate.
Step 3: Arrange on the Sheet Pan
Add all the prepped vegetables (potatoes, onion, bell peppers, zucchini) to the same bowl that you used for marinating the chicken. Drizzle with a little extra olive oil if they seem dry, and season lightly with salt and pepper. Toss to coat evenly.
Spread the seasoned vegetables in a single layer on the prepared baking sheet. Try not to overcrowd the pan, as this will steam the vegetables rather than roast them. If your pan is too small, use two. It’s crucial for achieving that lovely caramelization!
Now, nestle the marinated chicken pieces amongst the vegetables, ensuring they are also in a single layer and not overlapping too much. This allows for even cooking and browning.
Step 4: Bake to Perfection
Place the baking sheet in the preheated oven. Roast for 30-35 minutes, or until the chicken is cooked through (internal temperature reaches 165°F or 74°C) and the vegetables are tender and slightly caramelized.
About halfway through the cooking time (around 15-20 minutes), you can give the contents of the pan a gentle toss or flip the chicken pieces to promote even browning and cooking. If you’re adding quick-cooking vegetables like broccoli or asparagus, this is the ideal time to add them to the pan.
Step 5: Finish & Serve
Once the chicken is cooked and the vegetables are tender, remove the baking sheet from the oven. Immediately scatter the crumbled feta cheese over the hot chicken and vegetables. The residual heat will soften and slightly melt the cheese, creating a wonderfully creamy texture.
Garnish with fresh chopped parsley or dill, if desired, for a pop of freshness and color. Serve directly from the sheet pan or plate it up. This dish is best enjoyed hot!
Nutritional Snapshot
While exact nutritional values can vary based on specific ingredients and portion sizes, this Herby Feta Lemon Chicken Sheet Pan Dinner is generally a well-balanced meal. A typical serving (approximately 1/4 of the recipe) would include:
- Calories: Around 450-550 kcal
- Protein: Approximately 30-40g (from chicken)
- Fat: Approximately 25-35g (mostly healthy fats from olive oil and chicken)
- Carbohydrates: Approximately 20-30g (from vegetables and potatoes)
- Fiber: Approximately 5-8g
Note: This is an estimate. For precise tracking, it’s recommended to use a nutritional calculator with your specific ingredients and quantities.
Healthier & Flavor-Boosting Swaps
Looking to lighten things up or adjust the flavor profile? Here are some fantastic alternatives:
- Leaner Protein: Opt for chicken breasts instead of thighs, or increase the vegetable components and reduce chicken proportion.
- Reduced Oil: Use a good quality non-stick baking sheet or parchment paper to significantly reduce the amount of olive oil needed. You can get away with just 2 tablespoons for coating everything.
- Veggie Power-Up: Load up on non-starchy vegetables like broccoli, asparagus, cauliflower, or green beans. These add volume, nutrients, and fiber with fewer calories.
- Herbacious Boost: Instead of relying solely on dried herbs, use fresh herbs generously towards the end of cooking or as a garnish. Fresh rosemary, thyme, or a sprinkle of za’atar can add another dimension.
- Spice it Up: Add a pinch of red pepper flakes to the marinade for a gentle kick, or serve with a dollop of Greek yogurt for a cooling contrast.
Serving Suggestions to Elevate Your Dish
This sheet pan dinner is a complete meal on its own, but here are some ways to make it even more spectacular:
- Mediterranean Flair: Serve alongside a simple Greek salad with cucumber, tomatoes, olives, and a light vinaigrette.
- Grain Bowl Base: Spoon the chicken and veggies over cooked quinoa, couscous, or farro for a hearty grain bowl.
- Dipping Sauce: A side of tzatziki sauce or a lemon-tahini dressing is a delicious accompaniment.
- Crusty Bread: Don’t forget some crusty bread or pita to soak up any delicious juices left on the pan!
Avoid These Common Mistakes!
Even simple recipes can have pitfalls. Here’s how to ensure your sheet pan dinner is perfect every time:
- Overcrowding the Pan: This is the most common mistake! Too many ingredients on one pan lead to steaming, not roasting. Use a larger pan or two smaller ones.
- Uneven Cutting: Ensure all vegetables and chicken pieces are cut to a similar size. This guarantees even cooking. Potatoes, in particular, need to be small enough to cook through.
- Not Preheating the Oven: A properly preheated oven is crucial for achieving that beautiful sear and caramelization on your ingredients.
- Adding Feta Too Soon: Feta will melt and disappear if added during the entire baking process. Add it at the very end to enjoy its creamy, slightly melty texture.
- Skipping the Parchment Paper: While not strictly necessary for flavor, it makes cleanup exponentially easier, saving you precious time and effort.
Smart Storing & Reheating
Leftovers are a bonus! Store any delicious remnants properly to enjoy later:
- Storage: Once cooled completely, transfer any leftovers to an airtight container and refrigerate. It should stay fresh for 3-4 days.
- Reheating: For best results, reheat in a moderate oven (around 350°F/175°C) or in a skillet on the stovetop until warmed through. Microwaving can make the chicken and vegetables a bit soft, but it’s the quickest option if convenience is key. You might want to add a squeeze of fresh lemon juice after reheating to brighten the flavors.
The Verdict: Your New Go-To Dinner
This Herby Feta Lemon Chicken Sheet Pan Dinner is the epitome of simple, delicious, and satisfying cooking. It proves that you don’t need hours in the kitchen or complex techniques to create a meal that’s bursting with flavor and appealing to the whole family. The combination of succulent chicken, perfectly roasted vegetables, tangy lemon, and savory feta is a winning formula for any night of the week. It’s versatile, forgiving, and incredibly rewarding. So, the next time you’re wondering what to make for dinner, pull out your sheet pan, gather these simple ingredients, and let the oven do the work. You’ll be amazed at how easy it is to create such a culinary delight!
Tried this recipe? We’d love to hear about it! Share your thoughts in the comments below or tag us on social media. Your feedback inspires us!
Frequently Asked Questions
***Can I use boneless, skinless chicken breasts instead of thighs?***
Absolutely! Chicken breasts are a great option. They cook a little quicker, so keep an eye on them to prevent them from drying out. You might want to cut them into slightly smaller pieces than thighs for more even cooking with the vegetables.
***What vegetables can I substitute?***
The beauty of this recipe is its adaptability! Feel free to use broccoli, cauliflower, asparagus, green beans, sweet potatoes (cut smaller as they take longer to cook), Brussels sprouts, or cherry tomatoes. Just remember that denser vegetables like broccoli and Brussels sprouts might need a head start or be added halfway through the cooking time.
***How do I prevent the vegetables from getting soggy?***
The key is to avoid overcrowding the pan and to ensure your oven is fully preheated to 400°F (200°C). Overcrowding causes steam to build up, preventing the vegetables from achieving that desirable caramelization. Use a large enough baking sheet, or even two, to give everything space.
***Can I make this dairy-free?***
Yes! Simply omit the feta cheese. You can sprinkle a dairy-free feta alternative over the top at the end of cooking, or simply enjoy the delicious lemon-herb flavors without it. A dollop of dairy-free yogurt on the side can also be a great addition.
***How do I know when the chicken is cooked through?***
The safest way is to use a meat thermometer. Chicken is fully cooked when it reaches an internal temperature of 165°F (74°C). Visually, the juices should run clear when pierced with a fork, and the inside should be opaque white.

Herby Feta Lemon Chicken Sheet Pan Dinner | Easy Recipe
Description
Welcome, food enthusiasts! If you’re in the mood for a delicious, easy-to-make dinner that’s bursting with flavor, then you’ve come to the right place. ThisHerby Feta Lemon Chicken and Veggie Sheet Pan Dinneris perfect for weeknights or special family dinners. With juicy chicken, hearty vegetables, and zesty lemon, this dish will become a favorite in no time!
Ingredients
- ½ cupfeta cheese (crumbled)
- ¼ cupolive oil
- 1lemon (freshly squeezed)
- 2cloves garlic (minced)
- 2 tablespoonsparsley (finely chopped)
- 1 tablespoondill (finely chopped)
- 1 tablespoonoregano (finely chopped)
- 1 tablespoonrosemary (finely chopped)
- ½ teaspoonsalt
- ½ teaspoonblack pepper
- ½ teaspoonsumac
- 1lb baby potatoes (chopped into ½” cubes)
- 1 ½ cupsbell peppers (thinly sliced or chopped)
- 1 cupcherry tomatoes
- ½large red onion (thinly sliced)
- 2 tablespoonsolive oil
- ½ teaspoonsalt
- ½ teaspoonblack pepper
- 1 ½lbs boneless, skinless chicken breast
- 1–2lemons (sliced into thick rounds)
- ½ cupfeta (cut into ¼” – ½” cubes)
Instructions
- In a bowl or liquid measuring cup, combine olive oil, crumbled feta, garlic, lemon juice, parsley, dill, oregano, rosemary, salt, pepper, and sumac. Stir everything together until well combined. Set aside the marinade.
- Preheat your oven to 425°F. This high heat will help the chicken cook thoroughly while getting the vegetables tender and slightly crispy.
- On a large, rimmed baking sheet, spread out the chopped potatoes, bell peppers, tomatoes, and red onion. Drizzle with olive oil, then sprinkle with salt and pepper. Toss everything to ensure even coating and spread them into a single layer.
- Nestle the chicken breasts among the vegetables on the sheet pan. Pour the prepared marinade over the chicken, ensuring both sides of each breast are coated. Lay lemon slices on top of the chicken.
- Bake the sheet pan in the oven for 35-40 minutes, rotating the pan halfway through. The chicken is done when an instant-read thermometer inserted in the thickest part of the breast registers 165°F.
- During the last 10 minutes of baking, sprinkle the feta cubes on top of the chicken and vegetables. This gives the feta time to soften without fully melting.
- Once done, remove the pan from the oven. Squeeze the roasted lemon slices over the chicken and vegetables for an extra punch of citrus. Garnish with additional fresh herbs if desired. Serve and enjoy!
Notes
Use Fresh Ingredients:Always use freshly squeezed lemon juice and fresh herbs for the best flavor.
Substitutions:You can swap the chicken breasts for chicken thighs if you prefer a juicier cut of meat.
Potato Alternatives:If you don’t have baby potatoes, try using sweet potatoes or even butternut squash for a slightly different flavor.
“`