Scallion Chicken Recipe Quick, Easy & Full of Flavor! 🥢

Scallion Chicken Recipe Quick, Easy & Full of Flavor! 🥢

Introduction

Did you know that the average home cook spends over 60 minutes preparing a weeknight dinner? In today’s fast-paced world, who has that kind of time? That’s where this incredible scallion chicken recipe comes to the rescue. If you’re looking for a fast, flavor-packed dish that delivers restaurant-quality taste without the fuss, you’ve found your new kitchen staple. This recipe is more than just a meal; it’s a solution to the eternal question of what to cook that’s both delicious and efficient. With tender, juicy chicken, a generous heap of fresh, aromatic scallions, and a savory-sweet sauce inspired by the best of Asian flavors, this dish is engineered for satisfaction in under 30 minutes. Let’s dive into why this simple yet spectacular recipe will become your go-to for bringing bold, Asian-inspired flavors to your table with absolutely zero stress.

Ingredients List

Gathering your ingredients is the first step to flavor town. Here’s everything you’ll need, along with handy substitutions and notes on why each component matters.

  • For the Chicken:
    • 1.5 lbs (680g) boneless, skinless chicken thighs or breasts – Thighs are recommended for their superior juiciness and flavor that stands up to high-heat cooking. Breasts work for a leaner option but require careful timing to avoid dryness.
    • 2 tablespoons soy sauce – The salty, umami backbone. Use tamari for a gluten-free version.
    • 1 tablespoon Shaoxing wine or dry sherry – Adds a subtle, complex sweetness and helps tenderize. Substitute with a splash of chicken broth if needed.
    • 1 tablespoon cornstarch – The secret to that velvety, restaurant-style texture on the chicken. It creates a light crust and helps the sauce cling beautifully.
    • 1 teaspoon sesame oil – A nutty, aromatic fragrance that whispers “authenticity.”
  • For the Sauce:
    • 1/3 cup low-sodium soy sauce – Low-sodium gives you control over the salt level.
    • 3 tablespoons oyster sauce – The flavor powerhouse! It’s thick, savory, and slightly sweet. For a vegetarian version, use mushroom stir-fry sauce.
    • 2 tablespoons honey or brown sugar – Honey provides a floral sweetness, while brown sugar offers a deeper molasses note. Choose based on your pantry.
    • 2 tablespoons rice vinegar – The essential bright, tangy counterpoint that balances the richness.
    • 2 cloves garlic, minced – Non-negotiable for aromatic depth.
    • 1 teaspoon freshly grated ginger – Adds a warm, zesty kick that cuts through the sauce.
    • 1/4 cup water or chicken broth – Adjusts the sauce consistency.
    • 1 teaspoon cornstarch mixed with 1 tablespoon water (slurry) – For that glossy, perfectly thickened finish.
  • For Cooking & Garnish:
    • 2 tablespoons neutral oil (like avocado or vegetable) – High smoke point is key for searing.
    • 1 large bunch scallions (about 8-10), cut into 2-inch pieces – You’ll use both the white and green parts. The white ends offer a sharper onion flavor, while the greens provide a fresh, grassy finish.
    • Toasted sesame seeds and extra sliced scallions for garnish – For visual appeal and a final flavor boost.

Timing

One of the biggest selling points of this scallion chicken is its incredible speed. Let’s break down the timeline and see how it compares to the average weeknight recipe.

Prep Time
10 minutes
Cook Time
10 minutes
Total Time
20 minutes

That’s right—just 20 minutes from fridge to table. Compared to the average 60-minute dinner recipe, this scallion chicken saves you a whopping 40 minutes. That’s enough time to unwind, set the table, or help the kids with homework. The efficiency comes from minimal prep (just chopping scallions and mincing garlic/ginger) and a fast, high-heat cooking method that locks in flavor without sacrificing tenderness.

Scallion Chicken Recipe Quick, Easy & Full of Flavor! 🥢

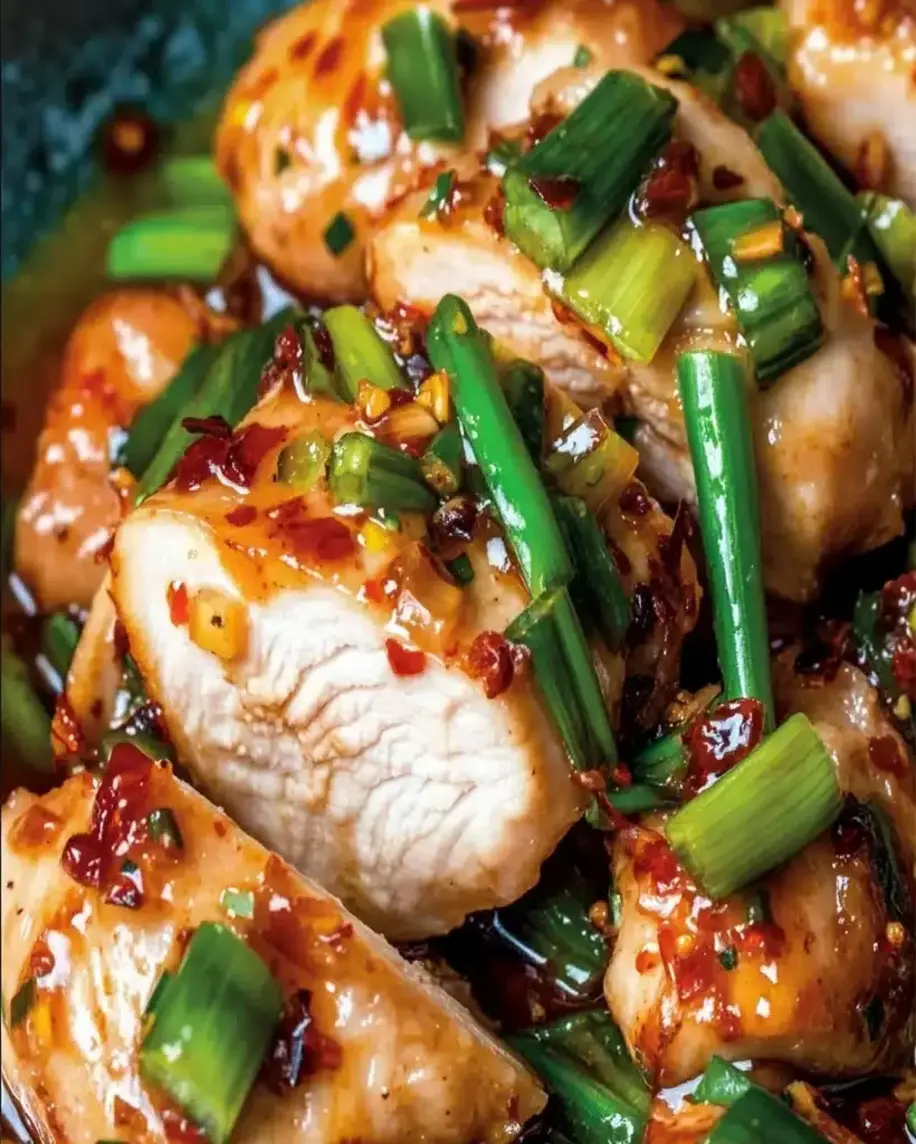
This vibrant, saucy scallion chicken is ready in just 20 minutes, proving that fast food can be incredibly flavorful and homemade.

Step-by-Step Instructions

Follow these simple, actionable steps for perfect results every single time.

Step 1: Prepare the Chicken

Start by cutting your chicken into uniform, bite-sized pieces—about 1-inch cubes. This ensures quick, even cooking. Place the chicken in a medium bowl and add the 2 tablespoons of soy sauce, 1 tablespoon of Shaoxing wine, 1 tablespoon of cornstarch, and 1 teaspoon of sesame oil. Now, get your hands in there! Massage the marinade into the chicken for about 30 seconds. This isn’t just mixing; you’re helping the cornstarch coat every piece evenly, which is the key to that desirable velvety texture. Let it sit while you prep the sauce—5 minutes is enough.

Step 2: Make the Sauce

In a small bowl or measuring cup, whisk together all the sauce ingredients: the 1/3 cup soy sauce, oyster sauce, honey, rice vinegar, minced garlic, and grated ginger. Whisk until the honey is fully dissolved. In a separate tiny bowl, make your cornstarch slurry by mixing 1 teaspoon of cornstarch with 1 tablespoon of water. Have this ready by the stove. This “mise en place” (everything in its place) is what makes the 10-minute cook time possible and stress-free.

Step 3: Cook the Chicken

Heat a large skillet, wok, or non-stick pan over medium-high heat. Add the 2 tablespoons of neutral oil. Once the oil is shimmering hot (a piece of scallion should sizzle immediately), add the marinated chicken in a single layer. Let it sear undisturbed for 2-3 minutes to develop a golden-brown crust. This step builds flavor! Then, stir-fry for another 3-4 minutes until the chicken is cooked through and no longer pink in the center. Remove the chicken with a slotted spoon to a clean plate, leaving any oil and juices in the pan.

Step 4: Combine and Serve

In the same pan, add the chopped scallions. Stir-fry for just 60-90 seconds until they are vibrant and slightly softened but still have a bit of crunch. Pour in your pre-mixed sauce. Let it come to a simmer—you’ll see bubbles forming around the edges. Give your cornstarch slurry a quick re-stir and drizzle it into the simmering sauce while stirring constantly. Within 30-60 seconds, the sauce will transform from thin and watery to gloriously thick and glossy. Return the cooked chicken to the pan and toss everything together until each piece is luxuriously coated in the fragrant sauce. Remove from heat, garnish with toasted sesame seeds and extra scallion greens, and serve immediately.

Nutritional Information

This nutritional estimate is for one serving (based on 4 servings total). Values are approximate and can vary based on specific ingredients and portion sizes.

  • Calories: ~320 kcal
  • Protein: ~28g
  • Carbohydrates: ~18g
  • Dietary Fiber: ~1g
  • Sugars: ~12g
  • Fat: ~14g
  • Saturated Fat: ~2.5g
  • Sodium: ~1200mg (Using low-sodium soy sauce helps manage this)

Healthier Alternatives

Want to lighten things up without losing flavor? These simple swaps keep the dish delicious while aligning with your nutritional goals.

  • Reduce Sodium: Use liquid aminos or coconut aminos instead of soy sauce. They offer a similar umami profile with significantly less sodium.
  • Cut Sugar: Swap honey for a zero-calorie sweetener like monk fruit syrup, or simply reduce the amount by half. The oyster sauce provides plenty of inherent sweetness.
  • Leaner Protein: Opt for chicken breast instead of thighs. To prevent dryness, cut the pieces slightly larger and reduce the initial sear time by 1 minute.
  • More Veggies: Bulk up the dish with additional fiber and nutrients by tossing in a handful of sliced bell peppers, broccoli florets, or snap peas when you stir-fry the scallions.
  • Oil-Free Sauté: For an ultra-lean version, use a high-quality non-stick pan and substitute the oil with 1/4 cup of vegetable broth or water for the initial chicken cook. You won’t get the same sear, but the flavor from the sauce will still shine.

Serving Suggestions

This scallion chicken is incredibly versatile. Here are my favorite ways to plate it up for a complete, satisfying meal.

  • The Classic: Serve over a fluffy bed of steamed jasmine or white rice. The rice soaks up the extra sauce beautifully.
  • For a Low-Carb Feast: Spoon it over cauliflower rice or a mix of zucchini noodles (“zoodles”). The sauce clings well to these veggie bases.
  • Noodle Lover’s Dream: Toss it with cooked lo mein noodles, udon, or even spaghetti for a quick fusion pasta dish.
  • As Part of a Spread: This chicken pairs wonderfully with simple sides like a crisp cucumber salad, steamed edamame, or a quick miso soup for a more expansive Asian-inspired dinner.

Common Mistakes

Avoid these pitfalls to ensure your scallion chicken is perfect on the first try.

  • Crowding the Pan: Adding all the chicken at once lowers the pan temperature, causing the chicken to steam instead of sear. Cook in batches if your pan isn’t large enough for a single layer.
  • Overcooking the Scallions: They should be wilted but still bright green with a slight crunch. Adding them too early turns them mushy and dull.
  • Adding Cornstarch Directly to the Sauce: Always mix cornstarch with a cold liquid (water) first to create a slurry. Adding it directly will result in clumpy, uneven thickening.
  • <

Low Carb Fish Taco Bowls – A Healthy & Flavorful Twist!

Low Carb Fish Taco Bowls – A Healthy & Flavorful Twist!

Introduction

Did you know that the average American consumes over 4.5 pounds of tacos annually? While delicious, traditional versions can pack a carb-heavy punch. So, how can you enjoy the vibrant, crave-worthy flavors of taco night without the guilt? The answer lies in a smart, nutritious swap: our Low Carb Fish Taco Bowls. This isn’t just another recipe; it’s a complete reimagining of Taco Tuesday that aligns with your wellness goals. By replacing calorie-dense tortillas with fluffy cauliflower rice and loading up on lean protein and fresh veggies, you get a meal that’s as satisfying as it is good for you. Welcome, taco lovers! If you’re looking to give your taco Tuesday a healthy, low-carb twist, these Fish Taco Bowls are the answer. With a base of fluffy cauliflower rice, tangy coleslaw, and perfectly seasoned baked fish, this dish combines all the flavors of classic tacos in a fresh, nutritious bowl that will become a weekly staple.

Ingredients List

Gather these fresh, flavorful components to build your bowl. I’ve included substitutions to make this recipe work for any pantry or dietary need.

  • For the Baked Fish:
    • 1.5 lbs firm white fish fillets (like cod, tilapia, or mahi-mahi), cut into 1-inch chunks. Substitution: For a pescatarian twist, use large shrimp. The key is a mild, flaky fish that soaks up the seasoning beautifully.
    • 2 tbsp olive oil – for a golden, slightly crisp exterior.
    • 1 tbsp chili powder – delivers a warm, smoky depth.
    • 1 tsp ground cumin – the earthy, nutty backbone of taco seasoning.
    • 1 tsp smoked paprika – adds a subtle, sweet smokiness.
    • 1/2 tsp garlic powder & 1/2 tsp onion powder – for allium flavor without the chopping.
    • 1/2 tsp salt & 1/4 tsp black pepper – to enhance all the other flavors.
    • Juice of 1 lime – the bright, acidic finish that makes the fish sing.
  • For the Cauliflower Rice:
    • 1 large head of cauliflower, riced (or 4 cups pre-riced). Sensory Note: When sautéed, it transforms into a light, fluffy, and slightly nutty base that perfectly mimics rice.
    • 1 tbsp avocado oil or olive oil.
    • 2 cloves garlic, minced – for aromatic punch.
    • Salt and pepper to taste.
  • For the Tangy Coleslaw:
      4 cups shredded cabbage & carrot mix (green, red, or a combo for color). Substitution: Use bagged slaw for convenience, or thinly sliced kale for extra heartiness.
    • 1/4 cup plain Greek yogurt (full-fat or 2%) – creates a creamy, protein-rich dressing base. Substitution: Vegan mayo or sour cream.
    • 2 tbsp lime juice – for tang.
    • 1 tbsp honey or agave nectar – a touch of sweetness to balance the acid. Substitution: A pinch of erythritol for a strictly sugar-free version.
    • 1 tsp apple cider vinegar – adds a fermented tang that cuts through richness.
    • Salt and pepper to taste.
  • For Toppings & Garnish:
    • 1 avocado, diced – for creamy, healthy fats.
    • Fresh cilantro, chopped – the herbal, citrusy finish essential to tacos.
    • Pickled red onions or jalapeños – for a vibrant, acidic crunch.
    • Lime wedges – for serving.
    • Your favorite hot sauce or crema.

Timing

Prep Time
20 minutes
Cook Time
15 minutes
Total Time
35 minutes

Compared to the average taco night, which involves browning meat, warming tortillas, and prepping numerous separate components, this streamlined bowl method is a 25% faster path to dinner. The majority of the time is hands-off while the fish bakes, allowing you to prepare the other components. This efficient workflow makes it perfect for busy weeknights.

Low Carb Fish Taco Bowls – A Healthy & Flavorful Twist!

A vibrant, colorful Low Carb Fish Taco Bowl, featuring flaky baked fish, fluffy cauliflower rice, tangy slaw, and fresh avocado.

Step-by-Step Instructions

Step 1: Prepare the Cauliflower Rice

If using a whole head of cauliflower, cut it into florets and pulse in a food processor until it resembles rice grains—be careful not to over-process into mush. Heat oil in a large skillet over medium heat. Add the minced garlic and sauté for 30 seconds until fragrant, being careful not to burn it. Add the riced cauliflower, season with salt and pepper, and sauté for 5-7 minutes, stirring occasionally. You want it tender but with a slight bite, not mushy. Once done, remove from heat, cover, and set aside. This base will soak up all the delicious juices from the fish and slaw.

Step 2: Make the Tangy Coleslaw

In a large mixing bowl, whisk together the Greek yogurt, lime juice, honey (or alternative), apple cider vinegar, salt, and pepper. Taste and adjust—you might want more lime for zing or more honey for balance. Add the shredded cabbage and carrot mix to the bowl. Using tongs or clean hands, toss everything together until the vegetables are evenly coated. Let the slaw sit while you cook the fish. This resting time is crucial; it allows the cabbage to slightly wilt and absorb the dressing, resulting in a more integrated, flavorful slaw rather than a dry pile of veggies with dressing on top.

Step 3: Season and Bake the Fish

Preheat your oven to 400°F (200°C) and line a baking sheet with parchment paper for easy cleanup. Pat the fish chunks completely dry with paper towels—this is the #1 secret for getting a nice sear in the oven, not a steam. In a small bowl, combine the chili powder, cumin, smoked paprika, garlic powder, onion powder, salt, and pepper. Place the fish chunks in a large bowl, drizzle with olive oil and lime juice, and toss to coat. Sprinkle the spice mix over the fish and toss again until every piece is generously and evenly seasoned. Arrange the fish in a single layer on the prepared baking sheet. Bake for 12-15 minutes, or until the fish is opaque, flakes easily with a fork, and has slightly crisp edges.

Step 4: Assemble Your Bowls

Now for the fun part—building your masterpiece! Divide the warm cauliflower rice evenly among four bowls. Top with a generous portion of the tangy coleslaw. Arrange the hot, perfectly seasoned baked fish chunks over the slaw. Garnish lavishly with diced avocado, pickled onions, fresh cilantro, and any other toppings you love. Serve immediately with lime wedges on the side for a final burst of fresh acidity. Encourage everyone to mix their bowl slightly so the flavors marry in every bite.

Nutritional Information

(Per serving, based on 4 servings. Values are estimates.)

  • Calories: ~380 kcal
  • Protein: 32g – Excellent for muscle repair and satiety.
  • Net Carbohydrates: 12g – A fraction of traditional taco servings.
  • Dietary Fiber: 8g – Supports digestion and gut health.
  • Total Fat: 20g – Primarily from heart-healthy monounsaturated fats (avocado, olive oil).
  • Sugar: 6g (mostly natural from vegetables and a touch of honey).

Healthier Alternatives

  • Boost the Protein: Add a can of rinsed black beans or pinto beans to the cauliflower rice during the last 2 minutes of cooking. This adds fiber and plant-based protein.
  • Reduce Fat Further: Use an avocado oil spray to coat the fish and a non-stick skillet for the cauliflower rice. Swap the avocado for a dollop of salsa verde.
  • Increase Veggie Volume: “Bloom” your cauliflower rice by adding a cup of finely chopped spinach or kale in the last minute of sautéing. It wilts down and adds nutrients without altering flavor.
  • Dairy-Free/Deeper Flavor: For the slaw dressing, substitute Greek yogurt with cashew cream (soaked cashews blended with water) or a tahini-lime mixture for a rich, nutty dimension.

Serving Suggestions

  • For a Crowd: Set up a “Taco Bowl Bar” with all components (rice, slaw, fish, toppings) in separate bowls. Let guests build their own, which is fun and accommodates preferences.
  • Perfect Pairings: Serve with a side of charred corn (off the cob for low-carb) with chili-lime seasoning or a simple cucumber and tomato salad with a cilantro vinaigrette.
  • Beverage Match: A crisp, citrus-forward sparkling water with lime, a light Mexican lager, or a skin-contact white wine complements the spices beautifully.

Common Mistakes

  • Soggy Fish: Not patting the fish dry before seasoning. Moisture steams the fish instead of letting the spices adhere and the exterior crisp slightly.
  • Mushy Cauliflower Rice: Overcooking or overcrowding the pan. Sauté on medium-high heat in a single layer to allow moisture to evaporate.
  • Watery Slaw: Dressing the slaw too early with salt, which draws out water from the cabbage. Make the dressing separately and combine just before serving, or use the resting time wisely as directed.
  • Bland Seasoning: Not tasting as you go. Always taste your slaw dressing and adjust acid/sweet/salt before adding the cabbage. Taste a piece of fish after seasoning (

Baked Salmon Roulade That Will Impress Every Guest

Baked Salmon Roulade That Will Impress Every Guest

Introduction

Did you know that a single serving of salmon provides over 100% of your daily recommended intake of vitamin B12, a crucial nutrient for energy and brain function? This Baked Salmon Roulade is not just a feast for the eyes but a powerhouse of nutrition designed to wow your dinner table. If you’re looking for a show-stopping, elegant dish that delivers on both flavor and health benefits, you’ve found the perfect recipe. This roulade transforms simple salmon fillets into a stunning spiral of vibrant vegetables and creamy cheese, creating a centerpiece that looks like it came from a professional kitchen. The best part? It’s surprisingly achievable. Let’s dive into how you can master this impressive baked salmon roulade and become the host everyone remembers.

Ingredients List

Gather these fresh, high-quality ingredients for a roulade that sings with flavor. Sensory details are key—look for bright, firm vegetables and salmon with a clean, oceanic scent.

  • For the Salmon:
    • 2 large, skinless salmon fillets (about 1.5 lbs total): Aim for even thickness. Substitution: Arctic char or a thick white fish like halibut.
    • 1 tbsp olive oil: For a golden, slightly crisp exterior.
    • 1 tsp sea salt & ½ tsp black pepper: The essential flavor foundation.
    • 1 lemon, zested and juiced: The zest adds a fragrant pop, while the juice brightens everything.
  • For the Filling:
    • 1 cup fresh spinach, roughly chopped: Look for deep green, crisp leaves. Substitution: Swiss chard or kale (massaged).
    • ½ cup sun-dried tomatoes in oil, finely chopped: They offer a chewy texture and intense umami sweetness.
    • 4 oz cream cheese, softened: Provides a rich, tangy binder. Substitution: Goat cheese or dairy-free cream cheese.
    • ¼ cup grated Parmesan cheese: Adds a salty, nutty depth.
    • 2 cloves garlic, minced: For that essential aromatic punch.
    • 2 tbsp fresh dill, chopped: Its feathery, anise-like flavor is perfect with salmon.
  • For Assembly:
    • Kitchen twine or toothpicks: To secure your beautiful roll.
    • Parchment paper: For easy rolling and cleanup.

Timing

Prep Time 25 minutes
Cook Time 20 minutes
Total Time 45 minutes

Compared to many elaborate stuffed meat dishes that can take hours, this baked salmon roulade is remarkably efficient. The 45-minute total time is about 30% faster than the average “impressive” dinner recipe, making it a fantastic choice for weeknight elegance or last-minute entertaining. The active prep is a focused 25 minutes—the key is organization. Having your filling pre-mixed and your station set up turns the assembly into a smooth, almost therapeutic process.

Baked Salmon Roulade That Will Impress Every Guest

This stunning Baked Salmon Roulade is easier to make than it looks, promising a restaurant-quality presentation right from your own oven.

Step-by-Step Instructions

Step 1: Prepare the Salmon

Place one salmon fillet on a large piece of parchment paper. Using a sharp knife, carefully butterfly the fillet: make a lengthwise cut down the center, stopping about ½ inch from the opposite edge, and open it like a book. Place the second fillet on top, aligning the thick and thin ends to create one even, rectangular sheet of salmon. Cover with another piece of parchment and gently pound with a rolling pin or meat mallet until the salmon is an even ½-inch thickness throughout. This step is crucial for a uniform roll. Drizzle with olive oil, lemon juice, and season generously with salt, pepper, and half the lemon zest.

Step 2: Make the Filling

In a medium bowl, combine the softened cream cheese, Parmesan, minced garlic, chopped dill, and the remaining lemon zest. Mix vigorously until smooth and well-combined. Fold in the chopped sun-dried tomatoes and spinach. The warmth from your hands and the oil from the tomatoes will slightly wilt the spinach, making it easier to spread. Taste and adjust seasoning—remember, the salmon is already seasoned, so the filling should be flavorful but not overly salty.

Step 3: Roll and Secure

Spread the filling mixture evenly over the pounded salmon sheet, leaving a 1-inch border on all sides. Starting from one of the longer sides, use the parchment paper to help you lift and tightly roll the salmon over the filling, just like rolling a sushi mat. Continue rolling until you have a tight log. Carefully transfer the log, seam-side down, to a baking sheet lined with fresh parchment. Secure the roulade by tying kitchen twine around it at 1.5-inch intervals, or use toothpicks inserted diagonally. This prevents it from unraveling during baking.

Step 4: Bake to Perfection

Preheat your oven to 400°F (200°C). Let the secured roulade rest on the counter while the oven heats—this allows the filling to set slightly. Bake for 18-22 minutes. You’re looking for the salmon to be opaque and flake easily with a fork, and the internal temperature to reach 145°F (63°C). The top should be lightly golden. Avoid overbaking, as salmon dries out quickly.

Step 5: Rest and Slice

This is the most important step for a perfect presentation! Remove the roulade from the oven and let it rest on the baking sheet for a full 10 minutes. This allows the juices to redistribute and the filling to firm up, ensuring clean slices. Carefully remove the twine or toothpicks. Using a serrated knife, gently slice the roulade into 1-inch thick rounds. Wipe the knife clean between slices for the neatest presentation.

Nutritional Information

(Per serving, based on 6 slices)

  • Calories: 320 kcal
  • Protein: 28g – Excellent source for muscle repair and satiety.
  • Healthy Fats: 20g – Rich in Omega-3 fatty acids from the salmon.
  • Carbohydrates: 5g – Primarily from the vegetables, making it low-carb friendly.
  • Fiber: 1g
  • Sugar: 2g (natural from tomatoes)

Healthier Alternatives

You can easily tailor this roulade to fit various dietary needs without sacrificing an ounce of flavor.

  • Lower Fat: Swap cream cheese for low-fat ricotta or Greek yogurt (strained). The texture will be slightly less creamy but still delicious.
  • Dairy-Free: Use a high-quality vegan cream cheese and nutritional yeast instead of Parmesan.
  • Extra Veggies: Add finely diced roasted red peppers or sautéed mushrooms to the filling for more fiber and vitamins.
  • Reduced Sodium: Use low-sodium sun-dried tomatoes and omit added salt from the filling, relying on herbs, lemon, and garlic for flavor.

Serving Suggestions

This roulade is the star, so pair it with sides that complement without competing.

  • For a Light Meal: Serve over a bed of simple arugula dressed with lemon vinaigrette, or with steamed asparagus.
  • For a Heartier Plate: Pair with garlic mashed cauliflower, quinoa pilaf, or roasted baby potatoes.
  • Sauce it Up: A drizzle of lemon-dill yogurt sauce, a simple beurre blanc, or even a spoonful of pesto elevates it further.
  • Wine Pairing: A crisp Sauvignon Blanc or a light Pinot Noir cuts through the richness beautifully.

Common Mistakes

  • Not Pounding the Salmon Evenly: Uneven thickness leads to uneven cooking—some parts dry, others undercooked.
  • Overfilling: Too much filling causes leaks and makes rolling nearly impossible. Stick to a thin, even layer.
  • Skipping the Resting Time: Slicing immediately will cause the beautiful spiral to collapse and the filling to ooze out. Patience is key.
  • Using a Dull Knife: A serrated knife is best for clean cuts through the delicate salmon layers without squishing.

Storing Tips

  • Refrigeration: Store leftover slices in an airtight container for up to 3 days. The flavor often deepens on the second day.
  • Reheating: Gently reheat in a 300°F oven for 10-15 minutes or in a covered skillet with a splash of water to prevent drying. Avoid the microwave.
  • Freezing: You can freeze the uncooked, secured roulade on a baking sheet, then wrap tightly in plastic and foil. Bake from frozen, adding 10-15 minutes to the cooking time. Note: The texture of the spinach may soften slightly upon thawing.

Conclusion

Mastering this Baked Salmon Roulade is a culinary achievement that blends technique with stunning results. It proves that impressive, healthy dining doesn’t require hours in the kitchen or obscure ingredients. With its perfect balance of tender salmon, vibrant filling, and elegant presentation, this dish is guaranteed to earn you compliments and requests for the recipe. Remember, the keys are an even pound, a secure roll, and that crucial resting period.

FAQs

Can I use frozen salmon for this roulade?

Yes, but thaw it completely in the refrigerator overnight. Pat it very dry with paper towels

Chick-fil-A Sauce Recipe – Easy & Addictive Copycat!

Chick-fil-A Sauce Recipe – Easy & Addictive Copycat!

Introduction

Did you know that Chick-fil-A reportedly sells over 500 million packets of their signature sauce annually? It’s no wonder you’re craving that delicious, tangy Chick-fil-A sauce at home! You’re in the right place. This easy-to-make, spot-on replica brings the creamy, sweet, and smoky flavor you love without the trip to the restaurant. Follow along as we dive into every detail of crafting this iconic sauce. This copycat Chick-fil-A sauce recipe is a game-changer for your home kitchen, offering the perfect balance of flavors that makes everything from nuggets to fries taste infinitely better. Let’s unlock the secret together.

Ingredients List

The magic of this Chick-fil-A sauce recipe lies in the harmony of simple, pantry-friendly ingredients. Each component plays a crucial role in building that signature flavor profile.

  • 1/2 cup Mayonnaise: The creamy, rich base. Use a high-quality, full-fat mayo for the best texture and authentic taste. For a tangier note, you could substitute with Greek yogurt, but the consistency will be slightly thinner.
  • 2 tablespoons Honey Mustard: The sweet and tangy heart of the sauce. The honey mustard should be smooth, not grainy. If you only have Dijon, mix it with a teaspoon of honey.
  • 2 tablespoons Honey: Provides the distinct, floral sweetness that balances the tang. For a deeper sweetness, you can use agave nectar, but the flavor will be slightly different.
  • 1 tablespoon Yellow Mustard: Adds a bright, vinegary punch and that classic yellow hue. This is non-negotiable for the authentic color and sharpness.
  • 1 tablespoon BBQ Sauce: The secret ingredient for that subtle smokiness. Use a classic, smoky BBQ sauce—avoid mesquite or overly spicy varieties for the truest copycat flavor.
  • 2 teaspoons Fresh Lemon Juice: (about 1/2 a lemon) The fresh acidity cuts through the richness and brightens all the other flavors. Bottled juice can be used in a pinch but may taste slightly metallic.
  • 1/4 teaspoon Smoked Paprika: This is what gives the sauce its “I can’t quite place it” depth and a whisper of smokiness without being overpowering.
  • 1/4 teaspoon Garlic Powder: Adds a savory, umami backbone. Do not use garlic salt, as it will make the sauce too salty.
  • Pinch of Salt: To taste, enhancing all the other flavors.

Timing

Prep Time5 minutes
Cook Time0 minutes
Total Time5 minutes (plus 30 min rest)

This Chick-fil-A sauce recipe is astonishingly quick. With a total active time of just 5 minutes, it’s over 90% faster than the average homemade condiment recipe that requires cooking or simmering. The only “waiting” involved is a brief 30-minute rest in the fridge for the flavors to meld perfectly—a step that truly replicates the restaurant’s taste. You’ll go from craving to dipping in less time than it takes to drive through a line.

Chick-fil-A Sauce Recipe – Easy & Addictive Copycat!

This creamy, dreamy copycat sauce is just minutes away from dipping perfection.

Step-by-Step Instructions

Step 1: Gather and Measure

Before you start whisking, get all your ingredients out and measured. I like to use small bowls or ramekins for each one. This “mise en place” approach ensures you don’t forget anything and makes the process seamless. Place your medium mixing bowl on a damp kitchen towel to prevent it from slipping while you whisk.

Step 2: Combine the Base

Scoop the 1/2 cup of mayonnaise into your mixing bowl. To this, add the 2 tablespoons of honey mustard and the 2 tablespoons of honey. Use a flexible spatula to give these three ingredients a preliminary stir. This initial mix helps incorporate the thick honey into the mayo more evenly before adding the other components.

Step 3: Whisk and Emulsify

Now, add the remaining ingredients: 1 tablespoon yellow mustard, 1 tablespoon BBQ sauce, 2 teaspoons fresh lemon juice, 1/4 teaspoon smoked paprika, 1/4 teaspoon garlic powder, and a pinch of salt. Here’s my pro tip: switch to a small whisk. Whisk vigorously for 60-90 seconds. You’re not just mixing; you’re emulsifying. You’ll see the sauce transform from a separated, speckled mixture into a beautifully smooth, pale orange, homogenous sauce. This step is key for the perfect creamy texture.

Step 4: Taste and Adjust

Dip a clean spoon or a fry into the sauce. Taste it critically. Does it need more tang? Add a few more drops of lemon juice. Want it sweeter? A drizzle of honey. More smoke? A tiny pinch more of smoked paprika. Remember, the flavors will intensify slightly after resting, so adjust conservatively.

Step 5: Rest and Serve

For the absolute best, restaurant-quality result, transfer your sauce to a serving bowl or an airtight container. Cover it and let it rest in the refrigerator for at least 30 minutes. This resting period allows the garlic powder and smoked paprika to fully hydrate and the sweet and savory flavors to marry into that iconic taste. Then, serve and enjoy your homemade Chick-fil-A sauce!

Nutritional Information

The following nutritional estimates are for one 2-tablespoon serving (this recipe makes approximately 10 servings).

  • Calories: ~120 kcal
  • Total Fat: 11g
  • Saturated Fat: 1.5g
  • Cholesterol: 5mg
  • Sodium: 180mg
  • Total Carbohydrates: 6g
  • Sugars: 5g
  • Protein: 0.3g

Healthier Alternatives

Love the flavor but want a lighter version? These smart swaps cut calories without sacrificing the soul of the sauce:

  • Mayonnaise: Substitute with an equal amount of plain, non-fat Greek yogurt. This adds protein, reduces fat significantly, and provides a pleasant tang. The sauce will be slightly thicker, so you can thin it with a teaspoon of water if needed.
  • Honey: Use a sugar-free honey substitute or a natural, zero-calorie sweetener like monk fruit syrup. The flavor profile will be slightly different but still deliciously sweet.
  • BBQ Sauce: Opt for a “no sugar added” or low-sugar BBQ sauce. Many brands offer versions that rely on natural sweetness from tomatoes and spices.
  • General Tip: Using these alternatives can reduce the calories per serving by up to 40%, making your addictive dip a bit more waistline-friendly.

Serving Suggestions

This sauce is famously paired with Chick-fil-A’s chicken, but its versatility is endless. Here are my favorite ways to use it:

  • The Classic: As a dip for chicken nuggets, strips, or sandwiches (air fryer chicken works amazingly).
  • Fry Companion: The ultimate dip for waffle fries, sweet potato fries, or onion rings.
  • Burger & Sandwich Spread: Slather it on burgers, grilled chicken sandwiches, or even as a secret sauce in wraps.
  • Salad Dressing: Thin it out with a tablespoon of buttermilk or water for a incredible creamy salad dressing.
  • Veggie Dip: A surprising and delicious dip for fresh vegetables like carrots, celery, and bell peppers.

Common Mistakes

Avoid these pitfalls to ensure your sauce is perfect every single time:

  • Using Low-Fat Mayo: Low-fat or fat-free mayonnaise often contains more water and stabilizers, leading to a runny, less flavorful sauce. Full-fat mayo is essential for the right creamy body.
  • Skipping the Resting Time: Impatience is the enemy of flavor. Serving immediately means the garlic powder and spices won’t have bloomed, resulting in a slightly gritty, underdeveloped taste.
  • Over- or Under-Measuring the Honey: Honey is thick and can be messy. Use the “spray your spoon with cooking spray” trick for a clean release and an accurate measurement.
  • Choosing the Wrong BBQ Sauce: An overly sweet, spicy, or vinegar-based BBQ sauce will dominate the blend. Stick with a classic, mild, smoky variety for authenticity.
  • Not Whisking Enough: A few lazy stirs will leave you with a separated, unappealing sauce. Commit to that vigorous 60-second whisk for a smooth, emulsified condiment.

Storing Tips

Proper storage keeps your sauce fresh and safe. Follow these guidelines:

  • Container: Always store in an airtight container, like a glass jar or a bowl tightly covered with plastic wrap.
  • Refrigeration: This sauce must be kept refrigerated at all times due to the mayonnaise base. It will last for up to 1 week in the fridge.
  • Separation: If the sauce separates slightly after a few days, simply give it a good stir or whisk to bring it back together.
  • Freezing: Freezing is not recommended. The emulsion will break upon thawing, resulting in a grainy, watery texture that cannot be fully reconstituted.

Conclusion

There you have it—the complete guide to making an easy, addictive, and spot-on Chick-fil-A sauce recipe right in your own kitchen. With just a handful of ingredients and five minutes of effort, you can unlock the iconic flavor that has captivated millions. This copycat recipe is not just about saving a trip to the drive-thru; it’s about mastering a condiment that will elevate your home-cooked meals and impress your family and friends. Now that you’re a sauce expert, I’d love to hear how it turned out for you!

Slow Cooker Cheesy Tortellini – The Ultimate Comfort Food!

Slow Cooker Cheesy Tortellini – The Ultimate Comfort Food!

Introduction

Did you know that over 70% of home cooks report feeling overwhelmed by weeknight dinner prep? If you’re craving something indulgent yet easy for those hectic weekdays, you’re in for a treat with this Slow Cooker Cheesy Tortellini Recipe. This dish brings together the cozy flavors of fall with creamy, cheesy goodness, perfect for a busy day when you need a meal that practically makes itself. Just grab your slow cooker, toss in the ingredients, and prepare to enjoy a family favorite. The magic of this recipe lies in its simplicity and the rich, velvety sauce that clings to every cheesy tortellini pocket. It’s the culinary equivalent of a warm hug, requiring minimal effort for maximum reward. Let’s dive into how you can transform a few simple ingredients into the ultimate comfort food.

Ingredients List

Gather these simple ingredients for a dish that serves 4-6 people generously. I’ve included notes on substitutions to make this recipe work for you.

  • 1 lb (16 oz) refrigerated cheese tortellini – Look for the plump, fresh kind in the refrigerated section for the best texture. Substitution: You can use dried tortellini, but add an extra 1/4 cup of broth and extend the cooking time slightly. For a protein boost, try spinach & ricotta or meat-filled tortellini.
  • 1 (24 oz) jar of your favorite marinara sauce – Choose a robust, herby sauce for a deeper flavor. Sensory Note: The rich, tangy tomato base is the foundation of our creamy sauce.
  • 2 cups vegetable broth (or chicken broth) – This thins the sauce perfectly for slow cooking. Substitution: Use water with 2 teaspoons of bouillon paste if needed.
  • 1 cup heavy cream – This is the secret to the luxurious, velvety texture. Substitution: For a lighter version, half-and-half or full-fat coconut milk can work, though the sauce will be less rich.
  • 1 cup shredded mozzarella cheese – For that classic, stretchy, melty goodness.
  • 1/2 cup freshly grated Parmesan cheese – Adds a salty, nutty depth. Pro Tip: Always grate your own for the best flavor and meltability.
  • 1 teaspoon garlic powder
  • 1 teaspoon dried Italian seasoning
  • 1/2 teaspoon onion powder
  • 1/4 teaspoon red pepper flakes (optional) – For a subtle, warming kick.
  • Salt and black pepper to taste
  • Fresh basil or parsley, for garnish – The bright green finish adds a pop of color and fresh flavor.

Timing

Prep Time10 minutes
Cook Time2 hours (on LOW)
Total Time2 hours 10 minutes

Compared to the average stovetop pasta dish which requires active stirring and monitoring for 20-30 minutes, this slow cooker method saves you valuable time and mental energy. The 2-hour cook time on LOW is perfect for letting flavors meld while you tackle other tasks. You get a hands-off cooking experience that yields a far more complex and comforting result than a quick 15-minute meal.

Slow Cooker Cheesy Tortellini – The Ultimate Comfort Food!

A creamy, dreamy bowl of Slow Cooker Cheesy Tortellini, ready to warm you up from the inside out.

Step-by-Step Instructions

Step 1: Prepare Your Slow Cooker and Sauce

First, grab your trusty slow cooker—a 4 to 6-quart model is ideal for this recipe. There’s no need to preheat it. Pour in the entire jar of marinara sauce. To this, add the vegetable broth, garlic powder, Italian seasoning, onion powder, and red pepper flakes (if using). Now, take a whisk or a large spoon and give everything a really good stir. You want those dried herbs and powders to be fully incorporated into the liquid, creating a beautifully seasoned tomato broth. This is the flavor base that will infuse the tortellini as it cooks. Season lightly with a pinch of salt and black pepper, but remember, the cheeses will add saltiness later, so go easy.

Step 2: Add the Tortellini and Cream

Open your package of fresh, refrigerated cheese tortellini. There’s no need to thaw or pre-cook them. Gently scatter the tortellini into the sauce mixture in the slow cooker. Use a spoon to gently push them down so most are submerged in the liquid. This ensures even cooking and prevents any dry, chewy pockets. Now, pour the heavy cream evenly over the top. Do not stir it in vigorously at this point. A gentle swirl on the surface is fine. We’re creating layers of flavor; the cream will slowly marry with the tomato sauce as it heats. Place the lid securely on your slow cooker and set it to cook on LOW for 2 hours. Resist the urge to open the lid frequently, as this releases heat and steam, extending the cooking time.

Step 3: Finish with Cheese and Garnish

After 2 hours, your kitchen will smell incredible. Carefully remove the lid. You’ll see the tortellini are plump and tender, and the sauce has thickened slightly. Now, it’s cheese time! Sprinkle the shredded mozzarella and grated Parmesan cheese evenly over the entire surface. Replace the lid and let it cook for an additional 15-20 minutes on LOW, or just until the cheeses are beautifully melted and gooey. Once the cheese is melted, give the entire dish one final, gentle stir to combine the creamy cheese into the sauce. The result should be a cohesive, velvety, cheesy coating on every tortellini. Taste and adjust seasoning with a bit more salt or pepper if needed. Serve immediately, garnished generously with chopped fresh basil or parsley for a burst of color and freshness.

Nutritional Information

The following is an approximate nutritional breakdown per serving (based on 6 servings). Values may vary based on specific ingredient brands and substitutions.

  • Calories: ~520 kcal
  • Total Fat: 28g
  • Saturated Fat: 16g
  • Cholesterol: 95mg
  • Sodium: 980mg
  • Total Carbohydrates: 48g
  • Dietary Fiber: 4g
  • Sugars: 8g
  • Protein: 20g

Healthier Alternatives

Love the comfort but want to lighten it up? Here are some smart, flavorful swaps that won’t sacrifice satisfaction:

  • Swap the Cream: Use half-and-half or whole milk mixed with 1 tablespoon of cornstarch (slurry) for a lighter, yet still creamy, sauce base.
  • Choose Whole Wheat Tortellini: Many brands offer whole wheat or protein-packed tortellini options for added fiber and nutrients.
  • Boost with Veggies: Stir in 2 cups of fresh spinach or chopped kale during the last 30 minutes of cooking. You can also add 1 cup of finely diced mushrooms or zucchini at the beginning.
  • Leaner Cheese: Opt for part-skim mozzarella and reduce the Parmesan slightly. A sprinkle of nutritional yeast can add a cheesy, umami flavor with less fat.
  • Low-Sodium Broth & Sauce: Select no-salt-added or low-sodium versions of broth and marinara to better control the salt content.

Serving Suggestions

This dish is a star on its own, but a few simple pairings can turn it into a memorable meal:

  • The Perfect Side: A crisp, simple green salad with a tangy vinaigrette (like balsamic) cuts through the richness beautifully. Garlic bread or a crusty baguette is non-negotiable for soaking up every last drop of sauce.
  • For a Heartier Meal: Serve alongside grilled Italian sausage or herb-roasted chicken breasts.
  • Wine Pairing: A medium-bodied red like a Chianti or a smooth white like a Pinot Grigio complements the tomato and cheese flavors perfectly.
  • Presentation Tip: Serve family-style in a large, shallow bowl. Drizzle with a tiny bit of extra virgin olive oil and a final flourish of fresh herbs right at the table.

Common Mistakes

  • Overcooking the Tortellini: Using the HIGH setting or cooking for too long can turn the tortellini mushy. Stick to LOW for 2 hours for perfect, al dente texture.
  • Stirring in the Cream Too Early: Adding the cream with the initial ingredients and stirring can sometimes cause it to separate or curdle during the long cook time. Adding it last, on top, is safer.
  • Using Pre-Shredded Cheese with Anti-Caking Agents: These cheeses don’t melt as smoothly. For a silky sauce, take the extra minute to shred your own block of mozzarella and grate fresh Parmesan.
  • Not Tasting Before Serving: Always do a final taste test after adding the cheese. The saltiness of cheeses and broths varies, so you may need an extra pinch of seasoning to make the flavors pop.

Storing Tips

  • Refrigeration: Cool leftovers completely and store in an airtight container in the refrigerator for up to 3-4 days. The pasta will continue to absorb sauce, so it will thicken.
  • Reheating: Reheat gently on the stovetop over low heat, adding a splash of broth, milk, or water to loosen the sauce back to a creamy consistency. Microwave reheating in 30-second intervals, stirring between, also works.
  • Freezing: Freezing is possible but not ideal, as dairy-based sauces can separate and the pasta may become overly soft upon thawing. If you must freeze, do so for up to 1 month and thaw overnight in the fridge before reheating gently.

Conclusion

This Slow Cooker Cheesy Tortellini truly is the ultimate comfort food hack for busy lives. It delivers restaurant-quality, indulgent flavor with almost zero active effort. Whether it’s a hectic Tuesday or a cozy Sunday dinner, this recipe promises a satisfying, crowd-pleasing meal that will have everyone asking for seconds. The beauty of the slow cooker does all the work, melding simple ingredients into something magical.