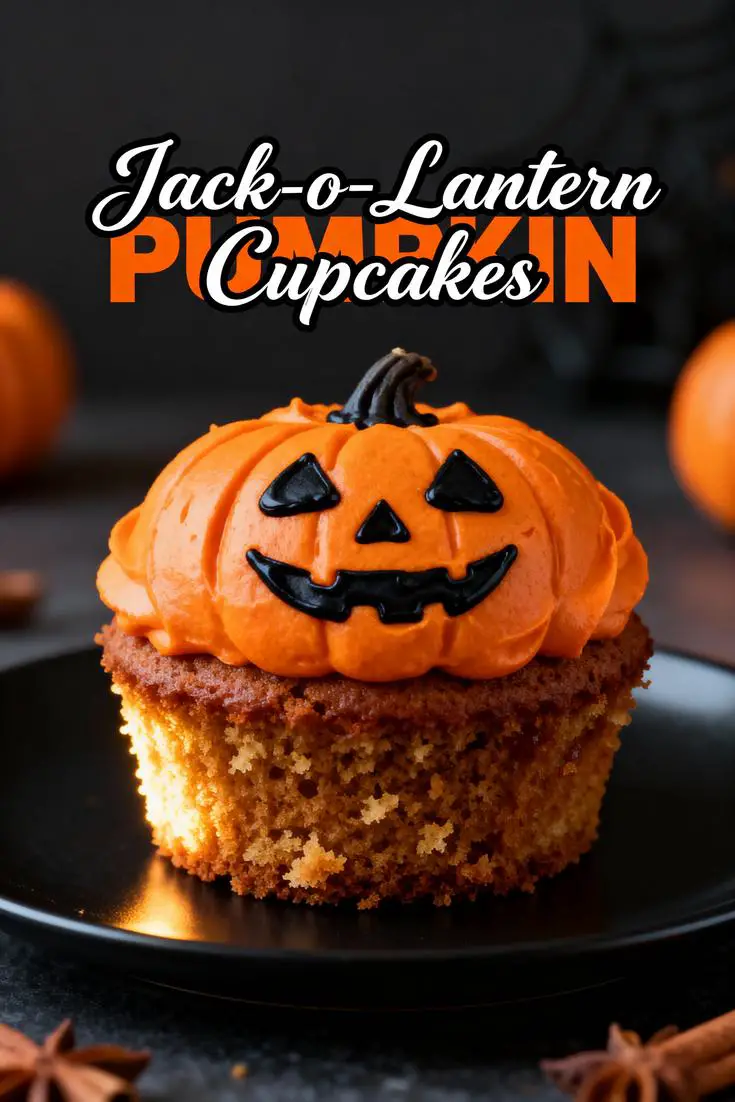
Best Crispy Fried Onion Rings Recipe – Light & Crunchy

The BEST Crispy Fried Onion Rings: A Restaurant-Style Delight at Home

⚖️
Difficulty
Medium

⏲️
Prep Time
20 mins

🕒
Cook Time
10 mins

⏱️
Total Time
30 mins

🍽️
Servings
4 servings

Onion rings are a classic snack and a favorite side dish enjoyed by many around the world. When cooked to golden perfection, they offer a delightful crunch and a burst of flavor that complements everything from burgers to salads. Today, I’m sharing the BEST crispy fried onion rings recipe, which will transport your taste buds straight to your favorite diner, but made conveniently in your own kitchen. These crispy bites are not only mouthwatering but also incredibly easy to make, allowing you to impress family and friends with your culinary skills.

Imagine biting into a perfectly crispy fried onion ring, the crunchy exterior giving way to a sweet and tender onion inside. The contrast in texture is just the beginning of the experience. They are deep-fried to a gorgeous golden hue, making them visually appealing and inviting. With a few ingredients and the right techniques, you can create onion rings that are far superior to any frozen or restaurant version. Join me in preparing this crispy delight that’s bound to be a crowd-pleaser!

Quick Recipe Highlights

  • Flavor Profile: These onion rings are savory with a hint of sweetness from the onions, enhanced by a seasoned batter that adds depth and aroma.
  • Texture: Expect a satisfying crunch with each bite, thanks to a double-dipping technique that ensures maximum crispiness.
  • Aroma: A tantalizing smell of fried onions wafts through the air, inviting everyone to the table.
  • Visual Appeal: Golden brown and perfectly round, these onion rings are as delicious as they are attractive.
  • Skill Level Needed: Basic frying skills are necessary, making this recipe suitable for novice cooks and culinary enthusiasts alike.
  • Special Equipment: A deep fryer or a heavy pot for frying is essential for achieving that crispy perfection.

Recipe Overview

  • Difficulty Level: This recipe is considered medium. The technique of frying is straightforward, but attention is needed to maintain the right oil temperature.
  • Category: This dish serves as a fantastic appetizer or side dish and can also function as a snack during gatherings.
  • Cuisine: Fried onion rings are commonly found in American cuisine, often served in diners and at barbeques, showcasing the love for deep-fried snacks.
  • Cost: Ingredients are affordable, typically ranging from $5 to $10 for a batch depending on quality and quantity.
  • Season: Ideal for all seasons, they are particularly popular during summer for BBQs and cookouts.
  • Occasion: Perfect for parties, game day snacks, or a fun family dinner.

Why You’ll Love This Recipe

Crispy fried onion rings bring irresistible taste and texture to your table. Each bite offers a delicious contrast between the crunchy, well-seasoned batter and the tender, sweet onion inside. This delightful pairing creates a mouthwatering experience that is hard to resist. You’ll find that the homemade flavor is superior to store-bought alternatives, making it a favored choice for anyone looking to enjoy a classic snack.

Preparation for this recipe is a breeze, allowing you to whip up a batch of onion rings in less time than you might think. With minimal ingredients, you can have fresh, hot crispy fried onion rings on your table in a flash. This convenience is paired with the satisfaction of creating something from scratch, which adds immense value to your cooking repertoire. Your family will appreciate the effort you’ve put into making such a beloved treat.

Moreover, there are nutritional benefits to homemade onion rings; you can control the ingredients and adjust the batter to suit your dietary preferences. You can use whole wheat flour for added fiber or incorporate spices that cater to your taste. This recipe also provides an excellent way to enjoy onions, known for their health benefits including anti-inflammatory properties and being rich in vitamins and minerals.

When it comes to social gatherings, onion rings serve as a perfect shareable dish. Their crispy appeal makes them a popular choice for entertaining, whether it’s a casual get-together or a formal celebration. They pair well with a variety of beverages and are an excellent addition to any feast, inviting laughter and sharing among guests.

Lastly, this recipe is cost-effective, allowing you to serve a large quantity without breaking the bank. Compared to buying onion rings at a restaurant, making your own yields significant savings while delivering exceptional flavor. Your homemade onion rings are bound to impress and may even inspire others to follow your culinary lead.

Historical Background and Cultural Significance

Onion rings have a rich history that dates back to the early 1920s in the United States, initially appearing on menus in diners and fast-food restaurants. Their popularity soared due to their simple yet delectable flavor, making them a beloved choice among snack lovers. Over the years, they have become an iconic part of American cuisine, often accompanying burgers and sandwiches in casual eateries across the country.

Culturally, onion rings embody the spirit of indulgent American cooking, often associated with summer BBQs and family gatherings. They reflect a tradition of enjoying deep-fried foods that many families have cherished over generations. As a comfort food, onion rings evoke nostalgia, reminding many of simpler times spent dining with loved ones.

The recipe for onion rings has evolved, with variations appearing in different regions. For instance, some areas add different seasonings or batters, making each version unique. This evolution showcases the versatility of the onion ring, adapting to different palates and regional tastes while retaining its core flavor profile.

Additionally, onion rings have found their way into international cuisine, especially in variations like Japanese “tamanegi” (onion rings) and Indian-style “kanda bhaji” (onion bhaji). These adaptations highlight the universal appeal of fried onions and their ability to transcend cultural boundaries, allowing people all over the world to enjoy them in their unique dishes.

Ingredient Deep Dive

Onions: Onions are the star of this dish, offering a distinct sweetness that complements their crispy texture once fried. Rich in vitamins and minerals, onions provide health benefits such as anti-inflammatory properties and heart health support. When selecting onions for frying, look for large, firm, and fresh specimens. Store them in a cool, dry place, away from potatoes to prevent sprouting. If you’re in need of substitutes, sweet onions or shallots can work well.

Flour: The flour used in the batter gives structure and crispiness to the onion rings. All-purpose flour is the most common choice, but whole wheat or gluten-free blends can serve as alternatives without sacrificing flavor. Flour not only binds the ingredients together but also helps achieve that signature crispy outer layer. To store, keep it in a cool, dry place. For substitutions, cornstarch can be used for added crunch.

Breadcrumbs: Breadcrumbs add an extra layer of crunch and texture, enhancing the overall mouthfeel. They help in achieving a golden-brown color and a satisfying crunch. Use plain or seasoned breadcrumbs depending on your preference for flavor. Store breadcrumbs in an airtight container, and for those needing options, crushed cornflakes can substitute effectively for a gluten-free alternative.

Seasonings: Seasonings are crucial in elevating the flavor of onion rings. A mix of salt, pepper, paprika, and garlic powder can provide a balanced taste. Each seasoning brings its unique characteristic, with paprika offering smokiness and garlic powder contributing depth. Store in a cool place, and don’t hesitate to experiment with spices like cayenne or Italian herbs to suit your taste preferences.

Common Mistakes to Avoid

  • Not soaking the onions: Soaking the onion rings in milk or buttermilk helps enhance their flavor and removes some of the onion’s sharpness. Skipping this step can lead to a less flavorful outcome.
  • Incorrect oil temperature: Ensuring your frying oil is at the right temperature (around 350°F) is crucial. If it’s too hot, the batter may burn, and if it’s too cold, the rings will absorb oil, turning soggy.
  • Overcrowding the pan: Frying too many onion rings at once can lower the oil temperature, resulting in less crispy rings. Fry in smaller batches to ensure even cooking and crispiness.
  • Using all-purpose flour only: While all-purpose flour is common, incorporating cornstarch or using a panko breadcrumb coating can enhance the crunchiness.
  • Not seasoning the batter: Failing to season your flour and breadcrumb mixtures can result in bland onion rings. Make sure to add spices to enhance the flavor.
  • Neglecting to preheat the oil: Preheating oil is essential to ensure that the onion rings cook evenly and develop a nice crust. Cold oil can lead to greasy, unappetizing results.
  • Using old oil: Always use fresh oil for frying. Old oil can impart an unpleasant taste to your onion rings.
  • Skipping the double-dip: Not double-dipping your onion rings can prevent you from achieving that golden, crunchy texture. The double-dipping method is key to success.
  • Not draining properly after frying: After frying, always drain your onion rings on paper towels to remove excess oil. This will prevent them from becoming soggy.
  • Forgetting to let oil cool before disposal: Allow your used frying oil to cool completely before disposing of it. Hot oil can be dangerous and cause fires.

Essential Techniques

Soaking: Soaking onion rings in a buttermilk mixture tenderizes the onions, enhances flavor, and helps the batter stick. To master this technique, simply slice your onions and soak them for at least 30 minutes before breading. Ensure you use enough liquid to fully immerse the rings without leaving any dry spots.

Frying: Frying is the key to achieving perfect crispy fried onion rings. It’s essential to maintain a consistent oil temperature of 350°F for optimal frying. Use a thermometer to monitor the temperature, and avoid overcrowding the pan. Fry in batches, and employ tongs to carefully flip the onion rings during frying for even cooking.

Breading: The double-dipping method—a process involving flour coating, wet batter, and breadcrumbs—is critical for achieving a crispy texture. Start by coating the onion rings in flour, dip them in the batter, and finish by rolling them in breadcrumbs. This approach builds layers that create an irresistible crunch.

Draining: After frying, always allow your crispy fried onion rings to rest on a plate lined with paper towels. This step removes excess oil and helps retain leur crispiness. Be patient and avoid stacking them immediately after cooking—so they stay crunchy longer.

Pro Tips for Perfect Crispy Fried Onion Rings

– Always preheat your oil for the best frying results. Use a thermometer to monitor the temperature, as this ensures that the onion rings cook quickly and evenly.
– Don’t skip soaking your onions! Soaking not only enhances the flavor but also firms them up for a better texture after frying.
– Try using a mixture of flours for your batter; combining all-purpose and cornstarch creates a lighter, crispier finish.
– Experiment with seasoning and spices in your breading mixture to elevate the flavor profile. Don’t hesitate to get creative!
– Allow the onion rings to sit for a few minutes once they come out of the frying oil. This helps eliminate excess steam and moisture that can make them soggy.
– Serve onion rings immediately after frying for maximum crispness, but if you need to hold them, place them on a cooling rack instead of a paper towel to prevent steaming.
– Consider preparing your onion rings in advance and flash-freezing them before frying. This way, you can enjoy them freshly made whenever you desire.
– Use a deep fryer for consistent cooking results, but if frying in a pot, choose one that’s deep enough to allow for plenty of oil and space to fry without splashing.

Variations and Adaptations

There are numerous ways to customize your crispy fried onion rings. For a regional variation, try adding some spicy Cajun seasoning to the batter for a Southern twist. Alternatively, you can create a more robust flavor with garlic or chili powder incorporated into the breading.

Seasonally, consider topping your onion rings with fresh herbs or a sprinkle of cheese to celebrate festive occasions. For a lighter fare, bake the onion rings instead of frying, achieving a crunch through roasting. If you’re looking for dietary modifications, you can utilize gluten-free breadcrumbs and flour for a gluten-free version, ensuring that everyone can enjoy this dish.

For added flavor, toss the onion rings with BBQ sauce or hot sauce after frying. This provides a delightful kick that brings the dish to the next level. Finally, present your onion rings on a vibrant platter adorned with fresh herbs or alongside a colorful dipping sauce for an appealing touch.

Serving and Presentation Guide

When plating your crispy fried onion rings, aim for a visually enticing display. Use a shallow bowl or serving platter and arrange the onion rings in a circular pattern or stack them neatly. Consider incorporating garnishes such as sliced green onions or cilantro to add color and freshness.

For dipping, include an assortment of sauces like ranch, spicy mayo, or a zesty chipotle sauce for a fun, interactive experience. Present the sauces in small ramekins for individual servings, encouraging guests to mix and match. Additionally, serving onion rings with colorful vegetables or pickles on the side offers visual contrast and increased appeal.

Temperature is crucial for serving crispy fried onion rings. They are best enjoyed hot and fresh, so serve them immediately after frying. If you need to keep them warm, place them in a low-temperature oven (around 200°F) while preparing the rest of the meal. Maintain proper portion control to ensure that everyone has the chance to enjoy these delicious treats without overindulging.

Wine and Beverage Pairing

Pairing beverages with crispy fried onion rings can elevate your dining experience. For wine lovers, a chilled sparkling wine or a crisp Sauvignon Blanc complements the salty, crunchy goodness beautifully, cutting through the richness seamlessly.

If you’re looking for non-alcoholic alternatives, try pairing them with a refreshing iced tea or a zesty lemonade, both of which offer a palate-cleansing sweetness to balance the savory notes of the onion rings. Additionally, consider serving them alongside craft beers, particularly pale ales or lagers, which enhance the overall fry experience with bubbling crispness.

Coffee lovers can enjoy a cup of dark roast coffee as an unexpected, yet delightful pairing with the salty crunch of onion rings, while green tea’s earthy flavor can provide a nice contrast. Remember to ensure all beverages are served at their optimal temperatures for the best taste experience.

Storage and Shelf Life

Proper storage of your crispy fried onion rings is essential to maintain their quality. After frying, allow them to cool completely before placing them in an airtight container; this helps prevent moisture buildup. Fried onion rings are best enjoyed fresh, but you can store them in the fridge for up to 3 days.

For reheating, preheat your oven to 350°F and bake them on a baking sheet for about 10-15 minutes until heated through, ensuring they regain some crispiness. Avoid reheating in the microwave as this can lead to sogginess. If you want to store them longer, consider freezing for up to 3 months. Layer them between parchment paper in a freezer-safe container for easy separation.

Before frying, flash-freezing onion rings allows you to cook them directly from frozen in a fryer or oven without thawing, maintaining their crispy texture. Always check for signs of spoilage or freezer burn, discarding any that appear discolored or off-smelling.

Make Ahead Strategies

Preparing onion rings ahead of time can vastly simplify your cooking process. You can slice and soak the onions the night before, storing them in the refrigerator until you’re ready to fry. This technique enhances flavor and allows for quicker preparation during meal time.

Additionally, consider notifying guests that you’ve made the onion rings ahead. This not only builds anticipation but helps streamline your cooking. After frying, let the rings cool completely, and store them in an airtight container until you’re ready to reheat and serve.

If you’re short on time, you can pre-make the batter in advance, storing it in the refrigerator until use. Ensure that you check for freshness before culinary application to maintain state quality. This method won’t compromise flavor but saves time when you’re in a rush.

Lastly, be sure to reserve sauces for dipping separate from the rings to keep them fresh and delicious until serving time. Fresh herbs can be garnished right before serving for added appeal and flavor.

Scaling Instructions

Scaling the recipe for crispy fried onion rings can be simple and straightforward. If you want to half the recipe, reduce all ingredients proportionally while keeping the frying techniques the same. Ensure that oil levels in your frying vessel accommodate the smaller batch.

To double or triple the recipe, ensure you have enough mixing space and adjust your frying method accordingly. Employing multiple frying pots may be necessary to prevent overcrowding and maintain oil temperature for each batch.

Equipment adjustments may include using bigger bowls for mixing and larger frying vessels to accommodate the increased food volume, ensuring safety remains a top priority as oil levels may need adjustments. Timing may also slightly vary as you will have to fry in batches to maintain heartiness.

Be cautious of storage considerations, as larger quantities may increase cooling times and lead to food discrepancies. Always label larger containers with dates and volume to track freshness effectively.

Nutritional Deep Dive

The nutritional breakdown of crispy fried onion rings allows for conscious cooking. Each serving typically contains around 250-300 calories, depending on the amount of oil absorbed during frying. The carbs primarily come from the flour and breadcrumbs used in the breading process, contributing to energy needs.

Micronutrient analysis shows that while onion rings do not provide a significant amount of vitamins or minerals at face value, the onions contribute beneficial antioxidants and vitamins C and B6. They offer minimal fiber content but can be elevated by using whole-wheat coatings.

When considering health benefits, onion rings can serve as a fun addition to a balanced diet, particularly when made at home with lighter oils or baked instead of fried. It’s crucial to keep portion sizes moderate to manage calorie intake effectively.

Dietary considerations have led some to explore lower-calorie alternatives or modifications for their cooking needs; evaluate methods of baking versus frying when seeking to lighten up this favorite dish.

Dietary Adaptations

Making crispy fried onion rings accommodating to various dietary preferences can be simple. For a gluten-free option, substitute traditional wheat flour for gluten-free all-purpose flour and use gluten-free breadcrumbs to ensure everyone can enjoy this delicious snack.

If you’re looking for a lower-carb and keto version, consider using almond flour or coconut flour as a substitute for regular flour. The rings can be baked instead of fried to accommodate this diet while still retaining a delicious crunch.

For a dairy-free option, avoid milk in the soaking process and opt for non-dairy alternatives like almond milk or oat milk. Strive for the same flavor profiles without compromising dietary restrictions.

Vegetarians and vegans can enjoy these crispy treats; simply use a plant-based milk for soaking and ensure your breadcrumb mixture is animal product-free. For a lighter and healthier approach, consider air frying onion rings for a significant decrease in fat content.

Troubleshooting Guide

When cooking crispy fried onion rings, there are a few common challenges that may arise. If your onion rings come out soggy, it could be due to an incorrect frying temperature or overcrowding in the pan. Ensure you use hot oil (around 350°F) and fry small batches at a time.

If the onion rings are too greasy, this often indicates that the oil wasn’t hot enough. Frying in oil that hasn’t reached the right temperature leads to excessive absorption. Monitor your oil temperature closely using a thermometer for best results and maintain even cooking.

Sometimes, the batter may not stick well to the onions; ensure you’re properly soaking them and flouring before applying the wet batter. A double-dipping technique with flour and breadcrumbs can enhance adherence and flavor.

Overly burnt onion rings usually occur due to cooking them for too long or at excessively high temperatures. If this happens, adjust your frying time and temperature settings to achieve the golden-brown color without burning.

Finally, if your onion rings come out flat and unappetizing, it may be due to inadequate breading. Don’t skip the double-dip in flour and breadcrumbs, which helps create that much-loved crunch. Remember that achieving the perfect onion rings takes a bit of practice, so don’t get discouraged!

Recipe Success Stories

The crispy fried onion rings recipe has garnered fantastic feedback from home cooks around the world. Many have attributed their successful gatherings to the addition of these delectable onion rings, helping to elevate standard parties to culinary masterpieces.

Readers have often shared variations they’ve created, such as spicy jalapeño onion rings that delivered unexpected excitement to classic flavors. Community engagement encourages creative adaptations and fosters a supportive cooking environment.

Photography tips have also emerged from the success stories, with many users offering insight on how to best showcase their crispy fried creations on social platforms. With bright colors from accompanying dips and careful plating, these onion rings become a visual treat.

Individuals have expressed appreciation for the low-cost elements of the recipe, finding joy in preparing restaurant-quality dishes economically. The compelling flavor and texture have inspired many to turn this crispy fried favorite into a regular family affair.

Moreover, readers have emphasized the fun and interaction of preparing fried onion rings as a family activity, encouraging kids and adults alike to take part in the cooking process. The shared kitchen experience fosters camaraderie and laughter, making onion rings a staple in joyful gatherings.

Frequently Asked Questions

1. Can I bake these onion rings instead of frying them?
Yes, you can bake them! Simply coat the onion rings in the batter and breadcrumbs, place them on a baking sheet, and spray lightly with cooking oil. Bake at 425°F for about 20-25 minutes, flipping halfway, until crispy.

2. How do I prevent my onion rings from getting soggy after frying?
Ensure to drain the fried onion rings on paper towels to remove excess oil. Additionally, try to serve them immediately while they are still hot for the best texture.

3. What kind of dipping sauce goes well with onion rings?
Popular dipping sauces include ranch, honey mustard, BBQ sauce, and spicy ketchup. Feel free to experiment with your favorite sauces as well!

4. Can I use a different kind of onion?
While yellow onions are the classics, you can try sweet onions like Vidalia or even red onions for a unique flavor. Each variety brings its own character to the dish.

5. How can I make my onion rings spicier?
Add cayenne pepper or hot sauce to your batter for an extra kick. You can also serve them with spicy dipping sauces for an added zest.

6. How long will leftovers last in the fridge?
Leftover onion rings will stay fresh in the refrigerator for about 3-4 days. Ensure they are stored in an airtight container to maintain their texture.

7. Can I freeze my crispy fried onion rings?
Yes, you can freeze them. Make sure they are completely cooled, then store them in a single layer in a freezer-safe bag. They can last up to 3 months.

8. How do I reheat leftover onion rings?
To reheat, preheat your oven to 350°F and place them on a baking sheet. Bake for about 10-15 minutes until heated through for the best texture.

9. Can I customize the batter with different flavors?
Absolutely! Experiment with different seasonings in your batter, such as garlic powder, onion powder, or even add cheese for a different flavor profile.

10. Are these onion rings vegan-friendly?
Yes, substitutions like plant-based milk can make this recipe vegan. Just ensure your breadcrumbs are also free from animal products.

Additional Resources

For those eager to dive deeper into cooking adventures, consider exploring related recipes such as crispy fried zucchini or classic potato wedges, which allow for a similar cooking process with delightful results. Reviewing technique guides for frying will ensure you maximize your skills in the kitchen, making every dish you create shine.

You can also discover ingredient information that contributes to flavor profiles or explore equipment recommendations that can streamline the frying process. Additionally, consider seasonal variations for serves that change with the seasons, adapting your recipe accordingly for maximum flavor.

Join the Conversation

We invite you to share your experiences and feedback on this crispy fried onion rings recipe! Join the conversation on social media and use our hashtag to showcase your cooking creations.

Readers are encouraged to post their photographs, offer cooking tips, and share their variations of this beloved dish. Engaging with our community contributes to the collective joy of cooking and helps inspire others to experiment with their culinary endeavors. We can’t wait to see your crispy fried onion rings and hear your success stories!

The Recipe

The BEST Crispy Fried Onion Rings

Serves: 4 servings

Prep Time: 20 mins

Cook Time: 10 mins

Total Time: 30 mins

Kitchen Equipment Needed

  • Deep fryer or heavy pot
  • Measuring cups
  • Mixing bowls
  • Frying thermometer
  • Tongs or slotted spoon
  • Paper towels for draining

Ingredients

  • 2 large onions, sliced into rings
  • 1 cup buttermilk (or milk)
  • 1 cup all-purpose flour
  • 1 cup breadcrumbs (or panko)
  • 1 teaspoon paprika
  • 1 teaspoon garlic powder
  • Salt and pepper, to taste
  • Vegetable oil, for frying

Directions

  1. Soak the onion rings in buttermilk for at least 30 minutes to enhance flavor.
  2. In one bowl, combine flour, paprika, garlic powder, salt, and pepper.
  3. In another bowl, place the breadcrumbs.
  4. Heat the oil in the fryer or pot to 350°F.
  5. Remove the onion rings from the buttermilk, allowing excess to drip off.
  6. Coat each onion ring in the flour mixture, then dip in the buttermilk again, followed by the breadcrumbs.
  7. Carefully lower the rings into the hot oil, frying in batches until golden brown, about 2-3 minutes per side.
  8. Once fried, drain on paper towels and season with additional salt if desired.
  9. Serve immediately with your choice of dipping sauces.

Recipe Notes

  • For a gluten-free version, use gluten-free flour and breadcrumbs.
  • Add additional spices to the batter for variation in flavor.
  • Onion rings can be prepped in advance and fried just before serving.

Best Crispy Fried Pickles – Perfect for Burgers or Snacking

Irresistible Garlic Parmesan Fries: The Ultimate Snack for Burger Lovers

⚖️
Difficulty
Easy

⏲️
Prep Time
10 mins

🕒
Cook Time
25 mins

⏱️
Total Time
35 mins

🍽️
Servings
4 servings

If you’re looking for the perfect topping for your burger or a delightful snack to enjoy, then these Garlic Parmesan Fries are calling your name! Golden, crispy, and bursting with flavor, these fries are not just a side dish; they’re an experience. Imagine biting into perfectly cooked, seasoned fries that marry perfectly with the robust flavors of garlic and the richness of Parmesan cheese. Every bite is a symphony of crunch, flavor, and irresistible aroma, elevating your meal and your mood alike.

Not only are these Garlic Parmesan Fries easy to make, but they are incredibly versatile too. Whether you’re hosting a casual get-together, enjoying game day with friends, or simply indulging in a cozy night at home, these fries are sure to impress. Simply pair them with your favorite dipping sauce or serve them as is alongside a juicy burger for a gourmet touch. Get ready to have your taste buds dazzled as you pull these out of the oven!

Quick Recipe Highlights

  • Flavor Profile: A delightful blend of savory garlic, rich Parmesan, and hints of herbs that create an enchanting flavor experience.
  • Texture: Crispy on the outside with a tender, fluffy interior that will make you crave more.
  • Aroma: The enticing smell of roasted garlic combined with the toasty scent of Parmesan will fill your kitchen.
  • Visual Appeal: Golden brown fries sprinkled with fresh parsley create a visually stunning dish.
  • Skill Level Needed: This recipe is straightforward, making it suitable for cooks of all skill levels.
  • Special Equipment: Only a baking sheet and parchment paper are required, ensuring easy cleanup.

Recipe Overview

  • Difficulty Level: This Garlic Parmesan Fries recipe is classified as easy, making it an approachable option for everyone from beginners to experienced cooks.
  • Category: These fries can serve as a snack, appetizer, or side dish, making them a versatile addition to any meal.
  • Cuisine: Influenced by Italian culinary traditions, the use of garlic and Parmesan introduces a classic flavor profile that transcends borders.
  • Cost: Making Garlic Parmesan Fries is budget-friendly, with the primary ingredients costing less than $10.
  • Season: Perfect all year round, particularly enjoyable during the summer barbecue season or cozy winter nights.
  • Occasion: Ideal for casual gatherings, family dinners, or as a delightful snack while watching your favorite movie.

Why You’ll Love This Recipe

The blend of taste and texture in these Garlic Parmesan Fries is truly something special. The crispy exterior gives way to soft, fluffy potato goodness, providing a satisfying crunch with every bite. The generous coating of rich Parmesan and fragrant garlic elevates the flavor profile significantly, making it an impeccable addition to your meals or a delectable snack all on its own.

Convenience is another reason why this recipe shines. With minimal preparation time and straightforward cooking instructions, you can whip these up quickly, making them perfect for spontaneous gatherings or dinner alongside your favorite burger. The ease of prep and cook means more time spent enjoying the company of friends and family.

Nutritionally, these Garlic Parmesan Fries can be part of a balanced diet when enjoyed in moderation. They offer comfort and satisfaction without overwhelming your meal plan. The balance of carbs and fats makes them filling, while the garlic provides additional health benefits, including antioxidants and anti-inflammatory properties.

Socially, these fries are a crowd-pleaser which makes them perfect for gatherings and parties. Their appealing taste and presentation can spark conversations and will likely lead to requests for the recipe. Pair them with delicious burgers or as part of a snack platter during game days for an unforgettable experience.

Lastly, the cost-effectiveness of this recipe cannot be overstated. Using simple ingredients that are readily available, you can serve a hearty side or snack without breaking the bank. Enjoying restaurant-style fries at home is a win for both your taste buds and wallet!

Historical Background and Cultural Significance

The origins of fries can be traced back to Belgium, where they were traditionally made from whole potatoes cut into strips and fried. Over time, as culinary practices evolved, variations emerged across cultures, with the advent of different seasonings and serving styles. Garlic Parmesan Fries have Italian influences, with the rich, nutty flavor of Parmesan cheese bringing a taste characteristic of Italian cuisine to an otherwise classic fried dish.

Culturally, fries hold a unique place in many societies, often associated with comfort food. They have been embraced in various cuisines worldwide, from French fries to the spiced varieties found in Indian chaat. The introduction of garlic and herbs celebrates the fusion of flavors, showcasing culinary creativity that transcends traditional borders.

This particular recipe evolved as home cooks began experimenting, discovering that adding garlic and cheese significantly enhances the flavor of fries, transforming them from simple to spectacular. Today, Garlic Parmesan Fries are widely popular across restaurants and home kitchens alike, often listed among must-try dishes.

Regionally, variations of Garlic Parmesan Fries can be found, with different herbs and seasonings reflecting local tastes. For example, adding truffle oil or fresh rosemary can give a gourmet twist to the classic preparation, making it suitable for upscale dining or special occasions.

Ingredient Deep Dive

Garlic is a key ingredient in this recipe, known not only for its pungent flavor but also for its numerous health benefits. Historically, garlic has been celebrated for its medicinal properties, supporting heart health and offering anti-inflammatory effects. When selecting garlic, look for firm cloves and store them in a cool, dry place to maintain freshness. If you’re in need of a substitute, garlic powder can be used, though the flavor will not be as robust.

Parmesan cheese is the star of this dish, providing a rich, nutty flavor that perfectly complements the crispy fries. Originally from Italy, Parmigiano-Reggiano is a hard cheese made from cow’s milk. To maximize its flavor, always use freshly grated or shaved cheese, as pre-grated varieties often contain anti-caking agents, which dilute the taste. In terms of storage, keep Parmesan cheese in the refrigerator wrapped in parchment paper to maintain its freshness. If needed, Pecorino Romano can serve as a great alternative due to its similar texture and taste.

Potatoes serve as the base of this recipe, and the choice of variety can significantly affect the final product. Russet potatoes are recommended for their starchy texture, which helps achieve crispiness when fried. When selecting potatoes, choose those that are firm and free from blemishes. Store them in a dark, cool place to prevent sprouting. For an alternative, sweet potatoes may be used for a sweeter, more nutrient-dense option.

Olive oil is essential for achieving the best flavor and texture for the fries. Not only does it provide a healthier fat option, but it also enhances the overall flavor. Extra virgin olive oil is recommended for its robust flavor, while vegetable oil may be used if you prefer a more neutral taste. Store olive oil in a dark container to protect it from light, which can degrade its quality over time.

Lastly, fresh parsley adds a touch of color and freshness, enhancing the visual appeal of the dish. Parsley has its roots in Mediterranean cuisine and is rich in vitamins A, C, and K. Always choose vibrant green parsley, and store it in the refrigerator, wrapped in a damp paper towel to maintain freshness. Cilantro can be used as a fresh alternative for a different flavor profile.

Common Mistakes to Avoid

  • Overcrowding the baking sheet can result in uneven cooking and soggy fries. Always leave space between each fry to allow steam to escape.
  • Using old potatoes can lead to fries that are bland or mushy. Always choose fresh, firm potatoes for the best results.
  • Not soaking the cut fries in cold water can prevent the starch from releasing. Soaking for at least 30 minutes aids in achieving crispiness.
  • Skipping the preheating of the oven can lead to inconsistent cooking. Preheating is crucial for achieving that golden brown color.
  • Using too much or too little oil can affect the texture dramatically. Aim for a light coating to achieve crispy results without excess greasiness.
  • Failure to season the fries before and after cooking can result in blandness. A double seasoning approach enhances flavor significantly.
  • Overcooking the fries will lead to bitterness. Keep a close eye on them towards the end of the cooking time.
  • Not using fresh garlic can result in a diminished flavor profile. Fresh garlic cloves possess a more intense taste compared to pre-minced versions.
  • Neglecting to garnish with fresh herbs can make the dish look less appealing. A sprinkle of parsley not only improves aesthetics but adds freshness.
  • Using low-quality cheese can compromise flavor. Always opt for high-quality Parmesan for a truly remarkable taste experience.

Essential Techniques

Properly cutting the fries is essential to ensure even cooking. Aim for uniform strips to promote consistent texture; thicker cuts will require a longer cooking time. It’s best to use a mandoline or a sharp knife, ensuring safety with a cutting board.

Soaking the fries is key to removing excess starch, which helps in achieving that coveted crispiness. By soaking them in cold water for at least 30 minutes, you’ll notice a distinct improvement in the final texture. After soaking, be sure to dry them thoroughly using a clean kitchen towel.

Baking at a high temperature is important for crispiness. Preheat your oven to at least 425°F (220°C) to help achieve a crunchy exterior while keeping the inside tender. Rotate the baking sheet halfway through cooking to ensure an even bake.

Tossing the fries in olive oil adequately is another essential technique. This allows for the fries to crisp up properly, creating that golden finish. Use just enough oil to coat the fries lightly, ensuring they don’t become overly greasy.

Lastly, adding cheese and garlic at the right time is crucial for flavor development. It’s best to add them towards the end of cooking to avoid burning the garlic while still achieving a rich flavor from the Parmesan.

Pro Tips for Perfect Garlic Parmesan Fries

1. **Experiment with your potatoes**: Different varieties can result in various textures. Try Yukon Gold or fingerling potatoes for a unique twist.
2. **Add spices**: Consider seasoning the oil with paprika, cayenne, or Italian herbs for an added flavor dimension before baking.
3. **Try truffle oil**: Drizzle a little truffle oil before serving for a gourmet finish that takes your fries to the next level.
4. **Make it cheesy**: To enhance the cheese flavor, mix half Parmesan and half Pecorino Romano for a more complex taste.
5. **Dabble in dips**: Pair your fries with various dips like aioli, ranch, or spicy ketchup to cater to diverse taste palettes.
6. **Opt for a double-bake**: For the ultimate crispiness, bake them once, let cool, then bake again briefly before adding garlic and cheese to achieve an unbeatable texture.

Variations and Adaptations

There are countless ways to adapt Garlic Parmesan Fries to suit different tastes and dietary preferences. For a spicier kick, consider adding a sprinkle of cayenne pepper before baking or serve with a spicy dipping sauce.

In terms of seasonal adaptations, consider adding seasonal herbs or toppings such as fresh rosemary or thyme in the fall or a sprinkle of feta cheese with fresh herbs in the summer to create a vibrant dish that reflects the seasons.

For dietary modifications, make the fries gluten-free by ensuring all seasonings are verified to be gluten-free. If you’re looking for a dairy-free option, use nutritional yeast instead of Parmesan for a cheesy flavor without dairy.

To switch up the flavor profiles, try adding toppings like bacon bits or even a drizzle of garlic-infused olive oil for an exciting twist. For texture modifications, experiment with crinkle-cut fries or hand-cut wedges for a different eating experience.

Lastly, when it comes to presentation, consider serving the fries in a rustic parchment-lined basket or on a pristine white plate garnished with fresh herbs for that picturesque effect.

Serving and Presentation Guide

For an impressive serving presentation, consider using a rustic wooden board or a trendy metal tray to showcase your Garlic Parmesan Fries. Layer them in a pile for a casual vibe, or create distinct portions for a more refined approach.

Garnish each serving with a sprinkle of minced fresh parsley or herbs to enhance visual appeal and provide a pop of color. Adding a small bowl of sauce alongside can elevate the dish, providing a delicious dipping option.

Temperature matters—serve your fries hot and fresh out of the oven for the best taste and texture. If you’re plating, consider drizzling a little garlic-infused oil over the top to give them a gourmet touch.

For portion control, consider serving them with small tasting cups, allowing guests to sample different dipping sauces along with their fries. This transforms the eating experience into a fun outdoor picnic or gathering event, appealing to both kids and adults alike.

Lastly, don’t forget the traditional serving method of fries in a paper cone; it’s a playful, nostalgic way to enjoy this classic snack.

Wine and Beverage Pairing

When it comes to pairing wine with Garlic Parmesan Fries, a chilled Sauvignon Blanc works beautifully. Its crisp acidity cuts through the richness of the cheese, enhancing the overall experience. For red wine lovers, a light Pinot Noir brings out the savory garlic notes while balancing the flavor profile.

If you’re looking for non-alcoholic options, consider a refreshing elderflower soda or a zesty lemon-lime spritzer that complements the flavors without overpowering them.

Coffee or tea can also provide a pleasant contrast, with a light roast coffee or herbal iced tea serving as delightful accompaniments that won’t detract from the dish’s taste.

Consider temperature—serving the wine cool for whites and slightly chilled for reds can elevate their flavors, making the pairing even more enjoyable.

Storage and Shelf Life

To store leftover Garlic Parmesan Fries, allow them to cool completely before transferring them to an airtight container. Store them in the refrigerator, where they can last for up to three days.

When reheating fries, a quick turn in the oven at 350°F (180°C) for about 10–15 minutes will revive their crispiness. Avoid using the microwave, as it tends to result in sogginess.

For longer storage, consider freezing the fries before baking. Lay them out on a baking sheet until frozen solid, then transfer to freezer-safe bags. They can last up to three months. When you’re ready to enjoy, bake them straight from frozen, adding a few extra minutes to the cooking time.

Signs of spoilage include unusual smells or mushiness, indicating it’s best to discard any questionable leftovers. Properly stored, they should still retain their enticing garlic aroma and delicious taste.

Make Ahead Strategies

If you want to make Garlic Parmesan Fries ahead of time, consider cutting the potatoes and soaking them in cold water for up to 24 hours to keep them fresh while preventing browning.

After soaking, drain and dry the potatoes thoroughly before storing them in an airtight container in the refrigerator until you’re ready to bake. This method helps streamline the cooking process, allowing you to whip them up quickly at meal time.

To maintain quality, par-cook the fries by baking them briefly before storing. When you’re ready to serve, simply finish them off with another bake along with the garlic and cheese toppings.

If you want to add freshness after reheating, consider tossing the fries in some additional fresh herbs to bring back that vibrant flavor. Creating a light garlic oil drizzle just before serving can also enhance the overall taste.

Scaling Instructions

Scaling this Garlic Parmesan Fries recipe is simple! For halving the recipe, just cut the potato quantity in half. The seasonings can also be adjusted accordingly to maintain flavor intensity.

When doubling or tripling the recipe, be mindful of adjusting the cooking time. You may need to bake in batches on separate trays to ensure every fry cooks evenly and crisps properly.

If you’re using the same oven, consider the spacing of your trays; they should not touch to allow air to circulate freely.

For equipment adjustments, larger baking sheets or multiple trays may be required to hold the increased quantity, which leads to better results overall.

Also, monitor the temperature to make sure it remains consistent, and check fries regularly for doneness, adjusting the bake time accordingly based on quantity.

Nutritional Deep Dive

Garlic Parmesan Fries boast a balanced nutritional profile, making them an indulgent yet satisfying snack. Each serving provides a decent amount of carbohydrates from the potatoes, which are essential for energy, particularly when enjoyed as a side dish.

In terms of micronutrients, potatoes are rich in vitamin C, potassium, and vitamin B6, all contributing to various health benefits. Additionally, garlic enhances this dish by introducing antioxidants and supporting cardiovascular health.

Adjusting the portion size is crucial; if you’re watching your caloric intake, consider enjoying these fries as part of a balanced meal rather than the main dish. This snack works well alongside salads, protein sources, or low-calorie dips for a more nutritionally balanced approach.

Should you decide to modify the recipe for a healthier variant, consider using sweet potatoes for added vitamins A and C along with a lower glycemic index.

Portion control is essential; serving sizes should be moderate to enjoy the full flavor experience while managing calorie intake effectively, particularly with additional toppings.

Dietary Adaptations

Garlic Parmesan Fries can easily cater to different dietary needs. If you need a gluten-free version, simply ensure all cross-contaminated equipment is clean, and opt for certified gluten-free products in your seasonings.

For a dairy-free adaptation, substitute Parmesan with nutritional yeast, which provides a similar umami flavor while being completely plant-based. You can also consider vegan cheese options for a creamy texture.

If you’re following a low-carb or keto diet, you might experiment with using cauliflower or zucchini fries instead, seasoning them similarly to maintain that garlic Parmesan flavor while significantly cutting down on carbs.

Paleo followers can also enjoy these fries by using high-quality olive oil and avoiding any preservatives. Keeping the recipe fresh and simple stays true to the principles of this diet.

Lastly, individuals following a low-FODMAP diet can opt for garlic-infused oils, permitting the flavor without any adverse digestive effects from the actual garlic itself, granting an enjoyable experience for all.

Troubleshooting Guide

For texture issues, ensure that you’re cutting the fries evenly; this promotes consistent cooking throughout. If they come out soggy, consider baking them at a higher temperature with more space on the baking sheet.

If the flavor balance feels off, revisiting your seasoning by tasting before baking is essential. Properly layering salt and garlic before baking can enhance the overall taste significantly.

In cases where fries brown too quickly but aren’t cooked on the inside, reduce the temperature while extending the cooking time. Keep a close watch to prevent burning.

If you’re facing equipment challenges, such as an oven with uneven heat, rotating the baking sheets or swapping their positions can help ensure even cooking.

Ingredient substitutions can lead to unexpected flavors—test a small batch beforehand if you plan to swap key seasonings to ensure flavor compatibility.

For timing concerns, particularly on busy nights, par-cook the fries and hold them in the fridge until you’re ready to bake, making it easier to manage meal prep.

Recipe Success Stories

Community feedback has shown that Garlic Parmesan Fries have become a beloved favorite among those who try this recipe. Users often share that they wowed their guests, transforming gatherings into flavorful events with this unique spin on fries.

Variation successes are frequent, with many reporting that they incorporated leftovers, like roasted vegetables or protein, creating a complete meal out of the seasoned fries, showcasing their versatility.

Readers suggest adapting garlic and cheese levels based on personal preference, leading to successful experiments tailored to family and friends’ tastes.

Photography tips received rave reviews, with many adopting the suggested garnishing techniques to elevate their photos and presence on social media when sharing their creations.

The overall adaptability and taste of Garlic Parmesan Fries resonate with readers across different diets and occasions, creating a warm community of culinary enthusiasts celebrating shared success.

Frequently Asked Questions

Can I use frozen fries for this recipe?

Yes! If you’re short on time, store-bought frozen fries can be used, though fresh potatoes tend to yield better texture and flavor. Just adjust baking times according to package instructions.

What can I serve with Garlic Parmesan Fries?

They make a perfect side to burgers, sandwiches, or grilled meats. You can also serve them as a snack with dipping sauces like garlic aioli, ranch, or chili sauce for a flavor explosion.

Can I bake them instead of frying?

Absolutely! Baking is encouraged for a healthier option. Follow the directions outlined and ensure they are baked at high temperatures to achieve a crispy finish.

Is this recipe suitable for kids?

Yes! Kids generally love fries, and the flavorful twist of garlic and Parmesan will likely be a hit. Adjust the garlic level based on preference—a milder version may be more appealing to children.

Can I make these ahead of time?

Yes, you can soak and cut the potatoes ahead of time, or bake them and reheat later. They do taste best when fresh, but reheating will still retain delightful flavors.

Are garlic fries gluten-free?

Yes! As long as you use certified gluten-free seasonings and oils, these fries cater to gluten-free diets beautifully.

What are good dips for garlic fries?

A variety of dips works well! Aioli, ranch dressing, spicy ketchup, or a zesty yogurt dip are fantastic accompaniments to enhance their flavor.

Can I use different cheeses?

You can certainly experiment with other cheeses. Grated or shredded Gruyère, cheddar, or even a vegan cheese option can introduce new flavors to the dish.

What’s the best way to store leftovers?

Store any leftover fries in an airtight container in the refrigerator. They last up to three days, and reheat them in the oven to regain crispiness.

How do I get fries extra crispy?

To achieve extra crispiness, soak the fries in cold water before cooking, bake at a higher temperature with plenty of seasoning, and ensure there’s enough space on the baking sheet.

Additional Resources

For anyone interested in expanding their culinary skills, numerous related recipes can accompany Garlic Parmesan Fries, such as loaded potato skins, potato wedges with chipotle mayonnaise, or classic coleslaw for a crunchy contrast.

Technique guides for perfect frying or baking can help refine skills; also, ingredient information about best potato varieties or substitutes can be insightful.

Consider exploring equipment recommendations like air fryers or mandolines for perfectly cut fries to make life easier in the kitchen.

Additionally, keeping track of seasonal variations allows for roster updates based on fresh produce available at local markets.

Join the Conversation

We invite you to share your experiences with Garlic Parmesan Fries! Share photos and feedback on your favorite variations across social media platforms.

Engaging with fellow cooking enthusiasts and exchanging tips on how to make this recipe your own promotes a vibrant cooking community.

We’d love to hear your success stories, as they inspire others to try something new. Also, don’t forget to leave your reviews, as they greatly help other readers in refining this delicious recipe.

Share your creative plating ideas and variations that may become the next big hit on our recipe page! Let’s continue to cook, share, and enjoy the delightful world of food together.

The Recipe

Garlic Parmesan Fries

Serves: 4 servings

Prep Time: 10 mins

Cook Time: 25 mins

Total Time: 35 mins

Kitchen Equipment Needed

  • Baking sheet
  • Parchment paper
  • Sharp knife
  • Mixing bowl

Ingredients

  • 4 large Russet potatoes
  • 4 tablespoons olive oil
  • 4 cloves garlic, minced
  • 1 cup grated Parmesan cheese
  • 1 teaspoon salt
  • ½ teaspoon black pepper
  • Fresh parsley, chopped for garnish

Directions

  1. Preheat your oven to 425°F (220°C).
  2. Wash and cut the potatoes into evenly sized strips.
  3. Soak the fries in cold water for 30 minutes, then drain and dry thoroughly.
  4. In a large mixing bowl, combine the fries with olive oil, garlic, salt, and pepper, ensuring they are evenly coated.
  5. Spread the fries on a lined baking sheet in a single layer with plenty of space in between each fry.
  6. Bake in the preheated oven for 20 minutes, then flip the fries and bake for an additional 5-10 minutes until golden brown.
  7. Remove the fries from the oven and immediately sprinkle with grated Parmesan cheese.
  8. Garnish with fresh parsley and serve hot with your favorite dipping sauces.

Recipe Notes

  • For extra flavor, consider adding your favorite seasoning blends.
  • Feel free to substitute the Parmesan with your cheese of choice.
  • Make sure to serve them hot for the best texture.
  • If using thin-skinned potatoes, you can leave the skin on for added texture and nutrients.

Easy Air Fryer Canned Potatoes – Crispy & Delicious

Delicious Air Fryer Canned Potatoes: A Quick and Easy Recipe

⚖️
Difficulty
Easy

⏲️
Prep Time
5 mins

🕒
Cook Time
15 mins

⏱️
Total Time
20 mins

🍽️
Servings
4

Imagine a dish so easy to prepare, yet so savory and delicious that it becomes an instant favorite in your home. This Air Fryer Canned Potatoes recipe presents a wonderful way to enjoy crispy, golden potatoes that are packed with flavor. With just a few simple ingredients and minimal prep time, you will delight in roasting canned potatoes to perfection. Their crispy outer layer combined with tenderness inside makes each bite a treat.

What makes this recipe a must-try is the versatility of canned potatoes, which provide a quick base for countless flavor combinations. With every bite, you’ll savor the warmth and comfort that only potatoes can provide. Whether served as a side dish for a family gathering or as a quick snack during the week, these air fryer canned potatoes will have you coming back for more.

Quick Recipe Highlights

  • Flavor Profile: Crispy and savory with notes of garlic and herbs, these potatoes are flavor-packed.
  • Texture: The outside is crunchy while the inside remains soft and fluffy, creating a delightful contrast.
  • Aroma: Enjoy the enticing aroma of roasted garlic and seasonings as they cook and fill your kitchen.
  • Visual Appeal: Golden-brown potatoes will catch the eye, making your dish temptingly beautiful.
  • Skill Level Needed: This recipe is beginner-friendly, making it perfect for novice cooks.
  • Special Equipment: An air fryer is essential for achieving the perfect texture without deep frying.

Recipe Overview

  • Difficulty Level: Easy, suitable for anyone from beginner cooks to experienced home chefs.
  • Category: A delightful side dish that complements a variety of entrees.
  • Cuisine: This recipe draws inspiration from general comfort food and modern cooking techniques.
  • Cost: Very affordable, using canned potatoes and pantry staples.
  • Season: Ideal year-round, but especially comforting in cooler months.
  • Occasion: Perfect for casual family dinners or potluck gatherings.

Why You’ll Love This Recipe

The taste and texture of these air fryer canned potatoes are simply irresistible. Each potato is crisped to perfection, providing a satisfying crunch that complements any meal. The savory herbs and spices elevate this simple dish, ensuring that it will please even the pickiest eaters. Pair these potatoes with your favorite dipping sauce to enhance the flavor even further.

Convenience is key when preparing meals for busy days, and this recipe delivers. Ready in just 20 minutes, the dish requires only minimal hands-on time. This means more time to spend with family or focus on other tasks, allowing you to serve a tasty side with ease. Plus, using canned potatoes cuts down on prep time, making it a fantastic choice for quick evenings.

In addition to being delicious, air fryer canned potatoes are an excellent source of nutrition. Potatoes are rich in vitamins C and B6, potassium, and dietary fiber, providing essential nutrients for your overall health. When prepared in an air fryer, they require less oil than traditional frying methods, making them a healthier alternative for enjoying crispy potatoes.

Social and entertaining value is another major plus. When you serve these potatoes, they are sure to impress guests at a gathering. Their crispy texture and delightful flavor can spark conversations, creating memorable moments around the dinner table. Pair them with various dipping sauces to keep the flavors exciting and encourage guests to share their own favorites.

Lastly, the cost-effectiveness of this recipe makes it accessible for anyone looking to elevate their cooking game without overspending. Canned potatoes are inexpensive and allow for a quick dish that feels gourmet. Whether you’re cooking for a family meal or hosting friends, these air fryer canned potatoes will deliver satisfaction without breaking the bank.

Historical Background and Cultural Significance

The use of canned potatoes dates back to the mid-20th century, a time when convenience foods gained popularity. Initially designed to reduce prep time in households, canned vegetables transformed how families approached cooking. This trend led to the evolution of recipes and innovative cooking techniques, such as using an air fryer.

Canned potatoes hold cultural importance in many Western cultures, providing an accessible way for families to enjoy the staple potato without the fuss. These products cater to the busy lifestyles of modern families while maintaining the comforting essence of home-cooked meals.

As cooking methods evolved, so did variations of traditional recipes. Air fryers, with their ability to create crispy textures without the need for excessive oil, have revolutionized how we enjoy beloved comfort foods. The evolution of air fryers has also contributed to the rise of healthier eating habits, allowing for lower-calorie alternatives for traditionally fried dishes.

Regional variations of air-fried potato dishes have emerged as well, with different cultural interpretations focusing on seasoning and flavor pairings. From Cajun spices in the South of the U.S. to the use of herbs de Provence in French-inspired dishes, the possibilities are endless when it comes to customizing canned potatoes in the air fryer.

Ingredient Deep Dive

Canned potatoes are the star of this recipe. Historically, these shelf-stable vegetables provided a solution for families needing quick meal options. Nutritionally, potatoes are a great source of carbs and essential vitamins. When choosing canned potatoes, look for those free from preservatives and with minimal added ingredients. Store them in a cool, dry place, and always check expiration dates.

The herbs and spices used significantly enhance the flavor of the potatoes. Popular choices include garlic powder and paprika, which add depth and warmth. Fresh herbs can also be a fantastic addition, brightening the dish with their fresh aroma.

Oil can also be adjusted based on dietary needs; olive oil is a heart-healthy option, while ghee provides a rich flavor. This ingredient not only helps achieve a crispy texture but also contributes healthy fats to the meal. Experiment with different oils for various flavor profiles, and ensure to store them in a cool, dark place.

Common Mistakes to Avoid

  • Not preheating the air fryer: Skipping this step can lead to uneven cooking and less crispy potatoes. Always preheat for optimal results.
  • Overcrowding the basket: Too many potatoes can cook unevenly. Work in batches to ensure they crisp up perfectly.
  • Skipping seasoning: Plain potatoes can be bland. Don’t forget to season generously for maximum flavor.
  • Using cold or room temperature potatoes: For best results, use canned potatoes right after draining and drying them.
  • Not checking periodically: Air fryers cook quickly, so monitor the potatoes to prevent burning.
  • Using too much oil: While oil is necessary for crispiness, too much can lead to greasy potatoes. Use a light coating.
  • Neglecting to shake the basket: Shaking halfway through cooking ensures even browning and crisping.
  • Ignoring storage instructions: Leftover potatoes should be stored properly to maintain their quality.
  • Not experimenting with flavors: Embrace creativity with different seasonings and toppings for added interest.
  • Assuming all canned potatoes are the same: Choose brands known for quality and flavor; it makes a difference.

Essential Techniques

Preheating your air fryer is an essential technique for achieving the best results. It ensures even cooking from the moment you place your food inside. To master this, simply set the air fryer to the desired temperature and allow it to run for 2-3 minutes before adding the canned potatoes.

Properly shaking the basket during cooking is crucial in ensuring your potatoes crisp up evenly. Every five minutes, remove the air fryer basket, give it a gentle shake, and return it to finish cooking. This technique prevents sogginess by allowing hot air to circulate properly around every potato.

Frequently Asked Questions

  • Can I use fresh potatoes instead? Yes, but fresh potatoes require longer cooking times and additional preparation.
  • How can I ensure my potatoes are crispy? Make sure they’re well-drained and lightly coated with oil before cooking.
  • Is it necessary to peel the potatoes? No, canned potatoes are typically ready-to-use and don’t require peeling.
  • What are some seasoning options? You can use garlic powder, onion powder, paprika, or even ranch seasoning for variety.
  • Can this recipe be doubled? Yes, just cook in batches to avoid overcrowding the air fryer.
  • How do I store leftovers? Store in an airtight container in the fridge for up to 3 days.
  • Can I freeze air-fried canned potatoes? While not ideal, you can freeze them to extend shelf life, though texture may change.
  • What should I serve with these potatoes? They pair well with grilled meats, salads, or as part of a brunch spread.
  • How can I make these potatoes spicy? Add cayenne pepper or chili powder to your oil mixture for a kick.
  • Can I use an oven instead of an air fryer? Yes, but adjust cooking times and temperatures accordingly.
  • Join the Conversation

    We love hearing your feedback! Share your experiences with this Air Fryer Canned Potatoes recipe on social media. Don’t forget to tag us in your photos, and let us know how you customized the dish. Interested in the community’s take on variations? We encourage readers to swap ideas and tips to make this simple recipe your own. Your suggestions could inspire future adaptations, creating a collaborative cooking experience that we can all enjoy.

    The Recipe

    Air Fryer Canned Potatoes

    Serves: 4

    Prep Time: 5 mins

    Cook Time: 15 mins

    Total Time: 20 mins

    Kitchen Equipment Needed

    • Air Fryer
    • Mixing Bowl
    • Measuring Spoons

    Ingredients

    • 2 cans of potatoes (drained and rinsed)
    • 2 tablespoons olive oil
    • 1 teaspoon garlic powder
    • 1 teaspoon paprika
    • Salt and pepper to taste

    Directions

    1. Preheat the air fryer to 400°F (200°C).
    2. In a mixing bowl, combine the drained canned potatoes with olive oil, garlic powder, paprika, salt, and pepper.
    3. Gently toss until the potatoes are evenly coated.
    4. Place the seasoned potatoes in the air fryer basket in a single layer.
    5. Air fry for 15 minutes, shaking the basket halfway through for even cooking.
    6. Once golden and crispy, remove and serve immediately.

    Recipe Notes

    • Add fresh herbs like parsley for garnish before serving.
    • Feel free to tweak seasoning based on personal preferences.
    • Leftovers can be reheated in the air fryer for 5 minutes at 350°F.

    Best Pinterest Air Fryer Onion Rings – Crispy & Delicious

    Top Pinterest Air Fryer Onion Rings: The Ultimate Crunchy Snack

    ⚖️
    Difficulty
    Easy

    ⏲️
    Prep Time
    15 mins

    🕒
    Cook Time
    10 mins

    ⏱️
    Total Time
    25 mins

    🍽️
    Servings
    4

    Air Fryer Onion Rings are a must-try for anyone craving a crispy, crunchy snack that satisfies. This recipe transforms a classic indulgence into a healthier alternative without losing any of the delightful flavors. Imagine biting into a perfectly golden onion ring, with a crispy exterior giving way to tender, sweet onion inside. With the dial set to air fryer magic, these onion rings come together quickly, ensuring you can enjoy your favorite flavors without the guilt of traditional frying.

    What makes these Top Pinterest Air Fryer Onion Rings stand out is their versatility. They’re perfect as a party appetizer, a side dish for burgers, or even a comforting snack on movie night. The mixture of spices adds an extra kick, creating layers of flavor that will leave everyone wanting more. Grab a side of your favorite dipping sauce, and you have a tantalizing treat that is hard to resist.

    Quick Recipe Highlights

    • Flavor Profile: The sweet, caramelized onion mingles perfectly with a zesty spice blend, creating an unbeatable taste.
    • Texture: Expect a satisfying crunch on the outside paired with a tender, juicy center.
    • Aroma: The aromatic blend of onion and spices fills your kitchen, enticing everyone to gather around.
    • Visual Appeal: The vibrant golden-brown color makes these onion rings a feast for the eyes.
    • Skill Level Needed: This is an easy recipe perfect for beginner cooks wanting to impress.
    • Special Equipment: An air fryer is key for achieving that perfect crispy texture without the extra oil.

    Recipe Overview

    • Difficulty Level: This recipe is marked easy, making it accessible for both novice cooks and seasoned chefs looking for a quick snack.
    • Category: These onion rings fit into snack or appetizer categories and make a fantastic addition to any gathering.
    • Cuisine: While often associated with American cuisine, onion rings have transcended cultures, finding their way into various global foods.
    • Cost: Their cost-effectiveness makes them appealing—budget-friendly with minimal ingredients required.
    • Season: Perfect for year-round enjoyment, especially during summer barbecues and game nights.
    • Occasion: Serve these for casual parties, movie nights, or gatherings where finger foods reign supreme.

    Why You’ll Love This Recipe

    The taste and texture appeal of these Top Pinterest Air Fryer Onion Rings are irresistible. The contrasting crunchiness of the breading and the soft, sweet onion inside create an extraordinary sensory experience. Each bite bursts with flavor, making them addictive and a perfect companion alongside hamburgers or during a snacking session.

    Convenience is another winning aspect of this recipe. With just a bit of prep time and a quick cook cycle in the air fryer, you’ll discover a delightful way to whip up onion rings without spending hours in the kitchen. Unlike traditional frying, the air fryer eliminates the hassle of dealing with hot oil while still delivering that coveted crispy finish.

    The nutritional advantages of these onion rings should not be overlooked. Air frying reduces the typical calorie count associated with deep-frying, making this dish a more heart-healthy option. By using whole ingredients and minimal oil, you can enjoy this snack guilt-free, perfect for a variety of diets.

    These onion rings have significant social and entertaining value. They’re a fantastic choice to share at gatherings, igniting conversations and bringing people together over a shared love for delicious food. Whether watching a big game or hosting a backyard barbecue, your guests will surely appreciate this crowd-pleaser.

    Moreover, this recipe is cost-effective and accessible. With simple and affordable ingredients, it doesn’t break the bank. You can enjoy a treat that rivals traditional options while staying within a reasonable budget. This balance of flavor, ease, and affordability makes the recipe a clear winner.

    Historical Background and Cultural Significance

    Onion rings have an interesting origin story, believed to have began in the United States in the early 20th century. Their rise to popularity can be traced back to the fairgrounds and diners, where the crispy onion treat quickly gained fame. Different variations exist, with each region adding a unique spin, making them a beloved snack across the country.

    Culturally, onion rings signify indulgence and comfort food. They evoke warm memories of family gatherings and backyard cookouts, serving as a nostalgic reminder of leisurely summer days. This cultural relevance contributes to their ongoing popularity, ensuring they remain a staple in American cuisine.

    The evolution of the onion ring has taken interesting turns over the decades. What was once a simple roadside diner fare has now made its way into gourmet menus and restaurant chains alike, showcasing the versatility and enduring appeal of this beloved snack.

    Regional variations have also emerged, with different cultures incorporating unique spices and batters into their own takes on onion rings. For instance, some Southern-style recipes incorporate buttermilk, while others experiment with seasonings to create distinct flavor profiles that resonate with local traditions.

    Ingredient Deep Dive

    Onions are undoubtedly the star ingredient of this recipe. They hold cultural significance as a staple in numerous cuisines, symbolizing flavor and depth in cooking. Furthermore, onions are rich in antioxidants and vitamins, promoting heart health and providing anti-inflammatory benefits. When selecting onions for this recipe, look for firm, smooth-skinned bulbs, and store them in a cool, dark place to prolong their freshness.

    Breadcrumbs also play a crucial role in enhancing the texture of our onion rings. They create that sought-after crunch when cooked, complementing the softness of the onion within. Choose fresh breadcrumbs for the best texture, or make your own from leftover bread. Store breadcrumbs in an airtight container to keep them fresh for longer, and consider using panko for an even lighter and crispier finish.

    Finally, don’t forget the spices! Using a blend of seasonings can elevate your Air Fryer Onion Rings to extraordinary heights. Traditional spice choices may include paprika, garlic powder, and black pepper, enhancing flavor and aroma. Always opt for fresh spices for the most robust taste, and adjust your seasoning levels according to personal preference for a tailored flavor experience.

    Common Mistakes to Avoid

    • Not preheating the air fryer: Failing to preheat can lead to uneven cooking and less crispy results. Always preheat your air fryer for optimal texture.
    • Overcrowding the basket: Allowing too many onion rings in one batch can result in steaming rather than crisping. Cook in batches to achieve the best texture.
    • Skipping the coating: Skimping on the breading will result in onion rings that lack crunch. Take your time to fully coat each ring for that perfect crunch.
    • Using the wrong onion type: Always choose a variety known for its sweetness and tenderness, such as yellow or sweet onions. Avoid overly pungent varieties.
    • Incorrect oil application: Avoid using too much oil; a light spray is enough. Too much oil can lead to soggy onion rings instead of the desired crispiness.
    • Ignoring cook times: Monitor your cooking times closely; overcooked onion rings will become burned and lose their appeal.
    • Skipping the seasoning: Bypassing spice additions will result in bland onion rings. Don’t be shy with seasoning to enhance flavor.
    • Not letting the onion rings rest: Allowing onion rings to sit for a few moments post-cooking will help the crust firm up and improve texture.
    • Using soggy onions: Always choose firm onions. Soft or mushy onions can lead to an undesirable texture in your final dish.
    • Using outdated ingredients: Ensure spices and breadcrumbs are fresh to prevent a stale taste in your onion rings.

    Essential Techniques

    To achieve perfectly crispy onion rings, mastering the coating technique is crucial. Start by properly preparing the onions, slicing them to an even thickness to ensure uniform cooking. For the coating, dip each ring in flour, then egg, and finally breadcrumbs, ensuring an even covering on all sides. This triple-dipping technique establishes a crunchy exterior that enhances the final product.

    Another important technique is temperature control. Preheating the air fryer is essential to achieving that crispy finish. The air fryer should reach the desired temperature before adding your onion rings, as this prevents sogginess and supports optimal cooking. Keep an eye on the cooking time, adjusting as needed based on how thick your onion rings are.

    Pro Tips for Perfect Air Fryer Onion Rings

    1. Use a light hand when spraying oil. You want just enough to help the breadcrumbs adhere but not so much that the rings become greasy.
    2. Experiment with your breadcrumb mixture—try adding grated parmesan cheese or different herbs to create new flavors.
    3. Let the onion rings cool slightly after air frying for extra crunch before serving.
    4. Always slice onions consistently to ensure even cooking and a uniform eating experience.
    5. Encourage guests to get involved; have a DIY onion ring station for gatherings where they can coat their rings before cooking.
    6. Pair your onion rings with a variety of dipping sauces; this adds an extra fun element to the experience.
    7. Maintain watchfulness during the final minutes of cooking, as the last 1-2 minutes can make or break your crunch.
    8. Store leftover onion rings in a single layer in the fridge, reheat for freshness to maintain texture.

    Variations and Adaptations

    For regional variations, consider adding unique spices like Cajun seasoning for a Southern twist or chili powder for a spicy kick. Seasonal adaptations can introduce fresh herbs or even vegetable additions like zucchini for a vibrant mix. For dietary modifications, swap traditional breadcrumbs with gluten-free alternatives such as almond flour or ground oats.

    Flavor variations could include adding a squeeze of lemon juice for a bright contrast to the savory taste or incorporating cheese for a cheesy version. To modify texture, opt for thicker onion slices for a heartier bite or thinner cuts for more crunch. Presentation alternatives might include serving onion rings on skewers for novelty, making them more fun for gatherings.

    Serving and Presentation Guide

    Plating techniques can enhance the visual appeal of onion rings. Serve them in cone-shaped holders or on a wooden platter lined with parchment paper for a rustic touch. Garnishing ideas include fresh herbs like parsley or chives that add color and freshness, enhancing the overall look.

    For traditional accompaniments, consider pairing your onion rings with a rich ranch or zesty barbecue sauce. Modern serving suggestions could include a side of garlic aioli or spicy mayo, appealing to the contemporary palate. Ensure your onion rings are served hot for the best experience, enhancing the flavor and texture. Portion control can be managed by serving them in smaller baskets, encouraging guests to share and explore different dipping options.

    Wine and Beverage Pairing

    For a delightful wine pairing, explore a chilled, crisp Riesling as a refreshing contrast to the savory flavors of onion rings. Light-bodied beers or lagers also beautifully complement the crunchy texture, providing a refreshing contrast when sipped. For non-alcoholic alternatives, try serving sparkling water with a wedge of lemon or herb-infused lemonade to cleanse the palate.

    If coffee or tea is applicable, a lightly brewed iced tea with a hint of citrus can serve as a delightful accompaniment. It’s essential to ensure that beverages are served at the right temperature to complement the hot onion rings, enhancing the overall experience.

    Storage and Shelf Life

    For optimal storage, keep your leftover onion rings in an airtight container and refrigerate them for up to three days. Ensure they cool completely before transferring to prevent moisture accumulation, which can lead to sogginess. When reheating, use your air fryer at a low temperature to regain crispiness without overcooking.

    Freezing is another option if you want to extend shelf life; wrap the cooled onion rings in plastic wrap before placing them in a freezer-safe bag. They typically last around three months in the freezer. To reheat, bake them directly from frozen; this keeps them crispy without needing to thaw.

    Make Ahead Strategies

    You can streamline your cooking process by prepping onion rings ahead of time. Slice and coat the onion rings and store them in the refrigerator until you’re ready to cook. Holding them in the fridge helps the breading adhere better during cooking, ensuring crunchiness.

    Quality impact is essential to assess; the sooner you cook after prep, the better the taste and texture. When assembling, layering the rings on a baking sheet lined with parchment paper can keep them organized. If you want to add fresh elements, like greens, wait to incorporate them until just before serving.

    Scaling Instructions

    When halving the recipe, use fewer onions and adjust your spices and coating quantities accordingly. Doubling or tripling the recipe may require preparing in batches to ensure even cooking; always monitor your air fryer capacity to prevent crowding.

    For equipment adjustments, consider using multiple trays in your air fryer for larger volumes. Timing modifications are important; cooking times may vary with larger batches, so keep an eye on the progress to avoid overcooking. Proper storage considerations for any leftovers are essential to maintain flavor and texture; follow the storage guidelines outlined above.

    Nutritional Deep Dive

    Looking at the macro breakdown, Air Fryer Onion Rings provide carbohydrates primarily from the onions and breadcrumbs. This snack option is generally lower in fat compared to their traditional counterparts due to the air frying process, making them a healthier choice.

    Micronutrient analysis reveals that onions contribute essential vitamins C and B6, along with minerals such as potassium. These nutrients offer significant health benefits, including supporting immune function and maintaining heart health, making these rings a tasty treat that won’t derail a balanced diet.

    Dietary considerations are important for portion analysis. While delicious, moderation is advised to maintain healthy eating habits. These onion rings are versatile enough to fit into various eating plans; being mindful of chosen portions can aid in weight management efforts.

    Dietary Adaptations

    For gluten-free variations, simply replace traditional breadcrumbs with gluten-free alternatives like almond flour, providing a similar texture without the gluten. To accommodate dairy-free diets, use non-dairy milk in the egg wash and skip any cheesy adaptations.

    For those following vegan diets, substitute flax eggs in place of regular eggs and use plant-based breadcrumbs. Low-carb dieters can forgo the breadcrumbs entirely, opting for crushed pork rinds instead for that satisfying crunch. If following a paleo diet, choose all-natural ingredients while avoiding any processed additives.

    Troubleshooting Guide

    If you encounter texture issues, it might be helpful to increase the air fryer temperature slightly during the last moments of cooking to achieve the desired crispiness. For flavor balance problems, revisiting your spice mix is key; consider adjusting seasoning levels to enhance the overall taste.

    In cases of temperature problems, ensure that the air fryer is correctly preheated before cooking and monitor carefully to avoid undercooking. Equipment challenges can typically be solved by ensuring you’re using suitable baskets or trays that allow proper air circulation for even cooking.

    Ingredient substitutions can sometimes alter the final result; if you must substitute, select options that maintain texture and flavor integrity. Timing concerns should be solved with practice; keeping meticulous notes for adjustments on future attempts can make it easier to achieve perfection.

    Recipe Success Stories

    Our community has shared numerous success stories regarding this recipe, highlighting how these Top Pinterest Air Fryer Onion Rings have become a favorite snack item for their families. Readers frequently rave about how easy they are to prep and cook, even in busy schedules.

    Many have experimented with unique variations, sending in delightful adaptations that include using different dipping sauces or adding herbs to the breadcrumb mixture for an extra flavor punch. Adaptation stories are abundant, showcasing how this recipe has inspired creativity in kitchens everywhere.

    Photography tips also abound, with a stunning array of reader-contributed photos showing off their golden creations on social media. Testimonials emphasize how this simple recipe unfolds into an experience enjoyed together over laughter and conversation.

    Frequently Asked Questions

    How do I make sure my onion rings are crispy?

    To achieve ultra-crispy onion rings, ensure each ring is adequately coated in breadcrumbs and don’t overcrowd the air fryer basket. Preheating the air fryer before cooking is also crucial for maintaining that crispy exterior.

    Can I use other types of onions?

    Absolutely! While yellow and sweet onions are typically preferred for their sweetness, you can experiment with purple or even shallots for different flavor profiles.

    Do I need to peel the onions?

    Yes, it’s essential to peel the onions before slicing to ensure the best flavor and texture. The outer skin does not soften during cooking and can affect your bite.

    How can I store leftovers?

    Leftover onion rings can be stored in an airtight container in the refrigerator for up to three days. Ensure they cool completely before packing to prevent sogginess.

    Can I freeze onion rings?

    Yes, you can freeze these onion rings! Ensure they are cooked and cooled completely before wrapping them in plastic and placing them in a freezer-safe bag for up to three months.

    What dipping sauces pair well?

    Popular dipping sauces include ranch, barbecue sauce, and garlic aioli. Feel free to explore unique options like spicy mustard or honey mustard for an interesting twist.

    How long should I cook them in the air fryer?

    Cook your onion rings in the air fryer for about 8-10 minutes at 400°F. Check for golden brown coloring and adjust time as needed based on the thickness of your rings.

    Can I make these onion rings in the oven?

    While this recipe specifically uses an air fryer for optimal crispiness, you can bake the onion rings in a preheated oven at 425°F for about 15-20 minutes, flipping halfway through for even cooking.

    What can I do with leftover breading?

    Leftover breading can be stored in an airtight container for a short time and used for future breading applications, or you can sprinkle it on salads or casseroles for added crunch!

    Can I add spices to the breading?

    Absolutely! Feel free to mix in spices like paprika, Italian herbs, or cayenne pepper to customize the flavor of your breading to suit your taste.

    Additional Resources

    If you’re looking for more delicious recipes, consider exploring similar snack ideas like homemade sweet potato fries or crispy zucchini chips. Technique guides on air frying and breading can enhance your skills and broaden your cooking repertoire. Be sure to check seasonal variations, pulling in fresh ingredients to amp up flavor and nutrition throughout the year.

    Join the Conversation

    We encourage you to share your experiences replicating these Top Pinterest Air Fryer Onion Rings on social media! With your unique presentation ideas and photography tips, the community can engage further, exploring variations and adaptations while collecting feedback that inspires others. Your reviews are invaluable—we appreciate hearing your thoughts and insights on this recipe!

    The Recipe

    Top Pinterest Air Fryer Onion Rings

    Serves: 4

    Prep Time: 15 mins

    Cook Time: 10 mins

    Total Time: 25 mins

    Kitchen Equipment Needed

    • Air fryer
    • Cutting board
    • Sharp knife
    • Mixing bowls
    • Measuring cups and spoons
    • Spray oil bottle

    Ingredients

    • 2 large onions, sliced into ½-inch rings
    • 1 cup all-purpose flour
    • 2 large eggs, beaten
    • 2 cups breadcrumbs (preferably panko)
    • 1 teaspoon garlic powder
    • 1 teaspoon paprika
    • Salt and pepper to taste
    • Cooking spray

    Directions

    1. Preheat the air fryer to 400°F (200°C).
    2. In three separate bowls, set up a dredging station: one with flour seasoned with salt and pepper, the second with beaten eggs, and the third with breadcrumbs mixed with garlic powder and paprika.
    3. Start by dipping each onion ring in the flour, ensuring it’s coated.
    4. Next, dip the floured ring into the egg wash, letting excess drip off.
    5. Finally, press the onion ring into the breadcrumb mixture, ensuring it’s fully coated. Repeat for all onion rings.
    6. Arrange the breaded onion rings in a single layer in the air fryer basket, and spray lightly with cooking oil.
    7. Cook for 8-10 minutes, flipping halfway through until golden brown and crispy.
    8. Remove from the air fryer and serve immediately with your favorite dipping sauces.

    Recipe Notes

    • Experiment with different spices in the breadcrumbs for varied flavor profiles.
    • Store leftover onion rings in an airtight container for up to three days.
    • Reheat in the air fryer to reclaim crispiness if using leftovers.

    Easy Air Fried Pearl Onions – Mini Bloomin’ Onions Recipe

    Air Fried Pearl Onions: Delightful Mini Bloomin’ Onions

    ⚖️
    Difficulty
    Medium

    ⏲️
    Prep Time
    15 mins

    🕒
    Cook Time
    20 mins

    ⏱️
    Total Time
    35 mins

    🍽️
    Servings
    4 servings

    Air Fried Pearl Onions, also known as Mini Bloomin’ Onions, are an exciting and flavorful alternative to traditional onion rings. Perfect for parties or family gatherings, these crispy, golden bites will steal the show at any table. With their unique shape and a satisfying crunch, they capture the essence of comfort food while offering a fresh twist on a classics.

    The earthy sweetness of pearl onions pairs perfectly with a variety of dipping sauces, making them a versatile appetizer that can elevate any meal. As they cook in the air fryer, the onions caramelize, imparting a rich flavor that mingles beautifully with spices and breading. Whether served as a side or a snack, these bite-sized wonders will leave your guests coming back for more.

    Quick Recipe Highlights

    • Flavor Profile: These Air Fried Pearl Onions feature a delightful balance of savory, earthy, and slightly sweet flavors, enhanced by rich spices.
    • Texture: Expect a crispy exterior that gives way to tender, juicy onion centers, creating a satisfying contrast in every bite.
    • Aroma: The aroma of garlic and spices wafts through the air, inviting everyone to indulge in this appetizing treat.
    • Visual Appeal: Golden brown, intricately flaked onions create an inviting dish that’s as beautiful as it is delicious.
    • Skill Level Needed: With simple preparation and straightforward steps, even beginner cooks can master this delightful recipe.
    • Special Equipment: An air fryer is essential for achieving that perfectly crispy texture without the need for excess oil.

    Recipe Overview

    • Difficulty Level: The medium difficulty level stems from the careful preparation of the pearl onions and the precision required during breading.
    • Category: This recipe fits well within the appetizer category, making it ideal for social gatherings or casual evenings at home.
    • Cuisine: Influenced by classic American fare, Air Fried Pearl Onions draw inspiration from Southern comfort food traditions.
    • Cost: A budget-friendly option, most ingredients can be sourced reasonably, allowing you to treat your guests without overspending.
    • Season: Enjoy these Mini Bloomin’ Onions year-round, but they particularly shine in cooler months when hearty flavors are most appreciated.
    • Occasion: Ideal for game day celebrations, holiday parties, or just a fun family dinner, these onions can adapt to any occasion.

    Why You’ll Love This Recipe

    Imagine biting into a crispy pearl onion, bursting with flavor and texture. The combination of herbs, spices, and a light batter creates a snack that’s much lower in calories compared to deep-fried alternatives, allowing you to indulge guilt-free. These Air Fried Pearl Onions not only please the palate but are also incredibly convenient to prepare.

    Nutritionally, pearly onions offer a rich source of vitamins and minerals, including vitamin C and antioxidants that support overall health. They are low in calories and contain no cholesterol, making them a heart-healthy choice for your appetizer repertoire.

    Socially, serving these mini delights can act as an icebreaker during gatherings, encouraging guests to mingle and enjoy the atmosphere. Their impressive appearance will have everyone snapping photos and sharing them on social media, showcasing your culinary prowess.

    Cost-effectiveness adds another layer of appeal to this recipe, as it makes use of simple ingredients that many people keep on hand. You can whip up a delicious batch without worrying about breaking the bank, making it perfect for casual get-togethers or extravagant celebrations.

    Finally, there’s a sense of achievement in mastering the air fryer. As you pull out a beautifully cooked batch of Air Fried Pearl Onions, you’ll feel accomplished and proud to serve such a delightful dish to your friends and family.

    Historical Background and Cultural Significance

    The origin of fried onions dates back centuries, with various cultures experimenting with this beloved vegetable in innovative ways. In Southern cuisine, fried foods have long been a staple, representing hearty meals that warm the soul.

    Pearl onions, smaller and sweeter than their larger counterparts, have become a popular choice for frying due to their tender texture and unique flavor. Over time, recipes like these Mini Bloomin’ Onions have evolved from casual family dishes into trendy appetizers featured in many restaurants today.

    As air frying has gained popularity, this method offers a healthier twist on traditional frying. The ability to enjoy crispy, fried foods without the guilt has made these Air Fried Pearl Onions a go-to choice for both home cooks and food enthusiasts alike.

    Across the globe, variations of fried onions can be found, from crispy French onion soup toppings to Indian pakoras. This versatility speaks to the onion’s cultural importance, making it a beloved ingredient that connects diverse culinary traditions.

    Ingredient Deep Dive

    Pearl onions are small, sweet, and undeniably delicious. These little gems add a delightful sweetness to any dish, particularly when cooked. Their history dates back to ancient times, where they were prized not only for their flavor but for their health benefits. Low in calories and rich in vitamins, pearl onions are not just tasty but also nutritious.

    When selecting pearl onions, look for firm, unblemished bulbs. They should be free from sprouting and soft spots to ensure maximum freshness. Store them in a cool, dry place, preferably in a mesh bag or loosely in the refrigerator to keep air circulating. If you can’t find pearl onions, you can easily substitute with small shallots or other soft onions for similar flavor profiles.

    Breadcrumbs serve as the foundation for creating that beloved crunchy texture. Homemade breadcrumbs can take your Air Fried Pearl Onions to the next level, allowing for customization based on your favorite herbs and spices.

    Opting for whole-grain breadcrumbs can improve the overall nutritional profile, offering additional fiber and nutrients. Additionally, ensuring they remain dry and fresh contributes to the final crispiness. For variety, consider panko breadcrumbs, which lend an even lighter, airier crunch that pairs well with the sweet onions.

    Common Mistakes to Avoid

    • Overcrowding the air fryer basket: This prevents proper air circulation and can lead to uneven cooking. Always leave space between the onions to achieve that perfect crispness.
    • Not draining excess moisture from the onions: Make sure to pat your pearl onions dry after rinsing to enhance the crispy texture during cooking.
    • Using stale breadcrumbs: Fresh breadcrumbs not only taste better but also have a superior texture. Ensure your breadcrumbs are fresh or crisp them up before use.
    • Inconsistent onion size: Evenly sized onions cook at the same rate; using mixed sizes can result in some being undercooked while others are burnt.
    • Neglecting to preheat the air fryer: Preheating ensures that your dish cooks evenly and achieves that gorgeous golden color you are looking for.
    • Not seasoning adequately: The flavor of your Air Fried Pearl Onions relies heavily on the seasoning in the breadcrumbs. Don’t skimp on herbs and spices!
    • Skipping the egg wash: The egg wash acts as a glue that helps the breadcrumbs adhere to the onions more effectively for a well-coated finish.
    • Improper cooking time: Pay close attention to cooking time, as overcooked onions can become overly soft and lose their delightful crunch.
    • Ignoring visual cues: Cooking times may vary by air fryer model; monitor your onions and pull them out when they develop a golden-brown hue.
    • Serving without a dipping sauce: The right sauce elevates the flavors, so don’t forget to serve your delicious Air Fried Pearl Onions with a tasty dipping option.

    Essential Techniques

    Breading may seem simple, but it’s an essential technique that requires the proper balance of ingredients. This method involves coating your pearl onions in flour, dip them in an egg wash, and finally giving them a good roll in breadcrumbs. This combination ensures that they achieve that perfect crunch when cooked. Practice makes perfect, so don’t rush through this step.

    Monitoring cooking time and temperature is crucial for ensuring your onions are cooked perfectly. An air fryer requires precise timing to avoid overcooking or undercooking. Keep a close eye on the onions and adjust cooking times based on your specific air fryer model for optimal results.

    If you’re new to using an air fryer, make sure to familiarize yourself with how it functions. Different models may require different cooking techniques, temperature settings, and cooking times, so understanding your specific machine will help you achieve the best results.

    Pro Tips for Perfect Air Fried Pearl Onions

    Begin by soaking the pearl onions in hot water for a few minutes to make peeling easier. This simple trick saves you time and frustration.

    To enhance the flavor, try adding grated Parmesan cheese to your breadcrumbs. This addition adds richness and depth, giving you even tastier results.

    Consider marinating your pearl onions in your favorite seasonings before breading. A marinade can add an extra level of flavor that will impress your guests.

    Experiment with different spices in your breadcrumb mixture, such as smoked paprika or cayenne pepper, to customize the heat level of your Air Fried Pearl Onions.

    Don’t hesitate to try a gluten-free option with almond flour or cornmeal as your base instead of traditional breadcrumbs for a gluten-free variation.

    Let the cooked onions rest on a wire rack after frying to maintain their crisp texture. Placing them directly on a plate can cause sogginess as moisture collects.

    Before serving, garnish with freshly chopped herbs, like parsley or chives, to add a pop of color and additional flavor to your dish.

    Pair Air Fried Pearl Onions with a variety of dipping sauces, such as ranch, spicy mayo, or homemade aioli, for a versatile appetizer that complements many tastes.

    Variations and Adaptations

    Explore different flavor profiles by swapping in your favorite seasonings for the breading. Italian herbs or Cajun spices can transform the humble onion into something spectacular.

    Seasonal adaptations could include using seasonal vegetables alongside pearl onions, such as fresh bell peppers or zucchini for a colorful and nutritious twist.

    If dietary modifications are needed, consider using gluten-free breadcrumbs or eliminating dairy by replacing egg with a flax egg for vegan enthusiasts.

    For a flavor variation, consider adding cheese, such as cheddar or blue cheese, while air frying for an extra burst of flavor.

    When it comes to texture modifications, try double breading the onions for an added crunch; simply repeat the breading process for a thicker crust.

    For presentation alternatives, arrange the onions on a platter in a bouquet-style presentation, garnished with fresh herbs or sliced lemons for a visually stunning display.

    Serving and Presentation Guide

    Plating is key to making your Air Fried Pearl Onions look as appealing as they taste. Use a large platter and arrange the onions in a circular pattern or tower them in a pile for a stunning centerpiece.

    Garnish ideas include sprinkling freshly chopped herbs or drizzling a tangy sauce over the top to entice the palate further. Using colorful sauces in a small bowl beside the onions can create a vibrant presentation that catches the eye.

    Traditional accompaniments like ranch dipping sauce or other creamy dressings pair perfectly and enhance the eating experience. For modern suggestions, consider serving with spicy sriracha or an elegant balsamic reduction for a touch of sophistication.

    Temperature considerations should be made when serving; Air Fried Pearl Onions are best enjoyed immediately after cooking to maintain that delightful crunch.

    Remember to consider portion control, especially at gatherings. Providing small individual cups of dipping sauce will help guests control their portions effectively while keeping the appetizers clean and mess-free.

    Wine and Beverage Pairing

    A crisp white wine, such as Sauvignon Blanc, pairs beautifully with the flavors of Air Fried Pearl Onions. The acidity of the wine complements the sweetness of the onions, providing a well-rounded experience.

    For non-alcoholic alternatives, consider serving sparkling water infused with lemon or cucumber. It’s refreshing and elevates the dining experience without the alcohol.

    If you’re looking for an after-dinner drink, a light coffee or herbal tea can cleanse the palate after indulging in this flavorful appetizer.

    Temperature plays a role in pairing; serve white wine chilled to contrast beautifully with the warm dish, enhancing the overall dining experience.

    Presentation suggestions involve providing small glasses of wine and icy beverages alongside the onions, encouraging guests to explore various flavor combinations as they enjoy their meal.

    Storage and Shelf Life

    For proper storage, keep any leftovers in an airtight container in the refrigerator. Consumed within 3-4 days, the Air Fried Pearl Onions will maintain their best quality.

    Reheating requires a gentle approach; place them back in the air fryer at a low temperature to restore that cherished crispiness without cooking them further.

    For longer shelf life, consider freezing the uncooked, breaded pearl onions. Lay them on a baking sheet, freeze until firm, then transfer to a freezer bag for up to 3 months.

    Signs of spoilage include an off smell or slimy texture. If either is present, it’s best to err on the side of caution and discard any questionable leftovers.

    If reheating frozen onions, preheat the air fryer higher than normal and adjust timing, as they may take slightly longer than fresh ones to cook through.

    Make Ahead Strategies

    To save time, prep your Air Fried Pearl Onions a day in advance. Peel and soak the onions in water with a splash of vinegar to enhance sweetness, then store in the refrigerator.

    Separate your breading mixture and onion prep to avoid a soggy coating. Flour, egg wash, and breadcrumb stages can be prepared ahead and kept in sealed containers until ready to assemble.

    Assessing quality is vital; while assembled, breaded onions can remain covered in the refrigerator for a few hours. However, if longer storage is desired, consider freezing before cooking to preserve texture.

    Assembly tips include preparing your dipping sauce a day early to let the flavors meld together. Doing this means less stress on the day you serve.

    Reheating previously frozen breaded onions should be a delicious endeavor to do just before serving, as they will still be fresh and retain that crispy character.

    Lastly, add fresh herbs or your preferred spices to ensure vibrant flavors in your Air Fried Pearl Onions, even after prepping ahead.

    Scaling Instructions

    If you wish to halve the recipe, ensure that all ingredients maintain the necessary ratios for flavor and texture fidelity. Adjust cooking times as smaller batches typically cook faster.

    Doubling or tripling your recipe can be done easily, ensuring that you have enough air fryer capacity to accommodate larger batches. Multiple trays may be used in some models, which can expedite the process.

    When scaling, equipment adjustments may be needed; consider using a second air fryer or adjusting settings to ensure that each onion batch cooks evenly.

    Time modifications should be made for larger portions. Monitor closely, especially since larger quantities may require extra cooking time for the onions to achieve that perfect crispy texture.

    Finally, account for necessary storage considerations, particularly if there will be excess servings. As noted, leftovers should be stored promptly and properly to maintain quality for the next meal.

    Nutritional Deep Dive

    Air Fried Pearl Onions are not only delicious but also come packed with nutritional benefits. Low in calories, they present an excellent choice for those keeping an eye on their dietary intake.

    The macro breakdown reveals a good balance of carbohydrates with minimal fats, especially when prepared in an air fryer, which limits added oils. This makes them a satisfying, healthier snack option.

    A closer look at micronutrients shows that pearl onions are rich in vitamin C, known for its immune-boosting properties. They also contain antioxidants that combat free radicals, promoting overall health and wellness.

    Considering health benefits, their high fiber content plays a role in digestive health, aiding with satiety and helping to maintain a healthy gut.

    For portion analysis, moderation is key; enjoying a reasonable serving size can provide that crispy treat without jeopardizing your dietary goals. Incorporating these delightful onion bites into a well-balanced meal can enhance overall satisfaction and enjoyment.

    Dietary Adaptations

    For a gluten-free version, use certified gluten-free breadcrumbs and become creative with your seasonings. This alteration allows those with gluten sensitivities to enjoy Air Fried Pearl Onions without worry.

    Switching to dairy-free ingredients replaces the egg wash with plant-based options, such as almond milk or a flax egg. Alternatives make it easy to cater to those with dairy intolerance.

    Vegans can still enjoy these treats by using vegetable-based replacements for all ingredients, providing an alternative formulation that retains flavor and texture without animal products.

    For low-carb diets, consider using a mixture of almond flour and Parmesan cheese in place of traditional breadcrumbs. This will help in maintaining a delicious crunch while adhering to dietary restrictions.

    Keto enthusiasts will appreciate how these Air Fried Pearl Onions can fit into their meal plan with proper ingredient adjustments.

    Paleo followers can also enjoy a modified version by sticking to natural ingredients without any processed items, ensuring they remain in harmony with their dietary guidelines.

    Adapting to low-FODMAP diets requires choosing pearl onions in small amounts, as larger portions can cause digestive discomfort. Understanding these modifications allows everyone to partake in delicious meals.

    Troubleshooting Guide

    If you encounter texture issues where the breading appears too soggy, ensure your onions are patted dry before breading and consider letting them sit for a few minutes before cooking.

    For flavor balance, excessive seasoning can overwhelm the sweet onion taste. Start small with spices, adding more to your preference post-breading or adjusting the dipping sauces accordingly.

    Temperature problems may arise if the air fryer is not preheated, leading to unevenly cooked onions. Always preheat your air fryer to ensure even cooking from the start.

    If your equipment poses challenges, such as smaller air fryers, give attention to batches instead of overcrowding the basket to combat unevenness in cooking.

    Ingredient substitutions should always align closely with the original recipe for optimal flavor. Be cautious when replacing main components, as this may greatly affect the outcome.

    Timing concerns often lead to overcooked ingredients. Monitor cooking closely, as air fryers can vary significantly in performance, requiring adjustments in cook time.

    Recipe Success Stories

    Readers have shared their successful experiences with Air Fried Pearl Onions, emphasizing how the recipe has become a favorite for game-day gatherings and holiday celebrations.

    Many love experimenting with variations, adding personal touches such as different spices or serving with unique dipping sauces that surprise guests.

    Community members maintain that this recipe is foolproof, with minimal complaints when following guidelines but allowing for creativity during preparation.

    Photography tips include highlighting the crunchy texture and showcasing dipping sauces in beautiful shots, reflecting the delightful aspect of enjoyable food.

    People consistently recommend sharing stories of family gatherings centered around the flavors and aromas of these loved mini treats, reinforcing the social aspect of cooking.

    Frequently Asked Questions

    Can I make these Mini Bloomin’ Onions ahead of time?

    Yes, you can prepare the onions ahead of time by peeling and soaking them. However, it’s best to bread them just before cooking for optimal freshness and texture.

    What dipping sauces pair best with Air Fried Pearl Onions?

    Classic ranch dressing, zesty garlic aioli, or spicy sriracha mayo are wonderful choices that perfectly complement the flavors of the onions.

    Do I need to peel the pearl onions?

    Yes, peeling is necessary as the outer layer can be tough and bitter. Soaking them in hot water helps loosen the skins, making peeling easier.

    Can I freeze cooked Air Fried Pearl Onions?

    It’s not recommended to freeze cooked onions due to changes in texture. It’s best to consume them fresh, but uncooked, breaded onions can be frozen before frying.

    How do I reheat leftover Air Fried Pearl Onions?

    The best method to reheat is back in the air fryer at around 350°F for a few minutes until heated through to retain crunchiness.

    Are Air Fried Pearl Onions healthier than traditional fried onions?

    Yes, air frying significantly reduces the amount of oil needed for cooking, resulting in a lower-fat option that retains all the indulgent flavor.

    What is the best air fryer temperature for these onions?

    A temperature of 375°F is ideal for achieving a crispy exterior while ensuring the onions are cooked properly inside.

    Can I adapt this recipe for other vegetables?

    Absolutely! This breading and cooking technique can be applied to other vegetables like zucchini, mushrooms, or even broccoli.

    What if I don’t have fresh garlic?

    Dried garlic powder can be substituted in smaller amounts if fresh garlic is unavailable; however, fresh garlic will provide a more vibrant flavor.

    How long can I keep leftover Air Fried Pearl Onions?

    Leftovers can be stored in the refrigerator for up to 3-4 days when kept in an airtight container. Always check for freshness before consuming.

    Can I make these Mini Bloomin’ Onions spicier?

    Of course! Adding cayenne pepper or red pepper flakes to the breadcrumb mixture is an excellent way to increase the heat level of your onions.

    Additional Resources

    Expand your cooking knowledge with our related recipes and technique guides for air frying. Discover new ingredient information that can elevate your cooking experience, and find equipment recommendations to enhance your kitchen.

    Explore seasonal variations that keep your meals exciting and flavorful year-round. Join our mailing list for updates on new recipes and special offers that can inspire your next cooking adventure.

    Join the Conversation

    We invite you to share your experiences with Air Fried Pearl Onions on social media! Show off your kitchen creations, exchange your favorite dipping sauces, and post your photography tips. Engage with our community by leaving recipe reviews and sharing your unique variations to inspire others in their culinary journey.

    The Recipe

    Air Fried Pearl Onions

    Serves: 4 servings

    Prep Time: 15 mins

    Cook Time: 20 mins

    Total Time: 35 mins

    Kitchen Equipment Needed

    • Air Fryer
    • Mixing Bowls
    • Measuring Cups and Spoons
    • Cutting Board
    • Chef’s Knife
    • Whisk

    Ingredients

    • 1 lb pearl onions, peeled
    • 1 cup breadcrumbs
    • 1/2 cup all-purpose flour
    • 2 eggs, beaten
    • 1 tsp garlic powder
    • 1 tsp paprika
    • Salt and pepper to taste
    • Oil spray for cooking

    Directions

    1. Preheat your air fryer to 375°F (190°C).
    2. In one bowl, place the flour; in a second bowl, whisk together the eggs; and in a third bowl, combine breadcrumbs with garlic powder, paprika, salt, and pepper.
    3. Coat each peeled pearl onion in flour, then dip it in the egg mixture, and finally roll it in the breadcrumb mixture until fully covered.
    4. Arrange the breaded onions in the air fryer basket, making sure they are not overcrowded.
    5. Spray lightly with oil and cook for 15-20 minutes, shaking the basket halfway through, until golden brown and crispy.
    6. Remove from air fryer and let cool slightly before serving with your favorite dipping sauce.

    Recipe Notes

    • Try adding cheese to your breadcrumb mixture for an extra flavor boost.
    • To vary the flavors, consider using Italian seasoning in place of the garlic and paprika.
    • For a gluten-free option, substitute with gluten-free breadcrumbs and flour.
    • These Air Fried Pearl Onions can be made in batches; simply keep in a warm oven until ready to serve.