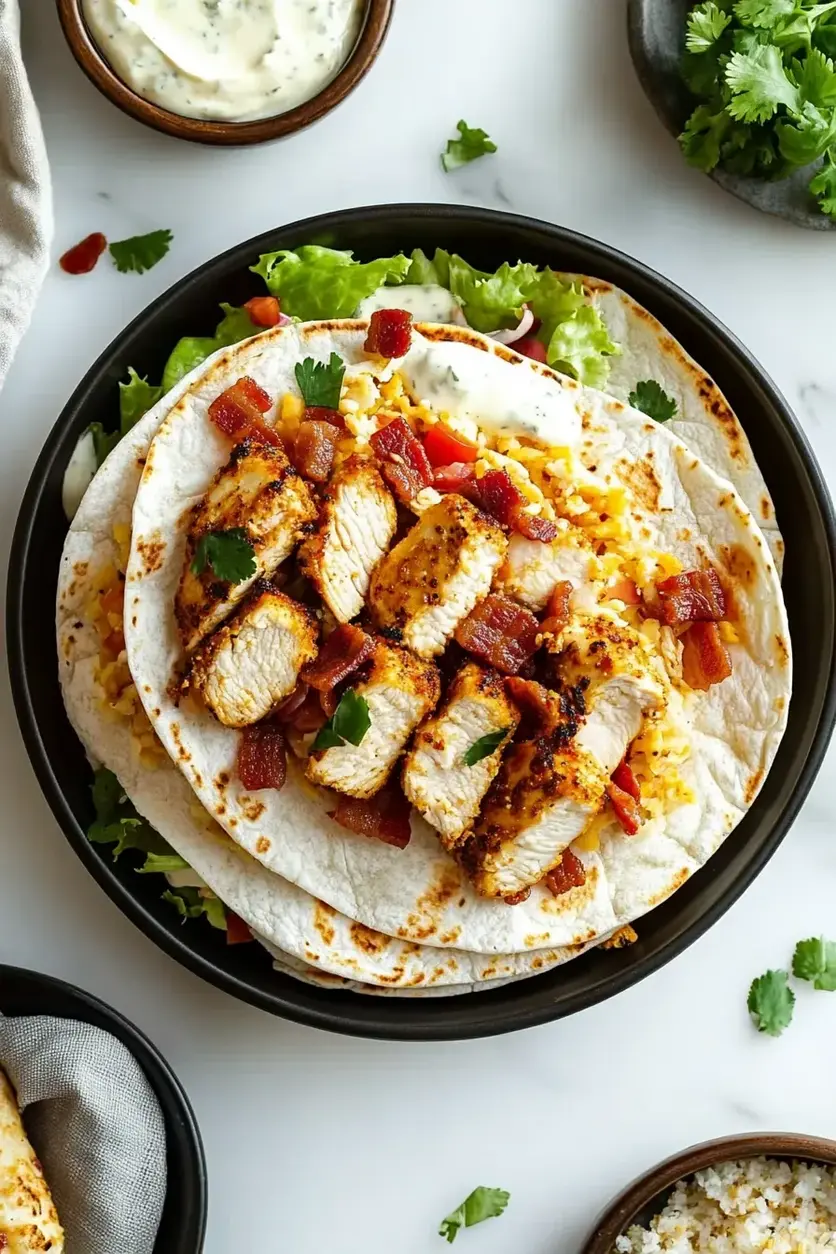
Looking for the ultimate savory wrap? Try this Crispy Chicken Bacon Ranch Wrap! Packed with crispy chicken, smoky bacon, and creamy ranch dressing, this easy-to-make wrap is perfect for lunch or dinner. With a crunchy exterior and tender filling, it’s a flavor-packed meal everyone will love. Quick, satisfying, and irresistible – make this delicious wrap today and treat your taste buds to a savory, crispy delight that’s sure to please!
This beef and broccoli is a popular Chinese take-out meal and it’s also easy enough to make at home. It’s also healthier than most take-out meal options. With juicy tender beef and crisp broccoli brought together in a rich brown sauce, this quick dinner is as colorful as it is delicious. Serve it over hot rice for an authentic Chinese take-out dinner. {Gluten-Free Adaptable}
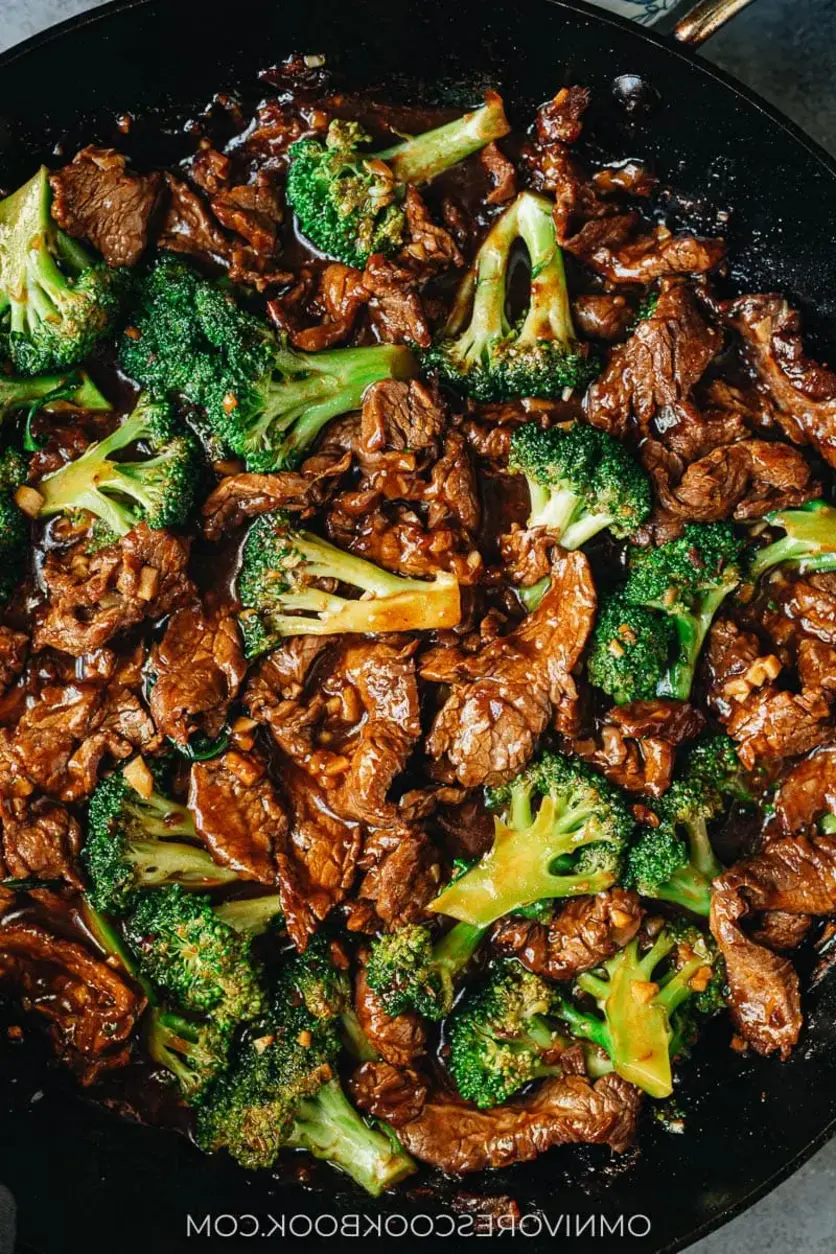
This beef and broccoli is a popular Chinese take-out meal and it’s also easy enough to make at home. It’s also healthier than most take-out meal options. With juicy tender beef and crisp broccoli brought together in a rich brown sauce, this quick dinner is as colorful as it is delicious. Serve it over hot rice for an authentic Chinese take-out dinner. {Gluten-Free Adaptable}To make this dish gluten-free, use dry sherry instead of Shaoxing wine, and use tamari instead of soy sauce.
Ingredients
Scale
1 lb flank steak , skirt steak, or other cut (*see footnote 1)
1 tablespoon soy sauce
1 tablespoon peanut oil (or vegetable oil)
1 tablespoon cornstarch
1/2 teaspoon baking soda (Optional) (*see footnote 1)
Instructions
Slice the beef against the grain into 0.5 cm (1/4 inch) thick slices or 1-cm (1/2 inch) sticks. Transfer to a small bowl. Add soy sauce, peanut oil, and cornstarch (*Footnote 1). Gently mix well by hand until all the slices are coated with a thin layer of sauce. Marinate for 10 minutes while preparing the other ingredients.
Combine all the ingredients for the sauce in a medium-sized bowl. Mix well.
Add 1/4 cup water into a large nonstick skillet over medium-high heat until the water begins to boil. Add the broccoli and cover. Steam until the broccoli just turns tender and the water evaporates,1 minute or so. Transfer broccoli to a plate. Wipe the pan with a paper towel held in a pair of tongs if there’s any water left.
Add the oil and swirl to coat the bottom. Heat over medium high heat until hot. Spread the steak in a single layer. Allow to cook without touching for 30 seconds, or until the bottom side is browned. Flip to cook the other side for a few seconds. Stir and cook until the surface is lightly charred and the inside is still pink.
Add the garlic and ginger. Stir a few times to release the flavor and fragrance.
Return the broccoli to the pan. Stir the sauce again to dissolve the cornstarch completely and pour it into the skillet. Cook and stir until the sauce thickens, about 1 minute. Transfer everything to a plate immediately. Serve hot as a main dish.
Notes
Notes If you need to use a cheaper but toucher cut of beef, for example, chuck, brisket, or round roast, add 1/2 teaspoon of baking soda to the marinade and marinate the beef for 30 minutes before cooking. This method tenderizes the beef and will create a very juicy result. Dark soy sauce will add an appetizing dark color to the sauce with a hint of caramel taste, but you can skip it if you don’t have it. If you skip the dark soy sauce, you can add 1/2 teaspoon molasses to enhance the flavor. If you do not have peanut oil, you can drizzle 1/2 teaspoon of toasted sesame oil at the end of the cooking after turning off the heat and mix together. It will boost the flavor.
Nutrition
Calories:291kcal
Sugar:4.5g
Protein:26.6g
Mongolian Ground Beef Noodles Recipe
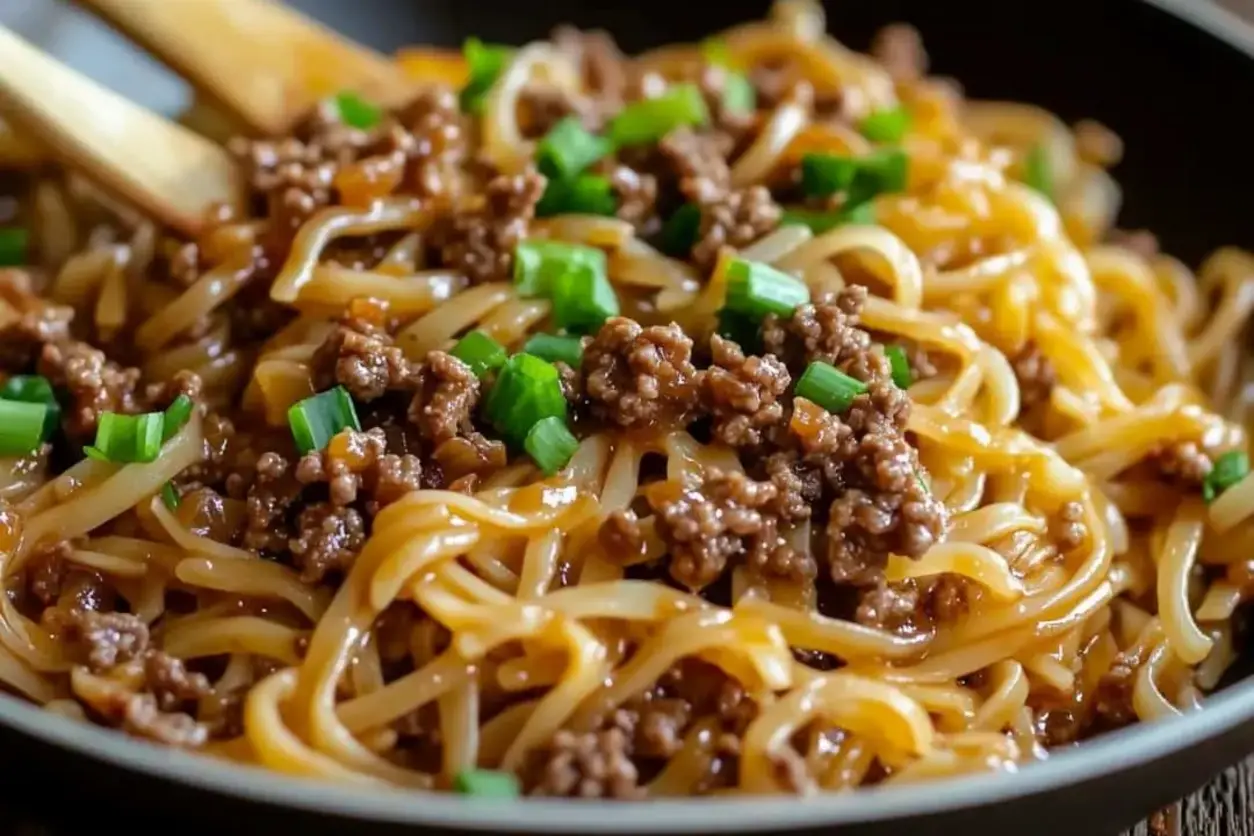
This Mongolian Ground Beef Noodles recipe is a quick and flavorful meal that brings together savory ground beef, aromatic garlic, and a rich, sweet-savory sauce with tender linguine. It’s perfect for a weeknight dinner that’s both satisfying and easy to make.
This Mongolian Ground Beef Noodles dish is a quick and flavorful meal combining savory ground beef, a rich and slightly sweet sauce, and tender linguine. Its perfect for a weeknight dinner thats both satisfying and easy to make.ezstandalone.cmd.push(function { ezstandalone.showAds(130); });
Ingredients
Scale
1 lb ground beef
5 cloves garlic, minced
1/3 cup brown sugar
1/4 cup beef broth
1/3 cup soy sauce
3 tablespoons hoisin sauce
1/2 teaspoon ground ginger
1/2 teaspoon ground black pepper
Pinch of red pepper flakes (optional for a spicy kick)
10 oz linguine
1 tablespoon cornstarch
2 tablespoons water
4 green onions, sliced for garnish
Instructions
Cook the Pasta: Begin by cooking the linguine according to the package instructions. Once cooked, drain and set aside.
Brown the Ground Beef: In a large skillet, cook the ground beef over medium heat until it is browned and cooked through. Drain any excess fat.
Add Aromatics and Sauces: Add the minced garlic to the browned beef and cook for about 1 minute until fragrant. Stir in the brown sugar, beef broth, soy sauce, hoisin sauce, ground ginger, ground black pepper, and red pepper flakes if using. Stir well to combine all the flavors.
Thicken the Sauce: In a small bowl, mix the cornstarch with water to create a slurry. Add this mixture to the skillet and stir until the sauce thickens, about 2-3 minutes.
Combine with Noodles: Once the sauce has thickened, add the cooked linguine to the skillet. Toss the noodles in the sauce until they are well coated.
Garnish and Serve: Garnish the dish with sliced green onions and serve hot.
Notes
You can add vegetables like bell peppers or broccoli for extra texture and nutrition.
For a gluten-free version, substitute the soy sauce with tamari and use gluten-free pasta.
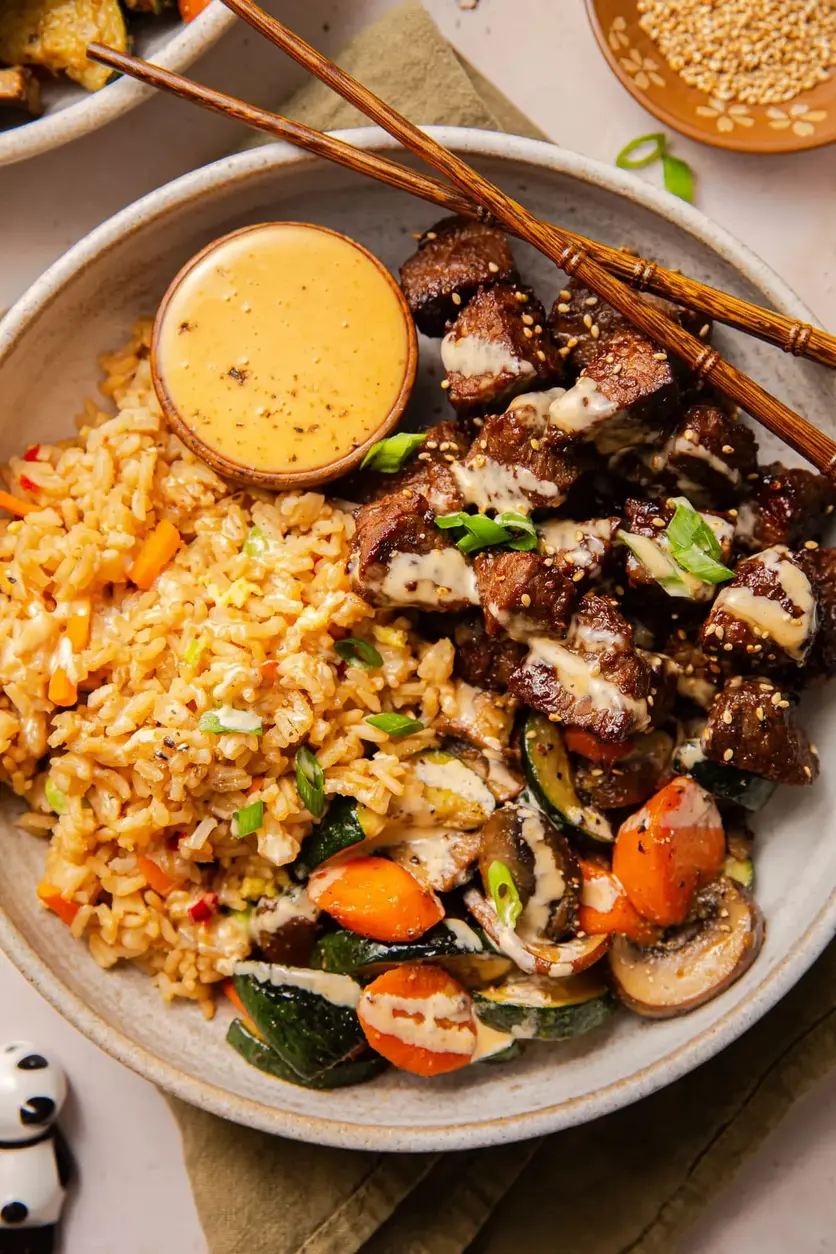
These Hibachi Steak Bowls are loaded with tender, flavorful pieces of sirloin, sautéed vegetables, and fried rice. If you love Benihana and Kobé Japanese steakhouses, you’ll enjoy these bowls inspired by those restaurants! This recipe is wildly easy and perfect for a delicious weeknight-friendly dinner or meal prepping!
Ingredients
Scale
2 lbs top sirloin steak, cut into rough chunks
1 tablespoon mirin
6 cloves of garlic, finely minced or pressed
2 teaspoons ginger paste
2 tablespoons plus 1 teaspoon sesame oil, divided
½ teaspoon ground white pepper (or black pepper)
Kosher salt, to taste
4 tablespoons unsalted butter, divided
3 medium carrots, thinly cut on a bias
2 medium zucchinis, sliced in half lengthwise & then cut into half moons
4–5 ounces sliced mushrooms (I use baby bella)
½ teaspoon garlic powder
1–2 tablespoons teriyaki sauce or Japanese BBQ Sauce (we love Bachan’s!)
For serving: Fried rice & store-bought Yum Yum Sauce
Instructions
Prep & marinate steak. Place the sirloin into a large bowl (or inside a large plastic baggie). Add the mirin, garlic, ginger, 1 teaspoon sesame oil, white pepper (or black pepper), and salt-to taste. Toss all ingredients to fully combine, ensuring steak chunks are thoroughly coated. Then set the steak aside to marinate for at least 30 minutes.
Sauté veggies. In a wok or large skillet, heat 2 tablespoons of butter and 1 tablespoon of sesame oil over medium heat. When hot, add the carrots, zucchini, and mushrooms. Cook the veggies, tossing often, until tender and golden brown, about 10-15 minutes. Season the veggies with garlic powder and salt/pepper- to taste. Then transfer the sautéed veggies to a clean plate and set aside. If needed, carefully wipe the pan clean with a damp paper towel.
Cook steak. In the same pan, add remaining 2 tablespoons butter and 1 tablespoon sesame oil over medium-high heat. When hot, add the steak. Cook, tossing beef often, until nicely seared, about 3-4 minutes- careful not to overcook steak into toughness. Then remove from heat, and drizzle in the teriyaki sauce or Japanese BBQ sauce, toss well to coat steak in sauce until chunks are glistening.
Build the bowls & serve. Evenly divide the cooked steak and sautéed veggies into shallow bowls, along with fried rice. Finish off bowls with a drizzle of store-bought Yum Yum sauce (or feel free to serve it on the side) to complete these hibachi steak bowls. Enjoy!
Notes
Store-bought Yum Yum Sauce is typically found in the international section of your local grocery store (near the Asian goods). Stores like Publix, Target, Walmart, and Kroger usually keep it in stock. It’s also available online- I love Terry Ho’s brand!
Fried rice note: To keep the quick + easy theme rolling for this recipe, I like to use store-bought fried rice that just needs to be heated. It’s available in the freezer section of grocery stores- I love the InnovAsian brand! Otherwise, feel free to make your own or use your preferred choice of rice here.
Please read blog post in its entirety for more tips + tricks.
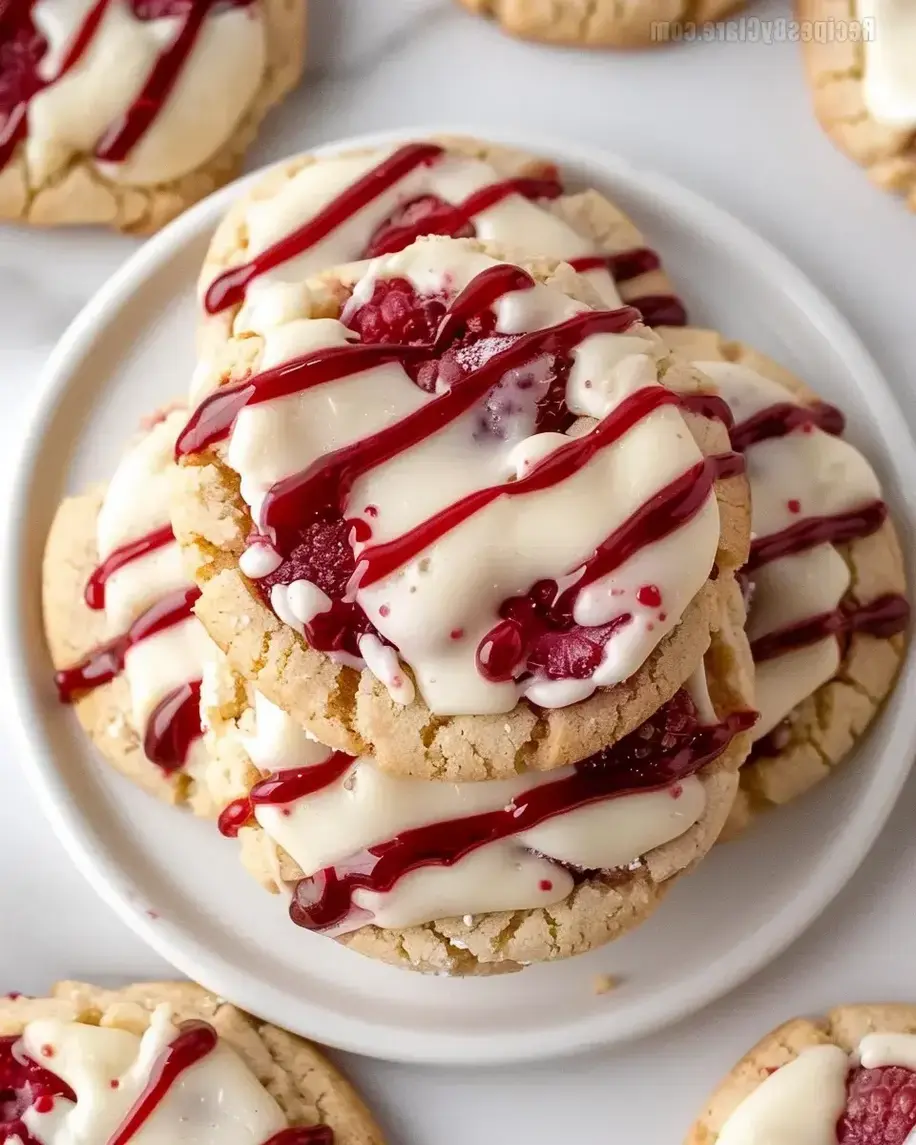
Did you know that over 60% of home bakers crave the rich, creamy texture of cheesecake but are intimidated by the time and precision it requires? That’s where these incredible Raspberry Cheesecake Cookies come in. They capture the luxurious essence of a classic New York cheesecake with a burst of raspberry flavor, all in a soft, chewy, handheld cookie form. This recipe is the perfect solution for anyone wanting to enjoy that iconic tangy cream cheese frosting and sweet-tart raspberry drizzle without the fuss of a water bath or springform pan. Get ready to bake a batch of these stunning cookies that are sure to become your new favorite treat, balancing sweetness and tartness in every single bite.
Ingredients List
For the best results, use room-temperature ingredients unless otherwise noted. This ensures a smooth, evenly mixed dough and frosting.
For the Cookies:
1 cup (2 sticks) unsalted butter, softened – The base for a rich, tender crumb. For a slightly nutty flavor, try browned butter.
1 cup granulated sugar – Creates a crisp exterior while keeping the center soft.
1/2 cup light brown sugar, packed – Adds moisture and a hint of caramel warmth.
2 large eggs – Binds the dough and adds structure.
1 teaspoon pure vanilla extract – Use the real stuff for the best aromatic flavor.
3 cups all-purpose flour – The foundation. For a gluten-free version, use a 1:1 gluten-free baking blend.
1 teaspoon cornstarch – The secret weapon for an ultra-soft, chewy texture.
1 teaspoon baking soda – Leavening agent for the perfect rise.
1/2 teaspoon baking powder – Works with the baking soda for lift.
1/2 teaspoon salt – Essential to balance and enhance all the sweet flavors.
For the Cream Cheese Frosting:
4 oz (1/2 block) full-fat cream cheese, softened – Full-fat is non-negotiable for that signature tangy, creamy texture. Low-fat will make the frosting runny.
1/4 cup (1/2 stick) unsalted butter, softened
1 1/2 cups powdered sugar, sifted – Sifting prevents lumps for a silky-smooth frosting.
1 teaspoon pure vanilla extract
Pinch of salt
For the Raspberry Drizzle:
1 cup fresh or frozen raspberries – Frozen work perfectly and are often more economical. Their vibrant tartness is key.
2 tablespoons granulated sugar – Adjust to taste based on the sweetness of your berries.
1 tablespoon lemon juice – Brightens the berry flavor.
1 teaspoon cornstarch mixed with 1 tablespoon water – A slurry to thicken the drizzle to a perfect, glossy consistency.
Timing
Prep Time 25 minutes
Cook Time 10-12 minutes
Chill Time 30 minutes
Total Time ~1 hour 10 minutes
Compared to the average cookie recipe, this one includes a crucial chilling step for the dough and requires time to make the frosting and drizzle. However, at just over an hour from start to finish, it’s significantly faster than baking an actual cheesecake, which can take 4+ hours with cooling. The active hands-on time is minimal, and the stunning results are well worth the brief wait for the dough to firm up.
Soft, chewy cookies topped with tangy cream cheese frosting and a vibrant raspberry drizzle.
Step-by-Step Instructions
Step 1: Prepare the Cookie Dough
In the bowl of a stand mixer fitted with the paddle attachment (or using a large bowl and a hand mixer), cream together the softened butter, granulated sugar, and brown sugar on medium-high speed for 2-3 minutes. You want the mixture to become light, fluffy, and pale in color. This step is crucial for incorporating air, which leads to a softer cookie. Scrape down the sides of the bowl. Add the eggs one at a time, beating well after each addition until fully incorporated. Beat in the vanilla extract.
Step 2: Chill and Scoop
In a separate bowl, whisk together the flour, cornstarch, baking soda, baking powder, and salt. With the mixer on low speed, gradually add the dry ingredients to the wet ingredients. Mix just until no dry streaks of flour remain—do not overmix. The dough will be soft. Cover the bowl with plastic wrap and refrigerate for at least 30 minutes. This chilling step prevents the cookies from spreading too thin in the oven. Preheat your oven to 350°F (175°C) and line baking sheets with parchment paper. Once chilled, use a medium cookie scoop (about 1.5 tablespoons) to portion the dough onto the prepared sheets, spacing them about 2 inches apart.
Step 3: Bake to Perfection
Bake the cookies for 10-12 minutes. They are done when the edges are just set and lightly golden, but the centers still look soft and slightly puffy. They will firm up as they cool. For perfectly round cookies, you can gently use a round cookie cutter or a large mug to swirl around each cookie right when they come out of the oven. Let the cookies cool on the baking sheet for 5 minutes before transferring them to a wire rack to cool completely. They must be completely cool before frosting.
Step 4: Make the Cream Cheese Frosting
While the cookies cool, make the frosting. In a clean mixer bowl, beat the softened cream cheese and butter together on medium speed until completely smooth and lump-free, about 2 minutes. Reduce the speed to low and gradually add the sifted powdered sugar. Once incorporated, increase the speed to medium-high and beat for another 1-2 minutes until the frosting is light and fluffy. Beat in the vanilla extract and pinch of salt. Set aside.
Step 5: Create the Raspberry Drizzle
In a small saucepan, combine the raspberries, sugar, and lemon juice. Cook over medium heat, stirring and mashing the berries with a spoon or fork, until they break down and release their juices, about 5-7 minutes. Strain the mixture through a fine-mesh sieve into a clean bowl, pressing on the solids to extract all the liquid. Discard the seeds. Return the strained raspberry liquid to the saucepan. Whisk the cornstarch slurry again and stir it into the raspberry liquid. Cook over low heat, stirring constantly, until the mixture thickens to a syrup-like consistency, about 2-3 minutes. Remove from heat and let it cool to room temperature; it will thicken further as it cools.
Step 6: Assemble and Serve
Once the cookies are cool, spread or pipe a generous dollop of the cream cheese frosting onto the center of each cookie. Using a spoon or a small squeeze bottle, drizzle the cooled raspberry sauce over the frosted cookies. For a professional finish, you can add a single fresh raspberry or a sprinkle of crushed freeze-dried raspberries on top. Allow the drizzle to set for a few minutes before serving.
Nutritional Information
The following is an approximate nutritional breakdown per cookie (recipe makes about 24 cookies).
Calories: 280 kcal
Total Fat: 14g
Saturated Fat: 8g
Cholesterol: 50mg
Sodium: 120mg
Total Carbohydrates: 36g
Dietary Fiber: 1g
Sugars: 23g
Protein: 3g
Healthier Alternatives
You can enjoy these delicious cookies with a few mindful swaps without sacrificing flavor:
Flour: Substitute half of the all-purpose flour with white whole wheat flour for added fiber.
Sugar: In the cookie dough, you can reduce the granulated sugar by 1/4 cup. For the frosting, try using a powdered erythritol blend instead of traditional powdered sugar.
Butter & Cream Cheese: Use a reduced-fat cream cheese and replace half the butter in the cookie dough with unsweetened applesauce for a lower-fat, still-moist result.
Raspberry Drizzle: Omit the added sugar and rely on the natural sweetness of very ripe berries, thickening with a touch more cornstarch if needed.
Serving Suggestions
These cookies are a showstopper on their own, but they can be elevated for special occasions. Serve them as part of a dessert charcuterie board alongside dark chocolate truffles and fresh fruit. They pair beautifully with a cup of hot coffee, Earl Grey tea, or a glass of cold milk. For a truly decadent dessert, crumble a cookie over a scoop of vanilla bean ice cream.
Common Mistakes
Using Cold Ingredients: Cold butter and cream cheese won’t cream properly, leading to dense cookies and lumpy frosting. Plan ahead to let them sit out for an hour.
Skipping the Chill Time: This causes excessive spreading, resulting in thin, flat cookies instead of soft, thick ones.
Overmixing the Dough: Once the flour is added, mix just until combined. Overmixing develops gluten, making cookies tough.
Frosting Warm Cookies: The cream cheese frosting will melt into a messy puddle. Patience is key—ensure cookies are completely cool.
Not Straining the Raspberry Sauce: The seeds can create an unpleasant gritty texture. Straining is essential for a smooth, glossy drizzle.