Red Velvet Cinnamon Rolls

Red Velvet Cinnamon Rolls

Introduction

Did you know that searches for “holiday baking” spike by over 200% in the final quarter of the year, with red velvet cinnamon rolls consistently ranking among the top 10 most sought-after recipes? It’s no wonder—this stunning fusion of a classic dessert and a beloved breakfast treat is a showstopper. Imagine a rich, cocoa-kissed, vibrant red dough, impossibly soft and swirled with a warm, aromatic cinnamon-sugar filling, all crowned with a luscious, tangy cream cheese frosting that melts on contact. This recipe isn’t just baking; it’s creating an experience, a centerpiece for your brunch table or a decadent gift that speaks volumes. Let’s dive into the art of making these irresistible red velvet cinnamon rolls that are guaranteed to earn you rave reviews.

Ingredients List

Gather your ingredients. Using high-quality components makes a noticeable difference in flavor and texture.

For the Red Velvet Dough:

  • Warm Milk (110°F/43°C): 1 cup – activates the yeast. Substitution: Any plant-based milk like almond or oat works beautifully.
  • Granulated Sugar: ½ cup – feeds the yeast and adds sweetness.
  • Active Dry Yeast: 2 ¼ teaspoons (one standard packet) – the leavening agent for a fluffy, airy crumb.
  • All-Purpose Flour: 4 to 4 ½ cups – provides structure. Sensory Tip: The dough should be tacky but not sticky, pulling away from the bowl cleanly.
  • Unsweetened Cocoa Powder: 2 tablespoons – the secret behind the classic red velvet flavor, offering a subtle, earthy chocolate note.
  • Salt: 1 teaspoon – balances all the sweetness.
  • Egg: 1 large, at room temperature – enriches the dough and adds tenderness.
  • Unsalted Butter: ¼ cup, melted and cooled – for incredible richness and a soft texture.
  • Red Gel Food Coloring: 1-2 tablespoons – use gel for a vibrant, non-watery red hue without affecting consistency. Liquid coloring will require much more and can thin the dough.
  • Pure Vanilla Extract: 2 teaspoons – the aromatic backbone.

For the Cinnamon Filling:

  • Softened Unsalted Butter: ½ cup – acts as the glue for the cinnamon sugar.
  • Light Brown Sugar: 1 cup, packed – its molasses content creates a deeper, caramel-like flavor and a gooey texture.
  • Ground Cinnamon: 2 tablespoons – use fresh, high-quality cinnamon for the most potent, warm aroma.

For the Cream Cheese Frosting:

  • Cream Cheese: 8 oz block, full-fat, softened to room temperature – the tangy star. Don’t use spreadable tubs.
  • Unsalted Butter: ½ cup, softened – creates a smooth, spreadable consistency.
  • Powdered Sugar: 3 cups, sifted – for sweetness and structure.
  • Pure Vanilla Extract: 1 teaspoon – enhances the frosting’s flavor profile.
  • Pinch of Salt: – cuts the sweetness and brightens the cream cheese flavor.

Timing

Prep Time

30 minutes
(Active hands-on work)

Rise Time

1 hour 30 minutes
(Mostly hands-off)

Cook Time

25 minutes

Total Time

2 hours 25 minutes

While the total time is around 2.5 hours, over 60% of that is inactive rising time, perfect for doing other tasks. Compared to average cinnamon roll recipes, the addition of cocoa and food coloring doesn’t add any extra active time. The double-rise process is non-negotiable for achieving that signature cloud-like, tender texture.

Red Velvet Cinnamon Rolls fresh from the oven with cream cheese frosting drizzled on top

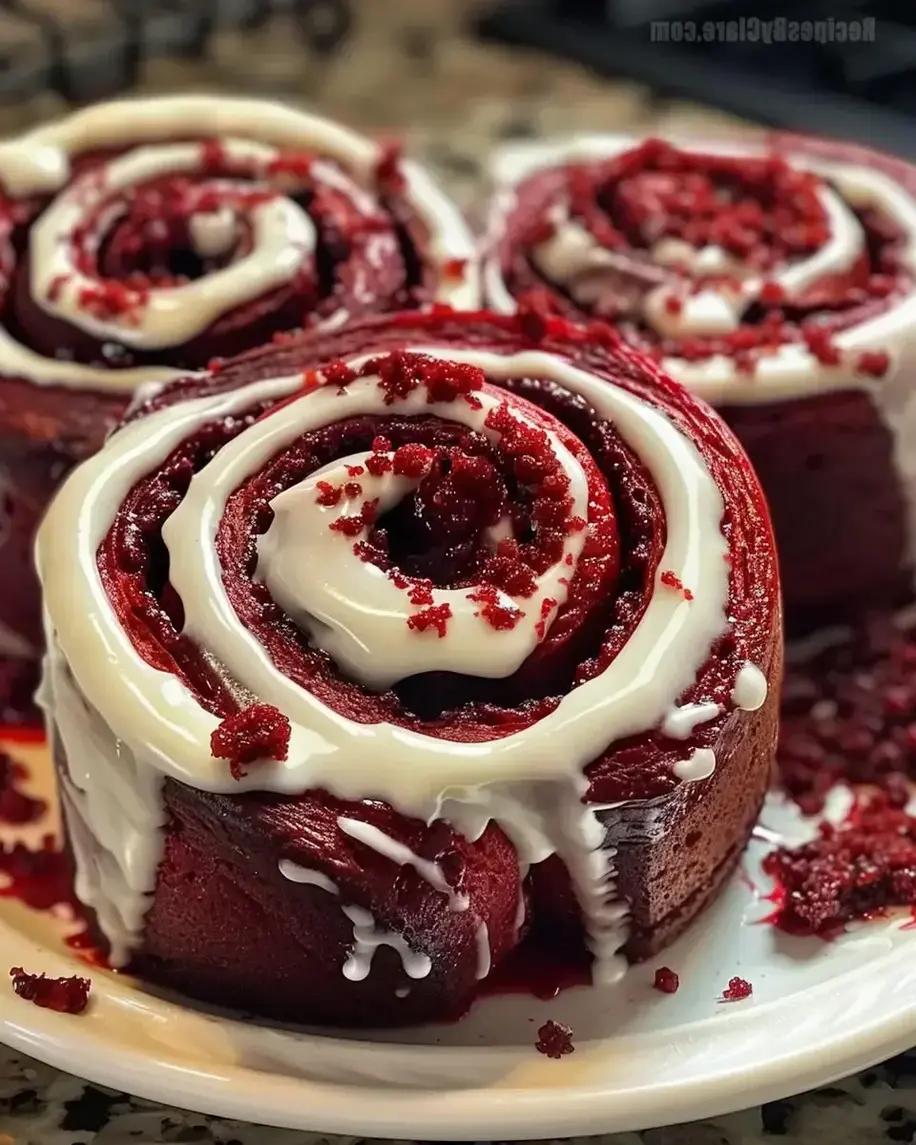
Freshly baked red velvet cinnamon rolls, warm and swirled, ready for their cream cheese crown.

Step-by-Step Instructions

Step 1: Prepare the Dough

In the bowl of a stand mixer fitted with the dough hook, combine the warm milk, sugar, and yeast. Let it sit for 5-7 minutes until it becomes frothy and fragrant—this “proofs” the yeast, ensuring it’s active. If it doesn’t foam, your yeast may be old or the liquid was too hot; start over. Add the egg, melted butter, vanilla, and red gel food coloring. Mix on low until just combined. In a separate bowl, whisk together 4 cups of flour, cocoa powder, and salt. With the mixer on low, gradually add the dry ingredients to the wet. Mix until a shaggy dough forms. If the dough is very sticky, add the remaining ½ cup of flour, one tablespoon at a time, until it clears the sides of the bowl but remains slightly tacky to the touch. Knead on medium speed for 5-7 minutes until smooth and elastic.

Step 2: First Rise

Shape the vibrant red dough into a ball. Lightly oil a large bowl, place the dough inside, and turn it to coat. Cover tightly with plastic wrap or a damp kitchen towel. Place it in a warm, draft-free spot (like an oven with just the light on) for about 1 hour, or until it has doubled in size. This slow fermentation develops flavor and texture.

Step 3: Roll and Fill

Punch down the risen dough to release air bubbles. Turn it out onto a lightly floured surface. Using a rolling pin, roll it into a large rectangle, roughly 18×12 inches. Spread the ½ cup of softened butter evenly over the entire surface, leaving a ½-inch border along one long edge. In a small bowl, mix the brown sugar and cinnamon. Sprinkle this mixture evenly over the buttered dough, pressing it down gently with your hands.

Step 4: Cut and Second Rise

Starting from the long edge opposite the clean border, tightly roll the dough into a log, pinching the clean edge to seal. Using a sharp serrated knife or unflavored dental floss, cut the log into 12 equal rolls (about 1.5 inches each). Place them cut-side up in a generously buttered 9×13 inch baking dish. Cover the dish and let the rolls rise again in a warm place for 30-45 minutes until puffy and nearly doubled. Meanwhile, preheat your oven to 350°F (175°C).

Step 5: Bake to Perfection

Bake the risen rolls for 22-27 minutes. They’re done when the tops are set and the internal temperature reads about 190°F (88°C) on an instant-read thermometer. The edges will be lightly golden, and your kitchen will smell incredible. Let them cool in the pan for 10-15 minutes before frosting—this prevents the frosting from melting into a puddle.

Step 6: Frost and Serve

While the rolls cool, make the frosting. In a clean mixer bowl with the paddle attachment, beat the softened cream cheese and butter on medium-high until completely smooth and lump-free, about 2 minutes. Reduce speed to low and gradually add the sifted powdered sugar. Once incorporated, add the vanilla and salt, then beat on high for 1-2 minutes until light and fluffy. Spread or pipe the frosting generously over the warm (not hot) rolls. Serve immediately for the ultimate gooey, melty experience.

Nutritional Information

Estimated per roll (1 of 12, including frosting):

  • Calories: 480 kcal
  • Total Fat: 22g
  • Saturated Fat: 13g
  • Carbohydrates: 67g
  • Fiber: 1.5g
  • Sugars: 42g
  • Protein: 6g
  • Sodium: 220mg

Healthier Alternatives

You can enjoy these rolls with a lighter touch without sacrificing decadence.

  • Flour: Substitute half the all-purpose flour with white whole wheat flour for added fiber and nutrients.
  • Sugar: In the dough, replace granulated sugar with coconut sugar or a monk fruit blend. For the filling, try a mix of coconut sugar and a touch of maple syrup for binding.
  • Frosting: Use reduced-fat cream cheese and blend it with Greek yogurt (strained) and a smaller amount of powdered sugar or honey for sweetness. The tang remains delightful.
  • Butter: In the filling, a thin layer of unsweetened applesauce mixed with cinnamon can replace half the butter for a less gooey but still flavorful option.

Serving Suggestions

  • Brunch Centerpiece: Serve alongside crispy bacon, savory scrambled eggs, and fresh fruit salad to balance the sweetness.
  • Holiday Breakfast: Pair with a pot of strong coffee, hot chocolate, or mulled cider. The red color makes them perfect for Christmas or Valentine’s Day.
  • Dessert Upgrade: Serve warm with a scoop of vanilla bean ice cream and a drizzle of caramel sauce for an over-the-top dessert.
  • Gifting: Package cooled, unfrosted rolls in a decorative tin with a container of frosting on the side. Include reheating instructions for a thoughtful, homemade gift.

Common Mistakes

  • Killing the Yeast: Using milk that’s too hot (above 115°F) will kill the yeast, resulting in dense rolls. Use a thermometer.
  • Over-flouring the Dough: Adding too much flour during kneading creates dry, tough rolls. The dough should be tacky, not

Cotton Candy Marshmallows

Cotton Candy Marshmallows

Introduction

Did you know that homemade marshmallows contain 40% less artificial additives than store-bought versions, making them a surprisingly customizable treat? If you’ve ever wondered how to capture the whimsical, nostalgic essence of the carnival in a fluffy, melt-in-your-mouth confection, you’re in the right place. These Cotton Candy Marshmallows are not just a dessert; they’re a fun, edible experience. Perfect for birthday parties, movie nights, or simply adding a pop of color to your hot cocoa, this recipe transforms simple ingredients into cloud-like pillows of sweet, cotton candy flavor. Let’s ditch the bland, packaged stuff and create something magical that will delight both kids and adults alike.

Ingredients List

Gathering high-quality ingredients is the first step to marshmallow success. Here’s what you’ll need, along with sensory notes and possible substitutions.

  • 3 packets (21g) Unflavored Gelatin: The backbone of our fluff. It provides the signature springy, chewy texture. For a vegetarian alternative, you can experiment with agar-agar powder, but note the setting properties differ slightly.
  • 1/2 cup + 1/3 cup Cold Water, divided: The cold water blooms the gelatin, while the rest goes into the sugar syrup. Using ice-cold water for the gelatin ensures it hydrates properly without clumping.
  • 1 1/2 cups Granulated Sugar: This is our primary sweetener, creating the glossy syrup that gives structure. It will cook to a “soft-ball” stage, which feels like, well, a soft ball when dropped in water.
  • 1 cup Light Corn Syrup: This is the secret to a smooth, non-grainy texture and prevents crystallization. For a substitution, you can use golden syrup or honey, though honey will impart its own distinct flavor.
  • 1/4 teaspoon Salt: A tiny pinch to balance the overwhelming sweetness and enhance the overall flavor profile.
  • 2 teaspoons Pure Cotton Candy Flavoring Oil or Extract: This is the star! Look for a high-quality, oil-based flavoring for the most potent and authentic taste. Liquid extract works but may be milder.
  • Pink and Blue Gel Food Coloring: Gel or paste coloring is ideal as it provides vibrant hues without adding extra liquid that could deflate your meringue. You’ll want a few drops of each.
  • Powdered Sugar & Cornstarch (for dusting): A 50/50 mix for coating the marshmallows. This prevents them from being a sticky mess and gives them that classic, snow-dusted look.

Timing

Prep Time30 minutes
Cook Time10 minutes
Set Time4+ hours (or overnight)
Total Time4 hours 40 minutes

While the active time for these Cotton Candy Marshmallows is under an hour, the crucial setting time is where patience pays off. Compared to many baked goods, this recipe is relatively quick on the “cooking” front but requires planning due to the gelatin setting. The 4+ hour set time is non-negotiable for perfect, non-sticky squares. Pro tip: Make these the night before your event for stress-free, ready-to-eat treats in the morning.

Cotton Candy Marshmallows

Fluffy, pastel-hued homemade Cotton Candy Marshmallows, ready to be devoured!

Step-by-Step Instructions

Step 1: Prepare Your Pan and Mixer

Before you touch the sugar, get your workstation ready. This “mise en place” is critical because the sugar syrup moves fast. Generously coat an 8×8 or 9×9 inch baking pan with non-stick spray or butter. Then, sift a heavy layer of the powdered sugar and cornstarch mixture into the pan, tilting to coat all sides. Tap out any excess—this will be used later. Also, fit your stand mixer with the whisk attachment. Having this ready means you can pour the hot syrup directly into the bowl without frantic scrambling.

Step 2: Bloom the Gelatin

In the bowl of your stand mixer, sprinkle the 3 packets of unflavored gelatin over 1/2 cup of ice-cold water. Do not stir. Just let it sit there and absorb the water for about 10-15 minutes. It will transform from a grainy powder into a firm, rubbery, opaque blob. This process, called “blooming,” is essential for the gelatin to dissolve evenly later and create a smooth, lump-free marshmallow base.

Step 3: Cook the Sugar Syrup

While the gelatin blooms, combine the remaining 1/3 cup water, granulated sugar, corn syrup, and salt in a medium saucepan. Stir over medium heat just until the sugar dissolves. Once dissolved, stop stirring! Attach a candy thermometer to the side of the pan, ensuring it doesn’t touch the bottom. Let the mixture boil undisturbed until it reaches 240°F (115°C), the “soft-ball stage.” This usually takes 7-10 minutes. The syrup will be clear and bubbling. The precise temperature is key for the correct texture.

Step 4: Whip It Good

With the mixer on low speed, carefully and slowly pour the hot sugar syrup directly into the bowl with the bloomed gelatin. Aim for the side of the bowl to avoid splashing. Once all the syrup is added, increase the speed to high. Now, let it whip! This is where the magic happens. Whip for 10-12 minutes until the mixture is thick, glossy, white, and has tripled in volume. It should form stiff, fluffy peaks that hold their shape when you lift the whisk. The bowl should be just warm to the touch, not hot.

Step 5: Color and Flavor

Reduce the mixer speed to low. Add the cotton candy flavoring and whip for another 30 seconds to incorporate. Now, for the fun part: coloring. Turn off the mixer. Using a spatula, gently transfer about one-third of the white marshmallow fluff to a separate bowl. Add a few drops of pink gel coloring and fold gently until you achieve a uniform pastel pink. Repeat with another third of the fluff and blue gel coloring. You’ll now have three bowls: pink, blue, and white.

Step 6: Set and Cut

Using two spoons or spatulas, dollop large spoonfuls of each colored marshmallow fluff randomly into your prepared pan. Don’t worry about making it perfect or mixing it—the marbled, swirly effect is what we want. Once all the fluff is in the pan, sift another layer of the powdered sugar/cornstarch mix over the top. Use wet hands or a wet offset spatula to smooth the top (the water prevents sticking). Let the pan sit, uncovered, at room temperature for at least 4 hours, but preferably overnight.

The next day, run a knife around the edges. Turn the giant marshmallow slab out onto a cutting board dusted with more sugar/starch. Using a pizza cutter or a sharp knife dusted with the coating, cut into squares. Toss each marshmallow in the coating to seal all sides. They are now ready to enjoy!

Nutritional Information

The following is an approximate nutritional breakdown per marshmallow (recipe yields about 36 pieces).

  • Calories: 70 kcal
  • Total Fat: 0g
  • Sodium: 20mg
  • Total Carbohydrates: 18g
  • Sugars: 16g
  • Protein: 1g

Healthier Alternatives

Love the fluff but want to tweak the nutrition? Here are some flavorful swaps that don’t sacrifice fun:

  • Reduce Sugar: You can replace up to 1/4 cup of the granulated sugar with a powdered zero-calorie sweetener designed for baking (like erythritol). Note: This may slightly alter the texture and browning of the syrup.
  • Natural Color: Swap synthetic gel colors for powders made from freeze-dried fruits (e.g., raspberry powder for pink, blue spirulina for blue). The flavor will be subtle but natural.
  • Flavor Boost: Enhance the cotton candy flavor with a teaspoon of real vanilla extract in addition to the cotton candy oil for a more complex, less one-note sweetness.
  • Coating Swap: For the dusting, you can use 100% powdered sugar, though the cornstarch is better at preventing stickiness. Alternatively, use finely shredded unsweetened coconut for a fun, textured coating.

Serving Suggestions

These marshmallows are stars on their own, but they can elevate so many other desserts:

  • Hot Chocolate Float: Drop a pink and blue marshmallow into a mug of rich hot chocolate for a colorful, melty surprise.
  • Ice Cream Topping: Chop them up and sprinkle over vanilla or birthday cake ice cream.
  • S’mores Bar: Create the ultimate carnival-themed s’mores with graham crackers, chocolate, and these cotton candy mallows.
  • Cake Decor: Use them as playful, edible decorations on cupcakes or a layered birthday cake.
  • Trail Mix: Toss mini pieces with popcorn, pretzels, and white chocolate chips for a sweet and salty party mix.

Common Mistakes

  • Not Using a Candy Thermometer: Guessing the syrup stage is the #1 cause of failure. Too low, and marshmallows won’t set; too high, and they become hard and chewy. Invest in a good thermometer.
  • Under-Whipping: If you stop whipping before stiff peaks form, the marshmallow will be too loose and won’t hold its shape in the pan. Be patient and let the mixer do its job for the full 10-12 minutes.
  • Skipping the Dusting: That powdered sugar/cornstarch mix is your best friend. Skimping on coating the pan, your hands, or the cutter will result in a frustratingly sticky situation.
  • Cutting Too Soon: Impatience is the enemy. If you try to cut before the marshmallow has fully set (less than 4 hours), it will ooze and collapse. Overnight is truly best.
  • Using Liquid Food Coloring Excessively: Adding too much liquid (from color or extract) can deflate your beautifully whipped meringue.

No-Bake Unicorn Cheesecake Recipe

No-Bake Unicorn Cheesecake Recipe

Introduction

Did you know that visually appealing, colorful food can increase perceived enjoyment by up to 30%? That’s the magic behind this stunning No-Bake Unicorn Cheesecake. Perfect for birthdays, baby showers, or any celebration that needs a touch of whimsy, this dessert is as delightful to make as it is to eat. Forget the oven—this recipe relies on simple techniques to create a creamy, dreamy filling swirled with vibrant pastel colors, all nestled in a buttery, crunchy digestive biscuit crust. The final sprinkle of edible glitter transforms it into a true showstopper. Let’s dive into how you can create this magical centerpiece that’s guaranteed to be the highlight of your festive occasion.

Ingredients List

Gather these ingredients for a magical dessert that serves 10-12 people.

  • For the Digestive Crust:
    • 300g Digestive Biscuits (or Graham Crackers): These provide a sweet, wheaty, and slightly malty base with the perfect crumbly texture. For a nuttier flavor, try using Biscoff cookies.
    • 120g Unsalted Butter, melted: Acts as the glue, creating a rich, cohesive base that firms up beautifully when chilled. For a dairy-free version, use coconut oil.
    • 1 tbsp Granulated Sugar (optional): Adds a subtle sweetness if your biscuits aren’t very sweet.
  • For the Cheesecake Filling:
    • 600g Full-Fat Cream Cheese, room temperature: The star of the show. Full-fat is non-negotiable for that luxuriously creamy, stable texture and tangy flavor. Let it soften completely to avoid lumps.
    • 150g Icing Sugar, sifted: Dissolves seamlessly into the cream cheese, providing sweetness without grittiness.
    • 300ml Double Cream (Heavy Cream), cold: Whipped to soft peaks, it introduces air and lightness, balancing the density of the cream cheese.
    • 1 tsp Vanilla Bean Paste or Extract: Adds a warm, aromatic depth that enhances all the other flavors.
    • Zest of 1 Lemon: A secret weapon! The bright, citrusy note cuts through the richness and prevents the cheesecake from tasting overly cloying.
  • For the Unicorn Swirls & Decoration:
    • Gel Food Coloring (Pink, Purple, Blue, Yellow): Gel colors are highly concentrated and won’t water down your filling. They create those vibrant, magical pastel swirls.
    • Edible Glitter or Gold/Silver Dust: The finishing touch that makes the cheesecake sparkle and shimmer under the light.
    • Optional: White Chocolate Shavings, Sprinkles, Fresh Berries: For extra decoration and texture.

Timing

Prep Time30 minutes
Chill Time6 hours (minimum)
Total Time6 hours 30 minutes

Compared to a traditional baked cheesecake, which can take over an hour of active baking plus cooling time, this no-bake version is significantly faster and requires no technical baking skills. The majority of the time is hands-off chilling, allowing the flavors to meld and the texture to set perfectly. Plan ahead for the best results!

No-Bake Unicorn Cheesecake Recipe

This stunning No-Bake Unicorn Cheesecake is a vibrant, magical dessert perfect for any celebration.

Step-by-Step Instructions

Step 1: Prepare the Crust

First, line the base of a 9-inch springform pan with parchment paper. This is your insurance policy for a clean release later. Place your digestive biscuits in a sturdy zip-top bag and crush them into fine crumbs using a rolling pin. You want a texture resembling coarse sand. Transfer the crumbs to a mixing bowl and pour the melted butter over them. Use a fork to mix until every crumb is evenly coated and the mixture holds together when pinched. Pour the buttery crumbs into your prepared pan. Using the bottom of a glass or a flat measuring cup, press the mixture firmly and evenly across the base and slightly up the sides. This compact layer is the foundation of your cheesecake. Pop the crust in the refrigerator to set while you make the filling.

Step 2: Make the Cheesecake Filling

In a large bowl, beat the softened cream cheese with an electric mixer on medium speed for about 2 minutes until it’s completely smooth and lump-free. Scrape down the sides of the bowl. Add the sifted icing sugar, vanilla paste, and lemon zest. Beat again until everything is fully incorporated and the mixture is silky. In a separate, clean, cold bowl, whip the double cream until it reaches soft peaks—this means the cream will hold its shape but still have a slight curl at the tip of your whisk. Gently fold the whipped cream into the cream cheese mixture in two additions. Use a large spatula and a light hand to maintain the air you’ve whipped in; this is what gives the cheesecake its light, mousse-like texture.

Step 3: Create the Unicorn Swirls

This is where the magic happens! Divide the plain cheesecake filling evenly among four smaller bowls. Add a tiny drop of gel food coloring to each bowl—pink, purple, blue, and yellow. Use a separate spoon for each color to mix until you achieve vibrant, even hues. Remember, you can always add more color, but you can’t take it away. Now, retrieve your chilled crust. Using large spoons, randomly dollop the different colored fillings over the crust. Don’t try to smooth it yet. Once all the filling is in the pan, take a butter knife or a skewer and gently swirl it through the dollops in a figure-eight pattern. The goal is beautiful marbling, not a muddy mix. Stop as soon as you see those gorgeous swirls.

Step 4: Chill and Set

Gently tap the pan on the counter a few times to release any large air bubbles. Loosely cover the top of the pan with cling film to prevent any fridge odors from being absorbed. Place the cheesecake in the refrigerator to set for a minimum of 6 hours, though overnight is ideal. This extended chilling time is crucial for the filling to firm up properly, making it sliceable and allowing the flavors to develop fully. Do not rush this step.

Step 5: Decorate and Serve

Once fully set, carefully run a thin knife around the inside edge of the springform pan before releasing the clamp. Transfer the cheesecake to your serving plate. Just before serving, dust the top generously with edible glitter or luster dust. For an extra magical touch, add a crown of white chocolate shavings, a few sprinkles, or a ring of fresh raspberries and blueberries around the edge. Use a sharp knife dipped in hot water and wiped dry for the cleanest slices.

Nutritional Information

The following is an approximate nutritional breakdown per serving (based on 12 servings).

  • Calories: 480 kcal
  • Total Fat: 38g
  • Saturated Fat: 23g
  • Carbohydrates: 30g
  • Sugars: 20g
  • Protein: 6g
  • Fiber: 1g

Healthier Alternatives

You can create a lighter version of this magical dessert without sacrificing too much flavor or fun.

  • Crust: Swap digestive biscuits for blended dates and almonds (a “date-nut” crust) or use high-fiber oat biscuits.
  • Filling: Use reduced-fat cream cheese and swap half the double cream for thick Greek yogurt. The yogurt adds a lovely tang and protein.
  • Sweetener: Replace icing sugar with a powdered erythritol/monk fruit blend for a lower-glycemic option.
  • Colors: Use natural food colorings derived from beetroot powder (pink), blue spirulina (blue), and turmeric (yellow).

Serving Suggestions

  • Pair a slice with a scoop of vanilla bean ice cream or a dollop of lightly sweetened whipped cream for an extra indulgent treat.
  • Serve alongside a fresh berry compote or a drizzle of raspberry coulis to add a tart contrast to the sweet, creamy filling.
  • For a themed party, create a “unicorn drink” station with pastel-colored milkshakes or sparkling lemonades.
  • Cut into smaller, bite-sized squares for a party buffet or a kid-friendly dessert table.

Common Mistakes

  • Using Cold Cream Cheese: This is the #1 cause of a lumpy filling. Ensure your cream cheese has been out of the fridge for at least 2 hours.
  • Over-whipping the Cream: If you whip the cream to stiff peaks, it becomes difficult to fold in and can make the final texture grainy. Stop at soft peaks.
  • Over-mixing the Colors: Swirling too vigorously will blend the beautiful pastels into a dull, greyish-brown color. Less is more.
  • Insufficient Chilling Time: Slicing too early will result in a runny, messy cheesecake. Patience is key for the perfect slice.
  • Using Liquid Food Coloring: Liquid dyes can water down the filling and produce pale, washed-out colors. Gel or paste colors are essential.

Storing Tips

  • Refrigeration: Store the cheesecake, covered with cling film or in an airtight container, in the refrigerator for up to 4 days.
  • Freezing: This cheesecake freezes beautifully for up to 2 months. Freeze the whole cake or individual slices on a parchment-lined tray until solid, then wrap tightly in cling film and foil. Thaw overnight in the refrigerator.
  • Serving After Storage: If the glitter has dulled, add a fresh sprinkle just before serving. Let the cheesecake sit at room temperature for 10-15 minutes before slicing for the creamiest texture.

Conclusion

This No-Bake Un

What Makes These Thai Basil Beef Rolls So Irresistible

These Thai Basil Beef Rolls offer a truly fresh flavor experience packed with savory beef and crisp vegetables you will love. This healthy recipe comes together quickly, letting you serve something satisfying in under 30 minutes time. If you are looking for an easy way to improve your weeknight meals with amazing taste, you will want to keep this recipe close by. Your whole family will ask for these flavorful beef rolls again and again. Tap to learn more

Print

clock clock iconcutlery cutlery iconflag flag iconfolder folder iconinstagram instagram iconpinterest pinterest iconfacebook facebook iconprint print iconsquares squares iconheart heart iconheart solid heart solid icon

Irresistible Thai Basil Beef Rolls for Fresh Flavor Lovers

  • Author: Chef Mia

Description

Enjoy the fresh flavors of Thai Basil Beef Rolls, a delightful combination of savory beef and vibrant vegetables.


Ingredients

Scale
  • 500 g Lean Ground Beef a rich protein base full of flavor.
  • 3 tablespoon Soy Sauce adds a savory, salty depth to the beef.
  • 2 tablespoon Hoisin Sauce balances the flavors with a touch of sweetness.
  • 1 cup Shredded Carrots brings crunch and vibrant color to each roll.
  • 1 cup Chopped Bell Peppers adds freshness and a hint of sweetness.
  • 1 cup Fresh Basil Leaves the aromatic star that elevates the flavor.

Instructions

  1. In a frying pan, cook the lean ground beef until browned. Stir in soy sauce and hoisin sauce, mixing well.
  2. Remove from heat and let it cool slightly. Then add shredded carrots, chopped bell peppers, and fresh basil leaves.
  3. Prepare the rice paper wrappers by softening each one in warm water, one at a time.
  4. Place a portion of the filling on the wrapper, fold in the sides, and roll tightly.
  5. Repeat until all filling is used. Serve immediately with a dipping sauce of your choice.

Notes

For best results, enjoy rolls immediately after preparation. Leftovers can become soggy.


Nutrition

  • Calories: 350kcal
  • Sugar: 3g
  • Protein: 25g

Are These Red Wine Meatballs Your Best Dinner Yet

What makes red wine braised meatballs the most satisfying dinner you can make this week? Learn how to simmer your meatballs in a truly rich sauce for a cozy, flavorful meal everyone will remember. This recipe helps you get that deep, amazing flavor into your perfect dinner setting. See how simple it is to create such a comforting meal. Tap to learn more

Print

clock clock iconcutlery cutlery iconflag flag iconfolder folder iconinstagram instagram iconpinterest pinterest iconfacebook facebook iconprint print iconsquares squares iconheart heart iconheart solid heart solid icon

Irresistibly Delicious Red Wine Braised Meatballs for Dinner

  • Author: Chef Mia

Description

Amazing Red Wine Braised Meatballs for a Delicious Dinner are a gourmet twist on comfort food, bursting with flavor.


Ingredients

Scale
  • 1 lb ground beef 80/20 recommended
  • ¼ cup fresh parsley chopped
  • 1 onion finely chopped
  • 3 cloves garlic minced
  • 1 cup red wine fruity variety like Merlot
  • 14 oz canned tomatoes crushed
  • 1 cup beef broth low-sodium
  • to taste salt
  • to taste pepper
  • for browning tablespoon olive oil

Instructions

  1. Finely chop the onion and mince the garlic.
  2. In a large bowl, combine ground beef, parsley, onion, garlic, salt, and pepper. Mix by hand until just combined.
  3. Form the mixture into golf ball-sized meatballs.
  4. Heat olive oil in a large skillet over medium heat. Add meatballs, browning them on all sides until golden brown, about 8-10 minutes.
  5. Remove meatballs. Pour red wine into the skillet, scraping up flavorful bits. Stir in crushed tomatoes and beef broth, then bring to a simmer.
  6. Return meatballs to the sauce, cover, and let simmer on low for about 30 minutes.

Notes

Serve with crusty bread or over pasta. Allow leftovers to cool before storage.


Nutrition

  • Calories: 350kcal
  • Sugar: 5g
  • Protein: 25g