Table of Contents
Christmas Cranberry Honey Butter: The Only Recipe You’ll Ever Need
The holiday season is a whirlwind of festive gatherings, cozy nights, and, of course, delicious food. But amidst the hustle, wouldn’t it be wonderful to have a simple yet show-stopping recipe that instantly elevates your spread? Our **Christmas Cranberry Honey Butter** is exactly that. This easy cranberry butter recipe is your secret weapon for adding a burst of festive flavor and a touch of elegance to everything from morning toast to holiday dessert platters. It’s the perfect blend of sweet and tart, with a rich, creamy texture that will have your guests raving. Forget store-bought spreads; this homemade holiday butter spread is incredibly easy to make and tastes leagues better.
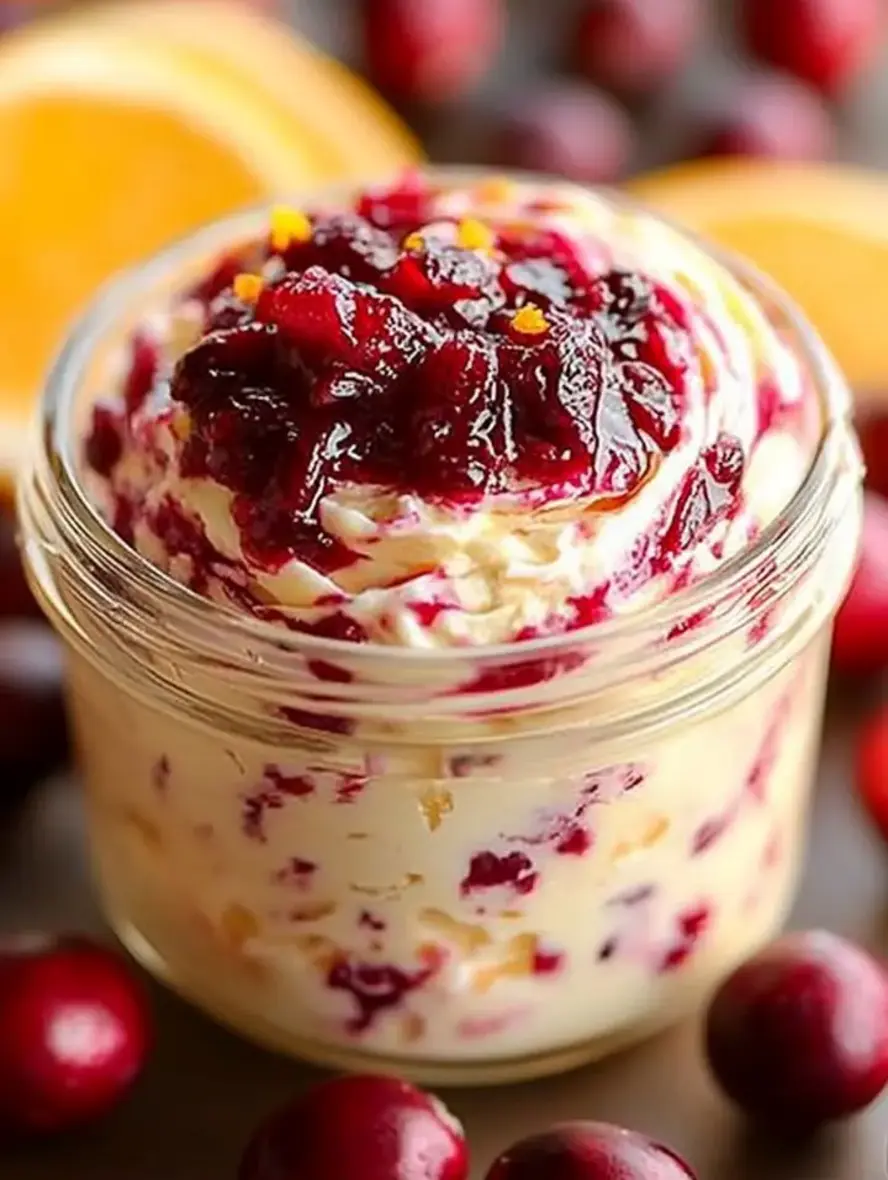
Imagine the vibrant ruby red of fresh cranberries mingling with the golden sweetness of pure honey, all whipped into a luxuriously smooth butter infused with the bright zest of orange. The aroma alone is enough to transport you to a warm, inviting kitchen filled with holiday cheer. Each bite offers a delightful contrast – the slight tang from the cranberries, the comforting sweetness of honey, and the rich, creamy foundation of butter, all brightened by a whisper of citrus. This incredibly easy cranberry butter recipe is not just a condiment; it’s a festive experience in a jar, perfect for gifting or simply treating yourself.
At exorecipes.com, we believe in making exceptional cooking accessible to everyone. That’s why this **Christmas Cranberry Honey Butter** recipe has been meticulously tested to ensure foolproof success, even for novice cooks. We’ve refined it to bring out the most vibrant flavors and achieve an unparalleled creamy texture. Our “Chef’s Secret” lies in the simple yet crucial step of allowing the butter to soften perfectly, creating a truly harmonious blend. Get ready to discover your new favorite holiday staple!
Why This Christmas Cranberry Honey Butter Recipe is a Game-Changer
The Chef’s Secret: Perfectly Balanced Flavor & Unbeatable Creaminess
The magic of this **cranberry butter recipe** lies in its simplicity and the quality of its core ingredients, working in perfect harmony. The key to its **unbeatable creamy texture** and balanced flavor isn’t a complex technique, but rather a deep understanding of how each component contributes. We start with perfectly softened, unsalted butter – not melted, not cold, but at room temperature. This allows it to emulsify beautifully with the pulsing cranberries and honey, creating a smooth, spreadable consistency that holds its shape without being stiff. The fresh cranberries provide a bright, tart counterpoint to the sweetness of the honey, preventing the butter from becoming cloyingly sweet. Finally, the orange zest isn’t just for show; it adds a layer of fragrant brightness that cuts through the richness and ties all the flavors together. This **holiday butter spread** is proof that sometimes, the most extraordinary results come from the simplest, well-executed ideas.
Foolproof for a Reason
We understand that the holidays can be stressful, and the last thing you need is a finicky recipe. This **easy cranberry butter** is designed for ultimate reliability. Our testing process involved multiple batches, ensuring that the ratio of cranberries to honey to butter consistently yields a perfect result. You don’t need fancy equipment or advanced culinary skills. A standard food processor is all you need to combine these simple ingredients into something truly special. This recipe has been developed with the home cook in mind, guaranteeing a delicious outcome every time.
Ingredient Spotlight: Quality Makes the Difference
Fresh Cranberries: The Tart Powerhouse
These vibrant ruby gems are the heart and soul of our **Christmas cranberry butter**. Using fresh cranberries is crucial for that signature tangy bite that cuts through the richness of the butter and sweetness of the honey. They also lend a beautiful, festive color to the spread. While frozen cranberries can be used (see FAQ!), fresh ones offer a brighter, more distinct flavor. When selecting fresh cranberries, look for plump, firm berries with a deep red hue and no soft spots. About 1 cup of fresh cranberries will yield a beautifully speckled and flavorful butter.
Honey: Nature’s Liquid Gold
For this **cranberry honey butter**, the type of honey you choose directly impacts the final flavor profile. We recommend a good quality, natural honey. A mild, floral honey like clover or wildflower will allow the cranberry and orange notes to shine. If you prefer a richer, more robust flavor, a darker honey like buckwheat can be used, but be mindful that it might slightly alter the overall taste. The 1/2 cup of honey provides the perfect level of sweetness to balance the tartness of the cranberries, ensuring this holiday butter spread is delightful, not overpowering.
Unsalted Butter: The Creamy Canvas
Good quality unsalted butter is the foundation of this **holiday butter spread**, providing its luxurious, creamy texture. Using unsalted butter gives you control over the final saltiness (though this recipe doesn’t call for added salt, which is intentional to let the other flavors sing). Ensure your butter is properly softened to room temperature – this is key for achieving a smooth, homogenous mixture without over-processing. Over-softened or melted butter can result in a greasy or grainy texture, so aim for butter that yields slightly to the touch but still holds its shape. 1 cup of softened butter is the perfect amount to create a rich yet perfectly spreadable consistency.
Orange Zest: The Zesty Kiss
A tablespoon of fresh orange zest might seem small, but it packs a powerful punch in this **Christmas cranberry butter**. It adds a bright, aromatic lift that awakens the palate and complements both the tart cranberries and sweet honey beautifully. The zest, which is the outer colored peel of the orange, contains aromatic oils that release an intense citrus fragrance and flavor. Be sure to zest only the orange part, avoiding the bitter white pith underneath. This simple addition elevates the entire flavor profile, making this **easy cranberry butter** truly irresistible.
Step-by-Step Instructions
Step 1: Preparing the Cranberry-Honey Mixture
In the bowl of a food processor, combine the 1 cup of fresh cranberries and 1/2 cup of honey.
Pro Tip: Make sure your food processor is clean and completely dry before you begin. This prevents any unwanted flavors from transferring and ensures the butter emulsifies properly.
Step 2: Pulsing to Perfection
Pulse the cranberries and honey mixture until the cranberries are coarsely chopped. You’re looking for a chunky texture, not a fine puree, as this will provide delightful little bursts of cranberry flavor within the butter.
Common Mistake to Avoid: Don’t over-process! Pulsing too much will turn the cranberries into a liquidy sauce. You want some texture remaining. Aim for about 8-10 short pulses.
Step 3: Adding Butter and Zest
Add the 1 cup of softened unsalted butter and 1 tablespoon of orange zest to the food processor.
Pro Tip: Ensure your butter is truly softened to room temperature. If it’s too cold, it won’t blend smoothly; if it’s too warm or melted, your butter might become greasy.
Step 4: Creaming to Smoothness
Process the mixture until it is smooth and creamy, scraping down the sides of the bowl as needed. This should take about 1-2 minutes. The color should be a beautiful, uniform pinkish-red.
Common Mistake to Avoid: Resist the urge to keep processing for too long once it’s smooth. Over-processing can introduce too much air, making the butter too light, or break down the fat structure.
Step 5: Chilling to Set
Transfer the cranberry honey butter mixture to a clean container. Cover and refrigerate for at least 2 hours before serving. This chilling time allows the flavors to meld and the butter to firm up to a perfect spreadable consistency.
Pro Tip: For an attractive serving presentation, you can spoon the butter into a ramekin or a decorative jar.
Serving & Presentation
This **Christmas Cranberry Honey Butter** is as versatile as it is delicious. For a simple yet elegant breakfast or brunch, serve it alongside warm toast, flaky croissants, or freshly baked scones. It’s also a fantastic spread for cornbread muffins or even pancakes and waffles, adding a festive twist to your morning meal.
Beyond breakfast, consider using this **cranberry butter recipe** as a component of a festive cheese board. Its sweet and tart profile pairs wonderfully with a variety of cheeses, from creamy brie to sharp cheddar. Accompany it with your favorite crackers and some seasonal fruits like grapes or thinly sliced apples. For a truly impressive holiday dessert, it can be served alongside sugar cookies, shortbread, or even as a delightful filling for mini tarts. A sprinkle of chopped fresh rosemary or a few extra fresh cranberries as a garnish can add a beautiful visual touch.
Make-Ahead & Storage Solutions
Make-Ahead Strategy:
This **holiday butter spread** is a make-ahead marvel! You can easily prepare it up to 3 days in advance. Simply follow the recipe instructions, transfer the finished butter to an airtight container, and store it in the refrigerator. This means one less thing to worry about on busy holiday mornings or just before guests arrive. The flavors actually deepen and meld beautifully over time, making an early preparation even more rewarding.
Storing Leftovers:
To keep your **Christmas Cranberry Honey Butter** fresh and delicious, store any leftovers in an airtight container in the refrigerator. It will stay at its best for up to 2 weeks. Ensure the container is well-sealed to prevent it from absorbing any odors from other foods in the fridge. If you plan to keep it longer, consider freezing it in a freezer-safe container for up to 2 months. Thaw overnight in the refrigerator before serving.
The Best Way to Reheat (or Soften):
More often than not, you won’t need to “reheat” this **easy cranberry butter**. When taken directly from the refrigerator, it will be quite firm. Simply let it sit at room temperature for about 15-30 minutes (depending on your kitchen’s temperature) until it reaches a perfectly spreadable consistency. If you need to soften it more quickly, you can gently warm a serving bowl in hot water, dry it thoroughly, and then scoop the butter into it. Avoid microwaving, as this can easily melt the butter and ruin the texture.
Frequently Asked Questions (FAQ)
How long will Christmas Cranberry Honey Butter last in the refrigerator?
When stored properly in an airtight container in the refrigerator, this **Christmas cranberry butter** will stay fresh and delicious for up to 2 weeks. Always ensure it’s well-sealed to maintain quality and prevent any off-flavors.
Can I use frozen cranberries for Christmas Cranberry Honey Butter?
Yes, you can absolutely use frozen cranberries for this **cranberry honey butter** recipe. There’s no need to thaw them first; you can add them directly from the freezer to the food processor with the honey. They might require a slightly longer processing time as they are harder, but the end result will be very similar. Frozen cranberries can sometimes release a bit more liquid, so just ensure you process until you reach your desired texture.
What is the best way to store leftover Christmas Cranberry Honey Butter?
The best way to store leftover **Christmas cranberry butter** is in an airtight container in the refrigerator. This keeps it fresh for up to 2 weeks. For longer storage, it can be frozen in a freezer-safe container for up to 2 months. Just remember to thaw it in the refrigerator overnight before serving.
What can I serve Christmas Cranberry Honey Butter with besides toast?
This **holiday butter spread** is incredibly versatile! Serve it with scones, muffins, croissants, cornbread, waffles, or pancakes for breakfast. It’s also a fantastic addition to a cheese board, pairs well with crackers, and can be used as a delightful spread for holiday cookies, shortbread, or mini tarts. It’s even delicious on baked sweet potatoes or as a glaze for pork or chicken!
Can I make this recipe vegan/gluten-free?
To make this **Christmas Cranberry Honey Butter** vegan, you would need to substitute the butter with a high-quality vegan butter alternative that is solid at room temperature (not a spreadable tub variety). Look for brands that are known for their good baking properties. For a gluten-free option, this recipe is naturally gluten-free, as all the ingredients are typically gluten-free. Always ensure your sweetener (honey or an alternative) and butter substitute are certified gluten-free if you have celiac disease or a severe gluten sensitivity.
Tried This Recipe? Leave a Comment!
Did you make this recipe? I’d love to hear how it turned out! Please leave a comment and a rating below. Your feedback helps other home cooks and supports exorecipes!
For more delicious inspiration, follow me on Pinterest!
.
Print
Christmas Cranberry Honey Butter
- Prep Time: 10 minutes
- Cook Time: 0 minutes
- Total Time: 2 hours 10 minutes
- Yield: 16 servings 1x
- Method: Condiment
- Cuisine: American
Description
A festive holiday butter combining cranberries and honey for a sweet and tangy spread.
Ingredients
- 1 cup fresh cranberries
- 1/2 cup honey
- 1 cup unsalted butter, softened
- 1 tablespoon orange zest
Instructions
- In a food processor, combine the fresh cranberries and honey.
- Pulse until the mixture is coarsely chopped.
- Add the softened unsalted butter and orange zest, then process until smooth.
- Transfer the mixture to a container and refrigerate for at least 2 hours before serving.
Notes
Store in the refrigerator for up to 2 weeks; great on toast or muffins.
Nutrition
- Calories: 90
- Sugar: 6g
- Fat: 7g
- Carbohydrates: 7g
- Protein: 0g