Table of Contents
- Pecan Pie Cookies Recipe: The Only Recipe You’ll Ever Need
- Pecan Pie Cookies Recipe: Why This Version is a Game-Changer
- Ingredient Spotlight: Quality Makes the Difference in Pecan Pie Cookies
- Step-by-Step Instructions for Pecan Pie Cookies
- Serving & Presentation for Pecan Pie Cookies
- Make-Ahead & Storage Solutions for Pecan Pie Cookies
- Frequently Asked Questions (FAQ)
Pecan Pie Cookies Recipe: The Only Recipe You’ll Ever Need
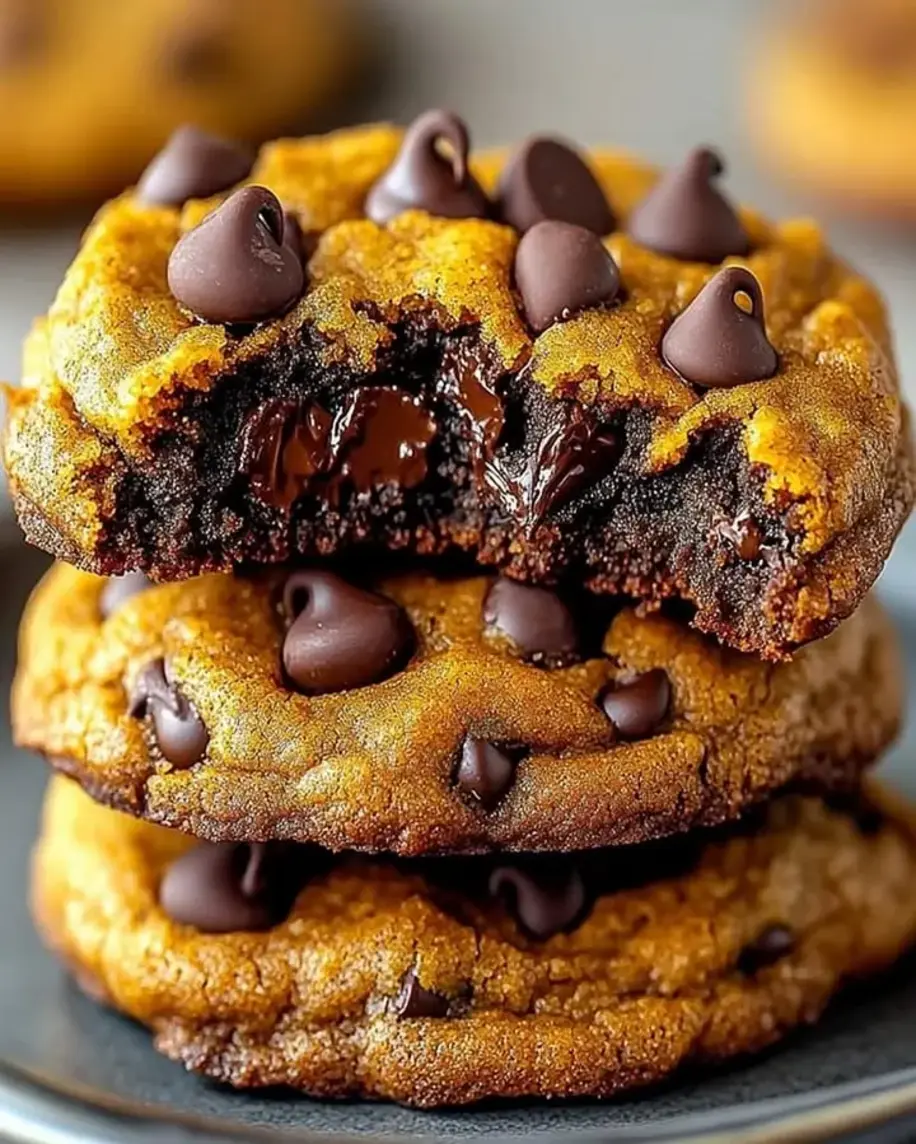
If you’re craving the rich, nutty goodness of pecan pie cookies without the fuss of baking an entire pie, this pecan pie cookies recipe is your ultimate solution. Imagine biting into a buttery, melt-in-your-mouth cookie that captures the essence of a classic Southern dessert, complete with an irresistible gooey pecan topping that sets it apart from ordinary cookies. As a holiday favorite or an easy pecan cookies treat for any occasion, this recipe from exorecipes.com delivers the best pecan pie cookies experience, blending simplicity with gourmet flair. Whether you’re a seasoned baker or a beginner, these pecan pie cookie delights will become your go-to for family gatherings, thanks to their foolproof method and that signature gooey texture that mimics the pie we all love.
The flavors of these pecan pie cookies are nothing short of heavenly—think warm, toasted pecans mingling with the sweetness of corn syrup and brown sugar, all nestled on a tender, buttery base. Each bite offers a perfect contrast of textures: the crisp edges giving way to a soft, chewy center that pulls you in with its sticky, caramel-like filling. The aroma alone, as these cookies bake, fills your kitchen with hints of vanilla and nutty warmth, evoking memories of festive holidays and cozy evenings. It’s not just a cookie; it’s a sensory journey that combines the crunch of chopped pecans with the gooey indulgence that makes pecan pie cookies a standout dessert.
What makes this pecan pie cookies recipe from exorecipes.com truly special is our commitment to providing a reliable, tested blueprint that’s been perfected by Chef Sally herself. Drawing from years of culinary expertise, we’ve incorporated a Chef’s Secret that ensures every batch turns out flawlessly, making it the best pecan pie cookies recipe you’ll find online. In this post, you’ll discover expert tips on achieving that ideal chewy texture, simple substitutions for dietary needs, and step-by-step guidance to build your confidence in the kitchen. Plus, we’ll address common questions like how to store your holiday pecan cookies for maximum freshness. Let’s dive in and make baking these easy pecan cookies a breeze!
Pecan Pie Cookies Recipe: Why This Version is a Game-Changer
The Chef’s Secret
The true magic of this pecan pie cookies recipe lies in the irresistible gooey pecan topping, achieved by carefully mixing corn syrup and brown sugar to create a caramelized layer that perfectly mimics the filling of a traditional pecan pie. This technique not only adds depth of flavor but also ensures the cookies remain moist and flavorful, elevating them beyond standard holiday pecan cookies. Unlike other recipes that might result in dry or overly sweet treats, our method involves gently spooning the topping onto each cookie just before baking, allowing it to seep into the dough for a unified, gooey bite.
Unbeatable Texture
The science behind the texture starts with the high-quality unsalted butter, which provides a rich fat content that creates a tender, flaky base. When creamed with sugar, it traps air for a light rise, while the baking powder ensures even expansion without over-browning. This results in cookies that are chewy in the center and golden at the edges, thanks to the precise oven temperature of 350°F, which prevents the gooey topping from burning while allowing the pecans to toast subtly.
Foolproof for a Reason
This recipe has been tested multiple times in our kitchens to guarantee success, even for novice bakers. With straightforward steps and clear measurements, it’s designed to minimize errors, making it one of the easiest pecan cookies recipes available. Readers rave about its consistency, ensuring your pecan pie cookie recipe turns out perfectly every time, whether you’re preparing for a holiday gathering or a simple weeknight treat.
Ingredient Spotlight: Quality Makes the Difference in Pecan Pie Cookies
When it comes to crafting the perfect pecan pie cookies, every ingredient plays a crucial role in delivering that signature flavor and texture. Starting with unsalted butter, this foundational element provides the rich, creamy base that makes these easy pecan cookies so irresistible. Opt for high-fat, European-style butter if possible, as it enhances the flakiness and prevents the dough from becoming greasy. If you’re substituting, try using an equal amount of coconut oil for a dairy-free option, but be aware it may slightly alter the texture.
Granulated sugar is essential for sweetness and structure, helping to cream with the butter for a light, airy dough. Using organic cane sugar can add a subtle depth, but avoid substitutes like honey, which might make the cookies too moist. Eggs act as a binder, adding moisture and richness; for the best results, use large, room-temperature eggs to ensure even incorporation. If you’re vegan, flax eggs (1 tablespoon ground flaxseed mixed with 3 tablespoons water per egg) work well as a substitution without compromising the structure.
Vanilla extract infuses the cookies with warm, aromatic notes that complement the nutty pecans. Always choose pure vanilla extract over imitation for authentic flavor—it’s the difference between a flat taste and a complex, inviting one. All-purpose flour forms the backbone of the dough, providing gluten for chewiness; for a gluten-free version, swap with a 1:1 gluten-free blend, though you may need to add a bit more for the right consistency. Baking powder and salt are the dynamic duo for lift and balance, with baking powder ensuring a gentle rise—double-check it’s fresh to avoid dense cookies.
Chopped pecans bring the crunch and nutty essence that define pecan pie cookies, so select fresh, high-quality nuts for the best flavor and even distribution. Finely chop them to prevent sinking in the dough. Corn syrup in the topping creates that gooey, sticky magic; if you’re avoiding corn products, agave syrup can substitute, though it might make the topping slightly less viscous. Finally, brown sugar in the topping adds molasses-rich depth; dark brown sugar intensifies the flavor, but light works in a pinch. Each ingredient, when sourced with care, ensures your pecan pie cookie recipe shines as the best on the web.
Step-by-Step Instructions for Pecan Pie Cookies
Step 1: Preheat the Oven and Prepare Baking Sheets
Preheat your oven to 350°F (175°C) and line your baking sheets with parchment paper to prevent sticking and ensure even baking. This step is crucial for achieving perfectly golden pecan pie cookies. Pro Tip: Use high-quality parchment paper to avoid any grease seepage that could affect the gooey topping.
Step 2: Cream Together Butter and Sugar
In a large bowl, cream together 1 cup of softened unsalted butter and 1 cup of granulated sugar until the mixture is light and fluffy, which usually takes about 2-3 minutes with an electric mixer. This incorporates air for a tender texture in your pecan pie cookie recipe. Common Mistake to Avoid: Don’t over-cream, as this can lead to cookies that spread too much; stop once it’s pale and smooth.
Step 3: Beat in the Eggs and Vanilla
Beat in 2 large eggs one at a time, ensuring each is fully incorporated before adding the next, then stir in 1 teaspoon of vanilla extract for that aromatic boost. This step binds the ingredients and adds moisture. Pro Tip: Let eggs come to room temperature for better emulsification and a smoother dough.
Step 4: Whisk Dry Ingredients
In another bowl, whisk together 2 1/2 cups of all-purpose flour, 1/2 teaspoon of baking powder, and 1/4 teaspoon of salt to ensure even distribution. Gradually add this to the creamed mixture, mixing until just combined. Common Mistake to Avoid: Overmixing here can make the cookies tough, so use a gentle hand.
Step 5: Fold in Chopped Pecans
Fold in 1 cup of chopped pecans into the dough for that signature nutty crunch in your easy pecan cookies. This adds texture and flavor without overworking the dough. Pro Tip: Finely chop the pecans for even distribution and to avoid large chunks that might burn.
Step 6: Drop Dough onto Sheets
Drop the dough by tablespoonfuls onto the prepared baking sheets, spacing them about 2 inches apart to allow for spreading. Common Mistake to Avoid: Don’t overcrowd the sheets, or the cookies won’t bake evenly.
Step 7: Prepare and Add the Topping
In a small bowl, mix 1/2 cup of corn syrup and 1/2 cup of brown sugar; spoon a small amount onto each cookie for that gooey pecan pie effect. Pro Tip: Use a teaspoon to add just enough topping to cover the center without overflowing.
Step 8: Bake the Cookies
Bake for 10-12 minutes or until the edges are golden, allowing the centers to remain soft for the perfect chewy texture in your best pecan pie cookies. Common Mistake to Avoid: Don’t overbake; check at 10 minutes to maintain that gooey interior.
Step 9: Cool the Cookies
Cool the cookies on wire racks to prevent sogginess and let the flavors set. Pro Tip: Transfer them immediately to racks to avoid steaming on the sheet.
Serving & Presentation for Pecan Pie Cookies
Elevate your pecan pie cookies with creative plating that turns them into a showstopper dessert. Arrange them on a rustic wooden board, dusted with a light sprinkle of powdered sugar for a festive touch, or pair with a drizzle of caramel sauce to enhance the gooey pecan filling. For holiday pecan cookies, garnish with a whole pecan on top or a sprig of fresh mint for color contrast. These cookies shine as a standalone treat but complement rich main courses like roasted turkey or ham during Thanksgiving, or even a simple coffee break. Serve warm for the best experience, perhaps alongside a scoop of vanilla ice cream to mimic a pie à la mode, making your pecan pie cookie recipe the star of any gathering.
Make-Ahead & Storage Solutions for Pecan Pie Cookies
Make-Ahead Strategy: Prepare the dough up to 3 days in advance by mixing all ingredients except the topping, then wrapping it tightly in plastic wrap and refrigerating. When ready, let it sit at room temperature for 15 minutes before shaping and adding the topping, ensuring your pecan pie cookies stay fresh and flavorful for busy holiday schedules.
Storing Leftovers: Store cooled cookies in an airtight container at room temperature for up to 5 days to maintain their chewy texture. For longer storage, freeze them in a single layer on a baking sheet first, then transfer to a freezer-safe bag for up to 2 months, preventing staleness in your easy pecan cookies.
The Best Way to Reheat: To restore the original gooey goodness, reheat frozen or stored cookies in a 300°F oven for 5-7 minutes, or microwave for 10-15 seconds. This gently warms them without drying out the pecan pie cookie recipe’s signature center.
Frequently Asked Questions (FAQ)
How do I get my pecan pie cookies to stay chewy?
To keep your pecan pie cookies chewy, ensure you don’t overbake them—aim for golden edges while the centers remain soft, typically 10-12 minutes at 350°F. Using fresh ingredients like high-fat butter and properly measured flour helps retain moisture. Store them in an airtight container with a slice of bread to absorb excess dryness, preserving that delightful texture for your pecan pie cookie recipe.
Can I use a different nut instead of pecans in pecan pie cookies?
Absolutely, you can substitute pecans with walnuts, almonds, or even hazelnuts for a twist on this pecan pie cookies recipe. Walnuts offer a similar earthy flavor, while almonds add a milder crunch. Use the same quantity (1 cup chopped) and toast them lightly beforehand for enhanced taste, but note that the overall flavor profile might shift slightly, making it a versatile option for holiday pecan cookies.
What’s the best way to store pecan pie cookies?
The best way to store pecan pie cookies is in an airtight container at room temperature for up to 5 days, which keeps them chewy and fresh. If you need longer storage, freeze them in a resealable bag for up to 2 months. Avoid refrigeration, as it can make them stale; instead, let them thaw at room temperature before enjoying your easy pecan cookies.
How long do pecan pie cookies need to bake?
Pecan pie cookies typically need 10-12 minutes to bake at 350°F, depending on your oven and desired texture. Check at the 10-minute mark for golden edges while keeping the centers soft for that gooey effect. This ensures the best results for your pecan pie cookie recipe, avoiding overbaking which can dry them out.
Can I make this recipe gluten-free?
Yes, you can make this pecan pie cookies recipe gluten-free by swapping the all-purpose flour with a 1:1 gluten-free flour blend. Ensure the blend includes xanthan gum for proper structure, and add an extra tablespoon of flour if the dough feels too sticky. This adjustment maintains the chewy texture while keeping it accessible for gluten-sensitive eaters.
Are pecan pie cookies suitable for kids?
Pecan pie cookies are generally kid-friendly, especially during holidays, but they contain nuts, which can be a choking hazard for young children. The sweetness appeals to kids, but always check for allergies. For a nut-free version, omit the pecans or use seeds like sunflower for a safe, delicious alternative in your easy pecan cookies recipe.
Tried This Recipe? Leave a Comment!
Did you make this pecan pie cookies recipe? I’d love to hear how it turned out! Please leave a comment and a rating below. Your feedback helps other home cooks and supports exorecipes in creating the best resources for holiday pecan cookies and more!
For more delicious inspiration, follow me on Pinterest!
.
Print
Pecan Pie Cookies
- Prep Time: 20 minutes
- Cook Time: 12 minutes
- Total Time: 32 minutes
- Yield: 24 cookies 1x
- Method: Dessert
- Cuisine: American
Description
These Pecan Pie Cookies are a delightful twist on the classic pie, featuring a buttery cookie base with a gooey pecan filling.
Ingredients
- 1 cup unsalted butter, softened
- 1 cup granulated sugar
- 2 large eggs
- 1 teaspoon vanilla extract
- 2 1/2 cups all-purpose flour
- 1/2 teaspoon baking powder
- 1/4 teaspoon salt
- 1 cup chopped pecans
- 1/2 cup corn syrup
- For the topping: 1/2 cup brown sugar
Instructions
- Preheat oven to 350°F (175°C) and line baking sheets with parchment paper.
- In a large bowl, cream together butter and sugar until light and fluffy.
- Beat in eggs one at a time, then stir in vanilla extract.
- In another bowl, whisk together flour, baking powder, and salt; gradually add to the creamed mixture.
- Fold in chopped pecans.
- Drop dough by tablespoonfuls onto prepared sheets.
- In a small bowl, mix corn syrup and brown sugar for topping; spoon onto each cookie.
- Bake for 10-12 minutes or until edges are golden.
- Cool on wire racks.
Notes
Ensure pecans are finely chopped for even distribution. Store cookies in an airtight container for up to 5 days.
Nutrition
- Calories: 180
- Sugar: 12g
- Fat: 9g
- Carbohydrates: 22g
- Protein: 2g