
Table of Contents
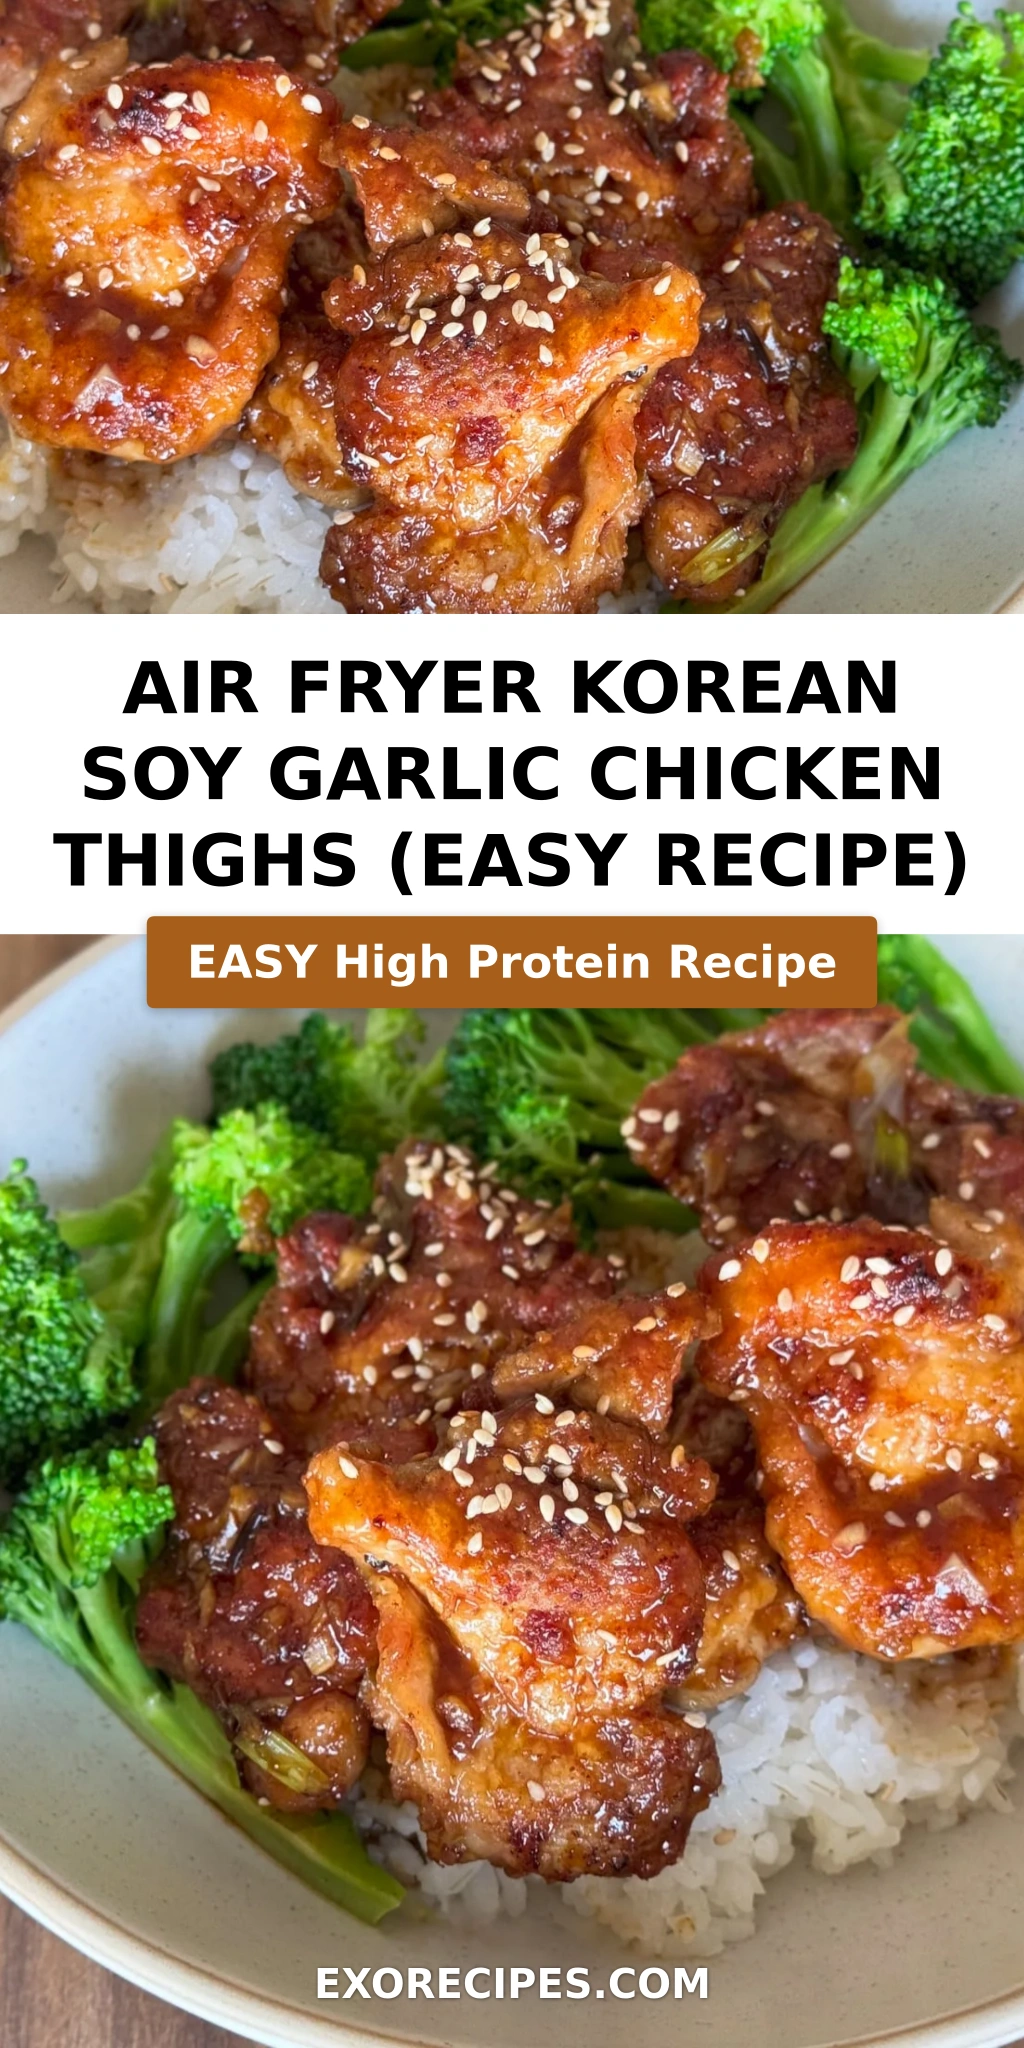
Air Fryer Korean Soy Garlic Chicken Thighs (Easy Recipe) – A Crispy, Sticky Flavor Explosion
Growing up in my mother’s kitchen in Morocco, there was always an emphasis on balancing sweet, savory, and a touch of heat. Moving to New York City, I’ve found endless inspiration in the global culinary scene, and Korean food quickly captured my heart with its vibrant flavors. This Air Fryer Korean Soy Garlic Chicken Thighs recipe is my love letter to that fusion – taking the incredible tastes of classic Korean fried chicken and making it accessible and weeknight-friendly using the air fryer. Forget deep-frying; we’re achieving that irresistible crispy texture and sticky, glossy coating with a fraction of the oil, making it an easy korean chicken recipe that’s as delicious as it is simple.
Imagine biting into perfectly golden-brown, juicy chicken thighs, each piece coated in a savory-sweet, garlicky sauce with a subtle kick of chili. The aroma alone, a blend of toasted sesame, pungent garlic, and a hint of caramelized honey, fills my NYC apartment, instantly transporting me. It’s like a symphony of textures and tastes: the delicate crunch of the potato starch crust, the tender meat within, and that finger-licking, glossy sauce that clings to every morsel. This recipe utilizes the power of the air fryer, a French-trained chef’s secret for achieving a crisp that rivals traditional frying methods without the fuss.
While traditional Korean fried chicken is a culinary masterpiece, I wanted to create a version that delivers on flavor and crunch without the extensive prep and cleanup. My approach focuses on maximizing flavor with minimal effort, ensuring every piece of chicken is caramelized and infused with that signature soy garlic goodness. I’ll share a pro tip for the crispiest skin, and we’ll steer clear of a common mistake that can leave your chicken soggy. If you’ve been looking for an incredible soy garlic chicken air fryer recipe, you’ve just found your new favorite.
Why This Air Fryer Korean Chicken Thighs Recipe Is the Best
The secret to the phenomenal flavor in this recipe lies in the perfect balance of sweet, savory, and umami. Drawing from my French culinary training in sauce work, I’ve crafted a sticky soy garlic sauce that coats each piece of chicken beautifully. It’s a harmonious blend of dark soy sauce, honey, rice vinegar, and a generous amount of fresh garlic, which, when caramelized, develops an incredible depth of flavor that’s both bold and comforting. This isn’t just any sauce; it’s designed to cling, shine, and deliver that authentic Korean taste.
Achieving that perfected texture was paramount for me. Boneless, skinless chicken thighs are naturally juicy, but making them crispy without deep frying is the real magic trick. My technique uses a precise combination of potato starch and all-purpose flour for a light yet incredibly crisp coating that stands up to the sticky sauce. The air fryer works its wonders, circulating hot air to create an even, golden-brown exterior that rivals its deep-fried cousins. It’s all about controlling the heat and ensuring proper breading, a principle I learned and refined during my time in Paris.
As a busy New Yorker, I know the importance of a foolproof and fast recipe. This air fryer chicken thighs recipe is designed for maximum impact with minimum fuss. From drying the chicken to mixing the simple coating and whisking together the sauce, each step is straightforward. The air fryer handles the cooking efficiently, freeing you up to prepare your sides. It’s perfect for a weeknight meal when you crave something special but need it on the table fast, proving that extraordinary flavor doesn’t have to mean endless hours in the kitchen.
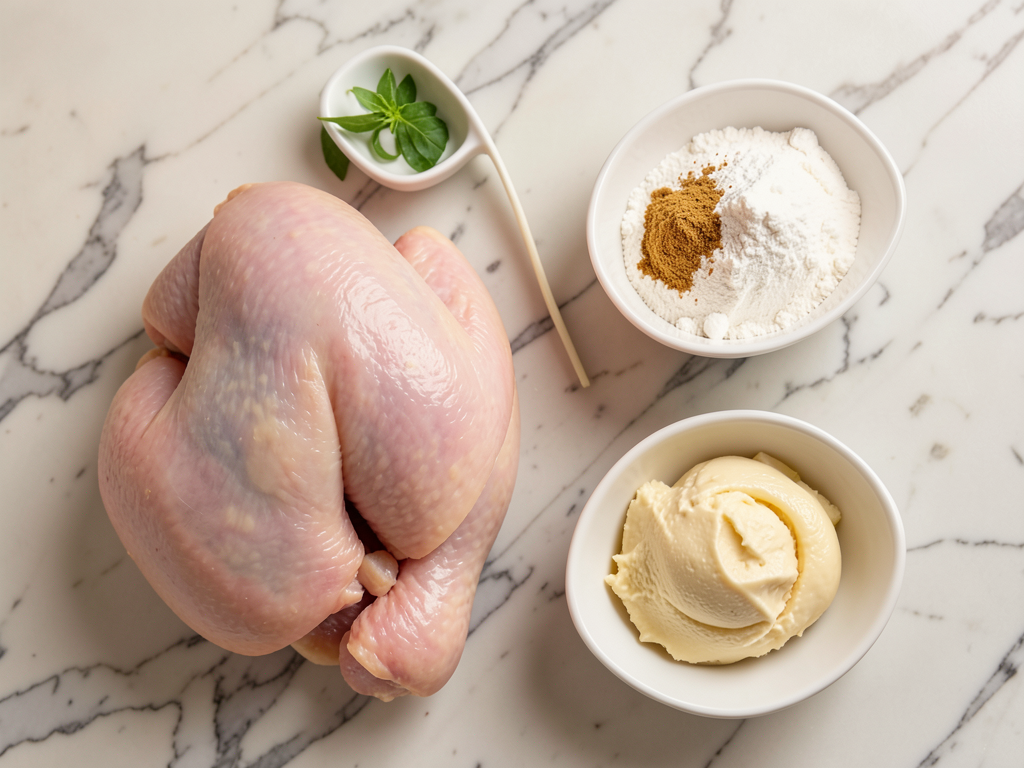
Air Fryer Korean Chicken Thighs Ingredients
When I shop for ingredients for this dish, I love visiting the Asian markets in Flushing, Queens, or even some of the more specialized stores in Manhattan. The freshness of the garlic, the quality of the soy sauce – it really makes a difference. But don’t worry, you can find everything you need at your local grocery store too!
Ingredients List
- Chicken
- 1 lb chicken thighs boneless skinless
- 3 tbsp potato starch
- 3 tbsp all purpose flour
- 1 tsp garlic powder
- 1/2 tsp salt
- 1/2 tsp black pepper
- 3 tbsp neutral oil for pan frying
- 8 cloves of garlic (minced)
- 2 stalks green onion (green and white parts seperated)
- 1 tsp red chili flakes
- Sauce
- 1/2 cup chicken stock (sub: water & chicken bouillon)
- 3 tbsp honey
- 1 tbsp rice vinegar
- 1 tbsp dark soy sauce
- 1 tsp cornstarch
- Garnish
- Green onion (green part)
- Sesame seeds
Ingredient Spotlight
Boneless, Skinless Chicken Thighs: These are the star of our show! Thighs are incredibly forgiving and stay wonderfully juicy thanks to their higher fat content. When selecting, look for plump, pink pieces without any discolored spots. If you can only find bone-in, skin-on thighs, you can debone and skin them yourself, just be careful and use a sharp knife. Chicken breasts can be used, but they might dry out more easily and cook faster; adjust your air frying time accordingly for best results.
Potato Starch: This is a game-changer for that signature Korean fried chicken crisp, even if we’re air frying. Potato starch creates an incredibly light and crispy coating that also helps the sauce adhere beautifully. You can usually find it in the baking aisle or international foods section. If you can’t get potato starch, cornstarch is an acceptable substitute; it will still yield a good crisp, but perhaps not quite as light and airy as potato starch.
Dark Soy Sauce: This isn’t just for saltiness; dark soy sauce provides that beautiful, rich color and a touch of subtle sweetness and deeper umami flavor to our sauce. It’s distinct from regular soy sauce. If you don’t have dark soy sauce, you can use regular soy sauce but perhaps add a tiny pinch of sugar or a touch more honey to achieve a similar depth of color and sweetness. The flavor profile will be slightly different but still delicious.
Honey: Beyond just sweetness, honey helps create that gorgeous, sticky, glossy glaze that is so characteristic of this dish. Any good quality honey will work. If you prefer, maple syrup can be used as a vegan or alternative sweetener, though it will impart a slightly different flavor. Brown sugar can also be used, but you might need to adjust the liquid slightly to achieve the desired consistency.
Fresh Garlic: We’re using a generous amount of minced garlic here, and for good reason! It’s the backbone of the “garlic” in our soy garlic sauce. Freshly minced garlic yields a much more potent and aromatic flavor than garlic powder. When sauteed lightly, it sweetens and deepens. If fresh garlic is absolutely not an option, you can use garlic powder, but start with less (maybe 1-2 teaspoons) and taste as you go.
| Original Ingredient | Best Substitution | Flavor / Texture Impact |
|---|---|---|
| Chicken Thighs | Chicken Breast | Less juicy, faster cook time; may dry out if overcooked. |
| Potato Starch | Cornstarch | Still crispy, but slightly less light and airy texture. |
| Dark Soy Sauce | Regular Soy Sauce + pinch of sugar | Lighter color, slightly less depth of flavor; sweetness needs adjusting. |
| Honey | Maple Syrup or Brown Sugar | Different subtle flavor notes; adjust liquid if using brown sugar. |
| Fresh Garlic (minced) | Garlic Powder (1-2 tsp) | Less potent and aromatic; adjust to taste. |
How to Make Air Fryer Korean Soy Garlic Chicken Thighs — Step-by-Step
You’re just a few steps away from an incredibly flavorful meal. Follow these instructions carefully, and you’ll have perfectly crispy, sticky Korean soy garlic chicken thighs ready to impress!
Step 1: Prepare the Soy Garlic Chicken Sauce
In a small bowl, combine all the sauce ingredients: 1/2 cup chicken stock (or use water with a chicken bouillon cube), 3 tbsp honey, 1 tbsp rice vinegar, 1 tbsp dark soy sauce, and 1 tsp cornstarch. Whisk until the cornstarch is fully dissolved and there are no lumps. Set this mixture aside; it’s going to become our glossy, irresistible glaze later.
💡 mia’s Pro Tip: Whisking the cornstarch thoroughly into a cold liquid before heating is a classic French technique to prevent lumps. It ensures a silky-smooth sauce every time!
Step 2: Pat Dry and Coat Chicken
Begin by patting the boneless, skinless chicken thighs thoroughly dry with paper towels. This is a crucial step for achieving maximum crispiness. On a large plate, mix together the potato starch, all-purpose flour, garlic powder, salt, and black pepper. Lightly dredge each chicken thigh in this mixture, ensuring it’s evenly coated on all sides. Shake off any excess flour mixture.
⚠️ Common Mistake to Avoid: Don’t skip patting the chicken dry! Moisture is the enemy of crispiness. Wet chicken steams rather than fries, leading to a soggy coating.
Step 3: Air Fry the Chicken
Preheat your air fryer to 400°F (200°C). Lightly grease the air fryer basket or spray with cooking oil. Place the coated chicken thighs in a single layer in the air fryer basket, ensuring not to overcrowd them. Work in batches if necessary. Air fry for 18-22 minutes, flipping halfway through, or until the chicken is golden brown, crispy, and cooked through (internal temperature reaches 165°F / 74°C).
💡 mia’s Pro Tip: For extra crispiness and even cooking, give the air fryer basket a gentle shake or flip the chicken a couple of times during the cooking process. Overcrowding will steam the chicken, so give each piece its breathing room!
Step 4: Sauté Aromatics
While the chicken is air frying, heat 1 tablespoon of neutral oil in a large frying pan or skillet over medium-high heat. Add the minced garlic, the white parts of the green onion, and the red chili flakes. Sauté for about 2-3 minutes, stirring constantly, until the garlic is fragrant and lightly golden brown. Be careful not to burn the garlic, as it can turn bitter quickly!
Step 5: Thicken the Sauce and Combine with Chicken
Pour the previously prepared soy garlic sauce mixture into the pan with the sautéed aromatics. Bring the sauce to a gentle simmer, stirring constantly, for about 1 minute or until the sauce has thickened to a glossy glaze. Once the sauce is thick and shiny, add the crispy air-fried chicken thighs back into the pan. Toss the chicken gently to ensure every piece is thoroughly coated with the delicious, sticky glaze. Cook for another 1-2 minutes, allowing the sauce to truly cling to the chicken.
⚠️ Common Mistake to Avoid: Don’t overcook the sauce once the chicken is added back. You want the sauce to coat, not to become overly reduced or clumpy. A quick toss is all it takes!
| Step | Action | Duration | Key Visual Cue |
|---|---|---|---|
| 1 | Prepare Sauce | 2 mins | Cornstarch dissolved, no lumps. |
| 2 | Pat & Coat Chicken | 5 mins | Chicken dry, evenly coated, no excess flour. |
| 3 | Air Fry Chicken | 18-22 mins | Golden brown, crispy, internal temp 165°F. |
| 4 | Sauté Aromatics | 2-3 mins | Garlic fragrant, lightly golden, not burnt. |
| 5 | Thicken Sauce & Combine | 2-3 mins | Sauce glossy & thick, chicken fully coated. |
Serving & Presentation
When it comes to presenting this beautiful air fryer korean chicken thighs, I always think about balance and color. Arrange the glistening chicken thighs artfully on a platter or individual plates. The deep caramel color of the sauce against the golden-brown chicken is already appealing, but a pop of green and a sprinkle of white really elevate it. This dish demands to be seen and savored!
For garnish, a generous sprinkle of thinly sliced green onion (the green parts we set aside earlier) adds freshness and a subtle oniony crunch. Toasted sesame seeds, white or black, provide an exquisite textural contrast and a nutty aroma – a trick I picked up from watching my chef mentors in Paris pay attention to every detail. Sometimes I’ll add a few extra red chili flakes for those who like an extra kick.
Pairing is key with a dish this flavorful. I love serving it with a simple bowl of fluffy steamed white or brown rice to soak up every last bit of that incredible soy garlic sauce. For a burst of freshness and to cut through the richness, a quick cucumber salad with a light vinegar dressing, or some simply blanched and seasoned broccoli or asparagus, makes for a complete and satisfying meal. Think about the vibrant, fresh flavors typical of fine dining in NYC, or even the simple yet perfect pairings my mother would make in Morocco – balance is everything.
| Pairing Type | Suggestions | Why It Works |
|---|---|---|
| Side Dish | Steamed white rice, brown rice, quick kimchi-style cucumber salad | Absorbs sauce beautifully, provides textural contrast and fresh counterpoint |
| Sauce / Dip | Extra drizzle of sauce, sriracha mayo, lime wedge | Adds more flavor, creaminess, or a refreshing citrus bite |
| Beverage | Cold lager beer, sparkling water with lemon, chilled sake | Complements the rich flavors, refreshing and light |
| Garnish | Toasted sesame seeds, sliced green onion, extra chili flakes | Adds visual appeal, nutty flavor, freshness, or heat |
Make-Ahead, Storage & Reheating
As a busy cook in NYC, I know the value of meal prep! This soy garlic chicken air fryer recipe is fantastic for making ahead, and it reheats surprisingly well, making it perfect for office lunches or quick dinners throughout the week. Planning is key to enjoying delicious food without the daily hustle.
| Method | Container | Duration | Reheating Tip |
|---|---|---|---|
| Refrigerator | Airtight container | 3-4 days | Reheat briefly in air fryer for crispness (350°F, 5-7 mins). |
| Freezer | Freezer-safe bag/container | Up to 2 months | Thaw overnight, then reheat in air fryer. |
| Make-Ahead | Cook chicken completely, store sauce separately. | Chicken: 1 day, Sauce: 3-4 days | Reheat chicken in air fryer till hot, then toss with warmed sauce. |
If you’re making this ahead, I recommend storing the chicken and the sauce separately if possible. This helps maintain the chicken’s crispiness. You can air fry the chicken until perfectly golden, then let it cool completely before storing. Prepare the sauce and keep it in a separate airtight jar in the fridge. When ready to serve, gently rewarm the sauce on the stovetop and reheat the chicken in the air fryer until hot and crisp, then toss them together.
For best reheating, the air fryer truly is your friend. A quick 5-7 minutes at 350°F (175°C) will bring back a good amount of the original crispiness. Microwaving is an option in a pinch, but you will lose most of the crisp texture, so I recommend crisping it up again for a minute or two in a hot pan if you don’t have an air fryer handy. Don’t be afraid to make a double batch — it’s always a hit!
Variations & Easy Swaps
One of the joys of cooking is experimenting with flavors and tailoring dishes to your preference or what you have on hand. This easy korean chicken recipe is incredibly versatile, and you can easily adapt it to create new and exciting meals. Here are some of my favorite twists:
| Variation | Key Change | Best For | Difficulty Impact |
|---|---|---|---|
| Spicy Gochujang Variation | Add Gochujang (Korean chili paste) to sauce | Heat lovers, authentic Korean spice | Slightly increased ingredient sourcing, same difficulty |
| Gluten-Free Soy Garlic Chicken | Use tamari or coconut aminos, gluten-free flour | Dietary restrictions (gluten-free) | Minor ingredient swaps, same difficulty |
| Citrus-Ginger Twist | Add orange zest and fresh ginger to sauce | Brighter, zesty flavor profile | Minor ingredient addition, same difficulty |
Spicy Gochujang Variation
If you crave a bit more heat, a spicy gochujang variation is a must-try. Simply add 1-2 tablespoons of gochujang (Korean chili paste) to your sauce mixture in Step 1. Gochujang brings a complex, fermented chili flavor that is deeply savory and wonderfully spicy, reminiscent of many authentic Korean dishes I’ve enjoyed in K-Town. Adjust the amount to your personal spice preference – I sometimes add a touch of Aleppo pepper for a Moroccan twist on the heat!
Gluten-Free Soy Garlic Chicken
Making this recipe gluten-free is incredibly easy! Simply swap out the all-purpose flour for a gluten-free all-purpose flour blend (ensure it contains xanthan gum for best results) and use tamari instead of dark soy sauce. Tamari is a gluten-free soy sauce alternative that still provides rich umami flavor. The potato starch is naturally gluten-free, so no need to change that. This ensures everyone can enjoy these delicious air fryer korean chicken thighs without compromise.
Citrus-Ginger Twist
For a brighter, zestier take that I sometimes prepare with spring finds from the Union Square Greenmarket, introduce fresh ginger and a hint of citrus. Add 1 tablespoon of finely grated fresh ginger to the pan with the garlic in Step 4, and about 1 teaspoon of orange or lime zest to the sauce mixture in Step 1. The fresh ginger adds a warm, spicy aroma, while the citrus zest brightens the entire dish, cutting through the richness and adding an unexpected layer of fresh flavor.
How long do you cook chicken thighs in an air fryer for this Korean soy garlic recipe?
For this Air Fryer Korean Soy Garlic Chicken Thighs recipe, I generally recommend air frying the boneless, skinless chicken thighs at 400°F (200°C) for 18-22 minutes. The exact time can vary slightly depending on the thickness of your chicken thighs and your specific air fryer model. Always ensure you flip the chicken halfway through to get that beautiful, even golden-brown crisp on both sides. The most important thing is to confirm the internal temperature reaches 165°F (74°C) to ensure they are safely cooked through and perfectly juicy. Using a meat thermometer is always my preferred method for precision!
Can I use chicken breasts instead of chicken thighs for this air fryer Korean chicken?
Yes, you can certainly use chicken breasts if that’s what you prefer or have on hand for this air fryer Korean chicken. However, be aware that chicken breasts are leaner and tend to dry out more easily than thighs. I would recommend cutting them into similar-sized pieces as the thighs (or even slightly smaller) to ensure even cooking. You’ll also need to adjust the cooking time; chicken breasts will likely cook faster, probably in the range of 15-20 minutes at 400°F (200°C). Keep a close eye on them and use a meat thermometer to ensure they reach 165°F (74°C) without overcooking.
What can I substitute for gochujang or soy sauce in this Korean garlic chicken recipe?
My recipe doesn’t explicitly call for gochujang in the main version, but if you’re exploring the spicy variation or a different Korean garlic chicken recipe, you can substitute gochujang with a mix of sriracha and a touch of brown sugar for sweetness, although the flavor profile will be different due to the lack of fermentation. For soy sauce, specifically the dark soy sauce, you can use tamari for a gluten-free option, or even coconut aminos for a soy-free alternative. If using regular soy sauce, you might want to add a tiny pinch more sugar or honey to replicate the subtle sweetness and color of dark soy sauce. These swaps will alter the taste slightly but still yield a delicious result.
What should I serve with air fryer Korean soy garlic chicken thighs?
These air fryer Korean soy garlic chicken thighs are so flavorful, they pair beautifully with a variety of sides. My go-to is always fluffy steamed white or brown rice to soak up that glorious sticky sauce. For vegetables, a simple quick cucumber salad with a light vinaigrette or some blanched and seasoned broccoli or asparagus adds a lovely fresh contrast. Other great options include sautéed spinach, a simple side of kimchi, or even spiralized zucchini noodles for a lighter, low-carb meal. Don’t forget a sprinkle of toasted sesame seeds and fresh green onions for garnish, as they add both texture and flavor to complete the dish.
How do I ensure my chicken is crispy when making soy garlic chicken in an air fryer?
Achieving crispiness in the air fryer is all about managing moisture and having the right coating! First, always pat your chicken thighs thoroughly dry with paper towels before breading – excess moisture creates steam, which leads to soggy chicken. Second, the combination of potato starch and all-purpose flour in my recipe is key; potato starch gives that super light, airy crisp. Third, don’t overcrowd the air fryer basket. Cook in batches if necessary, ensuring there’s enough space for hot air to circulate around each piece, giving every surface a chance to crisp up. Lastly, a light spray of oil on the chicken before air frying can enhance the golden-brown crust. Following these steps will result in wonderfully crispy air fryer Korean chicken thighs!
Share Your Version!
I poured my heart into crafting this Air Fryer Korean Soy Garlic Chicken Thighs recipe, blending my culinary training with my love for bold flavors, and now I’d love to see what you create! If you whip up this easy Korean chicken recipe, please leave a star rating and a comment below – your feedback means the world to me. Did you try a new side dish inspiration, or perhaps add a unique spice blend inspired by your own heritage?
Don’t forget to share a photo of your delicious creation on Instagram or Pinterest and tag @exorecipes. I absolutely adore seeing my recipes come to life in your kitchens! What’s your favorite sauce to add a unique flavor twist to air-fried chicken thighs? Can’t wait to hear from you!
From my NYC kitchen to yours — I hope this recipe brings as much warmth to your table as it does to mine. — mia 🧡
Love This Recipe? Save It to Pinterest!
If you enjoyed this Air Fryer Korean Soy Garlic Chicken Thighs (Easy Recipe) recipe, don’t let it get lost in your browser tabs! 😄 Pin it now so you can find it again anytime — and explore hundreds more tried-and-tested recipes waiting for you on my Pinterest boards.
👉 Follow mia on Pinterest @chefrecipes2
📌 Pin this recipe · 🔁 Re-pin your favorites · 💬 Tag me when you make it — I love seeing your creations!

Air Fryer Korean Soy Garlic Chicken Thighs (Easy Recipe)
Description
Soy Garlic Chicken Thighs are 10 /10 delicious and super easy to make. Everything can be done in one pan. Lightly bread with potato starch. Pan fry the chicken pieces, add the sauce and let it thicken and thats it.
Ingredients
- Chicken
- 1 lb chicken thighs boneless skinless
- 3 tbsp potato starch
- 3 tbsp all purpose flour
- 1 tsp garlic powder
- 1/2 tsp salt
- 1/2 tsp black pepper
- 3 tbsp neutral oil for pan frying
- 8 cloves of garlic (minced)
- 2 stalks green onion (green and white parts seperated)
- 1 tsp red chili flakes
- Sauce
- 1/2 cup chicken stock (sub: water & chicken bouillon)
- 3 tbsp honey
- 1 tbsp rice vinegar
- 1 tbsp dark soy sauce
- 1 tsp cornstarch
- Garnish
- Green onion (green part)
- Sesame seeds
Instructions
- SOY GARLIC CHICKEN SAUCE: combine all the sauce ingredients 1/2 cup chicken stock (or sub with water and chicken bouillon), 3 tbsp honey, 1 tbsp 1 tbsp rice vinegar, 1 tbsp dark soy sauce, 1 tsp cornstarch, mix then set aside.
- CHICKEN: Dry the boneless skinless chicken thighs with a paper towel.
- Mix the potato starch, flour, garlic powder, salt, and black pepper on a large plate.
- Lightly coat the chicken thighs on both sides.
- Heat enough neutral oil in a large frying pan over medium-high heat to cover the bottom of the pan.
- Once the oil is hot, add the chicken thighs and fry until golden brown on both sides, about 7 minutes per side.
- Remove the chicken from the pan and set aside on a plate.
- SAUCE: In the same pan, add the minced garlic, the white part of the green onion, and red chili flakes and saute for 3 minutes until the garlic is golden brown.
- Add the sauce to the pan and cook for 1 minute or until the sauce has thickened.
- Add the chicken back to the pan. Cook for 5 minutes or until the chicken is cooked and covered with the glossy sauce.
- Serve it with your favorite veggies and steamed rice.
k">
Tried This Recipe? Leave a Comment!
Did you make this recipe? I’d love to hear how it turned out! Please leave a comment and a rating below. Your feedback helps other home cooks and supports cheerychop.com!
For more delicious inspiration, follow me on Pinterest!
