Table of Contents
Twix Cookies
Introduction
Did you know that the classic Twix bar, with its perfect trio of cookie, caramel, and chocolate, is one of the top three best-selling candy bars globally? Now, what if you could capture that iconic, crave-worthy flavor in a homemade, shareable cookie bar that’s even more satisfying? Welcome to the ultimate guide for making irresistible Twix Cookies. This recipe transforms the beloved candy bar into a decadent dessert that’s perfect for parties, gifts, or a special treat. We’re talking about a buttery, crumbly shortbread base, a layer of rich, gooey homemade caramel, all enrobed in a smooth blanket of chocolate. It’s a textural symphony in every bite, and I promise, once you try these, the store-bought version will never compare. Let’s dive into how you can create this iconic treat in your own kitchen.
Ingredients List
Gathering high-quality ingredients is the first secret to perfect Twix Cookies. Here’s what you’ll need, broken down by layer with notes on substitutions and sensory details.
For the Shortbread Base:
- 1 cup (2 sticks / 226g) Unsalted Butter, softened: The foundation of flavor. Use high-fat, European-style butter for an extra rich, tender crumb with a subtle tang. It should be cool to the touch but yield to gentle pressure.
- 1/2 cup (100g) Granulated Sugar: Provides sweetness and helps create that signature sandy texture.
- 2 cups (250g) All-Purpose Flour: Spoon and level it for accuracy. For a nuttier flavor, you can substitute 1/4 cup with almond flour.
- 1/4 teaspoon Salt: A must to balance the sweetness and enhance all the other flavors.
- 1 teaspoon Pure Vanilla Extract: Use the real stuff! It adds a warm, floral aroma that elevates the simple shortbread.
For the Caramel Layer:
- 1 (11-oz) bag of Soft Caramel Candies, unwrapped: The classic choice for ease and authentic flavor. Look for that familiar golden color and soft, pliable texture.
- 3 tablespoons Heavy Cream: This is non-negotiable for a silky, pourable caramel. Milk can be used in a pinch, but the caramel will be firmer and less luscious.
- Pinch of Sea Salt: A flaky sea salt sprinkled on top of the caramel layer creates a sublime sweet-and-salty contrast.
For the Chocolate Topping:
- 2 cups (12 oz) Semi-Sweet Chocolate Chips or Chopped Chocolate Bars: Quality matters! A good semi-sweet chocolate (around 55-60% cacao) will have a balanced flavor that isn’t too bitter. For a true Twix taste, milk chocolate is a perfect substitute.
- 1 tablespoon Coconut Oil or Vegetable Shortening: This small addition ensures the chocolate sets with a beautiful, glossy snap and makes it easier to slice.
Timing
25 minutes
20 minutes
2 hours
2 hours 45 minutes
While the total time includes essential chilling, the active kitchen time is under an hour. Compared to many layered bar cookies that require multiple rounds of baking and cooling, this recipe is streamlined. The shortbread bakes just once, and the caramel and chocolate layers are no-bake, making the process efficient. The 2-hour chill is crucial for clean slicing, but if you’re in a pinch, the freezer can reduce this to about 45 minutes.
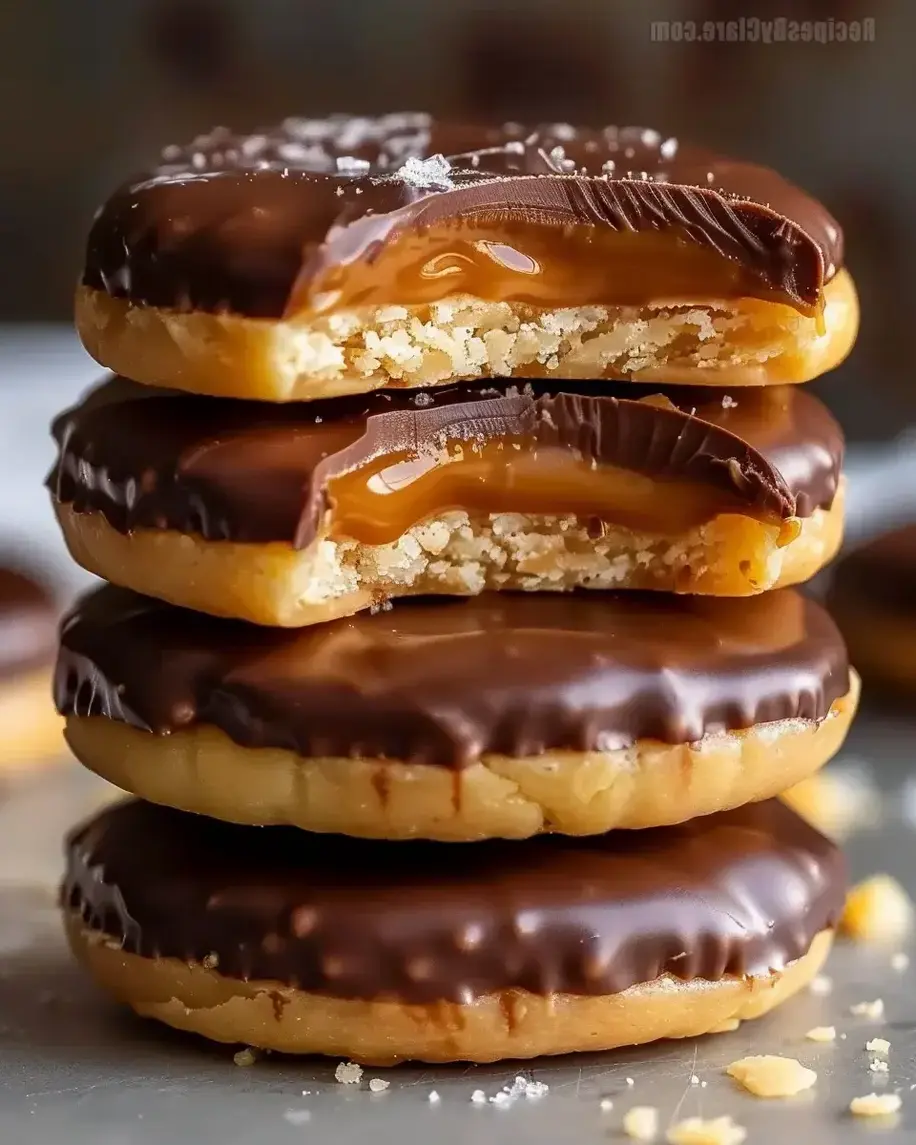
Golden shortbread topped with luscious caramel and glossy chocolate—the ultimate homemade Twix Cookies.
Step-by-Step Instructions
Step 1: Prepare the Shortbread Base
Preheat your oven to 350°F (175°C). Line a 9×13 inch baking pan with parchment paper, leaving an overhang on two sides. This “sling” will be your best friend for lifting the whole slab out later. In a large bowl, use an electric mixer on medium speed to cream the softened butter and granulated sugar together for 2-3 minutes. You want it to be light and fluffy, almost like pale yellow clouds. This step incorporates air, which contributes to the shortbread’s tender texture. Beat in the vanilla extract. Now, reduce the mixer speed to low and gradually add the flour and salt. Mix just until the dough comes together and no dry streaks of flour remain. It will be slightly crumbly but should hold together when pinched. Resist the urge to overmix, which can lead to a tough base.
Step 2: Bake the Shortbread
Transfer the dough to your prepared pan. Using your fingers, a flat-bottomed glass, or a small piece of parchment paper, press the dough firmly and evenly into the bottom of the pan. I like to use a measuring cup to really compact it and smooth the surface. Prick the dough all over with a fork—this prevents it from puffing up too much during baking. Bake for 18-22 minutes, or until the edges are just beginning to turn a very light golden brown. The center may still look pale, and that’s perfect. It will continue to firm up as it cools. Place the pan on a wire rack and let the shortbread cool completely. This is critical; if the base is warm, the caramel will melt and become a mess.
Step 3: Make the Gooey Caramel Layer
While the shortbread cools, make the caramel. In a medium saucepan, combine the unwrapped caramels and heavy cream. Cook over low heat, stirring constantly with a silicone spatula or wooden spoon. Low and slow is the key here—too much heat can cause the caramel to seize or burn. After 5-7 minutes, the caramels will melt into a smooth, velvety, golden-brown sauce. Once completely smooth, remove the pan from the heat. Let it cool for about 5 minutes; it should still be pourable but not scalding hot.
Step 4: Assemble the Caramel Layer
Pour the warm caramel sauce evenly over the completely cooled shortbread base. Tilt the pan gently to help it spread to the corners. Immediately sprinkle the top with a pinch of flaky sea salt. This not only looks beautiful but amplifies the caramel flavor. Allow the caramel layer to set at room temperature for about 15-20 minutes. It should be slightly firm to the touch but still have a bit of give.
Step 5: Add the Chocolate Topping
Now for the final coat! Combine the chocolate chips and coconut oil in a microwave-safe bowl. Microwave in 30-second bursts, stirring thoroughly after each interval, until the chocolate is completely melted and glossy. Alternatively, you can use a double boiler. Pour the melted chocolate over the set caramel layer. Use an offset spatula or the back of a spoon to spread it into a smooth, even layer, making sure to cover the caramel completely.
Step 6: Chill and Slice
This is the hardest part: waiting. Carefully transfer the pan to the refrigerator. Chill for at least 2 hours, or until the chocolate is completely firm and set. Once set, use the parchment paper overhang to lift the entire slab of Twix Cookies out of the pan and onto a cutting board. Using a large, sharp knife (wiping it clean with a hot towel between cuts makes for perfect slices), cut into bars or squares. For that authentic Twix look, I like to cut them into long, narrow fingers, about 1 inch by 3 inches.
Nutritional Information
The following is an approximate nutritional breakdown per serving (assuming 24 bars). For precise dietary tracking, use a dedicated calculator with your exact brands.
- Calories: ~280 kcal
- Total Fat: 16g
- Saturated Fat: 10g
- Cholesterol: 25mg
- Sodium: 85mg
- Total Carbohydrates: 33g
- Dietary Fiber: 1g
- Sugars: 22g
- Protein: 3g
Healthier Alternatives
You can enjoy the spirit of these Twix Cookies with some mindful swaps that don’t sacrifice flavor:
- Shortbread Base: Substitute half the all-purpose flour with whole wheat pastry flour for added fiber. You can also reduce the sugar by 2 tablespoons; the shortbread will be less sweet but still deliciously buttery.
- Caramel Layer: Opt for a homemade date caramel. Blend 1.5 cups of soaked pitted dates with 2-3 tablespoons of almond milk and a pinch of salt until completely smooth. It’s naturally sweet and packed with nutrients.
- Chocolate Topping: Use a high-quality dark chocolate (70% cacao or higher). It contains less sugar and more antioxidants. You can also use a sugar-free chocolate chip alternative.
- General: Reduce the overall richness by cutting the bars into 36 smaller, bite-sized pieces for portion control.
Serving Suggestions
These bars are stars on their own, but a little presentation goes a long way. Serve them on a platter dusted with a light sprinkle of cocoa powder or flaky salt. For a dessert board, pair them with fresh berries, a dollop of lightly sweetened whipped cream, or a scoop of vanilla bean ice cream. They make fantastic gifts—stack them in a clear cellophane bag tied with a ribbon, or package them in a decorative tin. They’re the perfect treat for bake sales, holiday cookie exchanges, or as a sweet ending to a dinner party.
Common Mistakes
- Not Cooling the Shortbread Completely: Pouring caramel onto a warm base is the #1 reason for a runny, unset middle layer. Patience is key.
- Overheating the Caramel: Cooking on too high a heat can cause the caramel to become grainy, burn, or turn into a hard, chewy block instead of a soft, gooey layer.
- Skipping the Parchment Paper Sling: Trying to pry these bars out of the pan with a spatula will result in broken, messy pieces. The parchment sling ensures clean, professional-looking bars.
