Irresistible Cookie Monster Cheesecake Recipe!

Welcome to the delectable world of Cookie Monster Cheesecake, where the indulgent qualities of creamy cheesecake meet the delightful whimsy of cookies! This unique dessert captivates both the eyes and taste buds with its striking blue hue, inspired by the playful character from Sesame Street, and is generously studded with chunks of your favorite cookies. If you’re searching for easy cheesecake recipes that offer a fun twist, this cookie dessert is sure to elevate your dessert game and bring a smile to everyone’s face. Get ready to dive into a slice of joy with this irresistible treat!

Key Takeaways

  • Cookie Monster Cheesecake combines cheesecake and cookie flavors for a delightful twist.
  • Its vibrant blue color makes it visually appealing and perfect for parties.
  • Great option for those seeking easy cheesecake recipes with a fun twist.
  • Features chunks of delicious cookies for added texture and flavor.
  • Perfect dessert choice for celebrations, holidays, or just because!

Introduction to the Cookie Monster Cheesecake

The Cookie Monster dessert captures the whimsical spirit of the beloved character from Sesame Street. This delightful cheesecake introduction presents a unique blend of traditional cheesecake with the nostalgic flavors of cookies, making it a favorite among dessert enthusiasts. The vibrant colors associated with Cookie Monster, often featuring shades of blue and chocolate chip sprinkles, add a cheerful touch to any gathering.

As social media popularity surges, the Cookie Monster cheesecake has become a staple in dessert cafes and a highlight at parties and special occasions. People are drawn to this delicious cheesecake not only for its taste but also for its eye-catching presentation, creating a perfect centerpiece for any dessert table. Embracing both creativity and flavor, this dessert is sure to impress friends and family alike.

What Makes This Cheesecake Irresistible

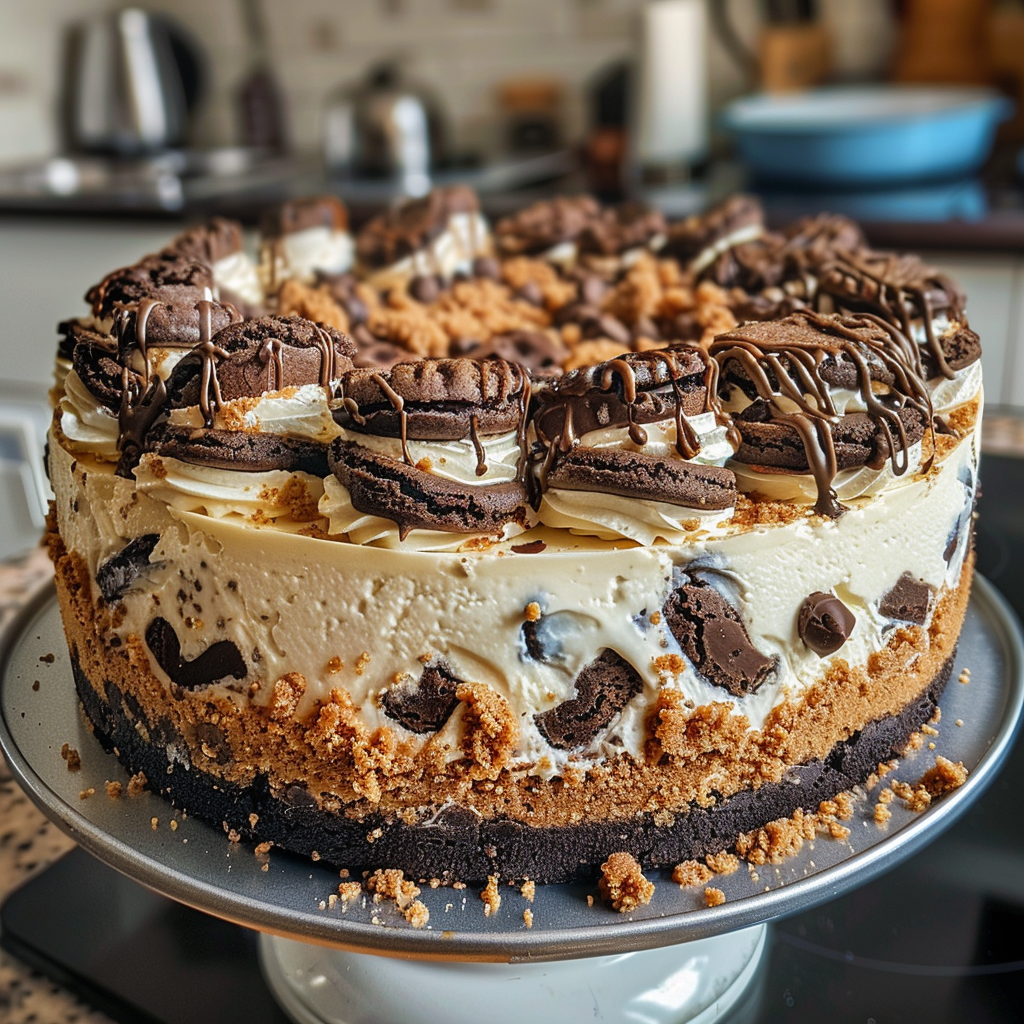
The Cookie Monster Cheesecake stands out as an irresistible cheesecake with its luxurious, creamy dessert texture that speaks to dessert lovers everywhere. The delightful combination of smooth cheesecake filling paired with various cookie flavors creates a unique contrast, making every bite an indulgent experience. Crunchy cookie elements not only enhance the texture but also offer bursts of flavor that surprise the palate.

Visually, the cheesecake captivates attention with its vibrant colors, playful decorations that evoke the beloved Cookie Monster character. Sprinkles, cookie crumbles, and colorful icing contribute to its charm, making it a perfect centerpiece for gatherings. This combination of flavors and visual appeal ensures that the Cookie Monster Cheesecake is not just a dessert but a playful treat that delights people of all ages.

FeatureDescription
TextureCreamy filling meets crunchy cookie layers
Visual AppealVibrant colors and playful decorations
Flavor ProfileCombines classic cheesecake with fun cookie flavors
AudienceAppeals to dessert lovers of all ages

Key Ingredients for Cookie Monster Cheesecake

Creating the perfect Cookie Monster Cheesecake begins with selecting the right ingredients. Each component contributes to the rich flavor and delightful texture of this dessert, transforming everyday cheesecake ingredients into something truly special. Below, we will explore the essential components and flavor enhancements that bring this treat to life.

Essential Components

To craft your cheesecake, start by gathering these baking essentials:

  • Cream Cheese: The base for your cheesecake, it provides a smooth and creamy consistency.
  • Heavy Cream: This adds richness and contributes to the cheesecake’s luscious mouthfeel.
  • Sugar: Sweetens the batter, balancing the creamy and cookie components.
  • Cookies: Incorporating cookies like Oreos or chocolate chip cookies adds flavor and texture. They can be crushed for the crust or mixed into the filling for extra fun.

Flavor Enhancements

Beyond the main cheesecake ingredients, you can elevate the flavors with these exciting options:

  • Blue Food Coloring: Perfect for achieving the classic Cookie Monster appearance, adding a playful twist.
  • Vanilla Extract: A little splash enhances depth and rounds out the sweetness.
  • Sea Salt: Just a pinch can intensify the sweet flavors, creating a more dynamic taste profile.
  • Extra Ingredients for Cheesecake: Consider mixing in chocolate chips or cookie crumbles, transforming the filling into a delightful surprise.

By carefully selecting your cheesecake ingredients and adding unique flavor enhancements, your Cookie Monster Cheesecake will be sure to impress anyone lucky enough to try it.

Step-by-Step Instructions for Preparation

Creating the perfect Cookie Monster Cheesecake involves a series of straightforward steps. This process begins with preparing the crust and culminates in the cheesecake assembly, ensuring a delightful treat every time.

Preparing the Crust

To achieve a delicious cookie crust, start by crushing your favorite cookies, such as Oreos, into fine crumbs. You’ll need around 2 cups of crumbs mixed with approximately 1/2 cup of melted butter. This combination forms the foundation of your cheesecake. When mixing, ensure the crumbs are evenly coated with butter to achieve the right texture for the baking crust.

Press the mixture firmly into the bottom of a springform pan, forming a solid base to support the creamy filling. Aim for an even thickness, which might require some pressing with the back of a measuring cup. Bake the crust at 350°F for about 10 minutes, allowing it to set. After baking, let it cool completely before adding the filling.

Making the Creamy Filling

The key to a smooth, creamy cheesecake filling lies in the mixing technique. Begin by blending 2 packs (16 oz total) of cream cheese with 1 cup of sugar until it is perfectly smooth. Incorporate four large eggs one at a time, mixing gently after each addition. This preserves the airy texture that enhances the cheesecake’s quality.

The use of vanilla extract adds depth to the flavor. While mixing, be cautious not to overbeat, as introducing too much air can lead to cracks during baking. For an extra creamy consistency, consider folding in some sour cream or heavy cream at this stage.

Assembling the Cheesecake

Layering cheesecakes requires careful attention to detail. Start by pouring the creamy cheesecake filling over the cooled cookie crust. Use a spatula to spread it evenly, ensuring that the filling reaches all corners. If you’re incorporating cookie chunks or other mix-ins, gently fold them into the filling before pouring.

As you complete the cheesecake assembly, give a final smooth over the top with a spatula. This not only ensures uniformity but also enhances the appearance. For a delightful finish, consider decorating the top with whipped cream or cookie crumbles after chilling the cheesecake for several hours in the refrigerator. The final touches will make your creation visually appealing and enhance the indulgent experience.

Baking Tips for the Perfect Cheesecake

Baking a Cookie Monster Cheesecake to perfection requires attention to detail. Utilizing effective cheesecake baking tips ensures you achieve that ideal creamy center without flaws. Understanding baking temperature and cooking time plays a significant role in this process, as an overbaked cheesecake can lead to cracks and an undesirable texture.

Temperature and Timing

The ideal baking temperature for cheesecake is typically around 325°F (163°C). Start by preheating your oven to achieve consistent heat. For proper doneness, follow these cheesecake baking tips:

  • Set the timer for a minimum of 45 minutes.
  • Check for doneness by inserting a toothpick into the center. It should come out mostly clean, with just a small amount of creamy filling sticking to it.
  • Keep a close eye on cooking time; every oven can vary, so adjust as needed.
  • Remove the cheesecake when the edges are firm, but the center remains slightly jiggly. It will continue to cook after being removed from the heat.

Using the Water Bath Method

Employing a water bath for cheesecake is a well-regarded baking technique that promotes even baking and prevents cracks. Here’s how to effectively set it up:

  1. Wrap the bottom of your cheesecake pan with aluminum foil to prevent water from leaking in.
  2. Place the wrapped pan in a larger baking dish.
  3. Fill the outer baking dish with hot water, ensuring it reaches halfway up the sides of the cheesecake pan.
  4. Proceed to bake as directed. The water bath aids in temperature regulation, leading to a smoother texture.

By following these essential cheesecake baking tips, you can create an irresistible Cookie Monster Cheesecake that delights all who indulge. Happy baking!

Serving Suggestions for Cookie Monster Cheesecake

For an unforgettable dessert experience, the way you present your Cookie Monster Cheesecake plays a significant role in delighting your guests. Consider using bright, colorful plates to enhance the cheesecake’s playful theme. This approach not only elevates the dessert presentation but also reflects the fun nature of this unique treat.

When it comes to serving cheesecake, a few creative garnishes can make a world of difference. Top each slice with a dollop of whipped cream and sprinkle cookie pieces on top for that extra cookie crunch. Adding vibrant blue icing or colored sprinkles will bring to mind everyone’s favorite cookie-loving monster, making the dessert even more enticing.

For cutting and serving, here are some cheesecake serving tips:

  • Use a hot knife for cleaner slices. Dip it in warm water and wipe it dry before cutting.
  • Serve in individual portions by using ramekins or cupcake liners for a fun twist.
  • Consider pairing slices with a scoop of vanilla ice cream or a drizzle of chocolate sauce for added indulgence.

These serving suggestions not only enhance the aesthetic but also invite everyone to indulge in this delightful dessert. Remember, the goal is to create a visual feast that mirrors the deliciousness of the cheesecake itself.

Variations to Try with Your Cheesecake

Exploring different cookie flavors can elevate your cheesecake to extraordinary heights. Incorporating various cookie options opens doors to exciting cheesecake variations. Each cookie brings its own unique flavor profile and texture, ensuring each bite provides a delightful surprise.

Different Cookie Options

Experiment with these cookie flavors to create your own signature cheesecake:

  • Chocolate Cookies: Offers a rich, cocoa-infused base that pairs wonderfully with the creamy filling.
  • Peanut Butter Cookies: Introduces a nutty sweetness, perfect for peanut butter enthusiasts.
  • Oatmeal Cookies: Provides a chewy texture and wholesome taste, making it a healthier alternative.

These creative cheesecakes highlighted by unique cookie choices will surprise and impress your friends and family.

Garnishing Ideas

The right cheesecake garnishing can make your dessert visually stunning. Here are some decorative ideas to complement your Cookie Monster theme:

  • Blue Chocolate Drip: A vibrant color that adds flair, reminiscent of the beloved character.
  • Cookie Crumbs: Sprinkling cookie crumbs on top enhances the texture and highlights the cookie flavors.
  • Fun Edible Eyes: Create amusing eyes using fondant for a playful touch that children will love.

These toppings not only improve the aesthetics but also elevate the overall experience of enjoying your cheesecake. Whether opting for cookie flavors that echo nostalgia or garnishing ideas that spur creativity, your cheesecake will surely be a centerpiece at any gathering.

Storage Tips for Your Cheesecake

Proper cheesecake storage is essential for maintaining the delightful texture and flavor of your Cookie Monster Cheesecake. To ensure that you are keeping cheesecake fresh for as long as possible, follow these practical tips:

  • Refrigerate Immediately: After preparing your cheesecake, allow it to cool completely at room temperature before placing it in the refrigerator. Ideally, cheesecake should be stored in an airtight container.
  • Use Plastic Wrap: If you don’t have an airtight container, cover the cheesecake tightly with plastic wrap. This helps with dessert preservation, preventing it from absorbing other odors in the fridge.
  • Store on a Flat Surface: Ensure the cheesecake is placed on a flat, stable surface in the refrigerator. A pie dish or cake stand works well.
  • Keep it Chilled: Cheesecake is best when kept chilled. Enjoy it within 5 to 7 days for optimal freshness.

For long-term storage, consider freezing portions of your cheesecake. Freezing allows you to enjoy this delectable dessert at a later time without compromising its quality.

  • Wrap Individual Slices: Slice your cheesecake and wrap each portion tightly in plastic wrap, followed by aluminum foil. This additional layer helps in preventing freezer burn.
  • Label and Date: Use freezer-safe labels to mark the date and type of cheesecake, ensuring you use it within 1 to 2 months for the best flavor.
  • Thawing Technique: When ready to indulge, transfer the cheesecake to the refrigerator to thaw overnight. This keeps the texture intact.

With these cheesecake storage methods, you can relish your Cookie Monster Cheesecake at its finest time and time again!

Storage MethodDuration
Refrigerated in airtight container5 to 7 days
Freezer (wrapped slices)1 to 2 months

Conclusion

The Cookie Monster Cheesecake showcases a delightful combination of rich flavors and textures that truly stands out in the world of desserts. In this cookie cheesecake summary, we’ve explored how the perfectly crafted crust, luscious creamy filling, and cookie embellishments come together to create a sweet symphony of taste that is simply irresistible. Each decadent slice is a testament not only to the joy of baking but also to the pleasure of sharing delicious treats with loved ones.

Encouraging creativity, we discussed variations that allow bakers to put their unique twist on this recipe, making each experience a personal one. Whether you opt for different cookies or experiment with stunning garnishes, each decision enhances your dessert recap while fostering a sense of exploration and community among fellow baking enthusiasts.

So why not take a moment to try your hand at this delightful cheesecake? Embrace the magic of flavors, gather your favorite ingredients, and embark on a baking adventure. Your taste buds—and your friends—will be delighted by the results!

FAQ

What is Cookie Monster Cheesecake?

Cookie Monster Cheesecake is a unique dessert that combines the creamy texture of cheesecake with the fun, playful elements of cookies. It’s visually striking, featuring blue hues and cookie chunks, inspired by the beloved character from Sesame Street.

How do I store my Cookie Monster Cheesecake?

To keep your Cookie Monster Cheesecake fresh, store it in the refrigerator, well covered. If you want to keep it for a longer period, you can also freeze individual slices. Just make sure to wrap them tightly to prevent freezer burn.

Can I use different types of cookies in the recipe?

Absolutely! You can experiment with various cookie flavors like chocolate chip, peanut butter, or even healthier options like oatmeal cookies. Each type adds a unique taste and texture to the cheesecake.

What makes this cheesecake so special?

The irresistible combination of creamy cheesecake with crunchy cookie pieces creates a delightful texture contrast. Plus, its vibrant blue color and playful decor resonate with dessert lovers of all ages, making it a perfect centerpiece for any gathering.

What are some serving suggestions for Cookie Monster Cheesecake?

You can serve Cookie Monster Cheesecake with whipped cream, additional cookie pieces, or colorful sprinkles. Creative plating and portioning help elevate the presentation, making it even more attractive for guests.

Do I need any special equipment to make this cheesecake?

Basic baking tools are sufficient, but using a springform pan is recommended for easy removal after baking. A mixer will also help achieve the desired creamy consistency in the filling.

What is the water bath method for baking cheesecakes?

The water bath method, or bain-marie, involves placing your cheesecake pan in a larger pan filled with water during baking. This technique helps maintain a consistent temperature and moisture level, resulting in a smoother texture and fewer cracks.

How long does Cookie Monster Cheesecake last?

When stored properly in the refrigerator, Cookie Monster Cheesecake can last up to 5 days. If frozen, it can maintain its quality for about 2-3 months.

Heavenly Peanut Butter & Jelly Cheesecake Recipe

Welcome to the delightfully decadent world of Peanut Butter & Jelly Cheesecake! This creamy cheesecake recipe combines the rich, velvety textures of traditional cheesecake with the nostalgic sweetness of peanut butter and jelly, creating a dessert that is not only easy to make but also a surefire hit for any gathering. Whether you’re hosting a cozy family dinner or celebrating a special occasion, this dessert will have everyone reminiscing about childhood flavors while indulging in a modern twist. Dive into this article to discover how to create the perfect Peanut Butter & Jelly Cheesecake that will surely leave your guests wanting more!

Key Takeaways

  • This recipe combines creamy cheesecake with classic peanut butter and jelly flavors.
  • Perfect for various occasions, from family gatherings to celebrations.
  • Easy to follow, making it great for both beginner and experienced bakers.
  • Offers a delightful twist on traditional dessert recipes.
  • Can be personalized with different nut butters and jelly flavors.

Introduction to Peanut Butter & Jelly Cheesecake

The Peanut Butter & Jelly Cheesecake introduction captures the delightful nostalgia of childhood treats, blending the rich flavors of creamy peanut butter with the sweetness of jelly. This unique dessert has roots in the long history of cheesecake, which dates back to ancient Greece. Over the years, various cheesecake variations have emerged, showcasing diverse flavors and textures.

As dessert enthusiasts explore these flavors, the combination of peanut butter and jelly stands out for its simplicity and indulgence. This pairing not only transforms a classic cheesecake but elevates it, making it a beloved choice for gatherings and celebrations. The appeal of this dessert lies in its harmonious balance, inviting everyone to enjoy a taste of their youth while indulging in a sophisticated twist.

As you prepare to dive into this cheesecake recipe, expect an easy-to-follow process that delivers delicious results. The union of these flavors brings forth a cake that satisfies both the palate and the heart, creating a memorable treat that resonates with all ages.

Ingredients for the Ultimate Cheesecake

Creating the perfect Peanut Butter & Jelly Cheesecake requires a careful selection of ingredients to ensure a rich and flavorful experience. This section details the essential and optional ingredients that will elevate your cheesecake to a delightful dessert.

Essential Ingredients

When gathering your cheesecake ingredients, consider the following essentials:

  • Cream Cheese: The base for any cheesecake, providing a creamy texture.
  • Heavy Cream: Adds richness and contributes to a velvety consistency.
  • Granulated Sugar: Balances the flavors and enhances sweetness.
  • Eggs: Essential for structure, binding the parts together.
  • Peanut Butter: The star of the dish, offering a prominent flavor.
  • Jelly Filling: Choose your favorite, like raspberry or grape, to complement the peanut butter.

Optional Add-Ins

To make your cheesecake unique, consider these cheesecake add-ins:

  • Crushed Graham Crackers: For extra texture in the crust.
  • Vanilla Extract: A splash can enhance overall flavor.
  • Different Flavored Nut Butters: Experiment with almond or cashew for exciting peanut butter variations.
  • Flavor Boosters: Items like chocolate chips or crushed pretzels can add interesting contrasts.

By carefully selecting these peanut butter cheesecake ingredients and optional add-ins, you set the stage for a dessert that will impress your guests and satisfy your taste buds.

Preparing the Cheesecake Crust

Creating the perfect cheesecake crust is essential for a delicious Peanut Butter & Jelly Cheesecake. A well-made graham cracker crust serves as a sturdy foundation, enhancing the overall flavor and texture of this delightful dessert. This cheesecake crust preparation involves just a few key ingredients and easy steps.

For a classic graham cracker crust, you will need:

  • 1 ½ cups graham cracker crumbs
  • ½ cup unsalted butter, melted
  • ¼ cup granulated sugar

To begin, combine the graham cracker crumbs, melted butter, and sugar in a mixing bowl. Stir until the mixture is well combined and resembles wet sand. This blend will create a flavorful no-bake crust that pairs perfectly with the rich cheesecake filling.

Next, press the crust mixture firmly into the bottom of a springform pan. Utilize your fingers or the bottom of a glass to ensure an even layer. The pressure is vital for achieving a sturdy base that will hold its shape once the cheesecake sets. This simple yet effective cheesecake crust preparation technique allows for a smooth and enjoyable eating experience.

Chilling the crust in the refrigerator for about 30 minutes before adding the cheesecake filling can provide additional stability. This step is crucial, especially when opting for a no-bake crust, ensuring a delicious treat that stands out at any gathering.

How to Make the Cheesecake Filling

Creating a smooth and creamy cheesecake filling starts with the right mixing techniques. Understanding the importance of temperature and method will greatly enhance your dessert. Room temperature cream cheese is key to achieving smooth texture. Gradually incorporating other ingredients minimizes the risk of lumps, allowing for a seamless finish.

Mixing Techniques

When it comes to mixing cheesecake ingredients, choosing the right tool makes a difference. A stand mixer or a hand mixer can be effective, though the stand mixer is often preferred for its power and efficiency. As you combine ingredients, focus on the following:

  • Start by beating the cream cheese until it is smooth.
  • Add sugar gradually to prevent clumping.
  • Pour in eggs one at a time, ensuring each is fully incorporated before adding the next.
  • Finish with flavoring ingredients, mixing until just combined to avoid overworking the batter.

Tips for a Creamy Filling

For those venturing into cheesecake filling methods, here are some creamy cheesecake tips to ensure success:

  • Always use room temperature ingredients to enhance achieving smooth texture.
  • Fold in whipped cream gently to maintain airiness.
  • Avoid over-mixing, which can lead to cracks, one of the most common cheesecake problems.

Taking these precautions will help produce a cheesecake that is both decadent and visually appealing. Master this essential stage, and you’ll be well on your way to impressing everyone with a delightful peanut butter and jelly cheesecake.

Peanut Butter & Jelly Cheesecake: The Layering Process

Creating a stunning peanut butter and jelly cheesecake involves an artful approach to layering cheesecake. Begin by preparing your peanut butter jelly filling, ensuring a smooth and creamy texture. Dividing the filling into two portions allows for effective layering, creating an enticing contrast between peanut butter and jelly flavors.

Follow these steps to assemble cheesecake:

  1. Spread a layer of the peanut butter filling evenly across the base.
  2. Using a spoon, drop dollops of jelly on top. This will create a visually appealing pattern.
  3. Use a knife or a skewer to swirl the jelly into the peanut butter filling; this adds depth and creates an attractive marbled effect.
  4. Repeat the layering process until all filling components are used, making sure to finish with a layer of peanut butter.

Attention to detail while layering will enhance both the aesthetic and taste of the final product. By carefully distributing the flavors, you ensure that each slice of cheesecake delivers the perfect combination of creamy peanut butter and fruity jelly, captivating everyone’s palate.

LayerIngredientsNotes
First LayerPeanut Butter FillingSpread evenly for a solid base.
Second LayerPebbles of JellyUse a spoon to create patterns.
SwirlingKnife/SkewerGently swirl to blend flavors.
Final LayerPeanut Butter FillingFinesse the top for a smooth finish.

Mastering the technique of layering cheesecake will yield a dessert that not only delights the eyes but also offers a harmonious blend of flavors in each bite.

Baking the Cheesecake to Perfection

Baking a cheesecake requires precise techniques to achieve a creamy texture and prevent unwanted cracks. Understanding the proper cheesecake baking temperature and the importance of oven settings can significantly enhance your baking experience. Here’s a guide on the ideal baking conditions and methods for determining when your cheesecake is perfectly baked.

Temperature Considerations

The ideal cheesecake baking temperature generally falls within the range of 325°F to 350°F. Baking at higher temperatures may yield an uneven texture and darkened edges, while lower temperatures can prolong the baking process, risking a custard-like consistency. Maintaining a steady temperature ensures even cooking and helps avoid cracks, a common issue for cheesecakes.

Recommended Baking Time

Cheesecake baking time typically spans 50 to 70 minutes, depending on the size and type of pan. To avoid overbaking, begin checking doneness around the 50-minute mark. Knowing when cheesecake is done is crucial for achieving the right consistency; the center should appear slightly jiggly but not liquid.

Effective methods for checking doneness include the toothpick test or observing the cheesecake’s surface. If the toothpick comes out clean, it is a good indication of doneness. Alternatively, gently shake the pan; if the center wobbles slightly while the edges remain intact, your cheesecake is ready.

Oven Temperature (°F)Cheesecake Baking Time (minutes)Checking Doneness Technique
32560-70Toothpick Test or Gentle Shake
35050-60Toothpick Test or Gentle Shake

Cooling and Setting Your Cheesecake

After baking your peanut butter and jelly cheesecake, the cheesecake cooling process plays a crucial role in achieving the perfect texture. Begin by allowing the cheesecake to cool gradually on the countertop for about an hour. This gradual cooling helps avoid sudden temperature changes that can result in cracks or undesirable textures.

Once it reaches room temperature, it’s essential to move the cheesecake into the refrigerator to complete the setting cheesecake phase. Aim for a minimum of four to six hours of refrigerator time, although overnight is ideal for achieving maximum firmness. During this time, the cheesecake solidifies, allowing it to slice cleanly and beautifully.

To prevent condensation from forming on the surface, cover the cheesecake loosely with plastic wrap after it cools completely. This simple step can avoid unwanted moisture that could affect the texture and flavor. By following these steps, you ensure a delightful dessert ready for any occasion!

Serving Suggestions

When it comes to enhancing the experience of indulging in a Peanut Butter & Jelly Cheesecake, thoughtful drink pairings and creative toppings can make all the difference. Discover the best beverages with dessert that will perfectly complement the rich and creamy flavors of this delightful cheesecake. Creative dessert garnishes can elevate the presentation and enjoyment of your dish.

Pairing Drinks

Selecting the right drink pairings for cheesecake can create a harmonious balance. Consider these options for complimentary beverages:

  • Refreshing fruit juices: Sweet and fruity options like apple or cherry juice can enhance the fruity layers of the cheesecake.
  • Coffee: A rich, dark roast provides a lovely contrast to the sweetness of the peanut butter and jelly toppings.
  • Dessert wines: Sweet dessert wines, such as Moscato or Riesling, complement the creamy texture and nutty flavors beautifully.
  • Milkshakes: A thick and creamy milkshake might just be the look you want, bringing an indulgent twist to the dessert.

Creative Toppings

To enhance the visual appeal and flavor profile, consider these cheesecake toppings that can add texture and excitement:

  • Whipped cream: A light and airy addition that complements the richness of the cheesecake effortlessly.
  • Chocolate shavings: For a decadent touch, sprinkle chocolate shavings over your cheesecake for added flavor and texture.
  • Additional swirls of jelly: Enhance the flavor with more jelly, allowing for a burst of flavor in every bite.
  • Crushed peanuts: A crunchy topping that echoes the flavors of peanut butter and adds a nice texture contrast.

These thoughtful drink pairings for cheesecake and creative dessert garnishes can transform the experience of enjoying your delightful creation, making it memorable for you and your guests.

Storing Your Cheesecake

Proper storage is essential for preserving the delightful taste and texture of your Peanut Butter & Jelly Cheesecake. Following these cheesecake storage tips will help you enjoy your creation for days to come. When refrigerating cheesecake, keep it covered to prevent it from absorbing odors and to maintain moisture.

To store your cheesecake, cover it with plastic wrap or aluminum foil. Alternatively, you can place it in an airtight container for protection. This method ensures your cheesecake stays fresh without picking up any unwanted flavors.

If you want to keep your cheesecake for an extended period, consider freezing it. When how to store cheesecake in the freezer, it’s important to slice it beforehand. Wrap each slice tightly in plastic wrap, then place them in a freezer-safe bag or container. Label the container with the date to keep track of freshness. Your cheesecake can last about two to three months in the freezer.

Storage MethodTimeframeNotes
RefrigeratingUp to 5 daysWrap in plastic or use an airtight container
Freezing2-3 monthsWrap slices individually for best results
Thawing (before serving)4-6 hours in fridgeRemove from freezer and transfer to refrigerator

By following these simple guidelines for refrigerating cheesecake and freezing, you can savor your Peanut Butter & Jelly Cheesecake whenever the craving strikes!

Variations on the Classic Recipe

Transforming the classic peanut butter and jelly cheesecake can lead to delightful surprises. By incorporating different nut butter variations and exploring unusual jelly flavors, bakers can create unique cheesecake flavors that cater to diverse palates. This section delves into both alternative nut butters and flavor swaps for the jelly used in this scrumptious dessert.

Different Nut Butters

Peanut butter remains the classic choice, but alternative nut butters such as almond butter or cashew butter can provide exciting new dimensions. Each nut butter offers distinct flavor profiles, making it easier to experiment with creative dessert ideas. Here are a few popular options:

  • Almond Butter: Adds a slightly sweet and nutty flavor.
  • Cashew Butter: Provides a creamy texture and a rich taste.
  • Sunflower Seed Butter: A great nut-free option with a mild flavor.

Using these alternative nut butters can result in unique cheesecake flavors that surprise and delight. Each one can alter the taste and texture, appealing to those with different preferences.

Flavor Swaps for the Jelly

When it comes to selecting jelly substitutes, the choices are abundant and can truly elevate your cheesecake. Whether seeking something traditional or adventurous, consider some of these unusual jelly flavors:

  • Strawberry Preserves: Classic yet always a favorite.
  • Blackberry Jam: Offers a tart and sweet combination.
  • Citrus Curd: Provides a zesty twist that brightens the dessert.

These flavored options enhance the overall cheesecake experience, encouraging bakers to explore outside conventional boundaries. The combination of unique nut butters and exciting jelly substitutes will surely create a cheesecake that stands out on any dessert table.

Why This Recipe is Perfect for Any Occasion

Peanut Butter & Jelly Cheesecake stands out as the best cheesecake for celebrations due to its unique combination of flavors and textures. Whether it’s a birthday gathering, holiday party, or family reunion, this dessert caters to a variety of taste preferences, making it a crowd-pleaser.

This versatile dessert showcases the beloved flavors of peanut butter and jelly, appealing to both kids and adults alike. Each slice delivers a delightful balance of sweetness and creaminess, ensuring that guests will return for seconds. Its eye-catching presentation makes it a fantastic centerpiece on any dessert table, contributing to the festive atmosphere of your celebration.

Another reason this cheesecake shines at any gathering is its adaptability. You can easily customize your festive cheesecake with different nut butters or fruit preserves, offering a range of flavors for everyone to enjoy. This flexibility ensures that the recipe remains a staple in your collection of versatile dessert recipes, accommodating various dietary needs and preferences.

Whether you’re celebrating a special occasion or simply indulging on a weekend, this Peanut Butter & Jelly Cheesecake promises to elevate the experience and make every moment memorable.

Conclusion

Wrapping up this cheesecake recipe, we’ve walked through each delightful step to create a Peanut Butter & Jelly Cheesecake that is simple yet impressive. From preparing the crust to perfecting the rich filling, every element is designed to harmonize into a dessert that not only tastes amazing but also brings joyful nostalgia with every bite. Remember to take your time with the baking and cooling process to ensure the best texture possible.

As you explore the recipe, keep in mind the ease of preparation, making it a fantastic choice for gatherings, celebrations, or a sweet treat on any day. The final thoughts on cheesecake remind you that with just a few quality ingredients, you can craft a dessert that leaves a lasting impression. Your loved ones will surely appreciate this easy dessert recap that showcases rich flavors paired with a beloved classic.

So go ahead, roll up your sleeves, and embark on this delicious journey. With your newfound knowledge, you can enjoy the delightful combination of tastes that is the Peanut Butter & Jelly Cheesecake, perfect for any occasion.

FAQ

What makes the Peanut Butter & Jelly Cheesecake unique?

The Heavenly Peanut Butter & Jelly Cheesecake uniquely combines the creamy richness of cheesecake with the nostalgic flavors of peanut butter and jelly, making it a beloved twist on a classic dessert recipe.

Can I make this cheesecake ahead of time?

Absolutely! This cheesecake can be made a day or two in advance. Just remember to properly cool and refrigerate it to maintain its flavor and texture.

What kind of jelly works best in this recipe?

While raspberry and grape jellies are traditional choices, feel free to experiment with other flavors like strawberry or even blackberry for a unique twist!

Is this recipe suitable for beginners?

Yes! This easy cheesecake recipe is perfect for beginners, as it includes straightforward steps and helpful tips to guide you through the process of making a delicious cheesecake.

How should I store leftover cheesecake?

To keep your Peanut Butter & Jelly Cheesecake fresh, cover it tightly with plastic wrap or aluminum foil and store it in the refrigerator. For longer storage, you can freeze it for up to two months.

Can I use an alternative nut butter?

Yes! You can use other nut butters such as almond butter or cashew butter instead of peanut butter for a different flavor profile. Just keep in mind that each nut butter may change the overall taste of the cheesecake.

What are some creative toppings I can use?

Get creative with toppings! Consider using whipped cream, extra jelly swirls, chocolate shavings, or crushed peanuts to enhance your cheesecake’s visual appeal and flavor.

How can I avoid cracks in my cheesecake?

To prevent cracks, avoid overmixing your filling and ensure you bake your cheesecake at a steady temperature. Letting it cool gradually in the oven can also help maintain its appearance.