
“`html
Table of Contents
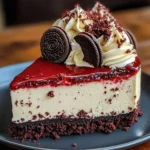
Red Velvet Oreo Cheesecake
What is Red Velvet Oreo Cheesecake?
Are you searching for a dessert that’s dramatic, decadent, and utterly unforgettable? If the thought of combining the rich, chocolatey goodness of Oreos, the tangy creaminess of classic cheesecake, and the visually stunning hue of red velvet excites your taste buds, then you’re in for a treat! This Red Velvet Oreo Cheesecake is not just a dessert; it’s an experience. Imagine a crisp, crunchy Oreo crust providing the perfect foundation, followed by a luxuriously smooth red velvet cheesecake filling studded with generous chunks of Oreos. To top it all off, a vibrant, tangy berry compote cuts through the richness, making every bite a harmonious symphony of textures and flavors. This showstopping dessert is perfect for celebrations, holidays, or simply when you want to indulge in something truly special. Get ready to impress your guests and satisfy your deepest cravings!
Ingredients to Elevate Your Cheesecake Game
The magic of this Red Velvet Oreo Cheesecake lies in the quality and interplay of its components. We’ve carefully selected ingredients that bring out the best in each flavor profile. Feel free to experiment with brands, but ensure you’re using full-fat ingredients for the creamiest cheesecake texture.
For the Oreo Crust
- 2 cups Oreo cookie crumbs (about 24-28 Oreos, finely crushed): The heart of our chocolatey base. Ensure they are finely crushed to form a cohesive crust. Substitution: You can use chocolate graham crackers or chocolate wafer cookies if Oreos aren’t available.
- 6 tablespoons unsalted butter, melted: Binds the crumbs together, creating a firm, delicious crust. Substitution: A good quality margarine will work, but butter yields a superior flavor.
- 1 tablespoon granulated sugar (optional): Adds a touch more sweetness and crispness.
For the Red Velvet Cheesecake Filling
- 3 (8-ounce) packages cream cheese, softened: The velvety soul of the cheesecake. Make sure it’s truly softened to room temperature to avoid lumps. (Use full-fat for best results). Substitution: Reduced-fat cream cheese can be used, but the texture may be slightly less rich.
- 1 ¼ cups granulated sugar: Balances the tanginess of the cream cheese and enhances sweetness.
- 3 large eggs, at room temperature: Essential for structure and richness. Room temperature eggs incorporate more smoothly.
- 1 teaspoon vanilla extract: Enhances all the flavors and adds a warm aroma.
- ⅓ cup unsweetened cocoa powder: Provides a subtle chocolate undertone that complements the red velvet and Oreos.
- 2 tablespoons red food coloring (gel or liquid): The signature vibrant color of red velvet. Gel coloring offers a more intense hue with less liquid. Adjust to your desired shade.
- 1 teaspoon white vinegar: Reacts with the cocoa and food coloring to intensify the red color.
- 1 ½ cups crushed Oreos (about 15-18 Oreos): For those irresistible red velvet cheesecake swirls and chunks. Substitution: You can omit these if you prefer a smoother texture, or add chopped chocolate chips for a different kind of indulgence.
For the Tangy Berry Compote (Optional but Recommended!)
- 2 cups mixed berries (fresh or frozen): Such as raspberries, strawberries, blueberries. For a pop of tartness and color.
- ¼ cup granulated sugar: Balances the tartness of the berries. Adjust to taste.
- 1 tablespoon lemon juice: Brightens the berry flavors.
- 1 tablespoon cornstarch mixed with 2 tablespoons water (slurry): To thicken the compote to a glossy consistency.
Timing Your Masterpiece
Compared to a standard cheesecake (which often has similar bake and chill times), this Red Velvet Oreo Cheesecake requires a bit more prep for the distinct red velvet elements and the optional compote. However, the active prep time is quite efficient, making it manageable for a weekend baking project. The majority of the time is hands-off chilling, allowing the flavors to meld beautifully.

Step-by-Step Instructions: Crafting Pure Bliss
Follow these steps closely to create a dessert that’s as delightful to look at as it is to eat. Patience is key, especially during the chilling phase!
Step 1: Prepare the Oreo Crust
Preheat your oven to 350°F (175°C). In a medium bowl, combine the finely crushed Oreo crumbs, melted butter, and optional sugar. Mix until the crumbs are evenly moistened. Press this mixture firmly and evenly into the bottom and slightly up the sides of a 9-inch springform pan. Use the bottom of a glass or a measuring cup to ensure a compact and even layer. Bake for 8-10 minutes until the crust is set and fragrant. Let it cool completely on a wire rack while you prepare the filling.
Step 2: Mix the Cheesecake Batter
In a large bowl, beat the softened cream cheese with an electric mixer on medium speed until smooth and creamy, about 2-3 minutes. Gradually add the granulated sugar and continue beating until well combined and no sugar lumps remain. Beat in the eggs one at a time, mixing just until each egg is incorporated. Be careful not to overmix once the eggs are added, as this can lead to cracks in the cheesecake. Stir in the vanilla extract, cocoa powder, red food coloring, and white vinegar until a uniform, vibrant red batter is formed. Gently fold in the 1 ½ cups of crushed Oreos, distributing them throughout the batter.
Step 3: Bake the Cheesecake
Pour the red velvet cheesecake batter evenly over the cooled Oreo crust in the springform pan. For a beautifully smooth top and to prevent cracks, I highly recommend baking the cheesecake in a water bath. Wrap the outside of the springform pan tightly with heavy-duty aluminum foil (at least 2-3 layers) to prevent water from seeping in. Place the foil-wrapped pan inside a larger roasting pan. Carefully pour hot water into the roasting pan, about halfway up the sides of the springform pan. This creates a humid environment for gentle, even baking. Bake for 60-75 minutes, or until the edges of the cheesecake are set and the center is still slightly jiggly when you gently shake the pan. Turn off the oven, crack open the oven door, and let the cheesecake cool inside the oven for 1 hour. This gradual cooling also helps prevent cracks.
Step 4: Make the Berry Compote (If Using)
While the cheesecake is cooling, prepare the compote. In a small saucepan, combine the mixed berries, sugar, and lemon juice. Cook over medium heat, stirring occasionally, until the berries break down and the mixture begins to simmer. Whisk in the cornstarch slurry and continue to cook, stirring constantly, until the compote thickens to a glossy sauce consistency, about 2-3 minutes. Remove from heat and let it cool completely.
Step 5: Assemble and Chill
Once the cheesecake has cooled in the oven for an hour, remove it from the water bath and place it on a wire rack to cool completely to room temperature. Once cooled, cover the cheesecake loosely with plastic wrap and refrigerate for at least 4 hours, or preferably overnight, to allow it to set properly and the flavors to meld. Just before serving, carefully remove the sides of the springform pan. Spoon the cooled berry compote over the top of the cheesecake, or serve it on the side.
Nutritional Information
Here’s an estimated nutritional breakdown per serving (based on 12 servings). Keep in mind that exact values can vary based on ingredients used and precise portioning.
- Calories: ~550-650 kcal
- Protein: ~7-9g
- Fat: ~35-45g (Saturated Fat: ~20-25g)
- Carbohydrates: ~50-60g (Sugars: ~35-45g)
- Fiber: ~2-3g
Healthier Alternatives
While this is a decadent dessert, we can make a few mindful swaps:
- Crust: Use whole wheat graham crackers or a reduced-sugar cookie for the crust. You could also try a nut-based crust for added healthy fats and fiber.
- Sweetener: Use a sugar substitute like erythritol or stevia in the filling and compote, though this may slightly alter the texture and sweetness profile.
- Dairy: Use light cream cheese and consider a Greek yogurt swirl for added protein and a tangier base, although this will change the classic cheesecake texture.
- Compote: Reduce the sugar or omit it entirely, letting the natural sweetness of the berries shine through.
Serving Suggestions
This Red Velvet Oreo Cheesecake is a showstopper on its own, but here are a few ways to enhance its presentation and flavor:
- Garnish: A dollop of fresh whipped cream, chocolate shavings, or a few whole Oreos and berries can elevate the visual appeal.
- Accompaniments: A side of unsweetened whipped cream or a scoop of vanilla bean ice cream pairs wonderfully.
- Portioning: Slice with a sharp knife dipped in hot water and wiped dry between each cut for clean, professional-looking slices.
Common Mistakes to Avoid
Preventing common cheesecake woes is key to achieving a perfect result:
- Overmixing: Incorporating too much air into the batter, especially after adding eggs, leads to cracks. Mix just until combined.
- Uneven Baking: A water bath and gradual cooling are crucial for preventing cracks and ensuring even cooking.
- Not Fully Chilled: Cheesecake needs ample time to set. Rushing the chilling process results in a loose, unset dessert.
- Lumpy Cream Cheese: Ensure your cream cheese is thoroughly softened to room temperature before beating.
Storing Tips
To keep your Red Velvet Oreo Cheesecake fresh:
- Refrigeration: Store leftover cheesecake, tightly covered with plastic wrap or in an airtight container, in the refrigerator for up to 4-5 days.
- Freezing: You can freeze individual slices, tightly wrapped in plastic wrap and then in a layer of aluminum foil, for up to 1 month. Thaw overnight in the refrigerator before serving.
Conclusion
This Red Velvet Oreo Cheesecake is more than just a dessert; it’s a celebration of textures and flavors that harmonize perfectly. The rich Oreo crust, the decadent red velvet cheesecake filling, and the bright berry compote create a dessert experience that is both comforting and exciting. It’s a guaranteed crowd-pleaser that will make any occasion feel extra special. So, gather your ingredients, follow these steps, and prepare to be amazed by the sheer deliciousness you’ve created. Happy baking!
Did you make this Red Velvet Oreo Cheesecake? We’d love to see your creations! Share your photos and tag us on social media, or leave a comment below with your thoughts. Your feedback inspires us!
Frequently Asked Questions (FAQs)
***Can I make the cheesecake without a water bath?***
While a water bath is highly recommended for even baking and preventing cracks, you can attempt to bake it without one. However, be prepared for a higher chance of the cheesecake cracking. Ensure you still follow the gradual cooling process.
***How do I know when the cheesecake is done?***
The edges of the cheesecake should appear set, and the center should still have a slight jiggle – about a 2-3 inch wobble. It will continue to set as it cools.
***Why did my cheesecake crack?***
Common causes include overmixing the batter (incorporating too much air), overbaking, and sudden temperature changes during cooling. Using a water bath and gradual cooling helps mitigate these issues.
***Can I use store-bought Oreo cookie crumbs?***
Yes, you can, but for the best texture, it’s recommended to crush whole Oreos yourself. This ensures the finest crumb consistency.
***How far in advance can I make this cheesecake?***
You can make this cheesecake up to 2 days in advance. It actually benefits from chilling time, as the flavors meld.
Red Velvet Oreo Cheesecake
Description
ThisRed Velvet Oreo Cheesecakecombines the rich flavors of cheesecake, red velvet, and Oreos into a showstopping dessert. A crunchy Oreo crust, velvety cheesecake filling with red velvet crumbs, and a tangy berry compote topping make this the perfect treat for any special occasion.
Ingredients
- 24Oreo cookies (plus extra for decoration)
- 5 tbspunsalted butter (melted)
- 16 ozcream cheese (softened)
- 3/4 cupgranulated sugar
- 1 tspvanilla extract
- 1 cupheavy whipping cream (chilled)
- 1 cupred velvet cake crumbs
- 1/4 cupraspberry or strawberry compote (for topping)
- Whipped cream (for garnish)
Instructions
- Preheat your oven to 350°F (175°C). Line the bottom of a 9-inch springform pan with parchment paper.
- Crush the Oreos into fine crumbs and mix them with the melted butter. Press the mixture firmly into the bottom of the prepared pan to create the crust. Bake for 8-10 minutes, then set aside to cool completely.
- In a large mixing bowl, beat the softened cream cheese and granulated sugar until smooth. Mix in the vanilla extract.
- Gradually fold in the heavy whipping cream until the filling is light and creamy. For a firmer set, dissolve 1 tsp of gelatin in 2 tbsp water and fold it into the filling.
- Gently mix in the red velvet cake crumbs until evenly distributed.
- Pour the filling over the cooled crust, spreading it evenly with a spatula. Cover and refrigerate for at least 6 hours or overnight to set.
- Once set, spread the berry compote on top of the cheesecake. Decorate with whipped cream and extra Oreo cookies.
- Serve chilled and enjoy!
Notes
Optional Additions:Sprinkle with chocolate shavings or chopped nuts for extra flair.
Storage Tips:Store leftovers in the fridge for up to 5 days or freeze slices for up to 1 month. Thaw in the refrigerator overnight before serving.
Make Ahead:Prepare this cheesecake the day before your event to ensure it has enough time to chill and set perfectly.
“`
