
“`html
Table of Contents
Pickle Juice Marinated Chicken Tenders | Tangy & Easy Recipe!
Ever wondered how to achieve incredibly moist and flavorful chicken that practically melts in your mouth? Are you searching for a go-to chicken tender recipe that punches up the taste without demanding hours in the kitchen? If the answer is a resounding “yes,” then welcome to the delicious world of flavor-packed chicken recipes! If you’re a fan of tangy dishes that pack a punch, you’re in for a treat. This Pickle Juice Marinated Chicken Tenders recipe is not only delicious but also a breeze to make. Whether you’re looking for a quick dinner or a lunch that stands out, this dish is a must-try! The magic of pickle juice lies in its acidity and salt content, which tenderizes the chicken beautifully and infuses it with a unique, zesty flavor that’s subtly different from traditional marinades. Get ready to revolutionize your chicken game!
Ingredients for Tangy Chicken Tenders
The beauty of this recipe is its simplicity, relying on pantry staples with one star ingredient that truly elevates it: pickle juice! Here’s what you’ll need:
- 1.5 lbs Boneless, Skinless Chicken Tenders: Look for tenders that are roughly the same size for even cooking. If you can only find breasts, simply slice them into tender-sized strips. The chicken should feel firm and slightly cool to the touch.
- 1.5 – 2 Cups Pickle Juice: This is the hero ingredient! Use the brine from your favorite dill pickles (crunchy dill, bread and butter, or spicy dill all work, but classic dill offers the most straightforward tang). Ensure it’s not overly sweet; the brine should have a distinct vinegary, salty profile.
- 1 tsp Garlic Powder: Adds a foundational savory note.
- 1 tsp Onion Powder: Complements the garlic and offers another layer of savory depth.
- ½ tsp Black Pepper: Freshly ground is best for a bright, pungent kick.
- Optional: ¼ tsp Smoked Paprika: For a hint of smoky sweetness and a lovely reddish hue.
- For Dredging (Optional, but Recommended for Crispy Tenders):
- 1 cup All-Purpose Flour
- 1 tsp Salt
- ½ tsp Black Pepper
- ½ tsp Paprika (for color)
- For Frying/Cooking: Vegetable oil, canola oil, or avocado oil, enough for your chosen cooking method.
Timing Your Tangy Chicken Tenders
Compared to an average chicken tender recipe that might involve hours of marinating in buttermilk or more complex spice blends, this pickle juice method is remarkably quick. The marinating time is flexible, but even 30 minutes yields fantastic results, making it perfect for weeknight meals.

Step-by-Step Instructions to Pickle Juice Perfection
Step 1: Prepare the Brine
In a medium bowl or a resealable plastic bag, combine your pickle juice, garlic powder, onion powder, black pepper, and smoked paprika (if using). Give it a good whisk or shake the bag to ensure the spices are well distributed throughout the tangy liquid. The aroma should be pungent and inviting!
Step 2: Marinate the Chicken
Add the chicken tenders to the brine. Make sure each tender is fully submerged in the liquid. If using a bowl, cover it tightly with plastic wrap. If using a bag, squeeze out as much air as possible before sealing. Place the chicken in the refrigerator to marinate. For a subtle tang and tenderizing effect, 30 minutes is sufficient. For a deeper, more pronounced flavor, marinate for at least 2 hours, or up to 4 hours. Avoid marinating for too long (over 6-8 hours) as the acidity can start to break down the chicken too much, making it mushy.
Step 3: Prepare for Cooking
Once the marinating time is up, remove the chicken from the refrigerator. If you plan to dredge the tenders for a crispier coating, prepare your dredging station. In a shallow dish, whisk together the flour, salt, pepper, and paprika. Remove chicken tenders from the brine, letting excess liquid drip off. Pat them very lightly with a paper towel – you want them moist enough for the flour to adhere, but not dripping wet. Dredge each tender in the seasoned flour, pressing gently to ensure an even coating. Set the floured tenders aside on a clean plate or wire rack while you prepare your cooking surface.
Step 4: Cook the Chicken
You have several excellent options for cooking:
- Pan-Frying: Heat about ½ inch of oil in a large skillet over medium-high heat until shimmering (around 350°F / 175°C). Carefully add chicken tenders in a single layer, working in batches if necessary to avoid overcrowding the pan. Fry for 3-5 minutes per side, until golden brown and cooked through.
- Baking: Preheat oven to 400°F (200°C). Place floured tenders on a baking sheet lined with parchment paper or lightly oiled. Bake for 18-25 minutes, flipping halfway through, until golden and cooked through. Baking will yield a less crispy but still delicious result.
- Air Frying: Preheat your air fryer to 380°F (190°C). Lightly spray the air fryer basket with oil. Arrange tenders in a single layer and cook for 10-14 minutes, flipping halfway, until golden and cooked through.
The internal temperature of the chicken should reach 165°F (74°C).
Step 5: Rest and Serve
Once cooked, transfer the chicken tenders to a wire rack to rest for a few minutes. This allows the juices to redistribute, ensuring maximum tenderness. Serve hot and enjoy the tangy, savory goodness!
Nutritional Snapshot
While exact nutritional values can vary based on cooking method and portion size, here’s a general estimate for pickle juice marinated chicken tenders (per 3-4 tenders, pan-fried without heavy batter):
- Calories: Approximately 250-350
- Protein: 30-40g
- Fat: 10-20g (will be higher if fried, lower if baked/air-fried)
- Carbohydrates: 5-10g (will be higher if floured/battered)
- Sodium: Moderate (due to pickle brine and seasoning)
Note: These are estimates. For precise tracking, calculate based on your specific ingredients and quantities.
Healthier Alternatives & Flavor Swaps
Want to lighten this up or experiment with flavors? Try these mindful modifications:
- Lighter Dredging: Instead of flour, try a coating of almond flour, coconut flour (use sparingly as it’s absorbent), or even crushed whole-wheat crackers for a healthier crunch. For a gluten-free option, use gluten-free flour blends or rice flour.
- Reduced Sodium: If you’re watching your sodium intake, use a low-sodium pickle juice or dilute regular pickle juice with a little water. You can also adjust the salt in the seasoning mix.
- Spice it Up: Add a pinch of cayenne pepper or a dash of hot sauce to the marinade for a spicy kick.
- Herbaceous Twist: Incorporate fresh or dried herbs like dill, parsley, or thyme into the marinade or the dredging mixture.
Serving Suggestions
These tangy chicken tenders are incredibly versatile! Serve them:
- As a main course with a side of roasted vegetables and a fresh salad.
- As an appetizer with your favorite dipping sauces (ranch, honey mustard, BBQ, or even sriracha mayo).
- In sandwiches or wraps for a flavorful lunch.
- As a protein add-on to salads or grain bowls.
Common Mistakes to Avoid
To ensure your tenders turn out perfectly every time, steer clear of these common pitfalls:
- Over-Marinating: As mentioned, too much time in the acidic brine can make the chicken mushy. Stick to the recommended timeframe.
- Overcrowding the Pan/Air Fryer: This leads to steaming rather than searing, resulting in pale, soggy tenders. Cook in batches.
- Not Patting Dry: Excess brine can make it harder for the flour coating to adhere properly, and too much moisture will cause oil to splatter aggressively when frying.
- Not Using a Thermometer: Don’t guess if the chicken is done! A meat thermometer ensures it’s cooked to a safe internal temperature of 165°F (74°C).
Storing Your Delicious Tenders
Cooked chicken tenders can be stored in an airtight container in the refrigerator for up to 3-4 days. Reheat them in a preheated oven or a skillet for the best texture, as microwave reheating can sometimes make them a bit soft.
Love this recipe? Share your creations with us on social media and tag #PickleJuiceChicken!
Conclusion: A Tangy Triumph!
Pickle juice marinated chicken tenders are a game-changer for anyone seeking a quick, incredibly flavorful, and tender chicken dish. The simple yet effective brine transforms ordinary chicken into something extraordinary, offering a delightful tangy counterpoint to the savory meat. Whether you’re a seasoned chef or a beginner cook, this recipe is sure to become a staple in your culinary repertoire. So, grab that jar of pickles and get ready to taste the tangy perfection!
Frequently Asked Questions
***Is it safe to marinate chicken in pickle juice?***
Yes, it is perfectly safe! Pickle juice is acidic and salty, which helps to tenderize the chicken and infuse it with flavor. Just be sure to refrigerate the chicken while it marinates and discard any leftover marinade.
***Can I use a different type of pickle juice?***
Absolutely! While classic dill pickle juice is recommended for its straightforward tang, you can experiment with bread and butter pickles (for a sweeter tang), spicy pickles, or even garlic dill pickles for added complexity.
***How long can I marinate the chicken in pickle juice?***
The ideal marinating time is between 30 minutes and 4 hours. Marinating for longer than 6-8 hours can cause the chicken texture to become overly soft or mushy due to the acidity.
***What if I don’t have chicken tenders?***
You can easily use boneless, skinless chicken breasts or thighs. Cut them into uniform tender-sized pieces for even cooking. Adjust cooking time as needed based on the thickness of the pieces.
***Can I make this recipe in advance?***
You can marinate the chicken for up to 4 hours in advance. However, for the best texture, it’s recommended to cook the tenders shortly after marinating and preferably serve them fresh. Cooked tenders can be stored and reheated, but they are best enjoyed shortly after preparation.
Pickle Juice Marinated Chicken Tenders – Easy Recipe Guide
Description
Welcome to the world of flavor-packed chicken recipes! If you’re a fan of tangy dishes that pack a punch, you’re in for a treat. ThisPickle Juice Marinated Chicken Tendersrecipe is not only delicious but also a breeze to make. Whether you’re looking for a quick dinner or a lunch that stands out, this dish is a must-try!
Ingredients
- Optional Substitutions:
Instructions
- Place the chicken tendersin a large bowl. Cover them completely withpickle juice. If you like, addbay leavesto enhance the flavor.
- Cover and refrigeratefor at least 3 hours, or ideally, overnight. This allows the chicken to soak up all the tangy goodness.
- About30 minutes before cooking, take the chicken out of the fridge to let it come to room temperature. This ensures even cooking.
- Discard the pickle juiceand remove the bay leaves. Pat the chicken dry with a paper towel.
- Preheat your grill tomedium-high heat. If you’re using an outside grill or a grill pan,spray it lightly with avocado oilto prevent sticking.
- Place the chicken tenderson the grill. Cook for3-5 minutes on each side, or until the chicken is no longer pink inside and the grill marks appear.
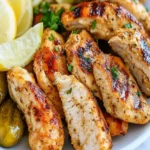
- Transfer the chicken tenders to a plate andserve with fresh picklesandlemon wedgesfor an extra tangy touch.
- Pair with a fresh salad or roasted vegetables for a complete meal.
Notes
Use Fresh Pickle Juice: The fresher the pickle juice, the better the flavor. Dill pickle juice works best for this recipe, but you can experiment with other flavors like spicy or garlic pickles.
Add Some Spice: If you like a bit of heat, mix in somecrushed red pepper flakesor a dash ofhot sauceto the marinade.
Perfect Grill Marks: Make sure the grill is hot enough to create those perfect grill marks without overcooking the chicken.
“`
