Table of Contents
No-Bake Lemon Coconut Mini Pies 🥥 – Easy, Creamy & Irresistible!
Introduction
Did you know that no-bake desserts have seen a 47% surge in popularity over the last year, driven by the demand for quick, foolproof treats? Today, we’re diving into a refreshing and creamy delight that’s perfect for any occasion—No-Bake Lemon Coconut Mini Pie. Whether you’re craving a quick, easy-to-make treat or looking for something light and tangy, these mini pies are sure to satisfy. Plus, the combination of zesty lemon and toasted coconut brings a tropical twist to every bite! Let’s get started on crafting this Luscious Lemon Coconut Delight!
Imagine a dessert that requires zero oven time, minimal cleanup, and delivers a burst of sunshine in every spoonful. That’s the magic of these mini pies. They are the perfect answer to summer potlucks, weeknight cravings, or when you need an impressive dessert that looks like you spent hours in the kitchen. The creamy, tart filling nestled in a crunchy, sweet coconut crust is a textural dream come true. So, grab your mixing bowls and let’s create some edible sunshine!
Ingredients List
Gather these simple, high-quality ingredients for the best flavor and texture. I’ve included sensory notes and substitutions to help you customize.
For the Coconut Graham Cracker Crust:
- 1 ½ cups graham cracker crumbs – About 10-12 full sheets, crushed until fine and sandy. This provides the classic, slightly sweet, and buttery base. Substitution: Use digestive biscuits or gluten-free graham crackers for a dietary swap.
- ½ cup sweetened shredded coconut, toasted – Toasting is non-negotiable! It unlocks a deep, nutty aroma and golden color that elevates the entire crust.
- ⅓ cup unsalted butter, melted – The binding agent that creates that perfect, packable crunch. Use high-quality butter for the best flavor.
- 2 tablespoons granulated sugar – Just a touch to balance the tart lemon. You can reduce or omit if preferred.
For the Luscious Lemon Filling:
- 1 (8 oz) package full-fat cream cheese, softened – The star for richness and structure. It must be at room temperature for a silky-smooth, lump-free filling.
- 1 (14 oz) can sweetened condensed milk – This is the secret to the creamy, sweet base that sets without baking. Don’t substitute with evaporated milk.
- ⅓ cup freshly squeezed lemon juice (about 2-3 large lemons) – Fresh is best! The vibrant, tangy zing is what makes this dessert sing. Bottled juice lacks brightness.
- 1 tablespoon finely grated lemon zest – This is where the intense lemon oil and fragrance live. Don’t skip it!
- 1 teaspoon pure vanilla extract – Adds a warm, floral note that complements the citrus beautifully.
- A pinch of salt – To balance all the sweet and tart flavors, making them pop.
For Garnish (Optional but Recommended):
- Extra toasted coconut flakes
- Lemon zest curls or thin slices
- A dollop of whipped cream
Timing
Compared to traditional baked pies, which can take over 2 hours from start to finish, this no-bake version slashes active kitchen time by over 75%. The majority of the time is hands-off chilling, allowing you to prepare this dessert well in advance for any event. It’s the ultimate make-ahead marvel!
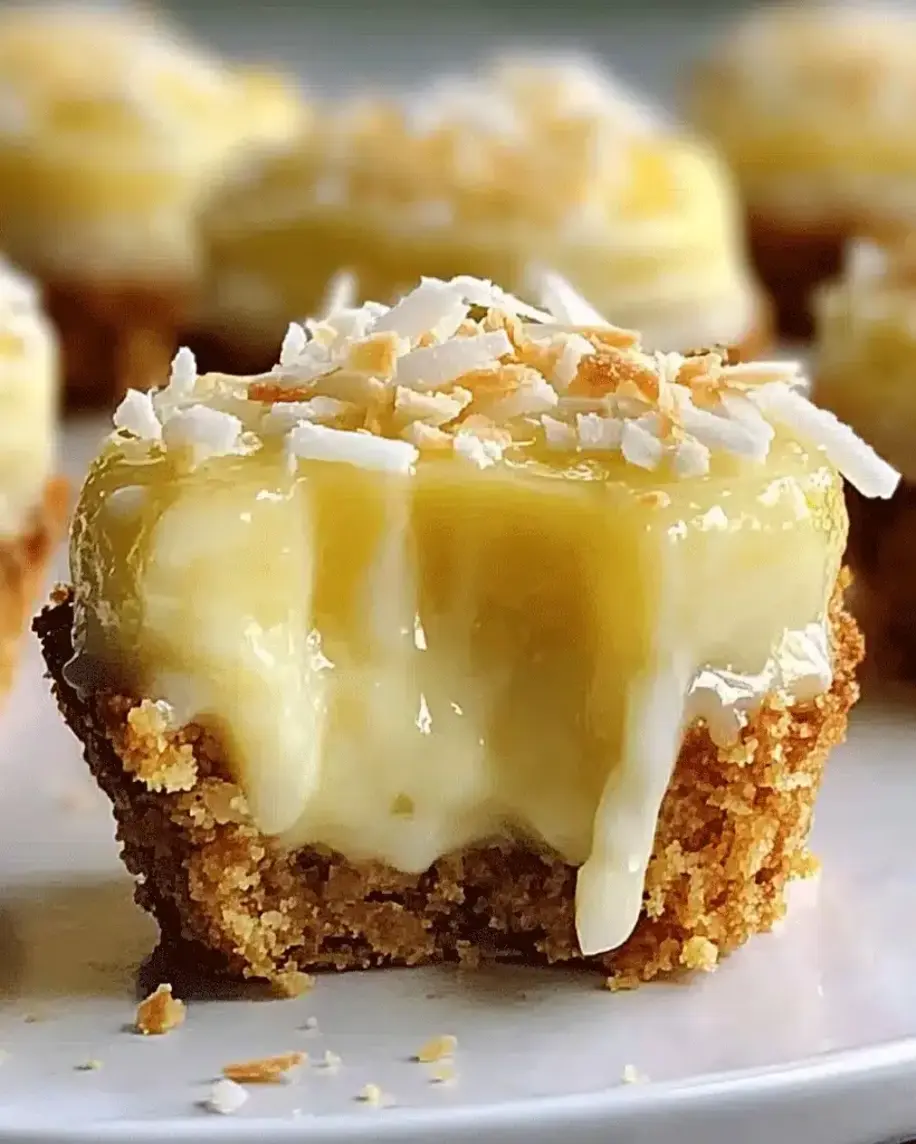
These creamy, dreamy mini pies are a visual and flavorful treat, perfect for any gathering.
Step-by-Step Instructions
Follow these detailed, foolproof steps to create perfect mini pies every single time.
Step 1: Prepare the Crust
First, let’s create that irresistible coconut crust. In a medium skillet over medium heat, toast the shredded coconut. Stir it constantly for 3-5 minutes until it turns a beautiful golden brown and fills your kitchen with a warm, nutty fragrance. Transfer it to a bowl immediately to stop the cooking. In a separate medium bowl, combine the graham cracker crumbs, toasted coconut, and sugar. Pour the melted butter over the mixture and use a fork to mix until every crumb is evenly moistened and the mixture holds together when pinched. Divide this mixture evenly among 8 standard muffin cups (preferably lined with paper or silicone liners for easy removal). Press the crumbs firmly and evenly into the bottom and slightly up the sides of each cup. I like to use the bottom of a small glass or a tamper to get a compact, even layer. Place the pan in the refrigerator to firm up while you make the filling.
Step 2: Make the Creamy Lemon Filling
This is where the magic happens! In a large mixing bowl, beat the softened cream cheese with an electric mixer on medium speed for 1-2 minutes until it’s completely smooth, creamy, and free of any lumps. Scrape down the sides of the bowl. With the mixer on low, gradually pour in the sweetened condensed milk. Once incorporated, increase the speed to medium and beat for another minute until the mixture is perfectly smooth and homogenous. Now, add the fresh lemon juice, lemon zest, vanilla extract, and pinch of salt. Beat on low speed just until everything is combined—be careful not to overmix at this stage. The filling will thicken slightly as you mix. You’ll know it’s ready when it has a lush, pudding-like consistency.
Step 3: Assemble and Chill
Retrieve your crust-lined muffin pan from the fridge. Spoon or pipe the lemon filling evenly into each crust, filling them almost to the top. Gently tap the pan on the counter a few times to release any air bubbles and create a smooth surface. For a professional finish, you can use a small offset spatula to level the tops. Cover the pan loosely with plastic wrap and refrigerate for at least 4 hours, but ideally overnight. This chilling time is crucial for the filling to set firmly and for the flavors to meld beautifully.
Step 4: Garnish and Serve
Once fully set, carefully remove the mini pies from the muffin liners. Just before serving, garnish each pie with a sprinkle of the reserved toasted coconut, a twist of lemon zest, or a light cloud of freshly whipped cream. The contrast of the cool, creamy filling with the crunchy, toasty crust is pure bliss with every bite.
Nutritional Information
The following is an approximate nutritional breakdown per mini pie (without optional garnishes).
- Calories: 380 kcal
- Total Fat: 22g
- Saturated Fat: 14g
- Cholesterol: 60mg
- Sodium: 220mg
- Total Carbohydrates: 40g
- Dietary Fiber: 1g
- Sugars: 32g
- Protein: 6g
Healthier Alternatives
Love the flavor but want a lighter version? Here are some simple swaps that maintain deliciousness:
- Crust: Use almond flour or crushed nuts mixed with a touch of coconut oil instead of graham crackers and butter. Reduce or use a sugar substitute like monk fruit sweetener.
- Filling: Opt for reduced-fat or Neufchâtel cream cheese and light sweetened condensed milk. You can also use a homemade version of condensed milk from coconut milk and a natural sweetener.
- Sweetness: The filling is quite sweet. You can safely reduce the sweetened condensed milk by ¼ cup and add a touch more lemon juice to balance the tartness.
- Dairy-Free: Use vegan cream cheese, coconut condensed milk, and a plant-based butter substitute. The coconut flavor will be even more pronounced and delightful!
Serving Suggestions
- Summer BBQ Finale: Serve these chilled pies alongside fresh berries for a refreshing end to a grilled feast.
- Elegant Dinner Party: Plate individually on dessert plates with a mint sprig and a drizzle of raspberry coulis.
- Poolside Treat: Keep them in the fridge and serve straight from the muffin liner for a mess-free, portable sweet.
- With Coffee or Tea: The bright lemon cuts through the richness of a dark roast coffee or a cup of Earl Grey perfectly.
Common Mistakes
- Using Cold Cream Cheese: This is the #1 cause of a lumpy filling. Ensure your cream cheese has been out of the fridge for at least an hour.
- Skipping the Toasting: Raw coconut lacks depth. Toasting is a quick step that adds immense flavor to the crust.
- Not Chilling Long Enough: Impatience leads to a runny filling. The 4-hour minimum is essential for proper setting.
- Overmixing After Adding Lemon Juice: Mix just until combined to maintain the ideal texture.
- Using Bottled Lemon Juice: The flavor is flat and often contains preservatives. Freshly squeezed is non-negotiable for the best taste.
Storing Tips
- Refrigeration: Store covered in the refrigerator for up to 5 days. They actually taste even better on day 2 as the flavors develop.
- Freezing: These pies freeze exceptionally well! Wrap each pie individually in plastic wrap and place in an airtight container. Freeze for up to 2 months. Thaw in the refrigerator overnight before serving.
- <
