
“`html
Table of Contents
Heavenly Chocolate Peanut Butter Ooey Gooey Cake – The Ultimate Indulgence!
Introduction
Welcome, chocolate and peanut butter enthusiasts! If you’re looking for a dessert that combines the rich indulgence of chocolate with the creamy, nutty goodness of peanut butter, you’ve found the perfect recipe. Did you know that chocolate and peanut butter combinations are among the most searched-for dessert recipes online, with millions of searches per month? This Heavenly Chocolate Peanut Butter Ooey Gooey Cake is an absolute must-try. Packed with layers of decadent flavors, it’s a dream come true for dessert lovers who crave a little extra sweetness. Whether you’re hosting a gathering or enjoying a cozy night at home, this gooey delight will satisfy any sweet tooth. Ready to dive in?
Ingredients
Get ready to gather your treasures for this divine creation! This cake is all about simple ingredients coming together for an extraordinary result. Don’t be intimidated by the “gooey” aspect; it’s all part of the magic!
For the Cake Base:
- 1 cup (2 sticks) unsalted butter, softened (for that rich, creamy foundation)
- 1 ½ cups granulated sugar (to ensure sweetness and moisture)
- 2 large eggs, room temperature (for binding and structure)
- 1 teaspoon vanilla extract (the classic aromatic enhancer)
- 1 ½ cups all-purpose flour (the backbone of our cake)
- ⅓ cup unsweetened cocoa powder (for that deep, dark chocolate flavor)
- 1 teaspoon baking soda (to help with leavening)
- ½ teaspoon salt (to balance the sweetness and amplify flavors)
- ¾ cup buttermilk, room temperature (for tenderness and a subtle tang)
For the Peanut Butter Gooey Layer:
- 1 cup creamy peanut butter (your favorite brand – smooth is key here!)
- ½ cup packed light brown sugar (for that classic caramel-like sweetness)
- ¼ cup heavy cream or milk (to create a luscious, pourable consistency)
- A pinch of salt (just to enhance the peanut butter flavor)
Optional Toppings:
- Chocolate chips (for extra chocolatey bursts)
- Chopped peanuts (for a delightful crunch)
- Whipped cream or ice cream (for serving)
Substitutions and Notes:
- Buttermilk: If you don’t have buttermilk, you can easily make your own. Pour ¾ cup milk into a measuring cup and stir in ¾ tablespoon of white vinegar or lemon juice. Let it sit for 5-10 minutes until it thickens slightly.
- Peanut Butter: Natural peanut butter can sometimes separate. If using, ensure it’s well-stirred. A good quality commercial creamy peanut butter will give the most consistent results for the gooey layer.
- Cocoa Powder: Dutch-processed cocoa powder will yield a richer, darker chocolate flavor compared to natural cocoa powder.
- Room Temperature Ingredients: Eggs, butter, and buttermilk incorporate better when at room temperature, leading to a smoother batter and more even bake.
Timing
25 minutes
35-45 minutes
60-70 minutes
Compared to many traditional layer cakes that can take over an hour purely for baking and cooling, this one-pan wonder is a time-saver. Most chocolate peanut butter cakes typically require similar prep and bake times, but the simplicity of this recipe certainly stands out. You’ll be indulging in this decadent treat faster than you can say “ooey gooey!”
Step-by-Step Instructions
Let’s get baking! Follow these simple steps to create your very own slice of heaven.
Step 1: Prepare Your Pan
Preheat your oven to 350°F (175°C). Grease and flour a 9×13 inch baking pan. You can also line it with parchment paper, leaving an overhang on the sides for easy lifting later. This ensures your masterpiece doesn’t stick.
Step 2: Mix the Dry Ingredients
In a medium bowl, whisk together the all-purpose flour, unsweetened cocoa powder, baking soda, and salt. This ensures everything is evenly distributed and helps prevent clumps in your batter.
Step 3: Create the Gooey Layer
In a separate small bowl, combine the creamy peanut butter, light brown sugar, heavy cream (or milk), and a pinch of salt. Stir until smooth and well combined. If it seems too thick, add another teaspoon of cream. This mixture will be poured over the cake batter and will become wonderfully gooey when baked.
Step 4: Assemble the Cake
Cream together the softened unsalted butter and granulated sugar in a large bowl until light and fluffy. Beat in the eggs one at a time, then stir in the vanilla extract. Alternately add the dry ingredients and the buttermilk to the butter mixture, beginning and ending with the dry ingredients. Mix until just combined – be careful not to overmix! Spread this chocolate batter evenly into the prepared baking pan. Gently pour or dollop the peanut butter mixture over the chocolate batter. You can swirl it slightly with a knife or spoon for a marbled effect, but don’t overdo it – we want distinct layers!
Step 5: Bake to Perfection
Bake in the preheated oven for 35-45 minutes. A toothpick inserted into the chocolate cake portion should come out with moist crumbs attached, while the peanut butter layer will be soft and gooey. Avoid overbaking, which can dry out the cake.
Step 6: Cool and Serve
Let the cake cool in the pan on a wire rack for at least 20-30 minutes before slicing. This allows the gooey layer to set up slightly, making it easier to serve. Serve warm or at room temperature. For an extra treat, top with whipped cream, a scoop of vanilla ice cream, or a sprinkle of chocolate chips and chopped peanuts.
Nutritional Information
While this cake is an indulgent treat, a typical serving (approx. 1/12 of the cake) contains:
- Calories: 450-550 kcal (this can vary based on specific ingredients, especially peanut butter and cream)
- Fat: 25-35g
- Carbohydrates: 50-65g
- Protein: 8-12g
- Sugar: 35-50g
Please note: This is an estimate and can vary.
Healthier Alternatives
Craving a lighter version without sacrificing too much flavor? Try these swaps:
- Flour: Use a whole wheat pastry flour or a gluten-free blend (though texture may change slightly).
- Sugar: Reduce the granulated sugar by ¼ cup and use maple syrup or a sugar substitute for the peanut butter layer.
- Peanut Butter: Opt for a natural, unsweetened peanut butter.
- Fat: For the cake base, consider using half butter and half unsweetened applesauce, or a good quality Greek yogurt for added protein and reduced fat.
- Portion Control: The easiest way to make it healthier is simply to enjoy a smaller slice!
Serving Suggestions
This cake is a showstopper on its own, but it’s also fantastic when paired with:
- A scoop of vanilla or chocolate ice cream (the contrast of warm gooey cake and cold ice cream is divine!).
- A dollop of freshly whipped cream.
- A sprinkle of flaky sea salt to enhance the chocolate and peanut butter flavors.
- Fresh berries, like raspberries or strawberries, to cut through the richness.
Common Mistakes to Avoid
- Overmixing the Batter: Overmixing develops gluten, leading to a tough cake. Mix until just combined.
- Not Softening Butter: Softened butter creams better with sugar, creating a lighter texture.
- Overbaking: This is the quickest way to turn a gooey dream into a dry disappointment. Watch it closely!
- Cutting Too Soon: While tempting, letting the cake cool briefly helps the gooey layer set.
Storing Tips
Store any leftovers in an airtight container at room temperature for up to 3 days. If your kitchen is very warm, or if you’ve added fresh cream or whipped cream, refrigerating is a good idea. Reheat slices slightly in the microwave or oven for that fresh-baked gooeyness.
Conclusion
The Heavenly Chocolate Peanut Butter Ooey Gooey Cake is more than just a dessert; it’s an experience. It perfectly marries two beloved flavors into a rich, decadent, and utterly satisfying treat. Whether you’re a seasoned baker or a beginner, this recipe is incredibly rewarding and will undoubtedly become a favorite for family gatherings and quiet nights in. So go ahead, bake it, share it, and enjoy every single, wonderfully gooey bite!
FAQs
***Where does the “gooey” come from?***
The gooey layer is created by the combination of peanut butter, brown sugar, and cream that is poured over the cake batter. During baking, this mixture melts and creates a luscious, sauce-like layer.
***Can I use crunchy peanut butter?***
While creamy peanut butter is recommended for the smoothest gooey layer, you can use crunchy if you prefer textural contrast. Just be aware that the nuts might be more prominent.
***How do I know when the cake is done?***
A toothpick inserted into the chocolate cake part should come out with moist crumbs, not wet batter. The peanut butter layer will remain soft and gooey, which is exactly what we want!
***Can I make this gluten-free?***
Yes, you can substitute a good quality gluten-free all-purpose flour blend for the all-purpose flour. You may need to adjust the liquid slightly depending on the blend used.
***Can this cake be frozen?***
It’s best enjoyed fresh. While you can freeze unfrosted cake, the gooey peanut butter layer might change texture upon thawing. If you must, freeze individual slices tightly wrapped.
Heavenly Chocolate Peanut Butter Ooey Gooey Cake Recipe
Description
Welcome, chocolate and peanut butter enthusiasts! If you’re looking for a dessert that combines the rich indulgence of chocolate with the creamy, nutty goodness of peanut butter, you’ve found the perfect recipe. ThisHeavenly Chocolate Peanut Butter Ooey Gooey Cakeis an absolute must-try. Packed with layers of decadent flavors, it’s a dream come true for dessert lovers who crave a little extra sweetness. Whether you’re hosting a gathering or enjoying a cozy night at home, this gooey delight will satisfy any sweet tooth. Ready to dive in?
Ingredients
- Substitution Tips: If you prefer a dairy-free option, substitute the butter with plant-based alternatives, use dairy-free chocolate chips, and replace heavy cream with coconut cream. For a gluten-free version, swap the all-purpose flour with a gluten-free blend.
Instructions
- Start by preheating your oven to 350°F (175°C). Grease and flour three 8-inch round cake pans. Properly preparing your pans ensures the cakes will release effortlessly once baked.
- In a medium bowl, whisk together the all-purpose flour, cocoa powder, baking soda, and salt. Set aside. This helps to distribute the dry ingredients evenly for a consistent batter.
- In a large mixing bowl, beat the softened unsalted butter, granulated sugar, and packed brown sugar until the mixture turns light and fluffy. This step is crucial for incorporating air into the batter, leading to a lighter cake.
- Beat in the eggs one at a time, ensuring each is fully incorporated before adding the next. Stir in the vanilla extract for a burst of flavor.
- Alternately add the dry flour mixture and buttermilk to the creamed butter, beginning and ending with the dry ingredients. Mix until just combined—overmixing can result in a denser cake.
- Slowly pour in the hot water while stirring. This will create a smoother batter, giving the cake its soft, moist texture.
- Divide the batter evenly among the three prepared pans. Bake in the preheated oven for 30-35 minutes or until a toothpick inserted into the center of the cakes comes out clean. Let them cool in the pans for 10 minutes before transferring them to wire racks to cool completely.
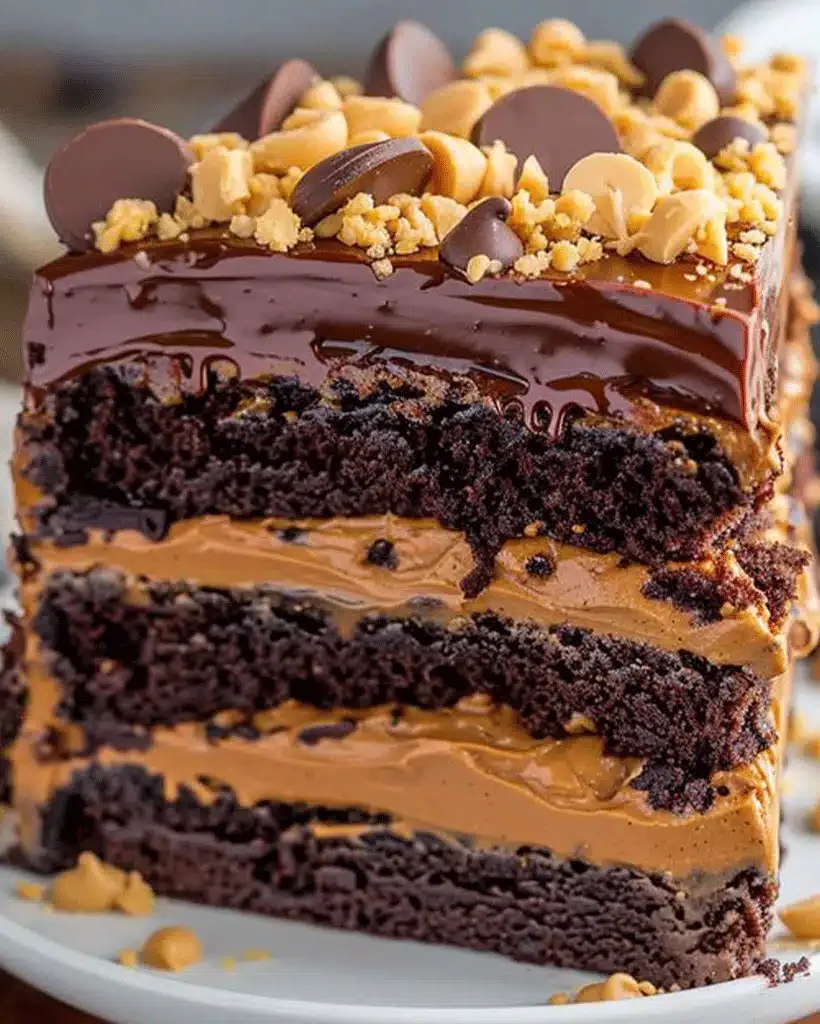
- In a medium bowl, beat the creamy peanut butter, powdered sugar, and heavy cream until the mixture is fluffy and smooth. This filling will be the perfect layer between the moist cake layers.
- Place one cake layer on a serving plate. Spread a generous amount of the peanut butter filling over the top. Repeat with the remaining layers, ending with the top cake layer.
- In a small saucepan, melt the chocolate chips with the heavy cream over low heat, stirring constantly until smooth. Pour this luscious ganache over the top of the assembled cake, letting it drip down the sides for a dramatic effect.
- Sprinkle the top of the cake with peanut butter chips and chopped peanuts. This adds a crunchy texture to the smooth and gooey cake.
Notes
Room Temperature Ingredients: Use room-temperature butter and eggs for a smoother batter that incorporates more evenly.
Consistency is Key: Make sure not to overmix the batter; mix until ingredients are just combined to avoid a dense cake.
Hot Water Trick: Adding hot water to the batter makes it thinner, resulting in a moist and tender texture after baking.
“`
