Gourmet Thick Peanut Butter Cookies: The Ultimate Chewy Delight
There’s nothing quite like the rich, nutty goodness of a perfectly baked gourmet thick peanut butter cookie. These cookies are the ultimate indulgence for those who crave a luscious blend of sweetness and a deep peanut flavor. With every bite, experience the satisfying chew and a nutty flair that is simply irresistible. These cookies make for a delightful treat that pairs well with a glass of warm milk or a steaming cup of coffee.
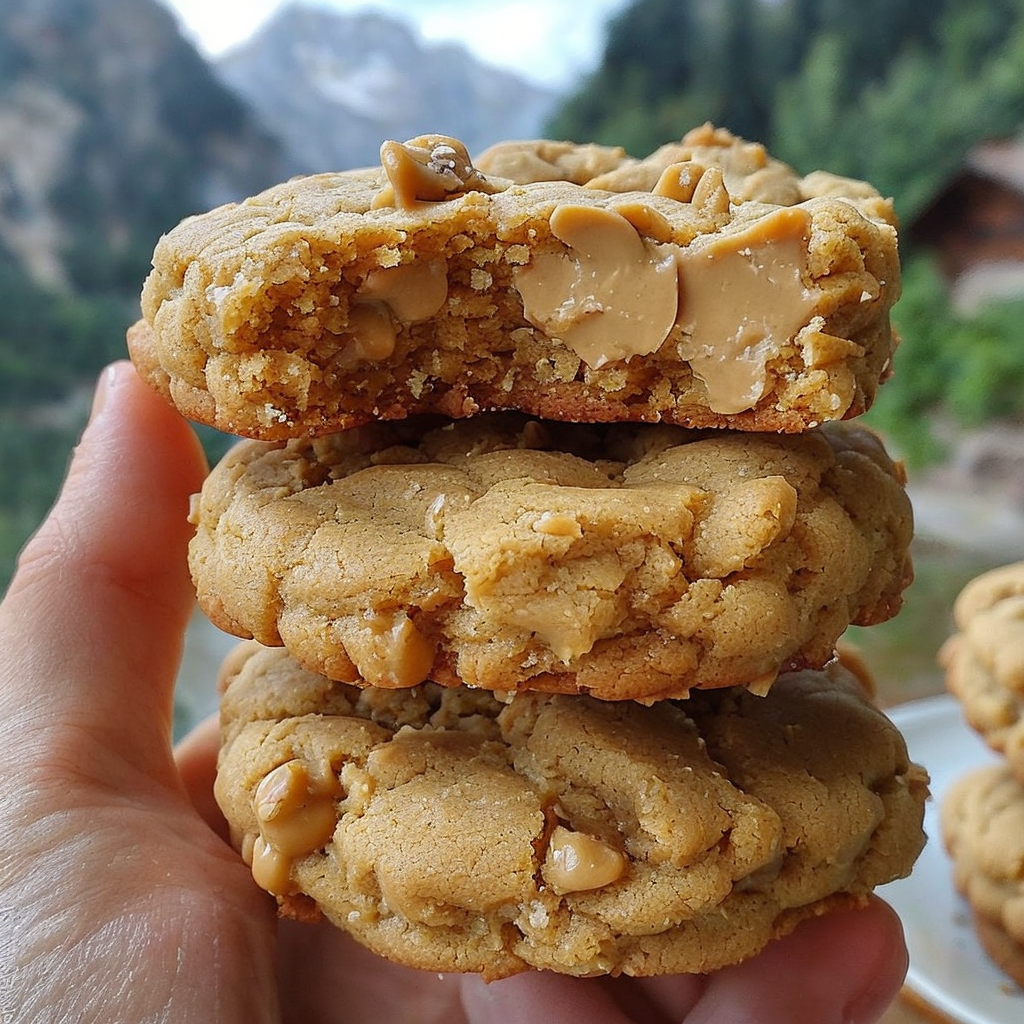
Imagine sinking your teeth into a thick cookie that’s both soft and slightly chewy, bursting with rich peanut butter taste. These thick peanut butter cookies are perfect for any occasion, whether you’re enjoying a quiet afternoon or hosting a fun get-together. The golden-brown cookies provide a beautiful contrast to the rich, creamy peanut butter flavor. Let’s dive into the delicious world of these gourmet treats, where every bite is a heavenly experience.
Quick Recipe Highlights
- Flavor Profile: Expect a delightful balance of sweet and savory, with the robust taste of roasted peanuts shining through each cookie.
- Texture: These cookies boast a thick and chewy texture, with just the right amount of crunch from the peanuts.
- Aroma: As they bake, the kitchen fills with the toasty, nutty aroma of peanut butter, tempting you to sneak a taste before they’re even finished.
- Visual Appeal: Golden brown and chunky, these cookies are visually as inviting as they are tasty, with a rustic homemade look.
- Skill Level Needed: Easy – Great for bakers of all skill levels. The recipe requires basic measuring and mixing skills.
- Special Equipment: A sturdy baking sheet and a cooling rack for the perfect cookie-making setup.
Recipe Overview
- Difficulty Level: This recipe is easy, making it perfect for both novice bakers and experienced pros. The straightforward steps ensure success with minimal effort.
- Category: These thick cookies fall comfortably into the dessert category but make for excellent snacks or gift treats too.
- Cuisine: Rooted in American traditions, these cookies carry a nostalgic charm reminiscent of childhood kitchens across the USA.
- Cost: Baking these gourmet treats is quite cost-effective, with most ingredients readily available at affordable prices.
- Season: Perfect for year-round baking! They’re especially delightful during cooler months when cozy treats are most appreciated.
- Occasion: From holiday gatherings to simple family weekends, these cookies fit seamlessly into any occasion, adding a sweet note of joy.
Why You’ll Love This Recipe
The gourmet thick peanut butter cookies are a dream come true for peanut butter lovers. The taste is an impeccable balance of sweet and savory, where the luscious peanut flavor takes center stage. Every bite offers a satisfying chewiness with pockets of crunchy peanuts that add excitement to the texture, making it a standout cookie experience.
Crafted for convenience, this recipe comes together quickly, allowing you to whip up a delicious batch in under half an hour. The ingredients are pantry staples, meaning you can indulge in these delicious cookies whenever the craving hits, with minimal preparation needed. It’s the perfect recipe to involve little ones in the kitchen, making baking a fun and engaging family activity.
Aside from their mouthwatering taste, these cookies offer notable nutritional benefits. Peanuts are a great source of protein and healthy fats, adding a nutritious element to your sweet treat. Enjoy the balance of decadent taste with wholesome nutrition that’s both satisfying and nourishing. These cookies provide an excellent way to sneak in some nutritional goodness while enjoying a delightful dessert.
The social and entertaining value of these cookies cannot be overstated. Whether shared at a party or included in a bake sale, these cookies are sure to be a hit. They’re versatile enough to fit any theme or occasion and bring a homey, comforting vibe to any gathering. Each cookie becomes a sweet offering of warmth and connection among friends and family.
Cost-effectiveness is another reason to love this recipe. With ingredients that are affordable and commonly found, there’s no need for fancy or expensive components. You can easily scale the recipe to feed a crowd, making these cookies a budget-friendly option for entertaining. With such simplicity and effectiveness, baking these gourmet cookies is a win-win for taste and cost!
Historical Background and Cultural Significance
The origin of peanut butter cookies can be traced back to the early 1900s in the United States, a byproduct of peanut farming advancements and the popularization of peanut butter as a health food. George Washington Carver, a pioneer in promoting peanut cultivation, is credited with creating numerous recipes that popularized peanuts, including variations of peanut-based cookies.
Culturally, peanut butter cookies have been a staple in American households, symbolizing comfort and tradition. They’ve become an integral part of holiday baking and childhood memories, often shared during special occasions and family gatherings. The love for these cookies transcends generations, maintaining their status as a beloved classic in the American culinary repertoire.
Over the years, the recipe has evolved to include variations and adaptations. Initially, recipes highlighted simple ingredients and minimal preparation steps. As culinary trends shifted, bakers introduced variations including add-ins like chocolate chips, oats, or spices, each twist bringing new dimensions to the traditional cookie.
Regional variations of peanut butter cookies reflect local tastes and ingredient availability. In some areas, these cookies may incorporate local nuts or sweeteners, enhancing their distinctive qualities while preserving the fundamental peanut taste. These adaptations continue to honor the cookie’s rich heritage while showcasing the creativity and adaptability of bakers around the world.
Ingredient Deep Dive
Peanut butter, the star ingredient of these cookies, carries a rich cultural significance. Originating from the Americas, peanuts were cultivated by indigenous people for centuries before spreading globally. Today, peanut butter enjoys a status as a versatile and beloved spread, a testament to its enduring popularity and adaptability in countless recipes.
Nutritionally, peanut butter is a powerhouse of essential nutrients, offering healthy fats, protein, and fiber. It’s a satisfying ingredient that imparts both flavor and nutrition, providing a sense of fullness and energy. When selecting peanut butter for baking, opt for creamy varieties without added sugars or preservatives to maximize flavor and purity.
Brown sugar, another key component, adds moisture and caramel-like depth to the cookies. Its molasses content elevates the chewiness while contributing to the golden color of the baked cookies. For optimal results, use fresh brown sugar to maintain the right texture and sweetness. Store it in an airtight container to prevent it from hardening or clumping.
In terms of substitutions, you can experiment with nut butters such as almond or cashew for a unique twist, though the classic peanut flavor is hard to beat. Consider nutritional alternatives for sweeteners, such as coconut sugar or honey, to adjust the recipe to dietary preferences, keeping the rich taste and wonderful textures intact.
Common Mistakes to Avoid
- Avoid overbaking: These cookies should be removed from the oven when they are just golden brown on the edges, as they will continue to firm up on the baking sheet.
- Using cold ingredients: Ensure that your butter and eggs are at room temperature for a well-mixed and cohesive dough.
- Skipping the cooling stage: Allow cookies to cool on the baking sheet before transferring to a rack, as moving them too soon can lead to breakage.
- Incorrect peanut butter type: Stick to creamy peanut butter without added oils or sugars, as natural versions can alter the texture and consistency.
- Ignoring measurements: Baking is a science—be precise with your ingredients to ensure consistency in taste and texture.
- Forgetting to adjust for altitude: If you live at a high altitude, consider adjusting baking times and temperatures to compensate for atmospheric differences.
- Not rotating your pans: Rotate the baking sheets halfway through to ensure even baking and prevent uneven results.
- Storing improperly: To keep the cookies fresh, store them in an airtight container at room temperature, preventing moisture loss and staling.
Essential Techniques
Creaming the butter and sugars successfully is key. This process introduces air into the batter, creating light and fluffy cookies. Use an electric mixer for consistency and cream for at least 3-5 minutes until the mixture is pale and fluffy. Be careful not to overmix, as this can result in denser cookies.
Mastering the art of measuring flour can significantly change the outcome of your baking. For accuracy, use the spoon and level method where you spoon flour into your measuring cup and level it off with a knife, keeping your cookies light and supple without being dense or heavy.
To ensure even baking, use a cookie scoop to portion out the dough. This ensures uniform size and shape, allowing the cookies to cook evenly and consistently. Invest in a quality scoop to make this task easier and more efficient, providing you with perfectly rounded cookies every time.
Visual cues are important for baking success. Know when your cookies are ready by observing their edges—look for a golden brown color and a slightly set center. If they appear too soft, they may need another minute of baking, but take caution not to overbake, as they will firm up as they cool.
Pro Tips for Perfect Gourmet Thick Peanut Butter Cookies
Ensure your peanut butter is at room temperature before adding to the mixture. This allows for easier incorporation into the dough and a smoother consistency, preventing any unwanted lumps or inconsistencies.
Chill the dough for at least an hour before baking. This helps to prevent spreading and gives the cookies a nice chewy texture. It also allows the flavors to meld, enhancing the overall taste of the cookies.
Experiment with adding chopped peanuts for additional texture. Not only does this amplify the peanut flavor, but it also adds a delightful crunch, making each bite more engaging and satisfying.
Try using a combination of white and brown sugar to get balanced sweetness and moisture. Brown sugar will add a depth of flavor, while white sugar helps in achieving the right spread during baking.
For a fun twist, consider drizzling melted chocolate over the cookies once cooled. This luxurious addition complements the peanut butter flavor and adds an attractive finish to each cookie.
Utilize parchment paper on baking sheets. This prevents sticking and helps with even baking, leading to cleaner cookies and easier cleanup – a winning scenario in any kitchen.
Variations and Adaptations
Regional variations can be expressed by using local versions of peanuts or nut butters, providing a unique taste while respecting regional ingredients. This could draw inspiration from various cultures, such as using cashew butter in regions where cashews are more popular.
Seasonal adaptations include introducing spices like cinnamon or nutmeg during fall or winter, offering additional warmth and depth to the cookies, making them a perfect treat for the festive season and cooler months.
Dietary modifications are easy with this recipe. To make vegan-friendly cookies, substitute the butter with a plant-based alternative and use a flaxseed egg in place of a traditional egg. This provides similar binding qualities while maintaining the desired texture.
Flavor variations are plentiful—consider adding vanilla extract or a touch of sea salt on top before baking for an elevated gourmet touch. Alternatively, add mini chocolate chips for a dash of indulgence.
For those who prefer a softer texture, decrease baking time slightly to maintain a gooey center, contrasting the firm outer edges. This results in a luscious, melt-in-the-mouth experience, reminiscent of a cookie dough bite.
Presentation alternatives can include pressing a fork lightly into the dough before baking for a classic crisscross pattern. This adds an element of visual interest while paying homage to traditional peanut butter cookie aesthetics.
Serving and Presentation Guide
For an elegant presentation, serve these cookies on a white platter lined with a decorative napkin. The contrast highlights the cookies’ golden hues and draws attention to their homemade charm, making them pop visually.
Garnishing with a sprinkle of powdered sugar or a drizzle of dark chocolate syrup adds sophistication, creating an elevated gourmet aesthetic that complements their rich flavor profile beautifully.
Traditional accompaniments include a glass of cold milk or a scoop of vanilla ice cream, providing a creamy counterbalance to the nutty, chewy richness of the cookies. These combinations enhance the overall dessert experience.
Modern serving suggestions incorporate a cookie tower or stack secured with a ribbon, an expression of casual elegance perfect for gifting or as a part of a dessert buffet.
Temperature considerations are crucial for enjoying these cookies at their best. They can be enjoyed warm from the oven for a soft and chewy bite or allowed to cool completely for a firmer texture, depending on personal preference.
Portion control tips involve pre-slicing portions into half-cookies for smaller bites suitable for light snacking or pairing with other treats, maintaining an element of indulgence without excess.
Wine and Beverage Pairing
Pair your gourmet thick peanut butter cookies with a light, fruity wine such as a Riesling or a subtly sweet Moscato. These wines emphasize the nutty aspects without overpowering the cookie’s natural sweet flavors.
For non-alcoholic options, consider a spiced chai latte or a creamy hot chocolate. The spices complement the warm, nutty flavors of the cookies, while the chocolate brings a delightful contrast, enhancing the whole experience.
If coffee or tea is your preference, a robust coffee with nutty undertones or a subtle black tea pairs well. These beverages provide a delightful balance, bringing out the cookie’s more intricate flavor notes while maintaining their own unique appeal.
Temperature plays an essential role in pairing success. Serve beverages slightly chilled or at room temperature to allow the cookie’s warmth to shine through, creating a harmonious gastronomic experience.
Ensure serving suggestions include inviting presentations, such as pairing cookies on a plate with a small taster glass of your chosen beverage or featuring assorted nuts as a garnish, enhancing the sensory and visual appeal.
Storage and Shelf Life
To maintain freshness, store these gourmet cookies in an airtight container at room temperature. They can last up to a week while retaining their chewiness and rich flavor. Avoid exposure to air to prevent them from becoming hard.
Optimal storage requires a cool, dry location away from direct sunlight, preserving their quality and preventing any degradation in taste or texture. Consider using parchment paper between cookie layers to prevent sticking and breakage.
Signs of spoilage include staling or hardness, indicating a loss of texture quality. Check for any change in odor or color, ensuring all ingredients maintain their intended freshness. Cookies can be refreshed briefly in the oven if needed.
Reheating instructions include a short warm-up in an oven set at a low temperature or a quick microwave pass, reviving their just-baked warmth and aroma, making them enjoyable at any preferred temperature.
Freezing guidelines recommend pre-freezing dough balls individually before transferring them to a ziplock bag, making future baking simple and convenient. When ready, bake directly from the freezer, adding a few extra minutes to cooking time.
Make Ahead Strategies
Plan your prep timeline to accommodate chilling the dough, an essential step for flavor development and structure. Have all ingredients and necessary tools ready to maximize efficiency and streamline the baking process.
Storage between steps involves wrapping chilled dough securely in plastic wrap or an airtight container, retaining its moisture and preventing any unwanted drying or contamination during fridge or freezetime.
Quality impact assessment ensures the integrity of your cookies remains high throughout preparation and storage. Use fresh ingredients and follow recipe instructions precisely for consistently excellent results.
Assembly tips include measuring and mixing all dry ingredients in advance for easy incorporation into wet ingredients, reducing prep stress and keeping tasks organized and manageable.
Reheating guidelines stress lightly warming cookies for fresh-baked allure. Cover with foil to retain moisture and prevent over-hardening, optimizing flavor and texture upon serving.
Fresh element additions like adding spices or nuts to dough before baking introduces a personalized touch, making the cookies uniquely yours and delightfully home-styled.
Scaling Instructions
When halving the recipe, adjust ingredient proportions carefully to maintain the original balance in taste and texture. Use precise measurements for best results, ensuring success regardless of batch size.
Doubling or tripling the recipe is perfect for larger gatherings. Ensure you have ample space and equipment to accommodate increased volume, such as larger mixing bowls and additional baking sheets.
Equipment adjustments may involve using multiple baking sheets or cooling racks to avoid overcrowding, enabling even baking and seamless transitions between batches.
Timing modifications might be necessary to accommodate varied batch sizes or oven capacities. Monitor cookies closely during additional batches to maintain quality and consistency throughout.
Storage considerations emphasize using airtight containers and separating layers with parchment paper when increasing batch sizes. This prevents sticking and breakage, extending shelf life effectively.
Nutritional Deep Dive
A macro breakdown reveals these cookies as a balanced treat. They contain carbohydrates for immediate energy, fats for sustained fuel, and proteins beneficial for body repair and maintenance.
Micronutrient analysis showcases notable contributions from peanuts, like vitamin E, niacin, and magnesium—essential elements for smooth digestion and cellular health, enriching the nutrition in each bite.
Health benefits extend beyond simple indulgence. Moderation promotes a balanced diet, and these cookies, enriched with peanut butter, offer satisfying fullness amidst their sweet, nutty delight.
Dietary considerations allow room for customization. Adjust sugar levels for reduced-calorie versions or explore additional fiber options with whole grain flour, aligning recipe output to nutritional goals.
Portion analysis suggests measured consumption for thoughtful enjoyment. Eat in moderation to balance dietary intake and fully appreciate the treat’s carefully curated flavors and textures.
Weight management tips underscore enjoying the cookies alongside varied meals, integrating them into a balanced diet to maintain nutritional harmony while satisfying sweet-tooth cravings.
Dietary Adaptations
For a gluten-free version, substitute traditional flour with gluten-free alternatives like almond or oat flour, ensuring similar texture and flavor while meeting dietary needs effectively.
A dairy-free adjustment involves using plant-based milk and butter varieties, such as coconut oil or almond milk, to maintain excellent taste and texture without animal-derived ingredients.
Vegan bakers can seamlessly replace egg content with flaxseed or chia seed substitutes, creating a cohesive dough that mimics the traditional version without compromising flavor or structure.
Low-carb adaptations recommend substituting sugar with sweeteners like stevia or erythritol, achieving guilt-free satisfaction while retaining the original appeal of these delightful cookies.
Keto adaptations involve exploring high-fat, low-carb alternatives. Using almond or coconut flour provides ample texture support, while stevia substitutes ensure compatibility with keto lifestyle preferences.
Paleo-friendly cookies can emerge using almond butter and date sugar, combining cherished peanut flavors with ingredient alignments that embody paleo dietary principles and maintain authenticity.
FODMAP adjustments hinge on using approved ingredients, like specific glucose substitutes, allowing cookies to adhere to dietary restrictions while remaining flavorful and enjoyable.
Troubleshooting Guide
Texture issues often arise from improper measurements or baking time adjustments. Ensure accurate ingredient proportions and remove from the oven when edges are golden to maintain chewiness.
Flavor balance relies on precise sugar and salt measurements. Taste adjustments stem from experimentation in sweetness or salty contrast, ensuring each bite resonates with desired complexity.
Temperature problems can lead to uneven baking or hardening. Observe oven settings and dough temperature before baking to guarantee accuracy and uniform results across every batch.
Equipment challenges include consideration of baking sheet materials or oven capacity, influencing bake quality and consistency. Adapt placements and sizes to suit your apparatus’s strengths.
Ingredient substitutions often necessitate trial and error. Experimenting with flour or nut butter varieties requires careful attention to liquidity levels and binding properties for successful adaptation.
Timing concerns underline efficient preparation and chilled dough. Plan adequate fridge time to prevent unintended spreading, achieving ideal cooking dynamics for structurally sound cookies.
Recipe Success Stories
Our community of bakers loves sharing success with these gourmet thick peanut butter cookies. Feedback often highlights family bonding time in the kitchen, with kids actively partaking in baking.
Variation successes include unique nut butter combinations and creative flavoring, from honey-drizzles to almond joy twists, showcasing readers’ enthusiasm in adapting the humble classic.
Adaptation stories reveal impressive skill in dietary changes, with vegan, keto, and gluten-free alternatives taking center stage. These variations underline the recipe’s flexibility and user-friendliness.
Reader suggestions prompt innovative interpretations of layering white chocolate or incorporating chia seeds for added benefits, a manifestation of collective creativity and resourcefulness.
Photography tips celebrate visual presentations. Readers pride in showcasing their cookies in dazzling formations and warm hues, capturing rustic appeal and personal achievements in baking.
Frequently Asked Questions
Q1: Can I use chunky peanut butter instead of creamy?
A: Yes, chunky peanut butter can add delightful texture and crunch. Just note that it will change the overall texture slightly, making the cookies a bit crumblier due to the extra nuts.
Q2: How should I store leftover cookies?
A: Store leftover cookies in an airtight container at room temperature for up to a week. Keep them away from direct sunlight to preserve freshness.
Q3: Can I freeze the cookie dough?
A: Absolutely! Freeze cookie dough scoops on a baking sheet, then transfer them to a zip-lock bag once solid. They can be baked directly from frozen, with an extra couple of minutes added to the bake time.
Q4: What alternatives can I use for eggs?
A: Substitute eggs with a flaxseed or chia seed “egg” by mixing 1 tablespoon of ground flaxseed or chia seeds with 2.5 tablespoons of water. Let it sit for a few minutes before adding to the dough.
Q5: How do I prevent my cookies from spreading too much?
A: Ensure your dough is well-chilled before baking, and use fresh baking soda. Both help maintain the cookie’s shape and thickness as they bake.
Q6: What can I add to enhance the flavor?
A: Adding a teaspoon of vanilla extract or a sprinkle of sea salt before baking can enhance flavor depth, balancing the cookie’s natural sweetness and nutty richness.
Q7: Can I bake these cookies on non-stick pans?
A: Yes, but line your pan with parchment paper for best results. This prevents cookies from over-browning and sticking, allowing consistent baking across batches.
Q8: How do I know when the cookies are done?
A: Look for lightly golden-brown edges with centers appearing slightly underbaked. They will continue to cook as they cool, achieving the perfect chewiness.
Q9: Is there a way to make these sugar-free?
A: Yes, you can substitute granulated sugar with sweetener options like stevia or erythritol, keeping an eye on altered consistencies that may arise.
Q10: Can I add chocolate chips?
A: Absolutely! Fold in a cup of your favorite chocolate chips to the dough after mixing. This yields a classic chocolate-peanut butter combination, enhancing cookie indulgence.
Q11: Why is my dough sticky?
A: Sticky dough can result from warm butter or excess mixing. Ensure accurate measuring and chill dough until slightly firm, making it easier to handle.
Q12: Can I make this dough ahead of time?
A: Yes, prepare the dough up to three days in advance, storing it in the refrigerator. Chilled dough enhances flavor development and eases preparation on baking day.
Additional Resources
For those eager to expand their baking repertoire, delve into related recipes such as classic chocolate chip cookies or vibrant oatmeal raisin creations, both embodying universal appeal.
Access comprehensive technique guides that cover essential baking principles, including the art of creaming, identifying stages of doneness, and understanding ingredient interactions for consistent results.
Explore in-depth ingredient information to broaden culinary knowledge, providing insights into the science of baking and the selection of best-fit ingredients, elevating your cookie-making skills.
Consider equipment recommendations that enhance baking success and ease, from non-stick parchment paper to essential measuring tools, each facilitating the creation of high-quality, successful cookies.
Embrace seasonal variations, incorporating regional influences or spice pairings, making your cookies endlessly adaptable. Celebrate a legacy of shared joy, reflected in every recipe variation and cultural nuance.
Join the Conversation
Dive into social media sharing to display your gourmet thick peanut butter cookie creations. Capture their golden, wholesome beauty amidst charming kitchen settings, inspiring fellow baking enthusiasts.
Celebrate photography tips to enhance cookie presentation on platforms like Pinterest or Instagram. Showcase fresh bakes in well-lit environments for truth in color and texture, making each cookie shine.
Encourage feedback and recipe reviews to fuel community growth. Your input can refine shared experience, spark new creativity, and support communal bonding over universally loved baked goods.
Explore community engagement turfs, discussing flavor experiments, resulting treats, and inventive takes on timeworn traditions—each interaction fostering connection and camaraderie.
Empower recipe variations among new bakers by sharing your culinary story. Nurture creative interpretations and inventive combinations as you celebrate each delightful culinary journey and expression of personal flair.
The Recipe
Gourmet Thick Peanut Butter Cookies
Serves: 24 cookies
Prep Time: 15 mins
Cook Time: 12 mins
Total Time: 27 mins
Kitchen Equipment Needed
- Baking sheets
- Cooling rack
- Electric mixer
- Mixing bowls
- Cookie scoop
- Measuring cups and spoons
Ingredients
- 1 cup creamy peanut butter
- 1 cup packed brown sugar
- 1/2 cup granulated sugar
- 1/2 cup unsalted butter, softened
- 2 large eggs
- 2 cups all-purpose flour
- 1 teaspoon baking powder
- 1/2 teaspoon baking soda
- 1/4 teaspoon salt
Directions
- Preheat your oven to 350°F (175°C) and line baking sheets with parchment paper.
- In a large mixing bowl, cream together peanut butter, brown sugar, granulated sugar, and butter using an electric mixer until light and fluffy.
- Add eggs one at a time, beating well after each addition.
- In a separate bowl, whisk together flour, baking powder, baking soda, and salt. Gradually add the dry ingredients to the wet ingredients, mixing until combined.
- Chill the dough in the refrigerator for at least 30 minutes.
- Use a cookie scoop to portion dough onto prepared baking sheets, spacing 2 inches apart. Flatten slightly with the palm of your hand.
- Bake for 10 to 12 minutes or until the edges are golden brown.
- Let cookies cool on the baking sheets for 5 minutes before transferring them to a cooling rack to cool completely.
Recipe Notes
- For extra flavorful cookies, consider adding a teaspoon of vanilla extract.
- If the dough is too sticky to handle, chill longer as needed to firm up.
- For crisscross patterns, press a fork into the dough balls before baking.

