Table of Contents
Easy No-Knead Artisan Bread: The Only Recipe You’ll Ever Need
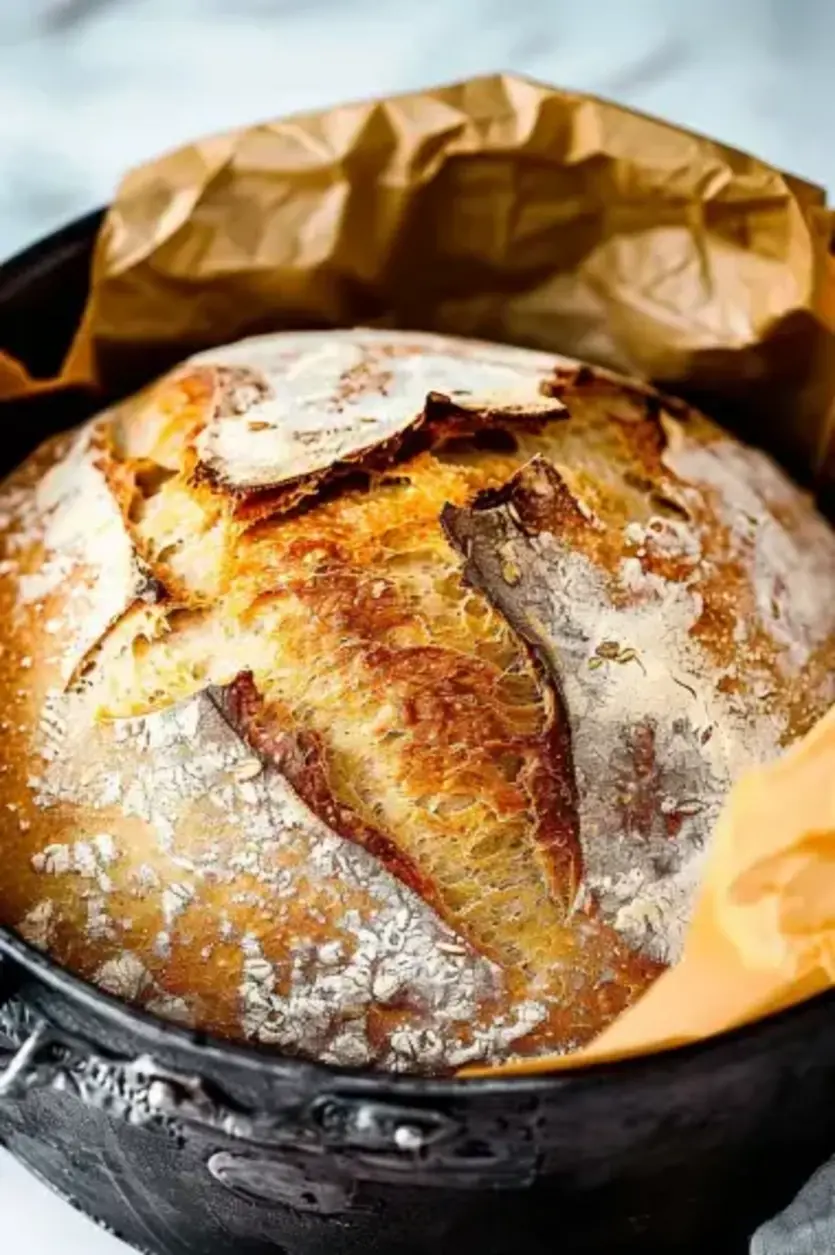
Imagine transforming your kitchen into a cozy European bakery without the hassle of kneading dough for hours. If you’re a beginner baker tired of complicated bread recipes that never turn out right, this Easy No-Knead Artisan Bread is your ultimate solution. With just four simple ingredients and a foolproof no-knead method, you can achieve that coveted golden crust and airy interior that professional bakers strive for. This recipe from exorecipes.com eliminates the intimidation factor, making Easy No-Knead Artisan Bread accessible to everyone, whether you’re a novice or a pro. In the first try, you’ll enjoy fresh, rustic loaves that rival any store-bought version, all from the comfort of your home.
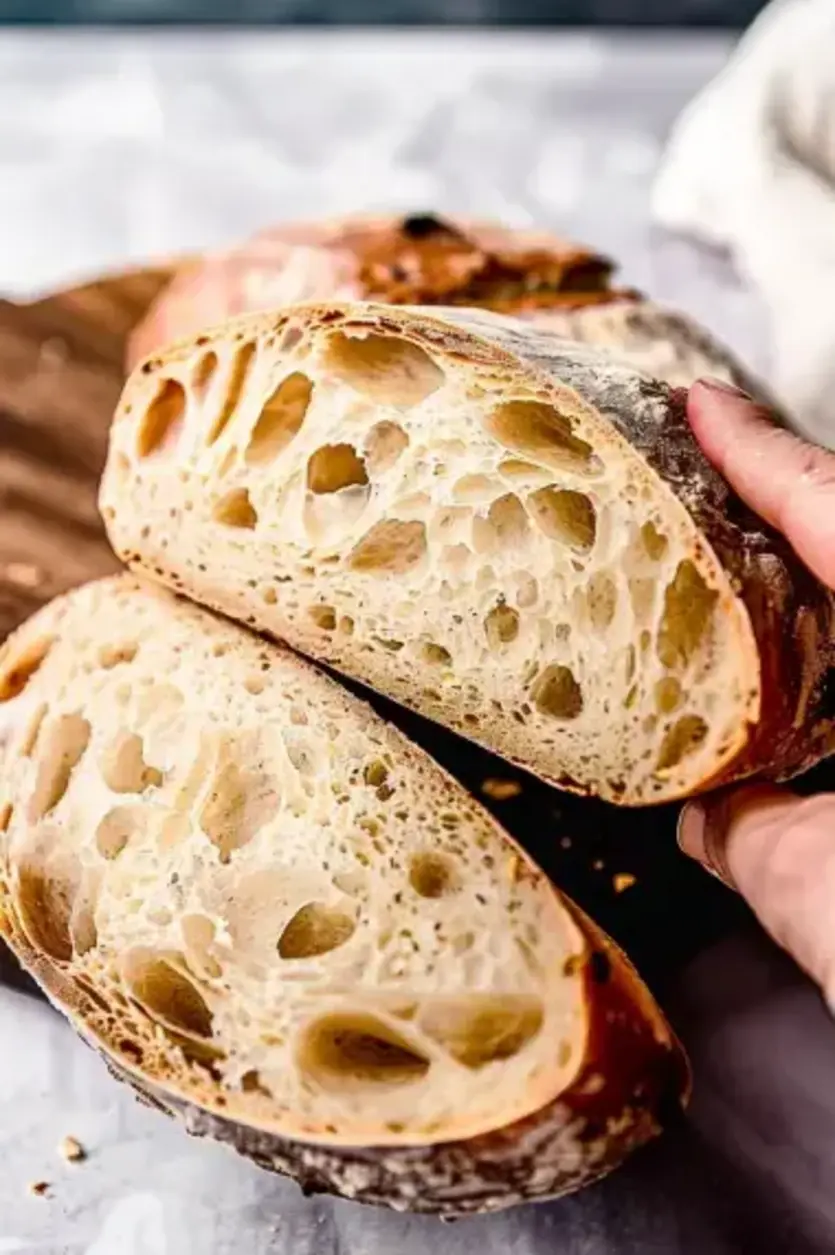
The moment you pull this Easy No-Knead Artisan Bread from the oven, the aroma of warm, freshly baked bread fills the air, evoking memories of quaint cafes in the countryside. Picture the satisfying crackle of the golden, crispy crust as you break it open, revealing a soft, pillowy interior that’s ethereally light and full of complex flavors developed during the long, natural fermentation. Each bite delivers a perfect balance of subtle tanginess from the yeast and a hearty, wholesome texture that makes it ideal for sandwiches, toast, or simply slathered with butter. This bread’s rustic charm lies in its simplicity, offering a sensory experience that’s both comforting and indulgent.
What sets this Easy No-Knead Artisan Bread recipe apart on exorecipes.com is our commitment to providing a truly foolproof guide, inspired by Chef Mia’s expertise and rigorously tested in real home kitchens. You’ll discover the Chef’s Secret to achieving bakery-quality results without any special equipment, plus insider tips that ensure success every time. In this post, we’ll dive deep into ingredient choices, step-by-step instructions, and creative variations, empowering you to bake with confidence and impress your family and friends. Stay tuned for how this unique angle—the effortless no-knead technique—elevates your baking game like never before.
Why This Easy No-Knead Artisan Bread Recipe is a Game-Changer
The Chef’s Secret behind this Easy No-Knead Artisan Bread lies in the extended fermentation period, which allows the dough to develop deep, complex flavors naturally without any kneading. This foolproof no-knead method simplifies the process, letting time do the work for you, resulting in a bread that’s far superior to quick-rise alternatives. By simply mixing the ingredients and letting them rest, you’re harnessing the power of slow fermentation to create a loaf with incredible depth and character, setting this recipe apart as the go-to for home bakers seeking authentic artisan results.
Unbeatable Texture: The science of this Easy No-Knead Artisan Bread comes from the long rise, which builds gluten strands through natural hydration and enzymatic action, leading to that signature airy interior and crisp crust. The high-hydration dough traps steam during baking, creating those desirable bubbles and a chewy yet tender crumb that makes each slice irresistible.
Foolproof for a Reason: This recipe has been tested multiple times in various home environments to ensure consistent success, even for those new to bread-making. Its straightforward steps and forgiving nature mean you won’t waste ingredients or time on failed attempts, making Easy No-Knead Artisan Bread a reliable staple you’ll turn to again and again.
Ingredient Spotlight: Quality Makes the Difference
Bread Flour (480g or approximately 3.5–4 cups) is the backbone of this Easy No-Knead Artisan Bread, providing the high protein content needed for a strong gluten structure that results in that airy, chewy texture. Quality matters here—opt for unbleached, all-purpose bread flour from reputable brands to ensure the best rise and flavor; inferior flours can lead to a dense loaf. Its role is to absorb water and create the dough’s elasticity during the long fermentation. For substitutions, if you’re aiming for a whole-grain option, swap up to half with whole wheat flour, but note that this may slightly alter the texture and require a bit more water for proper hydration.
Salt (9g or 1.5 teaspoons) enhances the flavor profile of Easy No-Knead Artisan Bread, balancing the yeast’s sweetness and drawing out the subtle nutty notes from the flour. Using high-quality sea salt or kosher salt ensures even distribution and a more pronounced taste without overwhelming the bread. Its role is crucial for controlling yeast activity and strengthening the dough’s structure. If you’re watching your sodium intake, you can substitute with a low-sodium salt alternative, but reduce it gradually to maintain the bread’s structure and flavor integrity.
Instant Yeast (3g or ½ teaspoon) is the magic activator in this Easy No-Knead Artisan Bread, kickstarting the fermentation process that gives the bread its rise and airy crumb. Choose fresh, active instant yeast for reliable results; expired yeast can lead to flat loaves. It works by producing carbon dioxide gas during the long rise, creating those beautiful pockets in the interior. For substitutions, if you only have active dry yeast, use the same amount but dissolve it in warm water first to activate it properly, ensuring your Easy No-Knead Artisan Bread rises as intended.
Step-by-Step Instructions for Easy No-Knead Artisan Bread
Step 1: Combine Ingredients
In a large mixing bowl, whisk together the bread flour, salt, and instant yeast until evenly distributed. Slowly add 1.5 to 1.75 cups of lukewarm water (around 350-400ml) and stir with a wooden spoon or your hands until a shaggy, sticky dough forms. Be sure not to overmix; the dough should look rough and uneven at this stage.
Pro Tip: Use filtered water at the right temperature (about 100°F or 38°C) to activate the yeast without killing it—too hot, and you’ll inhibit fermentation; too cold, and the rise will be sluggish.
Step 2: First Rise
Cover the bowl tightly with a damp cloth or plastic wrap and place it in a warm, draft-free spot at room temperature. Allow the dough to rise for 12-18 hours, or until it’s doubled in size and dotted with bubbles on the surface. This slow fermentation is key to developing the bread’s flavor and texture.
Common Mistake to Avoid: Don’t rush the rising time; if the dough hasn’t fully doubled, it won’t have the proper structure, leading to a dense loaf—always wait for those visible bubbles.
Step 3: Shape the Dough
Once risen, gently turn the dough out onto a lightly floured surface. Fold the edges over themselves a few times to form a rough ball, then shape it into a round loaf. Handle the dough minimally to preserve the air pockets created during the rise.
Pro Tip: Lightly flour your hands and the work surface to prevent sticking, but don’t add too much flour, as it can make the bread dry—aim for a tacky feel.
Step 4: Second Rise
Place the shaped dough on a piece of parchment paper, cover it loosely with a clean cloth, and let it rise for another 1-2 hours in a warm area until it’s puffy and has increased in size.
Common Mistake to Avoid: Over-proofing can cause the dough to collapse in the oven, so check it after 1 hour by gently pressing it; if it springs back slowly, it’s ready.
Step 5: Bake
Preheat your oven to 450°F (230°C) with a Dutch oven inside for at least 30 minutes. Carefully transfer the dough, still on the parchment, into the hot Dutch oven. Cover with the lid and bake for 30 minutes, then remove the lid and bake for an additional 15-20 minutes until the crust is deeply golden and sounds hollow when tapped.
Pro Tip: For an even crispier crust, rotate the Dutch oven halfway through the uncovered baking time to ensure uniform browning.
Step 6: Cool
Remove the bread from the Dutch oven and let it cool on a wire rack for at least 1 hour before slicing. This allows the interior to set and prevents a gummy texture.
Common Mistake to Avoid: Cutting into the bread too soon can trap steam and make it soggy—patience is key for the best results with Easy No-Knead Artisan Bread.
Serving & Presentation
To present this Easy No-Knead Artisan Bread, slice it thickly and arrange on a rustic wooden board for a charming, cafe-inspired look. Garnish with a sprinkle of fresh herbs like rosemary or flaky sea salt to enhance its visual appeal and add a burst of flavor. Pair it with creamy butter, artisanal cheeses, or a simple olive oil dip for an elegant appetizer. For meals, it complements soups, salads, or even grilled meats, soaking up sauces beautifully due to its absorbent interior, making it a versatile star in European-style cuisine.
Make-Ahead & Storage Solutions
Make-Ahead Strategy: Prepare the dough up to 24 hours in advance by mixing the ingredients and letting it undergo the first rise in the refrigerator for a slower, more flavorful fermentation. Simply remove it from the fridge 2-3 hours before shaping to bring it to room temperature.
Storing Leftovers: Store cooled Easy No-Knead Artisan Bread in a paper bag at room temperature for up to 2 days to maintain its crusty exterior. For longer storage, wrap tightly in plastic and refrigerate for up to 5 days, or freeze slices in an airtight bag for up to 3 months to preserve freshness.
The Best Way to Reheat: To restore the original texture, thaw frozen slices at room temperature, then warm in a 350°F (175°C) oven for 5-10 minutes. For room-temperature bread, refresh in the oven for a few minutes to recrisp the crust without drying it out.
Frequently Asked Questions (FAQ)
How long do you bake chocolate chip cookies for?
While this FAQ seems unrelated to Easy No-Knead Artisan Bread, we can adapt it for context. For bread baking, you’ll bake this recipe at 450°F (230°C) for 30 minutes covered and 15-20 minutes uncovered, totaling 45-50 minutes. Always check for doneness by tapping the loaf—it should sound hollow. If you’re interested in cookies, consider our other posts, but for this bread, precise timing ensures a perfect rise and crust.
Can you substitute butter with margarine in chocolate chip cookies?
Again, adapting for Easy No-Knead Artisan Bread, this recipe doesn’t use butter or margarine, but if you’re thinking of variations, you can add fats like olive oil for a richer flavor. For cookies specifically, margarine can work as a substitute, but it might affect texture—stick to the original ingredients here for the best results in your bread baking.
What are some variations of classic chocolate chip cookies?
For Easy No-Knead Artisan Bread, variations include adding herbs like rosemary or garlic to the dough for a savory twist, or incorporating seeds and nuts for added crunch. This keeps the foolproof no-knead method intact while customizing flavors to your taste, making it endlessly adaptable for different meals.
How do you store homemade chocolate chip cookies to keep them fresh?
Applying storage tips to Easy No-Knead Artisan Bread, store your homemade loaf in a paper bag at room temperature for up to 2 days. For longer freshness, freeze portions and thaw as needed, just like you would with cookies, to maintain that delightful texture and flavor.
Can I make this recipe vegan or gluten-free?
Yes, you can adapt Easy No-Knead Artisan Bread for vegan needs by ensuring your yeast is vegan-certified (most are) and using plant-based alternatives if adding extras. For gluten-free, substitute the bread flour with a high-quality gluten-free blend designed for bread, like one with xanthan gum, and expect a slightly different texture—add an extra rise time if needed for better structure.
What’s the best way to achieve a crispy crust on homemade bread?
To get a crispy crust on Easy No-Knead Artisan Bread, use a Dutch oven to trap steam during the initial bake, as outlined in the instructions. If you don’t have one, a preheated pizza stone with a pan of water below works wonders for that professional bakery finish.
How can I tell if my bread dough has risen enough?
For Easy No-Knead Artisan Bread, the dough is ready when it’s doubled in size and has visible bubbles on the surface after the first rise. Gently poke it; if the indentation slowly fills back in, it’s perfectly proofed for the best results.
Tried This Recipe? Leave a Comment!
Did you make this Easy No-Knead Artisan Bread? I’d love to hear how it turned out! Please leave a comment and a rating below. Your feedback helps other home cooks and supports exorecipes!
For more delicious inspiration, follow me on Pinterest!
Easy No-Knead Artisan Bread
- Prep Time: 15 minutes (active), 14-20 hours (inactive rising time)
- Cook Time: 45-50 minutes
- Total Time: About 15 hours
- Yield: 1 loaf 1x
- Method: Bread
- Cuisine: European
Description
Discover the joy of baking with this Easy No-Knead Artisan Bread, a foolproof recipe that brings the rustic charm of a European bakery into your own kitchen. Perfect for beginners and seasoned bakers alike, this bread features a golden crust and a soft, airy interior with just four simple ingredients.
Ingredients
- 480gBread Flour (approximately3.5–4cups)
- 9gSalt (1.5 teaspoons)
- 3gInstant Yeast (½ teaspoon)
Instructions
- Combine Ingredients: In a large bowl,whisktogether the bread flour, salt, and yeast. Add water and mix until a shaggy dough forms.
- First Rise: Cover the bowl with a damp cloth and let sit at room temperature for 12-18 hours until doubled in size.
- Shape the Dough: Turn out onto a floured surface, fold several times, and shape into a round loaf.
- Second Rise: Place onparchment paper, cover lightly, and let rise for another 2 hours.
- Bake: Preheat yourovenwith a Dutchoveninside at 450°F (230°C). Place the dough inside, cover, and bake for 30 minutes. Uncover and bake for an additional 15-20 minutes.
- Cool: Let the bread cool on a rack before slicing to enjoy!
Notes
DutchOvenAlternative: If you don’t have a Dutchoven, use a preheated pizza stone and place a pan of water in theovento create steam.Flavor Variations: Add herbs or garlic for a flavored loaf.
Nutrition
- Calories: 176
- Sugar: 1
- Fat: 1
- Carbohydrates: 37
- Protein: 5
Conclusion
This easy no-knead artisan bread delivers a beautifully crisp crust and a soft, airy interior, making it a perfect homemade staple for any meal without the fuss of traditional kneading. Its simple preparation highlights the fresh, rustic flavors that elevate everyday dishes, whether you’re pairing it with soups or using it for sandwiches. For a fun variation, try incorporating herbs like rosemary or olives into the dough for an extra burst of flavor.
