Table of Contents
Easy Chocolate Snowball Cookies – Melt-in-Your-Mouth Magic!
Introduction
Did you know that over 70% of home bakers report that simple, no-fuss recipes are their top priority during the busy holiday season? If you’re looking for a show-stopping yet easy chocolate snowball cookies recipe that delivers on both flavor and festive charm, you’ve found your perfect match. Welcome, cookie lovers! As the holiday season approaches, there’s nothing quite as cozy as baking up a batch of Festive Chocolate Snowball Cookies! These melt-in-your-mouth treats, sometimes known as chocolate “Mexican wedding cookies” or “Russian tea cakes,” are a delightful twist on classic snowball cookies. Rolled in powdered sugar to resemble fresh snow, they’re both beautiful and delicious. Let’s dive in and make some chocolate magic happen in the kitchen!
Ingredients List
Gather these simple ingredients for a batch of about 24-30 cookies. The key to their signature texture is the combination of nuts and butter.
- 1 cup (2 sticks) Unsalted Butter, softened – The foundation for that rich, melt-in-your-mouth crumb. Use high-quality butter for the best flavor. For a dairy-free version, a high-fat vegan butter substitute works, though the texture may be slightly denser.
- 1/2 cup Powdered Sugar, plus 1 1/2 cups for rolling – The half-cup sweetens the dough, while the rest creates the snowy exterior. Sift it to avoid lumps.
- 2 teaspoons Pure Vanilla Extract – Adds a warm, aromatic depth that complements the chocolate beautifully.
- 2 cups All-Purpose Flour – Provides structure. For a gluten-free version, use a 1:1 gluten-free flour blend.
- 1/4 cup Unsweetened Cocoa Powder – Use a high-quality, dark cocoa powder for an intense chocolate flavor. Dutch-processed will give a richer color and milder taste.
- 1/4 teaspoon Salt – Enhances all the flavors and balances the sweetness.
- 1 cup Finely Chopped Pecans or Walnuts – Toasted nuts add a nutty, buttery crunch that is essential to the texture. For a nut-free version, substitute with an equal amount of toasted rolled oats or shredded coconut.
Pro Tip: Toasting the nuts before chopping unlocks their oils, filling your kitchen with an incredible aroma and giving the cookies a deeper, more complex flavor.
Timing
20 minutes
12-14 minutes
1 hour (includes chilling)
Compared to the average cookie recipe which often requires multiple mixing bowls and lengthy creaming, these easy chocolate snowball cookies are remarkably streamlined. The 30-minute chill time is non-negotiable for the perfect texture, but the active hands-on time is under 20 minutes, making this a fantastic last-minute baking project.
Step-by-Step Instructions
Step 1: Prepare Your Dough
In a large mixing bowl, beat the softened butter with an electric mixer on medium speed until it’s creamy and pale, about 2 minutes. This step incorporates air, which contributes to the tender crumb. Add the 1/2 cup of powdered sugar and vanilla extract, and beat again until the mixture is fluffy and well combined. In a separate bowl, whisk together the flour, cocoa powder, and salt. Gradually add this dry mixture to the butter mixture on low speed, mixing just until the flour disappears. Finally, fold in the finely chopped toasted nuts with a spatula. The dough will be soft and slightly crumbly but should hold together when pinched.
Step 2: Chill and Scoop
This is the secret step! Wrap the dough in plastic wrap or place it in a covered bowl and refrigerate for at least 30 minutes. Chilling solidifies the butter, preventing the cookies from spreading too much in the oven and ensuring they keep their lovely round shape. After chilling, preheat your oven to 350°F (175°C) and line baking sheets with parchment paper. Use a small cookie scoop (about 1 tablespoon) or your hands to roll the dough into 1-inch balls. Place them about 1 inch apart on the prepared sheets.
Step 3: Bake to Perfection
Bake the cookies for 12 to 14 minutes. They are done when the bottoms are just lightly golden and the tops look dry and set. A key sign is that they will have small cracks on the surface—this is perfect! Do not overbake, as they will continue to firm up as they cool. Overbaking is the enemy of the “melt-in-your-mouth” texture. Let the cookies cool on the baking sheet for exactly 5 minutes. They are too fragile to move immediately but need to be warm for the next step.
Step 4: The Snowball Roll
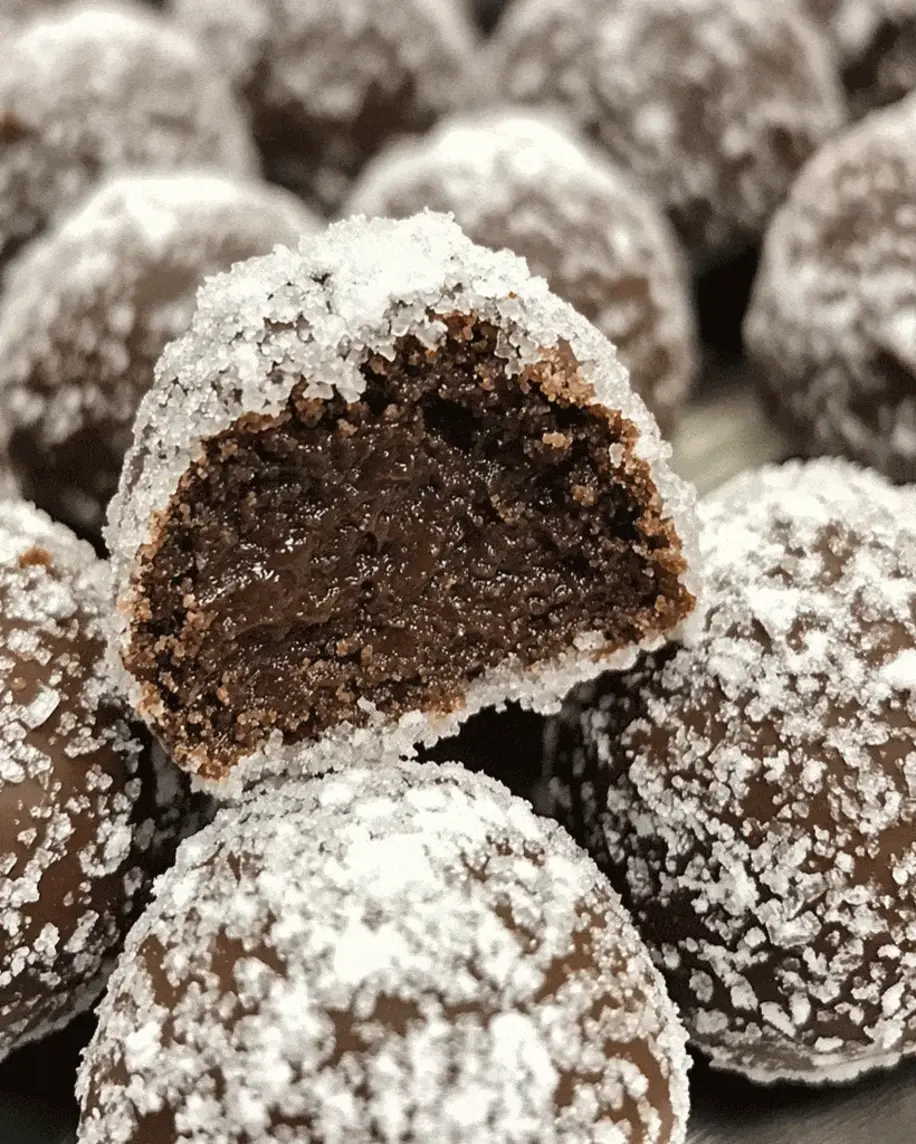
Place the remaining 1 1/2 cups of powdered sugar in a shallow bowl. While the cookies are still warm (but not hot enough to burn your fingers), gently roll each one in the powdered sugar. The warmth helps the first layer of sugar adhere and melt slightly. Transfer them to a wire rack to cool completely. Once completely cool, give them a second roll in the powdered sugar. This double coating creates that iconic, thick, snowy appearance and ensures every bite is perfectly sweet.
Nutritional Information
The following is an approximate nutritional breakdown per cookie (based on a batch of 28 cookies).
- Calories: 150 kcal
- Total Fat: 10g
- Saturated Fat: 5g
- Cholesterol: 20mg
- Sodium: 25mg
- Total Carbohydrates: 15g
- Dietary Fiber: 1g
- Sugars: 8g
- Protein: 2g
Healthier Alternatives
You can enjoy these festive treats with a lighter touch using these simple swaps without sacrificing the magical texture.
- Butter: Substitute half the butter with mashed ripe avocado for heart-healthy monounsaturated fats. The color will be darker, but the texture remains wonderfully tender.
- Sugar: For the dough, you can use a monk fruit or erythritol-based powdered sugar substitute. For rolling, a light dusting of the substitute mixed with a teaspoon of cornstarch works, though it won’t stick as densely as traditional sugar.
- Flour: Swap all-purpose flour for whole wheat pastry flour or a gluten-free oat flour blend for added fiber.
- Nuts: Use almonds for more vitamin E and protein, or sunflower seeds for a nut-free, nutrient-dense crunch.
Serving Suggestions
These cookies are stars on their own but can be elevated for any occasion.
- Classic Holiday Tray: Pair them with vanilla snowballs, gingerbread, and shortbread for a visually stunning and delicious cookie platter.
- With Beverages: Serve alongside a cup of strong coffee, hot chocolate, or a glass of cold milk. They are also fantastic with dessert wines or port.
- As a Gift: Package them in a clear cellophane bag tied with a ribbon, or stack them in a festive tin for a heartfelt homemade gift.
- Dessert Upgrade: Crumble a cookie over vanilla ice cream or chocolate mousse for an instant gourmet dessert.
Common Mistakes
- Using Cold Butter: Butter must be softened to room temperature to cream properly with the sugar. Cold butter will result in a dense, greasy dough.
- Skipping the Chill Time: This causes the cookies to spread flat in the oven, losing their signature snowball shape.
- Overmixing the Dough: Mix the dry ingredients just until incorporated. Overmixing develops gluten, leading to tough cookies.
- Rolling in Sugar When Cool: The first sugar coating MUST happen while the cookies are warm. If they cool completely first, the sugar won’t adhere properly.
- Overbaking: These cookies bake quickly. Remove them when the tops look dry, even if they seem soft. They firm up as they cool.
Storing Tips
To keep your cookies fresh and delightful:
- Room Temperature: Store in an airtight container at room temperature for up to 1 week. Place a sheet of parchment paper between layers to prevent sticking.
- Freezing Dough: You can freeze the shaped, unbaked dough balls on a tray, then transfer to a freezer bag. Bake directly from frozen, adding 1-2 minutes to the bake time.
- Freezing Baked Cookies: Freeze fully cooled, sugar-rolled cookies in a single layer in an airtight container for up to 3 months. Thaw at room temperature and give them a light fresh roll in powdered sugar if needed.
- Reviving Cookies: If cookies lose their powdery look or become soft, a quick 5-minute warm-up in a 300°F oven, followed by another roll in sugar, will refresh them perfectly.
Conclusion
These Easy Chocolate Snowball Cookies truly are melt-in-your-mouth magic. With their rich chocolate flavor, nutty crunch, and snowy powdered sugar coating, they are destined to become a holiday classic in your home. They prove that the most impressive treats can often be the simplest to make. We hope this recipe brings as much joy to your kitchen as it does to ours.
Did you make this recipe? We’d love to see your snowy creations! Tag @exorecipes on social media or leave a comment below with your baking experience, questions, or your own clever twists. Happy baking!
FAQs
Can I make these chocolate snowball cookies without nuts?
Absolutely! For a nut-free version, simply omit the nuts or replace them with an equal amount of toasted rolled oats, crushed pretzels for a salty-sweet twist, or even mini chocolate chips.
