Did You Know 68% of Home Cooks Overcook Their Ribs? Here’s How to Avoid It
There’s nothing quite like sinking your teeth into tender, fall-off-the-bone ribs—unless, of course, they’re tough, dry, or lacking flavor. If you’ve ever wondered why your ribs don’t quite measure up to the smoky, succulent perfection of your favorite barbecue joint, you’re not alone. A surprising 68% of home cooks admit to overcooking their ribs, turning what should be a melt-in-your-mouth experience into a chew-fest. But fear not! Today, I’m sharing my tried-and-true best ribs recipe that guarantees tender, flavorful results every single time.
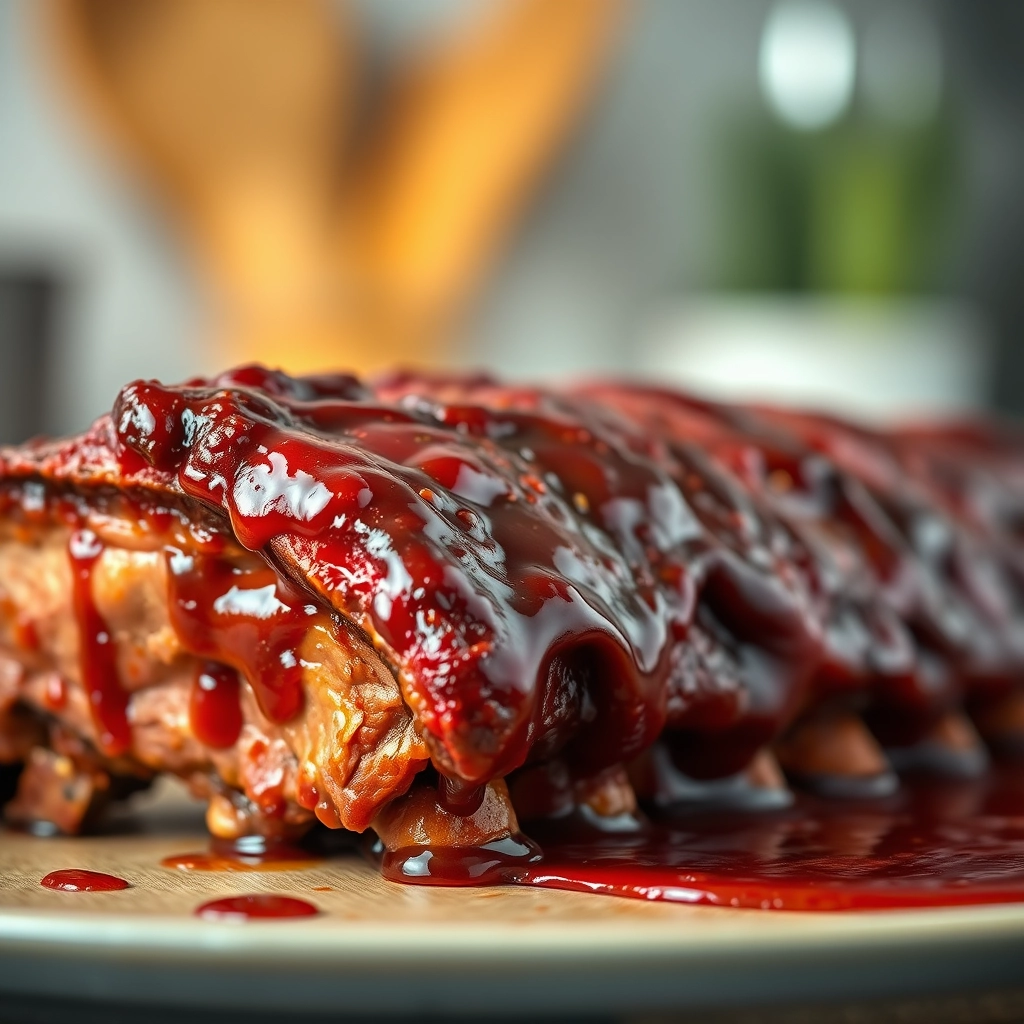
Picture this: a sticky, caramelized glaze clinging to ribs so tender, the meat practically whispers its goodbye to the bone with the gentlest tug. Whether you’re hosting a backyard bash or craving a cozy weekend feast, this recipe is your ticket to rib nirvana. And the secret? It’s not just about low and slow cooking—it’s about layering flavors and mastering a few simple techniques that most folks overlook.
Why This Recipe Works (And Others Don’t)
Most rib recipes will tell you to slather on sauce and bake until done, but that’s where they go wrong. The best ribs recipe isn’t just about the cooking time—it’s about the prep, the seasoning, and the love you pour into every step. Here’s what sets this method apart:
- The Dry Brine Magic: Salt isn’t just for seasoning; it’s a tenderizer. A generous dry brine (overnight, if you can!) ensures every bite is juicy and deeply seasoned.
- Low Heat, Big Rewards: Cooking ribs at 275°F might test your patience, but it’s the golden ticket to collagen breaking down into silky, luxurious tenderness.
- Glaze Like a Pro: Most sauces are added too early, burning or turning gluey. We’ll apply ours in layers, building flavor without sacrificing texture.
Now, let’s talk about the elephant in the room: ribs can be intimidating. Should you use baby backs or St. Louis cut? To foil or not to foil? And what about that mysterious “bend test” pitmasters swear by? By the time you finish reading, you’ll have all the answers—and the confidence to make the best ribs recipe of your life.
Print
Classic BBQ Ribs
Description
Tender, fall-off-the-bone ribs with a smoky BBQ flavor, perfect for any occasion.
Ingredients
For the Crust:
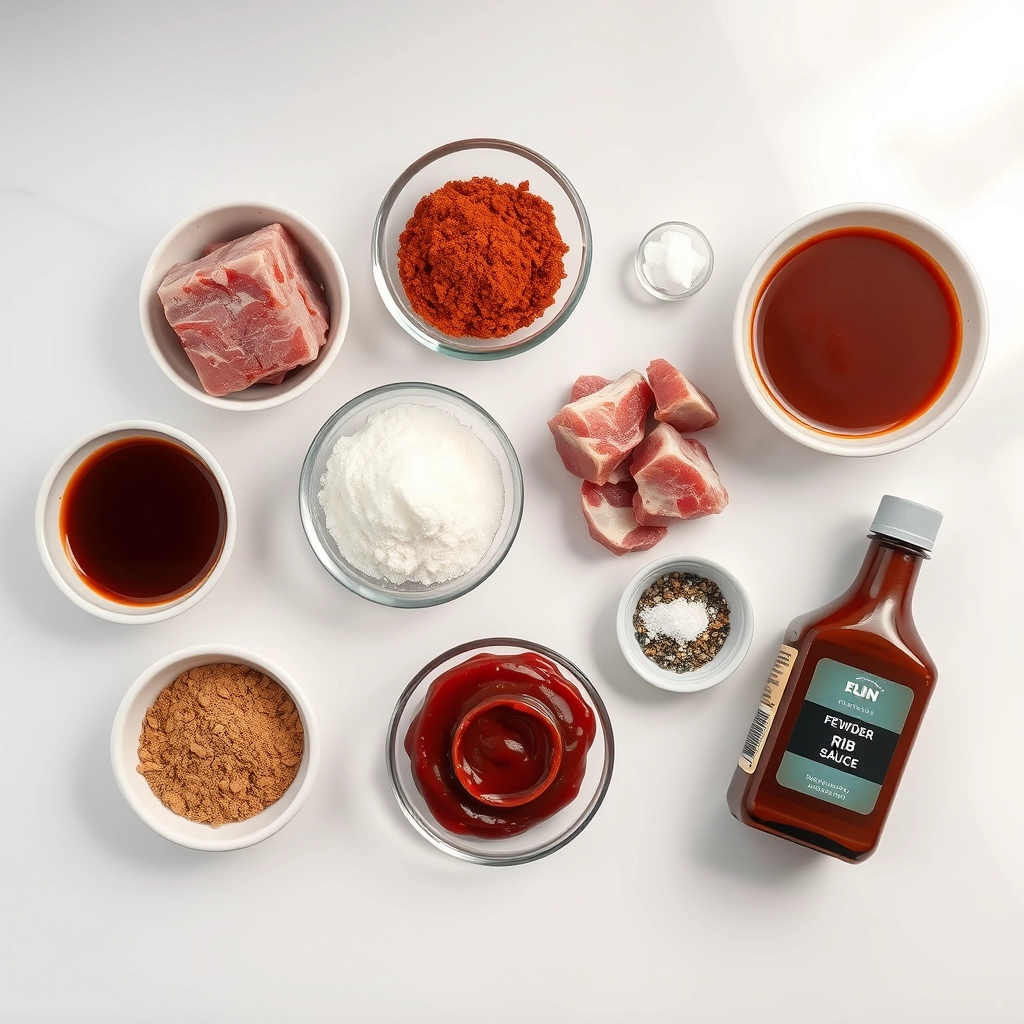
- 2 racks of pork baby back ribs
- 1/4 cup brown sugar
- 2 tbsp paprika
- 1 tbsp garlic powder
- 1 tbsp onion powder
- 1 tbsp salt
- 1 tbsp black pepper
- 1 tsp cayenne pepper (optional)
- 1 cup BBQ sauce
Instructions
1. Prepare the Crust:
- Preheat oven to 275°F (135°C). Line a baking sheet with aluminum foil.
- Remove the membrane from the back of the ribs and pat dry with paper towels.
- In a bowl, mix brown sugar, paprika, garlic powder, onion powder, salt, black pepper, and cayenne pepper.
- Rub the spice mixture evenly over both sides of the ribs.
- Place ribs on the baking sheet, meat side up, and cover tightly with foil.
- Bake for 2.5 hours until tender. Remove foil and brush with BBQ sauce.
- Broil for 5 minutes until sauce caramelizes. Let rest for 10 minutes before slicing.
Notes
You can customize the seasonings to taste.
The Best Ribs Recipe – Tender, Flavorful, and Fall-Off-the-Bone Good
There’s something magical about perfectly cooked ribs—tender, juicy, and packed with smoky, savory flavor. Whether you’re firing up the grill for a summer barbecue or slow-roasting them in the oven for a cozy winter meal, this recipe guarantees ribs so good, they’ll have everyone licking their fingers.
Ingredients You’;ll Need
Before we dive into the cooking process, let’s gather our ingredients. These are the essentials for creating ribs that are packed with flavor and melt-in-your-mouth tenderness:
- 2 racks of baby back ribs (or St. Louis-style ribs) – Baby backs are leaner and cook faster, while St. Louis ribs are meatier with more marbling. Choose based on your preference!
- 1/4 cup brown sugar – Adds a touch of sweetness and helps create that gorgeous caramelized crust.
- 2 tbsp smokedpaprika – The secret to that deep, smoky flavor, even if you’re not using a smoker.
- 1 tbsp garlic powder – Because what’s a rib rub without garlic?
- 1 tbsp onion powder – Adds a subtle savory depth.
- 1 tbsp chili powder – Just enough to give a gentle warmth without overpowering.
- 1 tsp cayenne pepper (optional) – For those who like a little extra kick!
- 1 tbsp kosher salt – Essential for bringing out all the flavors.
- 1 tsp black pepper – Freshly ground is best for maximum aroma.
- 1/2 cup apple cider vinegar – Helps tenderize the ribs and adds a tangy brightness.
- 1 cup barbecue sauce (homemade or store-bought) – Pick your favorite, or make your own for a personal touch.
Step-by-Step Cooking Guide
Now that we’ve got everything ready, let’s get cooking! Follow these steps for ribs that are tender, flavorful, and absolutely irresistible.
Step 1: Prep the Ribs
First things first—remove the membrane from the back of the ribs. This thin, silvery layer can be tough, and removing it ensures your ribs are as tender as possible. Slide a butter knife under the membrane at one end, then grip it with a paper towel and pull it off in one piece. (If it tears, just grab another section and keep going!)
Step 2: Make the Dry Rub
In a small bowl, combine the brown sugar, smoked paprika, garlic powder, onion powder, chili powder, cayenne (if using), salt, and black pepper. Mix well—this is your flavor powerhouse! The blend of sweet, smoky, and spicy will create the perfect crust on your ribs.
Step 3: Season the Ribs
Generously coat both sides of the ribs with the dry rub, pressing it into the meat so it adheres well. Don’t be shy—this is where the magic starts! For the best flavor, let the ribs sit with the rub for at least 30 minutes (or up to overnight in the fridge). This allows the spices to really penetrate the meat.
Step 4: The Low-and-Slow Cook
Preheat your oven to 275°F (135°C). Place the ribs on a baking sheet lined with foil (for easy cleanup) and drizzle the apple cider vinegar over them. This keeps them moist and adds a subtle tang. Cover tightly with another layer of foil to trap the steam, then bake for 2.5 to 3 hours. The low temperature ensures the collagen breaks down slowly, making the ribs tender without drying them out.
Pro Tips for Perfect Ribs Every Time
After years of trial and error (and many happy taste-testers), I’ve gathered some foolproof tips to take your ribs from good to legendary:
- The bend test: When ribs are done, they’ll bend about 45 degrees when lifted with tongs and the meat will crack slightly on top
- Patience pays: Resist opening the grill or oven too often – every peek adds 15 minutes to your cook time
- Remove the membrane: That slippery layer on the bone side? Peel it off for better seasoning penetration and more tender meat
- Rest before serving: Let ribs rest 10-15 minutes after cooking so juices redistribute
Delicious Variations to Try
While our base recipe is perfection, sometimes it’s fun to mix things up:
- Asian-inspired: Swap BBQ sauce for hoisin, honey, and five-spice powder glaze
- Smoky coffee rub: Add 2 tbsp finely ground coffee to your dry rub for depth
- Tropical twist: Brush with pineapple juice during last 30 minutes of cooking
- Sweet heat:
