Air Fried Pearl Onions

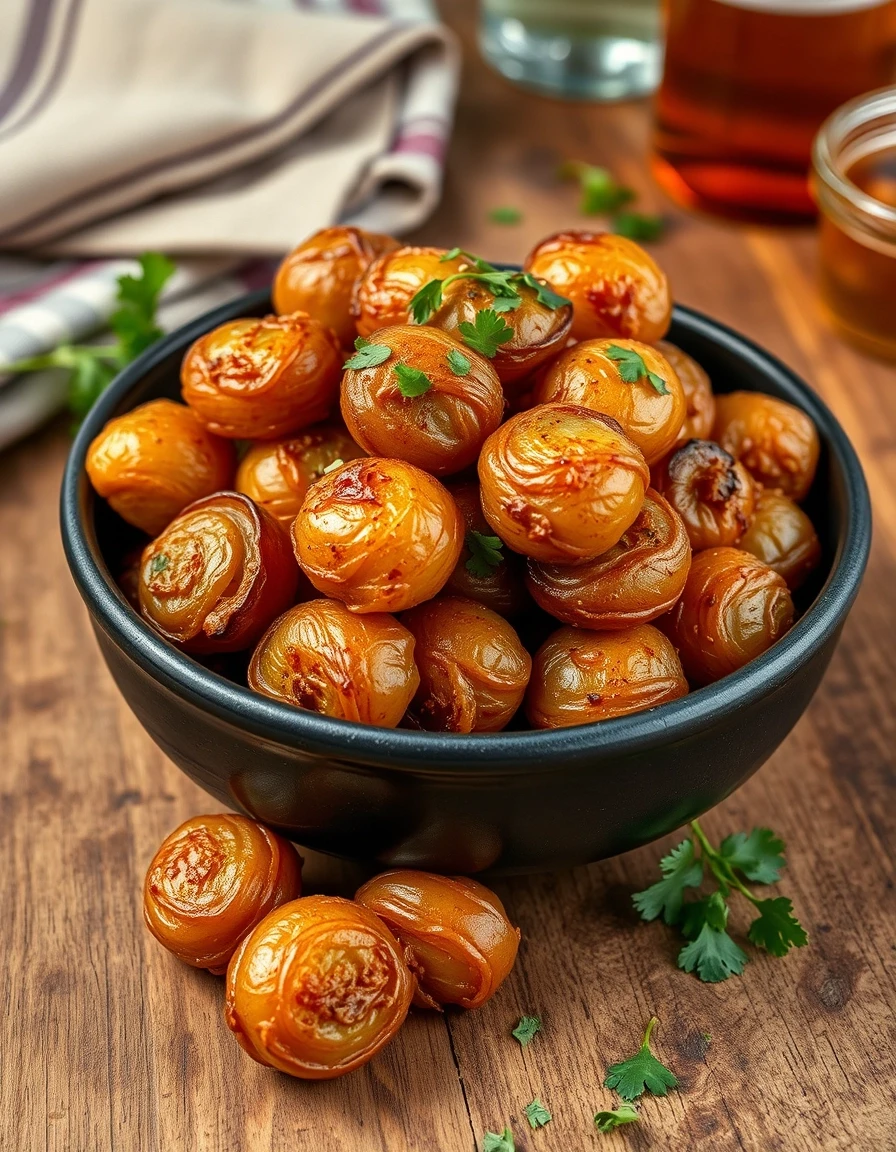
Air Fried Pearl Onions: Crispy, Sweet, and Irresistibly Easy

There’s something magical about pearl onions—their petite size, delicate sweetness, and ability to transform into golden, caramelized bites with minimal effort. And when you toss them into the air fryer? Pure kitchen sorcery happens. Whether you’re looking for a quick side dish, a salad topper with crunch, or a snack that’s equal parts fancy and fuss-free, these air fried pearl onions deliver every time.

I first fell for pearl onions during a cozy winter dinner party, where they were nestled in a creamy gratin. But let’s be honest: peeling them felt like a tiny kitchen workout. Enter the air fryer, my trusty shortcut to crispy perfection. No tedious peeling (thanks, frozen pearl onions!), no babysitting a skillet, and no guilt over devouring half the batch straight from the basket. If you’ve ever wondered how to turn these little alliums into a crave-worthy treat, you’re in the right place.

Why You’ll Love Air Fried Pearl Onions

Here’s why this recipe deserves a spot in your rotation:

  • Effortless: Skip the peeling—frozen pearl onions work beautifully.
  • Versatile: Toss them in salads, grain bowls, or serve alongside roasted meats.
  • Meal-prep friendly: Make a big batch to use all week.
  • Kid-approved: Their sweet, crispy texture is a hit with little eaters.

How to Make Air Fried Pearl Onions

Ingredients

  • 1 lb frozen pearl onions (no need to thaw)
  • 1 tbsp olive oil or avocado oil
  • ½ tsp garlic powder
  • ½ tsp smoked paprika (optional for a smoky kick)
  • Salt and black pepper to taste
  • Fresh thyme or parsley for garnish (optional)

Instructions

  1. Toss: In a bowl, combine pearl onions, oil, garlic powder, smoked paprika, salt, and pepper.
  2. Air fry: Spread onions in a single layer in the air fryer basket. Cook at 400°F for 12–15 minutes, shaking the basket halfway, until deeply golden.
  3. Serve: Garnish with herbs if desired. Enjoy warm!

Tips for the Best Results

Want to level up your onions? Try these tricks:

  • Double the batch: They disappear fast! Store leftovers in the fridge for up to 3 days.
  • Add a drizzle: Finish with balsamic glaze or honey for extra sweetness.
  • Mix flavors: Toss in rosemary or a pinch of cayenne for variety.

Pro tip: If using fresh pearl onions, blanch them in boiling water for 30 seconds to make peeling easier. Check out my guide to air fryer vegetables for more inspiration!

Ways to Serve Air Fried Pearl Onions

These little gems shine in so many dishes:

  • Scattered over creamy mashed potatoes for texture.
  • Mixed into grain bowls with roasted veggies and tahini.
  • As a topping for steak or pork chops (trust me, it’s a game-changer).

Frequently Asked Questions

Can I use fresh pearl onions instead of frozen?
Absolutely! Blanch them first to loosen the skins, then pat dry before air frying.

How do I prevent the onions from sticking to the basket?
Lightly coat the basket with oil or use parchment paper designed for air fryers.

What’s the best air fryer temperature for pearl onions?
400°F ensures crispy edges without burning. Adjust time based on your air fryer model.

Can I make these oil-free?
Yes, though they’ll be less crispy. Try spritzing with broth instead.

Are pearl onions the same as shallots?
No—pearl onions are smaller and sweeter. Learn more about onion varieties from Bon Appétit.

Can I freeze air fried pearl onions?
Yes! Freeze in a single layer, then transfer to a bag for up to 2 months. Reheat in the air fryer.

There you have it—a recipe that’s as easy as it is delicious. Whether you’re hosting a dinner party or just craving a savory snack, these air fried pearl onions are your new secret weapon. And if you’re anything like me, you’ll be sneaking a few (or ten) straight from the basket. For more air fryer magic, try my crispy Brussels sprouts next. Happy cooking!

Print
clock clock iconcutlery cutlery iconflag flag iconfolder folder iconinstagram instagram iconpinterest pinterest iconfacebook facebook iconprint print iconsquares squares iconheart heart iconheart solid heart solid icon

Air Fried Pearl Onions

  • Author: Chef AirFryMaster

Description

Crispy, caramelized pearl onions made effortlessly in the air fryer. Perfect as a side dish, salad topper, or snack!


Ingredients

Scale

For the Crust:

  • For the onions:
  • 1 pound pearl onions, peeled
  • 1 tablespoon olive oil
  • 1/2 teaspoon salt
  • 1/4 teaspoon black pepper
  • For the optional seasoning:
  • 1/2 teaspoon garlic powder
  • 1/4 teaspoon smoked paprika
  • 1 tablespoon chopped fresh parsley (for garnish)

Instructions

1. Prepare the Crust:

  1. 1. Preheat air fryer to 375°F (190°C).
  2. 2. In a bowl, toss peeled pearl onions with olive oil, salt, and pepper (and optional garlic powder/paprika if using).
  3. 3. Arrange onions in a single layer in the air fryer basket (work in batches if needed).
  4. 4. Air fry for 12-15 minutes, shaking the basket every 5 minutes, until golden brown and crispy.
  5. 5. Garnish with fresh parsley before serving.

Notes

For easier peeling, blanch pearl onions in boiling water for 1 minute, then transfer to ice water. The skins will slide off easily.

Air Fryer Blooming Onion


Air Fryer Blooming Onion: A Crispy, Healthier Twist on a Classic

There’s something undeniably fun about a blooming onion—the crispy petals, the savory seasoning, the way it’s meant to be shared (though no judgment if you keep it all to yourself). But let’s be honest: deep-frying at home can feel messy, intimidating, and let’s not forget, a little heavy on the guilt. That’s where the air fryer swoops in like a kitchen superhero. This Air Fryer Blooming Onion gives you all the crunch and flavor of the original, with a fraction of the oil and effort.

I first tried making this for a game night with friends, and let’s just say the platter was empty before the first quarter ended. The best part? Unlike the traditional version, there’s no vat of oil to deal with afterward—just a quick wipe of the air fryer basket. Whether you’re hosting a party, craving a snacky dinner (we’ve all been there), or just want to impress your family with your culinary flair, this recipe is a winner. Plus, it’s a sneaky way to make veggies the star of the show!

Why You’ll Love This Air Fryer Blooming Onion

If you’re still on the fence about whether to try this recipe, here are a few reasons it’s about to become your new favorite:

  • Healthier but just as crispy: Air frying uses up to 80% less oil than deep-frying.
  • Quick and easy: No thermometer, no splatter, no fuss.
  • Versatile: Pair it with ranch, spicy mayo, or even a homemade BBQ sauce.
  • Crowd-pleaser: Perfect for parties, game days, or treat yourself moments.

How to Make an Air Fryer Blooming Onion

Don’t let the fancy look fool you—this recipe is simpler than it seems. Here’s how to nail it:

Ingredients You’ll Need

  • 1 large sweet onion (like Vidalia)
  • 1/2 cup all-purpose flour
  • 1 tsp paprika
  • 1 tsp garlic powder
  • 1/2 tsp cayenne pepper (adjust to taste)
  • 1/2 cup buttermilk (or milk + 1 tsp vinegar)
  • Cooking spray or olive oil
  • Salt to taste

Step-by-Step Instructions

  1. Prep the onion: Cut off the top (not the root end!), peel it, then make vertical cuts to create petals. Gently spread them open.
  2. Dredge: Dip the onion in buttermilk, then coat evenly with the flour-spice mixture.
  3. Air fry: Spray the onion with oil, place it in the air fryer basket, and cook at 375°F for 12–15 minutes until golden.
  4. Serve: Sprinkle with salt and dig in while it’s hot!

Tips for the Perfect Blooming Onion

  • Use a sharp knife and a steady hand for even petals.
  • If the flour isn’t sticking, dip the onion in buttermilk again before coating.
  • For extra crispiness, spritz the petals lightly with oil before air frying.
  • Pair it with other air fryer favorites like crispy chicken wings for a full spread.

Frequently Asked Questions

Can I use a different type of onion?

Sweet onions like Vidalia work best for their mild flavor, but yellow onions will do in a pinch.

How do I store leftovers?

Store in an airtight container in the fridge for up to 2 days. Reheat in the air fryer for 3–4 minutes to revive the crispiness.

Can I make this gluten-free?

Absolutely! Swap the flour for a gluten-free blend or almond flour.

Why is my blooming onion falling apart?

Make sure not to cut through the root end—it’s what holds the onion together. For more tips, check out this guide on cutting onions.

What dipping sauces work best?

Classic ranch, spicy sriracha mayo, or even a tangy avocado crema are delicious.

Can I make this in the oven?

Yes! Bake at 400°F on a wire rack for 20–25 minutes, flipping halfway.

There you have it—a blooming onion that’s as fun to make as it is to eat. Whether you’re serving it up for a party or just because you deserve something crispy and delicious, this air fryer version is sure to impress. And hey, if you accidentally eat the whole thing yourself? We won’t tell. For more easy air fryer recipes, check out our air fryer hacks to make weeknights a breeze!


Print
clock clock iconcutlery cutlery iconflag flag iconfolder folder iconinstagram instagram iconpinterest pinterest iconfacebook facebook iconprint print iconsquares squares iconheart heart iconheart solid heart solid icon

Air Fryer Blooming Onion

  • Author: Chef Alex

Description

A crispy, golden blooming onion made healthier in the air fryer with a flavorful seasoned coating and a delicious dipping sauce. Perfect as an appetizer or party snack!


Ingredients

Scale

For the Crust:

  • For the Blooming Onion:
  • 1 large sweet onion (such as Vidalia)
  • 1 cup buttermilk
  • 1 cup all-purpose flour
  • 1 teaspoon paprika
  • 1 teaspoon garlic powder
  • 1 teaspoon onion powder
  • 1/2 teaspoon cayenne pepper (optional)
  • 1/2 teaspoon salt
  • 1/4 teaspoon black pepper
  • For the Dipping Sauce:
  • 1/2 cup mayonnaise
  • 2 tablespoons ketchup
  • 1 tablespoon horseradish
  • 1/2 teaspoon paprika
  • 1/4 teaspoon garlic powder
  • 1/4 teaspoon salt

Instructions

1. Prepare the Crust:

  1. 1. Prepare the onion: Peel the onion and cut about 1/2 inch off the top. Leave the root end intact.
  2. 2. Turn the onion upside down (root side up). Make 4 vertical cuts downward, dividing the onion into quarters, but stop about 1/2 inch from the root to keep it intact.
  3. 3. Make 3-4 more cuts between each quarter to create 16-20 ‘petals.’ Gently separate the layers.
  4. 4. Soak the onion in buttermilk for at least 30 minutes (or up to 2 hours) to tenderize and help the coating stick.
  5. 5. Preheat the air fryer to 375°F (190°C).
  6. 6. In a bowl, mix flour, paprika, garlic powder, onion powder, cayenne, salt, and black pepper.
  7. 7. Remove the onion from buttermilk, letting excess drip off. Dredge in the flour mixture, ensuring all layers are coated. Shake off excess.
  8. 8. Spray the air fryer basket with oil. Place the onion root-side down in the basket. Lightly spray the onion with oil.
  9. 9. Air fry for 12-15 minutes until golden and crispy. Check halfway and respray if needed.
  10. 10. Make the dipping sauce: Mix mayonnaise, ketchup, horseradish, paprika, garlic powder, and salt in a small bowl.
  11. 11. Serve the blooming onion hot with the dipping sauce.

Notes

For extra crispiness, double-dip the onion in buttermilk and flour mixture. If petals stick together during cooking, gently separate them with tongs. Adjust cayenne for desired spiciness.

Bloomin’ Onion Bites with Dipping Sauce

Bloomin’ Onion Bites with Dipping Sauce: A Crowd-Pleasing Appetizer

There’s something undeniably magical about the crispy, golden layers of a Bloomin’ Onion—especially when it’s bite-sized and served with a tangy dipping sauce. Whether you’re hosting a game-day gathering, a casual get-together, or just craving a fun snack, these Bloomin’ Onion Bites are guaranteed to disappear fast. They’re crunchy on the outside, tender on the inside, and packed with just the right amount of spice.

I first fell in love with this appetizer at a local fair, where the aroma of fried onions lured me in from across the parking lot. But let’s be honest—deep-frying a whole onion at home can feel a little intimidating (not to mention messy). That’s why I love this bite-sized version. It’s easier to make, just as delicious, and perfect for sharing. Plus, that creamy dipping sauce? It’s the stuff dreams are made of. Trust me, you’ll want to drizzle it on everything!

Why You’ll Love These Bloomin’ Onion Bites

If you need more convincing (though I doubt you will after one bite), here’s why this recipe is a winner:

  • Perfect for sharing: No need to fight over who gets the crispiest petal—every bite is equally delicious.
  • Easy to customize: Adjust the spice level to your liking, or swap the dipping sauce for your favorite ranch or sriracha mayo.
  • Crowd-pleaser: These little bites are always the first to vanish at parties. Consider doubling the batch!

How to Make Bloomin’ Onion Bites with Dipping Sauce

Ready to get started? Here’s everything you’ll need to bring these crispy bites to life.

Ingredients

  • 2 large sweet onions (like Vidalia)
  • 1 cup buttermilk
  • 1 cup all-purpose flour
  • 1 tsp paprika
  • 1 tsp garlic powder
  • 1/2 tsp cayenne pepper (adjust to taste)
  • 1/2 tsp salt
  • Oil for frying (vegetable or canola)

For the Dipping Sauce

  • 1/2 cup mayonnaise
  • 2 tbsp ketchup
  • 1 tsp horseradish
  • 1/2 tsp smoked paprika
  • 1/4 tsp garlic powder

Instructions

  1. Prep the onions: Slice off the tops and bottoms of the onions, then cut them into 1-inch wedges. Separate the layers gently to create “petals.”
  2. Soak in buttermilk: Place the onion pieces in a bowl and cover with buttermilk. Let soak for at least 30 minutes (this helps tenderize them and adds flavor).
  3. Mix the coating: In a separate bowl, whisk together flour, paprika, garlic powder, cayenne, and salt.
  4. Coat the onions: Drain the onions, then toss them in the flour mixture until fully coated.
  5. Fry to perfection: Heat oil to 375°F (190°C) in a deep fryer or heavy pot. Fry the onion bites in batches until golden brown, about 2–3 minutes. Drain on paper towels.
  6. Make the sauce: Stir together all dipping sauce ingredients until smooth. Serve alongside the hot onion bites.

Tips for the Best Bloomin’ Onion Bites

  • For extra crispiness, double-dip the onions: coat in flour, dip back in buttermilk, then coat in flour again.
  • Don’t overcrowd the fryer—this keeps the oil temperature steady for even cooking.
  • Serve immediately for maximum crunch. If needed, keep warm in a 200°F oven while frying batches.

If you love finger foods as much as I do, you’ll adore these Spicy Buffalo Cauliflower Bites—they’re another game-day favorite!

Frequently Asked Questions

Can I bake Bloomin’ Onion Bites instead of frying?

Yes! For a lighter version, spray the coated onions with cooking oil and bake at 425°F for 15–20 minutes, flipping halfway. They won’t be quite as crispy but still delicious.

What’s the best onion for Bloomin’ Onion Bites?

Sweet onions like Vidalia or Walla Walla work best—they’re mild and tender. Avoid red onions, as they can be too pungent.

Can I make the dipping sauce ahead of time?

Absolutely! The sauce tastes even better after chilling for a few hours. Store it in an airtight container in the fridge for up to 3 days.

How do I store leftovers?

While best fresh, you can store leftovers in an airtight container in the fridge for 1–2 days. Reheat in the oven or air fryer to crisp them up.

What can I substitute for buttermilk?

No buttermilk? Mix 1 cup milk with 1 tbsp lemon juice or vinegar and let it sit for 5 minutes before using.

Can I use an air fryer?

Yes! Air fry at 400°F for 8–10 minutes, shaking halfway. Lightly spray the onions with oil first for crispiness.

There you have it—everything you need to make these irresistible Bloomin’ Onion Bites with Dipping Sauce. Whether you’re serving them at a party or just treating yourself, they’re sure to be a hit. For more crowd-pleasing appetizers, check out these Loaded Nachos or this guide to frying onions from Serious Eats. Happy snacking!

Print
clock clock iconcutlery cutlery iconflag flag iconfolder folder iconinstagram instagram iconpinterest pinterest iconfacebook facebook iconprint print iconsquares squares iconheart heart iconheart solid heart solid icon

Bloomin’ Onion Bites with Dipping Sauce

  • Author: The Spicy Skillet

Description

These crispy Bloomin’ Onion Bites are the perfect party appetizer! Made with bite-sized pieces of onion coated in a seasoned batter and fried to golden perfection, served with a tangy dipping sauce. A fun twist on the classic bloomin’ onion that’s easy to share!


Ingredients

Scale

For the Crust:

  • For the Onion Bites:
  • 2 large sweet onions (like Vidalia)
  • 1 cup all-purpose flour
  • 1/2 cup cornstarch
  • 1 tsp paprika
  • 1 tsp garlic powder
  • 1 tsp cayenne pepper (adjust to taste)
  • 1 tsp salt
  • 1/2 tsp black pepper
  • 1 cup buttermilk
  • 1 egg
  • Vegetable oil (for frying)
  • For the Dipping Sauce:
  • 1/2 cup mayonnaise
  • 2 tbsp ketchup
  • 1 tbsp horseradish
  • 1/2 tsp paprika
  • 1/4 tsp garlic powder
  • 1/4 tsp salt
  • 1/4 tsp black pepper

Instructions

1. Prepare the Crust:

  1. 1. Prepare the onions: Peel the onions and cut them into 1-inch thick slices. Separate the slices into individual rings.
  2. 2. Make the batter: In a large bowl, whisk together flour, cornstarch, paprika, garlic powder, cayenne, salt, and black pepper.
  3. 3. In another bowl, whisk buttermilk and egg until smooth.
  4. 4. Dredge the onion rings: Dip each onion ring first in the flour mixture, then in the buttermilk mixture, then back in the flour mixture. Shake off excess and place on a plate.
  5. 5. Heat oil: In a deep fryer or large pot, heat 2-3 inches of vegetable oil to 375°F (190°C).
  6. 6. Fry the onions: Working in batches, fry the onion bites for 2-3 minutes until golden brown. Drain on paper towels.
  7. 7. Make the sauce: While onions fry, mix all dipping sauce ingredients in a small bowl. Refrigerate until serving.
  8. 8. Serve hot with the dipping sauce on the side.

Notes

For extra crispiness, let the coated onion rings rest for 10 minutes before frying. You can bake these at 425°F (220°C) for 15-20 minutes for a lighter version, but they won’t be as crispy.

Keto Low-Carb Onion Rings

Keto Low-Carb Onion Rings: Crispy, Guilt-Free Comfort Food

There’s something undeniably comforting about biting into a perfectly crispy onion ring—the crunch, the savory-sweet flavor, the way it pairs with just about everything. But if you’re following a keto or low-carb lifestyle, traditional onion rings (hello, deep-fried breading!) are usually off the table. That’s where these Keto Low-Carb Onion Rings come in. They’re golden, crunchy, and every bit as satisfying as the classic version—minus the carb overload.

I’ll admit, I was skeptical the first time I tried making keto onion rings. Could almond flour and Parmesan really deliver that crave-worthy crunch? Turns out, yes! After a few experiments (and a couple of “oops” moments), I landed on this foolproof recipe. Whether you’re serving them as a snack, a side for burgers, or just because you deserve a treat, these onion rings won’t disappoint. Plus, they’re gluten-free and packed with flavor—no one will guess they’re low-carb!

Why You’ll Love These Keto Onion Rings

If you’re looking for a keto-friendly way to enjoy your favorite fried foods, these onion rings are a game-changer. Here’s why:

  • Crunchy perfection: A golden, crispy exterior with tender, sweet onion inside.
  • Simple ingredients: No weird additives—just almond flour, Parmesan, and spices.
  • Quick to make: Ready in under 30 minutes, faster than takeout!
  • Versatile: Pair them with sugar-free BBQ sauce or a creamy dip.

How to Make Keto Low-Carb Onion Rings

This recipe is surprisingly easy, but a few tips will ensure your onion rings turn out perfectly crispy every time.

  1. Slice your onions thick: About ½-inch rings hold up best.
  2. Dry them well: Pat the rings with a paper towel to remove excess moisture.
  3. Double-coat for extra crunch: Dip in egg, then the almond flour mixture, then egg again.
  4. Don’t overcrowd the pan: Fry in batches for even cooking.

The Secret to Crispy Keto Breading

The magic lies in the blend of almond flour and grated Parmesan—it creates a texture that’s crisp, not soggy. For extra flavor, I like to add smoked paprika and garlic powder. If you’re dairy-free, nutritional yeast works instead of Parmesan (though the flavor will be slightly different).

Funny story: My first batch turned out more like onion “blobs” because I didn’t dry the onions enough. Lesson learned! Now, I always take that extra step to pat them dry, and it makes all the difference.

What to Serve with Keto Onion Rings

These onion rings are fantastic on their own, but they’re even better with:

  • A juicy keto burger (try my avocado-lime version!)
  • A crisp side salad for a lighter meal
  • Zesty sugar-free ketchup (Wholesome Yum has a great recipe)

FAQs About Keto Onion Rings

Can I bake keto onion rings instead of frying? Yes! Bake at 400°F for 15–20 minutes, flipping halfway.

Are onion rings keto-friendly? Traditional ones aren’t, but this low-carb version uses almond flour instead of breadcrumbs.

Can I use coconut flour instead? I don’t recommend it—it absorbs too much moisture and can turn gummy.

How do I store leftovers? Keep them in an airtight container in the fridge for up to 2 days. Reheat in the oven to crisp them up.

What’s the best onion for keto onion rings? Sweet onions like Vidalia work well, but yellow onions are great too.

Can I make these in an air fryer? Absolutely! Air fry at 375°F for 8–10 minutes, shaking halfway.

There you have it—crispy, golden keto onion rings that prove you don’t have to give up your favorite foods. Whether you’re dipping them, stacking them on a burger, or sneaking a few straight from the pan (no judgment here), they’re sure to become a staple in your low-carb kitchen. Happy crunching!

Print
clock clock iconcutlery cutlery iconflag flag iconfolder folder iconinstagram instagram iconpinterest pinterest iconfacebook facebook iconprint print iconsquares squares iconheart heart iconheart solid heart solid icon

Keto Low-Carb Onion Rings

  • Author: Keto Kitchen Master

Description

Crispy, golden onion rings with a fraction of the carbs! These keto-friendly onion rings use almond flour and Parmesan for a delicious crunch without the guilt. Perfect as a snack or side dish.


Ingredients

Scale

For the Crust:

  • For the onion rings:
  • 1 large yellow onion, sliced into 1/2-inch rings
  • 1/2 cup almond flour
  • 1/4 cup grated Parmesan cheese
  • 1 tsp garlic powder
  • 1 tsp paprika
  • 1/2 tsp salt
  • 1/4 tsp black pepper
  • For the coating:
  • 1 large egg
  • 2 tbsp heavy cream
  • For frying:
  • 1/2 cup avocado oil (or preferred high-heat oil)

Instructions

1. Prepare the Crust:

  1. 1. Slice the onion into 1/2-inch thick rings and separate them.
  2. 2. In a shallow bowl, mix almond flour, Parmesan, garlic powder, paprika, salt, and pepper.
  3. 3. In another bowl, whisk the egg and heavy cream together.
  4. 4. Dip each onion ring into the egg mixture, then coat with the almond flour mixture. Shake off excess.
  5. 5. Heat oil in a skillet over medium-high heat (350°F if using a thermometer).
  6. 6. Fry onion rings in batches for 2-3 minutes per side until golden brown.
  7. 7. Drain on paper towels and serve warm with keto-friendly dipping sauce.

Notes

For extra crispiness, bake at 400°F for 5 minutes after frying. Store leftovers in an airtight container for up to 2 days (reheat in oven or air fryer).

The Original Air Fried Blooming Onion

The Original Air Fried Blooming Onion: A Crispy, Healthier Twist

There’s something undeniably magical about a blooming onion—the way its golden petals fan out, the satisfying crunch, the irresistible aroma of seasoned batter. But let’s be honest: deep-frying at home can feel like a messy, greasy ordeal. That’s where your trusty air fryer swoops in to save the day! This recipe for The Original Air Fried Blooming Onion delivers all the crispy, flavorful goodness of the classic appetizer with a fraction of the oil (and guilt).

Picture this: you’re hosting a game night, and instead of stressing over a pot of sizzling oil, you’re casually popping this beauty into the air fryer. Ten minutes later, you’re met with applause (and maybe a few jealous glances). Whether it’s for a party, a cozy night in, or just because you deserve a fun snack, this recipe is a game-changer. Plus, it’s a sneaky way to make veggies the star of the show—don’t tell the kids!

Why You’ll Love This Air Fried Blooming Onion

This isn’t just another appetizer—it’s a healthier, hassle-free version of a restaurant favorite. Here’s why it’ll become your go-to:

  • Less oil, same crunch: Air frying cuts calories without sacrificing texture.
  • Quick and easy: No thermometer, no splatter, no fuss.
  • Versatile: Pair it with spicy mayo, ranch, or even a tangy BBQ sauce.
  • Crowd-pleaser: Perfect for parties, potlucks, or solo indulgence.

How to Make The Original Air Fried Blooming Onion

Ingredients You’ll Need

  • 1 large sweet onion (like Vidalia)
  • 1 cup buttermilk
  • 1 cup all-purpose flour
  • 1 tsp paprika
  • 1 tsp garlic powder
  • 1/2 tsp cayenne pepper (adjust to taste)
  • 1/2 tsp salt
  • Cooking spray or olive oil spray

Step-by-Step Instructions

  1. Prep the onion: Slice off the top (stem end), peel it, and place it cut-side down. Make vertical cuts 1/2-inch apart, stopping 1/2 inch from the root to keep it intact. Gently separate the petals.
  2. Soak: Dunk the onion in buttermilk, ensuring it seeps between the petals. Let it sit for 10 minutes.
  3. Coat: Mix flour and spices in a bowl. Shake off excess buttermilk, then dredge the onion in the flour mix, pressing gently to adhere.
  4. Air fry: Spritz the onion with oil and air fry at 375°F for 10–12 minutes until golden and crispy. Serve immediately with your favorite dip!

Tips for the Perfect Blooming Onion

Want to nail this recipe every time? Here are my pro tips:

  • Choose the right onion: Large, round onions with tight layers work best.
  • Don’t rush the soak: Buttermilk tenderizes and helps the coating stick.
  • Use a light hand with oil: A quick spritz is enough—too much can make it soggy.
  • Serve hot: Like all fried treats, it’s best fresh out of the air fryer!

For more air fryer inspiration, check out my Crispy Air Fryer Chicken Tenders or these Zucchini Fries.

Frequently Asked Questions

Can I make this blooming onion gluten-free?

Absolutely! Swap the all-purpose flour for a gluten-free blend or almond flour. For extra crispiness, add a tablespoon of cornstarch.

What’s the best dip for an air fried blooming onion?

Classic ranch or spicy sriracha mayo are my go-tos, but Food Network’s dip ideas offer endless inspiration.

Why is my onion not blooming?

You might be cutting too close to the root! Leave about 1/2 inch uncut at the bottom to hold it together.

Can I prep this ahead of time?

You can coat the onion and refrigerate it for up to 2 hours before air frying—just add a minute or two to the cook time.

Is an air fried blooming onion healthier than deep-fried?

Yes! Air frying uses significantly less oil. According to Healthline, it can reduce fat content by up to 75%.

Can I use a different onion?

Sweet onions work best, but yellow onions are a good backup. Avoid red onions—they’re too pungent for this recipe.

There you have it—a healthier, easier way to enjoy the iconic blooming onion without the deep-fryer drama. Whether you’re impressing guests or treating yourself, this recipe proves that comfort food can be both indulgent and smart. Now, who’s ready to dig in?

Print
clock clock iconcutlery cutlery iconflag flag iconfolder folder iconinstagram instagram iconpinterest pinterest iconfacebook facebook iconprint print iconsquares squares iconheart heart iconheart solid heart solid icon

The Original Air Fried Blooming Onion

  • Author: Crispy Eats

Description

A healthier take on the classic deep-fried blooming onion, made crispy and delicious in the air fryer with a flavorful seasoned coating and served with a tangy dipping sauce.


Ingredients

Scale

For the Crust:

  • For the Blooming Onion:
  • 1 large sweet onion (Vidalia or Texas Sweet preferred)
  • 1 cup buttermilk
  • 1 cup all-purpose flour
  • 1 teaspoon paprika
  • 1 teaspoon garlic powder
  • 1 teaspoon onion powder
  • 1/2 teaspoon cayenne pepper
  • 1/2 teaspoon salt
  • 1/2 teaspoon black pepper
  • Cooking spray (avocado or olive oil spray)
  • For the Dipping Sauce:
  • 1/2 cup mayonnaise
  • 2 tablespoons ketchup
  • 1 tablespoon horseradish
  • 1/2 teaspoon paprika
  • 1/4 teaspoon garlic powder
  • 1/4 teaspoon salt
  • 1/4 teaspoon black pepper

Instructions

1. Prepare the Crust:

  1. 1. Prepare the Onion: Peel the onion and cut about 1/2 inch off the top (stem end). Place the onion cut-side down. Using a sharp knife, make vertical cuts downward from the top, stopping about 1/2 inch from the root end to create 12-16 sections. Gently separate the layers to form a ‘bloom.’
  2. 2. Soak in Buttermilk: Place the onion in a bowl and pour buttermilk over it, ensuring it gets between the layers. Let soak for at least 30 minutes (or up to 2 hours).
  3. 3. Preheat Air Fryer: Preheat the air fryer to 375°F (190°C) for 5 minutes.
  4. 4. Prepare Coating: In a large bowl, mix flour, paprika, garlic powder, onion powder, cayenne, salt, and black pepper.
  5. 5. Coat the Onion: Remove the onion from buttermilk, letting excess drip off. Dredge in the flour mixture, pressing gently to coat all layers. Shake off excess.
  6. 6. Air Fry: Place the onion root-side down in the air fryer basket. Lightly spray with cooking oil. Air fry for 12-15 minutes until golden and crispy. Check halfway and spray again if needed.
  7. 7. Make the Sauce: While the onion cooks, whisk together mayonnaise, ketchup, horseradish, paprika, garlic powder, salt, and pepper in a small bowl.
  8. 8. Serve: Carefully remove the onion from the air fryer and serve immediately with the dipping sauce.

Notes

For extra crispiness, double-coat the onion by dipping it back in buttermilk and flour mixture before air frying. If layers stick together after cutting, gently rinse under cold water to separate.