Chicken Pot Pie with Biscuit Topping

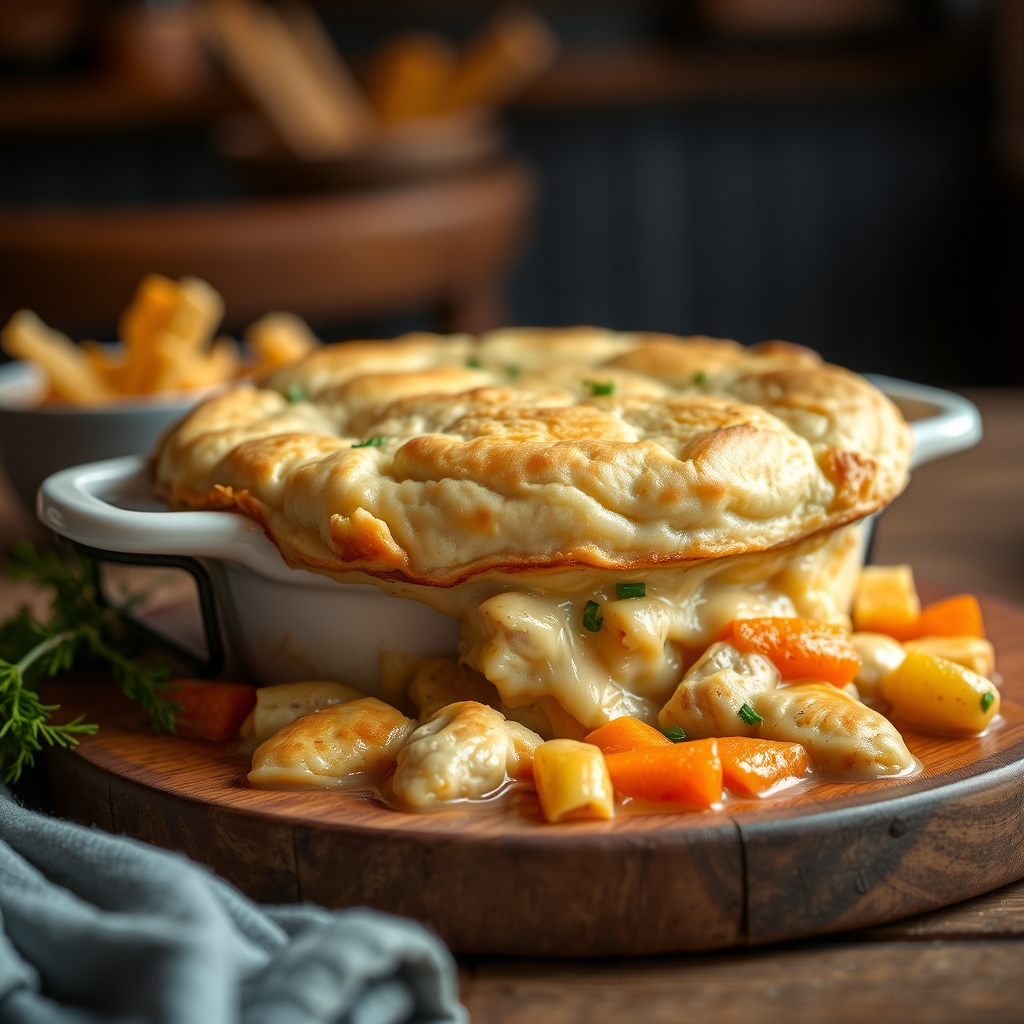
Chicken Pot Pie with Biscuit Topping: A Comforting Classic

This Chicken Pot Pie with Biscuit Topping is the ultimate comfort food, combining tender chicken, savory vegetables, and a creamy sauce topped with fluffy homemade biscuits. Perfect for family dinners or meal prep, this hearty dish will become a favorite in your recipe rotation.

Print
clock clock iconcutlery cutlery iconflag flag iconfolder folder iconinstagram instagram iconpinterest pinterest iconfacebook facebook iconprint print iconsquares squares iconheart heart iconheart solid heart solid icon

Chicken Pot Pie with Biscuit Topping

  • Author: Classic Comforts Kitchen

Description

A hearty and comforting chicken pot pie topped with flaky, buttery biscuits. This dish combines tender chicken, vegetables, and a creamy sauce, all baked under golden-brown biscuits for the ultimate comfort food experience.


Ingredients

Scale

For the Crust:

  • For the filling:
  • 2 cups cooked chicken, shredded or diced
  • 1/4 cup unsalted butter
  • 1/2 cup diced onion
  • 1/2 cup diced carrots
  • 1/2 cup diced celery
  • 1/3 cup all-purpose flour
  • 2 cups chicken broth
  • 1/2 cup heavy cream
  • 1 cup frozen peas
  • 1 tsp salt
  • 1/2 tsp black pepper
  • 1 tsp dried thyme
  • For the biscuit topping:
  • 2 cups all-purpose flour
  • 1 tbsp baking powder
  • 1/2 tsp salt
  • 1/2 cup unsalted butter, cold and cubed
  • 3/4 cup buttermilk
  • 1 egg (for egg wash)

Instructions

1. Prepare the Crust:

  1. Preheat oven to 375°F (190°C).
  2. In a large skillet, melt butter over medium heat. Add onion, carrots, and celery. Cook until softened, about 5 minutes.
  3. Stir in flour and cook for 1 minute, stirring constantly.
  4. Gradually whisk in chicken broth and heavy cream. Bring to a simmer and cook until thickened, about 3-5 minutes.
  5. Add chicken, peas, salt, pepper, and thyme. Stir to combine, then remove from heat.
  6. Pour filling into a 9×13-inch baking dish or divide among individual ramekins.
  7. For the biscuits: In a bowl, whisk together flour, baking powder, and salt.
  8. Cut in cold butter until mixture resembles coarse crumbs.
  9. Stir in buttermilk until just combined (do not overmix).
  10. Drop biscuit dough by spoonfuls over the filling (about 8-10 biscuits).
  11. Whisk egg with 1 tbsp water and brush over biscuits.
  12. Bake for 25-30 minutes until biscuits are golden and filling is bubbly.
  13. Let cool for 5 minutes before serving.

Notes

For extra flavor, add 1/2 tsp garlic powder to the filling. Leftovers can be refrigerated for 3 days. Reheat in oven at 350°F for best texture. Frozen mixed vegetables can substitute for peas.

No-Peek Chicken Casserole

No-Peek Chicken Casserole: A Simple and Delicious Family Favorite

This No-Peek Chicken Casserole is the ultimate comfort food that requires minimal effort but delivers maximum flavor. Perfect for busy weeknights, this easy chicken casserole recipe combines tender chicken, creamy sauce, and fluffy rice in one satisfying dish. Follow this step-by-step guide to create a meal your whole family will love.

Why You’ll Love This No-Peek Chicken Casserole

This chicken and rice casserole is a classic for good reason. It’s:

  • Incredibly easy to prepare with just 10 minutes of hands-on time
  • Made with simple pantry staples
  • A complete meal in one dish
  • Perfect for meal prep and leftovers
  • Crowd-pleasing comfort food at its best

Ingredients for No-Peek Chicken Casserole

This easy chicken casserole uses basic ingredients you probably already have:

  • 2 cups uncooked long-grain white rice
  • 4 boneless, skinless chicken breasts
  • 1 can (10.5 oz) cream of chicken soup
  • 1 can (10.5 oz) cream of mushroom soup
  • 1 ½ cups chicken broth
  • 1 packet dry onion soup mix
  • ½ teaspoon garlic powder
  • ½ teaspoon black pepper

How to Make No-Peek Chicken Casserole

Follow these simple steps for perfect chicken casserole with rice every time:

  1. Preheat your oven to 350°F (175°C).
  2. Spread the uncooked rice evenly in a 9×13 inch baking dish.
  3. Place chicken breasts on top of the rice in a single layer.
  4. In a medium bowl, whisk together both cream soups, chicken broth, onion soup mix, garlic powder, and black pepper.
  5. Pour the soup mixture evenly over the chicken and rice.
  6. Cover tightly with aluminum foil (this is the “no-peek” part!).
  7. Bake for 1 hour 30 minutes without removing the foil.
  8. Let rest for 5 minutes before serving.

Tips for the Best Chicken and Rice Casserole

For perfect results with this no-peek casserole recipe:

  • Use long-grain white rice for best texture
  • Don’t skip the foil – it creates steam for perfectly cooked rice
  • For extra flavor, sprinkle paprika over the chicken before baking
  • Let the casserole rest before serving to allow the sauce to thicken

Serving Suggestions

This hearty chicken casserole dish pairs well with:

  • Steamed green beans or broccoli
  • A crisp green salad
  • Warm dinner rolls
  • Roasted carrots or other root vegetables

Storage and Reheating Instructions

Store leftover no-peek chicken casserole in an airtight container in the refrigerator for up to 4 days. Reheat individual portions in the microwave or the entire dish in a 350°F oven until heated through. Add a splash of broth if the rice seems dry when reheating.

Frequently Asked Questions

Can I use brown rice in this casserole?

For best results with this no-peek chicken casserole recipe, stick with white rice as brown rice requires more liquid and longer cooking time. If substituting, increase liquid by ½ cup and baking time by 20-30 minutes.

Can I make this casserole ahead?

Yes! Assemble the chicken and rice bake up to 24 hours in advance, cover, and refrigerate. Add 10-15 minutes to the baking time when cooking from cold.

What can I use instead of cream soups?

For a homemade alternative, make a white sauce with butter, flour, and milk, then add chicken bouillon and sautéed mushrooms for flavor.

Final Thoughts

This No-Peek Chicken Casserole is the perfect solution for busy nights when you want a comforting, homemade meal without the fuss. With its simple preparation and foolproof cooking method, it’s sure to become a regular in your dinner rotation. The combination of tender chicken, flavorful rice, and creamy sauce makes this easy chicken and rice casserole a guaranteed crowd-pleaser.

Print
clock clock iconcutlery cutlery iconflag flag iconfolder folder iconinstagram instagram iconpinterest pinterest iconfacebook facebook iconprint print iconsquares squares iconheart heart iconheart solid heart solid icon

No-Peek Chicken Casserole

  • Author: Home Cook Extraordinaire

Description

A comforting and easy-to-make chicken casserole that requires no peeking while baking, resulting in tender chicken and perfectly cooked rice every time. This family-friendly dish is packed with flavor and minimal effort.


Ingredients

Scale

For the Crust:

  • For the casserole:
  • 1.5 lbs boneless, skinless chicken breasts, cut into bite-sized pieces
  • 1 cup uncooked long-grain white rice
  • 1 (10.5 oz) can cream of chicken soup
  • 1 (10.5 oz) can cream of mushroom soup
  • 1 cup chicken broth
  • 1/2 cup milk
  • For seasoning:
  • 1 teaspoon garlic powder
  • 1 teaspoon onion powder
  • 1/2 teaspoon paprika
  • 1/2 teaspoon black pepper
  • 1/2 teaspoon salt
  • For topping:
  • 1/2 cup shredded cheddar cheese
  • 1/4 cup grated parmesan cheese
  • 2 tablespoons butter, cut into small pieces

Instructions

1. Prepare the Crust:

  1. 1. Preheat oven to 350°F (175°C). Grease a 9×13 inch baking dish.
  2. 2. In a large bowl, combine cream of chicken soup, cream of mushroom soup, chicken broth, milk, garlic powder, onion powder, paprika, black pepper, and salt. Mix well.
  3. 3. Stir in uncooked rice until fully coated with the soup mixture.
  4. 4. Spread the rice mixture evenly in the prepared baking dish.
  5. 5. Arrange chicken pieces evenly over the rice mixture. Press down lightly to submerge chicken slightly.
  6. 6. Cover the baking dish tightly with aluminum foil, sealing all edges well.
  7. 7. Bake in preheated oven for 1 hour 15 minutes. DO NOT PEEK during baking.
  8. 8. Remove from oven, carefully remove foil (watch for steam), and sprinkle with cheddar and parmesan cheeses.
  9. 9. Dot with butter pieces and return to oven, uncovered, for 5-10 minutes until cheese is melted and bubbly.
  10. 10. Let stand for 5 minutes before serving.

Notes

For variation, try adding 1 cup of frozen mixed vegetables with the rice mixture. Leftovers reheat well – add a splash of milk when reheating to maintain creaminess. The ‘no-peek’ rule is important as opening the oven releases steam needed to cook the rice properly.

Oreo Cheesecake

Oreo Cheesecake: The Ultimate No-Bake Dessert

This Oreo Cheesecake is a dream come true for cookie lovers. With its creamy texture, rich chocolate flavor, and irresistible Oreo crust, this no-bake dessert will become your go-to treat for any occasion. Perfect for birthdays, potlucks, or just satisfying your sweet tooth, this Oreo Cheesecake recipe is simple yet impressive.

Oreo Cheesecake Ingredients

For the perfect balance of creaminess and crunch, you’ll need:

  • 36 Oreo cookies (divided)
  • 5 tbsp unsalted butter (melted)
  • 24 oz cream cheese (softened)
  • 1 cup powdered sugar
  • 1 tbsp vanilla extract
  • 1 1/2 cups heavy whipping cream
  • Optional: extra Oreos for garnish

How to Make Oreo Cheesecake

Follow these simple steps for the best no-bake Oreo cheesecake:

  1. Prepare the crust: Crush 24 Oreos into fine crumbs. Mix with melted butter and press into a 9-inch springform pan. Chill for 15 minutes.
  2. Make the filling: Beat cream cheese until smooth. Add powdered sugar and vanilla, mixing well.
  3. Whip the cream: In a separate bowl, whip heavy cream to stiff peaks. Gently fold into cream cheese mixture.
  4. Add Oreo pieces: Crush remaining 12 Oreos and fold into the filling.
  5. Assemble: Pour filling over chilled crust. Smooth the top and garnish with extra Oreo pieces if desired.
  6. Chill: Refrigerate for at least 6 hours, preferably overnight, before serving.

Tips for the Best Oreo Cheesecake

  • Use full-fat cream cheese for the creamiest texture
  • Ensure your cream cheese is at room temperature to avoid lumps
  • For a firmer cheesecake, freeze for 1-2 hours before serving
  • Try different Oreo flavors for unique variations

Storage and Serving Suggestions

Store your Oreo Cheesecake covered in the refrigerator for up to 5 days. For longer storage, freeze individual slices wrapped in plastic wrap. Serve chilled with a drizzle of chocolate sauce or a scoop of vanilla ice cream for extra indulgence.

Frequently Asked Questions

Can I make this Oreo Cheesecake ahead of time?

Absolutely! This dessert actually tastes better when made a day in advance, allowing the flavors to fully develop.

Can I use reduced-fat ingredients?

While possible, full-fat ingredients yield the best texture and flavor. Reduced-fat cream cheese may result in a softer cheesecake.

How do I prevent cracks in my cheesecake?

Since this is a no-bake recipe, cracks aren’t typically an issue. Just be sure to mix the filling until smooth and chill properly.

More Decadent Dessert Recipes

If you loved this Oreo Cheesecake recipe, try these other crowd-pleasing treats:

  • Chocolate Peanut Butter Pie
  • Strawberry Shortcake Cheesecake
  • Triple Chocolate Mousse Cake
Print
clock clock iconcutlery cutlery iconflag flag iconfolder folder iconinstagram instagram iconpinterest pinterest iconfacebook facebook iconprint print iconsquares squares iconheart heart iconheart solid heart solid icon

Oreo Cheesecake

  • Author: Baking Enthusiast

Description

A creamy and decadent Oreo cheesecake with a chocolate cookie crust and chunks of Oreo cookies throughout. Perfect for any occasion!


Ingredients

Scale

For the Crust:

  • For the Crust:
  • 24 Oreo cookies (with filling)
  • 4 tablespoons unsalted butter, melted
  • For the Cheesecake Filling:
  • 24 oz cream cheese, softened
  • 1 cup granulated sugar
  • 1 cup sour cream
  • 1 teaspoon vanilla extract
  • 3 large eggs
  • 12 Oreo cookies, coarsely chopped
  • For the Topping:
  • 8 Oreo cookies, halved
  • Whipped cream (optional)

Instructions

1. Prepare the Crust:

  1. Preheat oven to 325°F (163°C). Grease a 9-inch springform pan.
  2. For the crust: Crush 24 Oreo cookies into fine crumbs. Mix with melted butter and press firmly into the bottom of the pan. Bake for 10 minutes, then let cool.
  3. For the filling: Beat cream cheese and sugar until smooth. Add sour cream and vanilla, mixing well. Beat in eggs one at a time until just combined.
  4. Fold in chopped Oreo cookies. Pour filling over the cooled crust.
  5. Bake for 50-60 minutes or until the center is slightly jiggly. Turn off the oven, crack the door, and let cool for 1 hour inside.
  6. Chill in the refrigerator for at least 4 hours or overnight.
  7. Garnish with halved Oreos and whipped cream before serving.

Notes

For best results, use room-temperature ingredients. Avoid overmixing the batter to prevent cracks. Store leftovers in the fridge for up to 5 days.

Luxurious Chocolate Caramel Pecan Cake

Luxurious Chocolate Caramel Pecan Cake Recipe

Indulge in the ultimate dessert experience with this Luxurious Chocolate Caramel Pecan Cake. Perfect for special occasions or when you crave something decadent, this rich cake combines velvety chocolate, gooey caramel, and crunchy pecans for an unforgettable treat. Follow our step-by-step guide to create this showstopping dessert that will impress any crowd.

Why You’ll Love This Chocolate Caramel Pecan Cake

This Luxurious Chocolate Caramel Pecan Cake stands out because:

  • Features three layers of moist chocolate cake
  • Includes homemade caramel sauce with toasted pecans
  • Finished with silky chocolate ganache
  • Perfect balance of textures and flavors
  • Impressive presentation for special occasions

Ingredients for Chocolate Caramel Pecan Cake

For the Chocolate Cake Layers:

  • 2 cups all-purpose flour
  • 2 cups granulated sugar
  • ¾ cup unsweetened cocoa powder
  • 2 tsp baking powder
  • 1½ tsp baking soda
  • 1 tsp salt
  • 1 cup buttermilk
  • ½ cup vegetable oil
  • 2 large eggs
  • 2 tsp vanilla extract
  • 1 cup hot coffee

For the Caramel Pecan Filling:

  • 1 cup granulated sugar
  • 6 tbsp unsalted butter
  • ½ cup heavy cream
  • 1 tsp sea salt
  • 1½ cups chopped pecans, toasted

For the Chocolate Ganache:

  • 12 oz semisweet chocolate, finely chopped
  • 1½ cups heavy cream

How to Make Luxurious Chocolate Caramel Pecan Cake

Step 1: Bake the Chocolate Cake Layers

Preheat oven to 350°F. Grease and line three 8-inch cake pans. Whisk together dry ingredients in a large bowl. Add buttermilk, oil, eggs, and vanilla, mixing until combined. Carefully stir in hot coffee (batter will be thin). Divide evenly among pans and bake for 30-35 minutes until a toothpick comes out clean. Cool completely.

Step 2: Prepare the Caramel Pecan Filling

Heat sugar in a medium saucepan over medium heat, stirring constantly until melted and amber-colored. Carefully whisk in butter until melted. Slowly drizzle in cream while whisking (mixture will bubble vigorously). Remove from heat and stir in salt. Let cool slightly before folding in toasted pecans.

Step 3: Make the Chocolate Ganache

Place chopped chocolate in a heatproof bowl. Heat cream until just simmering, then pour over chocolate. Let sit for 5 minutes before whisking until smooth. Cool to spreading consistency.

Step 4: Assemble the Cake

Place first cake layer on serving plate. Spread half the caramel pecan filling evenly over the top. Repeat with second layer and remaining filling. Top with final cake layer. Frost entire cake with chocolate ganache, allowing some to drip down the sides decoratively. Garnish with additional pecans if desired.

Expert Tips for the Best Chocolate Caramel Cake

  • Toast pecans for maximum flavor – spread on baking sheet at 350°F for 8-10 minutes
  • Use room temperature ingredients for even mixing
  • Let caramel cool slightly before adding to cake layers
  • Chill cake for 30 minutes before slicing for cleaner cuts
  • Store leftovers in an airtight container at room temperature for up to 3 days

Frequently Asked Questions

Can I make this cake ahead of time?

Yes! Bake the cake layers up to 2 days in advance and store wrapped at room temperature. The caramel filling can be made 3 days ahead and refrigerated (reheat gently before using). Assemble the cake the day of serving for best texture.

Can I use store-bought caramel sauce?

While homemade caramel provides superior flavor, you can substitute 1½ cups of high-quality store-bought caramel sauce in a pinch. Warm it slightly and mix with the toasted pecans before assembling.

What’s the best way to slice this rich cake?

For clean slices, dip a sharp knife in hot water and wipe dry between cuts. The warmth helps glide through the ganache and caramel layers smoothly.

Serving Suggestions for Your Decadent Cake

This Luxurious Chocolate Caramel Pecan Cake needs no accompaniment, but for special presentations consider:

  • A scoop of vanilla bean ice cream
  • Fresh whipped cream
  • Drizzle of extra caramel sauce
  • Espresso or dark roast coffee
  • Dessert wine like port or late harvest riesling

Whether you’re celebrating a special occasion or simply treating yourself, this Luxurious Chocolate Caramel Pecan Cake delivers an unforgettable dessert experience. The combination of rich chocolate, buttery caramel, and crunchy pecans creates a symphony of flavors and textures that will have everyone asking for seconds.

Print
clock clock iconcutlery cutlery iconflag flag iconfolder folder iconinstagram instagram iconpinterest pinterest iconfacebook facebook iconprint print iconsquares squares iconheart heart iconheart solid heart solid icon

Luxurious Chocolate Caramel Pecan Cake

  • Author: Gourmet Delights Kitchen

Description

A decadent triple-layer chocolate cake filled with rich caramel and toasted pecans, enrobed in silky chocolate ganache. Perfect for celebrations or indulgent dessert nights.


Ingredients

Scale

For the Crust:

  • For the Cake:
  • 2 cups all-purpose flour
  • 2 cups granulated sugar
  • 3/4 cup unsweetened cocoa powder
  • 2 tsp baking soda
  • 1 tsp baking powder
  • 1 tsp salt
  • 1 cup buttermilk
  • 1 cup strong black coffee (hot)
  • 1/2 cup vegetable oil
  • 2 large eggs
  • 2 tsp vanilla extract
  • For the Caramel Filling:
  • 1 cup granulated sugar
  • 6 tbsp unsalted butter (cubed)
  • 1/2 cup heavy cream
  • 1 tsp sea salt
  • 1 1/2 cups toasted pecans (chopped)
  • For the Ganache:
  • 12 oz semisweet chocolate (finely chopped)
  • 1 1/2 cups heavy cream
  • 1 tbsp light corn syrup
  • For Decoration:
  • 1/2 cup caramel sauce
  • Whole pecans
  • Edible gold leaf (optional)

Instructions

1. Prepare the Crust:

  1. 1. Preheat oven to 350°F (175°C). Grease and line three 8-inch cake pans.
  2. 2. Whisk dry cake ingredients (flour through salt) in a large bowl. Add wet ingredients and mix until smooth (batter will be thin).
  3. 3. Divide batter evenly among pans. Bake 30-35 minutes until toothpick comes clean. Cool completely.
  4. 4. Make caramel: Melt sugar in saucepan over medium heat until amber (do not stir). Remove from heat, whisk in butter, then cream and salt. Cool to spreading consistency.
  5. 5. Assemble: Place first layer on cake stand. Spread half the caramel, sprinkle with pecans. Repeat with second layer. Top with final cake layer.
  6. 6. Make ganache: Heat cream until steaming. Pour over chocolate in bowl, let sit 5 minutes, then stir until smooth. Add corn syrup. Cool until thickened but pourable.
  7. 7. Frost cake with ganache. Drizzle with caramel, decorate with pecans and gold leaf. Refrigerate 1 hour before serving.

Notes

• Cake layers can be baked 1 day ahead (wrap tightly).
• Use room temperature ingredients for even mixing.
• For cleaner slices, dip knife in hot water between cuts.

Oreo Cheesecake

Oreo Cheesecake: The Ultimate No-Bake Dessert

This Oreo Cheesecake is a dream come true for cookie lovers. With its creamy texture, rich chocolate flavor, and irresistible Oreo crust, this no-bake dessert will become your go-to treat for any occasion. Perfect for birthdays, potlucks, or just satisfying your sweet tooth, this Oreo Cheesecake recipe is simple yet impressive.

Oreo Cheesecake Ingredients

For the perfect balance of creaminess and crunch, you’ll need:

  • 36 Oreo cookies (divided)
  • 5 tbsp unsalted butter (melted)
  • 24 oz cream cheese (softened)
  • 1 cup powdered sugar
  • 1 tbsp vanilla extract
  • 1 1/2 cups heavy whipping cream
  • Optional: extra Oreos for garnish

How to Make Oreo Cheesecake

Follow these simple steps for the best no-bake Oreo cheesecake:

  1. Prepare the crust: Crush 24 Oreos into fine crumbs. Mix with melted butter and press into a 9-inch springform pan. Chill for 15 minutes.
  2. Make the filling: Beat cream cheese until smooth. Add powdered sugar and vanilla, mixing well.
  3. Whip the cream: In a separate bowl, whip heavy cream to stiff peaks. Gently fold into cream cheese mixture.
  4. Add Oreo pieces: Crush remaining 12 Oreos and fold into the filling.
  5. Assemble: Pour filling over chilled crust. Smooth the top and garnish with extra Oreo pieces if desired.
  6. Chill: Refrigerate for at least 6 hours, preferably overnight, before serving.

Tips for the Best Oreo Cheesecake

  • Use full-fat cream cheese for the creamiest texture
  • Ensure your cream cheese is at room temperature to avoid lumps
  • For a firmer cheesecake, freeze for 1-2 hours before serving
  • Try different Oreo flavors for unique variations

Storage and Serving Suggestions

Store your Oreo Cheesecake covered in the refrigerator for up to 5 days. For longer storage, freeze individual slices wrapped in plastic wrap. Serve chilled with a drizzle of chocolate sauce or a scoop of vanilla ice cream for extra indulgence.

Frequently Asked Questions

Can I make this Oreo Cheesecake ahead of time?

Absolutely! This dessert actually tastes better when made a day in advance, allowing the flavors to fully develop.

Can I use reduced-fat ingredients?

While possible, full-fat ingredients yield the best texture and flavor. Reduced-fat cream cheese may result in a softer cheesecake.

How do I prevent cracks in my cheesecake?

Since this is a no-bake recipe, cracks aren’t typically an issue. Just be sure to mix the filling until smooth and chill properly.

More Decadent Dessert Recipes

If you loved this Oreo Cheesecake recipe, try these other crowd-pleasing treats:

  • Chocolate Peanut Butter Pie
  • Strawberry Shortcake Cheesecake
  • Triple Chocolate Mousse Cake

{“success”:false,”data”:{“message”:”Invalid JSON data”}}