CRISPY BATTERED COD AND ONION RINGS PLATTER

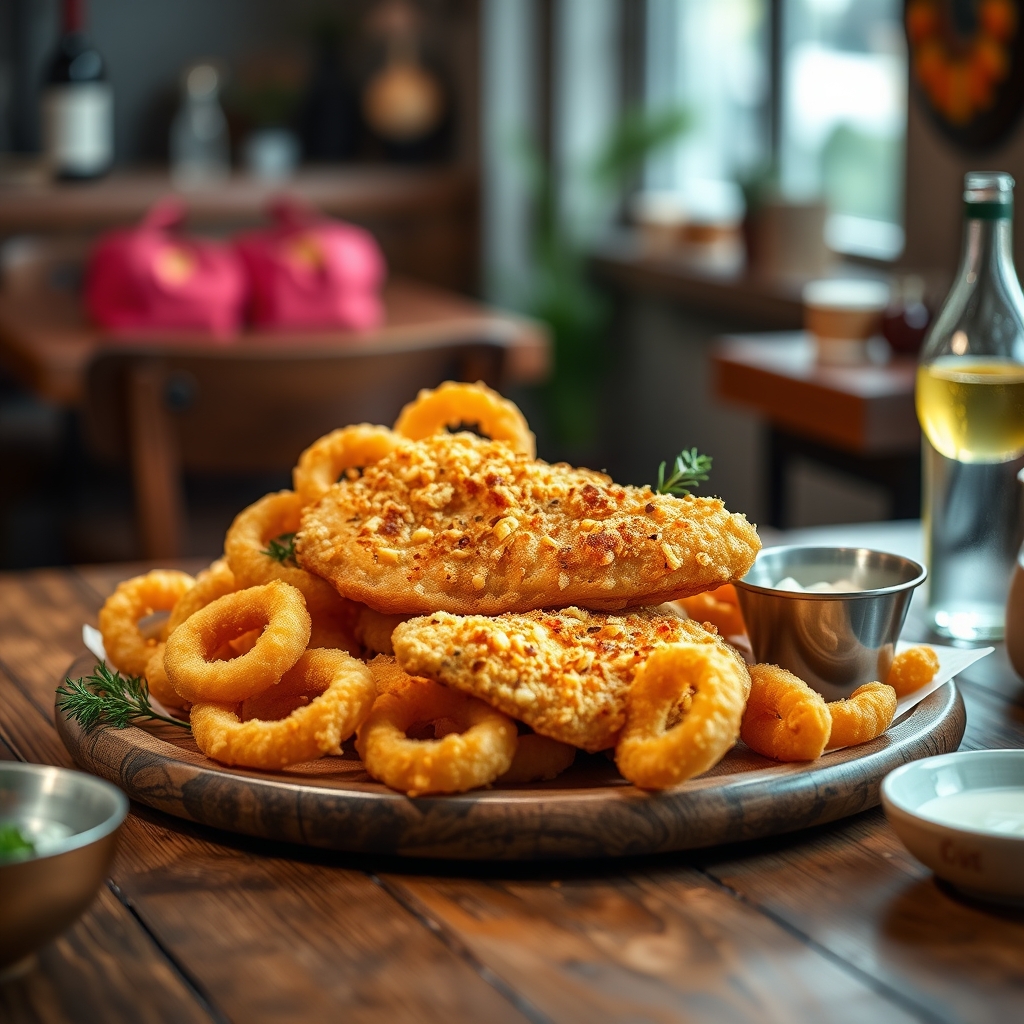
Crispy Battered Cod and Onion Rings Platter: The Ultimate Seafood Feast

This crispy battered cod and onion rings platter brings together golden, crunchy seafood with sweet onion rings for a restaurant-quality meal at home. Perfect for fish fry nights or casual gatherings, this platter delivers satisfying textures and flavors that will impress any seafood lover.

Why You’ll Love This Crispy Battered Cod and Onion Rings Combo

Combining two classic favorites creates the ultimate seafood platter. The light, airy batter crisps up beautifully on both the flaky cod fillets and sweet onion rings, while the double-fry technique ensures maximum crunch. Serve with tartar sauce, lemon wedges, and your favorite sides for a complete meal.

Ingredients for Crispy Battered Cod and Onion Rings

For the Batter:

  • 1 ½ cups all-purpose flour
  • ½ cup cornstarch
  • 1 tablespoon baking powder
  • 1 teaspoon salt
  • 1 teaspoon garlic powder
  • 1 teaspoon paprika
  • 1 ½ cups ice-cold beer or sparkling water

For the Cod and Onion Rings:

  • 4 cod fillets (about 6 oz each)
  • 2 large sweet onions, sliced into ½-inch rings
  • Vegetable oil for frying
  • Salt to taste
  • Lemon wedges for serving

How to Make Crispy Battered Cod and Onion Rings

Step 1: Prepare the Batter

In a large bowl, whisk together flour, cornstarch, baking powder, salt, garlic powder, and paprika. Gradually whisk in the cold beer or sparkling water until smooth. The batter should coat the back of a spoon but still be slightly runny.

Step 2: Heat the Oil

Fill a heavy-bottomed pot or Dutch oven with 3 inches of vegetable oil. Heat to 350°F (175°C) using a deep-fry thermometer. Maintain this temperature throughout cooking.

Step 3: Fry the Onion Rings

Dip onion rings in batter, letting excess drip off. Fry in batches for 2-3 minutes until light golden. Drain on paper towels. Increase oil temperature to 375°F (190°C).

Step 4: Fry the Cod

Pat cod fillets dry, then dip in batter. Carefully lower into hot oil. Fry for 4-5 minutes until golden brown and crispy. Drain on a wire rack.

Step 5: Double Fry for Extra Crispiness

Return onion rings to hot oil for 1 minute for extra crispness. Do the same with cod if desired. Season immediately with salt.

Serving Suggestions for Your Seafood Platter

Arrange the crispy battered cod and onion rings on a large platter with lemon wedges. Serve with:

  • Homemade tartar sauce
  • Malt vinegar
  • Coleslaw
  • French fries or roasted potatoes
  • Fresh green salad

Tips for Perfect Crispy Battered Seafood

  • Keep batter cold for maximum crispiness
  • Don’t overcrowd the frying pot
  • Use a thermometer to maintain proper oil temperature
  • Pat fish and onions dry before battering
  • Serve immediately for best texture

Frequently Asked Questions

Can I make this gluten-free?

Yes, substitute the all-purpose flour with a gluten-free flour blend and use gluten-free beer or sparkling water.

What’s the best oil for frying?

Vegetable, canola, or peanut oil work best for their high smoke points and neutral flavors.

Can I bake instead of fry?

While baking won’t achieve the same crispiness, you can bake at 425°F (220°C) on a wire rack for 15-20 minutes, flipping halfway.

Storage and Reheating Instructions

Store leftovers in an airtight container in the refrigerator for up to 2 days. Reheat in a 375°F (190°C) oven for 5-7 minutes to restore crispiness. Avoid microwaving as it will make the batter soggy.

This crispy battered cod and onion rings platter brings the fish and chips experience home with minimal effort. The contrast between the flaky cod and sweet onion rings makes every bite exciting, while the golden batter delivers that satisfying crunch we all crave in fried seafood.

Print
clock clock iconcutlery cutlery iconflag flag iconfolder folder iconinstagram instagram iconpinterest pinterest iconfacebook facebook iconprint print iconsquares squares iconheart heart iconheart solid heart solid icon

CRISPY BATTERED COD AND ONION RINGS PLATTER

  • Author: Seafood Delights Kitchen

Description

A classic fish and chips platter with a twist—featuring golden crispy battered cod and perfectly fried onion rings. Serve with tartar sauce and lemon wedges for a restaurant-quality meal at home.


Ingredients

Scale

For the Crust:

  • For the Cod:
  • 4 cod fillets (about 6 oz each)
  • 1 cup all-purpose flour
  • 1 tsp baking powder
  • 1 tsp salt
  • 1/2 tsp black pepper
  • 1 cup cold sparkling water or beer
  • 1 egg, lightly beaten
  • Vegetable oil (for frying)
  • For the Onion Rings:
  • 2 large sweet onions, sliced into rings
  • 1 cup buttermilk
  • 1 cup all-purpose flour
  • 1/2 cup cornstarch
  • 1 tsp paprika
  • 1 tsp garlic powder
  • 1/2 tsp cayenne pepper (optional)
  • Salt to taste
  • For Serving:
  • Tartar sauce
  • Lemon wedges
  • Fresh parsley (for garnish)

Instructions

1. Prepare the Crust:

  1. 1. Prepare the Cod Batter: In a large bowl, whisk together flour, baking powder, salt, and pepper. Add beaten egg and cold sparkling water (or beer), stirring until smooth. Let rest for 15 minutes.
  2. 2. Soak Onion Rings: Place sliced onion rings in buttermilk and let soak for 10 minutes while preparing the batter.
  3. 3. Heat Oil: Fill a deep fryer or heavy pot with 2-3 inches of vegetable oil. Heat to 375°F (190°C).
  4. 4. Coat Onion Rings: In a separate bowl, mix flour, cornstarch, paprika, garlic powder, cayenne, and salt. Dredge buttermilk-soaked onion rings in the flour mixture, shaking off excess.
  5. 5. Fry Onion Rings: Working in batches, fry onion rings for 2-3 minutes until golden brown. Drain on paper towels.
  6. 6. Batter & Fry Cod: Dip cod fillets into the prepared batter, letting excess drip off. Fry for 4-5 minutes until crispy and cooked through. Drain on paper towels.
  7. 7. Serve: Arrange cod and onion rings on a platter. Garnish with parsley and serve with tartar sauce and lemon wedges.

Notes

For extra crispiness, double-fry the onion rings. Keep fried items warm in a 200°F (95°C) oven while finishing batches. Substitute gluten-free flour if needed.

Crack Green Beans

Crack Green Beans: The Addictive Side Dish You Need to Try

If you’re searching for the ultimate crack green beans recipe that will have everyone begging for seconds, look no further. This irresistible side dish combines crisp green beans with a savory, slightly sweet sauce and crispy bacon for a flavor explosion that lives up to its addictive name. Perfect for potlucks, holiday meals, or weeknight dinners, these green beans disappear faster than you can make them.

Frequently Asked Questions

Can I use frozen green beans for this recipe?

While fresh green beans yield the best texture, you can substitute frozen in a pinch. Thaw completely and pat dry before using, and reduce baking time by 5 minutes.

How long do leftover crack green beans last?

Store leftovers in an airtight container in the refrigerator for up to 3 days. Reheat in the oven at 350°F for best results.

Can I make this recipe vegetarian?

For vegetarian crack green beans, omit the bacon and use 2 tablespoons olive oil instead of bacon drippings. Add 1 teaspoon smoked paprika for depth of flavor.

Why This Recipe Works

The magic of these easy crack green beans lies in the perfect balance of flavors and textures. The blanching preserves the beans’ vibrant color and crispness, while the sweet and salty sauce penetrates just enough to flavor without making them soggy. Bacon adds smoky richness, and the quick bake at the end brings all the elements together into an irresistible side dish that will become your new go-to recipe for any occasion.

Print
clock clock iconcutlery cutlery iconflag flag iconfolder folder iconinstagram instagram iconpinterest pinterest iconfacebook facebook iconprint print iconsquares squares iconheart heart iconheart solid heart solid icon

Description

These addictive green beans are loaded with bacon, garlic, and a sweet-savory glaze that makes them impossible to resist. Perfect as a side dish for any occasion!


Ingredients

Scale

For the Crust:

  • For the green beans:
  • 1.5 lbs fresh green beans, trimmed
  • 6 slices bacon, chopped
  • 3 cloves garlic, minced
  • For the glaze:
  • 1/4 cup brown sugar
  • 1/4 cup soy sauce
  • 2 tbsp butter
  • 1 tsp red pepper flakes (optional)
  • For garnish:
  • 1/4 cup sliced almonds, toasted

Instructions

1. Prepare the Crust:

  1. 1. In a large skillet over medium heat, cook chopped bacon until crispy. Remove with a slotted spoon and set aside, leaving bacon grease in the pan.
  2. 2. Add green beans to the skillet and sauté in bacon grease for 5 minutes until bright green but still crisp.
  3. 3. Push green beans to one side of the pan. Add minced garlic to the empty space and cook for 30 seconds until fragrant.
  4. 4. In a small bowl, whisk together brown sugar, soy sauce, butter, and red pepper flakes. Pour over green beans and stir to coat.
  5. 5. Continue cooking for 3-4 minutes until sauce thickens and coats the green beans.
  6. 6. Remove from heat and stir in reserved bacon pieces.
  7. 7. Transfer to a serving dish and top with toasted almonds before serving.

Notes

For crispier green beans, blanch them in boiling water for 2 minutes before sautéing. Can be made ahead and reheated – the flavors improve over time!

Cheeseburger Tot Nachos

Cheeseburger Tot Nachos: The Ultimate Game Day Snack

These Cheeseburger Tot Nachos combine two classic favorites into one irresistible appetizer. Perfect for game day, parties, or a fun family dinner, this recipe transforms crispy tater tots into a loaded nacho-style dish with all the flavors of a juicy cheeseburger. With melty cheese, savory ground beef, and classic burger toppings, this crowd-pleasing dish will disappear fast!

Why You’ll Love These Cheeseburger Tot Nachos

If you love the combination of crispy potatoes and cheeseburger flavors, this recipe is for you. The Cheeseburger Tot Nachos offer:

  • Easy preparation with minimal ingredients
  • Customizable toppings to suit any taste
  • Crispy tater tot base that holds up to toppings
  • All the classic cheeseburger flavors in nacho form

Cheeseburger Tot Nachos Ingredients

Gather these simple ingredients to make your loaded tater tot nachos:

  • 1 (32 oz) bag frozen tater tots
  • 1 lb ground beef (80/20 blend recommended)
  • 1 packet taco seasoning or burger seasoning
  • 2 cups shredded cheddar cheese
  • 1 cup shredded Monterey Jack cheese
  • 1/2 cup diced tomatoes
  • 1/4 cup diced red onion
  • 1/4 cup pickles, chopped
  • 1/4 cup ketchup
  • 1/4 cup mustard
  • 1 tbsp mayonnaise
  • 1 tsp Worcestershire sauce

How to Make Cheeseburger Tot Nachos

Follow these simple steps for perfect loaded tater tot nachos every time:

  1. Preheat oven to 425°F (220°C). Arrange tater tots in single layer on baking sheet.
  2. Bake tots for 20-25 minutes until golden brown and crispy.
  3. While tots bake, brown ground beef in skillet over medium heat. Drain excess fat.
  4. Add seasoning packet and 1/4 cup water to beef. Simmer 5 minutes.
  5. Mix mayonnaise, ketchup, mustard, and Worcestershire sauce to create special sauce.
  6. Remove tots from oven, sprinkle with cheeses and beef mixture.
  7. Return to oven for 3-5 minutes until cheese melts.
  8. Top with tomatoes, onions, pickles, and drizzle with special sauce.

Serving Suggestions for Your Tot Nachos

These Cheeseburger Tot Nachos are delicious on their own, but you can enhance them with:

  • Additional toppings like bacon bits or jalapeños
  • A side of ranch dressing for dipping
  • Cold beer or soda to drink
  • Extra napkins – these get messy!

Tips for Perfect Cheeseburger Tot Nachos

For the best results with your tater tot nacho recipe:

  • Use freshly shredded cheese for better melting
  • Spread tots evenly so every bite gets toppings
  • Add delicate toppings after baking to maintain texture
  • Serve immediately while hot and crispy

Storage and Reheating Instructions

While best enjoyed fresh, you can store leftovers in airtight container in refrigerator for 2 days. Reheat in 350°F oven for 10 minutes to restore crispiness. Microwave reheating will make tots soggy.

These Cheeseburger Tot Nachos offer all the satisfaction of a loaded burger in fun, shareable form. Whether you’re feeding a crowd or just craving something different, this creative twist on two classics will become a new favorite. The combination of crispy tots, seasoned beef, melty cheese, and classic burger toppings creates irresistible flavors and textures in every bite.

Print
clock clock iconcutlery cutlery iconflag flag iconfolder folder iconinstagram instagram iconpinterest pinterest iconfacebook facebook iconprint print iconsquares squares iconheart heart iconheart solid heart solid icon

Cheeseburger Tot Nachos

  • Author: The Comfort Kitchen

Description

A fun and indulgent twist on classic nachos, featuring crispy tater tots, seasoned ground beef, melty cheese, and all your favorite burger toppings. Perfect for game day or a cozy night in!


Ingredients

Scale

For the Crust:

  • For the Tots:
  • 1 (32 oz) bag frozen tater tots
  • 2 tablespoons olive oil
  • 1 teaspoon garlic powder
  • 1 teaspoon onion powder
  • For the Beef:
  • 1 pound ground beef (80/20 blend)
  • 1 small yellow onion, diced
  • 2 cloves garlic, minced
  • 1 tablespoon Worcestershire sauce
  • 1 teaspoon paprika
  • 1 teaspoon mustard powder
  • Salt and pepper to taste
  • For the Cheese Sauce:
  • 2 tablespoons butter
  • 2 tablespoons all-purpose flour
  • 1 cup whole milk
  • 2 cups shredded cheddar cheese
  • 1/4 teaspoon cayenne pepper (optional)
  • For Toppings:
  • 1 cup shredded lettuce
  • 1 tomato, diced
  • 1/4 cup diced pickles
  • 1/4 cup diced red onion
  • 1/4 cup ketchup
  • 1/4 cup mustard
  • 1/4 cup mayonnaise

Instructions

1. Prepare the Crust:

  1. 1. Preheat oven to 425°F (220°C). Line a large baking sheet with parchment paper.
  2. 2. In a large bowl, toss tater tots with olive oil, garlic powder, and onion powder until evenly coated. Spread in a single layer on the prepared baking sheet.
  3. 3. Bake for 25-30 minutes, flipping halfway, until golden and crispy.
  4. 4. While tots bake, cook beef: In a skillet over medium heat, brown ground beef with onion and garlic until no pink remains (5-7 minutes). Drain excess fat.
  5. 5. Stir in Worcestershire sauce, paprika, mustard powder, salt, and pepper. Reduce heat to low and keep warm.
  6. 6. Make cheese sauce: Melt butter in a saucepan over medium heat. Whisk in flour and cook for 1 minute. Gradually whisk in milk until smooth. Simmer for 2-3 minutes until thickened.
  7. 7. Remove from heat and stir in cheddar cheese until melted. Add cayenne if using.
  8. 8. Assemble: Arrange crispy tots on a platter. Top with beef mixture, drizzle with cheese sauce, then add lettuce, tomato, pickles, and red onion.
  9. 9. Serve immediately with ketchup, mustard, and mayonnaise on the side.

Notes

For extra crispiness, bake tots on a wire rack set over the baking sheet. Substitute ground turkey for a lighter option. Leftover cheese sauce can be refrigerated for 3 days (reheat with a splash of milk).

Chocolate Lava M&M Surprise Cookies

Chocolate Lava M&M Surprise Cookies: The Ultimate Gooey Treat

These Chocolate Lava M&M Surprise Cookies combine rich chocolate flavor with a molten center and colorful M&M candies for an irresistible dessert. Perfect for parties, holidays, or anytime you crave a decadent cookie with a fun surprise inside. Follow this easy recipe to create bakery-worthy treats that will impress everyone.

Why You’ll Love These Chocolate Lava M&M Surprise Cookies

These cookies stand out because they feature:

  • A soft chocolate cookie exterior
  • A warm, gooey chocolate lava center
  • Colorful M&M candies for crunch and sweetness
  • Simple ingredients with professional results

Ingredients for Chocolate Lava M&M Surprise Cookies

Makes 24 cookies

  • 1 cup unsalted butter, softened
  • 1 cup granulated sugar
  • 1 cup brown sugar, packed
  • 2 large eggs
  • 2 teaspoons vanilla extract
  • 2 1/2 cups all-purpose flour
  • 3/4 cup cocoa powder
  • 1 teaspoon baking soda
  • 1/2 teaspoon salt
  • 1 cup M&M candies
  • 24 chocolate truffles or chocolate squares for the lava center

Step-by-Step Instructions

1. Prepare the Cookie Dough

Preheat oven to 375°F (190°C). In a large bowl, cream together butter and both sugars until light and fluffy. Beat in eggs one at a time, then stir in vanilla.

2. Combine Dry Ingredients

In a separate bowl, whisk together flour, cocoa powder, baking soda, and salt. Gradually add to the wet ingredients, mixing until just combined.

3. Add the M&M Surprise

Fold in M&M candies, reserving some for topping. The dough will be thick but manageable.

4. Create the Lava Centers

Take about 2 tablespoons of dough and flatten it in your palm. Place a chocolate truffle in the center and wrap the dough around it, sealing completely. Repeat for all cookies.

5. Bake to Perfection

Place dough balls on parchment-lined baking sheets, spacing 2 inches apart. Gently press reserved M&Ms on top. Bake for 10-12 minutes until edges are set but centers are still soft.

6. Cool and Serve

Let cookies cool on baking sheets for 5 minutes before transferring to wire racks. Serve warm for the best lava effect.

Expert Tips for Perfect Chocolate Lava Cookies

  • Use high-quality chocolate for the lava center – chocolate squares or truffles work best
  • Don’t overbake – the cookies will continue to set as they cool
  • For extra chocolate flavor, add 1/2 cup chocolate chips to the dough
  • Try seasonal M&M colors for holiday variations

Storage and Serving Suggestions

Store cooled cookies in an airtight container at room temperature for up to 5 days. For the lava effect, reheat in the microwave for 10-15 seconds before serving. These cookies pair wonderfully with:

  • Vanilla ice cream
  • Cold milk
  • Hot coffee

Frequently Asked Questions

Can I make these cookies ahead of time?

Yes! You can prepare the dough balls and freeze them before baking. When ready to bake, simply add 1-2 minutes to the baking time.

What can I use instead of M&Ms?

Try Reese’s Pieces, chopped nuts, or chocolate chips as alternatives to M&Ms in this recipe.

How do I know when the cookies are done?

The edges should be set but the centers will still look slightly underbaked – this ensures the molten chocolate center.

Final Thoughts on These Decadent Cookies

These Chocolate Lava M&M Surprise Cookies offer the perfect combination of textures and flavors in every bite. The crisp exterior gives way to a soft cookie and finally to that irresistible molten chocolate center, while the M&Ms add pops of color and sweetness. Whether you’re baking for a special occasion or just want to treat yourself, this recipe delivers impressive results with simple techniques.

Print
clock clock iconcutlery cutlery iconflag flag iconfolder folder iconinstagram instagram iconpinterest pinterest iconfacebook facebook iconprint print iconsquares squares iconheart heart iconheart solid heart solid icon

Chocolate Lava M&M Surprise Cookies

  • Author: Bakery Delights

Description

Decadent chocolate cookies with a molten chocolate center and colorful M&M surprises in every bite. Perfect for celebrations or when you need a chocolate fix!


Ingredients

Scale

For the Crust:

  • For the cookie dough:
  • 1 cup unsalted butter, softened
  • 1 1/2 cups granulated sugar
  • 2 large eggs
  • 2 teaspoons vanilla extract
  • 2 cups all-purpose flour
  • 3/4 cup cocoa powder
  • 1 teaspoon baking soda
  • 1/2 teaspoon salt
  • For the filling & topping:
  • 24 chocolate truffles or chocolate squares (for lava centers)
  • 1 cup M&M’s (regular or mini)
  • 1/4 cup powdered sugar (for dusting)

Instructions

1. Prepare the Crust:

  1. 1. Preheat oven to 350°F (175°C) and line baking sheets with parchment paper.
  2. 2. In a large bowl, cream together butter and sugar until light and fluffy (3-4 minutes).
  3. 3. Beat in eggs one at a time, then add vanilla extract.
  4. 4. In a separate bowl, whisk together flour, cocoa powder, baking soda, and salt.
  5. 5. Gradually add dry ingredients to wet ingredients, mixing until just combined.
  6. 6. Fold in 1/2 cup of M&M’s into the dough.
  7. 7. Scoop 2 tablespoons of dough, flatten slightly, and place a chocolate truffle in the center. Wrap dough around truffle completely, forming a ball.
  8. 8. Place dough balls 2 inches apart on baking sheets. Press remaining M&M’s onto tops of cookies.
  9. 9. Bake for 10-12 minutes until edges are set but centers still look slightly soft.
  10. 10. Let cool on baking sheets for 5 minutes, then transfer to wire racks.
  11. 11. Dust with powdered sugar while still warm for extra presentation points!

Notes

• For best results, use room temperature ingredients. • Underbake slightly for maximum lava effect. • Store in airtight container for up to 3 days (reheat briefly for molten center). • Freeze unbaked dough balls for up to 2 months – bake from frozen adding 1-2 extra minutes.

Smothered Pork Chop Scalloped Potato Casserole

Smothered Pork Chop Scalloped Potato Casserole

This Smothered Pork Chop Scalloped Potato Casserole combines tender pork chops with creamy scalloped potatoes for the ultimate comfort food experience. Perfect for family dinners or special occasions, this hearty dish brings together classic flavors in one delicious bake. Follow our easy recipe to create this crowd-pleasing casserole that’s sure to become a regular in your meal rotation.

Frequently Asked Questions

Can I use boneless pork chops?

Yes, boneless pork chops work well in this recipe. Reduce cooking time by about 10 minutes as they cook faster than bone-in chops.

Can I make this casserole ahead?

You can assemble the casserole up to a day in advance. Cover and refrigerate until ready to bake. Add 10-15 minutes to the baking time if starting from cold.

What potatoes work best?

Russet potatoes are ideal for scalloped potatoes as they hold their shape well. Yukon Gold potatoes also work nicely for a creamier texture.

Final Thoughts

This smothered pork chop scalloped potato casserole delivers comfort food perfection with minimal effort. The combination of tender pork, creamy potatoes, and melted cheese creates a satisfying meal that pleases both kids and adults. Whether you’re looking for an easy weeknight dinner or a dish to bring to potlucks, this recipe is sure to impress with its delicious flavors and hearty portions.

Print
clock clock iconcutlery cutlery iconflag flag iconfolder folder iconinstagram instagram iconpinterest pinterest iconfacebook facebook iconprint print iconsquares squares iconheart heart iconheart solid heart solid icon

Smothered Pork Chop Scalloped Potato Casserole

  • Author: Chef HomeCook

Description

A hearty and comforting casserole featuring tender pork chops smothered in a rich gravy and layered with creamy scalloped potatoes. Perfect for a family dinner or special occasion.


Ingredients

Scale

For the Crust:

  • For the Pork Chops:
  • 4 bone-in pork chops (about 1-inch thick)
  • 1 teaspoon salt
  • 1 teaspoon black pepper
  • 1 teaspoon garlic powder
  • 1 teaspoon onion powder
  • 2 tablespoons olive oil
  • For the Scalloped Potatoes:
  • 4 large russet potatoes, thinly sliced
  • 1 medium onion, thinly sliced
  • 2 cups shredded cheddar cheese
  • 1 cup heavy cream
  • 1/2 cup whole milk
  • 2 tablespoons butter
  • 1 teaspoon salt
  • 1/2 teaspoon black pepper
  • 1/2 teaspoon dried thyme
  • For the Gravy:
  • 2 tablespoons butter
  • 2 tablespoons all-purpose flour
  • 1 1/2 cups chicken broth
  • 1/2 cup heavy cream
  • 1 teaspoon Worcestershire sauce
  • Salt and pepper to taste

Instructions

1. Prepare the Crust:

  1. 1. Preheat oven to 375°F (190°C). Grease a 9×13-inch baking dish.
  2. 2. Season pork chops with salt, pepper, garlic powder, and onion powder.
  3. 3. Heat olive oil in a large skillet over medium-high heat. Sear pork chops for 3-4 minutes per side until golden brown. Remove and set aside.
  4. 4. In the same skillet, melt butter for the gravy. Whisk in flour and cook for 1 minute. Gradually add chicken broth, heavy cream, and Worcestershire sauce. Simmer until thickened. Season with salt and pepper.
  5. 5. Layer half the sliced potatoes and onions in the baking dish. Sprinkle with half the cheese, salt, pepper, and thyme. Repeat with remaining potatoes, onions, and cheese.
  6. 6. Pour the heavy cream and milk mixture over the potatoes. Dot with butter.
  7. 7. Place seared pork chops on top of the potatoes. Pour the gravy over the pork chops.
  8. 8. Cover with foil and bake for 45 minutes. Remove foil and bake for another 15-20 minutes until potatoes are tender and top is golden.
  9. 9. Let rest for 10 minutes before serving.

Notes

For extra flavor, add a sprinkle of smoked paprika to the pork chops before searing. Leftovers can be stored in the refrigerator for up to 3 days.