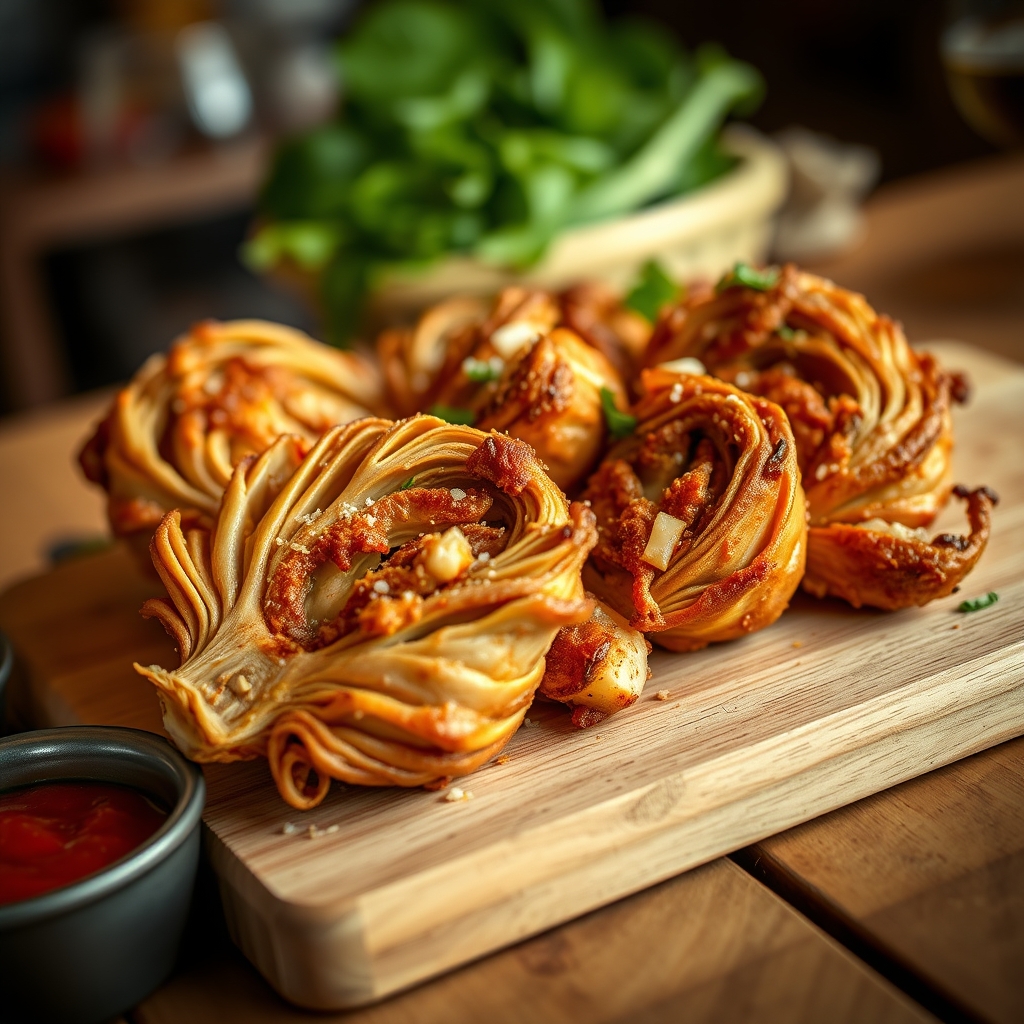
Crispy Parmesan Artichoke Hearts
There’s something undeniably magical about the combination of crispy, golden-brown edges and tender, flavorful artichoke hearts. This recipe for Crispy Parmesan Artichoke Hearts is a game-changer—whether you’re hosting a dinner party, looking for a show-stopping appetizer, or simply craving a savory snack. With a crunchy parmesan crust and a perfectly seasoned interior, these bites are sure to become a staple in your kitchen. Let’s dive into why this recipe is a must-try and how to make it flawlessly every time.
Why You’ll Love This Recipe
First, let’s talk about why this recipe deserves a spot in your culinary repertoire. Here are just a few reasons you’ll fall in love with these Crispy Parmesan Artichoke Hearts:
- Irresistible Texture: The contrast between the crispy, cheesy exterior and the tender artichoke hearts inside is pure perfection.
- Quick and Easy: With minimal prep time and simple ingredients, this dish comes together in under 30 minutes.
- Crowd-Pleasing: Whether served as an appetizer, side dish, or even a snack, these artichoke hearts disappear fast at gatherings.
- Versatile: Pair them with dips, salads, or enjoy them straight from the oven—they’re endlessly adaptable.
- Elegant Yet Approachable: They look gourmet but are simple enough for weeknight dinners.
Ingredients Breakdown
Every great recipe starts with quality ingredients. Here’s what you’ll need and why each one matters:
- Canned or Jarred Artichoke Hearts: The star of the dish. Look for quartered artichoke hearts in water or brine for the best texture.
- Parmesan Cheese: Freshly grated parmesan adds a rich, nutty flavor and helps create that irresistible crispy crust.
- Breadcrumbs: Panko breadcrumbs work best for extra crunch, but regular breadcrumbs will do in a pinch.
- Garlic Powder: A little goes a long way in enhancing the savory depth of the dish.
- Olive Oil: Helps bind the coating and ensures even browning in the oven.
- Salt and Pepper: Essential for seasoning and balancing the flavors.
- Fresh Parsley (optional): A sprinkle of fresh herbs adds brightness and color.
How to Make Crispy Parmesan Artichoke Hearts
Now, let’s walk through the steps to achieve crispy, golden perfection:
- Prep the Artichokes: Drain and pat dry the artichoke hearts thoroughly. Removing excess moisture is key for crispiness.
- Make the Coating: In a bowl, mix grated parmesan, breadcrumbs, garlic powder, salt, and pepper.
- Coat the Artichokes: Lightly brush each artichoke heart with olive oil, then roll them in the parmesan mixture until fully coated.
- Arrange on a Baking Sheet: Place the coated artichokes on a parchment-lined baking sheet, ensuring they’re spaced apart for even cooking.
- Bake to Perfection: Bake at 400°F for 15–20 minutes, flipping halfway, until golden and crispy.
- Garnish and Serve: Sprinkle with fresh parsley if desired, and serve immediately while hot.
Pro Tips for the Best Results
Want to take your Crispy Parmesan Artichoke Hearts to the next level? Try these expert tips:
- Dry Thoroughly: Any lingering moisture will prevent crispiness, so take the time to pat the artichokes dry.
- Use Freshly Grated Parmesan: Pre-grated cheese often contains anti-caking agents that can affect texture.
- Don’t Skip the Flip: Turning the artichokes halfway ensures even browning on all sides.
- Broil for Extra Crispiness: For a deeper golden crust, broil for the last 1–2 minutes (watch closely to avoid burning).
Variations and Substitutions
This recipe is wonderfully adaptable. Here are some delicious twists to try:
- Spicy Kick: Add a pinch of red pepper flakes or cayenne to the coating mix.
- Herb-Infused: Mix in dried oregano, thyme, or rosemary for an earthy flavor.
- Gluten-Free: Swap panko for almond flour or gluten-free breadcrumbs.
- Air Fryer Method: Cook at 375°F for 8–10 minutes, shaking halfway, for a quicker, crispier result.
What to Serve With It
These artichoke hearts are versatile enough to pair with almost anything. Here are some winning combinations:
- Dipping Sauces: Marinara, garlic aioli, or lemon tahini sauce complement the flavors beautifully.
- Salads: Serve atop a fresh arugula salad with shaved parmesan and a lemon vinaigrette.
- Pasta: Toss them into a creamy Alfredo or lemon garlic pasta for added texture.
- Charcuterie Boards: Add them to an antipasto spread for a gourmet touch.
How to Store and Reheat
While these are best enjoyed fresh, here’s how to handle leftovers:
- Refrigeration: Store in an airtight container for up to 3 days.
- Reheating: To revive the crispiness, reheat in a 350°F oven or air fryer for 5–7 minutes.
- Freezing: Freeze before baking. When ready to eat, bake straight from frozen, adding a few extra minutes.
Frequently Asked Questions (FAQs)
Let’s address some common questions about this recipe:
Can I use fresh artichokes instead of canned?
While possible, fresh artichokes require extensive prep (trimming, steaming, and removing the choke). Canned or jarred artichokes save time and work perfectly here.
Why are my artichoke hearts soggy?
This usually happens if they aren’t dried well before coating or if they’re overcrowded on the baking sheet. Ensure proper spacing and dryness for crisp results.
Can I make these ahead of time?
Yes! Prep the coated artichokes and refrigerate for up to 24 hours before baking. Add a few extra minutes to the cooking time if chilled.
Final Thoughts
Crispy Parmesan Artichoke Hearts are proof that simple ingredients can create something extraordinary. Whether you’re serving them as an elegant appetizer or enjoying them as a savory snack, their crispy, cheesy goodness is sure to impress. I’d love to hear how you make this recipe your own—maybe with a sprinkle of smoked paprika or a dash of truffle oil? Whatever your twist, happy cooking, and enjoy every crispy bite!
Print
Crispy Parmesan Artichoke Hearts
Description
Golden, crispy artichoke hearts coated in a savory Parmesan and breadcrumb crust, perfect as an appetizer or side dish. These are baked to perfection for a healthier twist without sacrificing crunch.
Ingredients
For the Crust:
- For the Artichokes:
- 2 (14 oz) cans artichoke hearts, drained and patted dry
- 1/2 cup all-purpose flour
- 2 large eggs, beaten
- For the Coating:
- 1 cup Panko breadcrumbs
- 1/2 cup grated Parmesan cheese
- 1 tsp garlic powder
- 1 tsp dried oregano
- 1/2 tsp smoked paprika
- 1/4 tsp black pepper
- For Serving:
- Lemon wedges
- Fresh parsley, chopped
- Marinara sauce (optional)
Instructions
1. Prepare the Crust:
- Preheat oven to 425°F (220°C). Line a baking sheet with parchment paper.
- Set up a breading station: Place flour in one shallow bowl, beaten eggs in another, and in a third bowl, mix Panko, Parmesan, garlic powder, oregano, paprika, and pepper.
- Dredge each artichoke heart in flour, shaking off excess. Dip in egg, then coat thoroughly with the Parmesan breadcrumb mixture. Place on the baking sheet.
- Lightly spray or drizzle coated artichokes with olive oil for extra crispiness.
- Bake for 18–20 minutes until golden brown and crispy, flipping halfway through.
- Garnish with parsley and serve immediately with lemon wedges and marinara sauce if desired.
Notes
For extra crispiness, use an air fryer at 400°F (200°C) for 10–12 minutes. Fresh artichoke hearts can be used—steam until tender before breading.