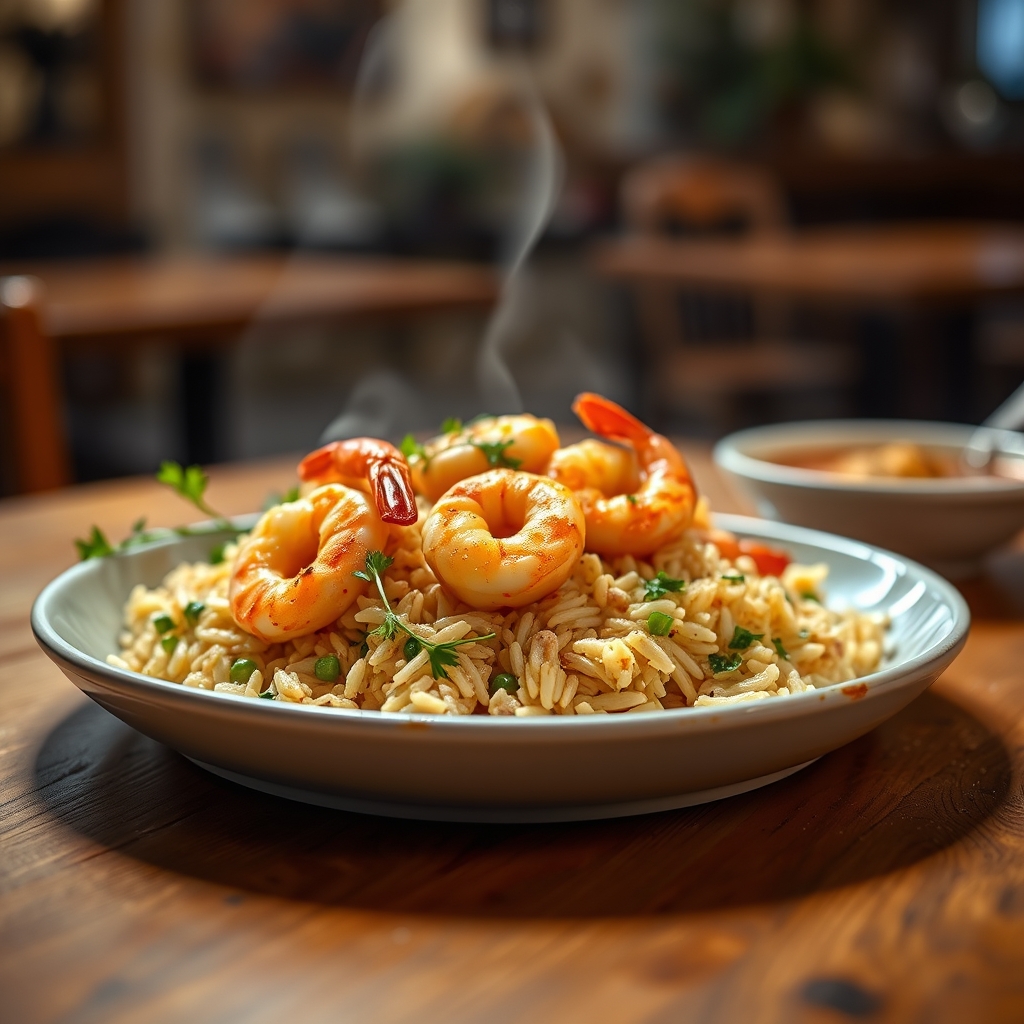
Garlic Butter Shrimp and Rice Skillet
There’s something undeniably comforting about a one-pan meal that comes together effortlessly yet tastes like it took hours to prepare. This Garlic Butter Shrimp and Rice Skillet is exactly that—a dish bursting with rich, buttery garlic flavor, tender shrimp, and perfectly cooked rice, all simmered in a savory broth that ties everything together. Whether you’re cooking for a weeknight dinner or entertaining guests, this recipe is a surefire way to impress without the stress. Let’s dive into why this dish deserves a permanent spot in your recipe rotation.
Why You’ll Love This Recipe
First, this recipe is a one-pan wonder, meaning fewer dishes to wash and more time to savor your meal. The entire dish cooks in a single skillet, from the aromatic garlic butter base to the final garnish of fresh herbs.
Second, the flavor profile is irresistible. The combination of garlic, butter, and shrimp creates a luxurious taste that feels restaurant-worthy, while the rice soaks up all the delicious juices for a satisfying bite in every forkful.
Third, it’s quick and easy. From start to finish, this dish takes about 30 minutes, making it perfect for busy evenings when you want something hearty and flavorful without spending hours in the kitchen.
Finally, it’s versatile. You can customize it with different spices, vegetables, or even protein swaps to suit your preferences or dietary needs. Whether you’re cooking for picky eaters or adventurous foodies, this recipe adapts beautifully.
Ingredients Breakdown
Understanding the role of each ingredient helps you appreciate why this dish works so well. Here’s what you’ll need:
Shrimp: Opt for large, peeled, and deveined shrimp for ease and texture. Shrimp cooks quickly and absorbs flavors beautifully, making it the star of this dish.
Butter: Unsalted butter is best, as it allows you to control the saltiness of the dish. Butter adds richness and helps create a velvety sauce.
Garlic: Freshly minced garlic is non-negotiable here—it infuses the dish with its unmistakable aroma and depth of flavor.
Rice: Long-grain white rice works best for its fluffy texture and ability to absorb liquid evenly. Avoid short-grain or instant rice, as they can become mushy.
Chicken or Vegetable Broth: This forms the cooking liquid for the rice, adding savory depth. Low-sodium broth is ideal to prevent over-salting.
Lemon Juice: A splash of acidity brightens the dish and balances the richness of the butter.
Fresh Herbs: Parsley or cilantro adds a fresh, vibrant finish. Don’t skip this—it makes a difference.
How to Make Garlic Butter Shrimp and Rice Skillet
Follow these steps for a foolproof, flavorful skillet meal:
Step 1: Prep the Shrimp – Pat the shrimp dry with paper towels to ensure they sear properly. Season lightly with salt and pepper.
Step 2: Sauté the Garlic – In a large skillet, melt butter over medium heat. Add minced garlic and cook just until fragrant—about 30 seconds. Be careful not to burn it.
Step 3: Cook the Shrimp – Add the shrimp in a single layer and cook for 1-2 minutes per side until pink and opaque. Remove them to a plate and set aside.
Step 4: Toast the Rice – In the same skillet, add a bit more butter if needed, then stir in the rice. Let it toast for a minute to enhance its nutty flavor.
Step 5: Simmer the Rice – Pour in the broth and bring to a gentle boil. Reduce heat to low, cover, and let the rice cook for 15-18 minutes, or until tender.
Step 6: Return the Shrimp – Once the rice is done, nestle the shrimp back into the skillet. Drizzle with lemon juice and sprinkle with fresh herbs. Cover for a minute to let the shrimp warm through.
Step 7: Serve Immediately – Fluff the rice gently with a fork, garnish with extra herbs if desired, and enjoy while hot.
Pro Tips for the Best Results
To take your Garlic Butter Shrimp and Rice Skillet to the next level, keep these expert tips in mind:
Use Fresh Garlic: Pre-minced garlic lacks the punch of freshly minced cloves. Take the extra minute to mince it yourself for the best flavor.
Don’t Overcook the Shrimp: Shrimp cooks quickly and can turn rubbery if left on the heat too long. Remove it as soon as it turns pink.
Let the Rice Rest: After cooking, let the skillet sit covered for 5 minutes off the heat. This allows the rice to steam and become perfectly fluffy.
Deglaze for Extra Flavor: If bits of garlic or shrimp stick to the pan when cooking, splash in a little broth to loosen them. These browned bits add incredible depth.
Variations and Substitutions
This recipe is wonderfully adaptable. Here are some ways to make it your own:
Protein Swaps: Not a fan of shrimp? Try diced chicken, scallops, or even tofu for a vegetarian version.
Vegetable Add-Ins: Stir in spinach, diced bell peppers, or peas during the last few minutes of cooking for extra color and nutrition.
Spice It Up: Add a pinch of red pepper flakes or a dash of Cajun seasoning for a spicy kick.
Dairy-Free Option: Replace butter with olive oil or a plant-based butter alternative for a dairy-free version.
What to Serve With It
While this dish is hearty enough to stand alone, here are a few pairing ideas to round out the meal:
Side Salad: A simple arugula salad with lemon vinaigrette adds a refreshing contrast.
Garlic Bread: For carb lovers, a slice of crusty garlic bread is perfect for soaking up any extra sauce.
White Wine: A crisp Sauvignon Blanc or Chardonnay complements the buttery shrimp beautifully.
Roasted Vegetables: Serve with roasted asparagus or green beans for a well-balanced plate.
How to Store and Reheat
Leftovers can be stored in an airtight container in the refrigerator for up to 3 days. To reheat:
Stovetop Method: Warm in a skillet over low heat with a splash of broth to prevent drying out.
Microwave Method: Cover with a damp paper towel and heat in 30-second intervals, stirring in between.
Note: Freezing is not recommended, as the shrimp may become tough upon thawing.
Frequently Asked Questions (FAQs)
Can I use frozen shrimp? Yes, but thaw it completely and pat it dry before cooking to avoid excess moisture.
What if I don’t have long-grain rice? Basmati or jasmine rice can be substituted, but adjust cooking times as needed.
Can I make this ahead of time? While best served fresh, you can prep ingredients in advance and cook just before serving.
How do I prevent the rice from sticking? Use a non-stick skillet or ensure the heat is low enough to prevent burning.
Is this recipe gluten-free? Yes, as long as your broth is gluten-free, this dish is naturally gluten-free.
Final Thoughts
This Garlic Butter Shrimp and Rice Skillet is more than just a meal—it’s a celebration of simple ingredients coming together in the most delicious way. Whether you’re cooking for yourself or sharing it with loved ones, this dish promises comfort, flavor, and ease in every bite. Don’t be surprised if it becomes a regular in your dinner lineup. Happy cooking!
Print
Garlic Butter Shrimp and Rice Skillet
Description
A one-pan wonder featuring succulent shrimp cooked in a rich garlic butter sauce, served over fluffy rice with a hint of lemon. Quick, easy, and packed with flavor!
Ingredients
For the Crust:
- For the shrimp:
- 1 lb large shrimp, peeled and deveined
- 2 tbsp olive oil
- 4 tbsp unsalted butter
- 4 cloves garlic, minced
- 1 tsp paprika
- 1/2 tsp red pepper flakes
- Salt and black pepper to taste
- For the rice:
- 1 1/2 cups long-grain white rice, rinsed
- 2 1/2 cups chicken broth
- 1 tbsp lemon juice
- 1/4 cup chopped fresh parsley
- For garnish:
- Lemon wedges
- Extra parsley
Instructions
1. Prepare the Crust:
- 1. In a large skillet, heat olive oil over medium-high heat. Add shrimp and cook for 1-2 minutes per side until pink. Remove and set aside.
- 2. In the same skillet, melt butter. Add garlic, paprika, and red pepper flakes. Cook for 30 seconds until fragrant.
- 3. Stir in rice, coating it with the garlic butter mixture. Pour in chicken broth and lemon juice. Bring to a boil.
- 4. Reduce heat to low, cover, and simmer for 15-18 minutes until rice is tender and liquid is absorbed.
- 5. Return shrimp to the skillet, stirring gently to combine. Cover and let sit for 2 minutes to heat through.
- 6. Garnish with fresh parsley and serve with lemon wedges.
Notes
For extra richness, substitute 1/2 cup of chicken broth with white wine. Frozen shrimp works well—just thaw and pat dry before cooking. Leftovers keep refrigerated for up to 2 days.