easy Kool Aid Pie recipe

easy Kool Aid Pie recipe

There’s something undeniably nostalgic about Kool Aid—the bright colors, the sweet-tart flavors, and the way it instantly transports you back to childhood summers. Now imagine that vibrant taste transformed into a creamy, dreamy pie that’s as fun to make as it is to eat. This easy Kool Aid Pie recipe is a no-bake dessert that’s perfect for potlucks, family gatherings, or just satisfying a sweet craving. Whether you’re a seasoned baker or a kitchen newbie, this recipe is foolproof and guaranteed to bring smiles to the table.

Why You’ll Love This Recipe

If you’re still on the fence about making this playful dessert, here are a few reasons why it’s a must-try:

  • Effortless and No-Bake – No oven required! This pie comes together in minutes with just a few simple steps, making it ideal for hot summer days or last-minute dessert emergencies.
  • Bursting with Flavor – The tangy sweetness of Kool Aid gives this pie a unique and refreshing taste that stands out from traditional desserts.
  • Kid-Friendly and Fun – Bright, colorful, and irresistibly sweet, this pie is a hit with kids and adults alike. It’s a great way to get little ones involved in the kitchen.
  • Budget-Friendly Ingredients – With just a handful of pantry staples and a packet of Kool Aid, this dessert won’t break the bank.
  • Endless Customization – Swap flavors, add toppings, or mix in extras to make it your own. The possibilities are endless!

Ingredients Breakdown

Let’s take a closer look at the key ingredients that make this easy Kool Aid Pie so delicious:

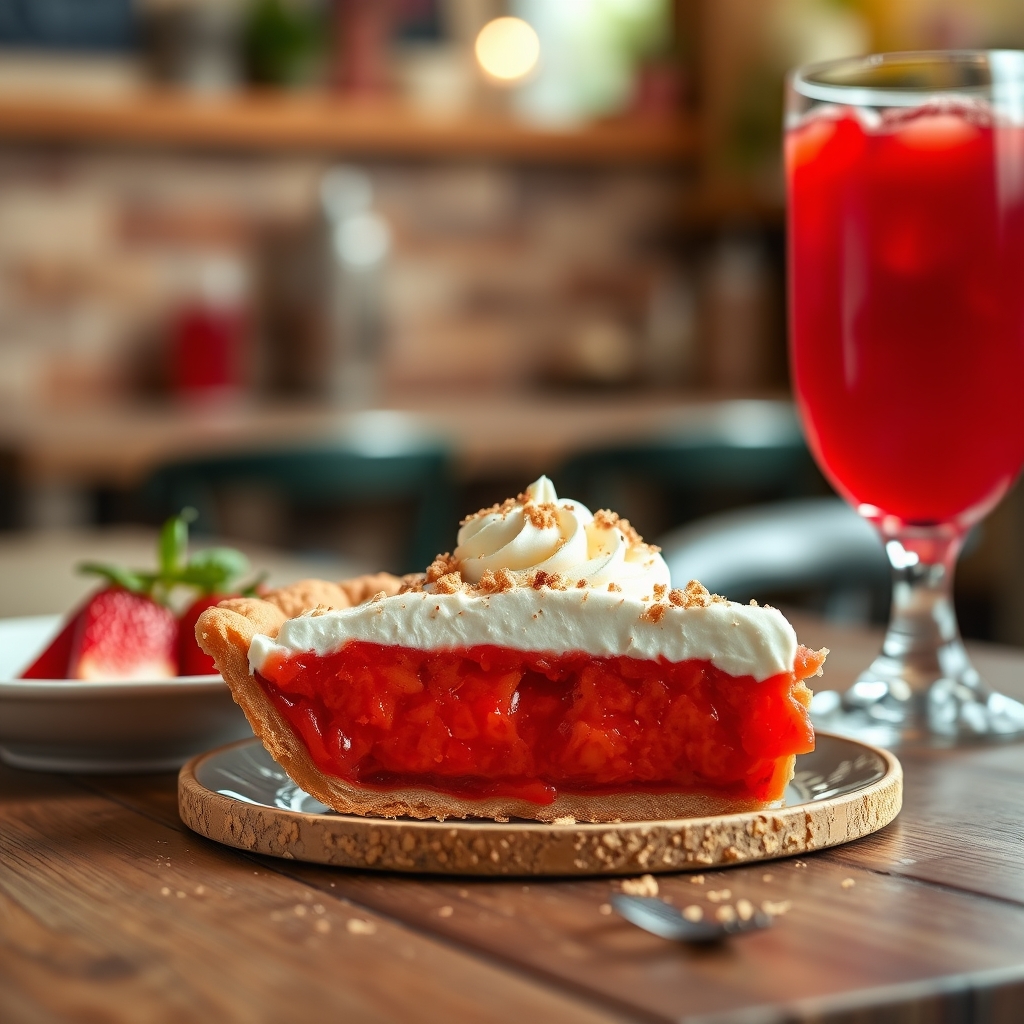
  • Kool Aid Packet – The star of the show! Any flavor works, but cherry, grape, and tropical punch are fan favorites. The powder provides both vibrant color and that signature tangy sweetness.
  • Sweetened Condensed Milk – This thick, rich milk adds creaminess and sweetness, balancing the tartness of the Kool Aid.
  • Whipped Topping – Light and fluffy, whipped topping (like Cool Whip) gives the pie its airy texture. You can also use homemade whipped cream for a fresher taste.
  • Graham Cracker Crust – A pre-made crust keeps things simple, but you can easily make your own by crushing graham crackers and mixing them with melted butter and sugar.

How to Make easy Kool Aid Pie recipe

Ready to whip up this nostalgic treat? Follow these simple steps for the best results:

  1. Prepare Your Ingredients – Gather your Kool Aid packet, sweetened condensed milk, whipped topping, and graham cracker crust. Let the whipped topping thaw slightly if frozen.
  2. Mix the Kool Aid and Condensed Milk – In a large bowl, whisk together the Kool Aid powder and sweetened condensed milk until fully combined. The mixture will thicken slightly.
  3. Fold in the Whipped Topping – Gently fold the whipped topping into the Kool Aid mixture until smooth and evenly colored. Avoid overmixing to keep the filling light.
  4. Fill the Crust – Pour the filling into the graham cracker crust, spreading it evenly with a spatula.
  5. Chill and Set – Refrigerate the pie for at least 4 hours, or preferably overnight, to allow it to firm up.
  6. Slice and Serve – Once set, slice into wedges and enjoy! For extra flair, top with additional whipped cream or fresh fruit.

Pro Tips for the Best Results

Want to take your easy Kool Aid Pie to the next level? Try these expert tips:

  • Use Full-Fat Ingredients – For the creamiest texture, stick with regular sweetened condensed milk and whipped topping. Low-fat versions can make the filling watery.
  • Let It Chill Properly – Patience is key! Allowing the pie to set overnight ensures the perfect sliceable consistency.
  • Experiment with Flavors – Mix and match Kool Aid flavors for unique combinations. Lemon-lime with blue raspberry? Absolutely!
  • Add a Citrus Zing – A splash of lemon or lime juice can enhance the tartness and balance the sweetness.

Variations and Substitutions

This recipe is incredibly versatile. Here are some fun twists to try:

  • Dairy-Free Version – Use coconut whipped topping and a dairy-free condensed milk alternative.
  • Crunchy Add-Ins – Stir in crushed cookies, sprinkles, or mini marshmallows for extra texture.
  • Layered Pie – Alternate Kool Aid flavors in layers for a stunning ombre effect.
  • Individual Servings – Make mini pies in muffin tins with graham cracker crusts for a party-friendly option.

What to Serve With It

This easy Kool Aid Pie pairs wonderfully with:

  • A scoop of vanilla ice cream for an extra indulgent treat.
  • Fresh berries or sliced citrus to cut through the sweetness.
  • A cold glass of lemonade or iced tea for a refreshing summer combo.

How to Store and Reheat

Since this is a no-bake pie, storage is simple:

  • Refrigeration – Keep covered in the fridge for up to 5 days.
  • Freezing – While possible, freezing may alter the texture. If freezing, wrap tightly and thaw in the fridge before serving.
  • Reheating – Not necessary! Enjoy chilled straight from the fridge.

Frequently Asked Questions (FAQs)

Can I use sugar-free Kool Aid?
Yes, but keep in mind that sugar-free Kool Aid may affect the sweetness and texture. Adjust with a little extra sweetener if needed.

Can I make this without a graham cracker crust?
Absolutely! Try an Oreo crust, pretzel crust, or even a shortbread crust for a different flavor profile.

Why is my pie too runny?
This usually happens if the pie hasn’t chilled long enough or if low-fat ingredients were used. Give it more time in the fridge, or stick to full-fat options next time.

Can I use fresh whipped cream instead of Cool Whip?
Yes, but stabilize it with a bit of powdered sugar or cornstarch to prevent weeping.

How far in advance can I make this pie?
It keeps well for up to 5 days in the fridge, making it a great make-ahead dessert.

Final Thoughts

There’s a reason this easy Kool Aid Pie has stood the test of time—it’s simple, nostalgic, and downright delicious. Whether you’re serving it at a backyard barbecue, a birthday party, or just as a sweet treat for yourself, it’s guaranteed to bring joy. So grab your favorite Kool Aid flavor, whip up a batch, and savor every bite of this playful, creamy dessert. Happy baking—or rather, happy no-baking!

Print
clock clock iconcutlery cutlery iconflag flag iconfolder folder iconinstagram instagram iconpinterest pinterest iconfacebook facebook iconprint print iconsquares squares iconheart heart iconheart solid heart solid icon

Easy Kool-Aid Pie

  • Author: Classic American Desserts

Description

A vibrant, no-bake pie that’s bursting with fruity flavor and creamy texture. This easy Kool-Aid pie recipe uses just a few simple ingredients for a nostalgic dessert that’s perfect for summer gatherings or anytime you crave something sweet and tangy.


Ingredients

Scale

For the Crust:

  • For the crust:
  • 1 1/2 cups graham cracker crumbs
  • 1/3 cup granulated sugar
  • 6 tablespoons melted butter
  • For the filling:
  • 1 (14 oz) can sweetened condensed milk
  • 1 (8 oz) container frozen whipped topping (thawed)
  • 1 packet (0.13 oz) unsweetened Kool-Aid mix (any flavor)
  • 1/2 cup cold water
  • For garnish (optional):
  • Additional whipped topping
  • Fresh fruit matching Kool-Aid flavor

Instructions

1. Prepare the Crust:

  1. 1. Make the crust: In a medium bowl, mix graham cracker crumbs, sugar, and melted butter until combined.
  2. 2. Press mixture firmly into a 9-inch pie plate, covering bottom and sides evenly. Chill for 30 minutes.
  3. 3. Prepare filling: In a large bowl, whisk Kool-Aid packet with cold water until fully dissolved.
  4. 4. Add sweetened condensed milk to Kool-Aid mixture and whisk until smooth and vibrant in color.
  5. 5. Gently fold in thawed whipped topping until no white streaks remain.
  6. 6. Pour filling into chilled crust and smooth the top with a spatula.
  7. 7. Refrigerate for at least 4 hours (preferably overnight) until set.
  8. 8. Before serving, garnish with additional whipped topping and fresh fruit if desired.

Notes

For best results, use classic Kool-Aid flavors like cherry, grape, or tropical punch. The pie will keep refrigerated for 3-4 days. For a firmer texture, freeze for 1 hour before serving.

Carrot Apple Zucchini Bread

Carrot Apple Zucchini Bread

There’s something undeniably comforting about a slice of homemade quick bread, especially when it’s packed with wholesome ingredients like carrots, apples, and zucchini. This Carrot Apple Zucchini Bread is a delightful fusion of flavors and textures—moist, subtly sweet, and brimming with nutrients. Whether you’re looking for a healthy breakfast option, a satisfying snack, or a dessert that doesn’t feel overly indulgent, this recipe checks all the boxes. Let’s dive into why this bread deserves a spot in your baking rotation.

Why You’ll Love This Recipe

First, this bread is incredibly moist thanks to the natural juices from the shredded zucchini and grated apples. Unlike some quick breads that dry out quickly, this one stays tender for days.

Second, it’s a fantastic way to sneak in extra vegetables and fruits without sacrificing flavor. The combination of carrots, apples, and zucchini creates a balanced sweetness that appeals to both kids and adults.

Third, it’s versatile. Enjoy it plain, toasted with butter, or even dressed up with a cream cheese spread for a more decadent treat.

Fourth, the recipe is forgiving. Whether you’re a seasoned baker or a beginner, the straightforward steps ensure success every time.

Finally, it freezes beautifully. Bake a double batch and stash one loaf in the freezer for those busy mornings when you need a quick, wholesome bite.

Ingredients Breakdown

Understanding the role of each ingredient helps you appreciate why this Carrot Apple Zucchini Bread turns out so well.

All-purpose flour: The base of the bread, providing structure. For a healthier twist, you can substitute half with whole wheat flour.

Brown sugar: Adds a deep, caramel-like sweetness and helps retain moisture. You can reduce the amount slightly if you prefer a less sweet bread.

Eggs: Bind the ingredients together and contribute to the bread’s tender crumb.

Vegetable oil: Keeps the bread moist. Melted coconut oil works as a great alternative for a hint of tropical flavor.

Vanilla extract: Enhances the overall flavor profile, adding warmth and depth.

Cinnamon and nutmeg: These spices bring warmth and complement the natural sweetness of the carrots and apples.

Baking powder and baking soda: Essential leavening agents that help the bread rise.

Salt: Balances the sweetness and enhances all the flavors.

Carrots, apples, and zucchini: The stars of the show. They add moisture, natural sweetness, and a boost of nutrients. Grating them finely ensures even distribution throughout the batter.

How to Make Carrot Apple Zucchini Bread

Follow these steps for a foolproof loaf every time.

1. Preheat your oven to 350°F (175°C). Grease a 9×5-inch loaf pan or line it with parchment paper for easy removal.

2. Whisk the dry ingredients: In a large bowl, combine 2 cups of all-purpose flour, 1 teaspoon of baking powder, 1/2 teaspoon of baking soda, 1 teaspoon of cinnamon, 1/4 teaspoon of nutmeg, and 1/2 teaspoon of salt. Set aside.

3. Mix the wet ingredients: In another bowl, whisk together 3/4 cup of brown sugar, 2 large eggs, 1/2 cup of vegetable oil, and 1 teaspoon of vanilla extract until smooth.

4. Combine wet and dry ingredients: Gradually add the dry mixture to the wet ingredients, stirring just until combined. Overmixing can lead to a dense loaf.

5. Fold in the grated vegetables and fruit: Gently stir in 1 cup of grated carrots, 1 cup of grated zucchini (squeezed to remove excess moisture), and 1 cup of grated apple.

6. Bake: Pour the batter into the prepared loaf pan and smooth the top. Bake for 50-60 minutes, or until a toothpick inserted into the center comes out clean.

7. Cool: Let the bread cool in the pan for 10 minutes before transferring it to a wire rack to cool completely. This prevents it from becoming soggy.

Pro Tips for the Best Results

For an extra-moist loaf, wrap the cooled bread in plastic wrap and let it sit overnight before slicing. This allows the flavors to meld and the texture to perfect itself.

If you prefer a crunchier top, sprinkle a tablespoon of turbinado sugar over the batter before baking.

To prevent the bread from browning too quickly, tent it with aluminum foil halfway through baking.

Use a box grater or food processor to shred the zucchini, carrots, and apples quickly and evenly.

For a nutty twist, fold in 1/2 cup of chopped walnuts or pecans with the grated vegetables.

Variations and Substitutions

For a gluten-free version, swap the all-purpose flour with a 1:1 gluten-free baking blend. Just ensure it contains xanthan gum for proper texture.

If you’re out of brown sugar, granulated sugar works, though the bread will be slightly less moist.

Add a handful of raisins or dried cranberries for bursts of sweetness.

For a dairy-free option, replace the eggs with flax eggs (1 tablespoon ground flaxseed mixed with 3 tablespoons water per egg).

Spice lovers can add a pinch of ginger or cloves for extra warmth.

What to Serve With It

This bread is delightful on its own, but pairing it with other foods can elevate the experience. Spread a slice with softened cream cheese or almond butter for added richness.

Serve it alongside a hot cup of chai tea or coffee for a cozy breakfast. For a more substantial meal, pair it with a yogurt parfait or a fruit salad.

If serving as dessert, warm a slice and top it with a scoop of vanilla ice cream or a drizzle of caramel sauce.

How to Store and Reheat

Store the cooled bread in an airtight container at room temperature for up to 3 days. For longer storage, wrap it tightly in plastic wrap and aluminum foil, then freeze for up to 3 months.

To reheat, thaw frozen bread overnight in the refrigerator. Warm individual slices in a toaster oven or microwave for 10-15 seconds. For a crispier texture, toast slices in a skillet with a little butter.

Frequently Asked Questions (FAQs)

Can I use pre-shredded carrots or zucchini? While convenient, pre-shredded vegetables are often too dry and coarse for this recipe. Freshly grated carrots and zucchini provide better moisture and texture.

Why is my bread dense? Overmixing the batter or using too much flour can lead to a dense loaf. Measure flour by spooning it into the measuring cup and leveling it off, and mix just until combined.

Can I make muffins instead of a loaf? Absolutely! Divide the batter into a greased muffin tin and bake at 350°F for 20-25 minutes.

Do I need to peel the zucchini? No, the skin is edible and adds extra nutrients. Just wash it thoroughly before grating.

Can I reduce the sugar? Yes, you can cut the sugar to 1/2 cup, but the bread will be less sweet and slightly drier.

Final Thoughts

This Carrot Apple Zucchini Bread is more than just a recipe—it’s a celebration of simple, wholesome ingredients coming together to create something truly special. Whether you’re baking it for a lazy Sunday breakfast, packing it in lunchboxes, or sharing it with friends over tea, it’s sure to become a favorite. Don’t be surprised if you find yourself making it again and again, tweaking it to suit your tastes each time. Happy baking!

Print
clock clock iconcutlery cutlery iconflag flag iconfolder folder iconinstagram instagram iconpinterest pinterest iconfacebook facebook iconprint print iconsquares squares iconheart heart iconheart solid heart solid icon

Carrot Apple Zucchini Bread

  • Author: Baking Enthusiast

Description

A moist and flavorful quick bread packed with grated carrots, apples, and zucchini. This wholesome loaf is lightly spiced with cinnamon and nutmeg, perfect for breakfast or an afternoon snack.


Ingredients

Scale

For the Crust:

  • For the bread:
  • 1 1/2 cups all-purpose flour
  • 1 teaspoon baking soda
  • 1/2 teaspoon baking powder
  • 1/2 teaspoon salt
  • 1 teaspoon ground cinnamon
  • 1/4 teaspoon ground nutmeg
  • 1/2 cup granulated sugar
  • 1/2 cup brown sugar, packed
  • 1/2 cup vegetable oil
  • 2 large eggs
  • 1 teaspoon vanilla extract
  • For the mix-ins:
  • 1 cup grated carrots
  • 1 cup grated zucchini (squeezed dry)
  • 1/2 cup grated apple (peeled)
  • For optional topping:
  • 2 tablespoons turbinado sugar
  • 1/4 cup chopped walnuts

Instructions

1. Prepare the Crust:

  1. Preheat oven to 350°F (175°C). Grease a 9×5-inch loaf pan.
  2. In a medium bowl, whisk together flour, baking soda, baking powder, salt, cinnamon, and nutmeg.
  3. In a large bowl, beat together granulated sugar, brown sugar, oil, eggs, and vanilla until well combined.
  4. Gradually stir the dry ingredients into the wet ingredients until just combined.
  5. Fold in grated carrots, zucchini, and apple until evenly distributed.
  6. Pour batter into prepared loaf pan. Sprinkle with turbinado sugar and walnuts if using.
  7. Bake for 50-60 minutes, or until a toothpick inserted in center comes out clean.
  8. Cool in pan for 10 minutes, then transfer to a wire rack to cool completely.

Notes

1) Squeeze excess moisture from zucchini using a clean kitchen towel. 2) Bread stays fresh for 3 days wrapped at room temperature. 3) For muffins: bake at same temp for 20-25 minutes.

Turkey Cranberry Pinwheels

Turkey Cranberry Pinwheels

There’s something undeniably festive about the combination of turkey and cranberry, isn’t there? These Turkey Cranberry Pinwheels bring that holiday magic into a simple, elegant appetizer or light lunch option. Perfect for gatherings, meal prep, or a quick snack, these pinwheels are as versatile as they are delicious. Whether you’re hosting a party or just craving a flavorful bite, this recipe is sure to become a favorite in your rotation.

Why You’ll Love This Recipe

First, let’s talk about why these Turkey Cranberry Pinwheels deserve a spot on your table. Here are a few reasons you’ll fall in love with them:

  • Effortless Elegance: These pinwheels look impressive but require minimal effort, making them perfect for entertaining or last-minute guests.
  • Perfect Balance of Flavors: The savory turkey, tangy cranberry sauce, and creamy cheese create a harmony of tastes that’s both comforting and refreshing.
  • Meal Prep Friendly: They can be made ahead of time, stored in the fridge, and sliced just before serving, making them ideal for busy schedules.
  • Crowd-Pleasing Appeal: Whether for a holiday party, baby shower, or casual get-together, these pinwheels disappear fast.
  • Customizable: Easily adaptable to different dietary needs or flavor preferences, so everyone can enjoy them.

Ingredients Breakdown

Understanding the ingredients is key to making the best Turkey Cranberry Pinwheels. Here’s what you’ll need and why each component matters:

  • Flour Tortillas: Soft, pliable, and neutral in flavor, they hold everything together without overpowering the filling.
  • Cream Cheese: Acts as a binder, adding creaminess and a slight tang that complements the cranberry and turkey.
  • Dijon Mustard: Adds a subtle kick and depth of flavor, balancing the sweetness of the cranberry.
  • Turkey Slices: Deli-style turkey works best for even layering and easy rolling.
  • Cranberry Sauce: Use homemade or high-quality store-bought for a bright, sweet-tart contrast.
  • Baby Spinach or Arugula: Adds freshness, texture, and a pop of color.
  • Shredded Cheese: Cheddar, Swiss, or pepper jack add extra richness and melt beautifully.

How to Make Turkey Cranberry Pinwheels

Now, let’s walk through the step-by-step process to create these irresistible pinwheels:

  1. Prep the Tortillas: Lay out the flour tortillas on a clean surface. If they’re too stiff, warm them slightly in the microwave for 10 seconds to make rolling easier.
  2. Spread the Cream Cheese Mixture: In a small bowl, mix softened cream cheese with Dijon mustard. Spread an even layer over each tortilla, leaving a small border around the edges.
  3. Layer the Turkey: Place turkey slices evenly over the cream cheese, covering the entire surface.
  4. Add Cranberry Sauce: Spoon cranberry sauce over the turkey, spreading it gently to avoid tearing the meat.
  5. Top with Greens and Cheese: Scatter baby spinach or arugula over the cranberry layer, followed by a sprinkle of shredded cheese.
  6. Roll Tightly: Starting at one end, roll the tortilla firmly but gently into a log. Wrap in plastic wrap and refrigerate for at least 30 minutes to set.
  7. Slice and Serve: Use a sharp knife to cut the rolls into 1-inch pinwheels. Arrange on a platter and enjoy!

Pro Tips for the Best Results

Want to take your Turkey Cranberry Pinwheels to the next level? Try these expert tips:

  • Chill Before Slicing: Refrigerating the rolled tortillas helps them hold their shape and makes slicing cleaner.
  • Use a Serrated Knife: A gentle sawing motion prevents squishing the pinwheels.
  • Experiment with Spreads: Swap Dijon for whole-grain mustard or add a touch of honey for extra sweetness.
  • Toast the Tortillas: For extra texture, lightly toast them before assembling.
  • Add Nuts: A sprinkle of chopped pecans or walnuts adds crunch and depth.

Variations and Substitutions

This recipe is wonderfully adaptable. Here are some ways to make it your own:

  • Vegetarian Option: Skip the turkey and use roasted butternut squash or sliced avocado instead.
  • Spicy Twist: Add jalapeños or a dash of hot sauce to the cream cheese mixture.
  • Different Meats: Swap turkey for ham, chicken, or even smoked salmon.
  • Gluten-Free: Use gluten-free tortillas or large lettuce leaves for wrapping.
  • Dairy-Free: Substitute cream cheese with a dairy-free alternative.

What to Serve With It

These pinwheels shine on their own but pair beautifully with:

  • A crisp green salad with a light vinaigrette.
  • Roasted sweet potato wedges for a heartier meal.
  • A warm bowl of butternut squash soup in the fall.
  • Sparkling apple cider or a dry white wine for drinks.

How to Store and Reheat

To keep your Turkey Cranberry Pinwheels fresh:

  • Refrigeration: Store unsliced rolls wrapped in plastic for up to 3 days. Slice just before serving.
  • Freezing: Freeze whole rolls for up to 1 month. Thaw in the fridge before slicing.
  • Reheating: Best served cold, but you can warm them slightly in the oven at 300°F for 5 minutes if desired.

Frequently Asked Questions (FAQs)

Can I make these ahead of time?
Absolutely! These pinwheels are perfect for making ahead. Just wrap the rolls tightly and slice them a few hours before serving.

What’s the best way to prevent soggy tortillas?
Make sure your cranberry sauce isn’t too watery, and don’t overfill the tortillas. Chilling before slicing also helps.

Can I use fresh cranberries instead of sauce?
Yes, but cook them down with a bit of sugar and water first to soften and sweeten them.

Are these kid-friendly?
Most kids love them! If they’re picky, try using milder cheese and skipping the greens.

Can I use a different type of wrap?
Spinach or sun-dried tomato tortillas add extra flavor, or try lavash for a thinner option.

Final Thoughts

Turkey Cranberry Pinwheels are more than just an appetizer—they’re a little bite of joy. Whether you’re serving them at a holiday gathering, packing them for lunch, or enjoying them as a quick snack, their vibrant flavors and effortless elegance make them a winner every time. I hope this recipe becomes a staple in your kitchen, just as it has in mine. Happy rolling, and even happier eating!

Print
clock clock iconcutlery cutlery iconflag flag iconfolder folder iconinstagram instagram iconpinterest pinterest iconfacebook facebook iconprint print iconsquares squares iconheart heart iconheart solid heart solid icon

Turkey Cranberry Pinwheels

  • Author: Chef Emily Carter

Description

These Turkey Cranberry Pinwheels are a perfect blend of savory and sweet, making them an excellent choice for holiday gatherings, parties, or a quick lunch. The combination of tender turkey, creamy cheese, and tangy cranberry sauce rolled in a soft tortilla creates a delightful bite-sized appetizer or snack.


Ingredients

Scale

For the Crust:

  • For the Spread:
  • 8 oz cream cheese, softened
  • 1/4 cup mayonnaise
  • 1 tsp garlic powder
  • 1 tsp onion powder
  • Salt and pepper to taste
  • For the Filling:
  • 4 large flour tortillas (10-inch)
  • 1/2 cup cranberry sauce (whole berry or jellied)
  • 8 oz sliced turkey breast (thinly sliced)
  • 1 cup baby spinach leaves
  • 1/2 cup shredded cheddar cheese
  • 1/4 cup chopped walnuts (optional)

Instructions

1. Prepare the Crust:

  1. 1. In a medium bowl, mix together the softened cream cheese, mayonnaise, garlic powder, onion powder, salt, and pepper until smooth and well combined.
  2. 2. Lay out one tortilla on a clean surface. Spread an even layer of the cream cheese mixture over the entire tortilla, leaving a small border around the edges.
  3. 3. Spoon 2 tablespoons of cranberry sauce over the cream cheese layer and spread it evenly.
  4. 4. Layer the turkey slices over the cranberry sauce, followed by the spinach leaves, shredded cheddar cheese, and chopped walnuts (if using).
  5. 5. Tightly roll up the tortilla, pressing gently to keep the filling in place. Repeat with the remaining tortillas and filling.
  6. 6. Wrap each rolled tortilla in plastic wrap and refrigerate for at least 1 hour to firm up (this makes slicing easier).
  7. 7. Remove from the fridge, unwrap, and use a sharp knife to slice each roll into 1-inch pinwheels.
  8. 8. Arrange the pinwheels on a serving platter and serve chilled or at room temperature.

Notes

For a festive touch, garnish the platter with fresh rosemary sprigs or extra cranberries. These pinwheels can be made a day ahead and stored in the refrigerator until ready to serve. If you prefer a different cheese, try using Swiss or pepper jack for a different flavor profile.

yummy Grape Salad doubles

yummy Grape Salad doubles

There’s something magical about a dish that’s both refreshing and indulgent, and this yummy Grape Salad doubles recipe is exactly that. Whether you’re hosting a summer barbecue, a potluck, or just craving a sweet and creamy treat, this salad delivers. The combination of crisp grapes, rich cream cheese, and a hint of brown sugar creates a symphony of flavors that will have everyone asking for seconds. Let’s dive into why this recipe is a must-try and how to make it perfectly every time.

Why You’ll Love This Recipe

First, let’s talk about why this grape salad is a standout. If you’ve never tried a grape salad before, prepare to be pleasantly surprised. Here’s why it’s a winner:

  • Perfect balance of textures – The juicy crunch of fresh grapes contrasts beautifully with the smooth, creamy dressing.
  • Effortless to make – No cooking required, just a few simple steps and minimal prep time.
  • Crowd-pleasing flavor – The sweetness of the grapes paired with the tangy cream cheese dressing appeals to all ages.
  • Versatile for any occasion – Serve it as a side dish, dessert, or even a light brunch option.
  • Easy to double or customize – Perfect for large gatherings or adjusting to personal taste preferences.

Ingredients Breakdown

Every great recipe starts with quality ingredients. Here’s what you’ll need and why each one matters:

  • Seedless grapes – The star of the dish. Red, green, or a mix of both add color and natural sweetness.
  • Cream cheese – Provides a rich, velvety base for the dressing. Softened cream cheese blends smoothly.
  • Sour cream – Adds a slight tang and helps thin the dressing to the perfect consistency.
  • Brown sugar – Deepens the flavor with a caramel-like sweetness that complements the grapes.
  • Vanilla extract – Enhances the overall aroma and ties all the flavors together.
  • Chopped pecans or walnuts – Optional, but they add a delightful crunch and nutty contrast.

How to Make yummy Grape Salad doubles

Now, let’s walk through the steps to create this irresistible salad:

  1. Prepare the grapes – Wash and thoroughly dry the grapes. If they’re large, halve them for easier eating.
  2. Make the dressing – In a large bowl, beat the softened cream cheese until smooth. Add sour cream, brown sugar, and vanilla extract, mixing until well combined.
  3. Combine with grapes – Gently fold the grapes into the cream cheese mixture until evenly coated.
  4. Chill – Cover and refrigerate for at least 1 hour to let the flavors meld.
  5. Add toppings – Just before serving, sprinkle with chopped nuts or an extra dusting of brown sugar if desired.

Tip: For the best texture, avoid overmixing the grapes to prevent them from breaking.

Pro Tips for the Best Results

Want to take your grape salad to the next level? Try these expert tricks:

  • Use full-fat ingredients – They create a richer, creamier texture compared to low-fat alternatives.
  • Toast the nuts – Lightly toasting pecans or walnuts before adding them enhances their flavor.
  • Let it rest – Allowing the salad to chill for a few hours (or overnight) intensifies the flavors.
  • Adjust sweetness – Taste the dressing before adding grapes and tweak the sugar to your preference.

Variations and Substitutions

This recipe is wonderfully adaptable. Here are some fun twists to try:

  • Greek yogurt swap – Replace sour cream with Greek yogurt for a slightly lighter version.
  • Citrus zest – Add a teaspoon of orange or lemon zest for a bright, fresh note.
  • Dairy-free option – Use dairy-free cream cheese and coconut yogurt to make it vegan-friendly.
  • Spiced version – A pinch of cinnamon or nutmeg adds warmth and complexity.

What to Serve With It

This grape salad is incredibly versatile. Here are some pairing ideas:

  • Grilled meats – The sweetness contrasts beautifully with smoky barbecue or roasted chicken.
  • Brunch spread – Serve alongside quiche, croissants, or a charcuterie board.
  • Holiday meals – A refreshing counterpoint to rich dishes like ham or turkey.
  • Standalone dessert – Top with whipped cream or a drizzle of caramel for extra decadence.

How to Store and Reheat

Since this salad contains dairy, proper storage is key:

  • Refrigeration – Store in an airtight container for up to 3 days. Stir gently before serving if separation occurs.
  • Freezing not recommended – Grapes and dairy don’t freeze well, as texture will suffer.
  • Serving leftovers – If the salad seems dry after storage, a splash of milk or cream can revive the dressing.

Frequently Asked Questions (FAQs)

Let’s address some common questions:

Can I use frozen grapes?
No, frozen grapes become mushy when thawed. Always use fresh, crisp grapes for the best texture.

How far in advance can I make this?
You can prepare it 1 day ahead. Add nuts just before serving to keep them crunchy.

Can I use a different sweetener?
Yes, honey or maple syrup can replace brown sugar, but adjust to taste as they’re sweeter.

What if my dressing is too thick?
Thin it with a tablespoon of milk or extra sour cream until it reaches the desired consistency.

Final Thoughts

This yummy Grape Salad doubles recipe is proof that simple ingredients can create something extraordinary. Whether you’re making it for a special occasion or just because, it’s guaranteed to bring smiles. The creamy, sweet, and slightly tangy flavors make it a dish you’ll come back to again and again. So grab those grapes, whip up the dressing, and get ready to enjoy a bite of pure delight. Happy cooking!

Print
clock clock iconcutlery cutlery iconflag flag iconfolder folder iconinstagram instagram iconpinterest pinterest iconfacebook facebook iconprint print iconsquares squares iconheart heart iconheart solid heart solid icon

Yummy Grape Salad Doubles

  • Author: Home Cook Extraordinaire

Description

A creamy, sweet, and crunchy grape salad that doubles the deliciousness with a perfect balance of flavors. Ideal for potlucks, brunches, or as a refreshing side dish.


Ingredients

Scale

For the Crust:

  • For the Salad:
  • 4 cups seedless red grapes, halved
  • 4 cups seedless green grapes, halved
  • 1 cup sour cream
  • 1 cup cream cheese, softened
  • 1/2 cup granulated sugar
  • 1 teaspoon vanilla extract
  • For the Topping:
  • 1 cup chopped pecans
  • 1/2 cup brown sugar, packed
  • 1/2 cup crushed graham crackers

Instructions

1. Prepare the Crust:

  1. 1. In a large mixing bowl, combine the sour cream, cream cheese, granulated sugar, and vanilla extract. Beat until smooth and creamy.
  2. 2. Gently fold in the halved red and green grapes until evenly coated with the cream mixture.
  3. 3. In a separate bowl, mix together the chopped pecans, brown sugar, and crushed graham crackers to create the topping.
  4. 4. Transfer the grape mixture to a serving dish and sprinkle the topping evenly over the top.
  5. 5. Cover and refrigerate for at least 2 hours before serving to allow the flavors to meld.
  6. 6. Serve chilled and enjoy!

Notes

For a lighter version, you can substitute Greek yogurt for sour cream and use a sugar substitute. The salad can be made a day ahead—just add the topping right before serving to maintain crunch.

homemade Apple Crumble

homemade Apple Crumble

There’s something undeniably comforting about a warm homemade apple crumble fresh from the oven. The sweet, tender apples mingling with a buttery, crisp topping is a dessert that feels like a hug in every bite. Whether you’re serving it at a family gathering or enjoying it as a cozy weeknight treat, this classic recipe never fails to delight. Today, I’m sharing my tried-and-true version of homemade apple crumble—simple, delicious, and packed with all the nostalgic flavors you love.

Why You’ll Love This Recipe

If you’re looking for a dessert that’s both easy to make and universally loved, this homemade apple crumble is the answer. Here’s why it’s a must-try:

  • Simple Ingredients: You likely already have everything you need in your pantry—no fancy or hard-to-find items required.
  • Perfect Texture: The contrast between the soft, spiced apples and the crunchy, golden topping is pure perfection.
  • Versatile: Serve it warm with ice cream for dessert, or even enjoy it cold for breakfast (we won’t judge).
  • Crowd-Pleasing: Whether it’s a holiday gathering or a casual dinner, this dessert appeals to all ages.
  • Easy to Customize: Swap in different fruits, spices, or nuts to make it your own.

Ingredients Breakdown

Let’s take a closer look at the key ingredients that make this homemade apple crumble so irresistible:

  • Apples: The star of the show. Opt for a mix of sweet and tart varieties like Honeycrisp and Granny Smith for balanced flavor.
  • Brown Sugar: Adds depth and caramel-like sweetness to both the filling and the crumble topping.
  • Cinnamon & Nutmeg: These warm spices enhance the apples and give the dessert its signature cozy taste.
  • Butter: Cold butter is essential for creating that irresistible crumbly texture in the topping.
  • Flour & Oats: The base of the crumble topping. Oats add extra crunch and a rustic feel.
  • Lemon Juice: A splash brightens the apples and prevents them from browning.

How to Make homemade Apple Crumble

Follow these simple steps to create a homemade apple crumble that’s sure to impress:

  1. Preheat & Prep: Preheat your oven to 375°F (190°C) and lightly grease a baking dish.
  2. Prepare the Apples: Peel, core, and slice the apples into even pieces. Toss them with lemon juice, brown sugar, cinnamon, and nutmeg until well coated.
  3. Make the Crumble Topping: In a separate bowl, combine flour, oats, brown sugar, and a pinch of salt. Cut in cold butter using your fingers or a pastry cutter until the mixture resembles coarse crumbs.
  4. Assemble: Spread the apple mixture evenly in the baking dish. Sprinkle the crumble topping over the apples, covering them completely.
  5. Bake: Place in the oven and bake for 35–40 minutes, or until the topping is golden brown and the apples are bubbling.
  6. Cool Slightly: Let the crumble rest for 10 minutes before serving to allow the juices to thicken slightly.

Pro Tips for the Best Results

For an even better homemade apple crumble, keep these expert tips in mind:

  • Use Cold Butter: This ensures a flaky, crumbly texture rather than a dense topping.
  • Slice Apples Evenly: Uniform pieces cook at the same rate, preventing some from turning mushy while others stay firm.
  • Don’t Overmix the Topping: A few lumps of butter are fine—they’ll melt and create delicious crispy bits.
  • Add Nuts for Extra Crunch: Stir chopped walnuts or pecans into the crumble topping for added texture.

Variations and Substitutions

This recipe is wonderfully adaptable. Here are some delicious twists to try:

  • Gluten-Free: Swap the all-purpose flour for a gluten-free blend and use certified gluten-free oats.
  • Vegan: Replace butter with coconut oil or vegan butter.
  • Berry Apple Crumble: Add a handful of fresh or frozen berries to the apple mixture for a fruity twist.
  • Spiced Up: Experiment with cardamom, ginger, or allspice for a more complex flavor profile.

What to Serve With It

While homemade apple crumble is delicious on its own, pairing it with the right accompaniments takes it to the next level:

  • Vanilla Ice Cream: A classic choice—the cold creaminess contrasts beautifully with the warm crumble.
  • Whipped Cream: Light and fluffy, it adds a luxurious touch.
  • Caramel Sauce: Drizzle extra caramel sauce for an indulgent dessert.
  • Hot Beverages: Serve with coffee, tea, or a glass of cold milk for a comforting finish to any meal.

How to Store and Reheat

If you have leftovers (which is rare!), here’s how to keep them fresh:

  • Refrigerate: Store covered in the fridge for up to 3 days.
  • Freeze: Wrap tightly and freeze for up to 2 months. Thaw in the fridge before reheating.
  • Reheat: Warm individual portions in the microwave or reheat the entire dish in a 350°F (175°C) oven until heated through.

Frequently Asked Questions (FAQs)

Here are answers to some common questions about making homemade apple crumble:

Can I use pre-sliced apples? Yes, but fresh apples yield the best texture and flavor. If using pre-sliced, check for added preservatives that might alter taste.

Can I make this ahead of time? Absolutely! Assemble the crumble and refrigerate it unbaked for up to 24 hours before baking.

Why is my topping soggy? This usually happens if the butter was too soft or the crumble was underbaked. Ensure your butter is cold and bake until golden.

Can I use other fruits? Definitely! Pears, peaches, or mixed berries work wonderfully in this recipe.

Do I need to peel the apples? Peeling ensures a smoother texture, but leaving the skins on adds fiber and a rustic touch.

Final Thoughts

Homemade apple crumble is one of those timeless desserts that never goes out of style. It’s simple enough for a weeknight treat yet elegant enough for special occasions. The aroma of cinnamon and baked apples filling your kitchen is just an added bonus. Whether you stick to the classic recipe or experiment with your own twists, I hope this dish brings as much joy to your table as it has to mine. Happy baking!

Print
clock clock iconcutlery cutlery iconflag flag iconfolder folder iconinstagram instagram iconpinterest pinterest iconfacebook facebook iconprint print iconsquares squares iconheart heart iconheart solid heart solid icon

Homemade Apple Crumble

  • Author: Baking Enthusiast

Description

A classic homemade apple crumble with a buttery, crisp topping and tender spiced apples. Perfect for cozy evenings or dessert gatherings.


Ingredients

Scale

For the Crust:

  • For the apple filling:
  • 6 medium apples (peeled, cored, and sliced)
  • 1/4 cup granulated sugar
  • 1 tablespoon lemon juice
  • 1 teaspoon ground cinnamon
  • 1/4 teaspoon ground nutmeg
  • 1 tablespoon all-purpose flour
  • For the crumble topping:
  • 1 cup all-purpose flour
  • 1/2 cup rolled oats
  • 1/2 cup packed brown sugar
  • 1/2 teaspoon ground cinnamon
  • 1/4 teaspoon salt
  • 1/2 cup unsalted butter (cold and cubed)

Instructions

1. Prepare the Crust:

  1. Preheat oven to 375°F (190°C). Lightly grease a 9-inch baking dish.
  2. In a large bowl, combine sliced apples, granulated sugar, lemon juice, cinnamon, nutmeg, and flour. Toss until apples are evenly coated.
  3. Transfer the apple mixture to the prepared baking dish, spreading it out evenly.
  4. In another bowl, mix flour, oats, brown sugar, cinnamon, and salt for the topping.
  5. Add cold cubed butter to the topping mixture. Use your fingers or a pastry cutter to blend until the mixture resembles coarse crumbs.
  6. Sprinkle the crumble topping evenly over the apples.
  7. Bake for 35-40 minutes, or until the topping is golden brown and the apples are bubbling.
  8. Let cool for 10 minutes before serving. Enjoy warm with vanilla ice cream or whipped cream!

Notes

For extra crunch, add chopped nuts like walnuts or pecans to the crumble topping. Store leftovers covered at room temperature for up to 2 days.